We may receive a commission when you use our affiliate links. However, this does not impact our recommendations.
A master craftsman’s method for making perfectly spaced drawers.
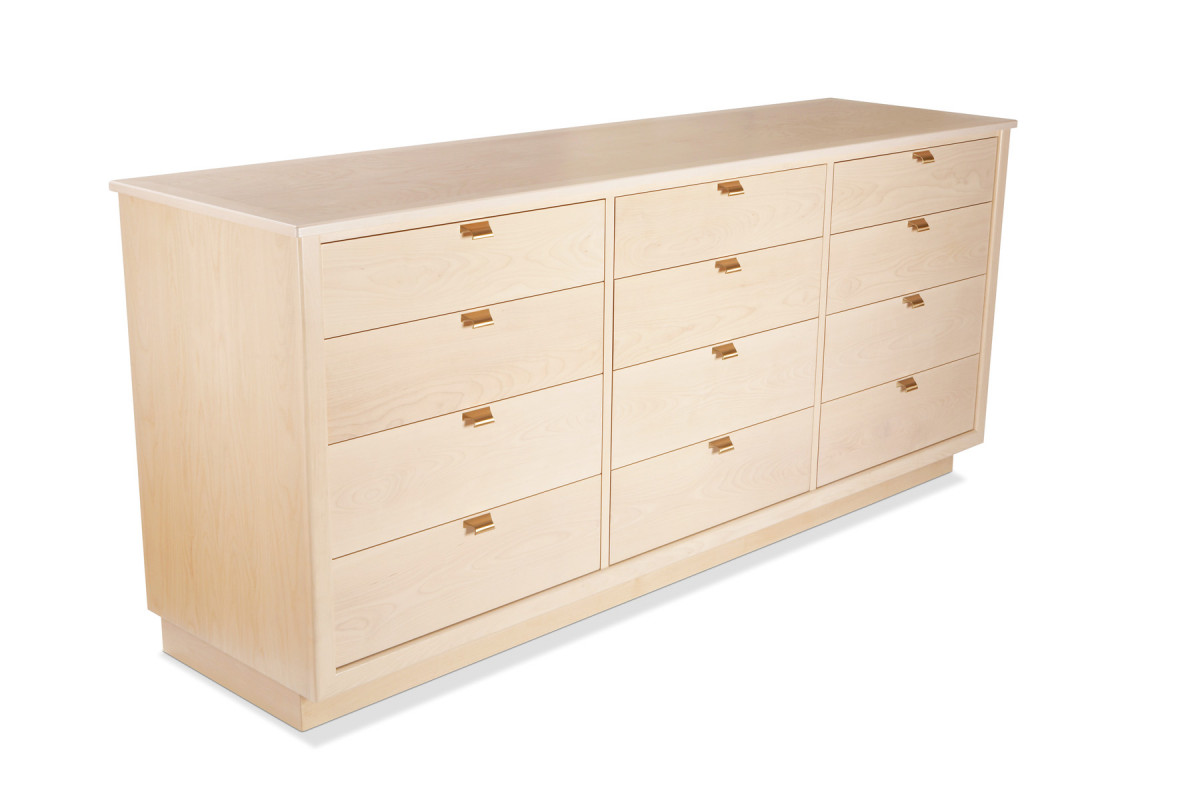
I made this dresser for a client whose father designed and built similar furniture back in the 1950s. Its grid system is very modern looking, but getting all the spacing just right requires an old-fashioned, methodical approach to ensure that the case is square each step of the way. I also used the same clever system for positioning the drawers that my client’s dad used, and it worked extremely well.
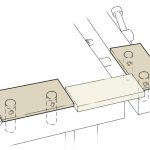
Part of the difficulty in spacing the drawers is that their fronts aren’t applied–they’re an integral part of the drawer box. When installing a drawer with an applied front, you just position the front with shims until the margins are even, then screw it to the drawer box. This dresser is different–you have to position the entire drawer. Here’s how the system works: These drawers are guided by tracks that run underneath the drawer’s bottoms. When building the dresser, leave the tracks loose in the web frames inside the case. Next, build the drawers, slide them in the case, and adjust each track’s position until the drawer is perfectly centered side to side. Once that’s done, lock the tracks in place with glue blocks.
This dresser uses web frame construction, which has gone out of favor in factory-made furniture. That’s too bad, because web frames do a bang-up job of making casework absolutely rock solid. The finish is as retro as the construction–it’s a white stain with a clear water-based polyurethane topcoat. The funky drawer pulls add the perfect final touch.
Construction notes
I determined the heights of the drawers based on the spacing of my dovetail jig, which is 7/8” on center. My dimensions leave a half-pin at the top of each drawer. My jig’s spacing is fairly standard, but before you build, check your jig’s spacing and adjust the drawers’ heights and cabinet’s height if necessary.
When you cut the dadoes and rabbets in the case’s ends (B1) and dividers (B2), note that the critical dimension isn’t their depth, but what’s left over. When you cut into the sides, for example, the remaining wood should be 1/2” thick. This method ensures that all the other dimensions will work out, regardless of the precise thickness of your plywood.
I made each row of drawer faces from one long, full-width board. This avoids mismatched figure and an annoying banded look that results when narrow boards are edge-glued together. However, if you goof up one drawer front, you have to remake all three in that row.
12 Drawer Dresser Cut List

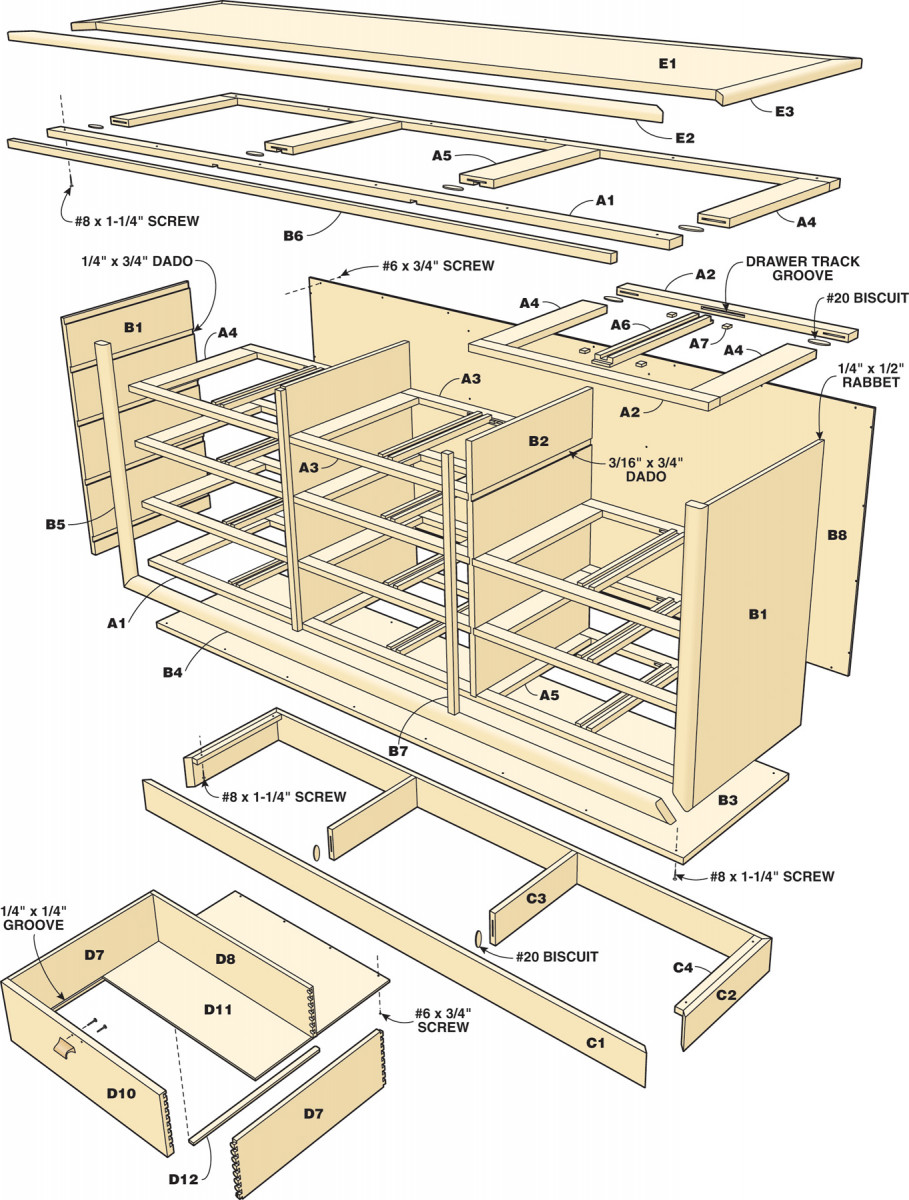
Fig. A) Exploded View
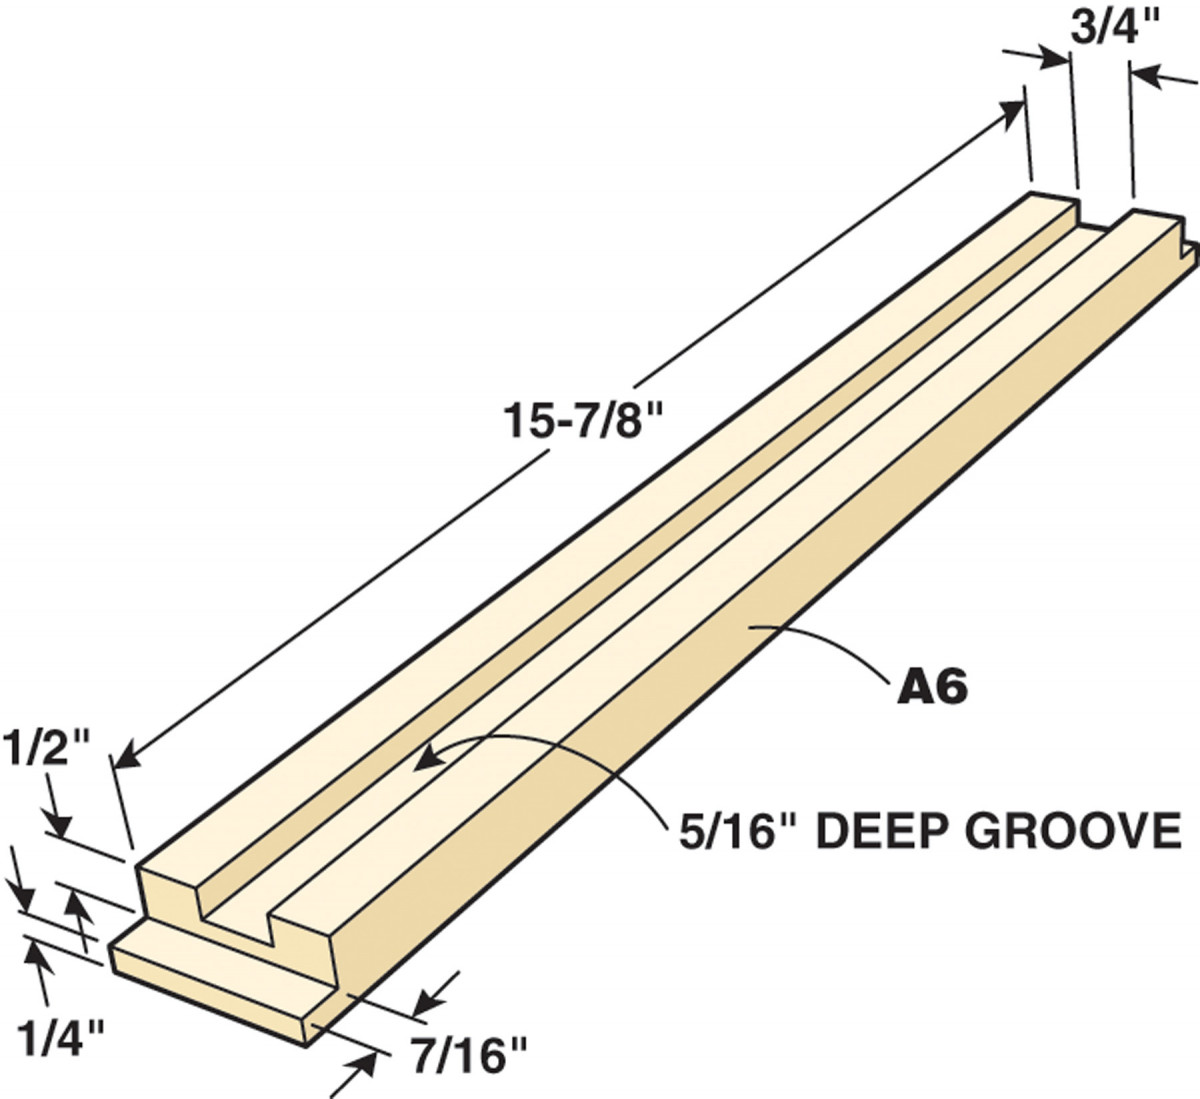
Fig. B) Drawer Track
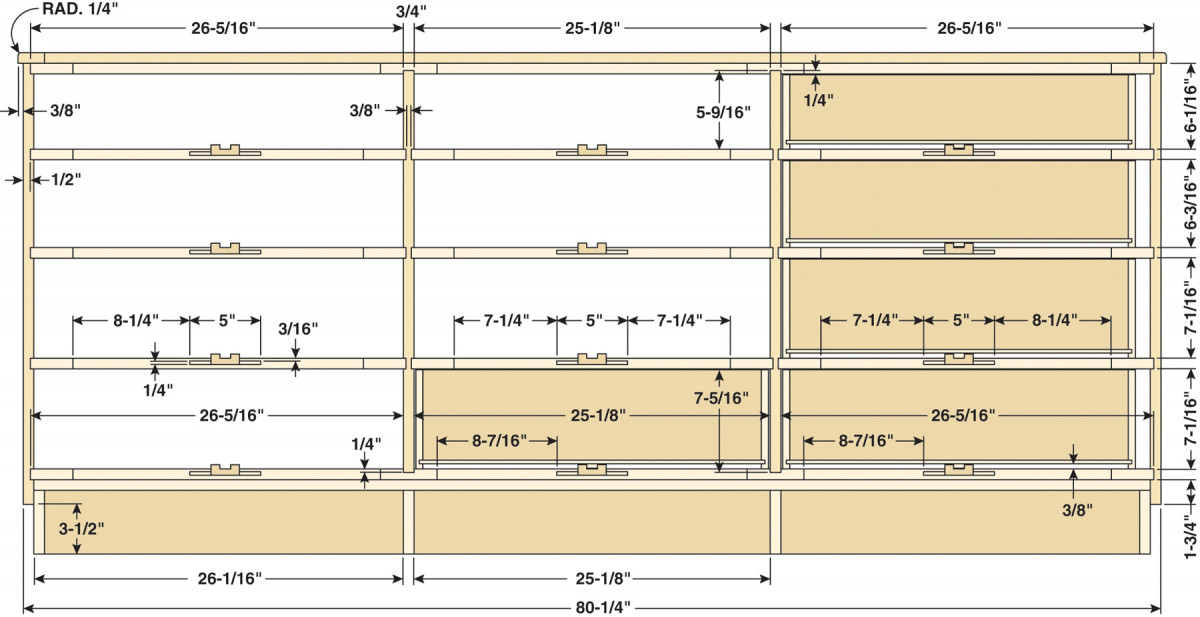
Fig. C) Front Elevation
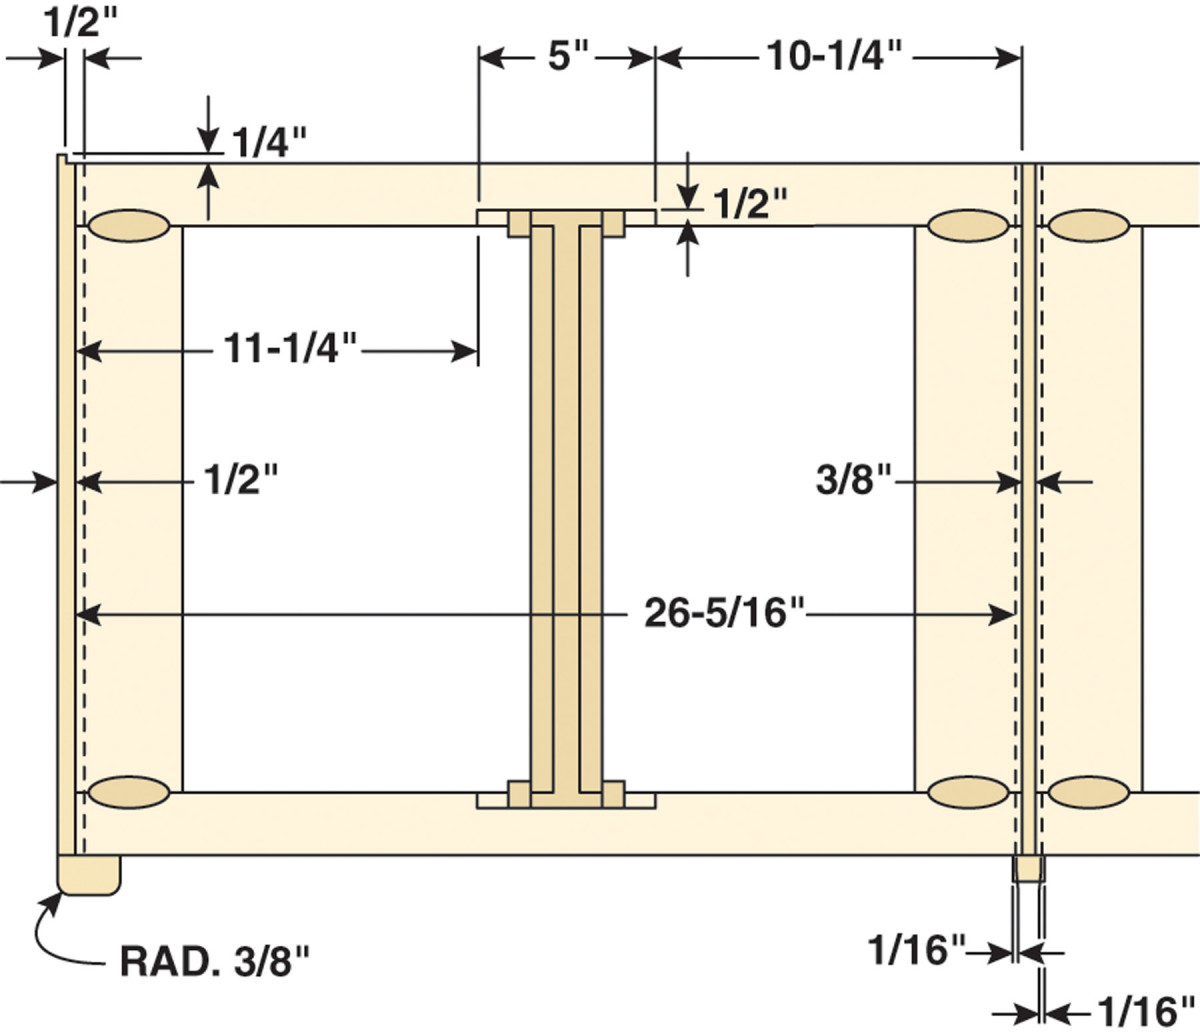
Fig. D) Top View
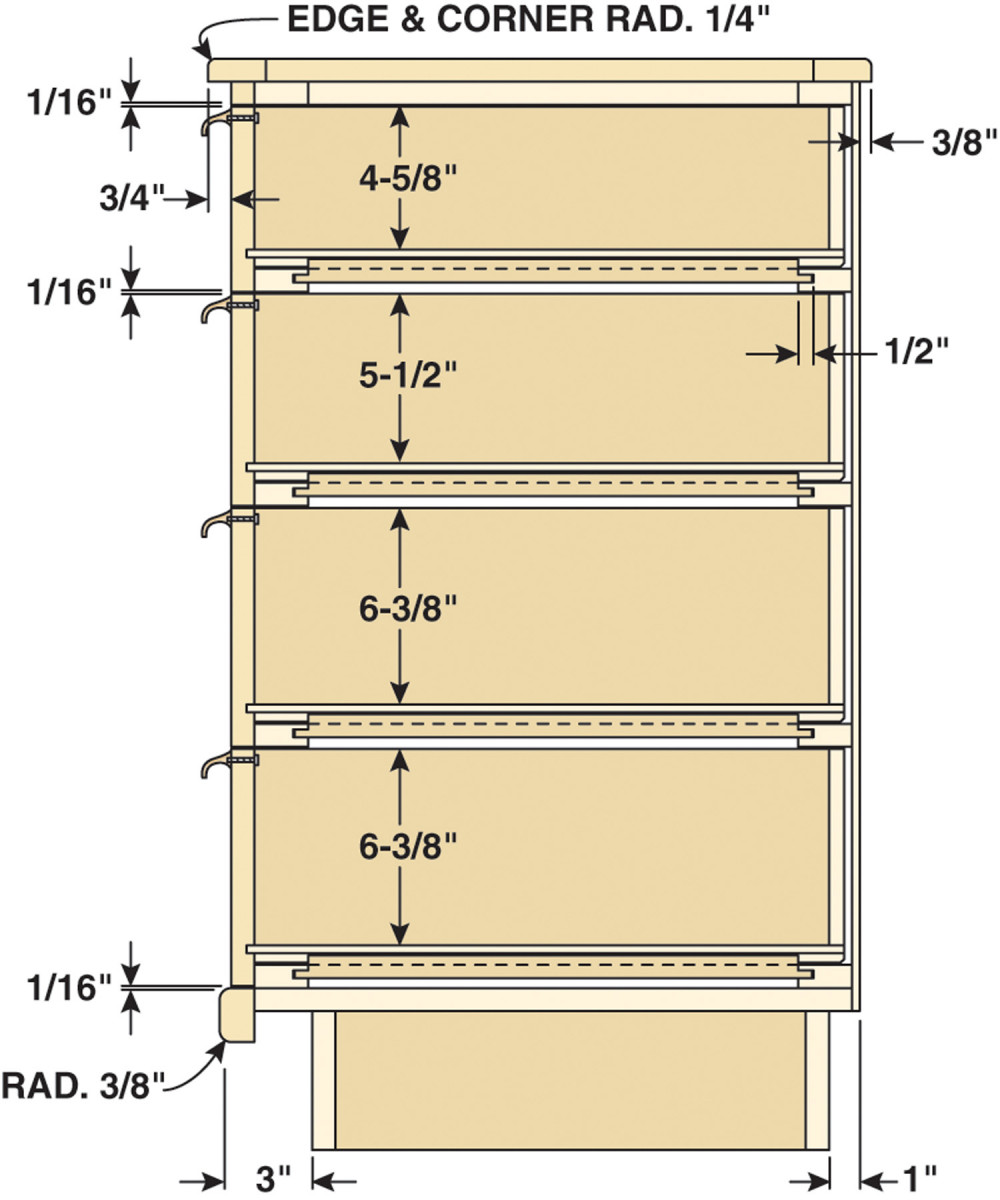
Fig. E) Side Elevation
Build the case
1. Cut the web frame parts (A1 – A5). Machine the drawer tracks (A6) (See Fig. B). Cut biscuit grooves for joining the web frame stiles and rails.
2. Rout the drawer track grooves in the web frame stiles (Figs. A and C). There are many different parts to deal with, so label them and set them in stacks for the right, middle and left sections of the drawer case.
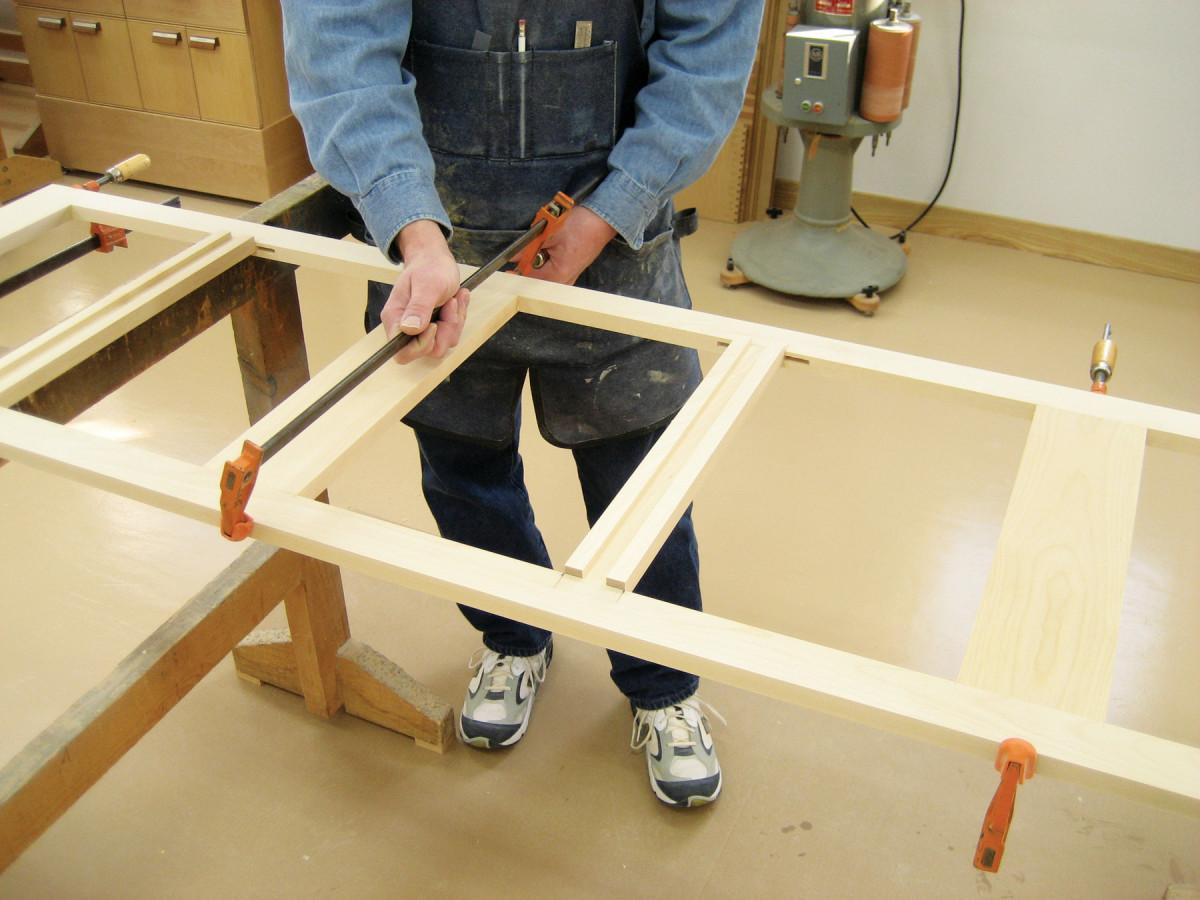
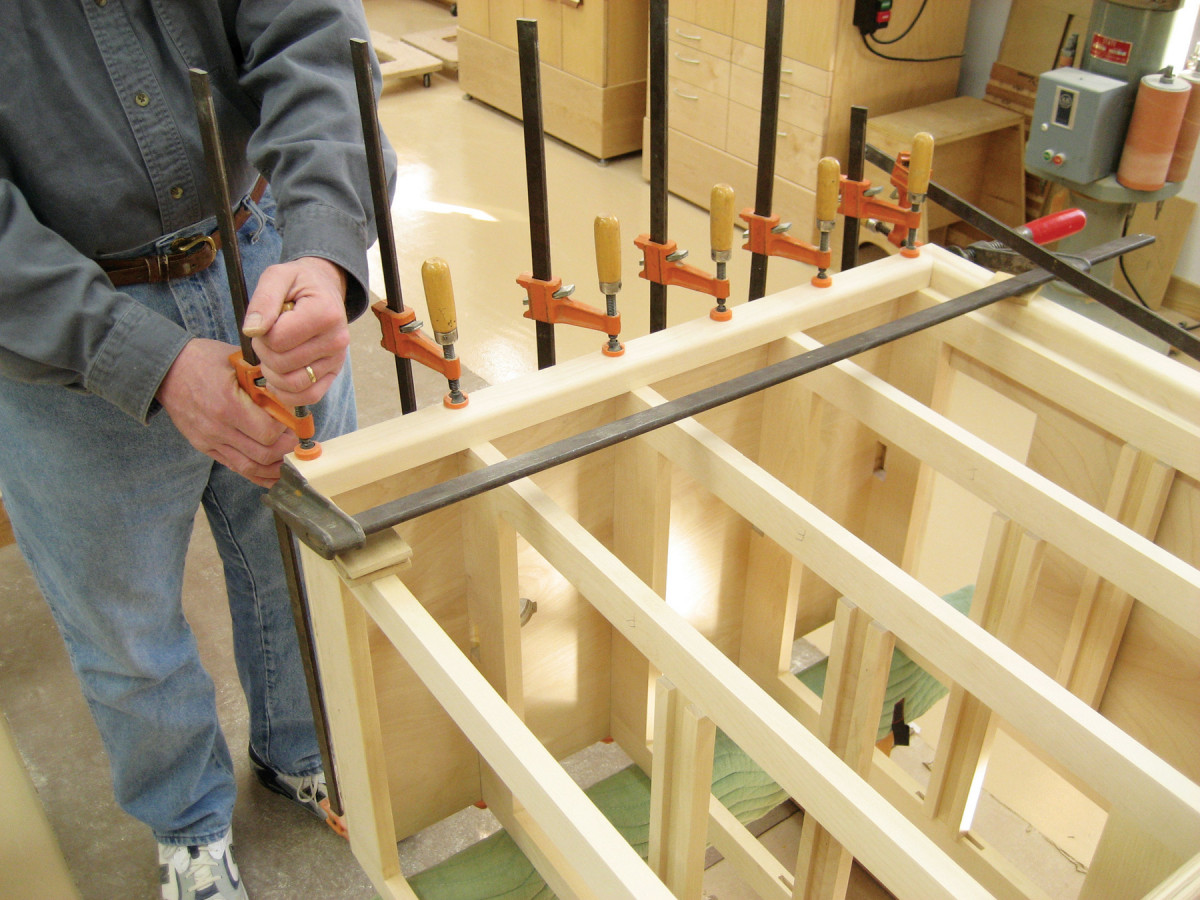
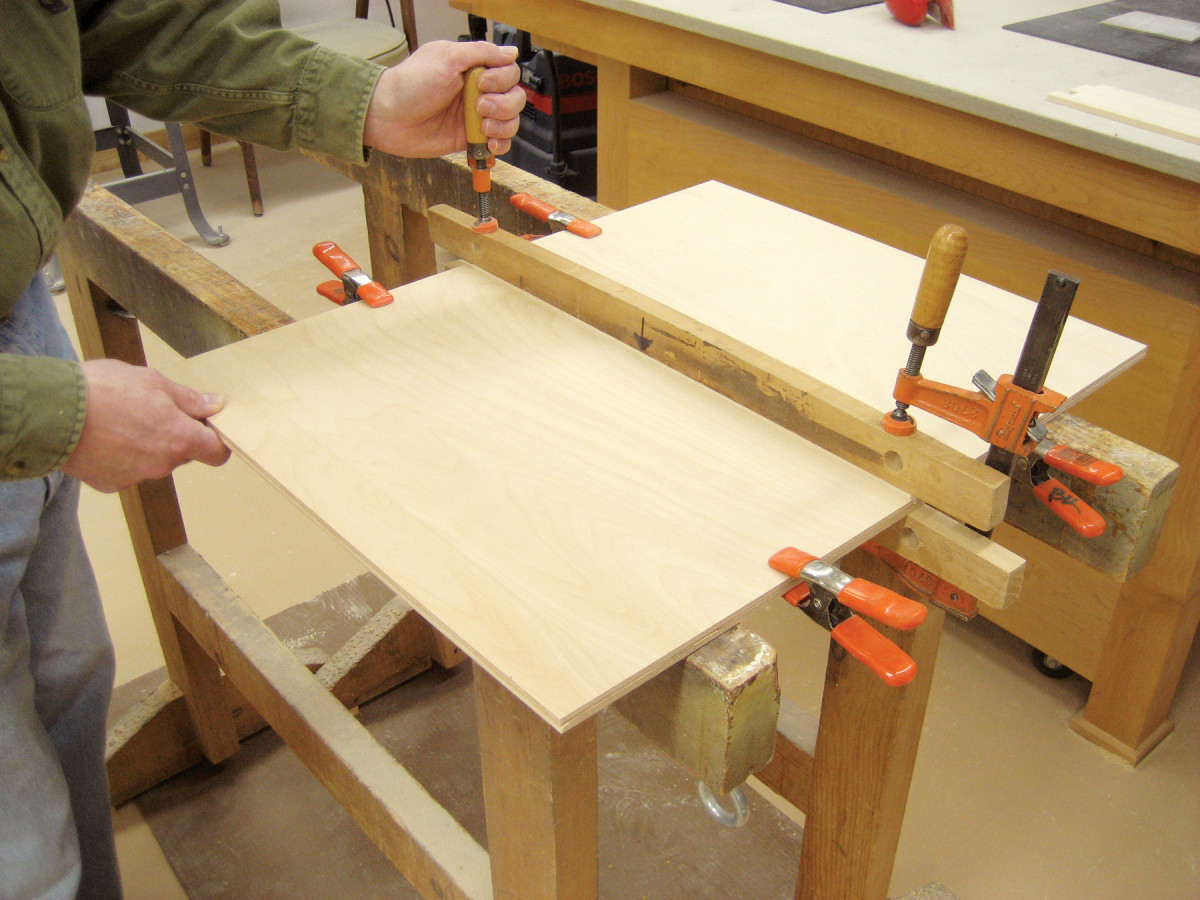
1. Build the upper and lower web frames, which run the full length of the case. Glue the rails, but don’t glue the drawer tracks. You’ll adjust their positions later when fitting the drawers.
3. Glue and clamp the web frames together. Do not glue the drawer tracks in their grooves (Photo 1).
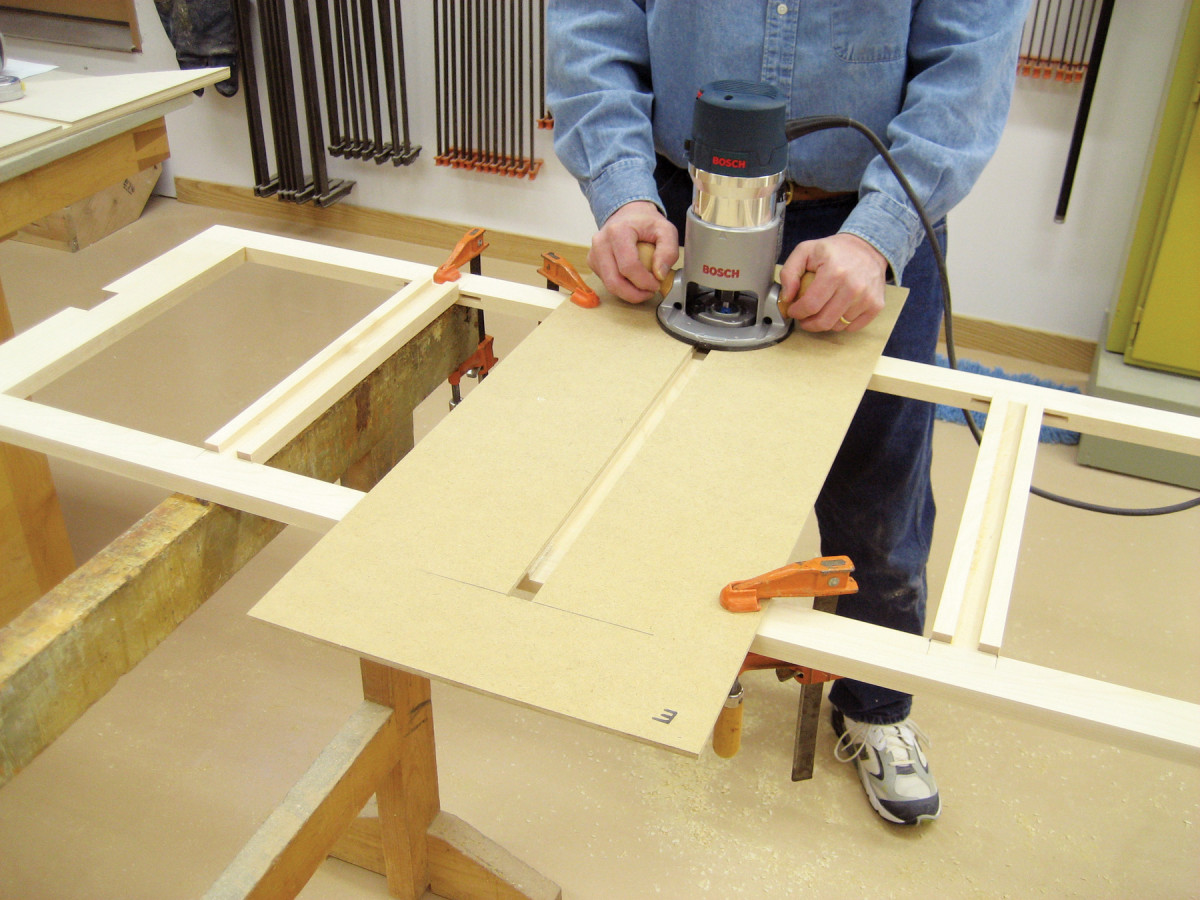
2. Rout grooves in the rails for the plywood vertical dividers. Guide the cut using a shop-made template. Size the slot so the plywood fits tight in the grooves.
4. Lay out and cut grooves in the top and bottom web frames to receive the dividers (B2, Photo 2).
5. Cut the case ends (B1) and dividers to size. Cut dadoes in the ends and dividers (See Fig. C). The dadoes should be cut to a depth that leaves 1/2” of plywood on the sides and 3/8” on the dividers.
6. Cut the rabbets on the top of the case sides so 1/2” of plywood remains.
7. Rout the rabbets for the back (B8) on the sides.
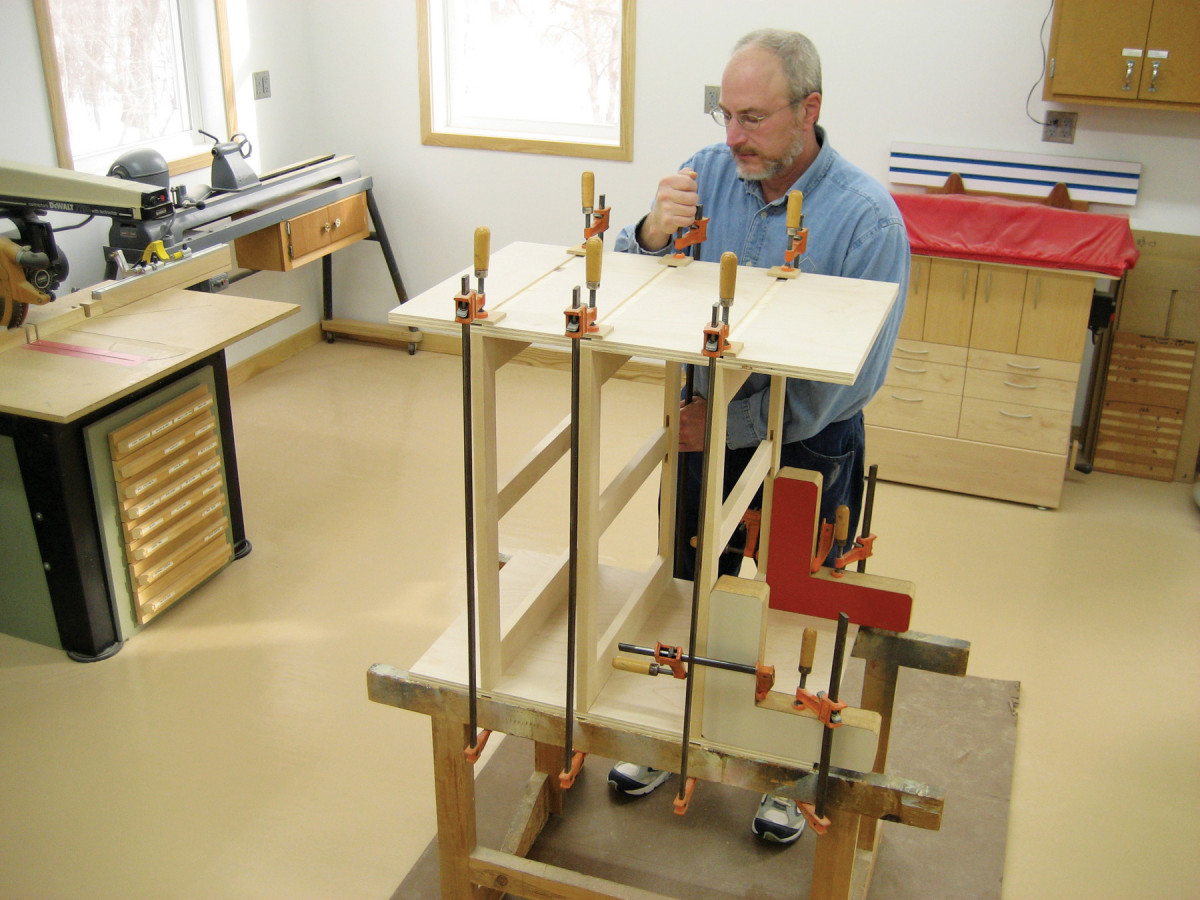
3. Glue short web frames to the vertical dividers, making the middle section of the dresser. Position the web frames upright so the assembly is easier to clamp. Use L-shaped squaring blocks to ensure that everything stays square.
8. Glue and clamp the middle section web frames and dividers. Make sure the assembly is square (Photo 3).
9. Drill and countersink the screw holes in the top web frame for attaching the dresser top.
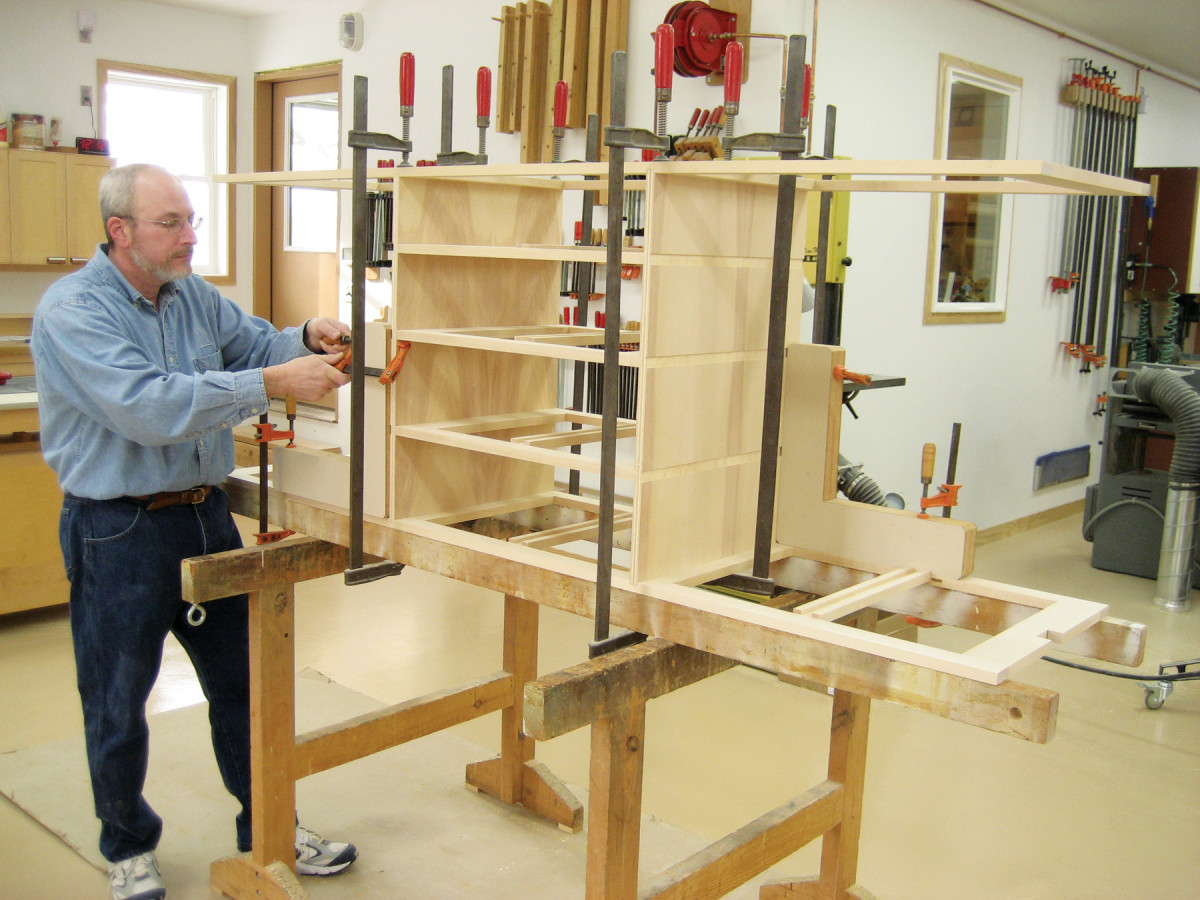
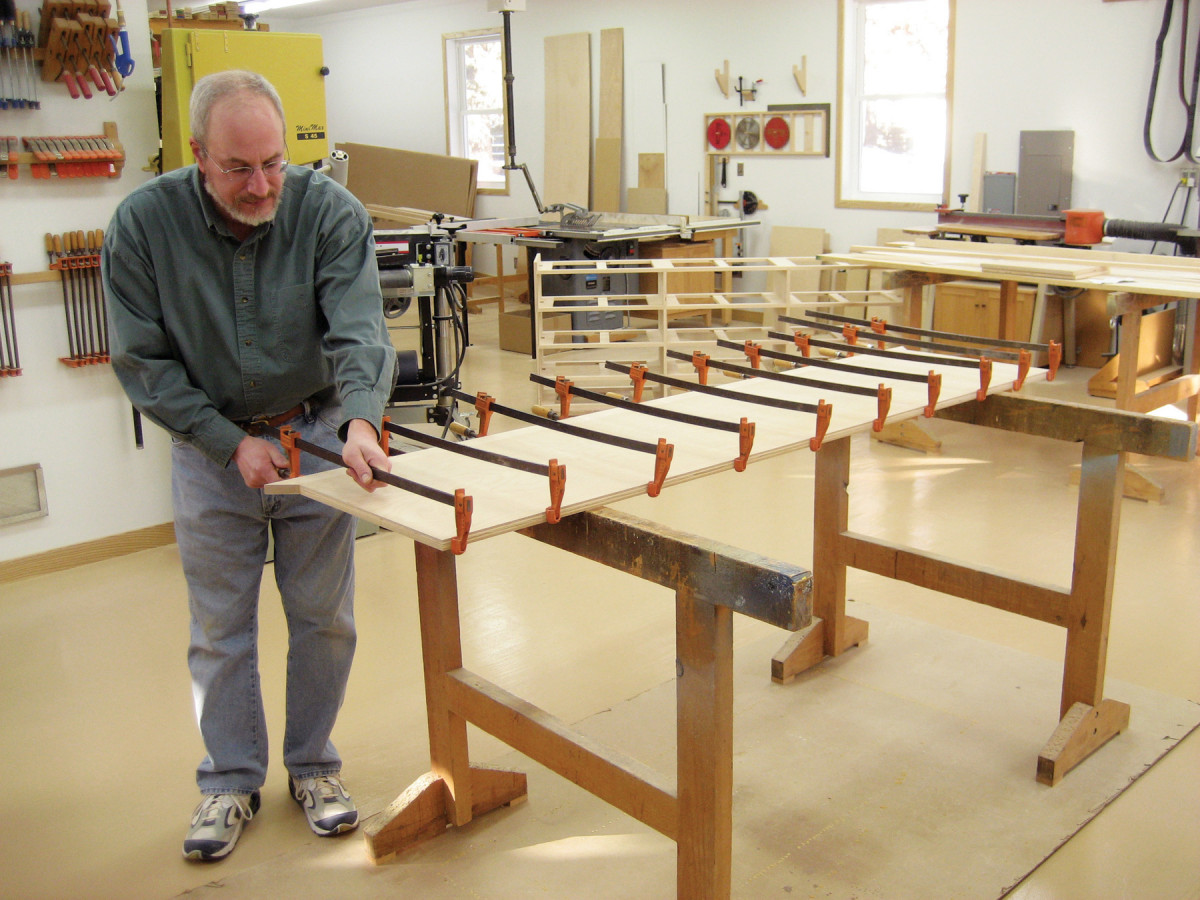
4. Build out from the middle section, starting with the top and bottom web frames. For assemblies like this, I work on sawhorses and use long, straight support boards and large squaring blocks.
10. Glue and clamp the top and bottom web frames to the case’s middle section (Photo 4).
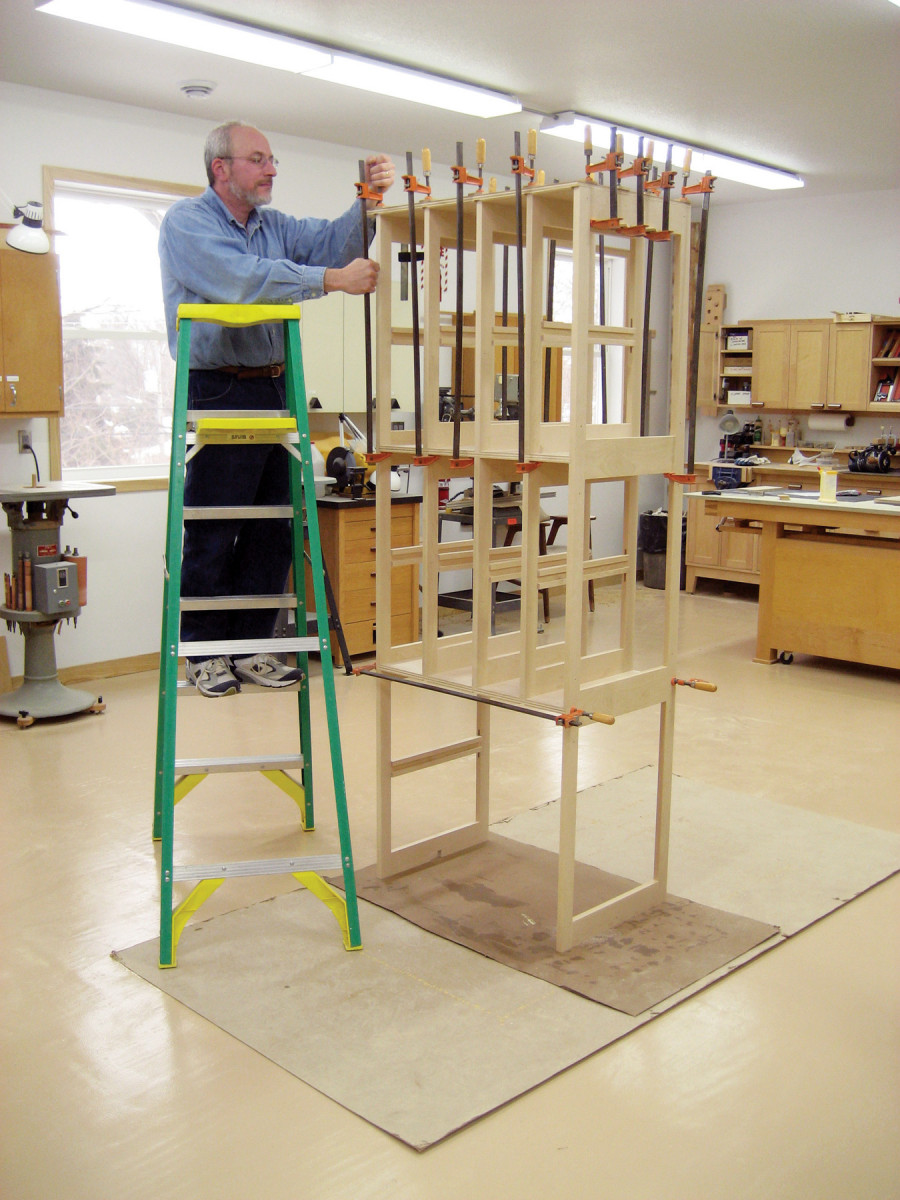
5. Stand the assembly on end to add the remaining web frames and end panels. I prevent glue from dripping on the floor by placing a sheet of cardboard under the assembly.
11. Glue the end web frames and case sides to the partially assembled inner case (Photo 5). This is a lot of gluing and clamping for one person. Either get some help or do it in stages by gluing a few joints at a time. Dry fit some of the parts; use them to align the pieces you glue.
12. Cut the bottom (B3) and glue and screw it to the underside of the bottom web frame. Make sure its front edge is flush with the front edge of the web frame.
Apply the edgings
6. Glue edging onto the front of the cabinet. The edging is mitered at the corners, down at the base. Draw the miters tight with long clamps.
13. Cut the bottom edging (B4) and end edging pieces (B5) to size. Rout a 3/8” radius roundover on the inside edges of these pieces. Miter and glue the bottom edging to the front edge of the plywood, leaving all of the web frame edge exposed (Photo 6). Miter and attach the side edging. Keep the outside edges flush to the faces of the plywood. Rout a roundover on the outside edges of the edging.
14. Cut the top edging piece (B6) to size and fit it between the end edging pieces. Glue it in place.
15. Cut the divider edging pieces (B7) to size and fit them between the top and bottom edging pieces. Glue them in place so there’s an equal overhang on each side of the plywood dividers.
16. Cut the back (B8) to size and screw it in place.
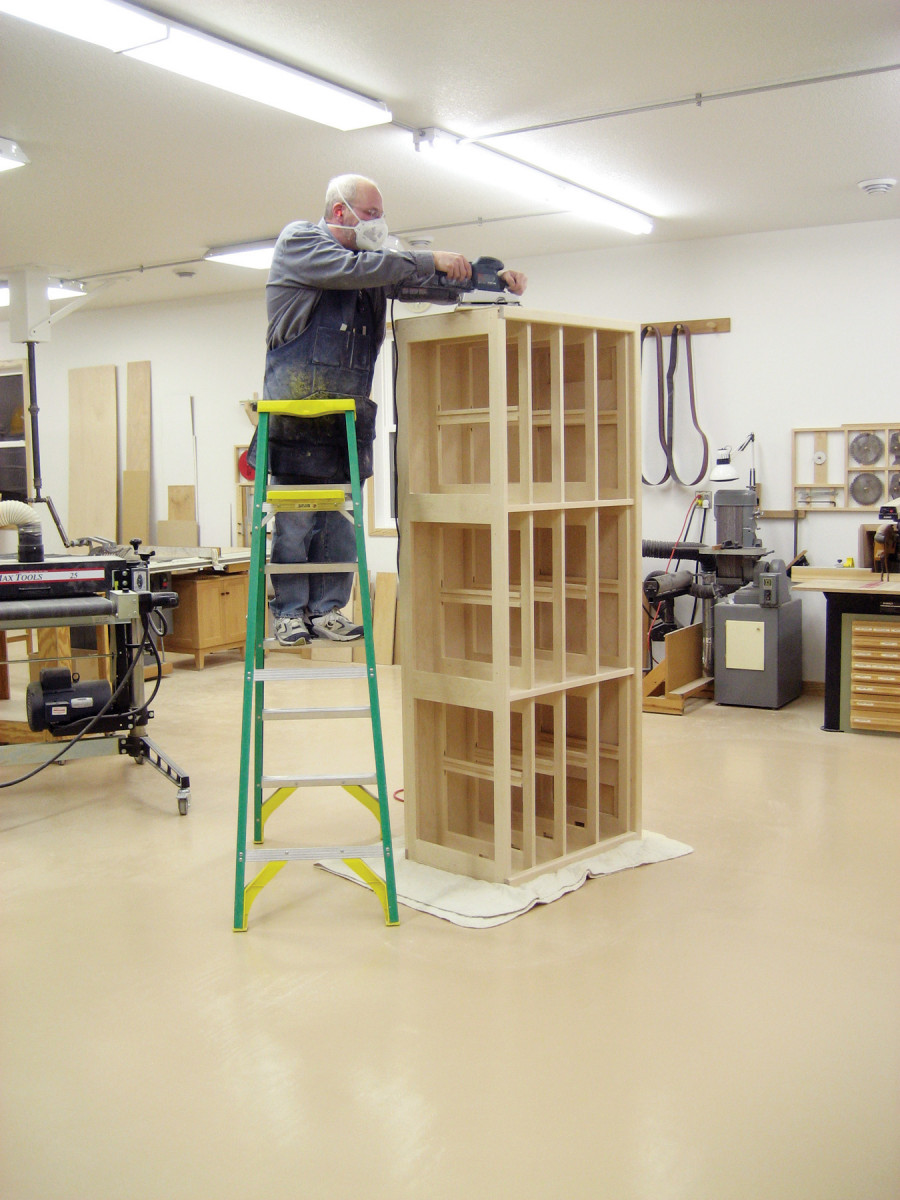
7. Use an orbital sander to sand the cabinet’s ends. An orbital sander is not as aggressive as a random orbit sander and gives a better final finish.
17. Finish sand the case’s ends (Photo 7).
Build the base
18. Cut the base parts (C1-C4) to size. Cut biscuit grooves in the cross braces and front and back pieces. Miter the ends of the base sides and ends.
19. Glue and clamp the base together. Drill screw holes in the cleats for attaching the base to the case. Glue the cleats to the base.
20. Screw the base to the case. Set the front of the base 3” back from the front of the case’s bottom edging (Fig. E).
Build the drawers
21. Here are a couple of tips for dimensioning the drawer parts: First, the lengths of the drawer sides in the cutting list includes 5/8” total for their tails. If your jig cuts a different length tail, make any necessary adjustments to the sides’ lengths. Second, I add 1/16” to the finished length of my drawer face and back, then cut the dovetail sockets an extra 1/32” deeper so the ends of the front and back protrude 1/32”. After assembly, I sand the overhang flush.
22. Cut the drawer parts (D1 – D10) to size. Measure the height of all the drawer openings, then cut the drawer sides 1/16” narrower.
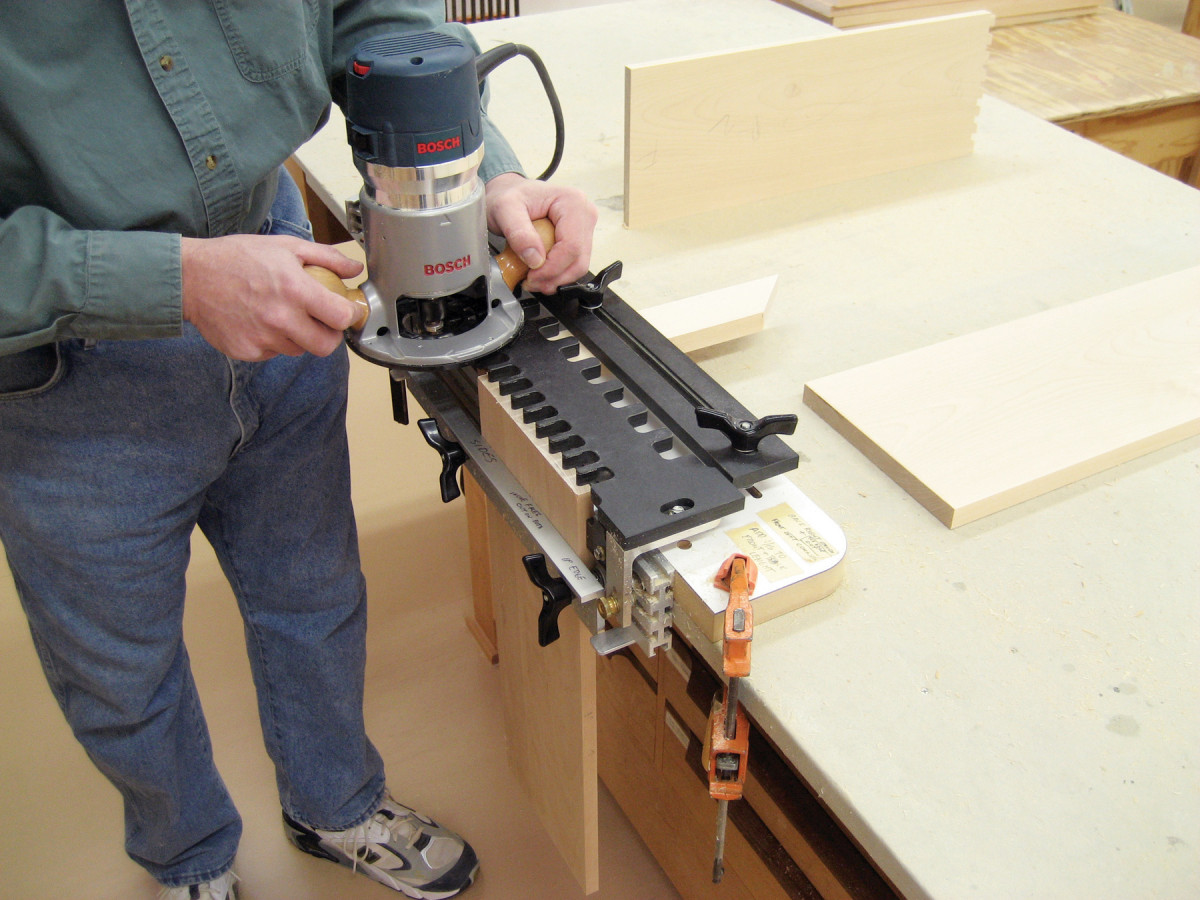
8. Rout the drawer joints with a half-blind dovetail jig.
23. Rout the half-blind dovetails in the drawer parts. Note: On the three lower drawers, the bottom edge of each drawer’s face hangs 11/16” below the drawer’s side (Fig. A). This distance is 3/4” on all other drawers. Because of this offset, there is no dovetail socket at the lower end of the drawer faces. Half-blind dovetail jigs are not designed to allow for this blank space, but there is an easy way to create it. Rout the lower tail of each drawer side using a sacrificial backer board rather than the drawer face. Once that tail is cut, remove the sacrificial board and substitute the drawer face, then cut the remaining tails and sockets (Photo 8).
24. Lay out and drill holes in the drawer faces for the drawer pull bolts. The pulls are centered on the drawer faces, and there’s a 1/16” reveal above the pulls when they’re mounted.
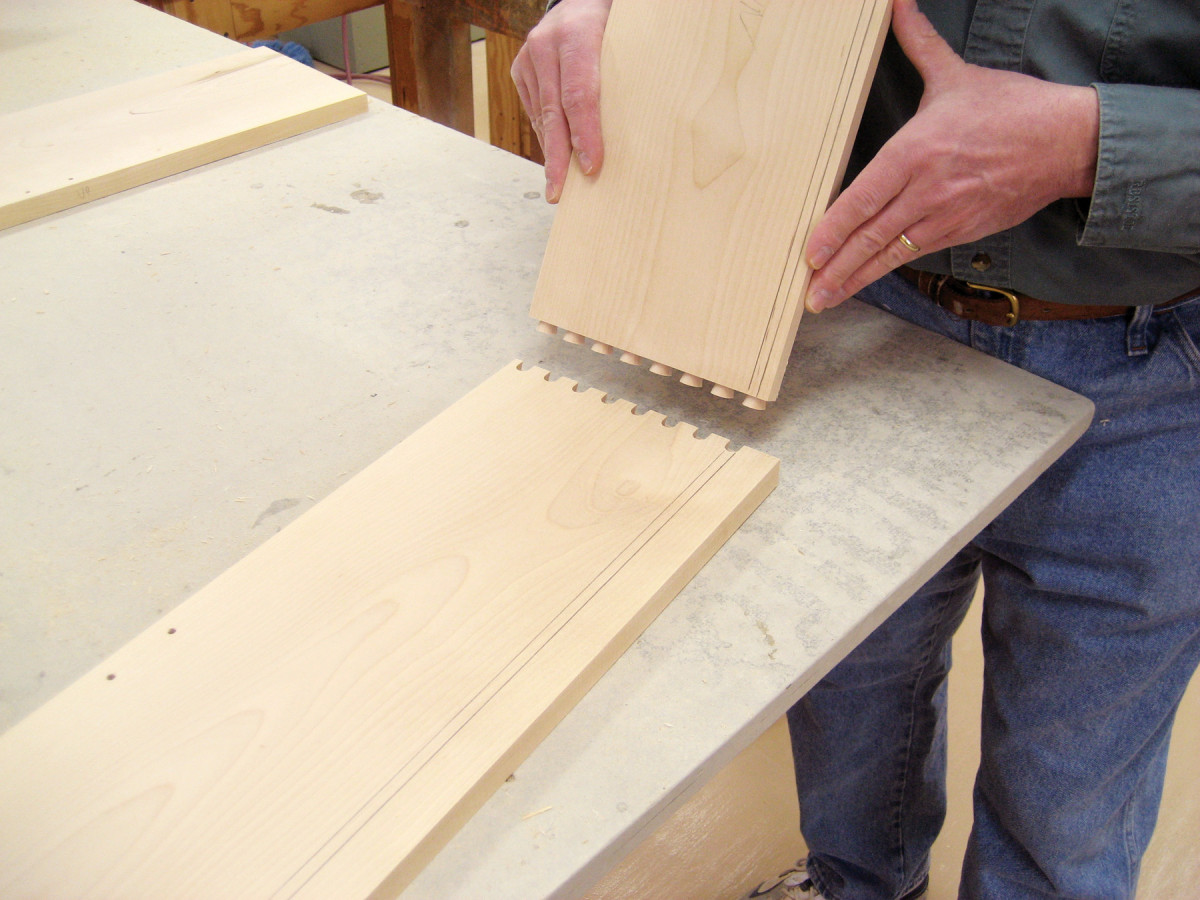
9. Lay out the drawer-bottom grooves so they’re in line with the bottom socket of the drawer’s front. Cut the grooves, then glue the drawers.
25. Lay out and cut the drawer bottom grooves (Photo 9). I use my table saw and a flat-toothed 1/8”-kerf blade. I make two cuts to define the groove’s width so the drawer bottom slides easily into it.
26. Cut the drawer bottoms (D11) to size plus 1” extra in width. When I assemble a drawer, I slide its bottom in place and use it to square the drawer. Since it’s easier to sand and finish a drawer without the bottom in place, the 1” tab makes it easy to remove the bottom after the glue has dried. Cut the drawer bottoms to their finished widths after the drawers are assembled, then reinstall them.
27. Assemble the drawers.
Mount the drawers
10. Remove the bottoms from the drawers, then glue a guide precisely in the center of each bottom. Use two plywood spacers to locate the guide. Put the bottoms back in the drawers and slide the drawers into the case.
28. Make the drawer guides (D12), and trim their widths just enough so they slide in the drawer tracks. Slightly chamfer their back edges and corners. Cut two 11-13/16” wide by 19-3/8” long spacers from 1/4” plywood. Use these spacers to center the drawer guides on the drawer bottoms (Photo 10). Align the back ends of the guides flush with the back edges of the drawer bottoms. This will leave the tracks 1/4” shy at the front so the drawer bottoms can slide into the grooves in the drawer face.
29. Slide the drawer bottoms into the drawers and screw them to the bottom edges of the drawer backs.
30. Make the drawer track stops (A7).
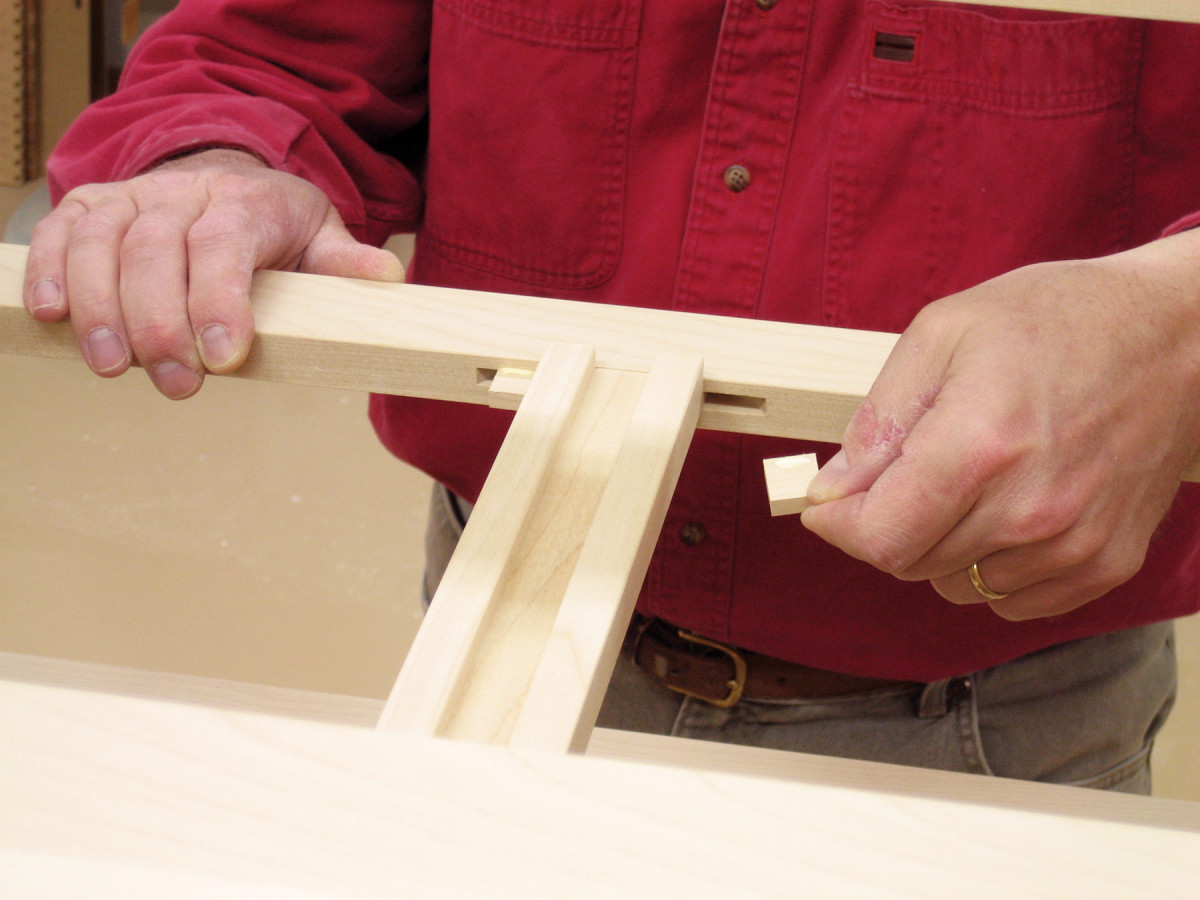
11. Adjust the tracks side to side to center the drawers. Then glue stops on either side of each track to lock it in position.
31. Insert the drawers in their openings and push the drawer faces tight against the web frames. Shift the drawers side-to-side until the spaces between the drawers and case are equal. The tracks will shift along with the drawers. Once all the alignments are made, carefully remove the drawers without disturbing the alignment of the tracks, then glue the stops in place (Photo 11).
Build the top
12. Glue and clamp the edging pieces to the top. Do the long sides first, and then fit and attach the ends.
32. Cut the pieces for the top (E1 – E3). Miter the ends of the edging pieces and fit them to the panel. Glue the edgings (Photo 12). Shape a 3/8” radius on the top’s corners, then rout a 1/4” radius roundover all around the top’s edge. Align and screw the top to the case.
Finish
33. Disassemble any screwed-together parts and apply your favorite stain and finish. To achieve a whitewashed look, I applied one coat of pre-stain wood conditioner applied with a foam brush, one wiped-on coat of Zar Country White Wood Stain, and three brushed on coats of Varathane Water Based Polyurethane Clear Satin (Sources, below).
SOURCES
Colonial Bronze Satin Bronze Drawer Pulls, #425
Zar Oil Base Wood Stain, Beach House (replacement for original color, Country White)
Varathane Water Based Polyurethane, Clear Satin
Here are some supplies and tools we find essential in our everyday work around the shop. We may receive a commission from sales referred by our links; however, we have carefully selected these products for their usefulness and quality.