We may receive a commission when you use our affiliate links. However, this does not impact our recommendations.
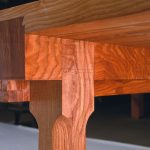
Joinery-palooza! By itself, the table highlights many seldom-seen joinery details. With the addition of the drawer frame and drawer joinery (including the author’s unique technique for drawer dovetails and stacked mortise-and-tenon joints), this project could be used to illustrate a joinery encyclopedia.
Many countries have their own woodworking traditions, which are often a combination of mythology and ideology. The Japanese are no exception, and those traditions are part of the foundation of my work.
There is a temple that ancient Japanese carpenters built. Its columns, hewn from trees, are positioned as when each was a standing tree. That is, the south side of the standing tree, when used as a column, also faces the south.
Though the tree’s south side has more knots, period Japanese carpenters believed that, if these trees had faced the sun for 1,000 years, as columns they would stand another 1,000 years if positioned the same.
Japanese woodworkers also try not to use wood upside down, even on small objects. And the heart side of the wood should always face the inside of a carcase or object. As a result, Japanese carpenters do not bookmatch material. Even for table legs, the core side should face the inside.
I follow these traditions as much as possible, especially the ideology used to indicate the two lives of a tree. Today, when making a sculpture or cabinet, I use materials that mostly come from my surroundings. There must be a strong reason to make an exception.
I don’t just hope – I carefully construct a table to exist at least 300 years.
Completing the Base
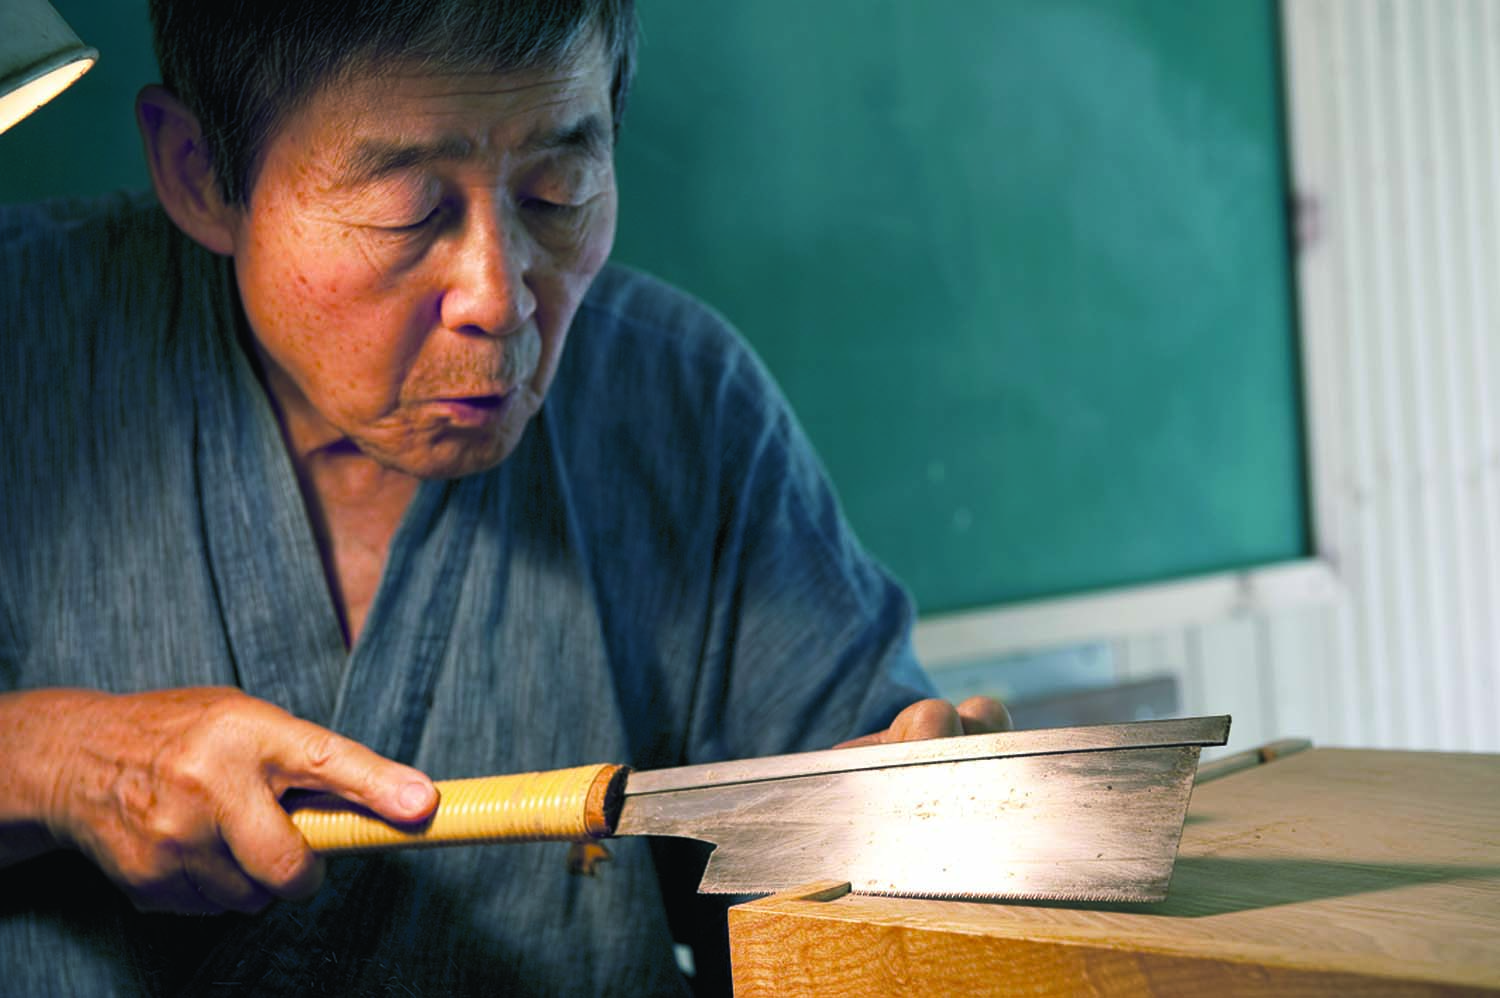
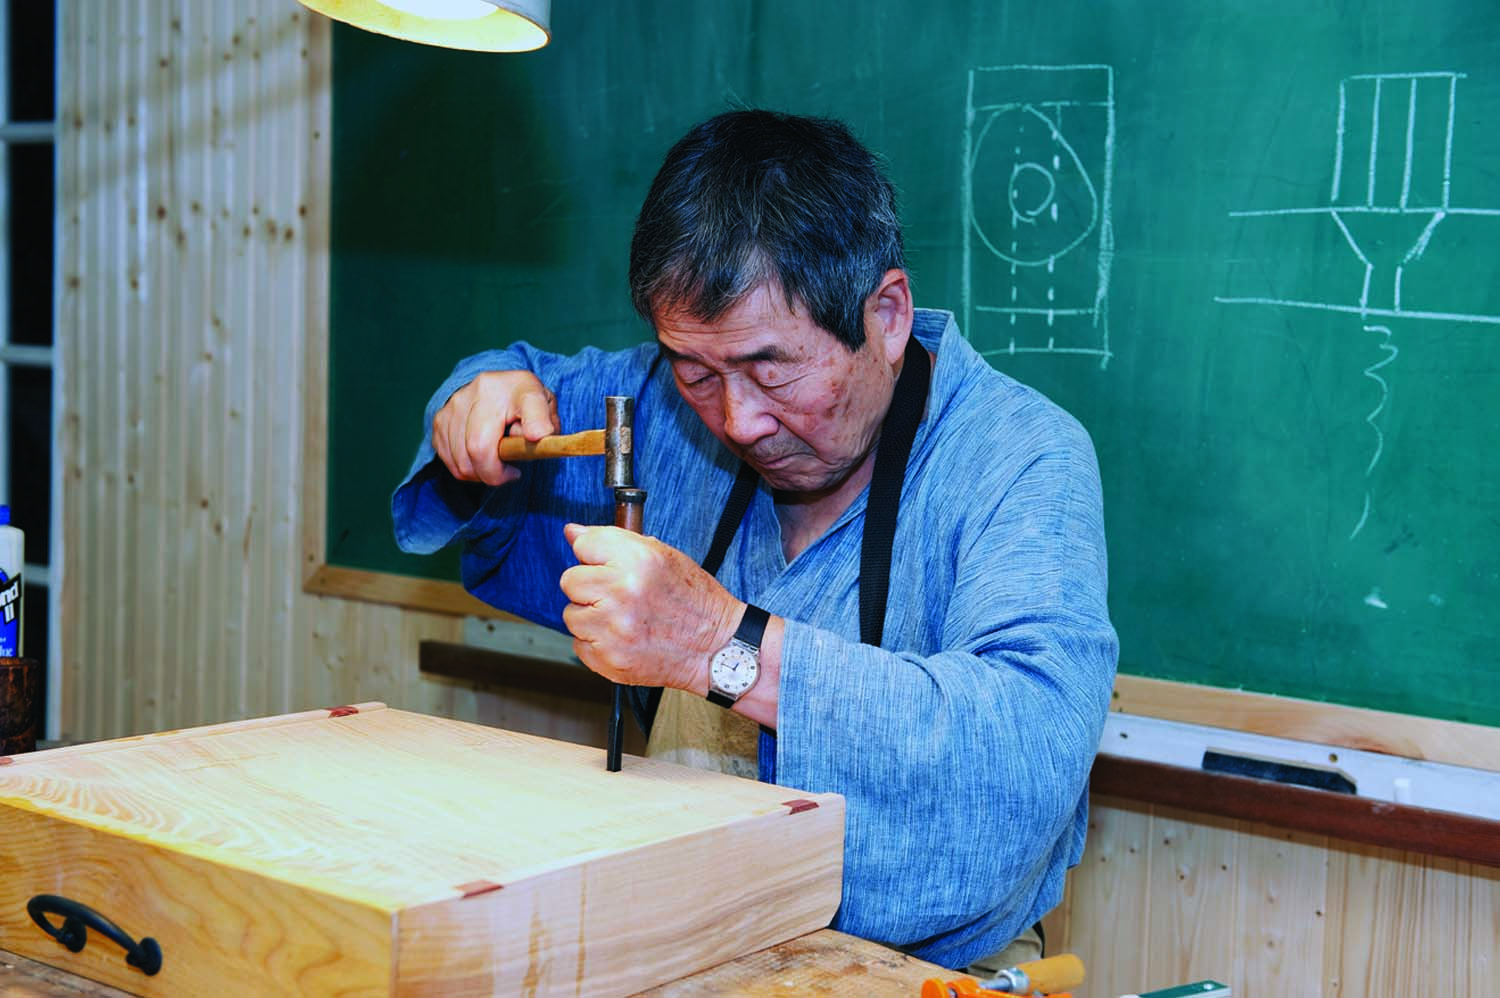
The Magobei’s table was still upside down on the horses with the sliding beams protruding from the table. My assistant (who did most of Part 1 of this article in the August 2010 issue), Laure Olender, sawed all four ends flush with the table’s edge. She chamfered the corners and planed the end grain.
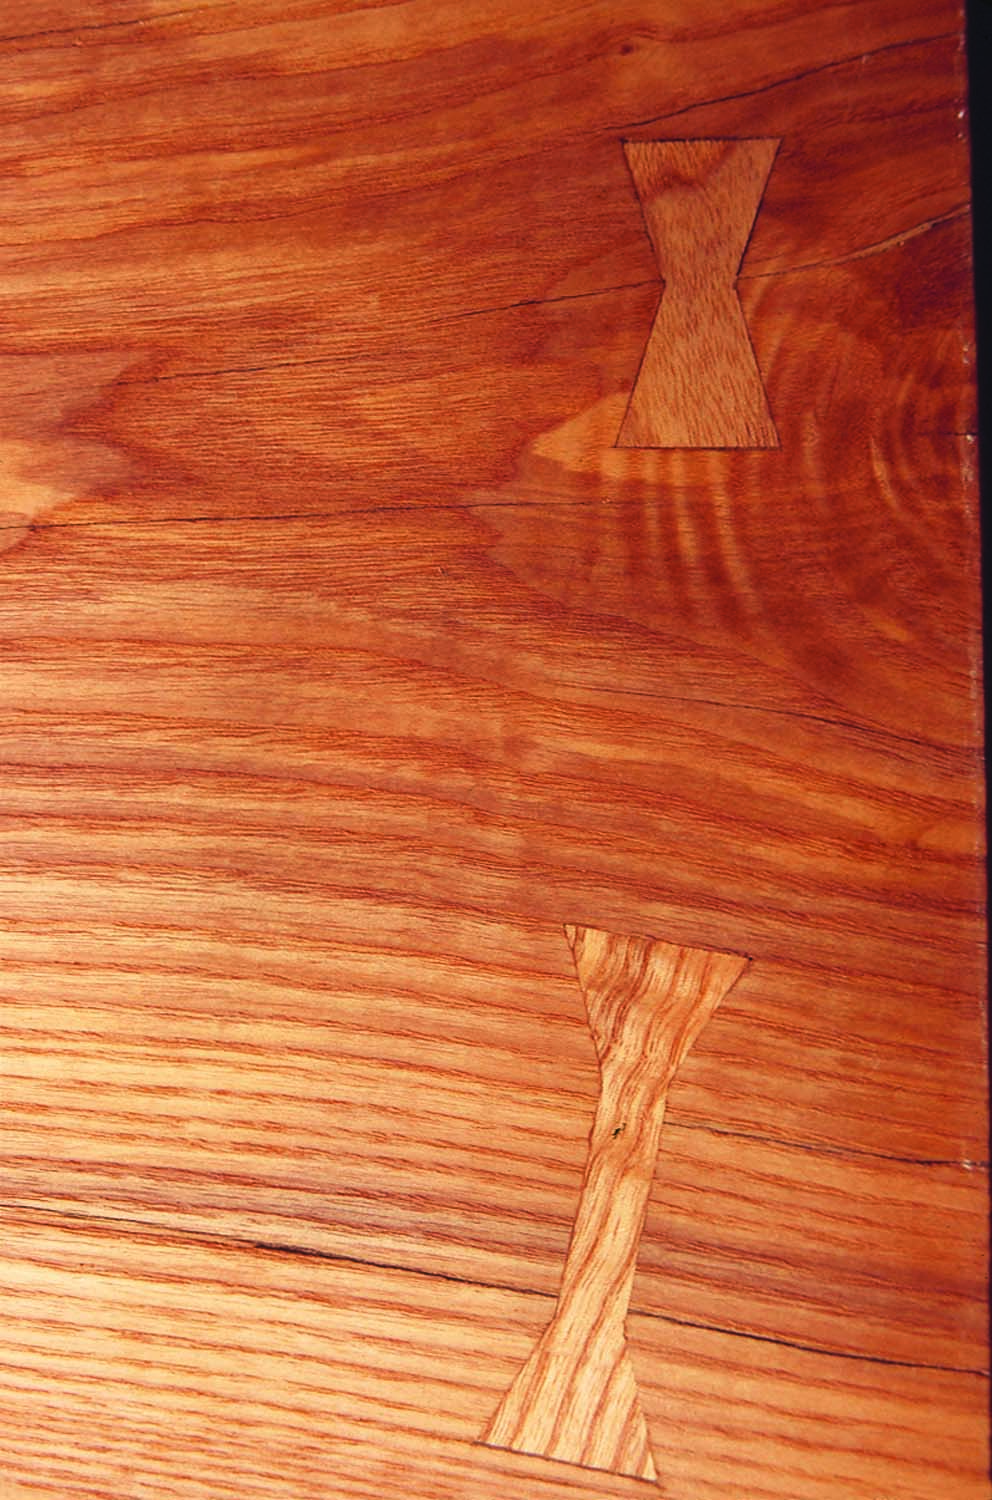
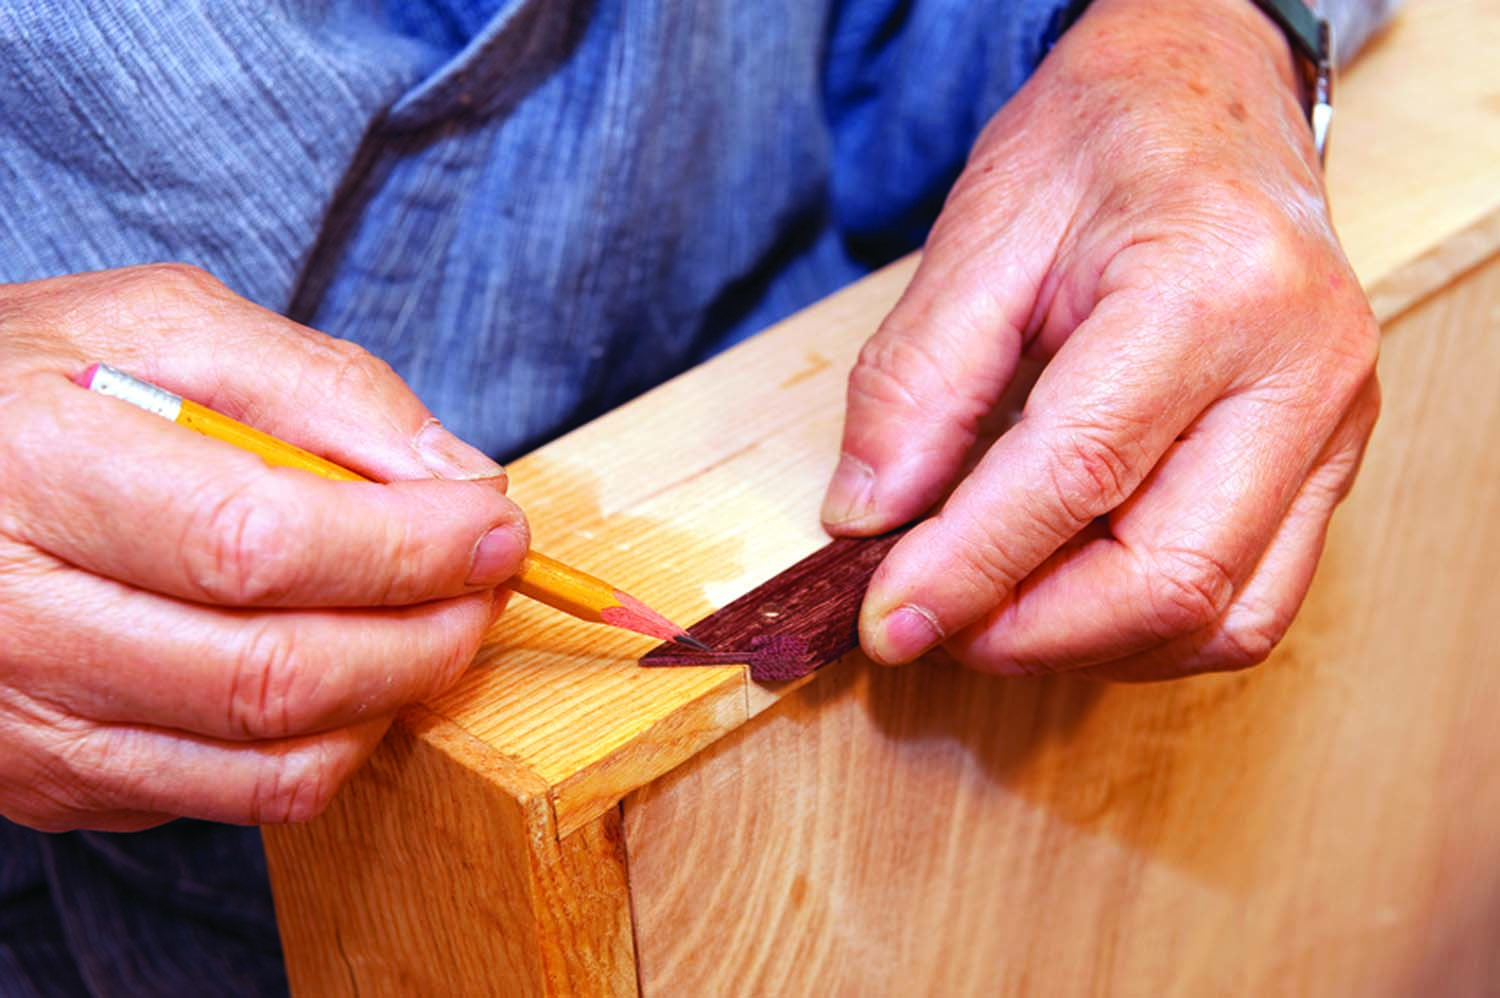
Old-school fix. Any small hairline cracks in the tabletop are bridged with inlaid butterflies. On the bottom face of the tabletop, we use a matching hardwood, but any splits in the top face are fixed with a contrasting wood. (We used purpleheart.)
The dovetail joints fit tightly into the top, but I noticed a hairline crack on the bottom face of the top. Laure inlaid a small oak butterfly across it. The top face had a couple wider splits, so again butterfly inlay was used – one inlay bridged two small cracks.
We sharpened the power planer blades for the final touch up. Laure then used a palm sander and three sanding grits for the final preparation. The table was wiped with a dry cloth before a coat of Danish oil was applied. The table was beautiful and elegant. We were satisfied and Laure was happy.
Concern About a Design Flaw
A few days later, I studied the table, and one concern came to mind. This top is about 33“ wide, 2“ thick and 108“ long. Between the legs there is about 73“. With time, the middle might sag. But I did not want to add a brace.
A week passed and my concern became serious. I decided to put drawers below the top – the frame would keep it from sagging. At first, Laure thought it might destroy the table’s elegance. But she realized there was not much of a choice. While her work on the table was perfect and the result beautiful, there was work to do.
Double-duty Added Structure
It was difficult to design the drawer structure, as the table was not made to have drawers. Here were the challenges: I did not want destroy the elegant look; a person should be able to sit comfortably with his legs below; and the drawer frame structure needed to be designed. Here were my solutions: The drawers are constructed with Western joints but should simulate traditional Japanese design; all the parts should come from the exact same tree; and the drawer handles should be hand-forged in a Japanese style.
I want this table to last at least 300 years. In traditional Japanese woodworking, nails were used to fasten most drawers, even the large chest of drawers known as “tansu.” However, tansu were made out of paulownia, a soft wood that has no strength to hold metal nails. Japanese woodworkers used tapered wooden nails made of Japanese boxwood; rice glue held the nails in place. (One of the greatest enemies for wood is metal rust. If I have to use metal, I choose stainless steel.)
For that reason, I used joinery to secure the structure of the drawer frame instead of nails or screws.
Building the Frame
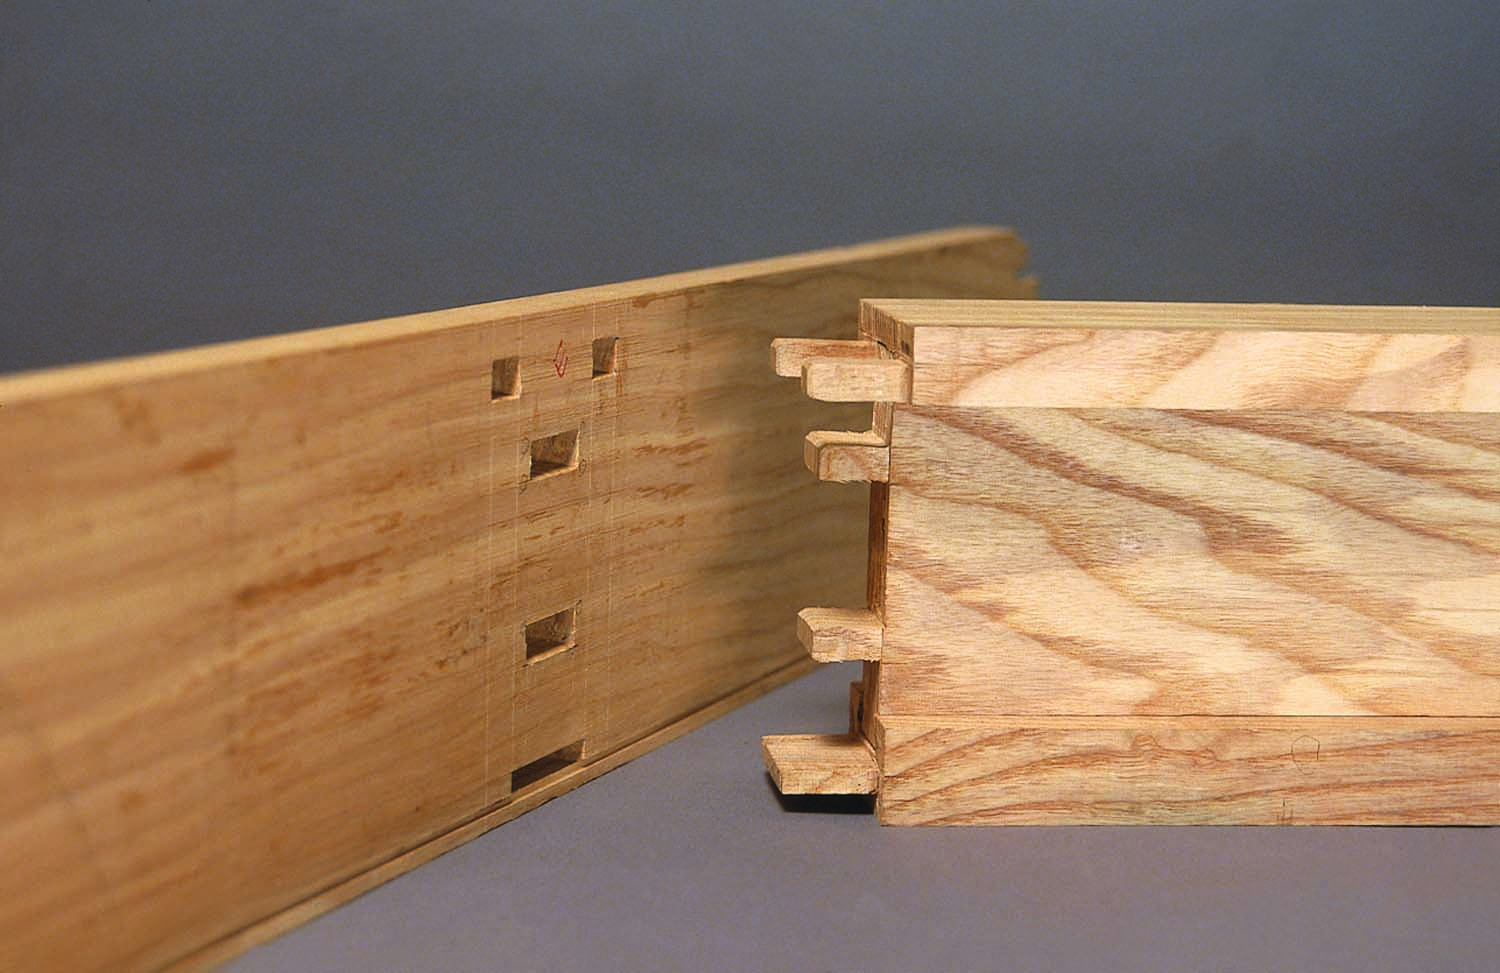
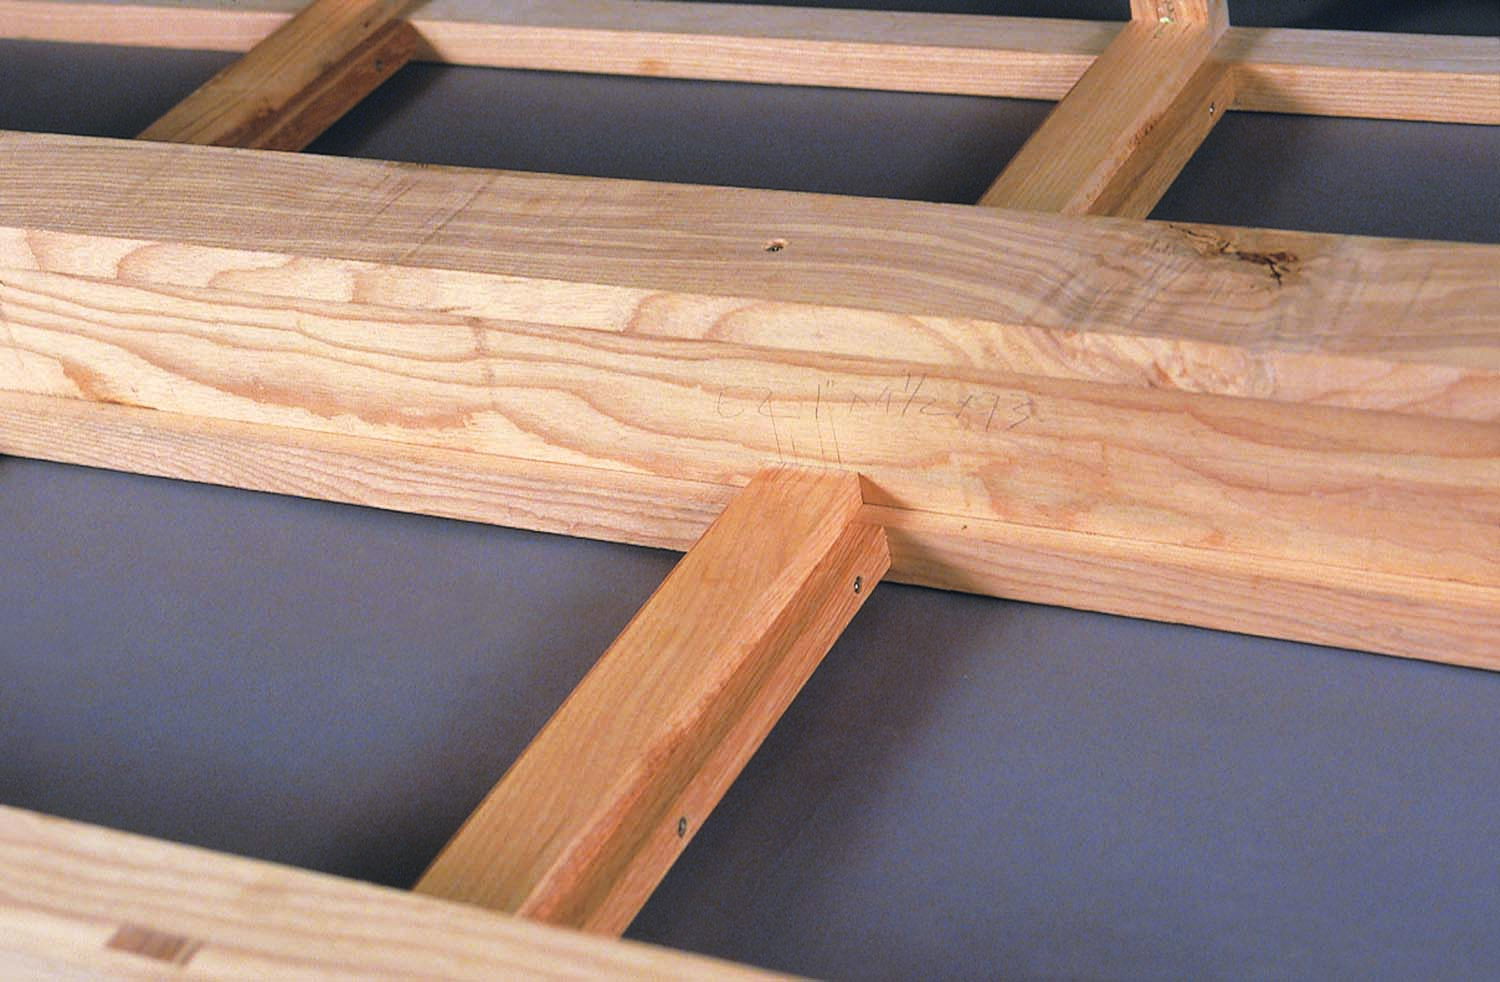
Great grasp. A properly fit mortise-and-tenon joint is very strong. The center-rail-to-end-rail joinery has five such joints.
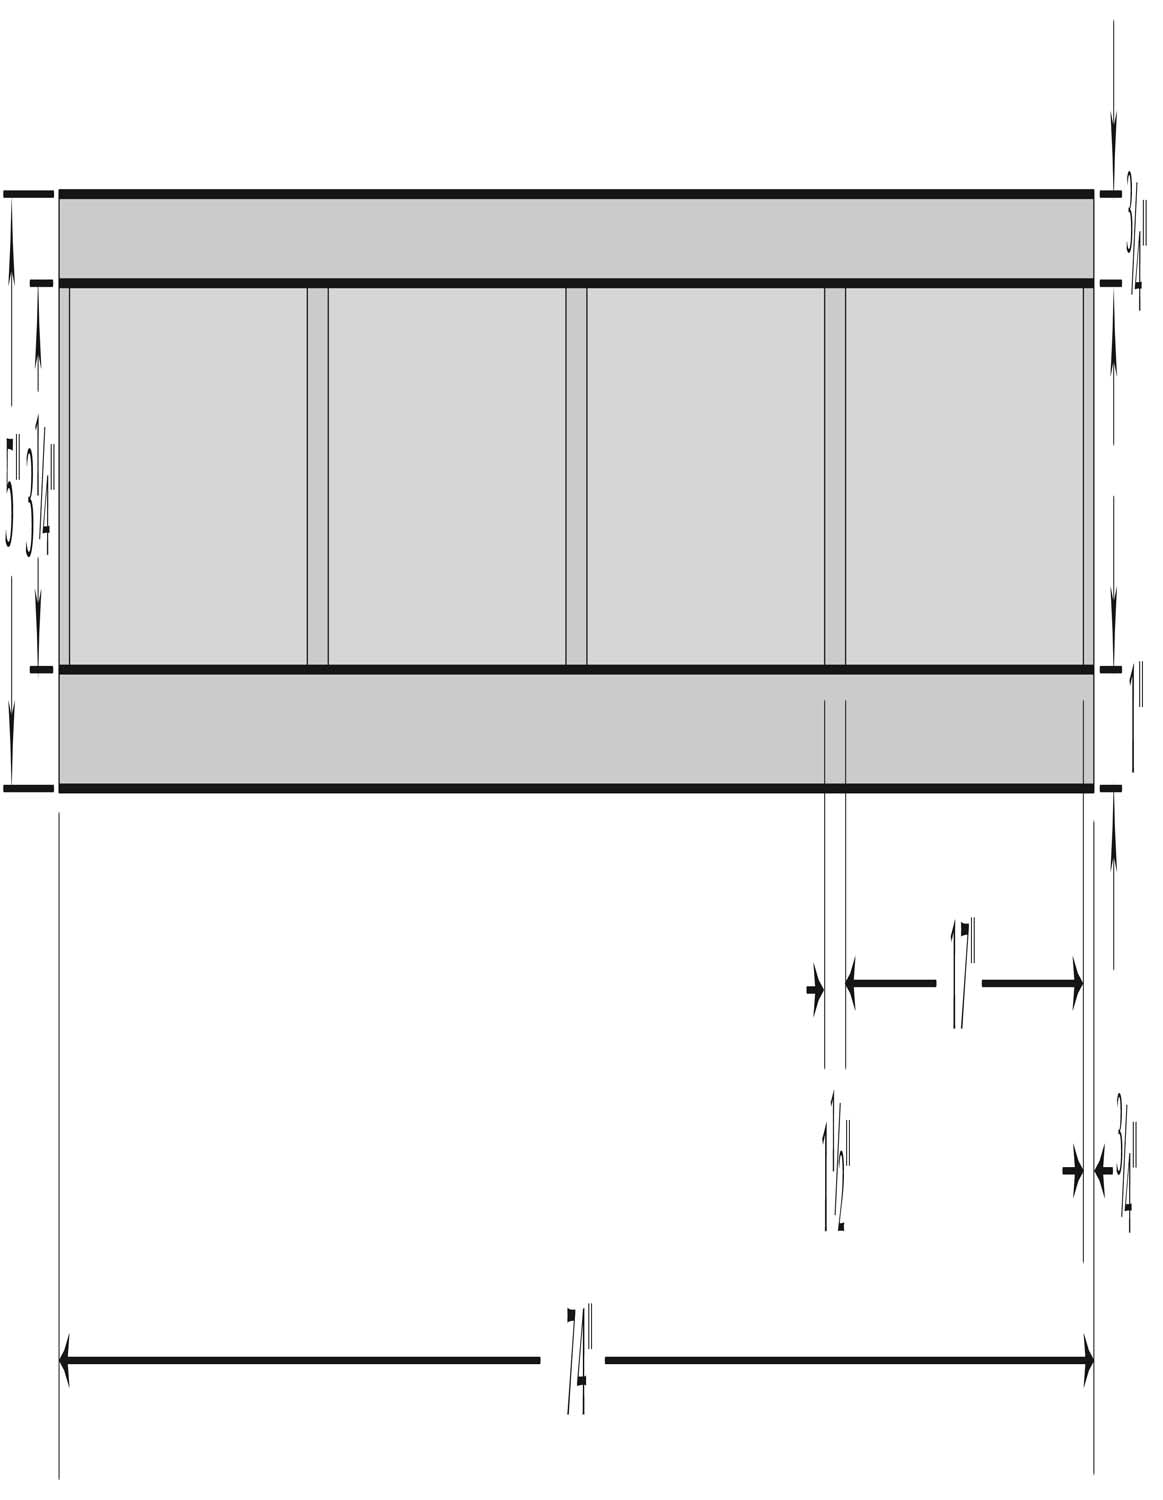
The drawer frame is a series of multiple-piece rails connected with mortise-and-tenon joints. The two outside rails have top and bottom pieces separated with five short dividers per rail. The center three dividers are set with the wide faces parallel to the rails while the end dividers are perpendicular to the rails. The center dividers have wedged through-tenons at the top, and blind, wedged tenons at the bottom. The end pieces have blind tenons at both the top and bottom that are held with glue only, no wedges.
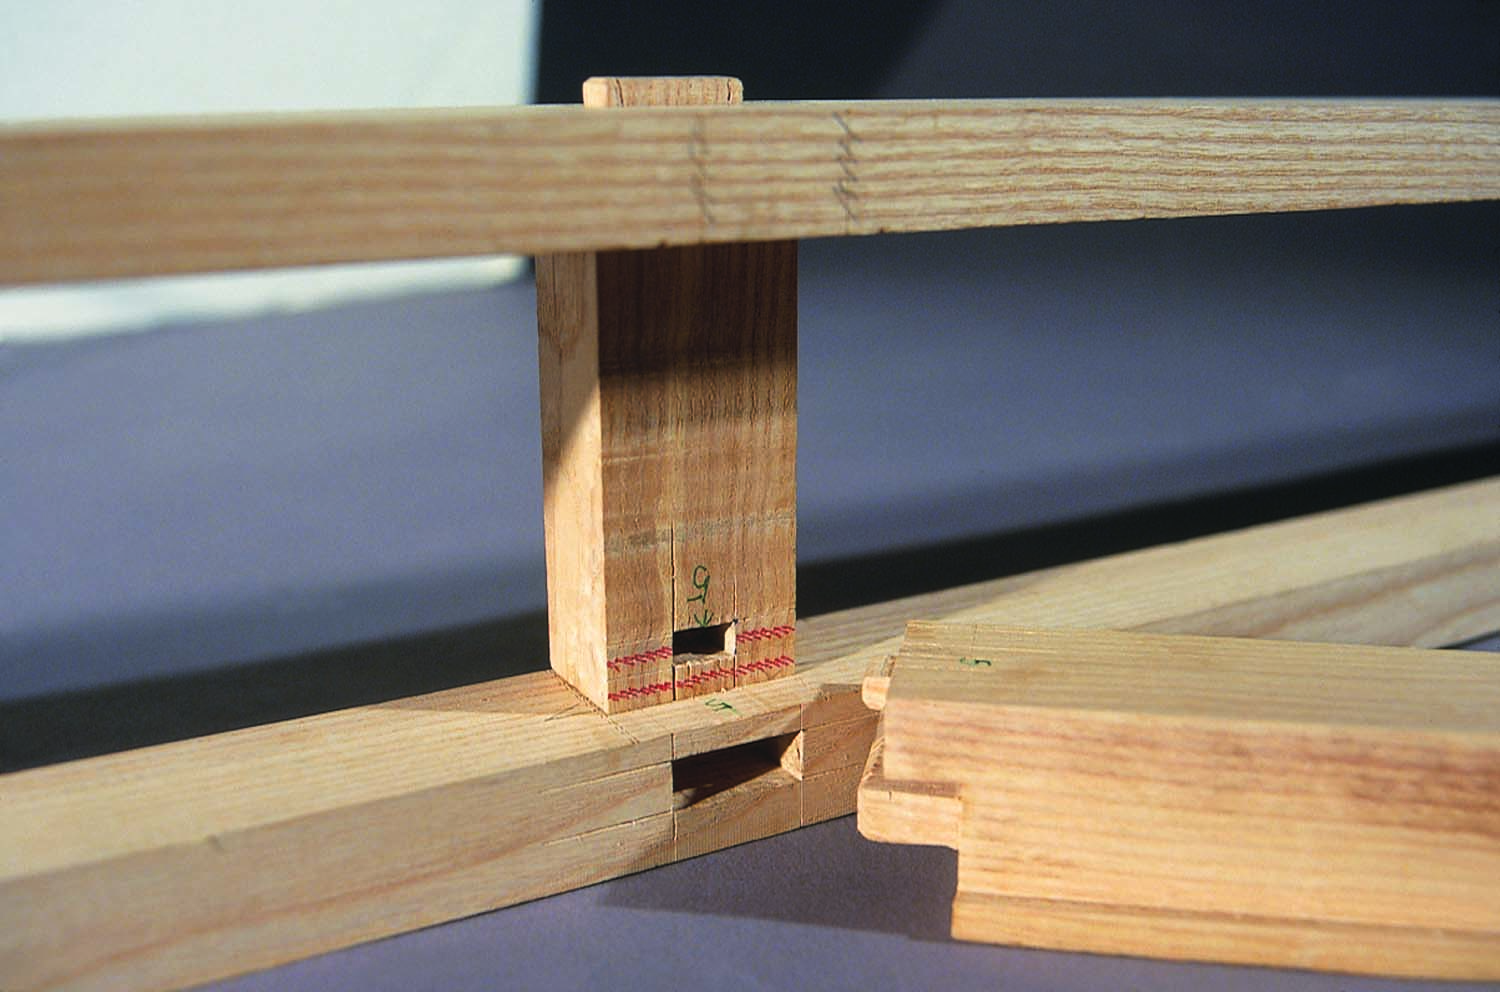
Four-pronged support. The end rails of the drawer frame not only attach to the dividers with mortise and tenons, the ends are notched to fit around the top and bottom pieces and the rail is tenoned into those pieces for additional support.
The center rail is made from three pieces that, when assembled, form an I-beam. The center part is attached to the upper and lower pieces with a sliding dovetail across the length of the rail, and each end is fit into the end rails with two tenons.
This looks familiar. The dovetail sockets on the drawer fronts begin as if the drawers were of a lipped design.
The upper piece of the center rail is attached to the end rail with a pair of split tenons, one on each side of the sliding-dovetail socket. The bottom rail has a single tenon fit to the end rail; blind wedges hold the joint secure.
Long-lasting joinery. The center dividers join the rails with wedged mortise-and-tenon joints. The top tenon, to be pared flush after the wedges are installed, extends above the rail while the bottom tenon is blind wedged – a technical joint that is as strong as a tree.
The two end rails are mortised to accept the center rail’s tenons, and they have tenons that fit into mortises in the end pieces of the outer rails. The end rails are also notched to fit around the outer rails’ top and bottom pieces, and tenons are formed on the end rails to fit matching mortises in those pieces. Dry-fit these joints, but do not yet glue them up.
Drawer Guides With a Twist
Study ancient furniture with drawers and you will see that the drawer runners show most of the wear. To help make this table last, it is important to allow for the replacement of those runners. For that reason, the runners are attached with screws, and if you carefully align the holes, the first fix is simply to flip each runner then re-install the screws.
It’s an easy fix. Because drawer runners receive a good deal of wear, it is advisable to allow for simple replacement. The runners are held to a support with stainless steel screws, no glue.
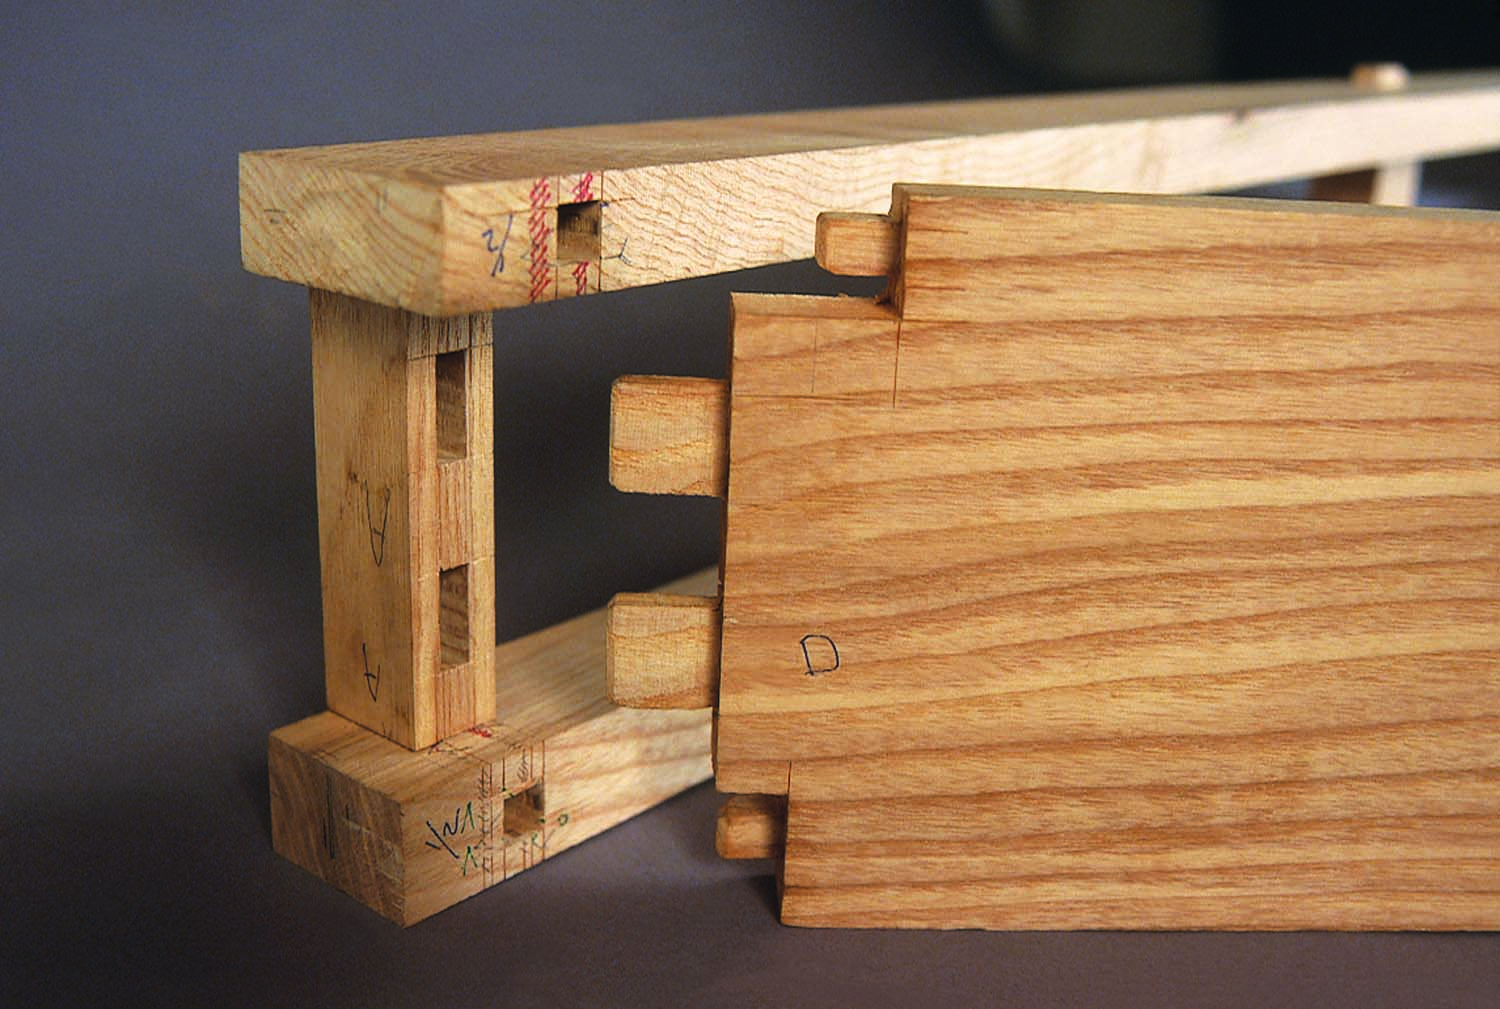
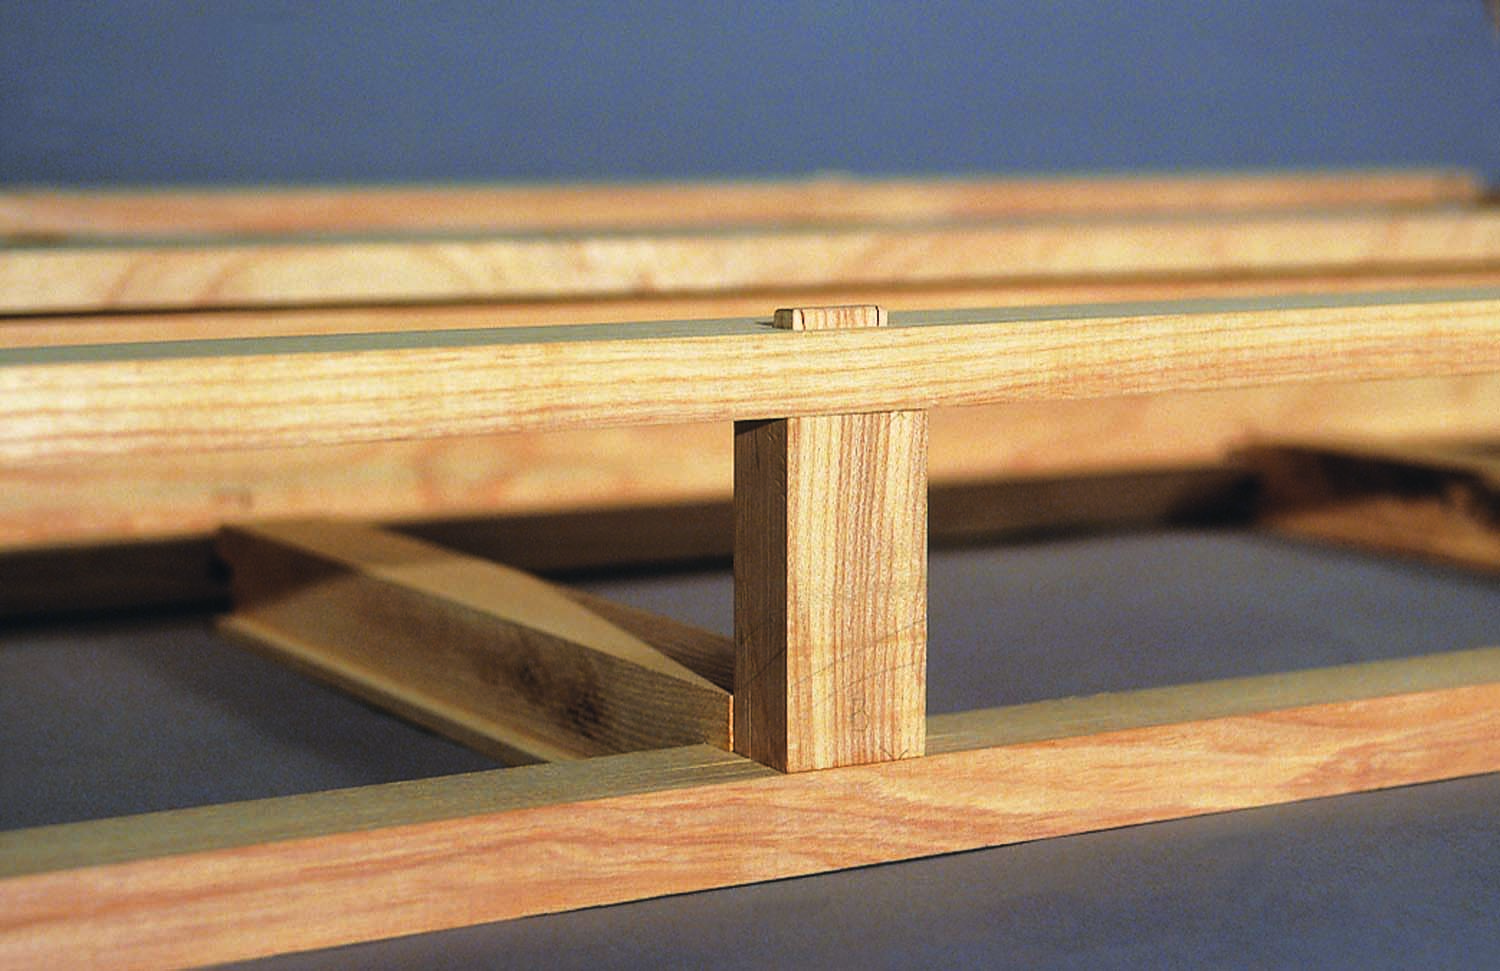
The runners at the end of the drawer frame are attached directly to the end rails. The interior runners are attached to support pieces that fit between the outer rails and the center rail. These supports are joined to the rails with mortise-and-tenon joints. Each support piece begins as a length of stock that is 2“ wide and 15⁄8“ thick. The sides of the support are rabbeted, leaving a 1⁄4“ x 1⁄4“ ledge to locate the runners.
It’s stronger than the rest. The design of the support is such that a portion actually rests on the bottom piece of the outer rail. Along with the mortise-and-tenon joinery, this rail has added support.
The photo above shows how the support fits to the front-rail assembly. Each interior support tenons into the bottom piece of the outer rail, then a portion of the support fits on top of that rail and tight to the divider, where a small tenon fits into the divider. Each support is fit to the center rail in the same way, except the upper tenon slips into the center part of that rail. After the drawer runners are cut to size and attached to the supports, the entire drawer frame is attached to the underside of the tabletop with screws.
Front View
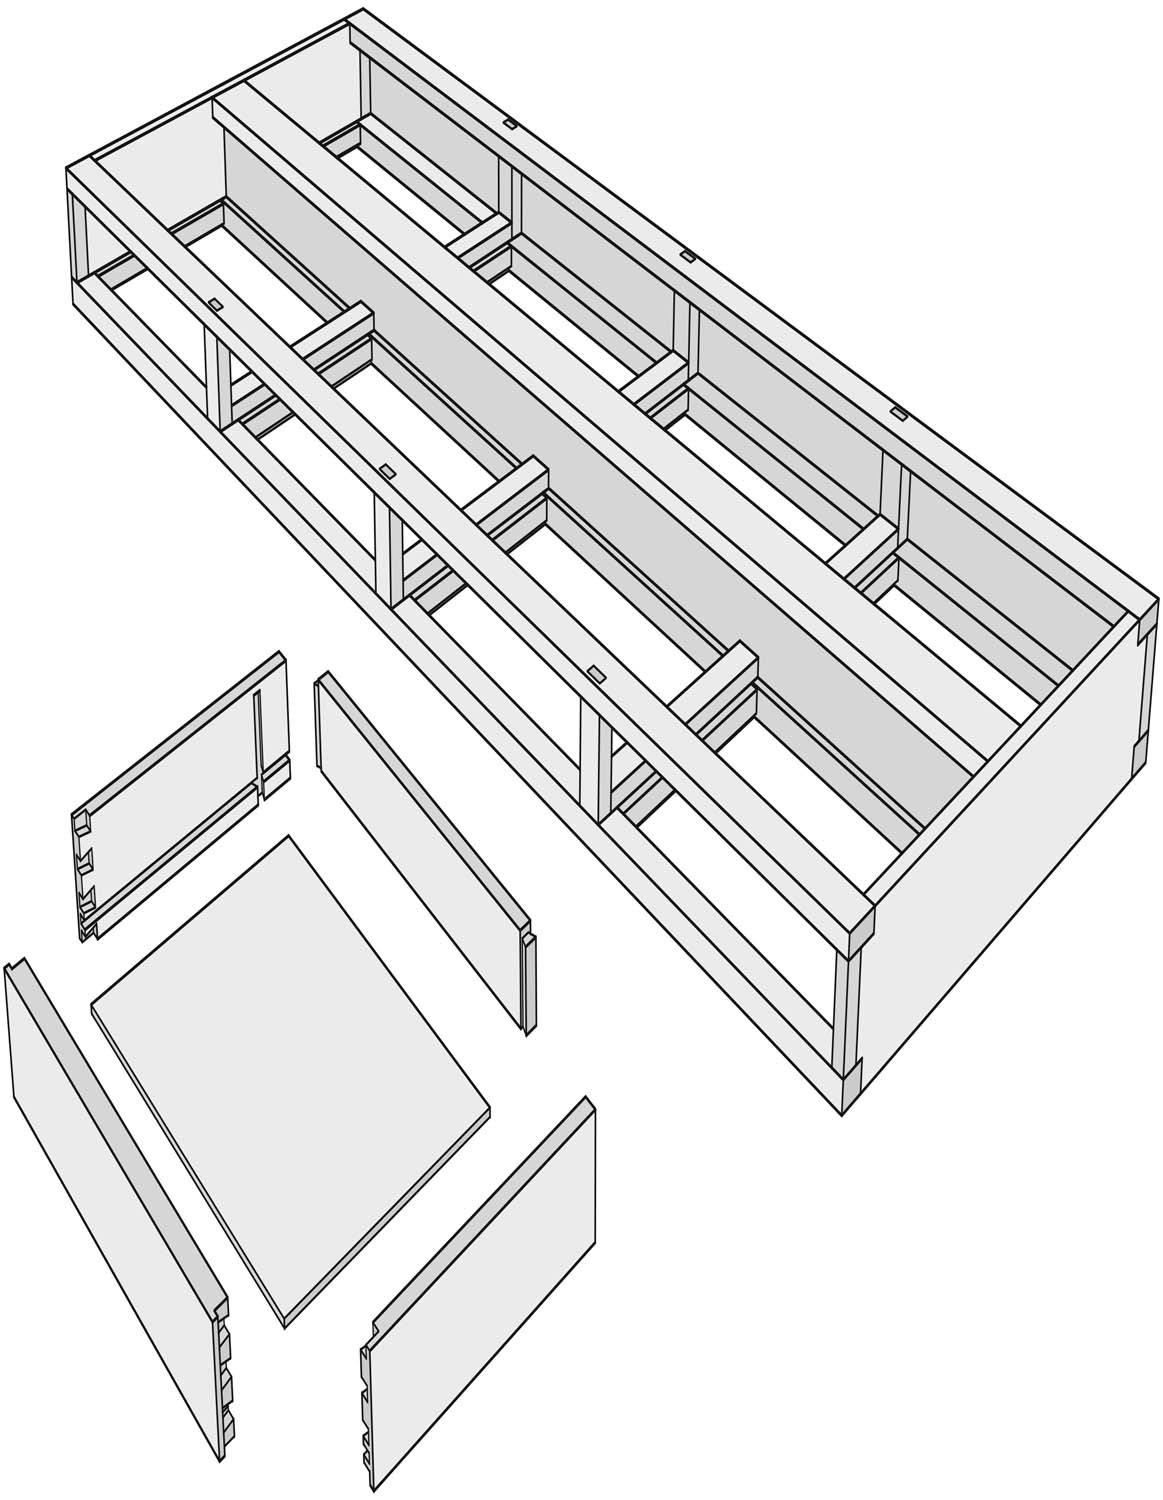
Exploded View

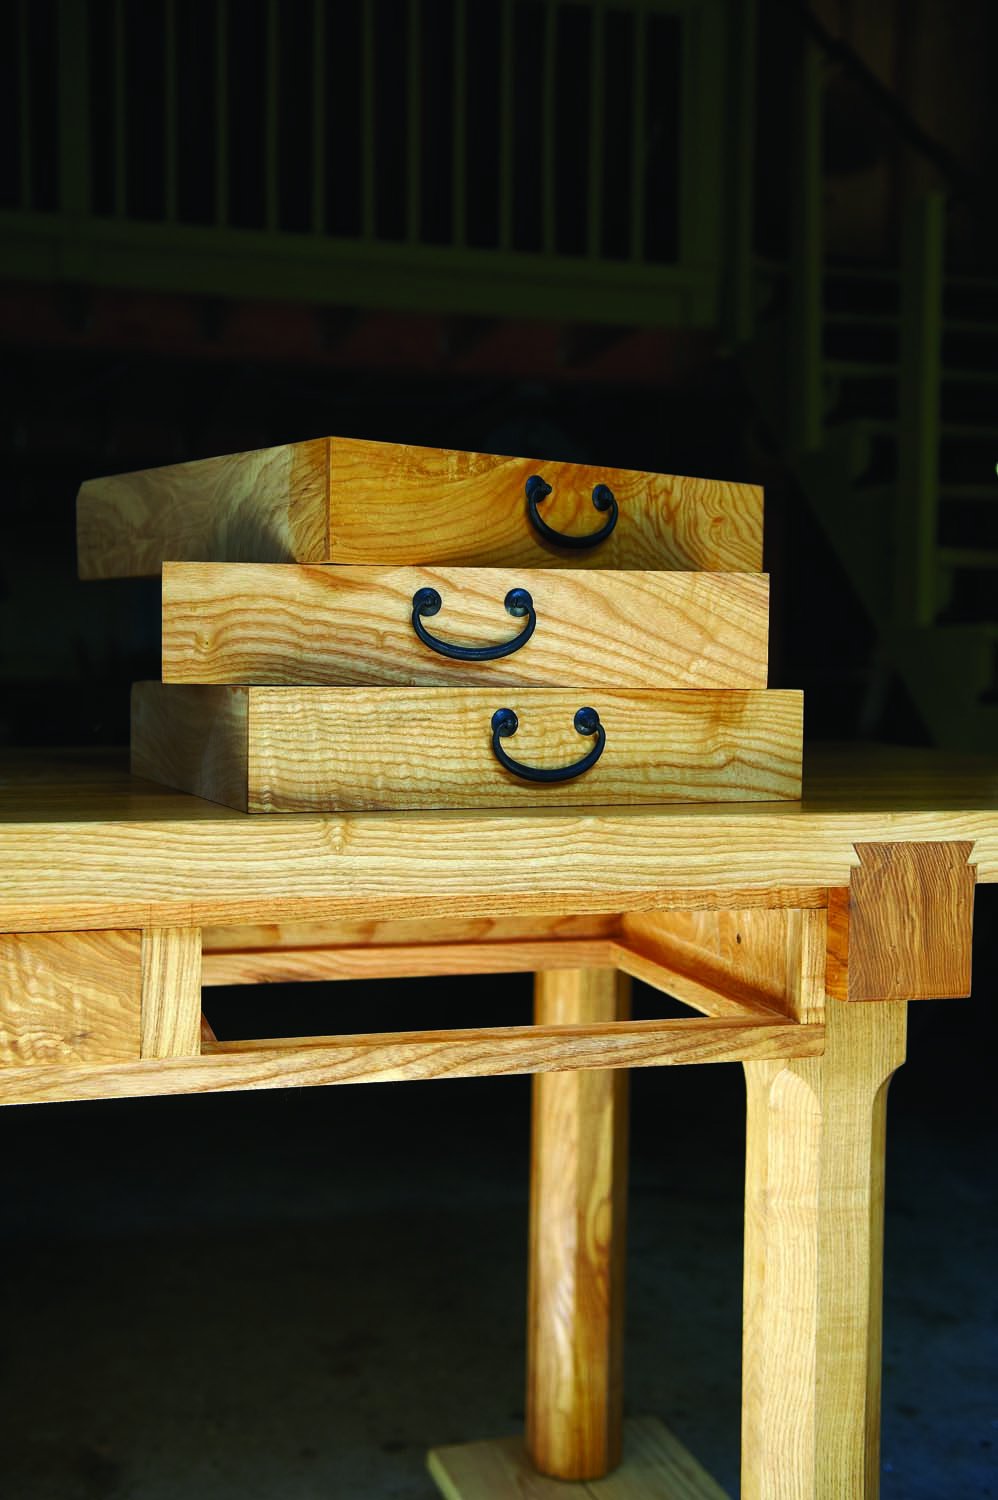
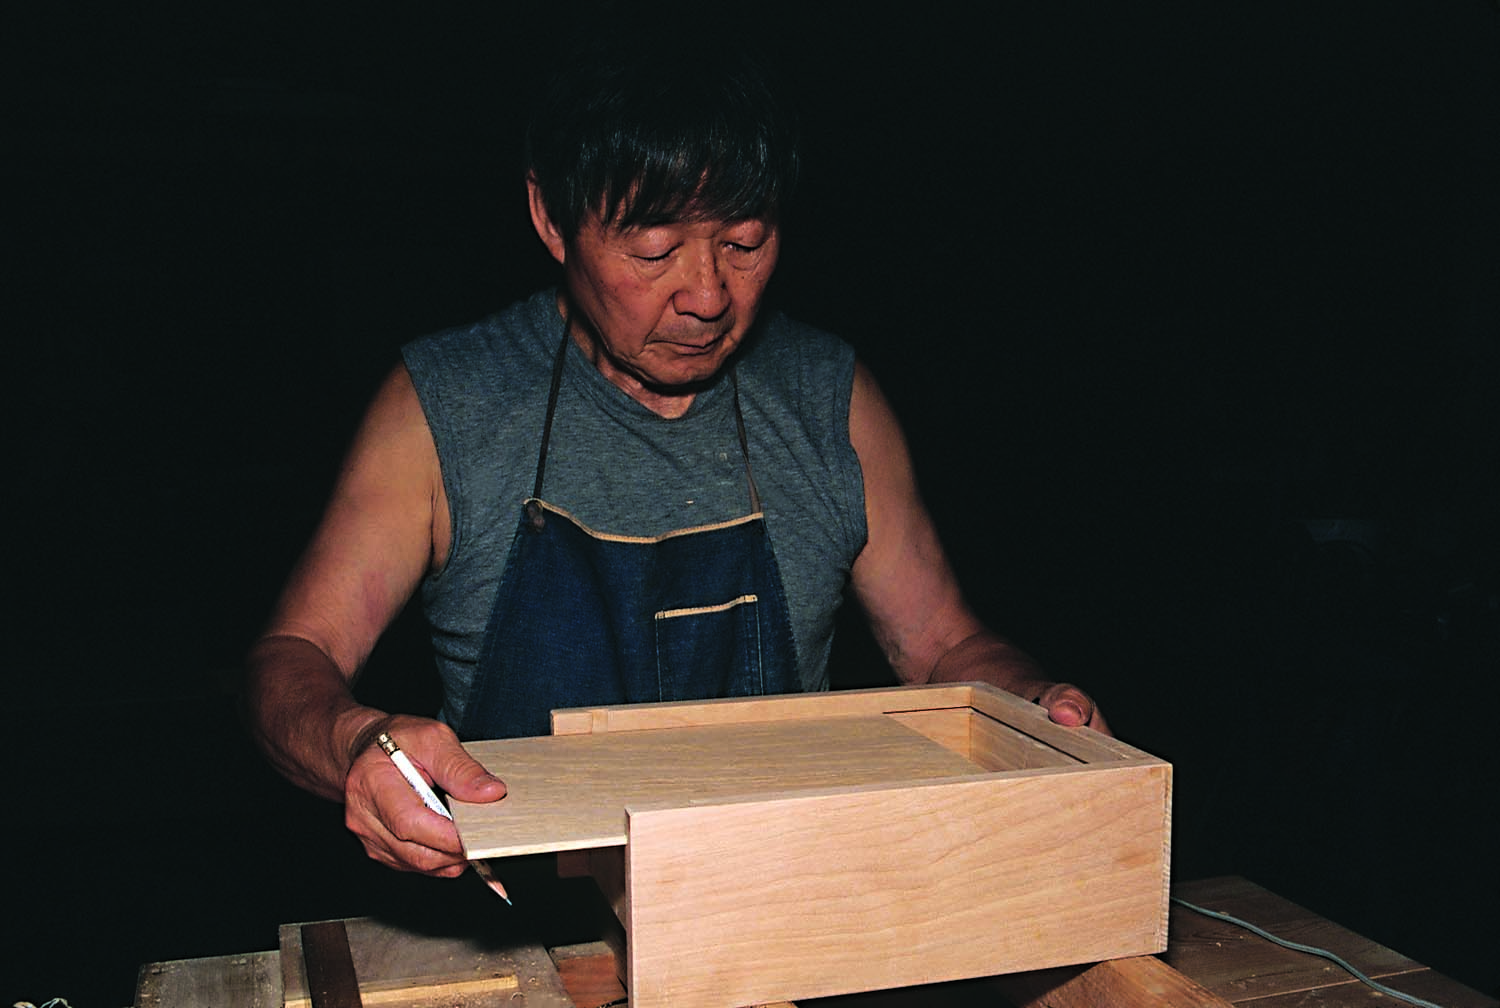
On to the Drawers
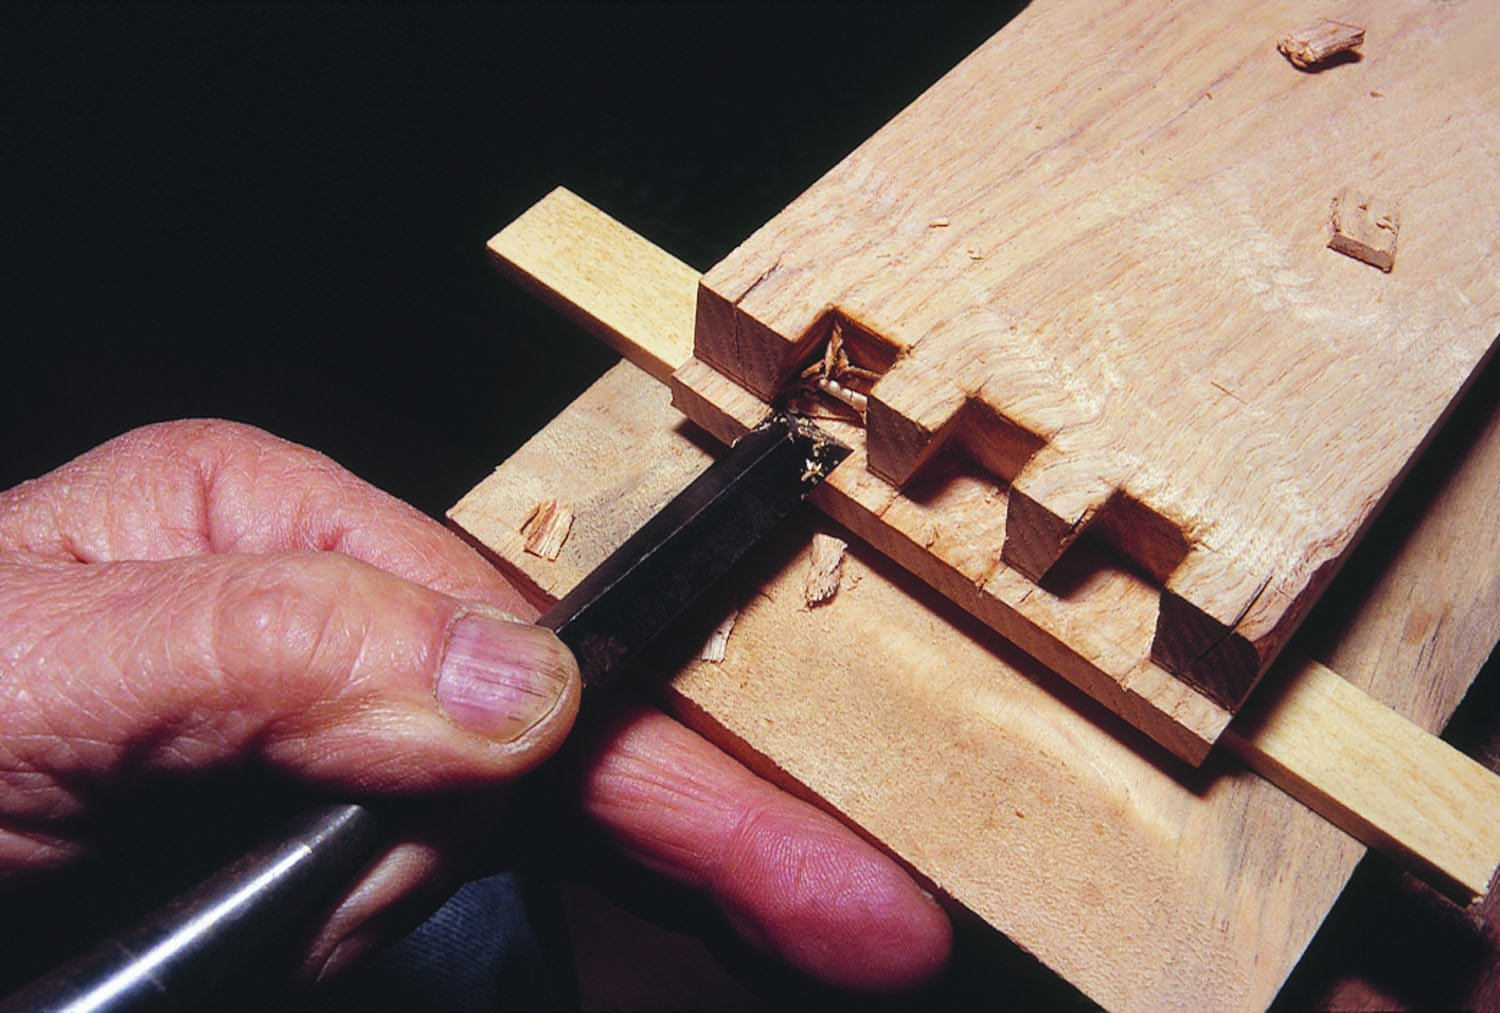
For these drawers, I decided to use hidden dovetails. Hidden dovetail joints for dining table drawers? One might consider this overkill. However, I have good reasons.
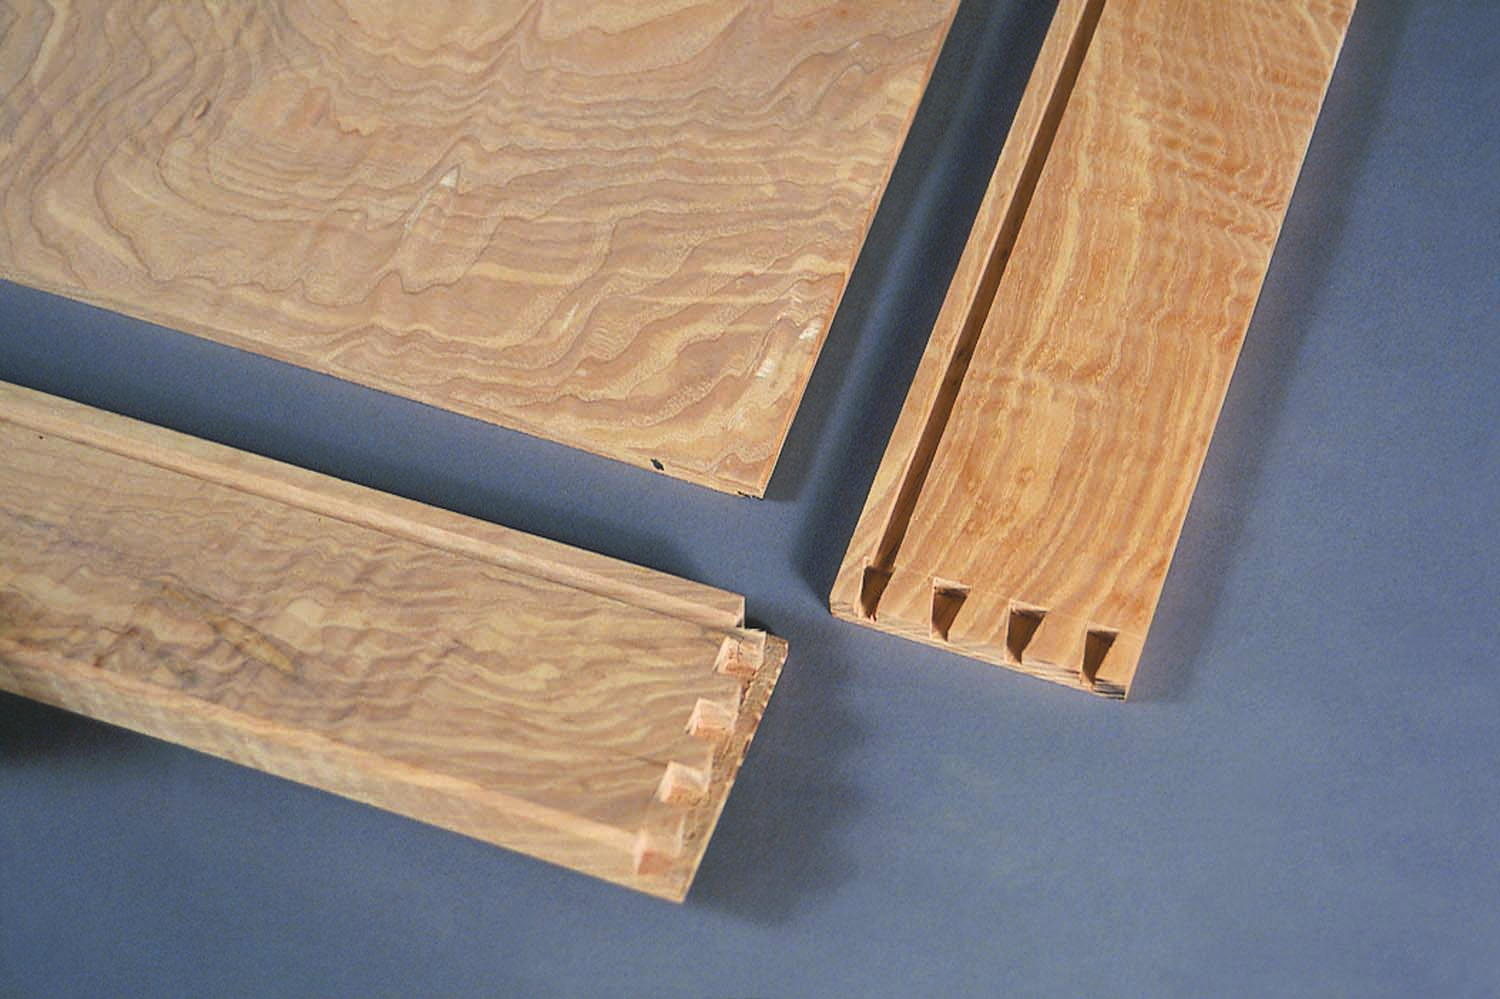
Here’s the difference. Take a close look at the drawer sides. The tails of the sides are not through-cut, so when the sides join to the drawer fronts, the fit is flush to the edge of the fronts.
First, Japanese woodworkers usually hide joints. For example, they mostly use blind mortises for interior work (although they would use through-mortises for an exterior door). Also, they hide intricate corner joints. As a result, only a miter line or shoulder line is visible.
Second, the outward appearance of my new-style drawer (which I think I will mostly make from now on) is similar to a traditional Japanese drawer – it looks like simple rabbet-joint construction, just without the wooden nails.
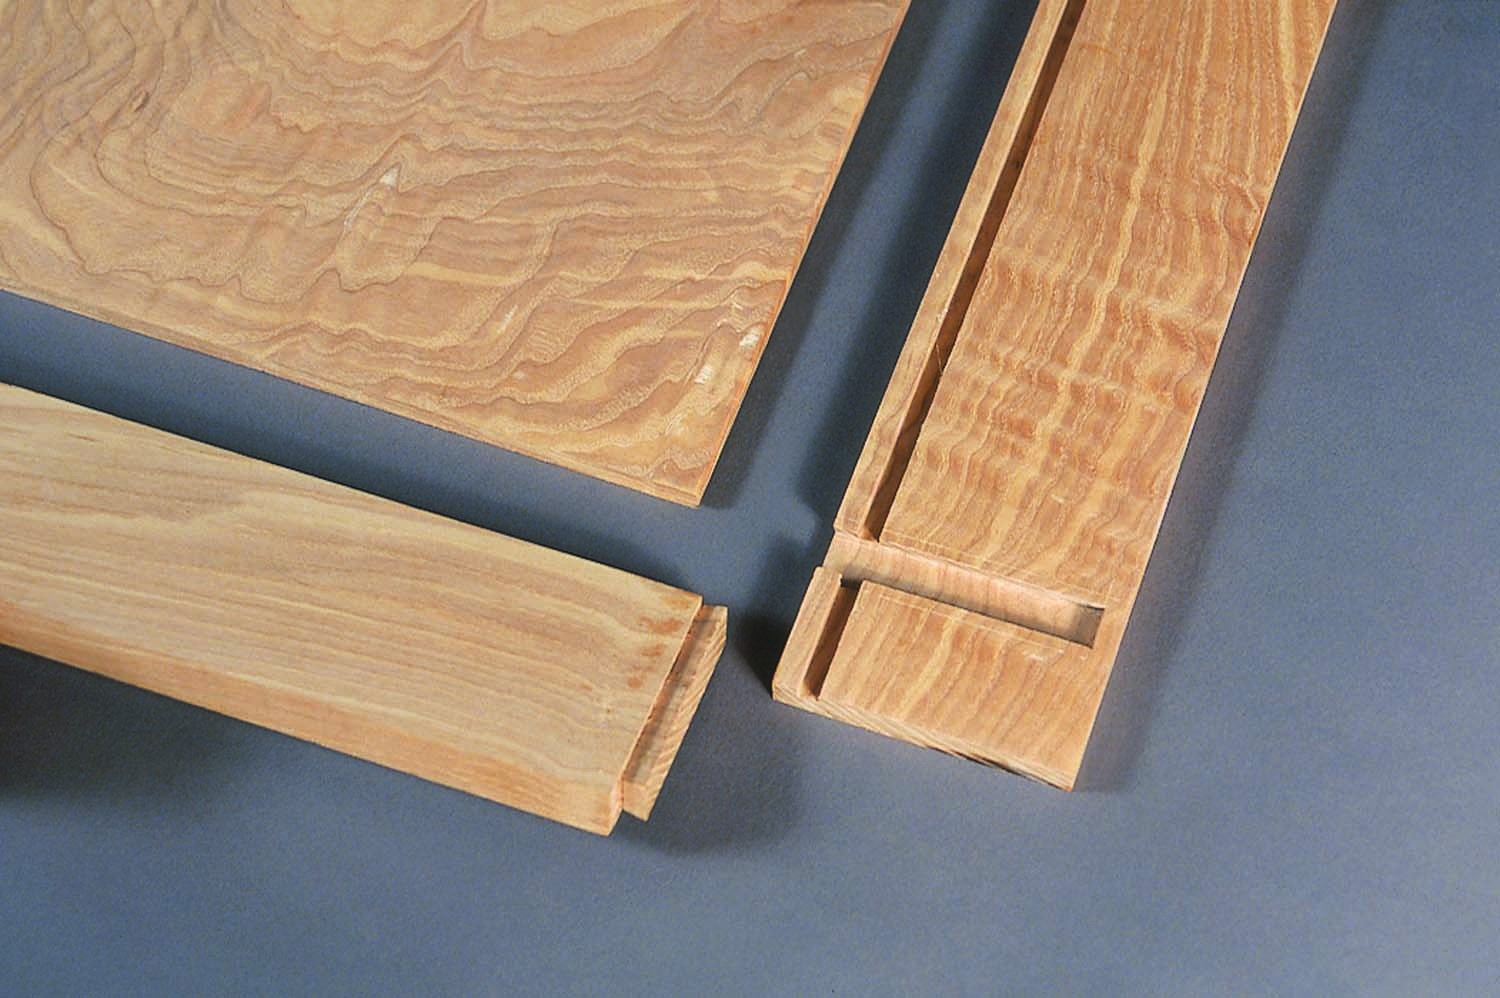
Slide & hide. The rear of the drawer is also a dovetail connection, but it is a sliding joint. The dovetail on the drawer back fits into a stop-cut socket in the drawer side. As a result, the joint appears as a simple butt joint.
The drawer fronts are lipped at the ends and dovetail sockets are cut just as you would see on Western drawers.
It’s the drawer sides that differ. When viewed from the side, there is no visible dovetail. The tails that fit into the sockets are blind, too. It is more detailed work, but the look mimics Japanese construction.
Boxes are built. Solid wood drawer bottoms adjust with the seasons. Align the grain to run side-to-side and glue the bottom to the drawer front to force any movement toward the back. The bottom has two screws (set in slots to allow movement) to keep the bottom from sagging.
For the drawer back, I also did not want to use nails. I used a sliding dovetail. I notched the leading edge of the tail and slid it into the socket from the bottom – the groove for the drawer bottom is 3⁄8” deep to allow access. The dovetail socket stops about 1⁄4“ from the top edge. In that way, you see only the shoulder line.
The bottom panel’s grain is parallel to the front face of the drawer. The panel is glued into a groove in the drawer front. In the event the panel shrinks, it would do so from the back edge toward the front. I hold this panel with two screws into the drawer back, set into 3⁄8“-long slits to allow the panel to move.
I added two “geta” to each drawer side to protect against wear (see “Geta: A Life Extended” on next page). These are tapered sliding dovetails tapped in from the outside and glued. They are flushed with the outside edge of the drawer side. By sliding the geta in from the outside (with the taper facing the inside), the pieces stay in place if the materials shrink.
Hardware & Finish Completed
After the drawers are constructed, we decide on the hardware design. The design is distinctly Japanese. The pulls feature a traditional installation method. The handle is centered and small holes are drilled for the cotter pin fasteners. Before I install the pulls, a coat of Danish oil was applied to the drawer fronts.
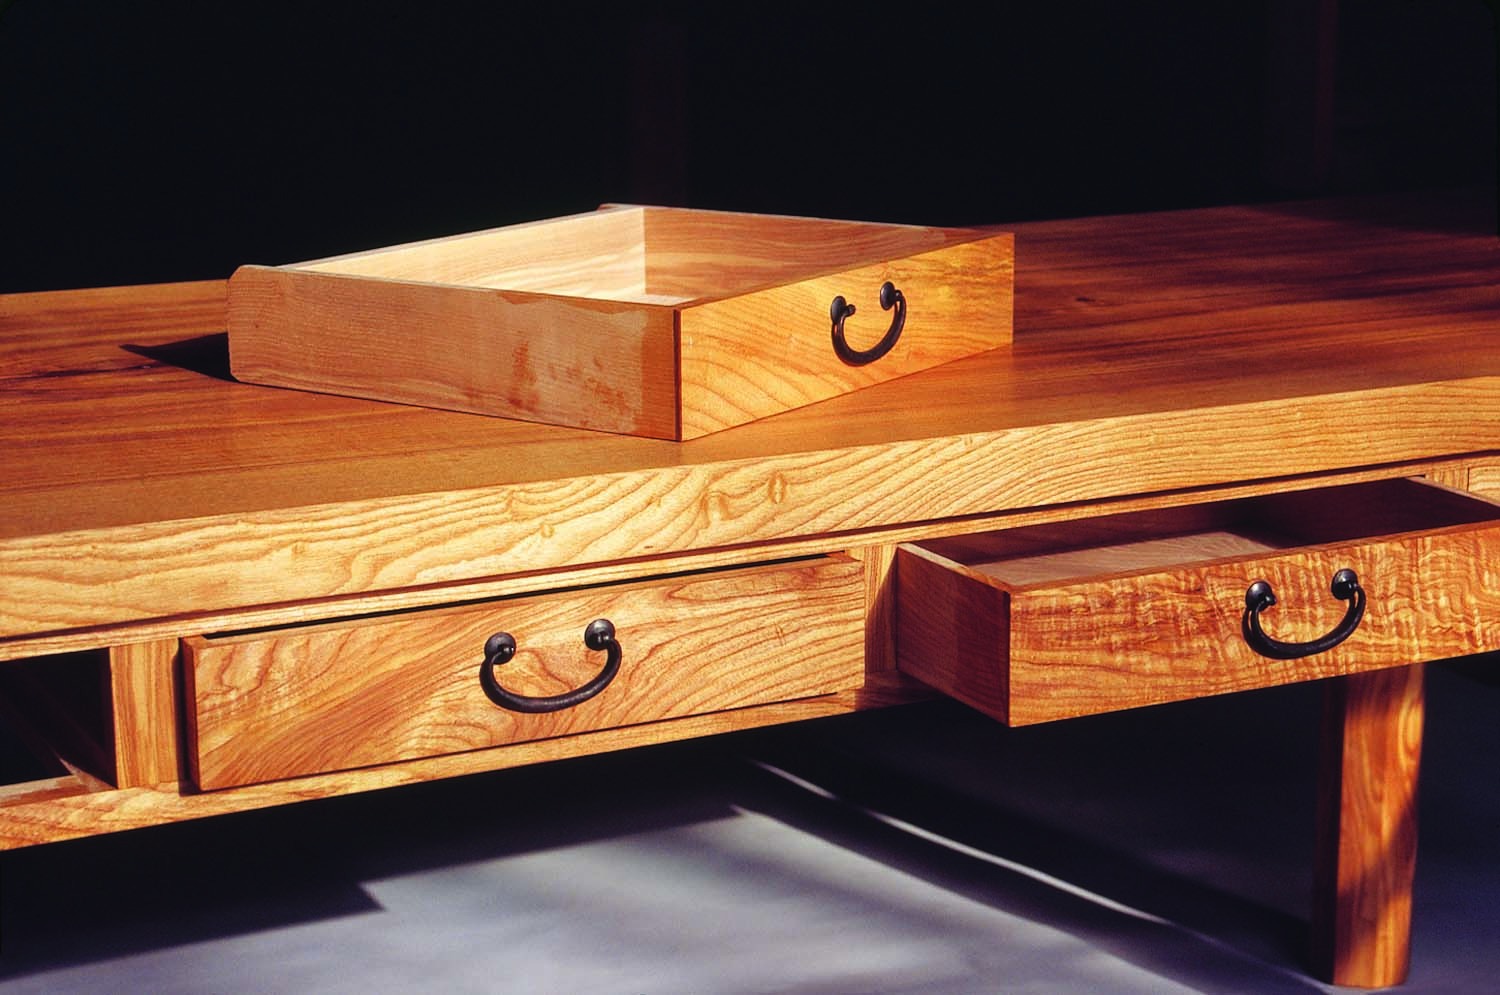
Goodbye concerns. Not only does the drawer frame reduce the potential for the large tabletop to sag, the drawers, with the appearance of Japanese construction and Western joinery, add valuable storage.
With the frame and drawers assembled and ready to use, I don’t worry about the top sagging. The drawer frame adds support, and the drawers are useful. The table remains beautiful and elegant.
Geta: A Life Extended
After studying sliding doors in Japanese furniture, I considered how to use geta – small dovetailed pieces that reduce wear in door rails – in drawer construction.
This drawer construction technique is a new idea. The pieces are easy to make and once installed, they increase the longevity of the drawer sides through reduced wear.
Drawers ride on the geta – made from a denser lumber – and that keeps the sides from wearing prematurely.
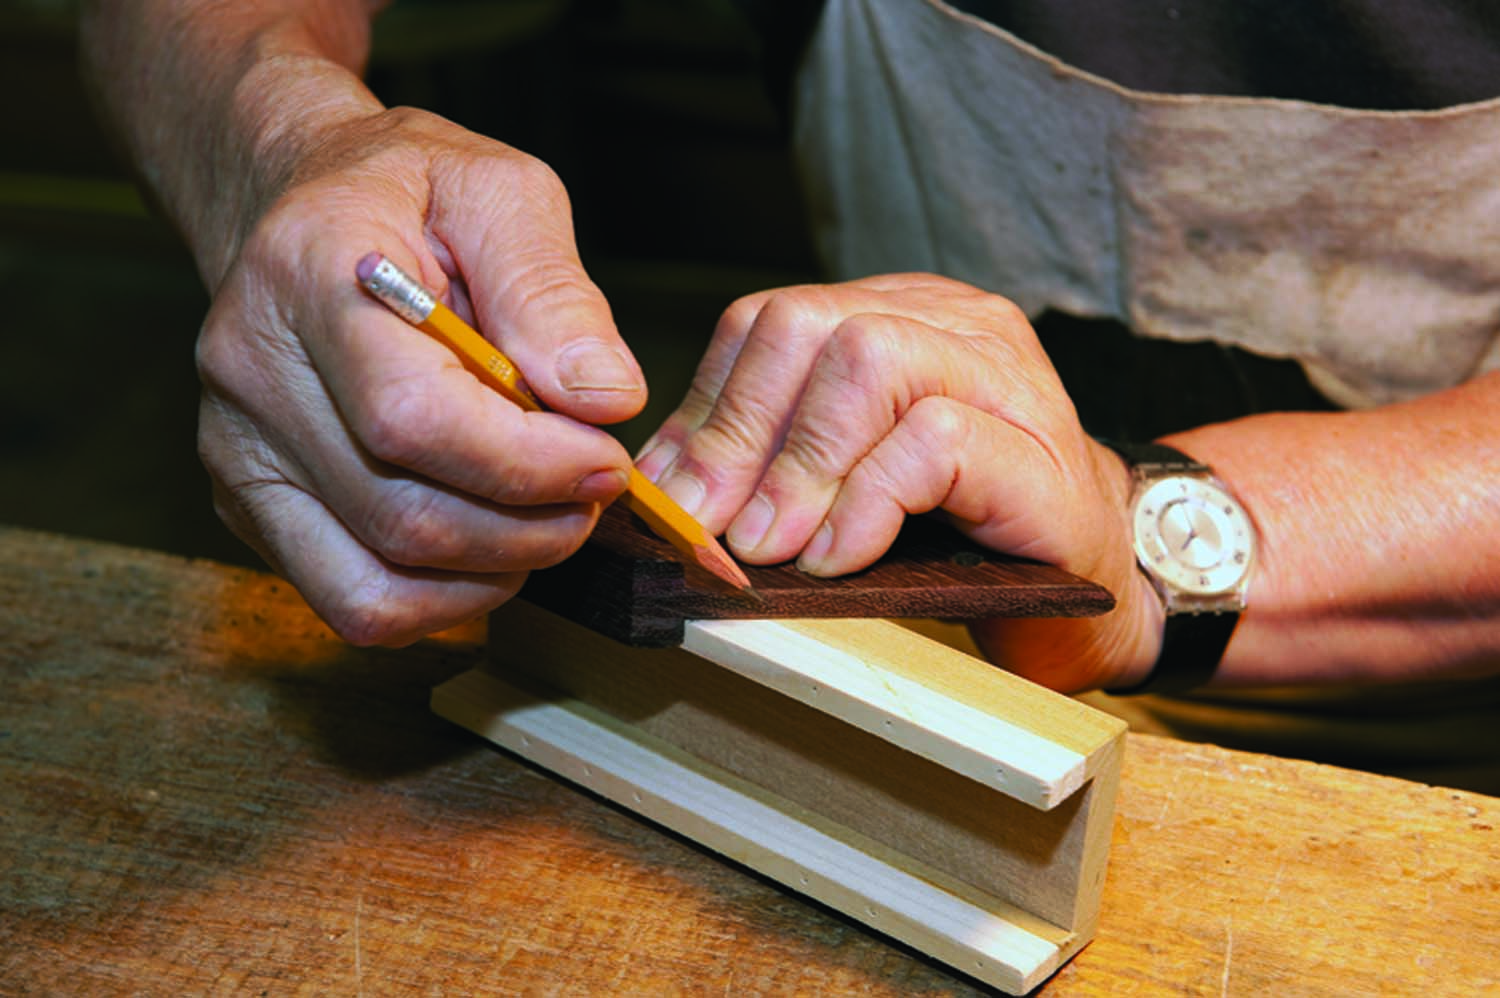
1. Custom miter box. A simple miter box makes sawing the geta quick. Clipped small brads act as feet to hold the jig in place.
2. Repetitive cuts. With the saw kerf made to the layout line, it’s easy to produce the needed number of geta, four per drawer.
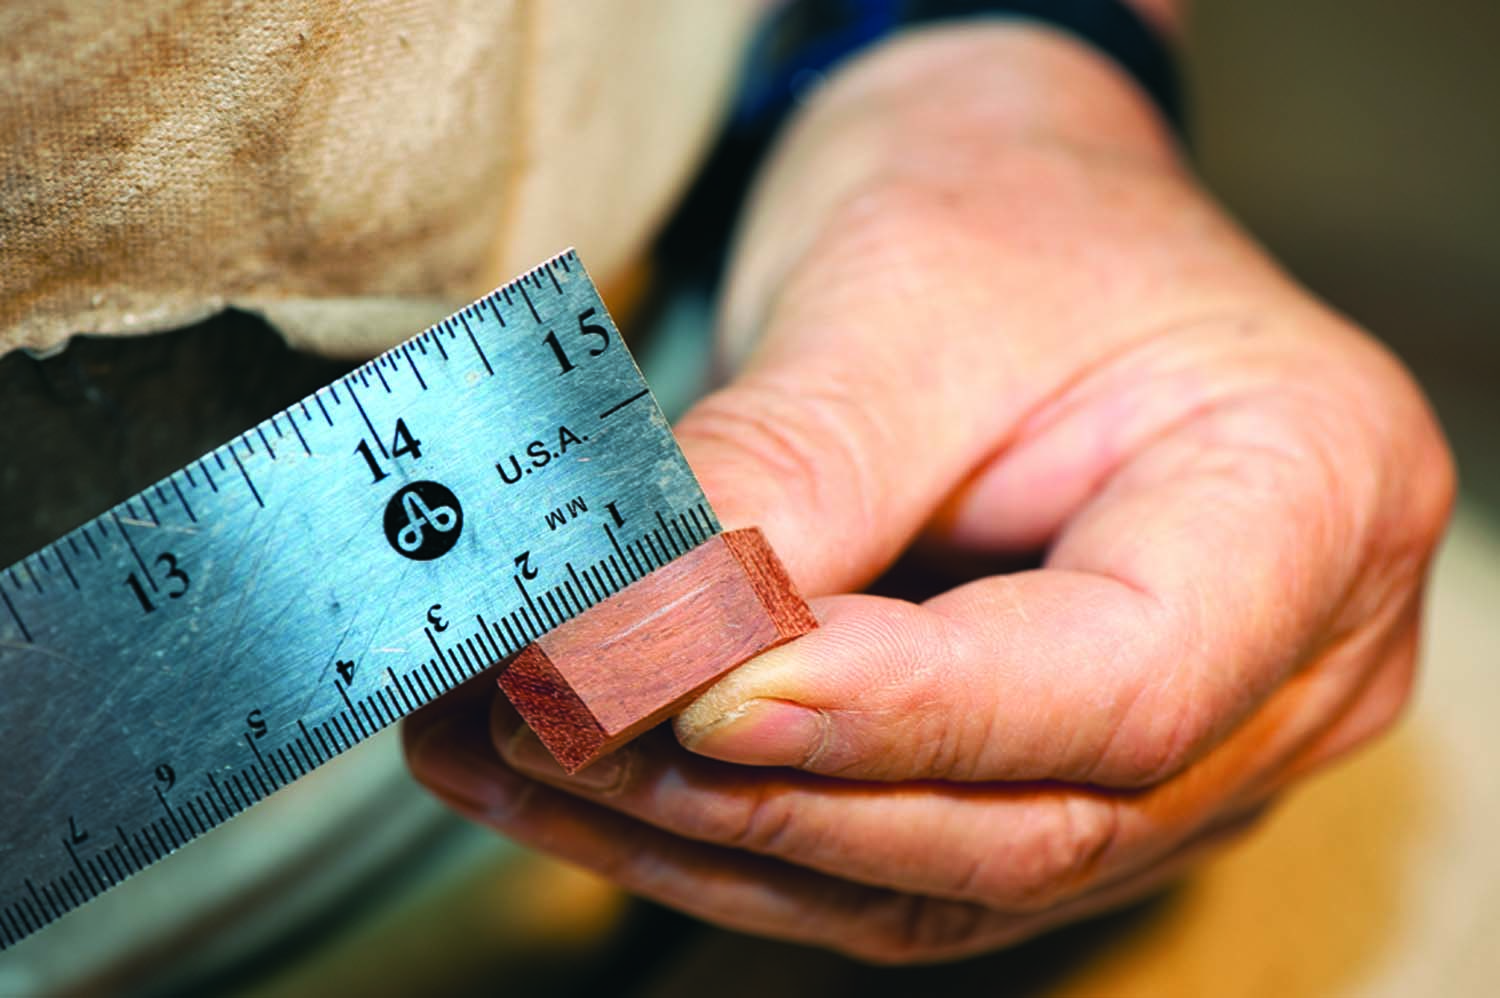
3. Consistency is best. Set up and cut the pieces close in size. While it’s not necessary to get them exact, large variations within the drawer would become apparent.
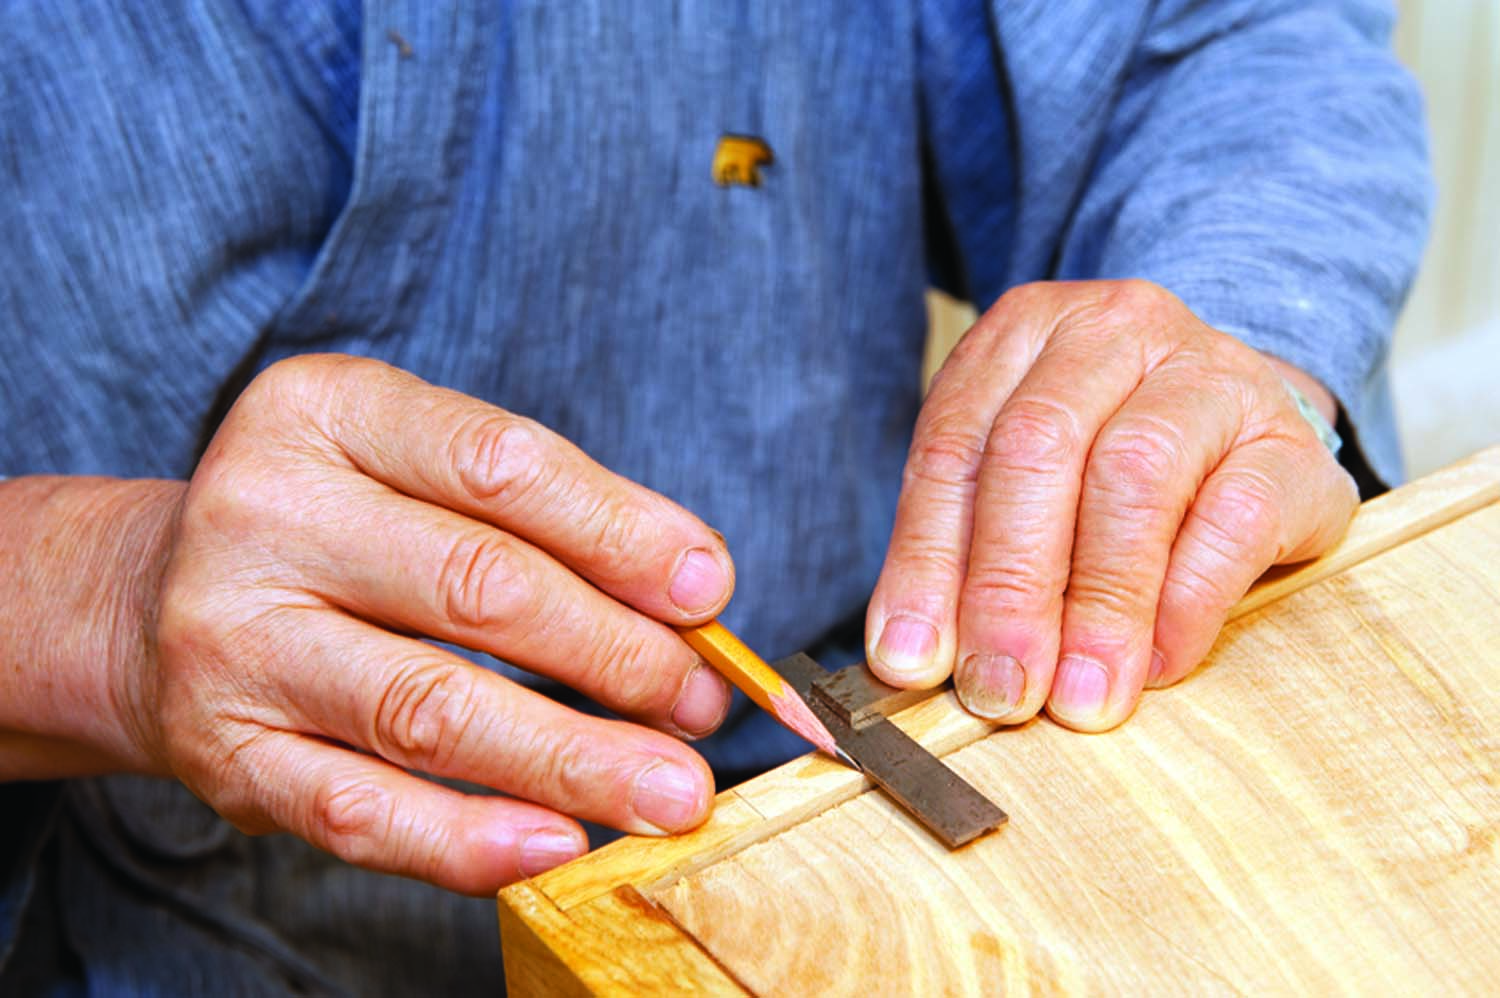
4. Accuracy counts. Because the individual pieces may vary in length, it’s best to mark each socket using the geta that is to fit the socket. Square the lines across the drawer sides.
5. A second jig. Use the miter box to make a layout jig. Due to the number of lines needed, a jig increases your accuracy as you transfer the lines to the drawer side faces.
6. Proper planning. It is easier to saw the sockets (taper pointing toward the drawer inside) without the drawer bottom in position. However, I developed the idea after the drawer boxes were completed. I also would change the location for the drawer bottom groove to provide for a thicker geta if I were beginning the drawer construction process.
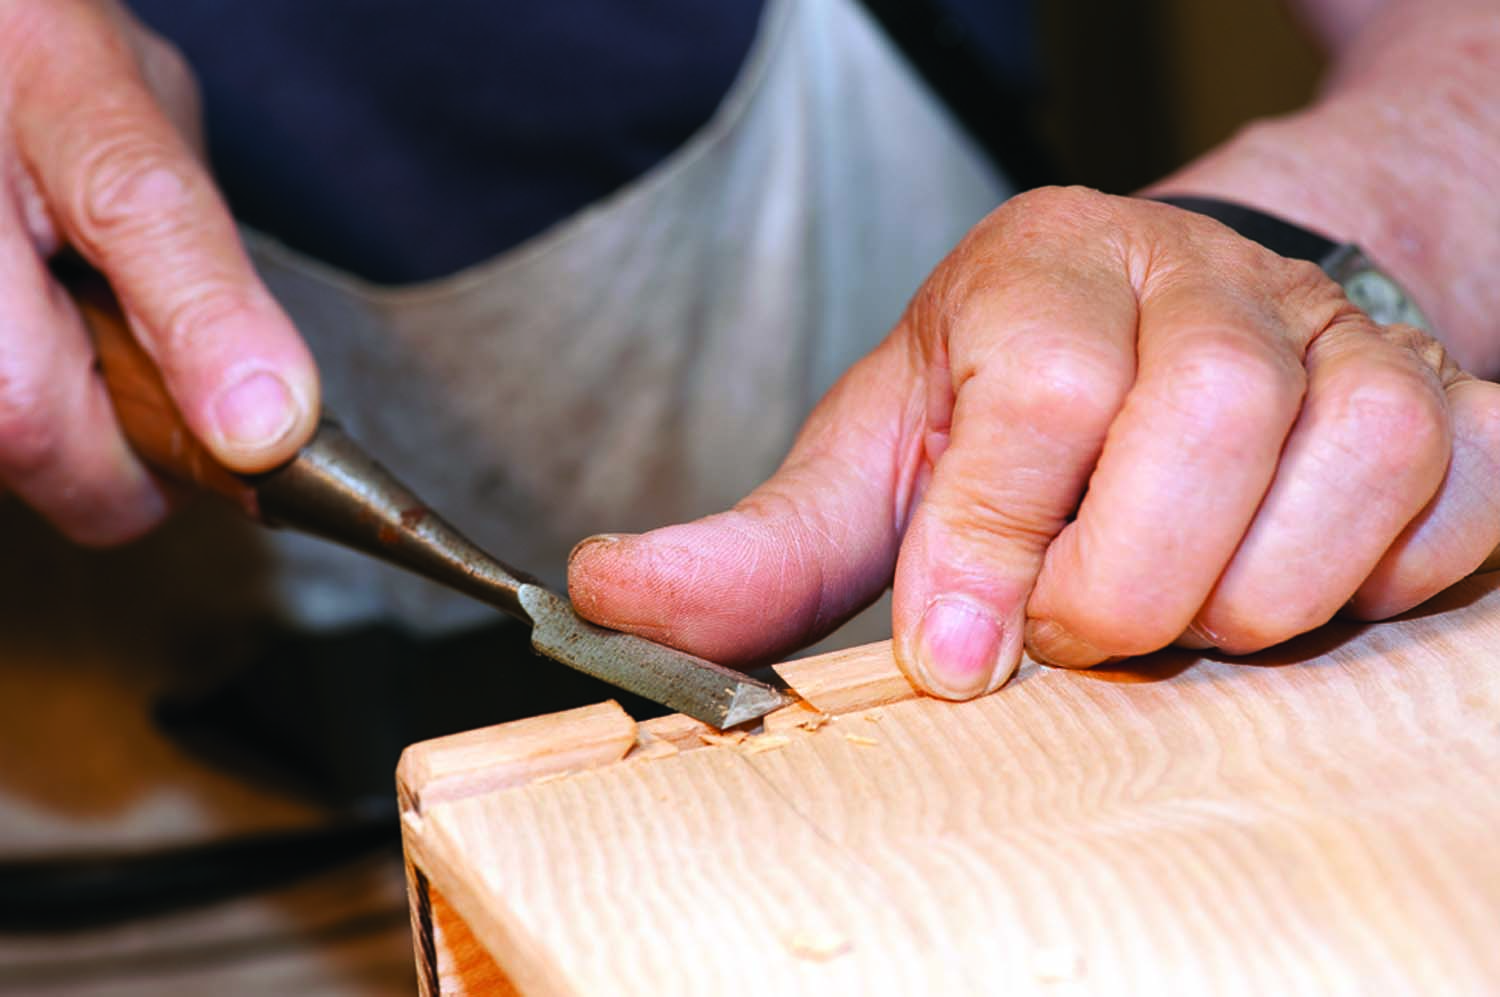
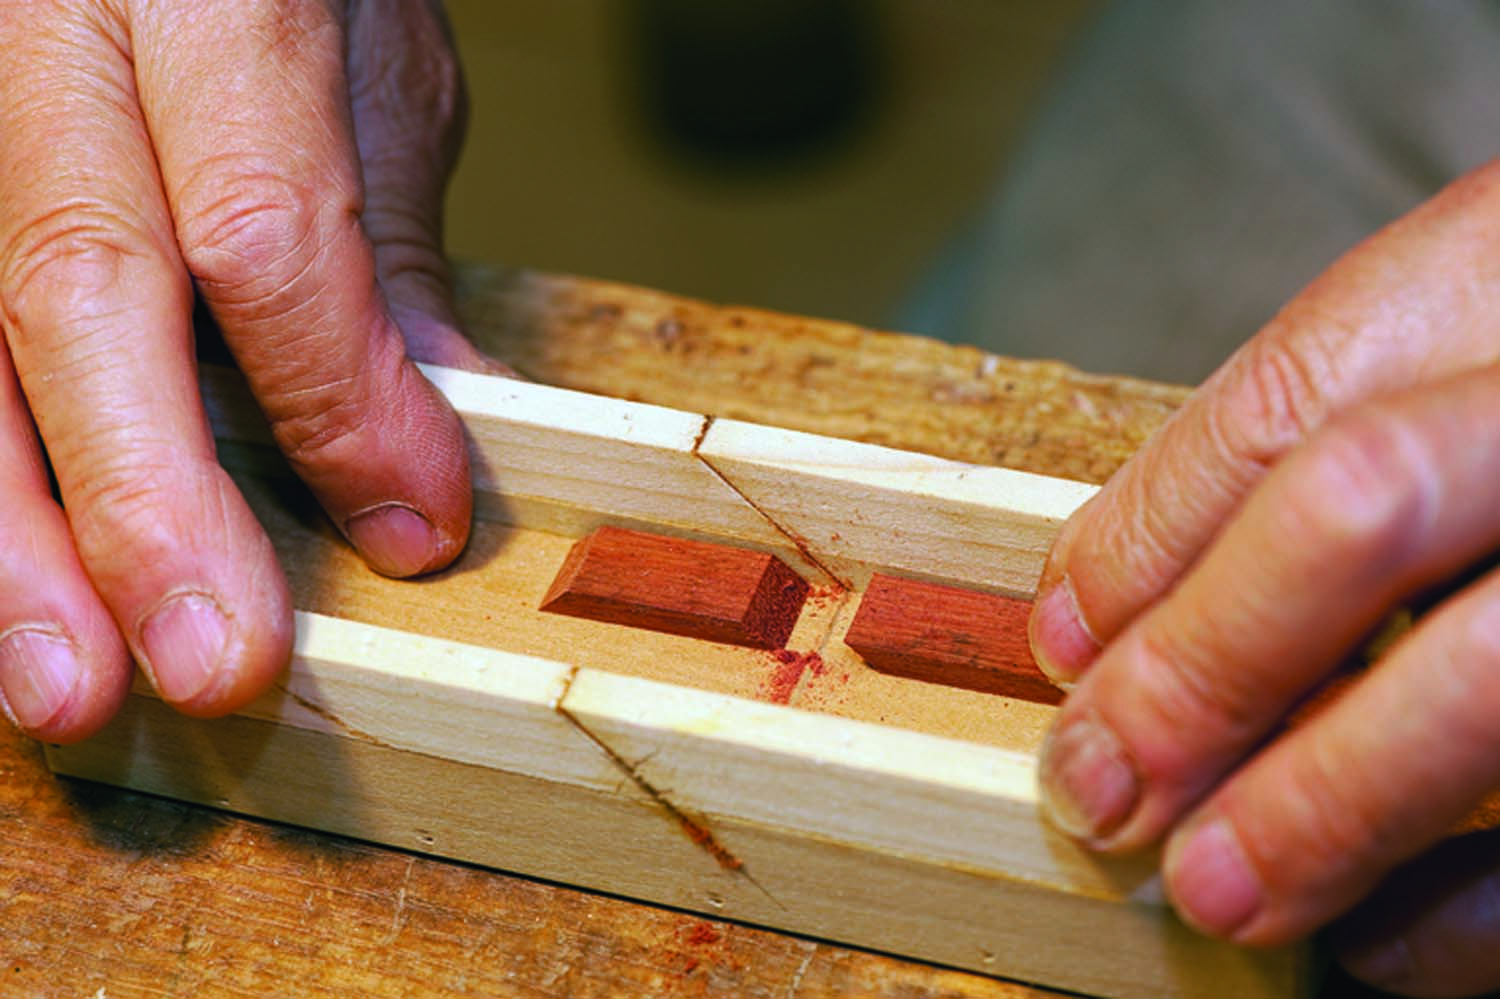
7. Opening the socket. Careful paring with your chisel opens the socket. Check the fit of the geta often to achieve a snug fit.
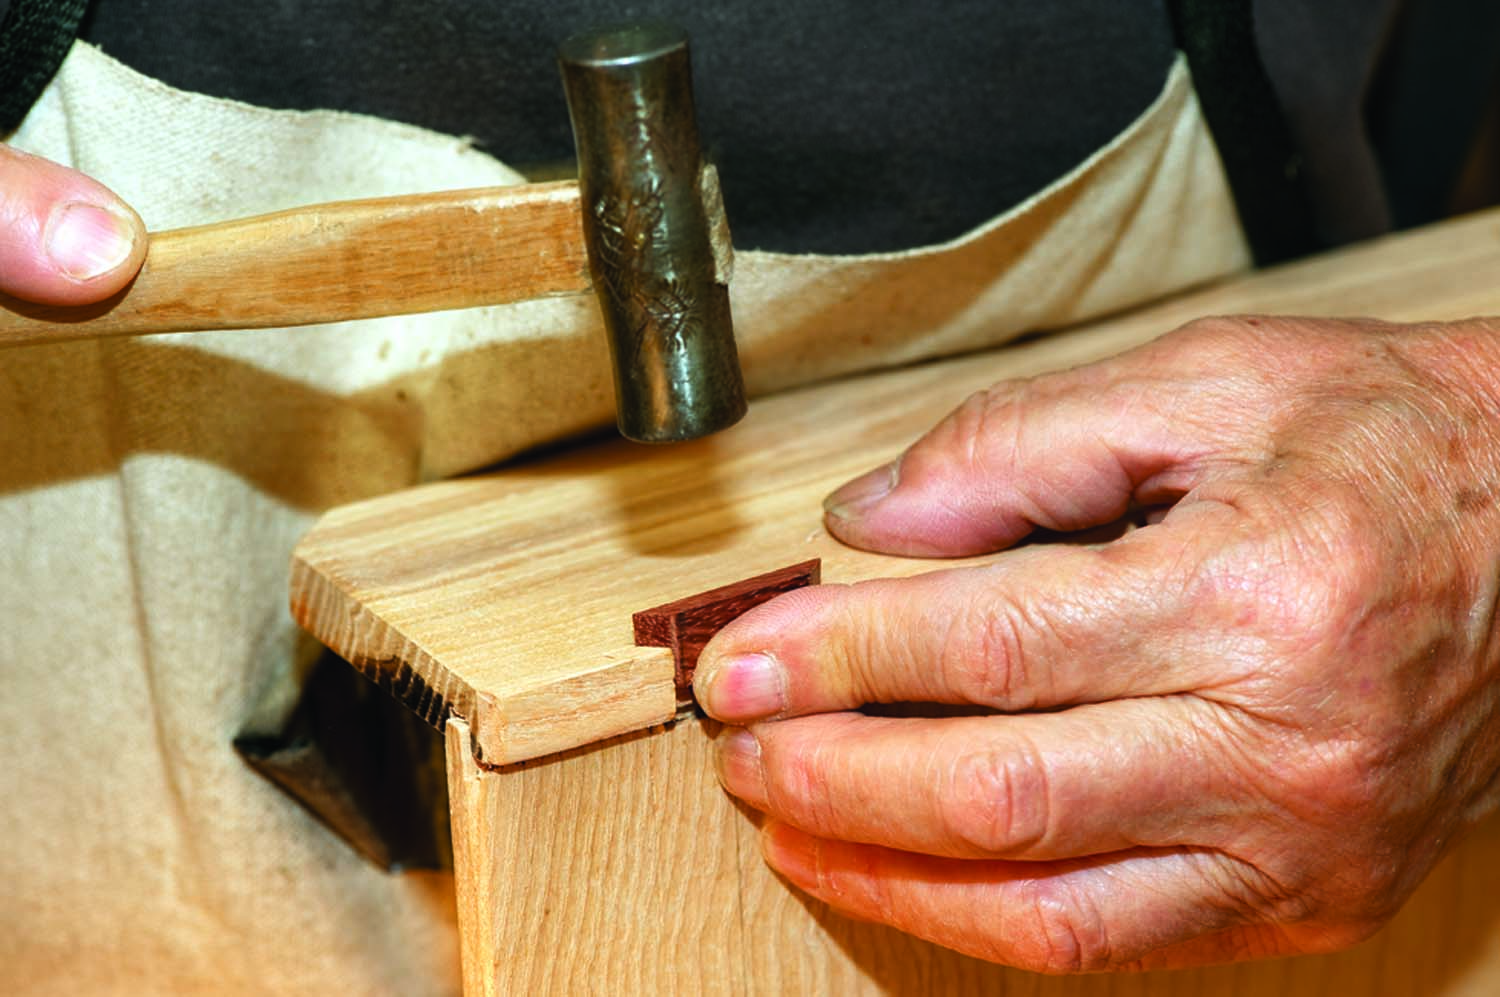
8. Assembly. Add glue before seating the tight-fitting geta into the drawer side. Installed from the outside face, the geta stays put even if the drawer parts shrink.
9. Installation is complete. The relationship of the geta to the drawer box is shown here. Because they are made from lumber that is more hard-wearing than the drawer sides, this small addition allows the drawer to function properly for a longer period of time.
Mr. Ash
People don’t like to cut down a tree, especially an old one. Owners devise ways to keep the tree from falling. Eventually, if the tree dies or becomes hazardous, people agree to cut it down.
Small branches are chipped; thicker branches become firewood. However, most people, because of the respect for its age, size, or because the tree carries memories, want something special done with the main part of the tree.
As a youth, I was taught to respect a tree as material for woodworking. Occasionally, people would call and say, “I have just cut down a large tree. It would be a shame to cut it up for firewood. If you can use it, you can have it.” They wish to preserve the spiritual and physical richness of the old tree.
I have heard the story and history of many trees and have developed an attitude toward the aging of an old tree. I imagine their knowledge, experience, wisdom, character and dignity. Anything that I make from them, no matter whether it is something large or small, is done with the greatest deliberation and attention.
Some time ago, I met with a man to look at an ash tree that had fallen during a storm. The large ash tree was lying quietly, and already many kinds of bushes were blanketing its surface. The tree weighed several tons – as it fell, it must have shaken the entire forest. When it fell, part of the forest floor was ripped, leaving a giant scar on the ground. The tree appeared to have been peacefully sleeping on the forest floor for centuries.
The bark looked very healthy; on it many vines were clinging tightly. About 20′ up from the roots a large branch stretched out to the left, and almost immediately thereafter another branch directed my eye up to the right. I call it a branch, but it was almost 30″ in diameter. The midsection of the tree was easily 5′ in diameter. I estimated it was 250 years old.
The lower portion of the tree was rotten and its underside had little bark. I suspected that side had no usable wood.
I examined the tree a little longer. Finally, I climbed on it and walked toward the end. I felt as if I were crossing a large log bridge above a deep valley. I could not see the ground. Overwhelmed by its mass and long life with hidden knowledge and wisdom, I decided to name the tree Mr. Ash. I felt a strong urge to preserve all of its character and dignity. I would make as many things as I could, large and small, while celebrating this tree with joy. The Magobei’s dining table is from this ash tree.
Video: Learn to calculate the sizes of the drawer needed for your project.
Here are some supplies and tools we find essential in our everyday work around the shop. We may receive a commission from sales referred by our links; however, we have carefully selected these products for their usefulness and quality.