


We may receive a commission when you use our affiliate links. However, this does not impact our recommendations.
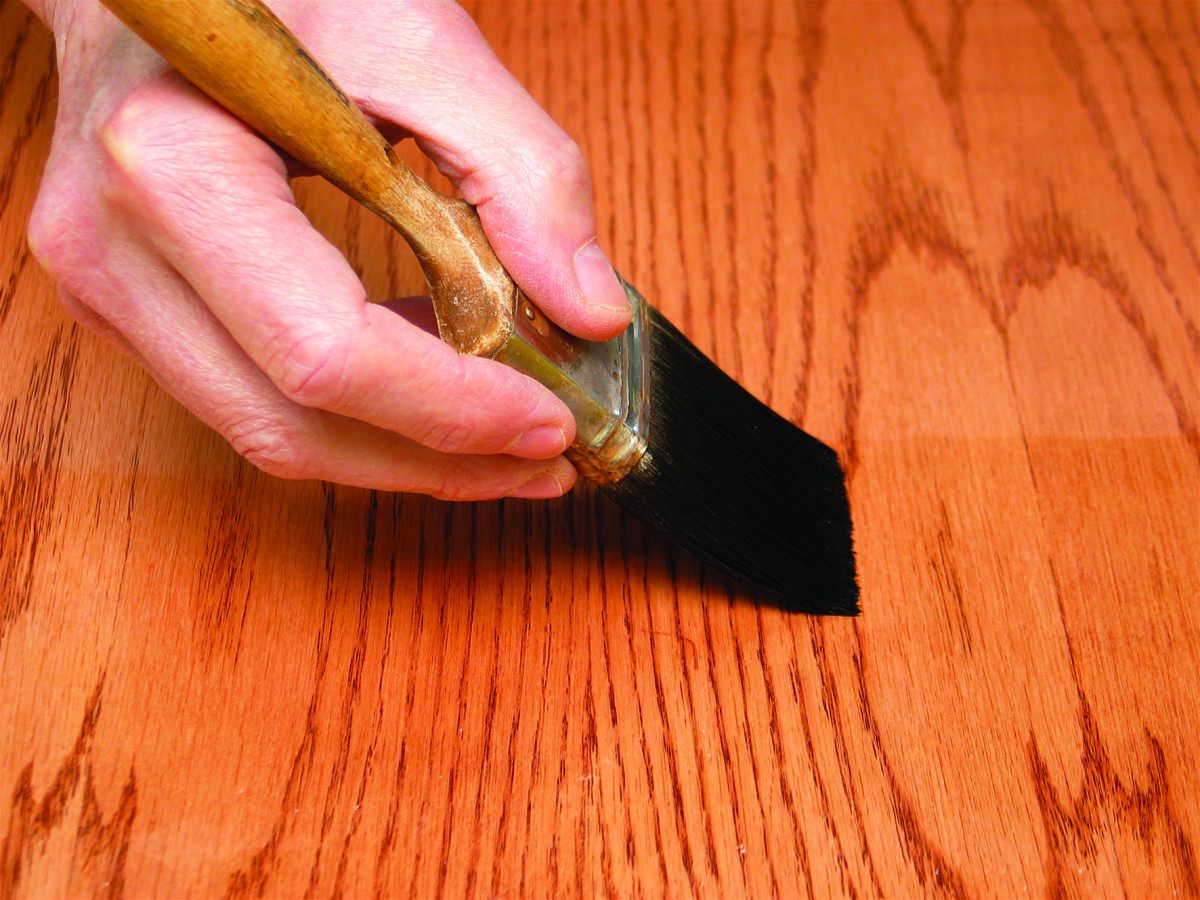
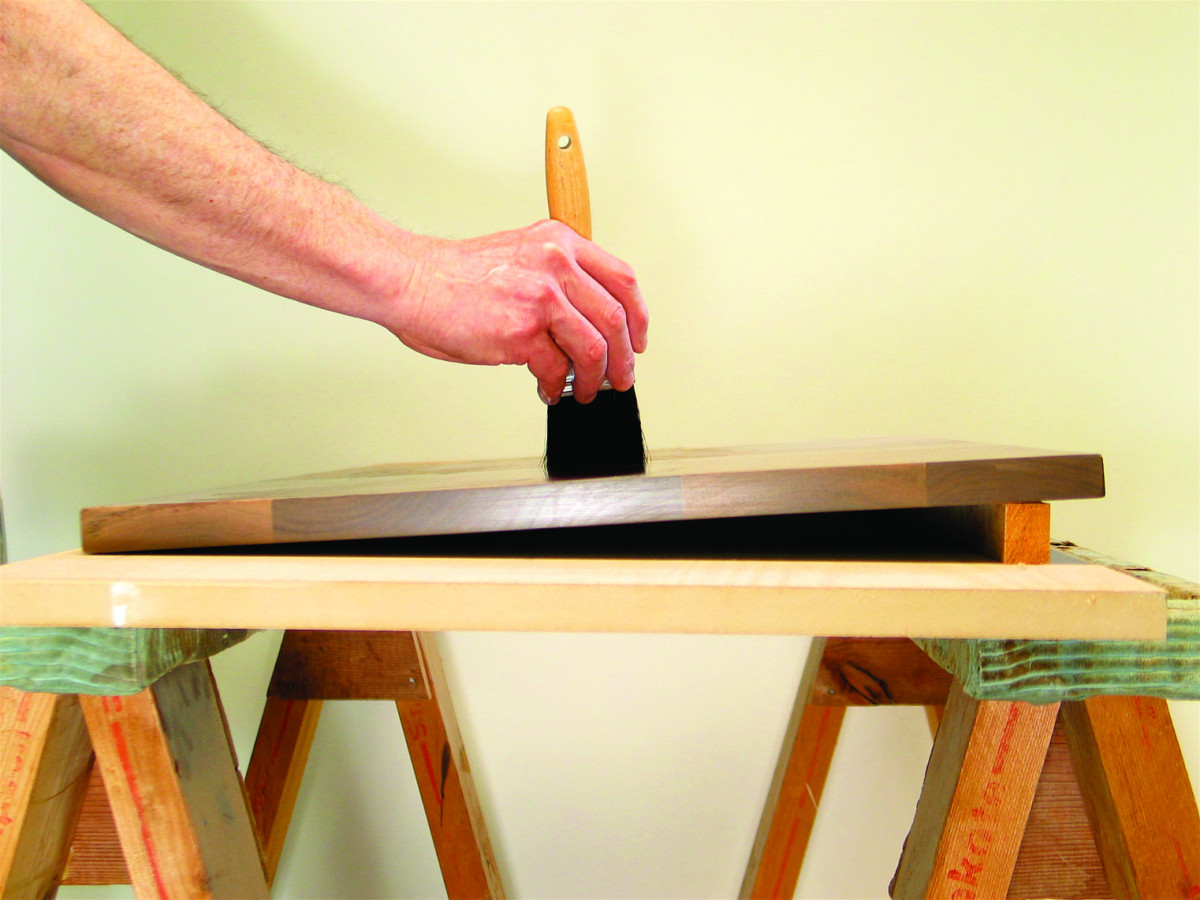
No advantage. It’s not necessary to brush across the grain, as I’m demonstrating here, to work the finish into the wood. The finish penetrates perfectly well by capillary action no matter how it is applied.
Oft-repeated ‘rules’ that are, quite simply, wrong.
All levels of finishing are burdened with myths, but the types of finishes used by amateurs and sold in home centers and woodworking stores suffer the most. Myths about polyurethane are a good example of the problem.
What is Polyurethane?
Oil-based polyurethane is simply a type of varnish. It’s common alkyd varnish made with some polyurethane resin added. Alkyd is the resin used in almost all varnishes and oil-based paints. The polyurethane resin adds scratch, heat, solvent and water resistance to the alkyd varnish.
Pure polyurethanes (with no alkyd resin) are always two-part products. They cure in several ways: With the addition of moisture (an example is Gorilla Glue), with heat (many common plastics), or they are packaged as two separate components that cure after they are mixed (similar to the way two-component epoxy adhesives work).
The two-component polyurethanes are becoming more common in the furniture industry because they perform well and have a very high solids content, meaning less solvent to escape into the atmosphere.
One-component, “uralkyd” polyurethane has become so dominant in the woodworking and home-consumer world that it’s now becoming somewhat difficult to even find old-fashioned alkyd varnish.
Confusion has been added in the last decade or so with the introduction of water-based finishes, some of which combine polyurethane with acrylic resins. These finishes are sometimes labeled “polyurethane,” with no obvious reference to their being an entirely different class of finish, one that performs less well than oil-based polyurethane and has very different application characteristics.
This isn’t to say you shouldn’t use water-based polyurethane. Just be aware that it is an entirely different finish – a water-based finish. This article deals solely with oil-based polyurethane.
The Myths
Myths are much more prevalent in finishing than in woodworking because finishes are chemistry, and you can’t always “see” differences in chemistry. For example, polyurethane and lacquer look the same, both in a can and on the wood, even though they have very different characteristics.
In contrast, woodworking is physics. You can see that a band saw is a band saw and not a table saw (even though both have a table) and that a mortise-and-tenon is not a dovetail.
So authors and manufacturers have much more opportunity to provide inaccurate information, intentionally or not, about finishes than about woodworking tools and procedures. And consumers are more vulnerable to misinformation – that is, “myths” – about finishing than about woodworking.
Once a myth gets into print, it’s common for it to be repeated endlessly until it becomes “fact,” simply because everyone says it. Here are some of the most common myths concerning polyurethane (and varnishes in general).
■ MYTH #1: Brush across the grain first to work the finish into the wood. All finishes soak perfectly adequately into the wood no matter how they are applied. They do this by capillary action, the same physical phenomenon that allows water and nutrients to rise from the ground to the top of a tree.
If it were necessary to brush across the grain first, or diagonal to it (as I’ve also seen advocated) to get the finish to penetrate into the wood, how would a sprayed finish penetrate?
The only benefit gained by brushing first across the grain and then with the grain (to line up the brush strokes with the grain) is to make the thickness of the application more even. But I never have a problem with some areas being noticeably thicker than others anyway.
More important, the longer polyurethane is brushed the more thinner evaporates, and this causes the finish to thicken and brush marks to be more pronounced.
■ MYTH #2: Thin the first coat 50 percent to get a good bond. This is an old myth that probably got its start because of poor understanding of the role of primers used under paint, and sanding sealers sometimes used under varnish and lacquer.
Sanding. Not only does polyurethane not need thinning or a special product to create a better bond to the wood, but it also sands easily on its own without clogging sandpaper.
Primers do create a better bond for paint because they contain a higher ratio of binder (finish) to pigment. But finishes are all binder, so they bond perfectly well without a separate product.
Sanding sealers contain a soap-like lubricant that makes the sanding of the first coat easier and faster, so they are especially useful in production situations. But they weaken the bond of the finish, so unless you’re doing production work, you’re better off not using a sanding sealer.
Polyurethane bonds especially poorly to sanding sealers, so most manufacturers of polyurethane discourage their use. Furthermore, polyurethane sands easily, so there isn’t any need for a sanding sealer.
Nevertheless, the existence of primers and sanding sealers (and the recent addition of “SealCoat,” a dewaxed shellac from Zinsser, marketed for use as a “sealer” under polyurethane) have created a belief among some that something has to be put under the polyurethane to make it bond better.
And those who believe this have come up with the idea of thinning the finish.
In fact, the only benefit gained by thinning is faster drying. The thinner the layer of any finish, the faster it dries, and the sooner it can be sanded and the next coat applied. So there is a benefit, but it’s not improved bonding.
■ MYTH #3: Never shake the can or you’ll introduce bubbles. A corollary is: Never wipe the bristles over the rim of the can because this will also introduce bubbles into the finish.

Bubbles. If you shake a finish vigorously, as I did this jar containing polyurethane (above), thousands of tiny bubbles appear. These can be transferred to the wood by a brush. But bubbles appear on the wood even when you don’t shake the finish because of the turbulence caused by the brush movement, as I’m demonstrating here with polyurethane I didn’t shake (below). So it’s more important to know how to deal with the inevitable bubbles than to follow instructions not to shake.
This is a very old myth that is more “misleading” than “myth” because it’s true but it doesn’t matter. I don’t know when the myth started, but it is so well established that it’s even highlighted in bold letters on the cans of common brands such as Minwax and Olympic polyurethane.
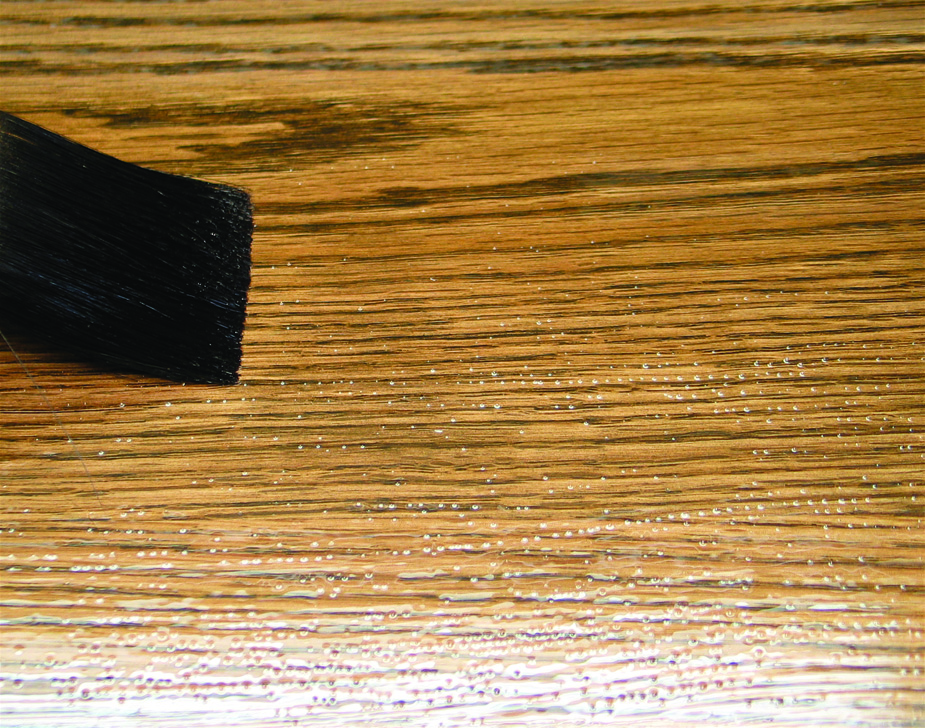 Sure, if you shake the can, bubbles appear in the finish. And if you then brush the finish, bubbles appear in it. But they appear in the brushed finish even if you don’t shake the can. This should be the clue that shaking isn’t the critical factor – brushing is.
If the great majority of bubbles are the result of the turbulence caused by the rapid movement of the brush, the way to avoid bubbles could be to brush very slowly to reduce the turbulence.
The published instruction from one author who suggests doing this is to brush one foot every eight seconds and not brush back over. Try it. It’s almost impossible to brush this slowly. And not brushing back over to stretch out the finish and thin it on the wood – and also line up brush strokes – leads inevitably to runs on vertical surfaces and build-up on horizontal surfaces wherever you set down a finish-loaded brush.
So you’re going to get bubbles if you brush, whether or not you shake the can. The trick is to know how to keep the bubbles from drying in the finish.
Usually, bubbles pop out on their own. But on hot days when the skinning-over occurs faster and traps the bubbles, you may need to help the popping along by “tipping-off” using your brush. Brush lightly back over the finish right after application. (You should do this anyway to line up the brush strokes with the grain.) Most of the bubbles will disappear.
If the tipping-off doesn’t work well enough, add 5 or 10 percent mineral spirits to keep the finish “open” longer and give the bubbles more time to pop out.
Some brands of polyurethane, such as Minwax, bubble noticeably more than others, but this is rarely a problem because the bubbles tend to pop out quickly.
There are two ways to deal with bubbles that won’t pop out. The first is to wipe off the bubbled coat of finish using a rag dampened with mineral spirits, naphtha or turpentine. You can do this for 15 to 30 minutes after application without a problem. You won’t damage the coat underneath, and you don’t have to get all the polyurethane removed. Simply wipe until what is left is smooth and bubble-free.
The second method is to let the bubbled finish dry and sand it level before applying another coat. Thin this coat enough with mineral spirits so the bubbles have time to pop out.
The disservice caused by attributing bubbles to shaking rather than to brushing is that users become frustrated and lose confidence when they follow directions and still don’t avoid the problem.
■ MYTH #4: Thinning with naphtha makes polyurethane dry faster. Naphtha evaporates much faster than mineral spirits or turpentine. So the logic behind this myth, which is fairly new, is that the finish will dry faster if the thinner evaporates faster.
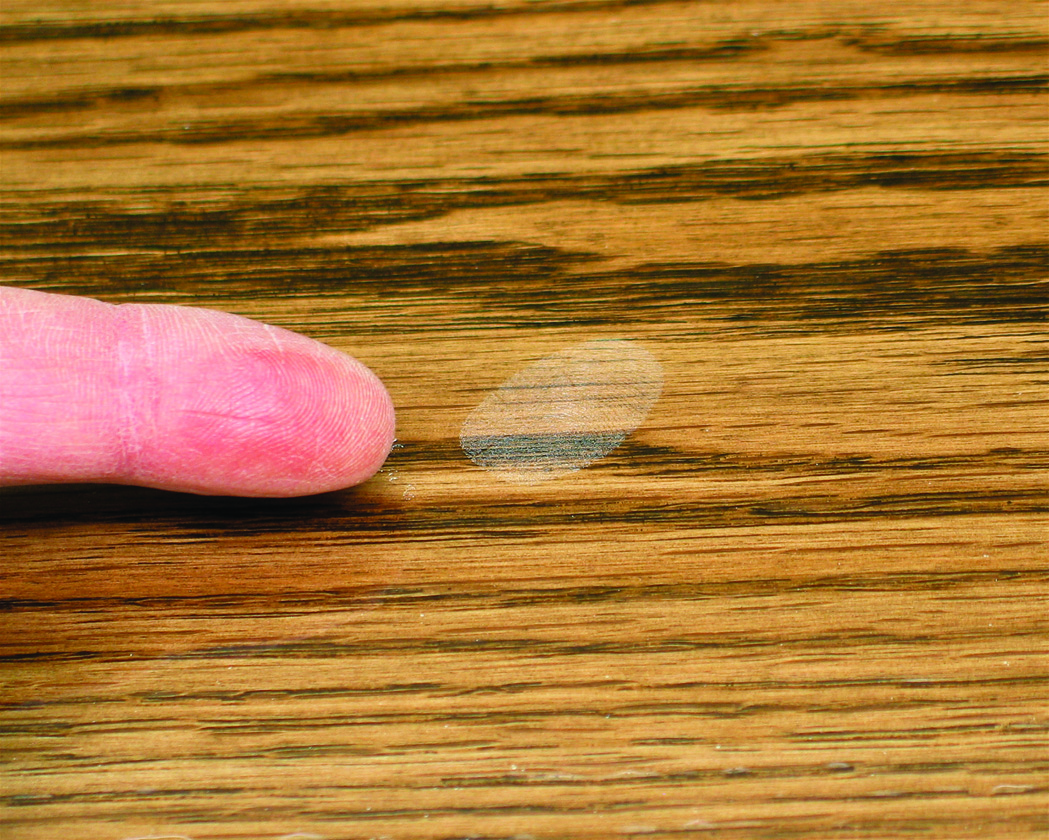
Sticky stage. Once the bubbles have popped out, you want the polyurethane to dry as fast as possible to get beyond the sticky stage (demonstrated here by a fingerprint in the finish) so dust nibs are kept to a minimum. Adding faster-evaporating naphtha to the finish doesn’t speed the drying of this stage beyond what is accomplished simply by the thinning. You could just as well use mineral spirits.
But, like all varnishes, polyurethane dries in two steps. The first is evaporation of the thinner. The second (and much longer) step is the curing, which is the crosslinking brought about by the introduction of oxygen from the air.
When you apply polyurethane, you notice that it stays wet on the surface for a short time as the thinner evaporates. Then the finish goes into a tacky or sticky stage for an hour or longer. This is the length of time it takes for the oxygen-induced crosslinking to occur. Adding a faster-evaporating thinner doesn’t speed this crosslinking.
In fact, adding naphtha probably has no noticeable effect on the drying of the finish beyond the impact of thinning described at the end of the second myth.
■ MYTH #5: Thinning with Penetrol reduces brush marks. Painters have added Penetrol, a widely available additive, to oil paint for decades to reduce drag and brush marking, especially when painting in hot or cold weather, or in sunlight. But until recently I had never seen Penetrol recommended for use in polyurethane, which is usually applied indoors in more ambient working conditions and brushes easily without drag.
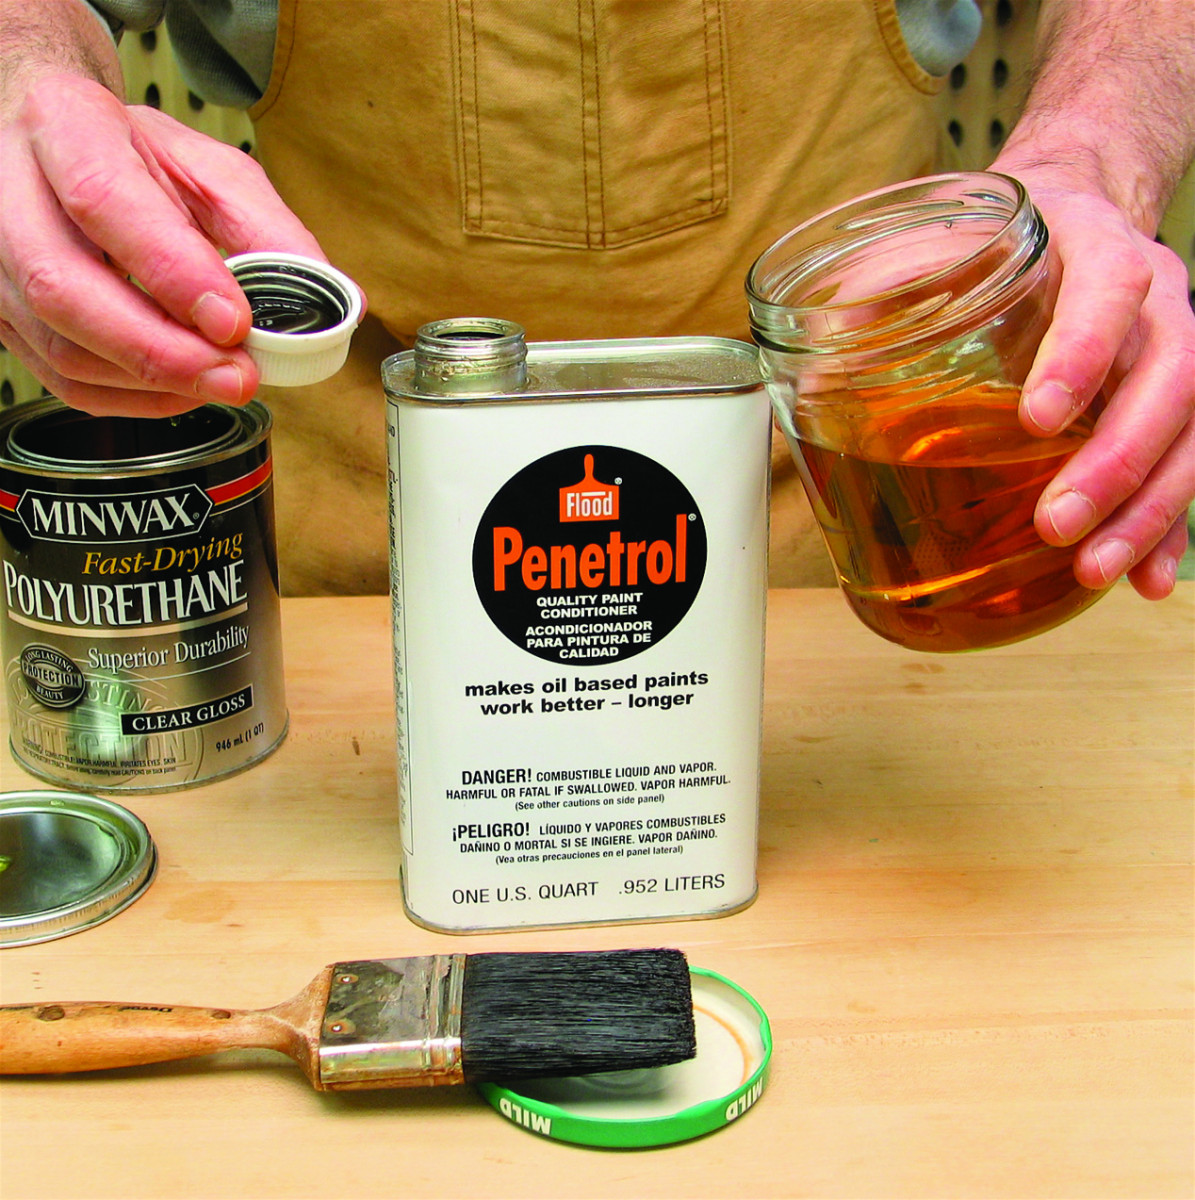
Penetrol. Adding Penetrol (a widely available additive for oil paint) to polyurethane slows its drying so dust has more time to settle and stick to the finish. Any possible gain in reduced brush marking is more than cancelled out by the added dust nibs.
Penetrol is a slow-drying oil product that lengthens the tacky stage of polyurethane and oil paint. This creates more time for dust to settle and stick to the surface. Painters don’t mind because dust isn’t a big problem for them, but it is for furniture finishers.
Most woodworkers want their polyurethane to reach a dust-free stage faster, not slower, as evidenced by myth #4. What little benefit might be gained in reducing brush marking is more than cancelled out by increased dust nibs. (If you want to reduce dust nibs, thin the last coat of polyurethane by 25 to 50 percent so it dries faster.)
Additionally, because Penetrol is an oil, it can’t help but weaken the durability of polyurethane – though not enough to cause a problem in most situations, so far as I can tell. (See the next myth for the way to eliminate brush marks.)
■ MYTH #6: Slant the panel to reduce brush marks. I read this myth for the first time only recently. The idea is to get brush marks to flow together by tilting flat panels such as tabletops 5° or 10° off the horizontal.

Brush marks. The way to apply a brush-mark-free finish using polyurethane is to first sand out the brush marks on the next-to-last coat using a flat backing block and a mineral oil, mineral-spirits or water lubricant. Then thin the last coat about 25 percent with mineral spirits so it levels well.
Not only is this a tricky procedure that will lead to sagging if you aren’t careful to keep the finish thin on the surface (similar to the difficulty brushing vertical surfaces), but the procedure doesn’t make any sense. It’s not gravity causing one brush-mark ridge to sag into another that reduces brush marking. It’s gravity evening out the difference between the ridges and the troughs that eliminates brush marking.
Some brands of polyurethane level naturally better than others because of their formulation. But all polyurethanes can be made to level perfectly by adding mineral spirits. So the way to get a brush-mark-free finish is to sand the next-to-last coat level, then thin the last coat enough so it levels well.
The amount of thinner necessary varies with brands. My suggestion is to begin with about 25 percent mineral spirits and adjust from there.
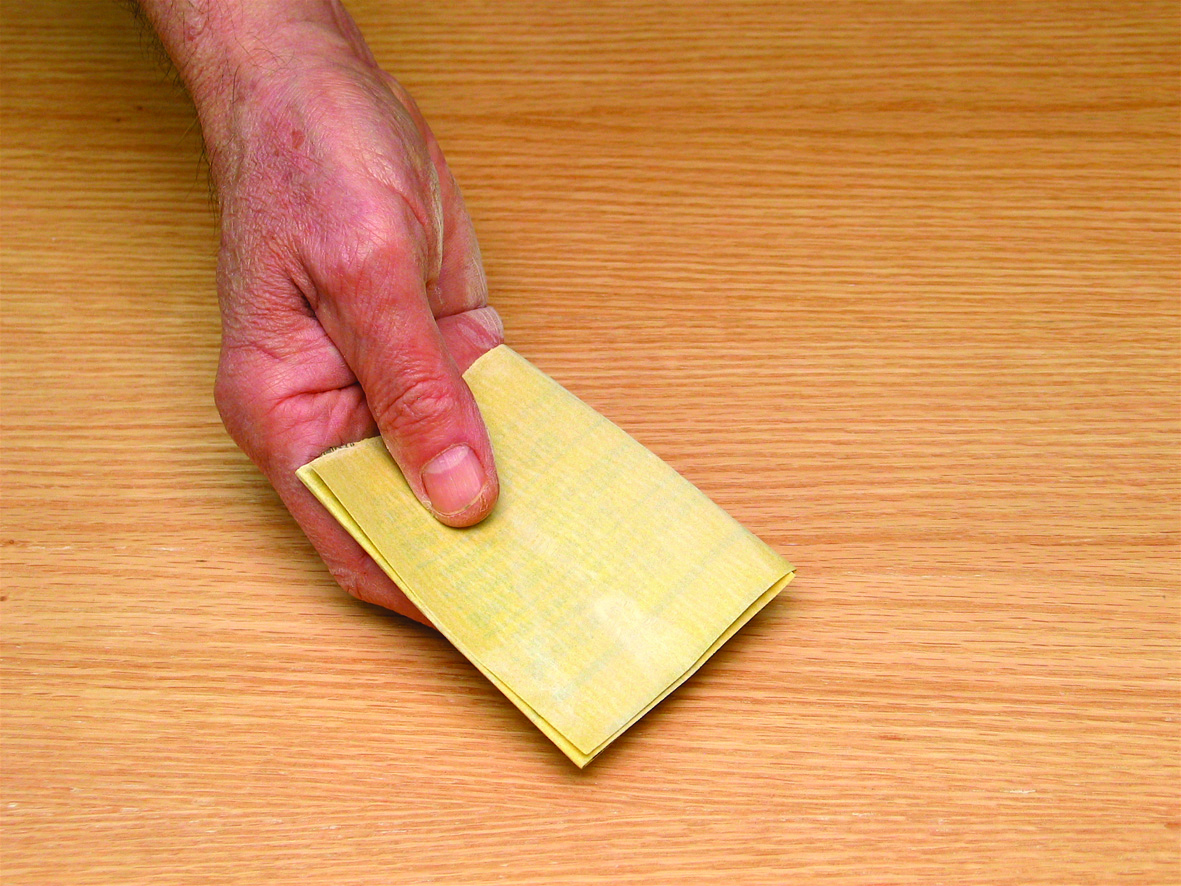
■ MYTH #7: Scuff sand between coats to get a good bond. The purpose of this instruction is to create scratches in the surface so the next coat of finish can establish a “mechanical” bond. The finish “keys” or “locks” into the sanding scratches.
Slant panel? Slanting a panel 5° or 10° is not the way to reduce brush marking, but this has actually been suggested recently. You would have thought furniture finishers working during the last several hundred years would have figured this out if it were true.
This myth is somewhat complicated. The first clue that sanding between coats isn’t so critical is that you rarely create scratches everywhere anyway. There are almost always gaps in your sanding – for example, in the pores, in recesses and often just because you aren’t being thorough enough.
And yet, the next coat usually bonds well anyway, especially if not a lot of time has gone by between coats. How often have you seen coats of polyurethane separating?
Here’s the way to approach sanding between coats: Do it anyway. Polyurethane dries slowly, so there are always dust nibs that should be sanded out before the next coat is applied.
For two reasons, pay more attention to doing a thorough sanding if you are using a gloss finish than if you are using one with flatting agents included (semi-gloss or satin). First, even tiny flaws show in gloss finishes, while they are often disguised in semi-gloss and satin. Second, finishes don’t “wet” and bond as well to gloss surfaces as they do to dull surfaces. (The dullness in semi-gloss and satin finishes is caused by a microscopically rough surface created by the flatting agent.)
Use a sandpaper grit that removes the flaws efficiently without creating deeper scratches than necessary. I almost always sand with #320 or #400 grit, regular or “P” grade. There have to be big flaws in the surface to require sanding with coarser grits.
I never back the sandpaper with a flat block when sanding between coats to remove dust nibs, though it would be all right to do this if the surface is truly flat. The biggest problem using a flat block is that you are more likely to clog the sandpaper and the clogs, or “corns,” will put deeper scratches into the finish that might telegraph through the next coat.
You can also abrade with steel wool or a synthetic abrasive pad, but neither cuts and levels as well as sandpaper.
Conclusion
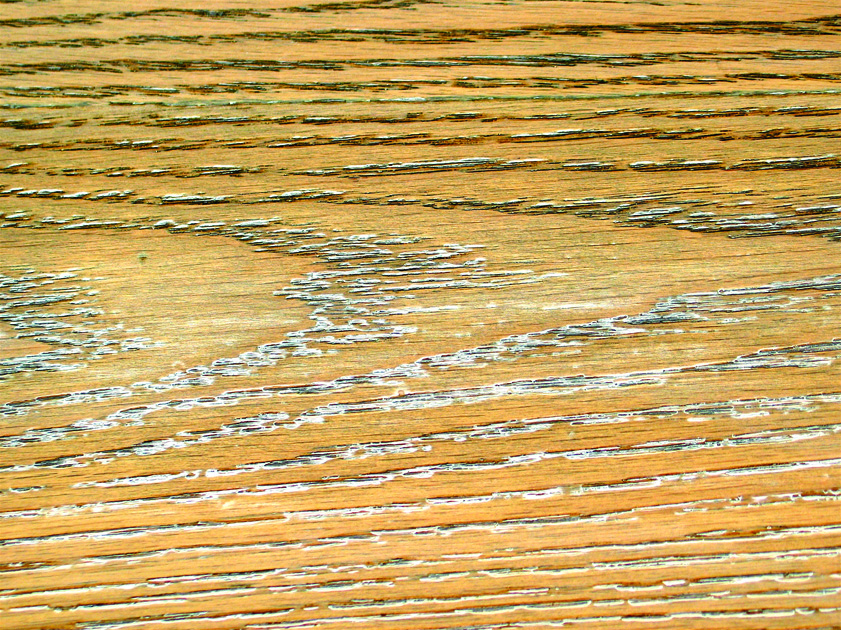
Scuffing. The main reason to sand polyurethane between coats is to level dust nibs and other flaws, not to create a better bond. This is demonstrated here by the gloss remaining in the pores after sanding the surface. The next coat of finish still bonds in the pores even though the finish there is rarely scuffed.
Brushing polyurethane is not complicated, but somehow authors and manufacturers have succeeded in making it seem so. They have done this by introducing myths into their instructions. Some of the myths make no sense but do no harm. Others purport to solve a problem, and when following them doesn’t help, frustration sets in.
It’s unfortunate, but once a myth gets into print, nothing, not even an article such as this, seems to have any impact slowing its spread.
Probably the opposite, in fact. Conspiracy theorists know that merely repeating an “untruth” in order to debunk it tends more to solidify it in the minds of believers.
Here are some supplies and tools we find essential in our everyday work around the shop. We may receive a commission from sales referred by our links; however, we have carefully selected these products for their usefulness and quality.


The one thing in this article I disagree with is the opinion on thinning polyurethane and what it does or doesn’t do. I thin mine with me paint thinner (the fumes are easily tolerated to me unless you’re trying to huff it for some weird reason and it’s just less refined mineral spirits that cost less) and at more than 5% to 10%. The dry time is remarkably shorter and is a lot less bs to deal with when it comes to any dust settling onto a wet or tacky coat. For me personally it’s easier to get a smoother coat with the ratio I thin it at. I can still build up multiple coats and get the results I want while it taking less time. Thinning polyurethane also makes it more durable and more water resistant. I found out the added durability and water resistance benefit of it reading an article on another site three or four months ago that explained the reaction chemically wise.
There are some people who apparently could desperately use reading comprehension here though. He’s not telling you to shake the can, he’s telling you that bubbles will appear in the finish no matter what which is true.
One other thing…. sanding between coats for removing any blemishes and to remove dust nibs makes it common sense. The author saying sanding for better adhesion is a myth and sanding doesn’t serve a purpose is off base with part of his statement.
Hi, I am a 70 year old furniture maker. I’ve been using polyurethane and varnishes since the “silicone scare” 1960s. As I read your article I got a little dizzy with each paragraph. Like with most things, skill and knowledge is acquired over years of practice. The greatest advance I ever had with poly application is thinning and knowing which ratio for which of each coat. The other is using the best cheesecloth (pro grade), using the small, synthetic short nap foam floor hand applicators or spray. No brushes with poly. Restraint in added strokes. One alway sands in between coats, always, not for adhesion, but to lightly hit those specs and nubs that are part of the process. http://www.salisburyartisans.com
Mr. Flexner,
Very good article.
As some of the responses would seem to indicate, one would do well to actually read it before responding.
Thank you.
Well, Mr. Flexner, as you expected, you’re perpetuating those myths!
It’s not your “repetition” of the myths that perpetuates them. It’s the idiots who didn’t “listen” as carefully to your ideas as they may have thought — and probably still think — they did.
While there may be a germ of truth in the thought that you might express some of your thoughts a bit more clearly, I think the real problem is that too many of the folks don’t read as well as you write.
I use two part polyurethanes a good bit and like them a lot more than the one part types. They are very low viscosity when applied and go on thinner, which means more coats, but better ones almost always. And, when three or four coats are built up, they’re far tougher and more abrasion resistant than most coatings. For those that like high gloss, it’s there. For those who like low gloss, it’s easy to get with the addition of flatteners (I use a few percent of Aerosil fumed silica – which adds more hardness and abrasion resistance to the surface) or the surface can be hand rubbed for the labor intensive route. Looks great!
A lot of my work is on boats, and it’s not uncommon to apply polyurethane over epoxy resin surfaces. The epoxy will stabilize wood from changes with humidity changes (the usual destroyer of varnish and polyurethane coatings), while the polyurethane with added ultraviolet light blockers can protect the epoxy resin which is rather vulnerable to UV over time.
I’ve used the same system on several bits of shop furniture as well, since I’m working mostly in a two car garage that changes humidity a LOT. The look great and wear well. I did my best on one rolling tool chest that has a “grand piano” finish of polyurethane over epoxy for a number of years now and has “taken a licking and still keeps ticking.”
The only limitations I’ve found with that system are that the system is a bit expensive unless you’re working with these coatings a lot and keep ’em on hand and that you’ve got to be really careful about the stains you try to use under epoxy resins. Test before use always!
I rarely comment bt some people should not write articles. First he says and I quote. In fact, the only benefit gained by thinning is faster drying.
Then he says and I quote, copy and paste actually. If the tipping-off doesn’t work well enough, add 5 or 10 percent mineral spirits to keep the finish “open” longer and give the bubbles more time to pop out.
I mean really did you ever soak your brush in thinner so it will dry faster?
So adding mineral spirits is not thinning, Or open does not mean drying slower. Or I misunderstood, thats not what he meant?
I shake my poly for the first coat, but always add mineral spirits, which slows down the drying (open time) and allows the bubbles time to escape. You will notice on the minwax can it says to apply a thin first coat. This does not mean brush it out it means to thin the first coat.
Why in the world would you want to shake it anyway? it isnt like a paint. Just gentle stirring is good enough. Even if it did have bubbles in the can….it can be worked out with gentle strokes when applying. I do however thin it sometimes, ONLY to give the bubbles a chance to pop . I love the product and have great results
matt m, I think you misunderstood Mr. Flexner. He didn’t necessarily recommend shaking the can. His suggestion was two-fold about what to do when bubbles occur. Are you saying that “tipping off” then lighly rebrushing or slightly diluting the varnish to increase the “open” time failed to produce the desired results?
Are you mad?? Go ahead and shake a can of poly and try to finish with it. I just did, trusting your article. It looks horrible, it’s the by bluest coat I’ve ever applied. Now I gotta redo that board and wait a day for the bubbles to settle out of my can. That’s what I get. For listening to an ‘expert’. (For the record, the coats I put on before, stirring by hand look good. It’s clearly the shaking that ruined it, and not my application.)
He didn’t mean to go shake your can of polyurethane. Bubbles popping up in the finish when applied being something that happens no matter what is his point and it is the truth. Context and reading comprehension go a long way. It’s not his fault you have to refinish a board.