We may receive a commission when you use our affiliate links. However, this does not impact our recommendations.
Tomorrow morning I start a new workbench class at the Marc Adams School of Woodworking. While I’ve lost count of the number of workbenches I’ve built or midwifed into this world, I never tire of the grueling and exhilarating labor they require.
For each class, I design a new workbench from scratch that is suited to the material I have gathered for the class, the needs of the students and the workbench hardware they want to use. The design process takes an entire day because I actually have to design 15 workbenches with the fewest machinery setups and part sizes.
That might seem like drudgery, but I take sick personal pleasure from the process.
This week we are using bench bundles from Horizon Wood Products. So I’ve designed our benches around the 12/4 and 8/4 ash included in these affordable bundles. The guys at Horizon are an absolute joy to deal with and they take immense pride in exceeding your expectations. For example: Out of 15 benches, I think we have only two knots in this entire pile of wood.
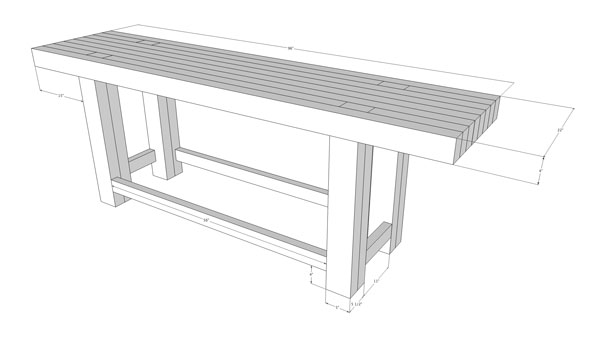
Because of the 12/4 material, I decided that the benches should have a single through-tenon on each leg that penetrates the top. I’ve built many benches using this type of joint and I have found no difference between it and using the sliding dovetail/tenon combination shown in Roubo (other than the aesthetic difference).
By using a single tenon and mortise, we can create the mortise while gluing up the tops and save almost two days of effort by skipping the dovetail. You might not believe my estimate, but I do.
The tenon will be drawbored and wedged into the top. It won’t really need stretchers below for the finished bench to stay stout, but we will have them anyway – everyone deserves a shelf below their benchtop.
The stretchers below the top are made using 8/4 ash that is tenoned into the legs – each tenon is 7/8” thick, 2-1/2” long and designed to be cut with only one machine setup. The base will be drawbored together using 5/8”-diameter pegs. After many years of mucking around with different sizes and species of pegs, I’ve found that a 5/8”-diameter store-bought dowel does the trick every single time. Even with a 1/8” drawbore offset.
One last thing I’m looking forward to with this class: Working with the students. Unlike every other class I teach, workbench classes are all about teamwork. You can’t build a bench like this in 40 hours without some serious help. Workbench classes forge personal bonds that last years and years.
I’ll be posting videos all week here on our bench project. So stay tuned.
— Christopher Schwarz
Here are some supplies and tools we find essential in our everyday work around the shop. We may receive a commission from sales referred by our links; however, we have carefully selected these products for their usefulness and quality.


Chris,
I’ve followed your bench builds/posts through the years and enjoy all of the great content you’ve posted. Finally, I have gotten around to building my 13 foot Roubo decked out with Benchcrafted vises. So…..I’m curious as to your current preference of joining the top to the legs. Stub tenons, through tenon, or the Roubo style through tenon/dovetail? I chose the latter. Also, I assume you’ve designed this particular bench project with through tenons mostly to avoid boring and chopping mortises for stub tenons. I personally feel that through tenons should aid in lateral stability a significant amount more than mere stub tenons. I may be posing this question a little late as just today I began piercing my 5″ rock maple top with my Mafell chain mortiser. Mafell is awesome for bench building. If you’re the least bit curious feel free to check out my progress at https://www.facebook.com/GalletArchitecture
Thanks again for the great content!
Hi Chris. I’m a great fan of your writings on benches. This nevertheless is to fly a potentially controversial kite on the subject of through tenons in bench tops.
They are very attractive – but a fairly superficial scan of drawings on the web (often put up by yourself – and you may know better) suggests that many of the old French benches shown may not have had through tenons. e.g. http://www.popularwoodworking.com/workbenches/schwarz-workbenches/where-to-put-holes-for-holdfasts-one-mans-opinion The combo is shown in just some drawings it seems?? e.g. http://benchcrafted.blogspot.ie/p/the-french-oak-roubo-project.html
I’m cautious about through tenons. They clearly work just fine, but when used in combination with lower stretchers must nevertheless lead to the issue (which you’ve addressed before – and which certainly is not a show stopper) of moderate racking as the top moves through the year. There’s also the matter of whether or not they remain flush with the bench top as it moves – probably not.
Guess i’m wondering if perhaps the combination dovetail and tenon might not be a hangover from a time when maybe these extremely solid benches didn’t have a storage platform underneath – and relied entirely on the top to locate the legs which in that situation were free to move with it?
Might the apparently non through versions have contained some provision (e.g. a high level stretcher and oversize mortice) to accommodate movement? Or that the through jointed version unthinkingly combined the joint with a platform. Or that even that artistic licence is a factor?
I’d be interested to hear your views…
ian
Pretty eye opening stuff. The flexibility that you show and the willingness to rethink the bench from year to year, based on materials and experience is rare, I think.
On another point, I’m surprised that the drawbore offset is a full 1/8″. I must have not been paying attention during your previous blogs re drawboring – I’d have guessed less offset – perhaps as little as 1/8″.