


We may receive a commission when you use our affiliate links. However, this does not impact our recommendations.
Since Bob Lang and I returned from our scouting trip for potential book projects at the Museum of Early Southern Decorative Arts, I have had the opportunity to build a few southern projects. 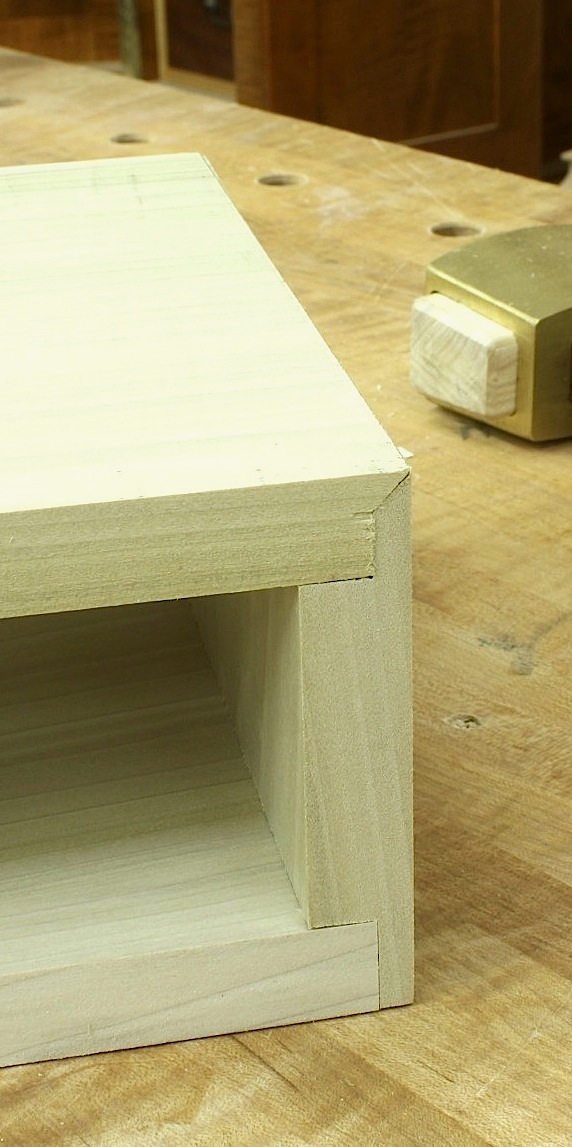 A couple or projects came from our book “Furniture in the Southern Style” and the project on which I’m working now was a piece taken from our “potential” list – pieces that didn’t make it in the book.
Interestingly, two of the projects have had quirks when it came to joinery. The lady’s desk I built in the November 2011 issue (#193) had double-blind dovetails where the case sides joined the top. (Read more about double-blind dovetails.) That is generally, at least in pieces that I have reproduced or researched, a half-blind or through dovetail.
The piece I’m working on now – I can’t tell you exactly what it is quite yet – has a twist in how a rabbet is cut. A rabbet joint is a rather easy joint to make. A two-step cut at my table saw and the joint is all but made.
Evidently, that was not good enough for the Piedmont woodworker that originally built this piece sometime between 1740 and 1780. What he did was miter the top edge of the side piece, then matched that profile with the top piece by adding a couple of extra steps. What was ingenious in his design was how any end grain was hidden from show surfaces. I’m sure that is what he intended.
I have not seen this before, but I can tell you I will keep it in my bag of joinery tricks. You never know when you may need it.
Here are some supplies and tools we find essential in our everyday work around the shop. We may receive a commission from sales referred by our links; however, we have carefully selected these products for their usefulness and quality.


Glen,
I’m assuming this frame and pannel joint was done this way to hide end grain as well. Why so many plugs?Any idea what the joint looks like inside?
Thanks
Ken
https://lh5.googleusercontent.com/-TZG2GVZQMus/UW1NvMMPx9I/AAAAAAAAABg/X8f1yI7j4I0/w571-h428-p-o/IMG_0047.JPG
Glen – If memory serves me, Ernest Joyce’s book as this illustrated as a Mitered Rabbet Joint.
Glen,
Charles Hayward talks about this joint in Woodworking Joints on page 65. He calls it a “rebate and mitre” or “mitred lap.” He stated that “Take the mitre in which the stuff is mitred in its thickness as in the case of a plinth or box. When nails are not an objection the joint has the advantage of simplicity. Rebates are cut in both pieces and the projecting laps are mitred. Nails as well as glue are needed to hold the parts together, and these should be driven through the left-hand piece into the other. It is of little use to nail through the thin lap.”
Is the joint you see nailed? How would you make the joint?
I have not tried this joint, but see how it could how it could be done on a well tuned table saw, with a lot of care. I wonder what tools Hayward would have used?
I would think coupling this with a hidden dowel would make for a good joint. Without having to cut mitered dovetails. Much quicker and more than likely just as strong.
That’s the lapped miter joint that Stickly used to form the quad legs – see Bob Lang’s books. Infinity tools sells a (expensive) router bit set that works quite well for repeatably cutting these joints, once you’ve invested time in the fairly finicky setup.
Glen,
We see this up in the north as well. I have also made a few reproductions that had the same joinery, but with the 1/8 to 3/16 inch thick sawn veneer. Basically the veneer is the only thing mitered. I will say it makes for a smooth transition.
Cheers,
Fred