We may receive a commission when you use our affiliate links. However, this does not impact our recommendations.
If I had a life, I would probably have something better to do on a Friday night than go to an auction preview of Arts & Crafts period furniture. But this was a chance to see some authentic pieces up close so off I went, camera in hand. (For the record, I did take my wife out to dinner after leaving the auction, so I think that makes me only about 75 percent geeky.) The auctioneers were very nice, so I have some pictures to show authentic details that answer some common questions. Today’s topic is the Morris chair.
Woodworkers worry a lot about details like leg construction when using quartersawn white oak. I’ve written in Popular Woodworking about two methods to make legs that show quartersawn figure on all four sides of the leg. Most recently, (November 2006) I showed Gustav Stickley‘s method of laminating two pieces by face-gluing and veneering the edge to cover the joint. In April 2006, I came up with a new method for creating Leopold Stickley‘s quadralinear leg. Here is a picture of a Gus Stickley leg, coming through the arm of a Morris chair.

You can clearly see the joint in the end grain between the two laminations on the leg. If you look closely, the center of the lamination isn’t centered in the through mortise, and while the grain is similar, it isn’t an exact match. If you want to be authentic, don’t worry about how the end grain appears – Gus and the guys working for him didn’t. If you look just below the end of the arm, you can see a crack in the veneer, right in line with the glue joint. It isn’t an awful crack, and this chair is more than 100 years old. It may have been out in the barn or in a damp, creepy basement for most of those years. I’ve seen some sort of cracking in about half of the original chairs I’ve come across. The reason for this is that the quartersawn white oak expands and contracts in thickness as the seasons change.

Above is a picture of one of the simplest solutions to a perplexing problem – making the bend in the end of a bent-arm chair. Rather than trying to miter the end of the arm, a wedge-shaped piece is sliced off the top of the arm, and glued on to the bottom. The crack you see in the arm (it runs uphill from right to left in line with the bottom of the arm) reveals the glue joint. It isn’t as noticeable as this picture suggests, and again, this is an old chair and who knows where it has been.

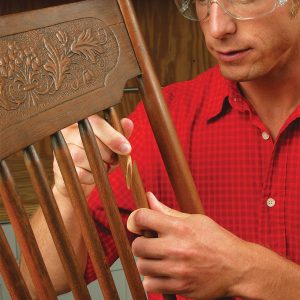
Another place where the brothers used different techniques was at the back of the chair. This picture is of a typical Gus Stickley back. There is a series of holes in the inside of the arm that hold a pair of stout wooden pegs. These support the uprights on the chair back and allow you to adjust the position from semi-alert to nearly comatose. In early chairs, these are square with rounded or beveled corners in the exposed part of the peg. Shorter pegs at the bottom act as hinges, and you can see wooden washers between the back and the leg of the chair. These parts often get lost, and the hinge pegs in this chair are replacements.

This is how younger brother Lee handled the back adjustment. The cross bar that supports the back has mortises in the underside that slip over the square pegs on top of the arm.
If you enjoyed this look at these details, let me know, either by leaving a comment, or by e-mail. I think it’s important to know these original details even if you choose to use a different method.