


We may receive a commission when you use our affiliate links. However, this does not impact our recommendations.
How they work, how to choose the right one and tips for better results.
by Richard Tendick
Random-orbital sanders are terrific time-saving machines. They can remove milling marks left by a tablesaw, jointer or planer in no time flat. As simple as they are to operate, though, we found in our test that they’re widely misunderstood tools.
Knowing how to use a sander correctly is as important as picking the right model. Through a series of questions and answers, we’ll explain how learning the correct technique can improve the results you get, no matter which sander you choose.
We’ll also show you how to pick the model that best fits your needs. Some sanders cut very quickly but leave behind relatively large swirl marks. Others cut slowly but leave a smoother finish. How do you tell them apart? We’ll give you the inside story.
|
Types We Tested
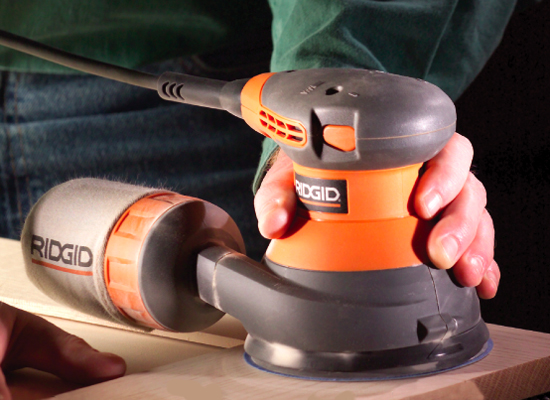
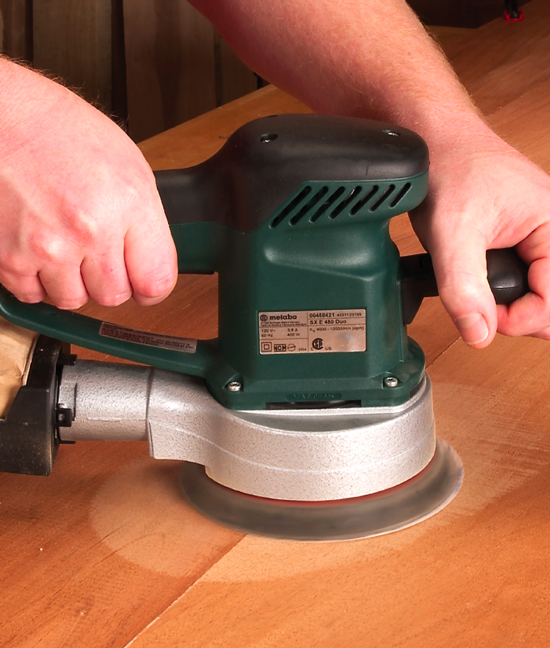
Random-orbit sanders come in three different body types: palm grip, pistol grip and right angle. We tested the first two: the palm- and pistol-grip styles.
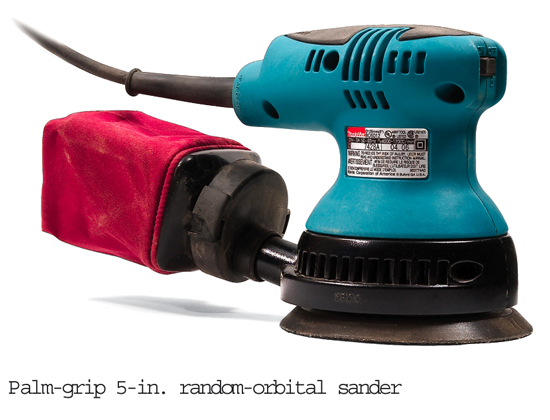
Most woodworkers prefer palm-grip sanders because they’re lightweight and can be operated with one hand. Palm-grip sanders are only available with 5-in. discs. All sanders with 6-in. discs are equipped with pistol-style grips. Their increased weight and torque generally require two hands to control, but most pistol-grip sanders may also be used one-handed. They have an additional palm grip above the motor. A few 5-in. sanders also have pistol grips because this design is standard in Europe.
Some random-orbit sanders run on compressed air rather than electricity. These pneumatic models are lightweight and very powerful, but they require a large air compressor to operate. We didn’t include pneumatic models in this test.
|
|

|
What does the disc actually do?
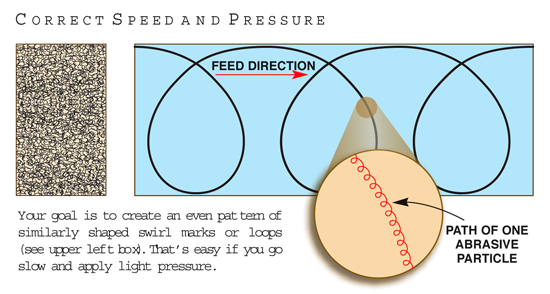
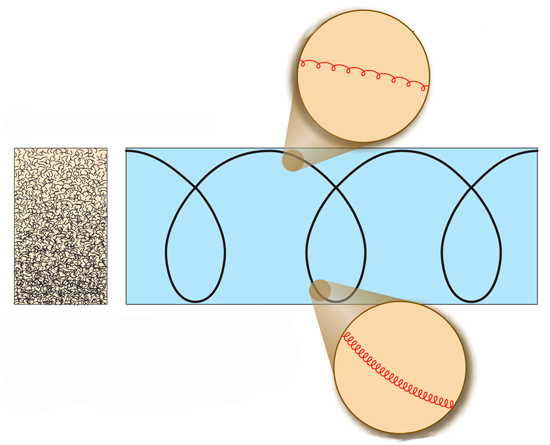
The disc on a random-orbit sander moves in two independent ways: It oscillates and rotates. This should produce a smooth finish without visible scratches, but success also depends on proper technique (see “Correct Speed and Pressure,” below).
Oscillation produces tiny circles, or “orbits.” Each orbit is always the same diameter on any individual sander, but that diameter varies from machine to machine.
The disc’s rotation speed varies with the amount of pressure you put on the sander. As you push harder, the rotation slows; however, the disc continues to oscillate and make the same size orbits. Slowing the disc’s rotation makes the pattern of swirl marks you leave behind much more visible (see “Correct Speed and Pressure”). |
|

|
What makes one 5-in. sander cut faster than another?
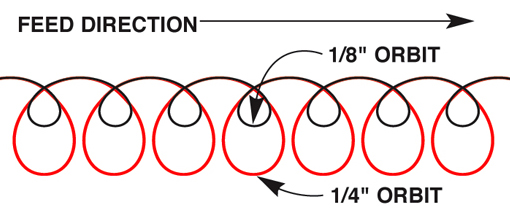
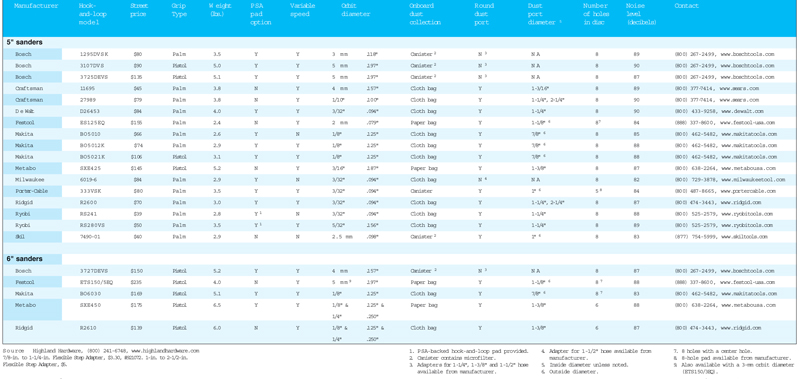
With most tools, more horsepower means faster stock removal. Random-orbit sanders are somewhat different. The orbit’s size primarily determines how quickly a machine sands, given the same disc diameter. Orbits vary from a miniscule 3/32 in. to a huge 1/4 in., which is almost three times as large (see Chart, below).
|
Sanders with large orbits cut faster than sanders with small orbits simply because large orbits cover much more ground in the same amount of time. Larger orbits leave more visible swirl marks, however, because the loops are bigger. |
|
Why does one 5-in. sander make a finer finish than another?
The orbit’s size also determines how easy it is to see swirl marks. A small orbit makes small swirl marks, which are hard to see. Large orbits make large swirl marks that are more visible. No matter which sander you use, however, it’s good practice to remove the swirls altogether by hand sanding prior to finishing. The smaller the orbits, the easier this will be. |
|
|
What orbit size should I look for?
Sanders with large orbits (more than 3/16 in.) are designed for quick stock removal. Sanders with small orbits (less than 1/8 in.) are designed for finishing work. Orbit size on most sanders falls somewhere in between. Two 6-in. models—Metabo SXE450 and Ridgid R2610—can switch from large to small orbits.
|
|
|
How can I improve my sanding technique?
The two keys to good results are to slow your arm action and lighten your pressure. Lots of woodworkers routinely commit two errors: They move the sander too fast and push down too hard. That reaction is only natural, though. When you sand by hand, both techniques get the job done more quickly with no apparent ill effect. With a random-orbit sander, however, both techniques are counterproductive, because they produce more noticeable scratch patterns. |
Correct Speed and Pressure: Your goal is to create an even pattern of similarly shaped swirl marks or loops (see upper left box). That’s easy if you go slow and apply light pressure. |
|
How fast should I move the sander?
To make an even scratch pattern, slow to a crawl. You should take 5 to 10 seconds to go 6 in. Going too fast creates an uneven pattern, with long, drawn-out swirl marks at the top of the sanding path and a denser pattern of bunched up marks at the bottom. This also leaves an uneven surface, with more wood taken off at the path’s bottom than at its top.
|
Too Much Speed: Rapidly pushing a random-orbit sander back and forth produces loops of uneven shape. The loops at the top of the sanding path are stretched out, which makes them more visible. |
|
How hard should I press down?
Light pressure is best, about 2 to 4 lbs. (That’s about the weight of your arm.) Light pressure allows the disc to rotate at top speed and make the most evenly distributed swirl pattern. It’s true that pushing down harder actually removes wood faster, but most of the time it’s counterproductive. That’s because pushing too hard leaves behind a stretched-out pattern of swirl marks that will take even more work to remove with the next grit. It can also create dished-out areas that won’t be visible until you apply a finish.
|
Too Much Pressure: Pushing down too hard slows the rotation of the disc. The result is long, deep tracks, rather than a more desirable random pattern of loops. |

|
What are the pros and cons of hook-and-loop discs?
All the sanders we tested take hook-and-loop (H&L) discs. They’re very user-friendly. You won’t ever throw away an H&L disc before it’s totally worn out, because you can put it on and take it off repeatedly. That’s ideal when you’re going through multiple grits while sanding small batches of parts. You can also leave a disc on a sander for weeks at a time and have no problem removing it. An H&L disc is relatively soft and flexible. It can easily dip into slightly low spots, which saves time sanding.
On the negative side, H&L discs are about twice as expensive as pressure-sensitive adhesive (PSA) discs, but prices are falling. As an additional expense, the H&L pad attached to the sander eventually loses its gripping ability and must be replaced. Average cost for a pad is about $25.
|
Hook-and-loop discs can be used repeatedly until they’re totally worn out. |

|
Should my sander also be able to use pressure-sensitive-adhesive discs?
Yes. We recommend buying a hook-and-loop (H&L) sander that can accept a pressure-sensitive-adhesive (PSA) pad and discs (see Chart, page 74). PSA discs are not as widely available as H&L discs, however. Some sanders have PSA-pad versions, but they’re not inclued in our test and chart.
The PSA system has two benefits. With PSA paper, you can sand a surface absolutely dead flat because the discs don’t have loops. The loop backing on an H&L disc is somewhat squishy. This can cause it to dig into the softer sections of a plainsawn board. The other benefit of the PSA system is that you’ll save money when you sand lots of wood with the same grit. Bulk quantities of PSA paper are less expensive than H&L in bulk.
On the down side, a PSA disc usually can’t be reused because the adhesive back is easily fouled with sawdust. You put the disc on, sand until you’re done and then throw it away.
|
Pressure-sensitive-adhesive discs cost much less than hook-and-loop discs but usually will stick to the pad only one time. |

|
Should I buy a 5-in. or a 6-in. sander?
Our preference for all-around work is a 5-in. sander. It’s easy to maneuver and comfortable to hold in various positions. A 6-in. sander cuts faster, however, because its disc is larger and its motor more powerful. A 6-in. sander is about twice as heavy as a 5-in. sander, so it’s awkward to use in a vertical position. If you’ve got lots of large, flat surfaces to sand, though, a 6-in. sander can be a real time-saver.
|
A 6-in. sander works quickly on large areas because its disc has almost 50 percent more sanding surface than a 5-in. sander. All 6-in. sanders have two-handed pistol grips.
A palm-grip 5-in. sander is easy to hold on both vertical and horizontal surfaces. |
|
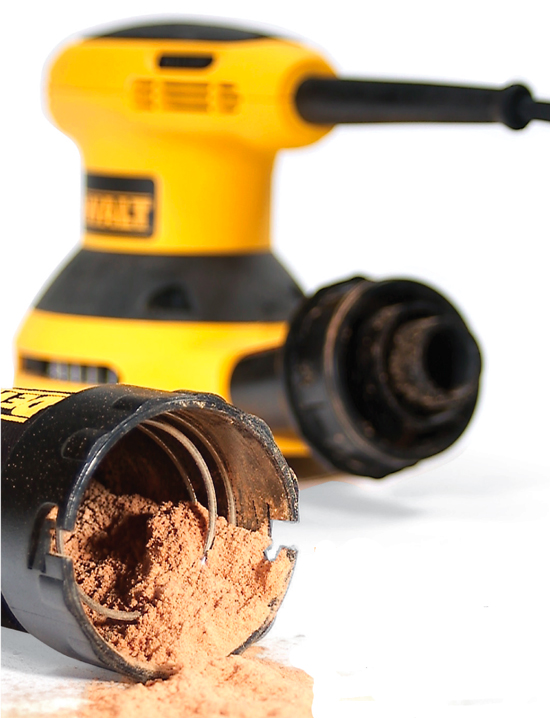
Tip! Empty your bag often!
It can fill up before you know it. When that happens, dust backs up into the motor. All those gritty particles will slowly destroy it. No kidding!
|
|
|
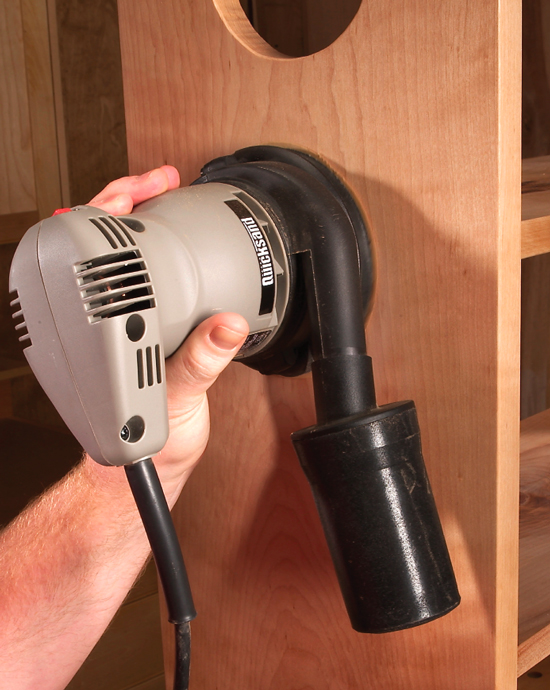
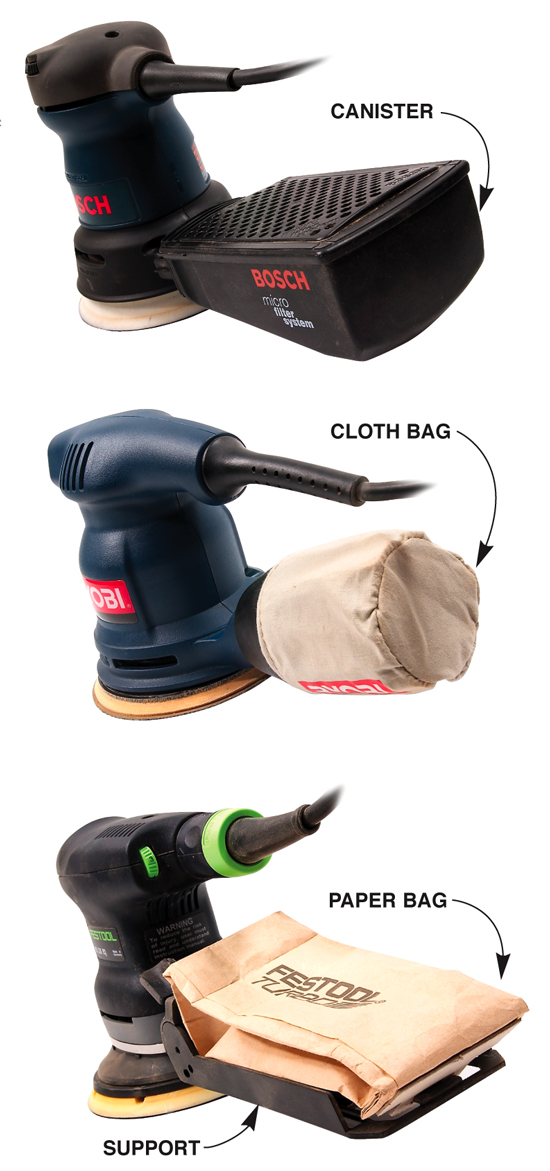
Should I buy a sander with a dust collection bag or a canister?
Both work, up to a point. Cloth and paper bags are about 60 to 70 percent effective; canisters with pleated microfilters are about 80 to 90 percent effective. Pleated filters are much more effective in capturing the smallest dust particles, which are the greatest threat to your health. But no type of onboard collection is as effective as hooking up to a shop vacuum.
Paper bags are disposable. When they fill up, you just toss them out. This avoids creating the cloud of dust that a cloth bag makes when you shake it out.
Both canisters and the supports under paper bags stick out quite a bit. They can get in the way when you’re working in tight quarters. Some models have optional cloth bags for these situations.
|
|
|
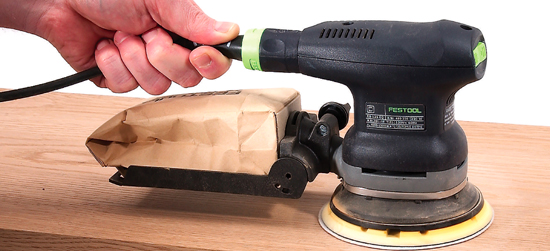
Do all sanders easily accept a vacuum hose?
No. This is a major difference among machines. Most sanders have round dust ports for directly hooking up a hose, but others have oval or rectangular ports that require an additional adapter from the manufacturer. Dust-port diameters are all over the map. Some sanders have ports sized to fit one of three common hoses (1-1/4 in., 1-3/8 in. or 2-1/4 in. outside diameter). Other sanders with odd-sized round ports require a manufacturer’s hose or adapter or a universal stepped adapter (see Source, page 74). It’s frustrating that neither dust ports nor hoses have been standardized.
Despite that, vacuum collection works amazingly well and has three major benefits. You’ll get better results, your shop will be cleaner and your lungs will be healthier. It’s the way to go!
|
Dust collection improvesdramatically when you hook up a vacuum hose.
|

|
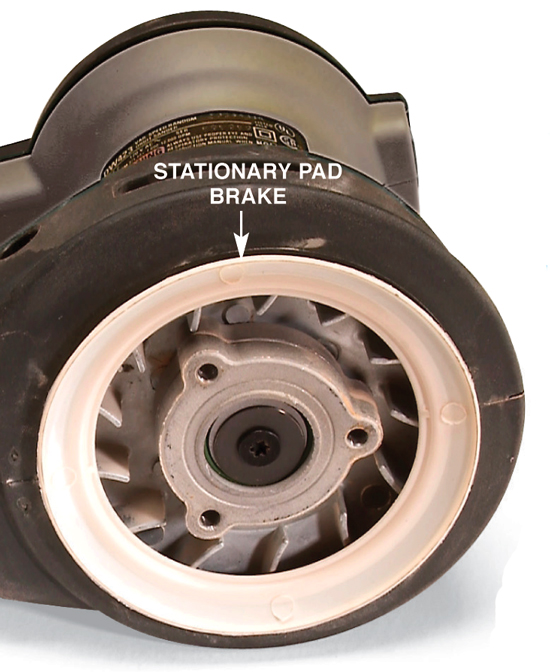
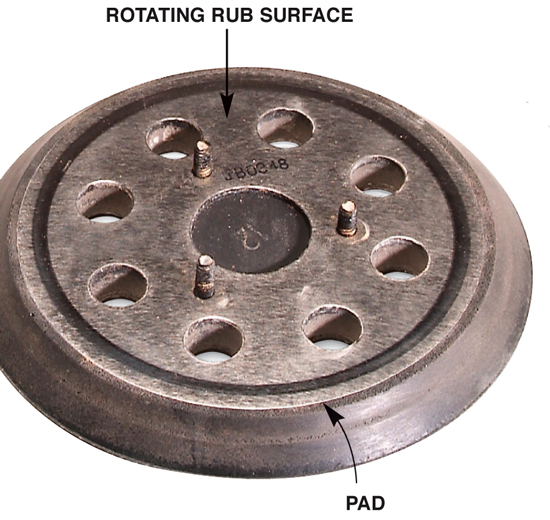
Do most sanders have some sort of brake? Does it wear out?
Most sanders have a simple device called a pad brake that is always on. It keeps the motor from spinning too fast when you lift the sander off your work. The brake prevents the disc from digging into the wood when you set it down on a new area. A brake can wear out, but it’s inexpensive and easy to fix.
The simplest and most common pad brake is a stationary plastic ring that constantly rubs against the pad. Eventually, the ring wears down. Replace it when your motor revs way too high as you remove it from a workpiece.
Permanently removing the pad brake increases the speed of the disc so it cuts slightly faster. This shouldn’t harm the motor, but it could void your warranty. And you will lose the no-digging-in benefit.
|
|
|
What are the benefits of variable speed?
Ever sand through veneer? Variable speed lets you slow the disc so you can more closely monitor your progress. That’s helpful when you’re leveling a face frame with a plywood cabinet, for example. Slightly slowing the maximum speed also allows you to find a machine’s sweet spot, where noise and vibration are minimized. Many models come in both single-speed and variable-speed versions. It’s not a big deal, but we think the few extra bucks for variable speed is worth it.
|
|

Is Your Sander a Smooth Runner?
During this test, we noticed that some sanders run much more smoothly than others. The smooth runners are easier to control and more comfortable to hold for long periods. Sanders that didn’t run smoothly either vibrated too much, wobbled excessively or shook so much that they would unexpectedly run off in random directions. Who wants one of those?
Identical Models, Different Behavior
No individual make or model stood out as the best or the worst, for one simple reason: Identical sanders from the same manufacturer may actually behave quite differently.
Let’s take three hypothetical sanders with the same model number. Sander A shakes but doesn’t vibrate or wobble. Sander B doesn’t shake, but it does vibrate and wobble. Sander C runs perfectly fine. Of all the sanders we tested, approximately 10 percent had unacceptable levels of shake, wobble or vibration.
We concluded that buying by brand name alone won’t guarantee that you’ll get a sander that runs as smoothly as a top. You’ve got to try it out.
3 At-Home Tests
Our advice is to make sure you can exchange a new sander if you don’t like it. Then take it for a test drive, using the tests described at right.
Don’t expect your sander to be perfect. Your goal is simply to find out whether you’ve received a substandard unit. The odds are slim. Fortunately, the next unit on the shelf from the same manufacturer is probably OK.
|
The Control Test |
Turn on your sander and hold it by the cord’s strain reliever. You should be able to easily control which direction it goes. |
|
The Wobble Test
|
A sander wobbles in use when its top slowly rotates off center, like a child’s toy top about to fall over. This is the least annoying of the three problems a sander may have—and it’s the only one you can fix.
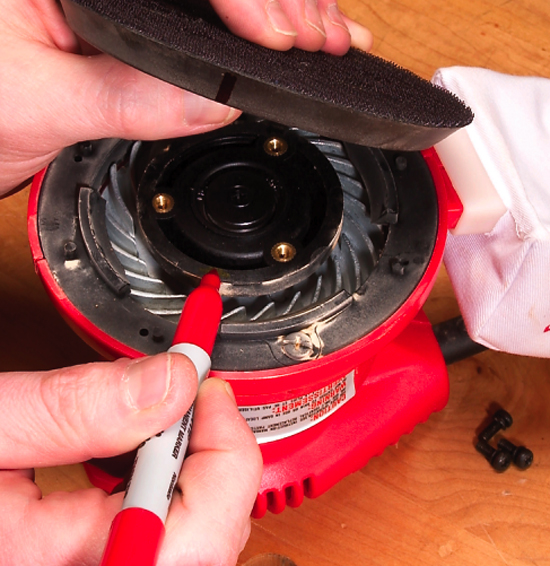
To measure wobble, unplug your sander, remove the sanding disc and butt the machine up to a pile of blocks and a ruler. Slowly rotate the sanding pad by hand. If the sander’s top wobbles away from the ruler by more than 1/16 in., it’s too much. Mark the pad at the point where the top is farthest from the ruler.
Remove the pad from the sander. Mark the same spot on the sander’s driving plate.
Shim the “low” spot with small pieces of thin tape. Reassemble the sander and repeat the test with the ruler. Add or subtract shims until the wobble is minimized. |


|
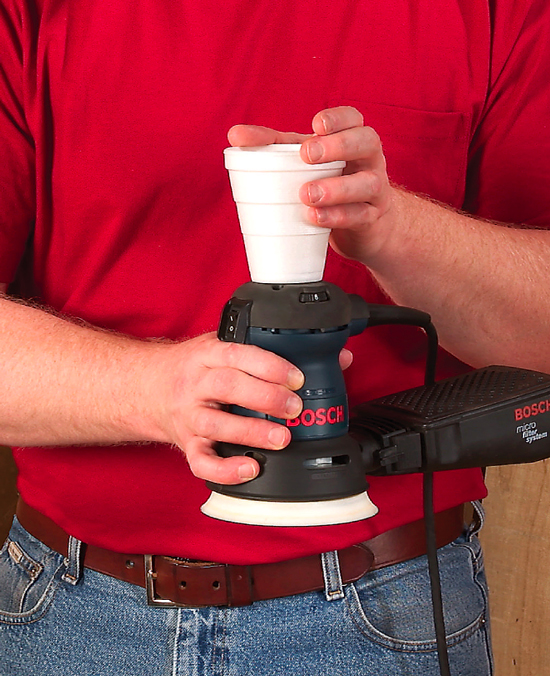
The Vibration Test |
Slightly press a partially filled Styrofoam cup on top of your sander. The ripples on the coffee’s surface show you how much the sander vibrates.
Waves around the perimeter and a calm interior indicate an acceptable level of vibration.
Waves around the perimeter and a calm interior indicate an acceptable level of vibration. |


Recommendations
All random-orbit sanders we tested perform well when you’ve figured out the right technique: light pressure and slow feed (see “Correct Speed and Pressure,” above).
The rate at which a sander cuts depends on two things: the disc’s diameter and the orbit’s diameter. A 6-in. sander does more work in less time than a 5-in. sander, but it’s also much bulkier. A sander with a 1/4-in. orbit removes wood faster than a sander with a 1/8-in. orbit. Larger orbits also produce larger swirl marks, however.
If your primary goal is to remove wood fast, choose a large-orbit sander, such as the 5-in. Bosch 3725DEVS ($135). A 6-in. large-orbit sander, such as the Ridgid R2610 ($149), works the fastest. If a smooth finish is your most important goal, choose a slower-cutting, small-orbit sander, such as the Porter-Cable 333VSK ($80). Many other sanders have a compromise mid-size orbit.
In any case, look for a sander that’s easy to hook up to a vacuum hose. The benefits of sanding without dust are so great that we feel this is a must. We also prefer a sander with variable speed, an optional PSA pad and a low noise level. Some manufacturers offer less-expensive models similar to those listed below that don’t have variable speed.
|
Ridgid R2600, $70
Many 5-in. professional-quality sanders perform very well, but this one stands out as a good value. It comes with a lifetime service agreement that offers free replacements for two normal-wear items: the hook-and-loop pad and pad brake. And it readily accepts a 1-1/4-in. vacuum hose.
|
|

Here are some supplies and tools we find essential in our everyday work around the shop. We may receive a commission from sales referred by our links; however, we have carefully selected these products for their usefulness and quality.


