We may receive a commission when you use our affiliate links. However, this does not impact our recommendations.
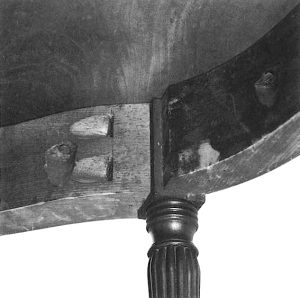 In the lowboy build that I’m working on for the February 2014 issue of Popular Woodworking Magazine, I’ve decided to use pocket screws to attach the lowboy top instead of driving nails through the top into the parts below. When some woodworkers hear that, I get the wrinkled-nose effect, as in “What the hell are you thinking?” It’s at that time that I mention that pocket screws were used extensively on some of the best examples of Federal furniture, including the Seymour table shown in the opening photo, from “The Masterworks of John and Thomas Seymour” by Robert D. Mussey Jr. (Peabody Essex Museum). It’s not a new technique invented by Kreg Tools (although the company has taken this joint to great length, and shopwoodworking.com has a great book that pushes the concept farther).
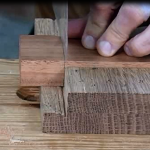
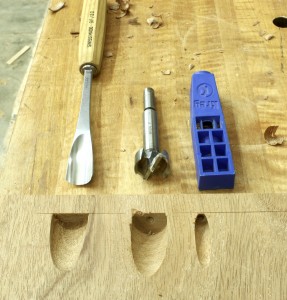 With my decision reached, I needed to look at appropriate ways to make the pockets. Of course I could use the Kreg jig, but in working toward period-like details, this jig is far away from what one would expect. For me, that left a couple of options. One was to use a fishtail gouge to sculpt out the pockets, and the second was to use a simple drill press jig that I had built years ago.The right-hand photo shows the results of three diverse methods. (I think it’s rather obvious how the Kreg-cut pocket hole differs from that shown on the Seymour table.)
If you look at the photo, you can see that my attempt at using a gouge – although not as deep as the drill-press cut pocket hole – was successful. I used a No. 9 sweep fishtail gouge, 20mm. (You can see the exact tool here.) The work was a bit time-consuming, and because there are seven pocket holes on the piece, I didn’t toss the idea, but I also wanted to look on.
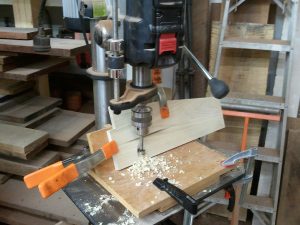 Over the years, I had forgotten about the jig that I built to drill pocket-screw holes using my drill press. I had assembled the jig to use with a benchtop press with a smaller table than the Delta press I use these days. Originally, the jig slid over the table, but to put the jig back into action, I had to clamp it directly to my table.
The jig – shown here cutting a pocket into one of the dividers used in the lowboy – kicks the workpiece back at a 22.5°. I have to position the work under the drill bit so the holes are cut sufficiently deep into the wood, but not so far as to weaken the opposite face. (Read this as it takes a bit of playing around to dial in the exact cut.) With the drill-bit position set, all one has to do is plunge the cut and the pocket is done.
The drill-press process is way easier than the hand work using the gouge, so I decided to combine the two methods. I hogged out the pockets using my drill press setup, then cleaned up any machine marks using the gouge. Ah, the best of both worlds.
Here are some supplies and tools we find essential in our everyday work around the shop. We may receive a commission from sales referred by our links; however, we have carefully selected these products for their usefulness and quality.


Totally agree. I use them for certain applications and don’t give a hoot about what some snobs think.
I like the process you came up with using the drill press & the gouge Glen.
Thanks for sharing.
Eric
central Florida
I agree with Bill, get the job done with whatever method is suitable.
I can’t see any problem whatsoever with using pocket hole joinery for non structural joints, like attaching a table top or a face frame. Done properly, the joint is quite strong. And if traditionalism is called into question, I read somewhere that pocket hole pegs were used as far back as ancient Egypt.