


We may receive a commission when you use our affiliate links. However, this does not impact our recommendations.
 When I lived in Maine, I had a wide array of projects and furniture that I wanted to build for our house. When it became clear, however, that we were going to move down here to Covington, Ky., I put the designs and wood aside, not wanting to build a bunch of furniture only to pack it into a van and move it – lumber is easy to move, furniture is a more delicate charge. So, now that we’ve arrived, it’s time to build a number of pieces, and start equipping our house from my woodshop instead of Craigslist. Today’s post is the first of a number that I’ll be throwing up here, detailing my exploits in outfitting our new home.
The first piece to get built is a simple coffee table. I’ve been holding onto a gorgeous slab of madrone (Arbutus menziesii) for almost three years now, since it was given to me by a Northern California lumberyard, in exchange for some chestnut that I had bought and ended up returning. The slab survived being used this long because of its dimensions – it is relatively narrow at one end, and only 1″ thick. I prefer to work from large slabs of wood and resaw my parts out from a single board, so generally work from at least 8/4, flitch-cut slabs – this piece never had enough meat to it to be broken down into parts for casework, chairs or a table.
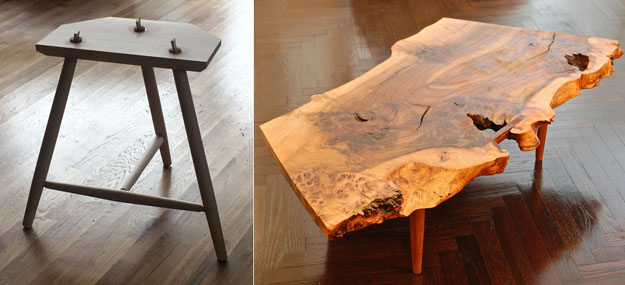
Can I combine these two styles, a staked joinery, live-edge slab table? Sometime’s this kind of mash-up is a bad idea, but here, I think the two will play nicely. Photos by Christopher Schwarz and Yoav Liberman.
So, armed with this madrone slab, which was the right size and shape for a coffee table, I set out trying to come up with proper legs and a frame for the table. I know this local writer and furniture maker who has some interesting ideas on how to work with legs on furniture, so I decided I’d try out his style on this design, a staked-leg structure, with conical mortises, wedged tenons and no stretchers. (You can find a lot of staked furniture in his “Anarchist’s Design Book.”)
With the design on hand, it was time to mill up the wood. The slab had been flattened when I bought it years ago, but it was due to be redressed. Two passes on each side through the 20″ planer we have here at the Popular Woodworking workshop was enough to flatten the slab, and a quick pair of crosscuts on the table saw later, the tabletop was ready for the next step. I tilted the blade in the table saw on these crosscuts, to continue the live edge’s bevel around to the sawn ends.
Next, to the legs. I didn’t have the madrone to make the legs, and with the wood nearly impossible to find outside of the Pacific Northwest, I had to turn to another species. In this case, I went with cherry (Prunus serotina) because I had some old 18″ rounds I’d bought in Massachusetts, and because the wood complements the madrone nicely. If it isn’t already obvious, I have a stock of random boards and pieces of wood that I’ve carried around the country with me for some time – as Krenov said, when you find the right piece of wood, ”beg, borrow or steal” to get ahold of it.
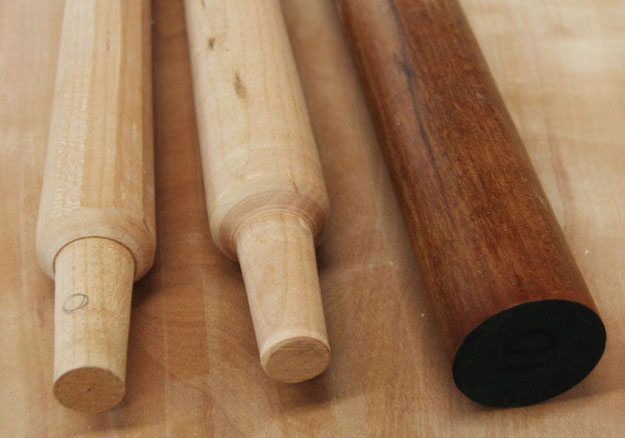
Here are the two leg styles I was playing with, and the cherry round stock I made them from. On the left is my final design and in the middle is the round, turned style I decided looked a bit too blobby here.
I wasn’t sure how I wanted to style to legs – turned round, octagonal or faceted. So, a good place to begin was to turn the tenon and tapered shape on the lathe for one leg and get a look at the form before proceeding. I’m not a seasoned turner, but I’m OK with the more basic geometry, so armed with a roughing gouge and skew chisel, I got there. The leg looked nice in the round, but I decided to go with a faceted look, not round or eight sided, both because I like the look and to break up the legs from looking blobby, which they did when staged under the live-edge slab.
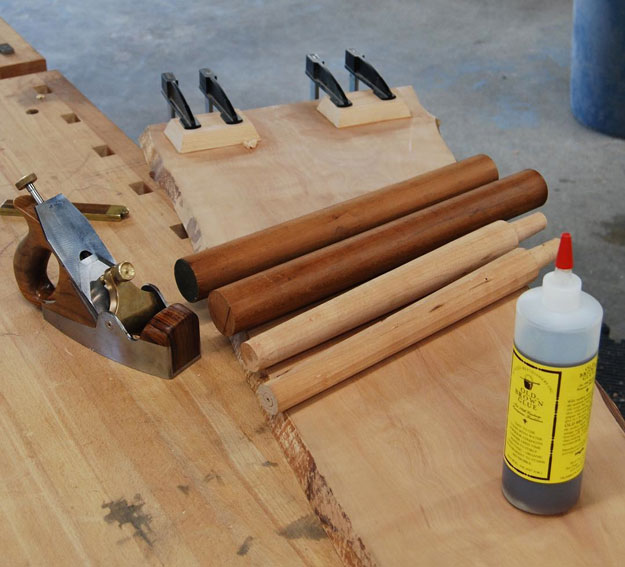
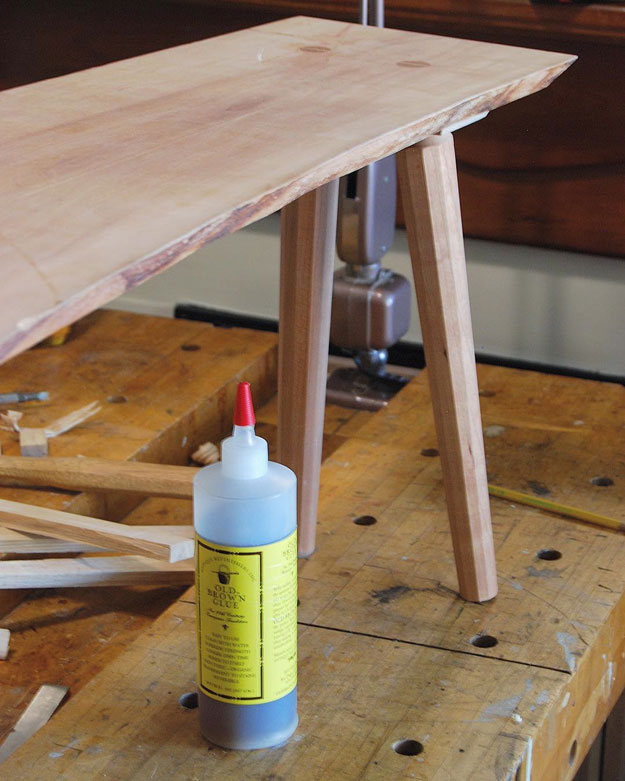
There’s a lot going on in this photo! The legs are in the process of being turned – you can see how dark cherry ages, with the difference between the fresh turnings and the rounds I bought. The bottom of the slab has also been smoothed, and the glue blocks, to strengthen the joinery, have been put on with Old Brown Glue (of course – because it’s my favorite).
With that design decision made, I turned the tenons and taper on all of the legs, then brought them to the workbench. I affixed the stock between the tail vise and a bench dog and handplaned the facets. I wasn’t shooting for a certain number of sides – instead, I picked a facet width that looked right and brought those facets around the leg. When I worked back around to my first facet, I fudged the width enough to meet cleanly with where I’d started. They turned out to be about 14 sides, with facets roughly 3/8” wide. I like clean geometries, but this quick faceting can look beautiful and intentional, even with its quick execution.
I also needed to fatten up the areas of the slab where I would be boring the mortises in the top, to give some extra purchase to the joinery. I glued some small cherry blocks in each place where the legs met the top. I beveled the sides of these blocks to obscure them from obvious view when looking at the table, and to refine the look a bit (from being a glued-in block to being an incorporated structure to the top). Before gluing these blocks on, I smooth-planed the bottom surface of the board, because I wouldn’t be able to do so easily once the blocks were on and I needed a smooth surface for a good glue joint. I used Old Brown Glue, which provided the strength and reversibility I like in my glue.
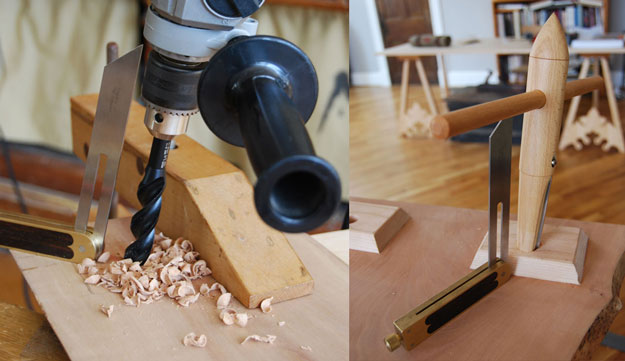
On the left: Drilling the mortises is simple with a beefy corded drill and Wood Owl auger bits – it was nice to have access to Christopher Schwarz’s setup for my first time doing this kind of joinery. The clamp is holding on a piece of scrap wood, to back up the bit’s exit. On the right: I’m using my Tim Manney reamer to make the mortise conical. I love this process, and the reamer can be steered slightly to correct for any drilling error.
With legs and the top milled and ready for joinery, I brought them all down to the obscure local writer’s storefront around the corner from my house, to borrow his sharp auger bits and a heavy-duty power drill. I decided on a splay and stance that I liked then drew some sightlines to aid in drilling. Armed with a bevel gauge and the drill, I put in the mortises, which were drilled from the top side of the slab, where I had more room for drawing sightlines, and an easier time registering against the surface. I had turned the tenons to a 6° taper, to match my Tim Manney reamer, so I reset the bevel gauge to 3° less than my intended angle (to account for the taper of the reamer) and reamed the mortises by hand. These were reamed from the bottom because the conical tenons fit in from the bottom – this makes alignment with a bevel gauge slightly harder, but it only requires a more careful eye.
So, now that I had my joinery in, it was time to glue up. I sawed the kerf for the wedges in the top of the tenon with my Brooklyn Tool & Craft Hardware Store Saw, which creates a wide kerf – large enough to take a big wedge. I made the wedges from some air-dried ash (Fraxinus americana) that had been split out as firewood and therefore had nice straight grain. The glue-up was straightforward – each leg gets glue on the tenon and mortise, is put home with a mallet, then wedged (with glue on the wedge to ensure a strong joint). The glue set up overnight, and in the morning, I sawed off the parts of the wedge and tenon that protruded out of the top with a flush-cut saw.
The morning after the glue-up, the proud tenons have been cut flush and quickly planed. (I’ve not yet here leveled the legs to the ground).
With the glue-up done, I leveled the legs to the benchtop, the closest thing to a flat surface in my 19th-century apartment. I leveled the tabletop to the bench surface with shims, then went around with a block of wood and a pencil to scribe a line parallel to the benchtop. I crosscut to that line. Next, using a technique popular among chairmakers, I clamped a plane in my bench’s vise flush with the surface of the benchtop, and used that to plane the legs flush, taking care to put a small bevel on the legs to prevent break out when planing the end grain.
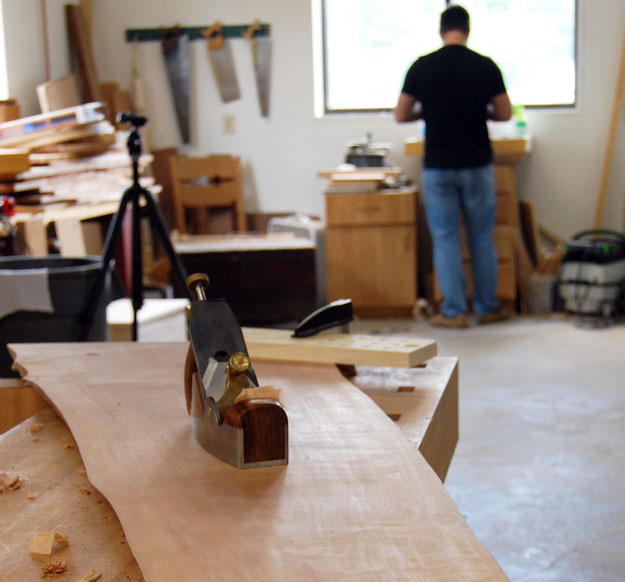
Smoothing the surface with a beautiful Ray Iles infill plane. David Lyell in the background, flattening the backs of his plane irons and learning to sharpen.
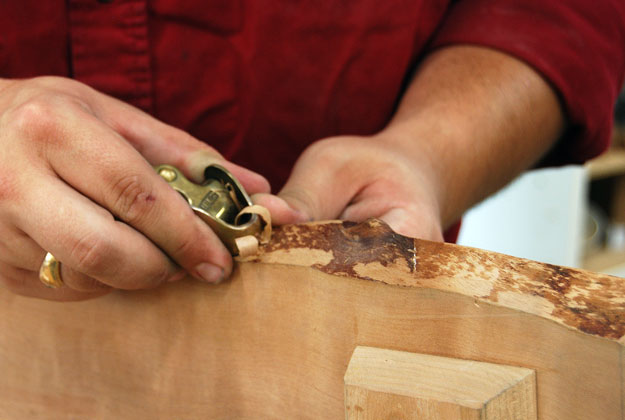
Using a small convex-bottom plane to remove the cambium, or inner bark, that was left on the live edge of the slab.
Finally, it was time to address all of the surfaces to prep them for finishing. I used a smoothing plane to address the top, and my small violinmaker’s plane to smooth out the live edges of the slab. The small, convex-bottom plane works nicely on irregularly curved surfaces; I prefer it to curved-bottom spokeshaves (what many woodworkers would reach for in this case). I’m a Krenovian at heart, and when I can use a plane, I do. I used my low-angle block plane to touch up the end grain and used both small planes to cut back the sharp edges of the tabletop.
And so, with everything smooth and prepped (with no sanding necessary, due to madrone’s workability and some sharp tools) it was time for finish. I wanted a durable, easy finish for this table – one I could apply as an oil due to the nooks and crannies. I also have an aversion to pre-finishing parts when working between multiple shops. So, I went with a matte polyurethane wiping varnish. I put a few coats of super blonde dewaxed shellac on the top to stave off any blotchiness, which occurs often when oiling dense, fine-grained woods such as madrone (or maple, cherry and the like). I have found that shellac acts to even out the wiping varnish and adds depth to the show surface, and adds protection. I used a light cut of shellac, applied in long strokes with the grain from a pad, and let it cure for an hour or two, then varnished the table.
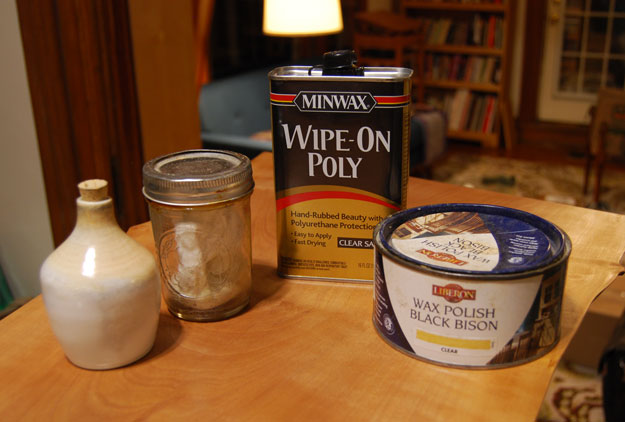
The three finishes I used on the table – super blonde shellac on the left (I made the porcelain bottle for just this use), the wiping varnish and the hard wax. This left a durable finish and pleasing finish – tiny little handplane marks can still be felt, and the wood feels relatively natural, not lacquered.
There was no special trick to varnishing this table – I just applied a healthy, even coat with a rag, gave it 5 or so minutes to soak in, then wiped off the excess with a clean rag. I did that four or five times, on all surfaces, allowing a few hours between coats to let the prior coat cure a bit. Because all of the surfaces were finished with a handplane, there was little raised grain. I used #400-grit Abranet to touch up the few spots of raised grain after the first coat and had no need to sand after that. After the last coat of polyurethane – once I had a uniform coverage of my surfaces and it looked right – I let the finish cure for 24 hours before applying a hard wax to all surfaces. In the end, the surface does not look like a glossy bartop or a finely shellacked surface – it’s a matte, serviceable finish that shows some minute handplane marks and imperfections, which is how I like it. Finishing with a handplane does not necessarily leave you the perfect surface – it leaves a pleasant, tactile surface that has interesting reflections and personality.
And finito! I’ve got a nice new coffee table. It is 17″ high, which makes it a good foot rest and a good place to put a laptop when watching the new season of “Twin Peaks” or whatever is on the digital boob tube. I was skeptical at the outset about combining two schemes of furniture making, the live-edge slab and the staked legs, but in the end I think it came together rather nicely. The madrone really sings – it is without a doubt my favorite wood. It takes and holds detail beautifully, its color and grain are like the beautiful love child of cherry and Swiss pear, and it holds a dear place in my heart as the sort of mascot wood of the Krenov School, at least when I was in attendance.
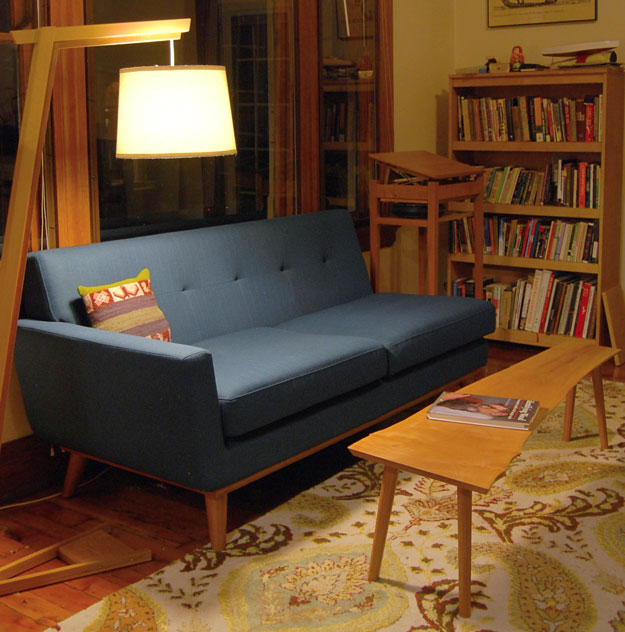
Fitting right in with some of my other furniture. The madrone standing desk at the back was my first time using madrone – I’ll never look back.
If this is an aesthetic that appeals to you, I’d recommend two videos we’ve got over in the shop: “Working with Live-Edge Tops” by my fellow Krenov School Alumnus Martin Goebel, which goes deep into working with slabs of wood for tabletops, and “No Fear Chairmaking” by Christopher Schwarz, which goes much more in-depth on how to design and make staked furniture. The two play very nicely together. If I get my hands on another, larger slab, I may be tempted to try this melange of styles again – at a larger scale for a nice dining table. If I need to build another coffee table anytime soon, I will certainly do it this way – it was fast, cheap and good.* which my father used to say you could only ever get two of in one project.
* My father used to tell me you get only two of those in any project: fast and cheap, fast and good or cheap and good. You can’t get fast, cheap and good. Usually.
Here are some supplies and tools we find essential in our everyday work around the shop. We may receive a commission from sales referred by our links; however, we have carefully selected these products for their usefulness and quality.


Looks very nice to see it all together after following on IG.