We may receive a commission when you use our affiliate links. However, this does not impact our recommendations.
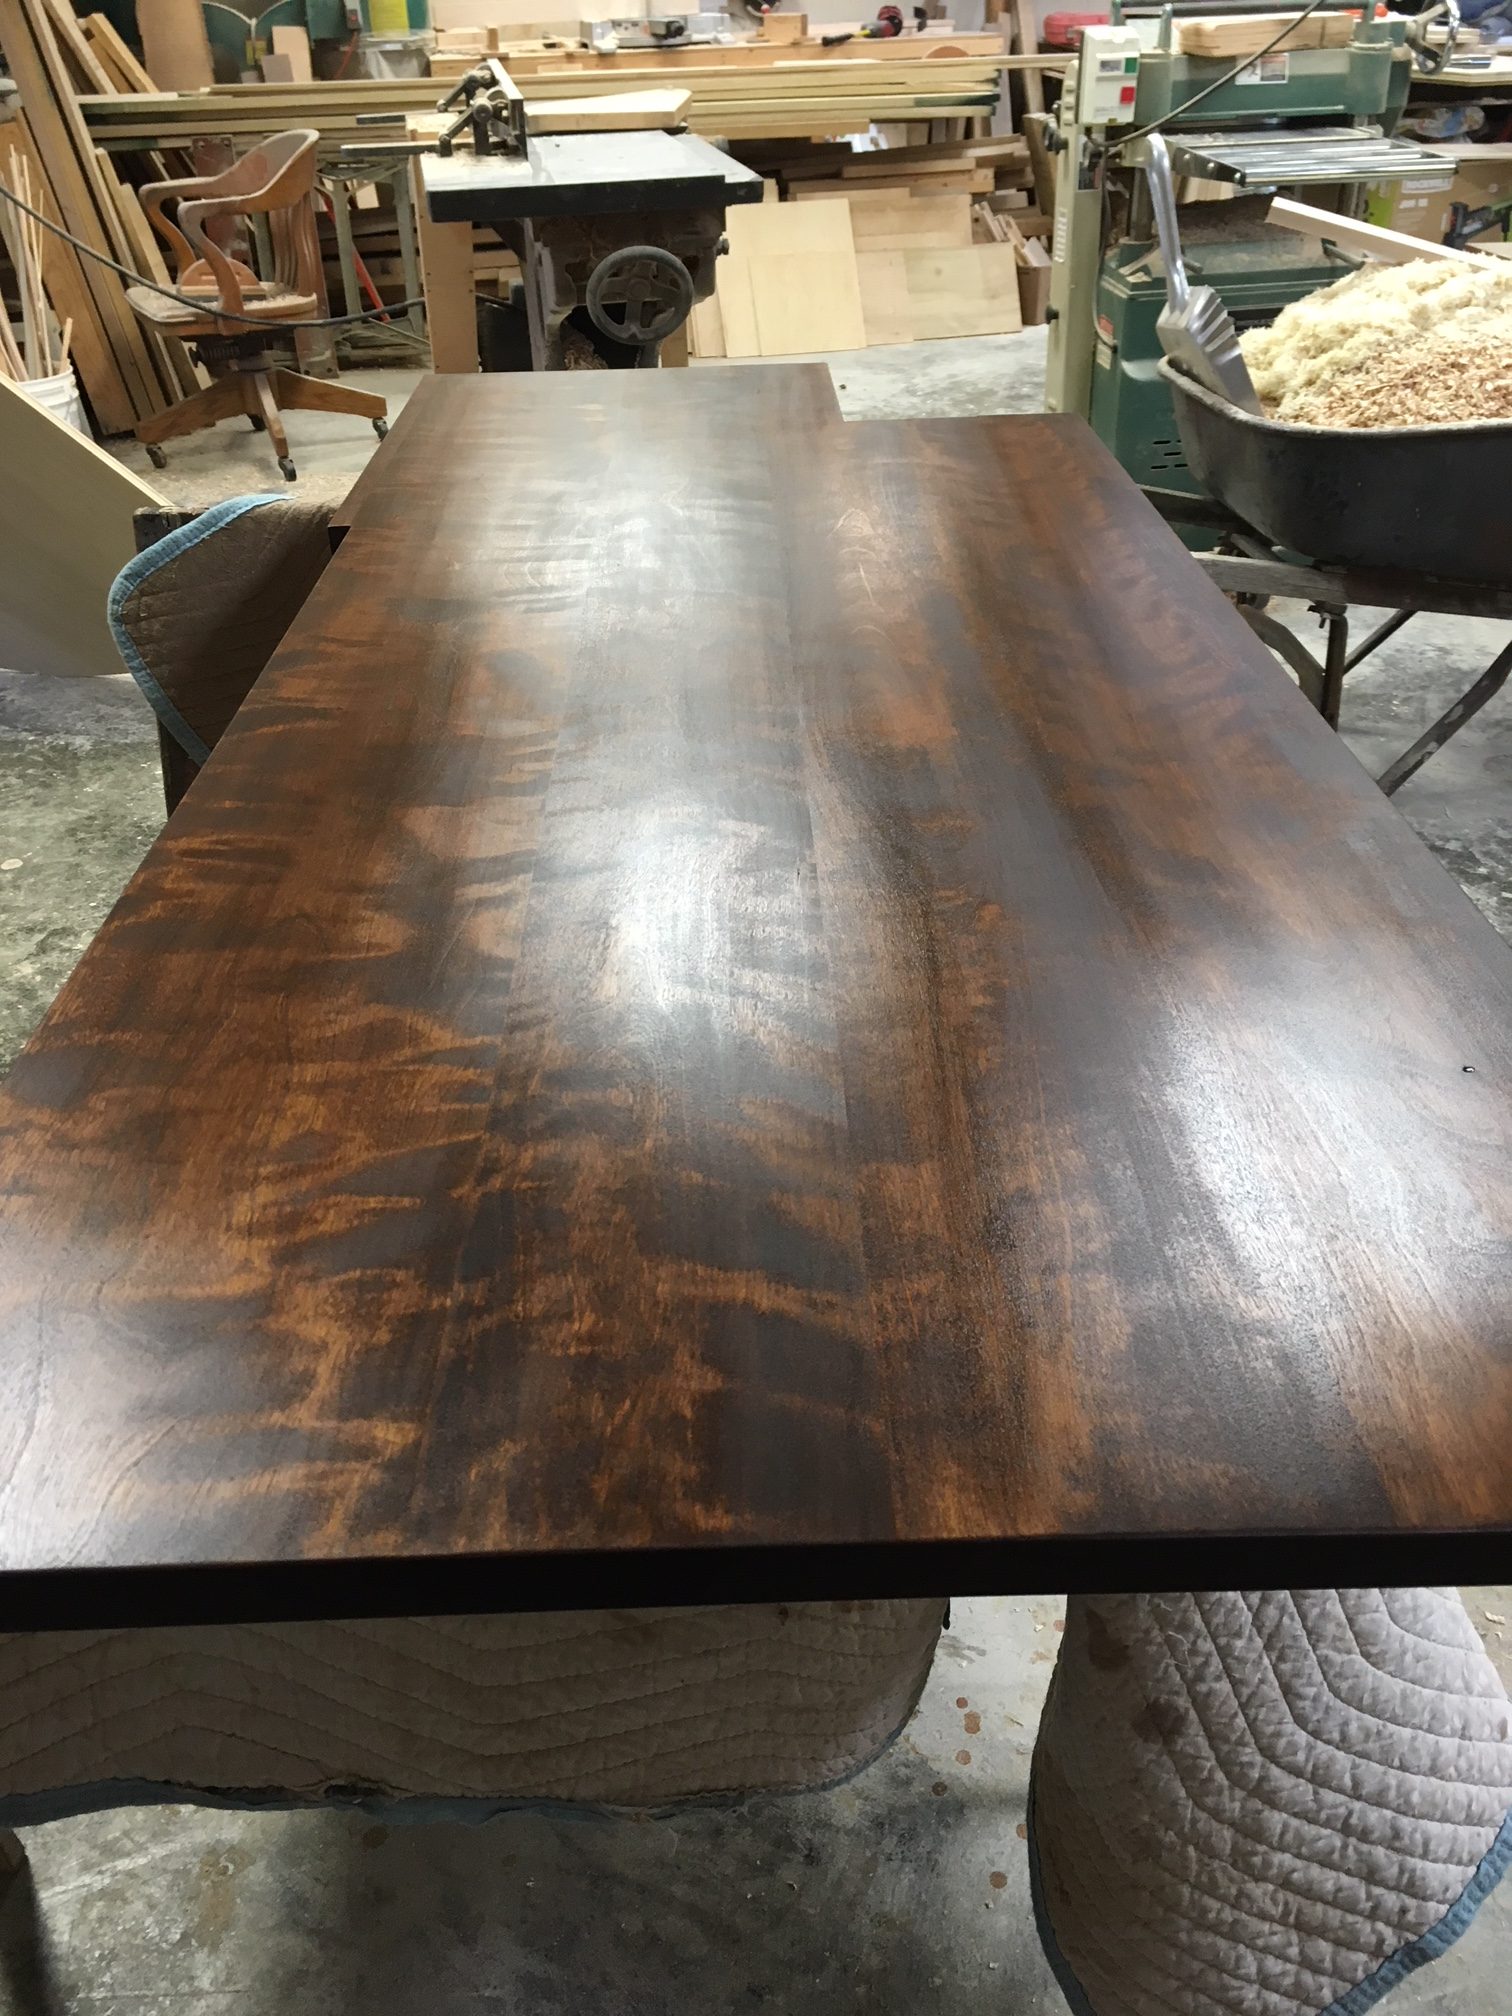
Dyed, stained, and glazed, the solid birch counter is ready to be sprayed. It should go without saying that the counter will be installed to allow for movement across the grain.
You find yourself needing to fit a counter in a tricky space. The job will involve fitting one end to a wall, notching the counter around a half-wall and the jamb of a cased opening, cutting an L-shaped section to fill in a narrow gap next to the stove, and finished overhangs.
Where do you even start?
Take it one step at a time. Assess the cabinets, walls, and trim to determine critical orienting points. A complex counter fitting job involves fitting one section at a time to get an accurate read on where you’ll cut next.
Step 1
In this case, the most important edge to start with was the main overhang on the kitchen side. Like the overhang at the peninsula’s finished end (in the foreground, below), it needed to be 1 inch.
Place the counter in position accordingly.
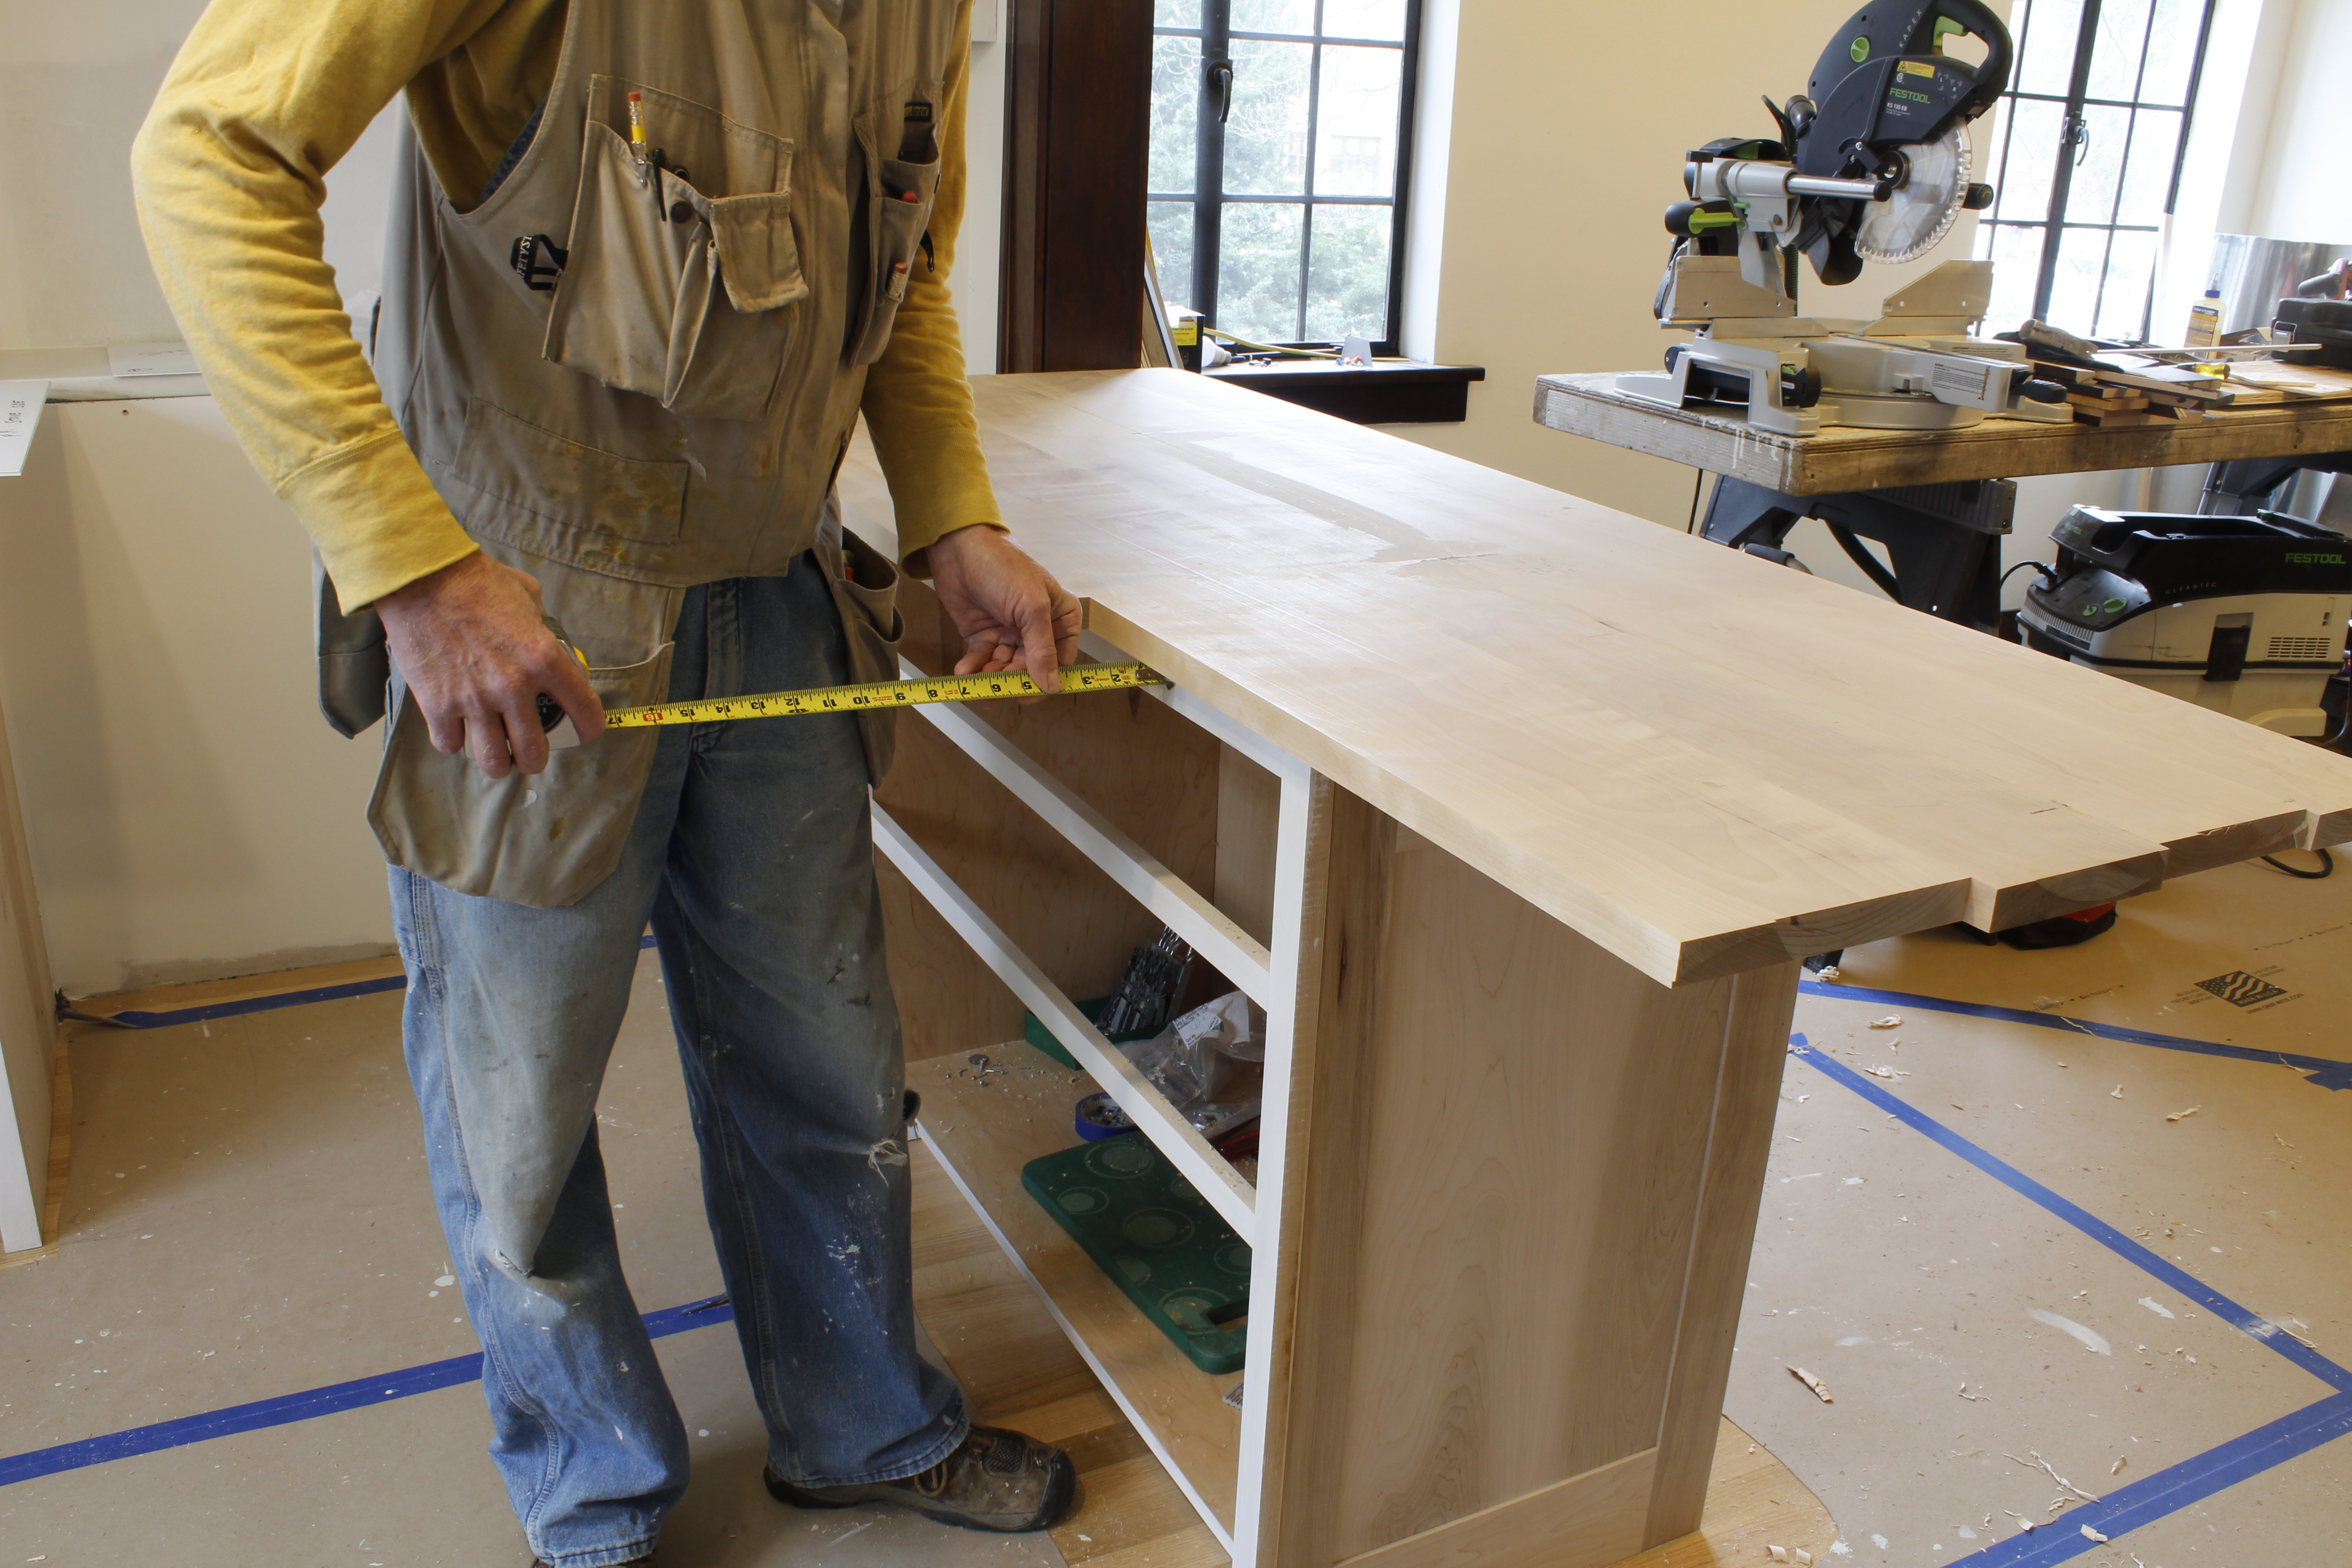
Checking the overhang on the kitchen side of the counter and adjusting the counter’s position to ensure a consistent overhang of 1″.
Step 2
Make sure the edge is parallel all the way along the critical edge.
Note: Don’t worry about how the counter fits everywhere else. It doesn’t matter that the rest of the counter (including both ends) is not yet fitted.
Step 3
In our case, the next part to fit was the trapped end, i.e. the end that would go against the wall visible at the left side of the image below. Walls are rarely square; in this case the counter fit tightly in the corner, where there was a build-up of drywall mud, but there was a gap of about 3/16″ at the front edge. In other cases there could be a concave or convex wall plane; it doesn’t matter what the shape is, you just need to scribe the counter to conform to the wall.
Ordinarily this would be simple, but in our case we also had to notch the back of the counter (the side that would overhang into the dining room, providing space for a couple of stools) around the jamb of the cased opening between the rooms.*
It was impossible to gauge accurately where we would need to cut the notch until after we had fitted the trapped end of the counter to the wall. But at the same time, we couldn’t push the counter up to the end wall, because doing so would have distorted the scribing of the trapped end. To keep the reference points accurate, we left the counter where it was–i.e., with its kitchen-side edge overhanging by 1″ and the end that would go against the back wall almost a foot away from that wall. Even at a foot (or more) away, you can scribe an object to its surroundings; in this case, Mark used a piece of scrap cut to the same length as the biggest gap between the counter’s end and the wall.
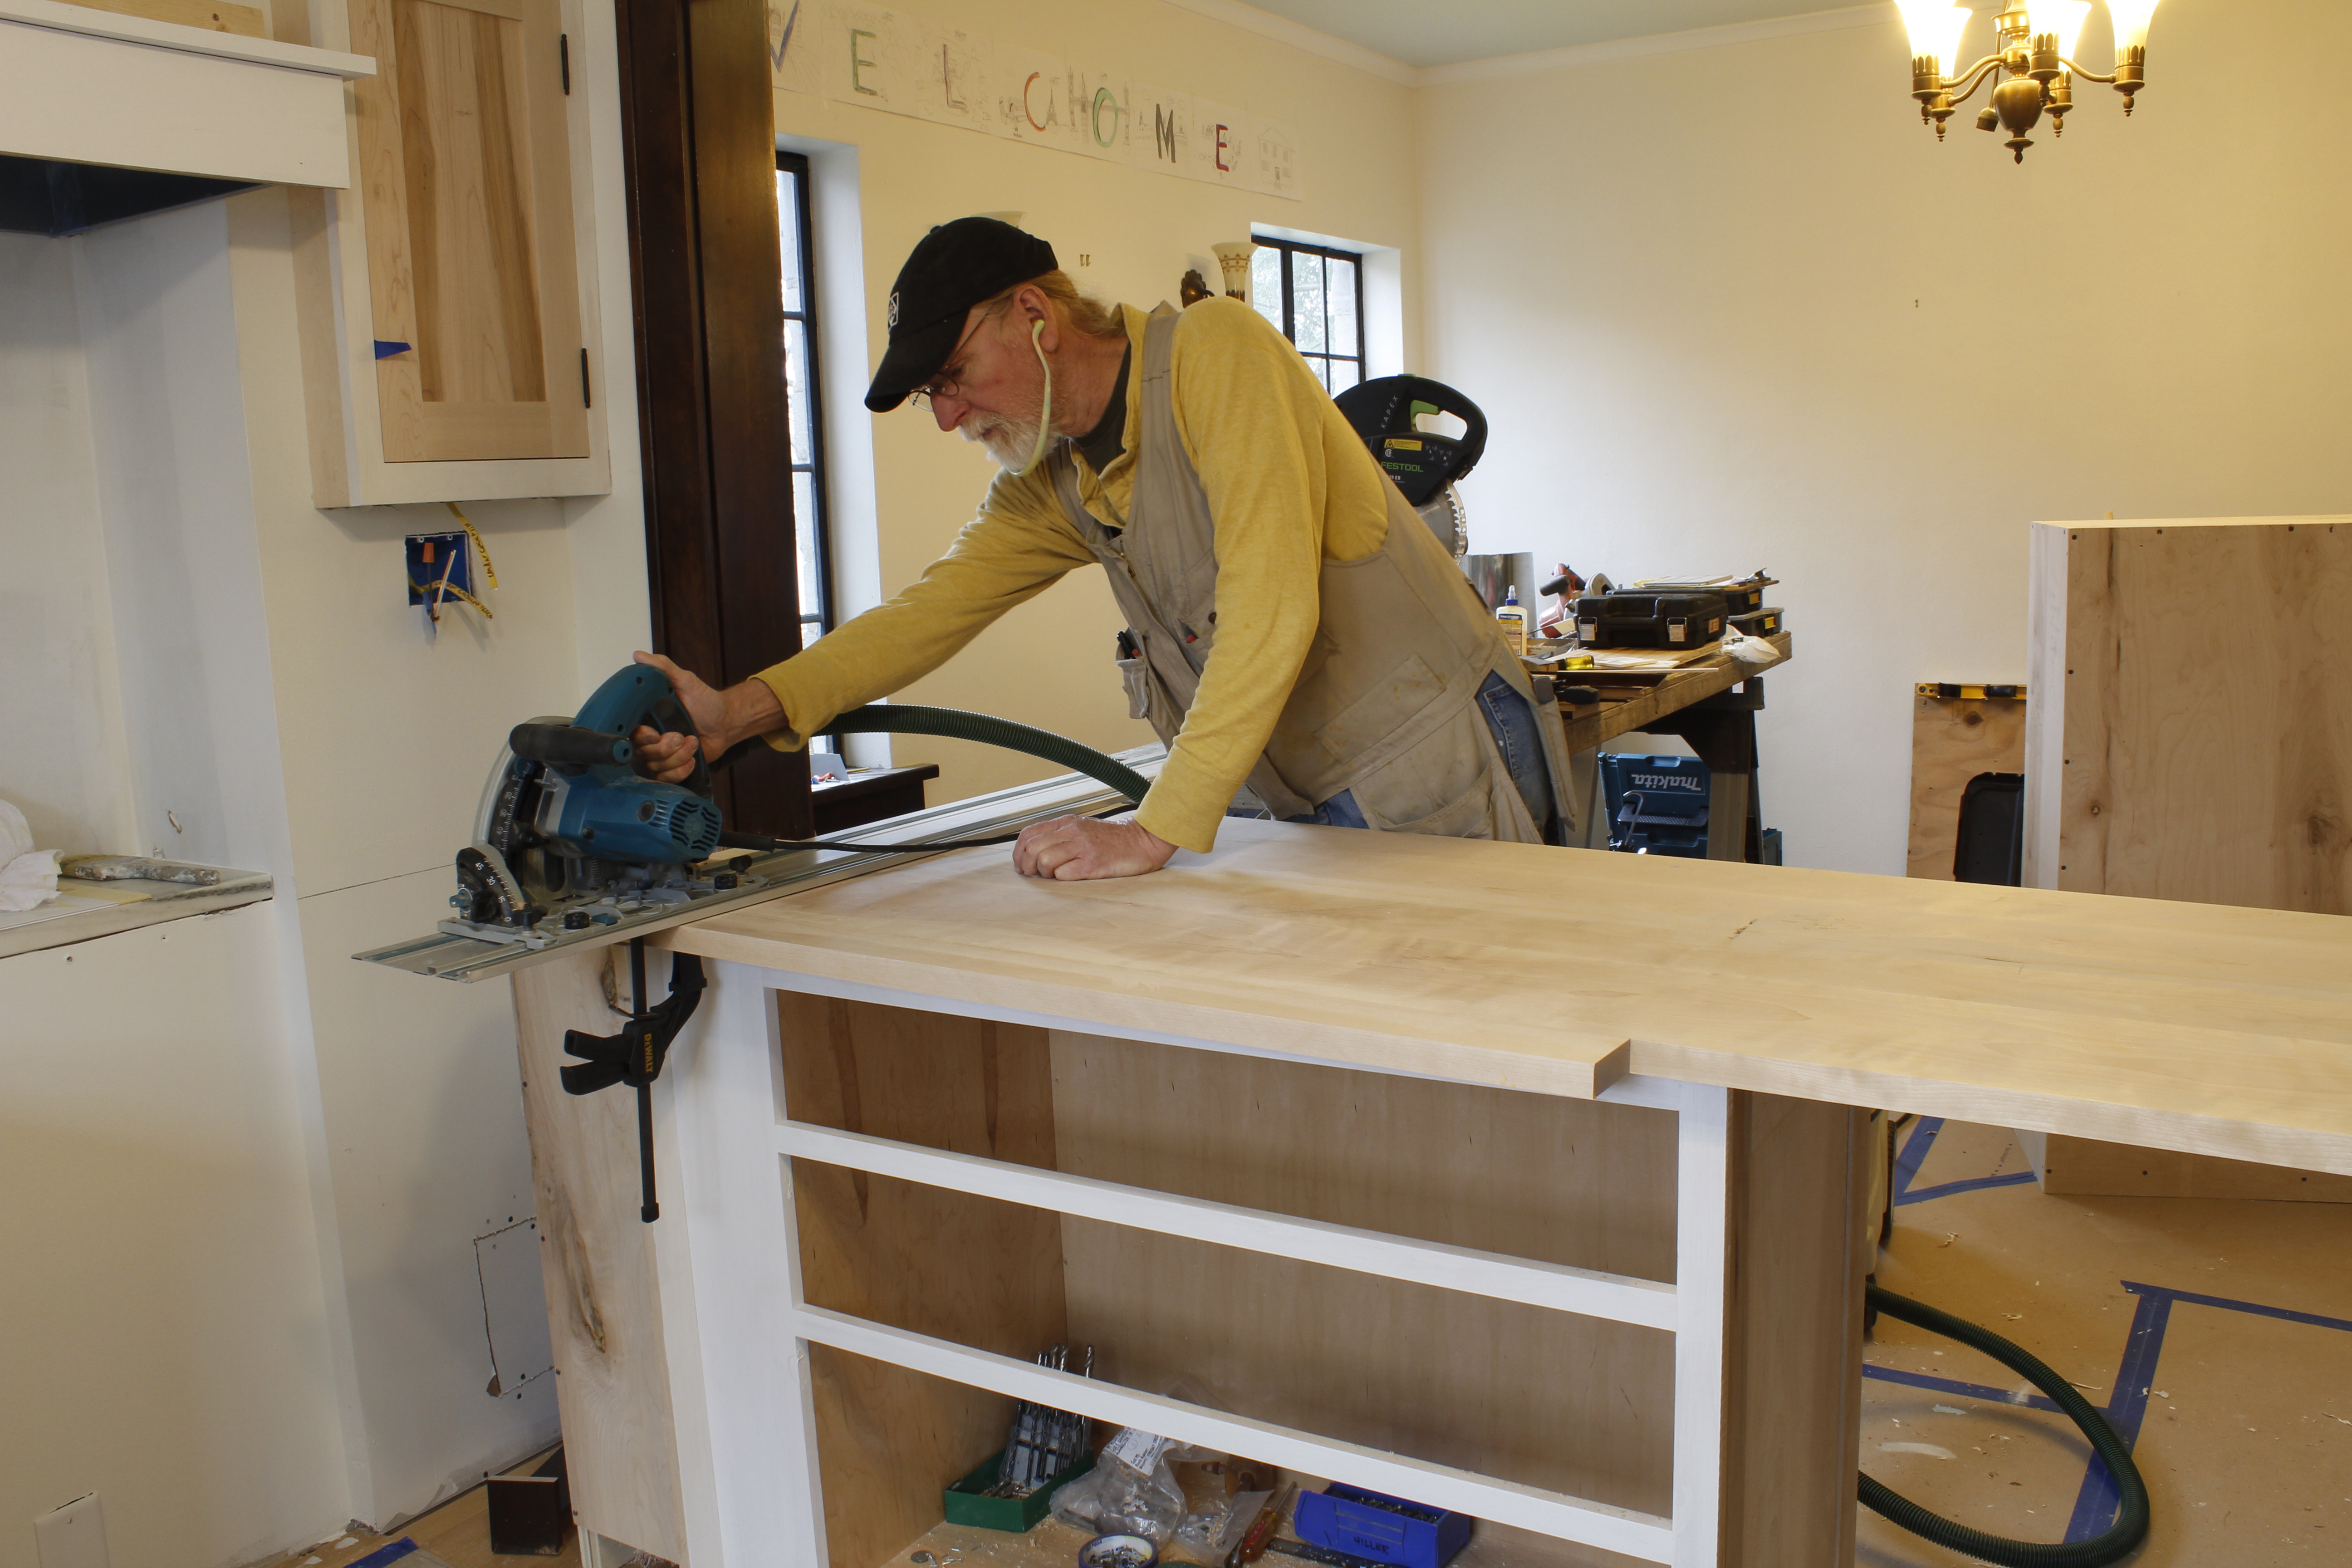
Mark cut the end with the counter still set in place, using a track saw. He set the depth of cut so as not to go through the top of the cabinet below the counter.
Step 4
Next we checked the distance from the inside corner of the trapped end to the front of the jamb, which would be the start of our notch.
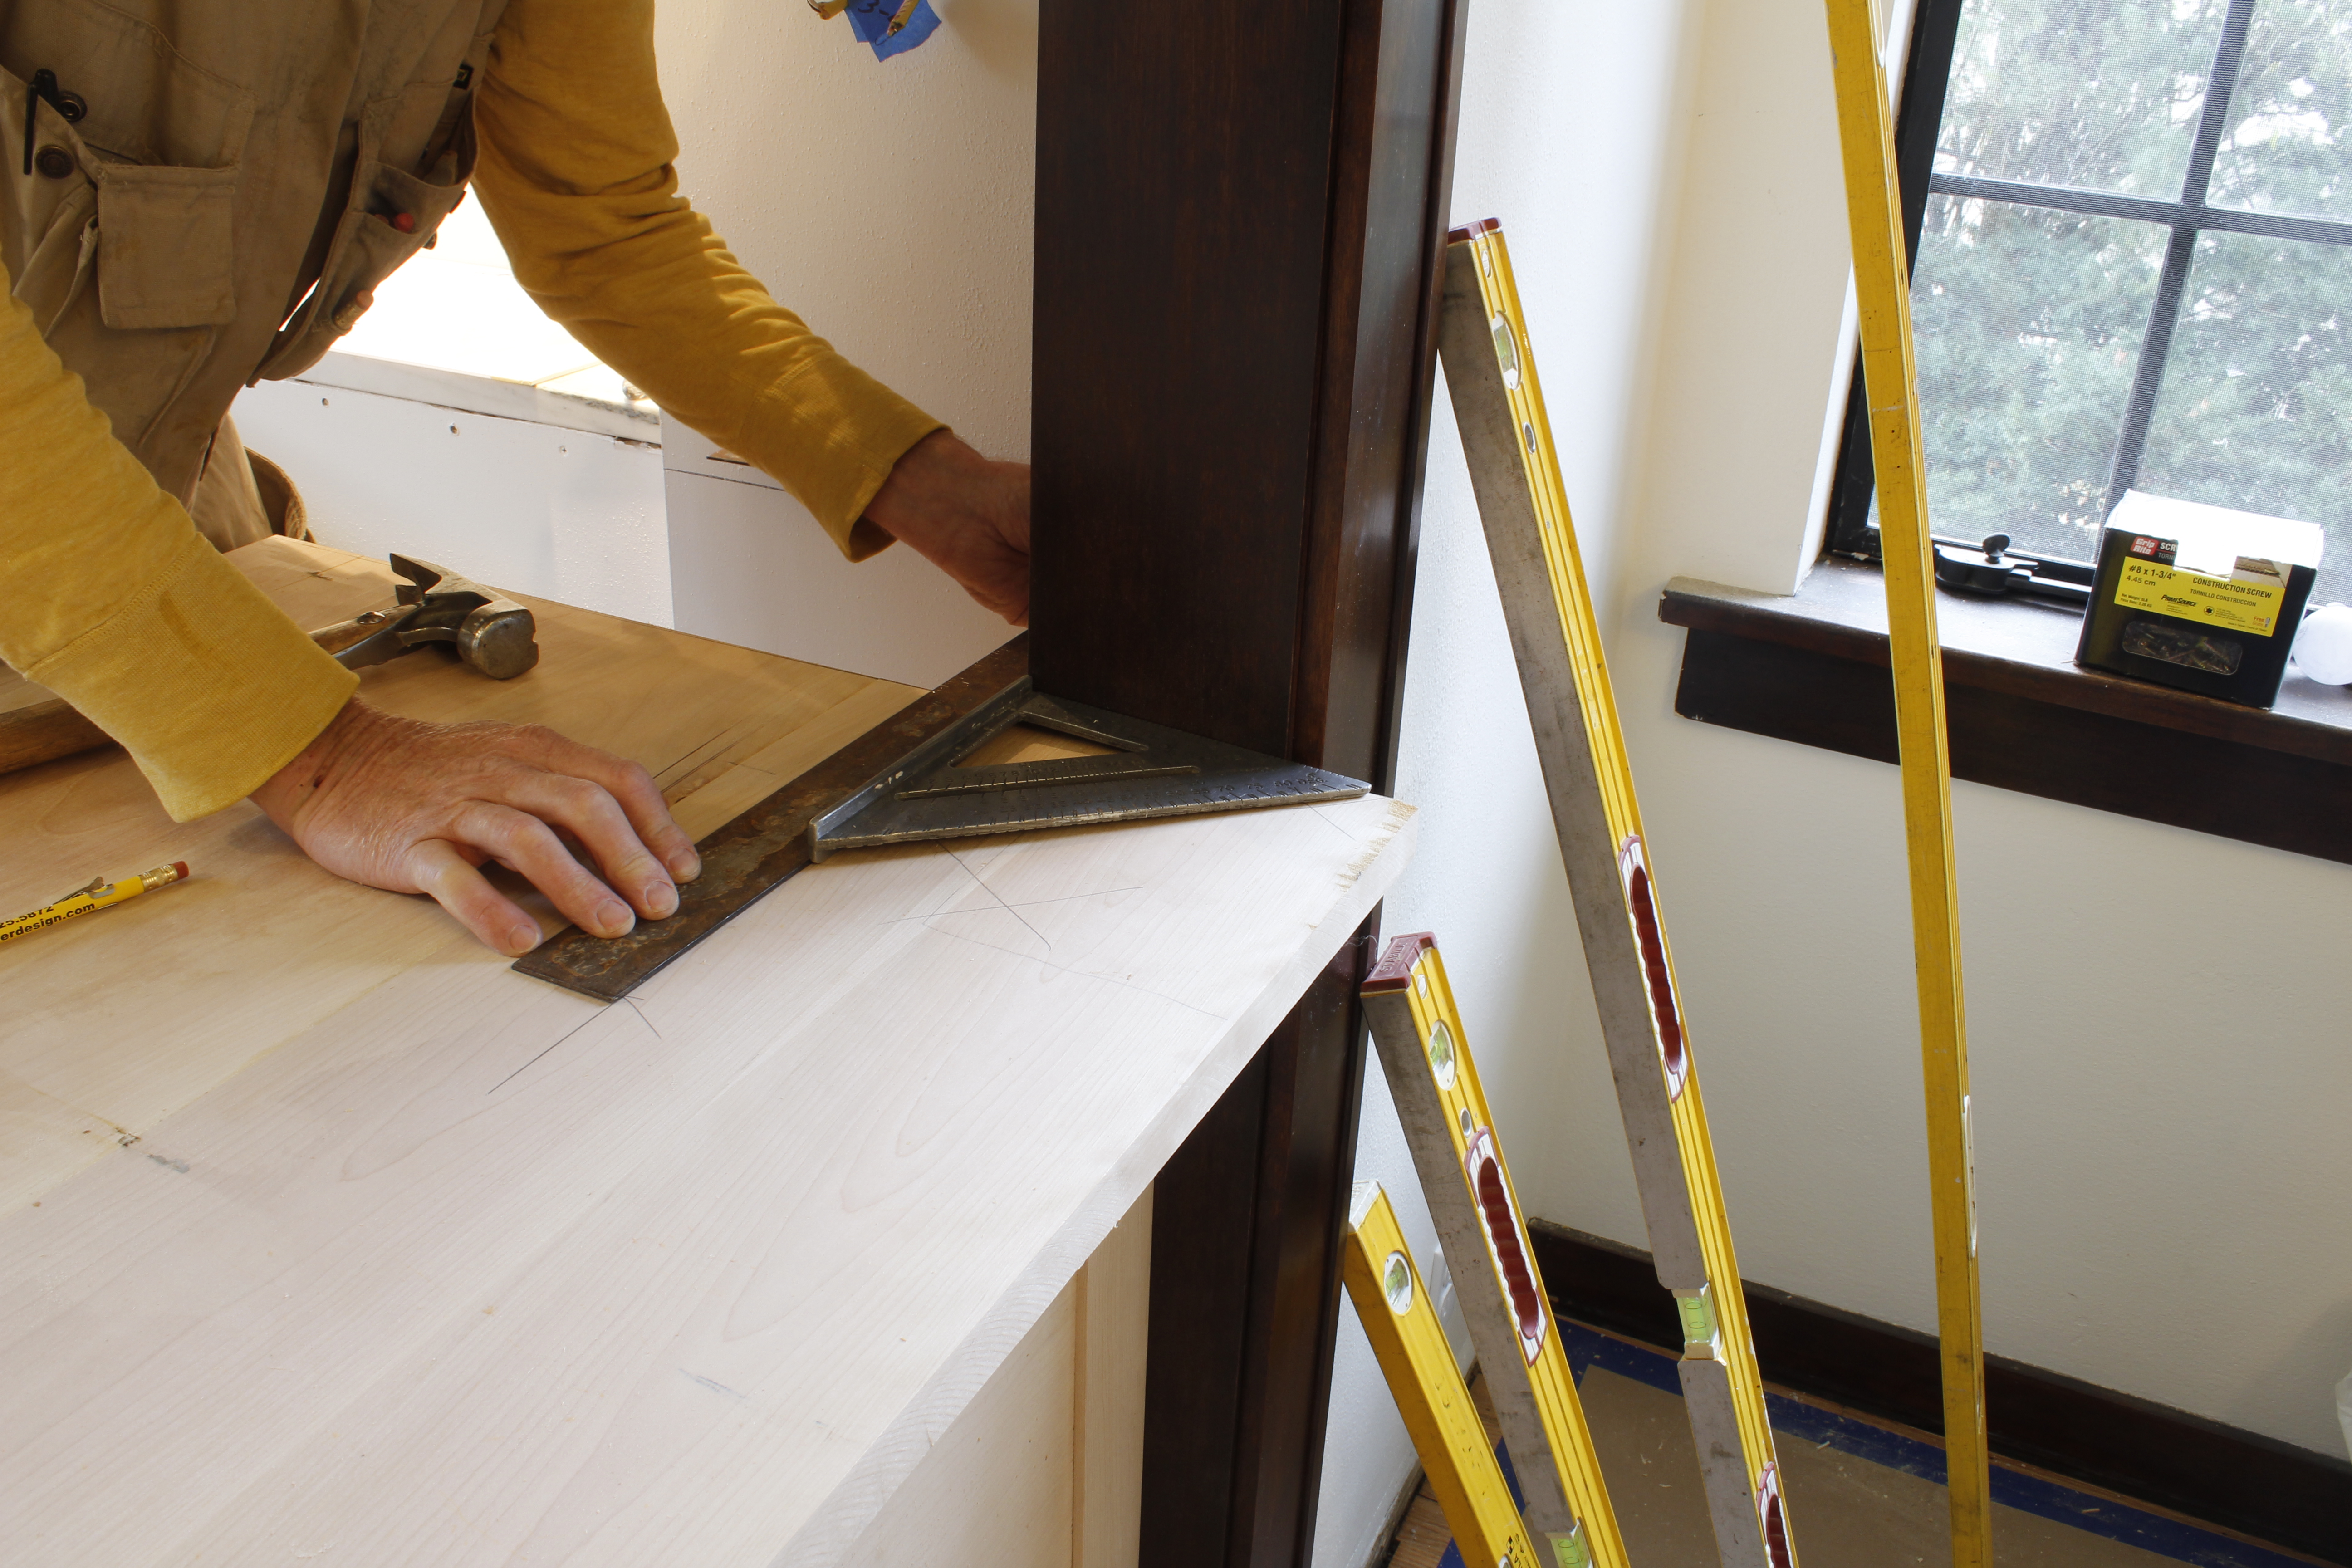
Mark used a framing square to measure the distance from the inside corner of the wall (near his left hand) to the front of the jamb, then transferred this distance onto the counter.
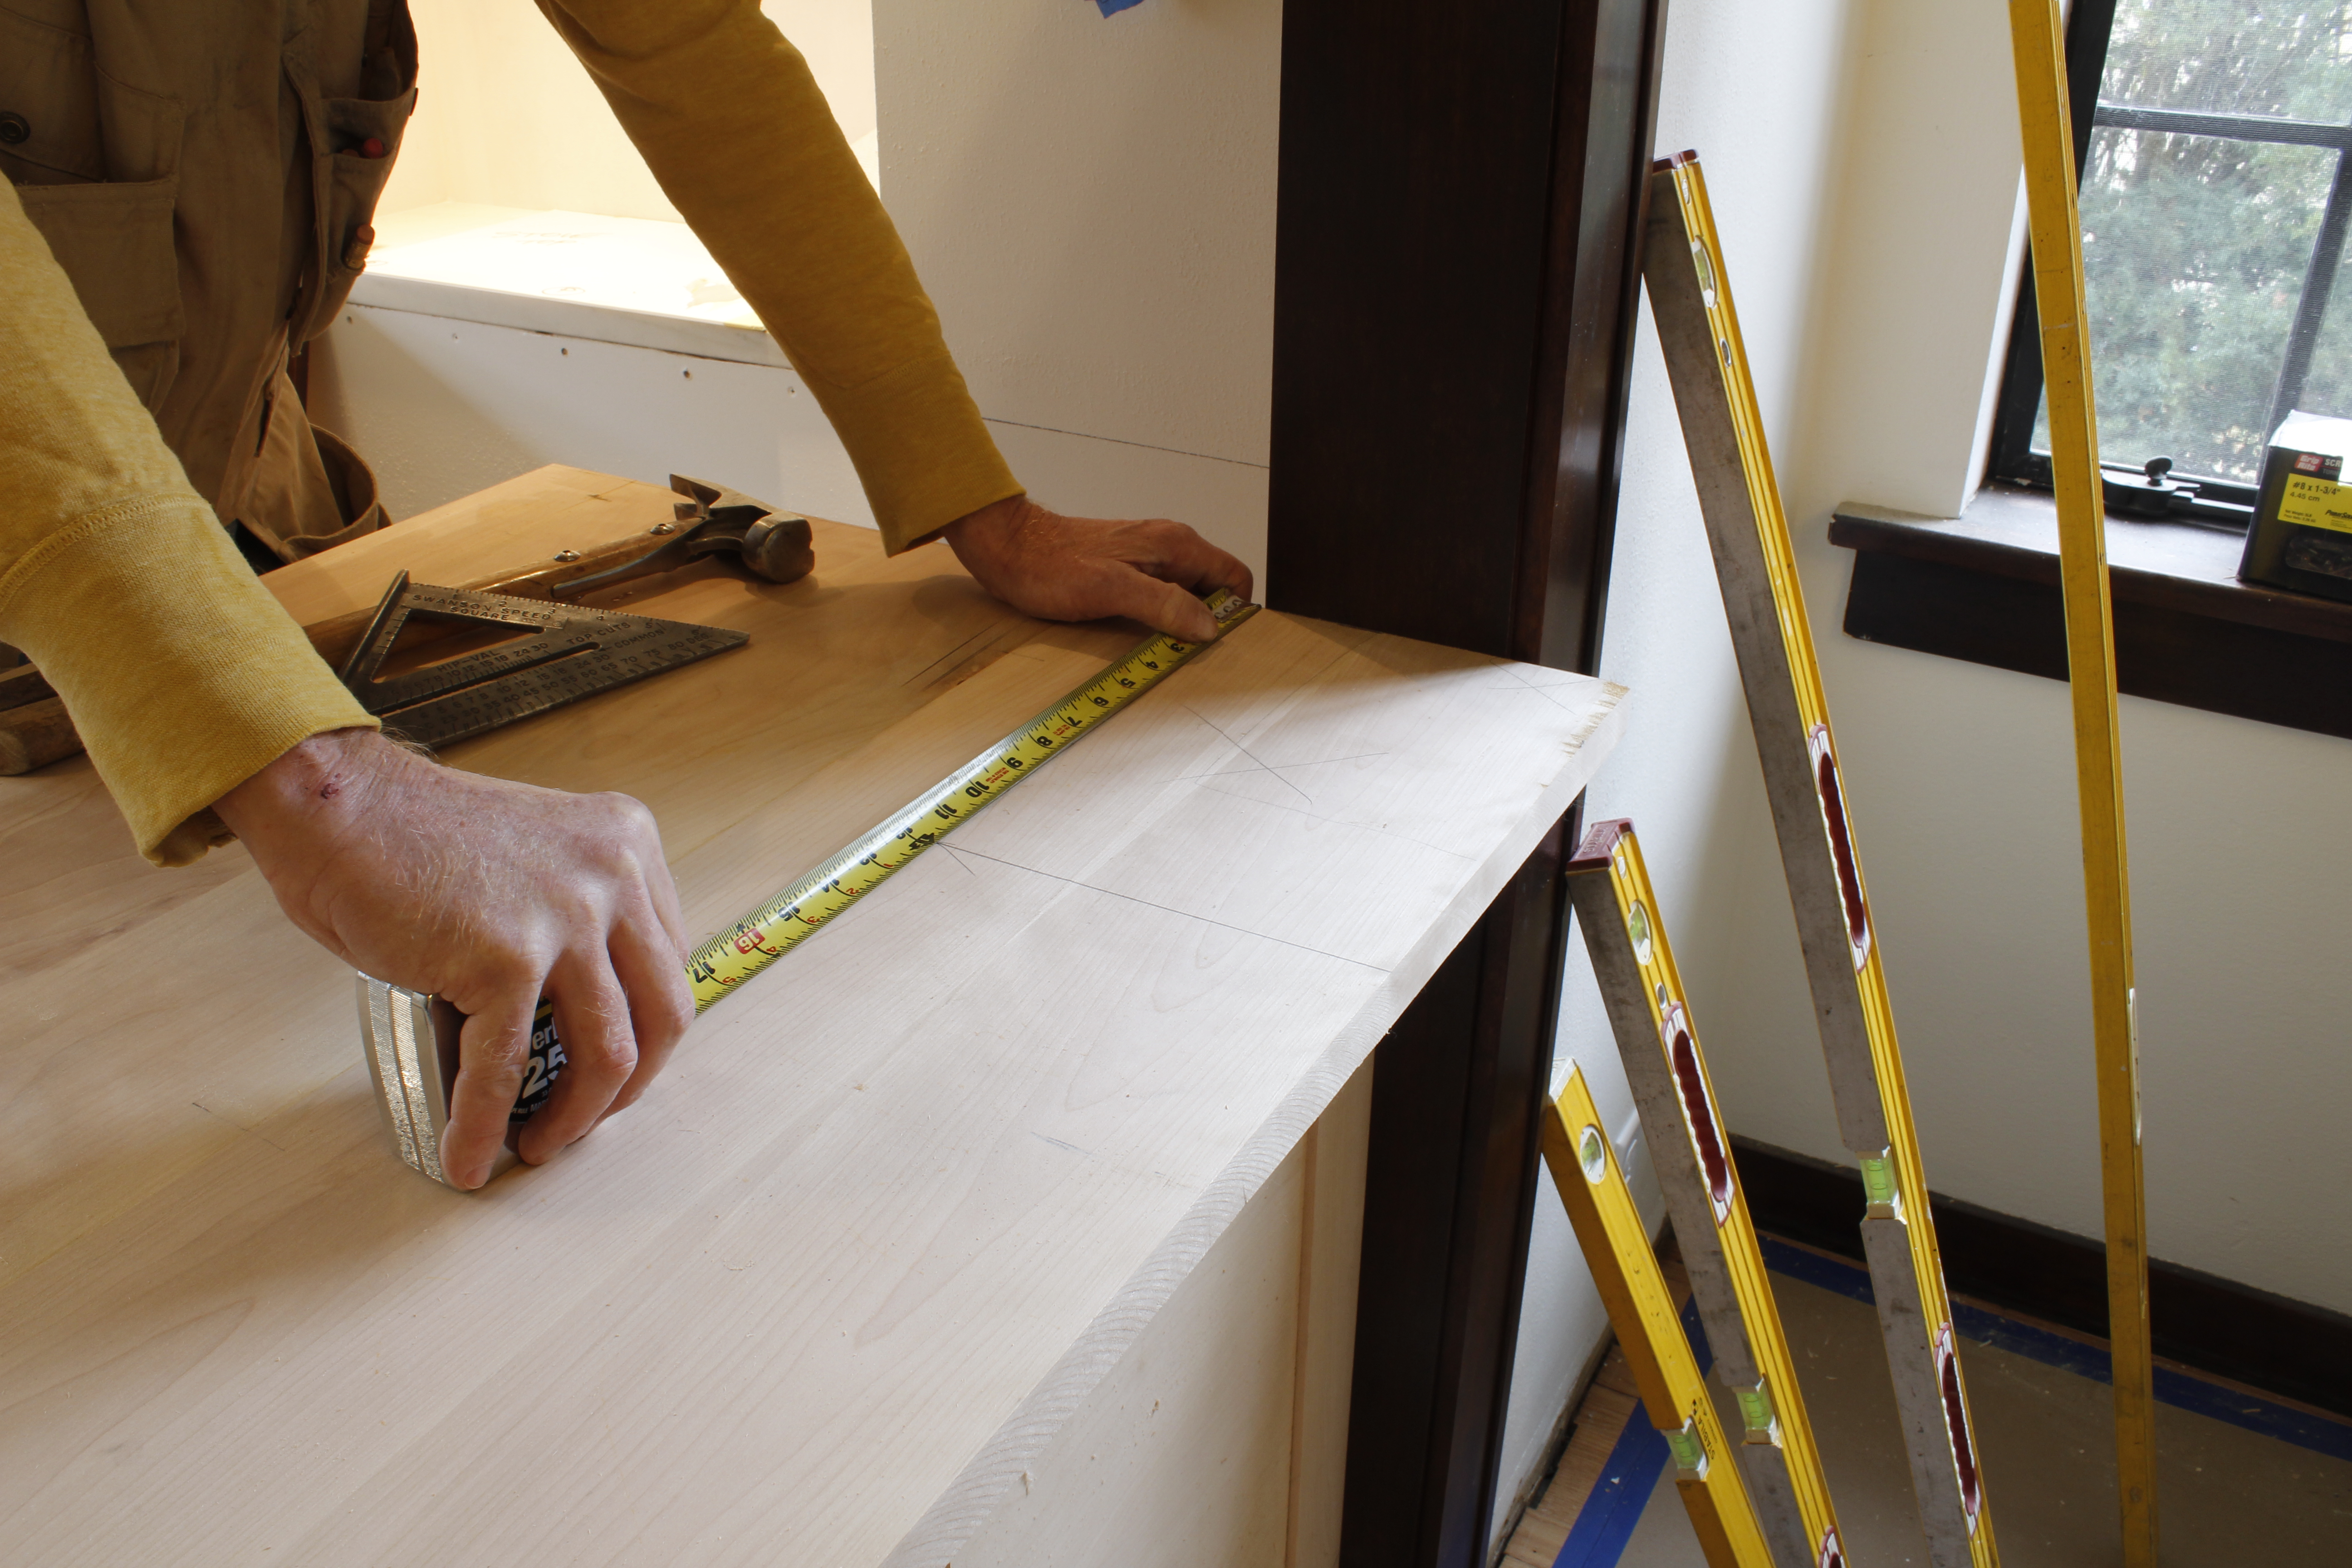
Here Mark is showing the measurement with a tape measure for clarity. This measurement is the distance from the inside corner of the wall to the starting point of the notch for the jamb. (Although Mark has squared a line across from the overhanging edge to the lengthwise mark, he still needs to confirm the angle. See the next picture.)
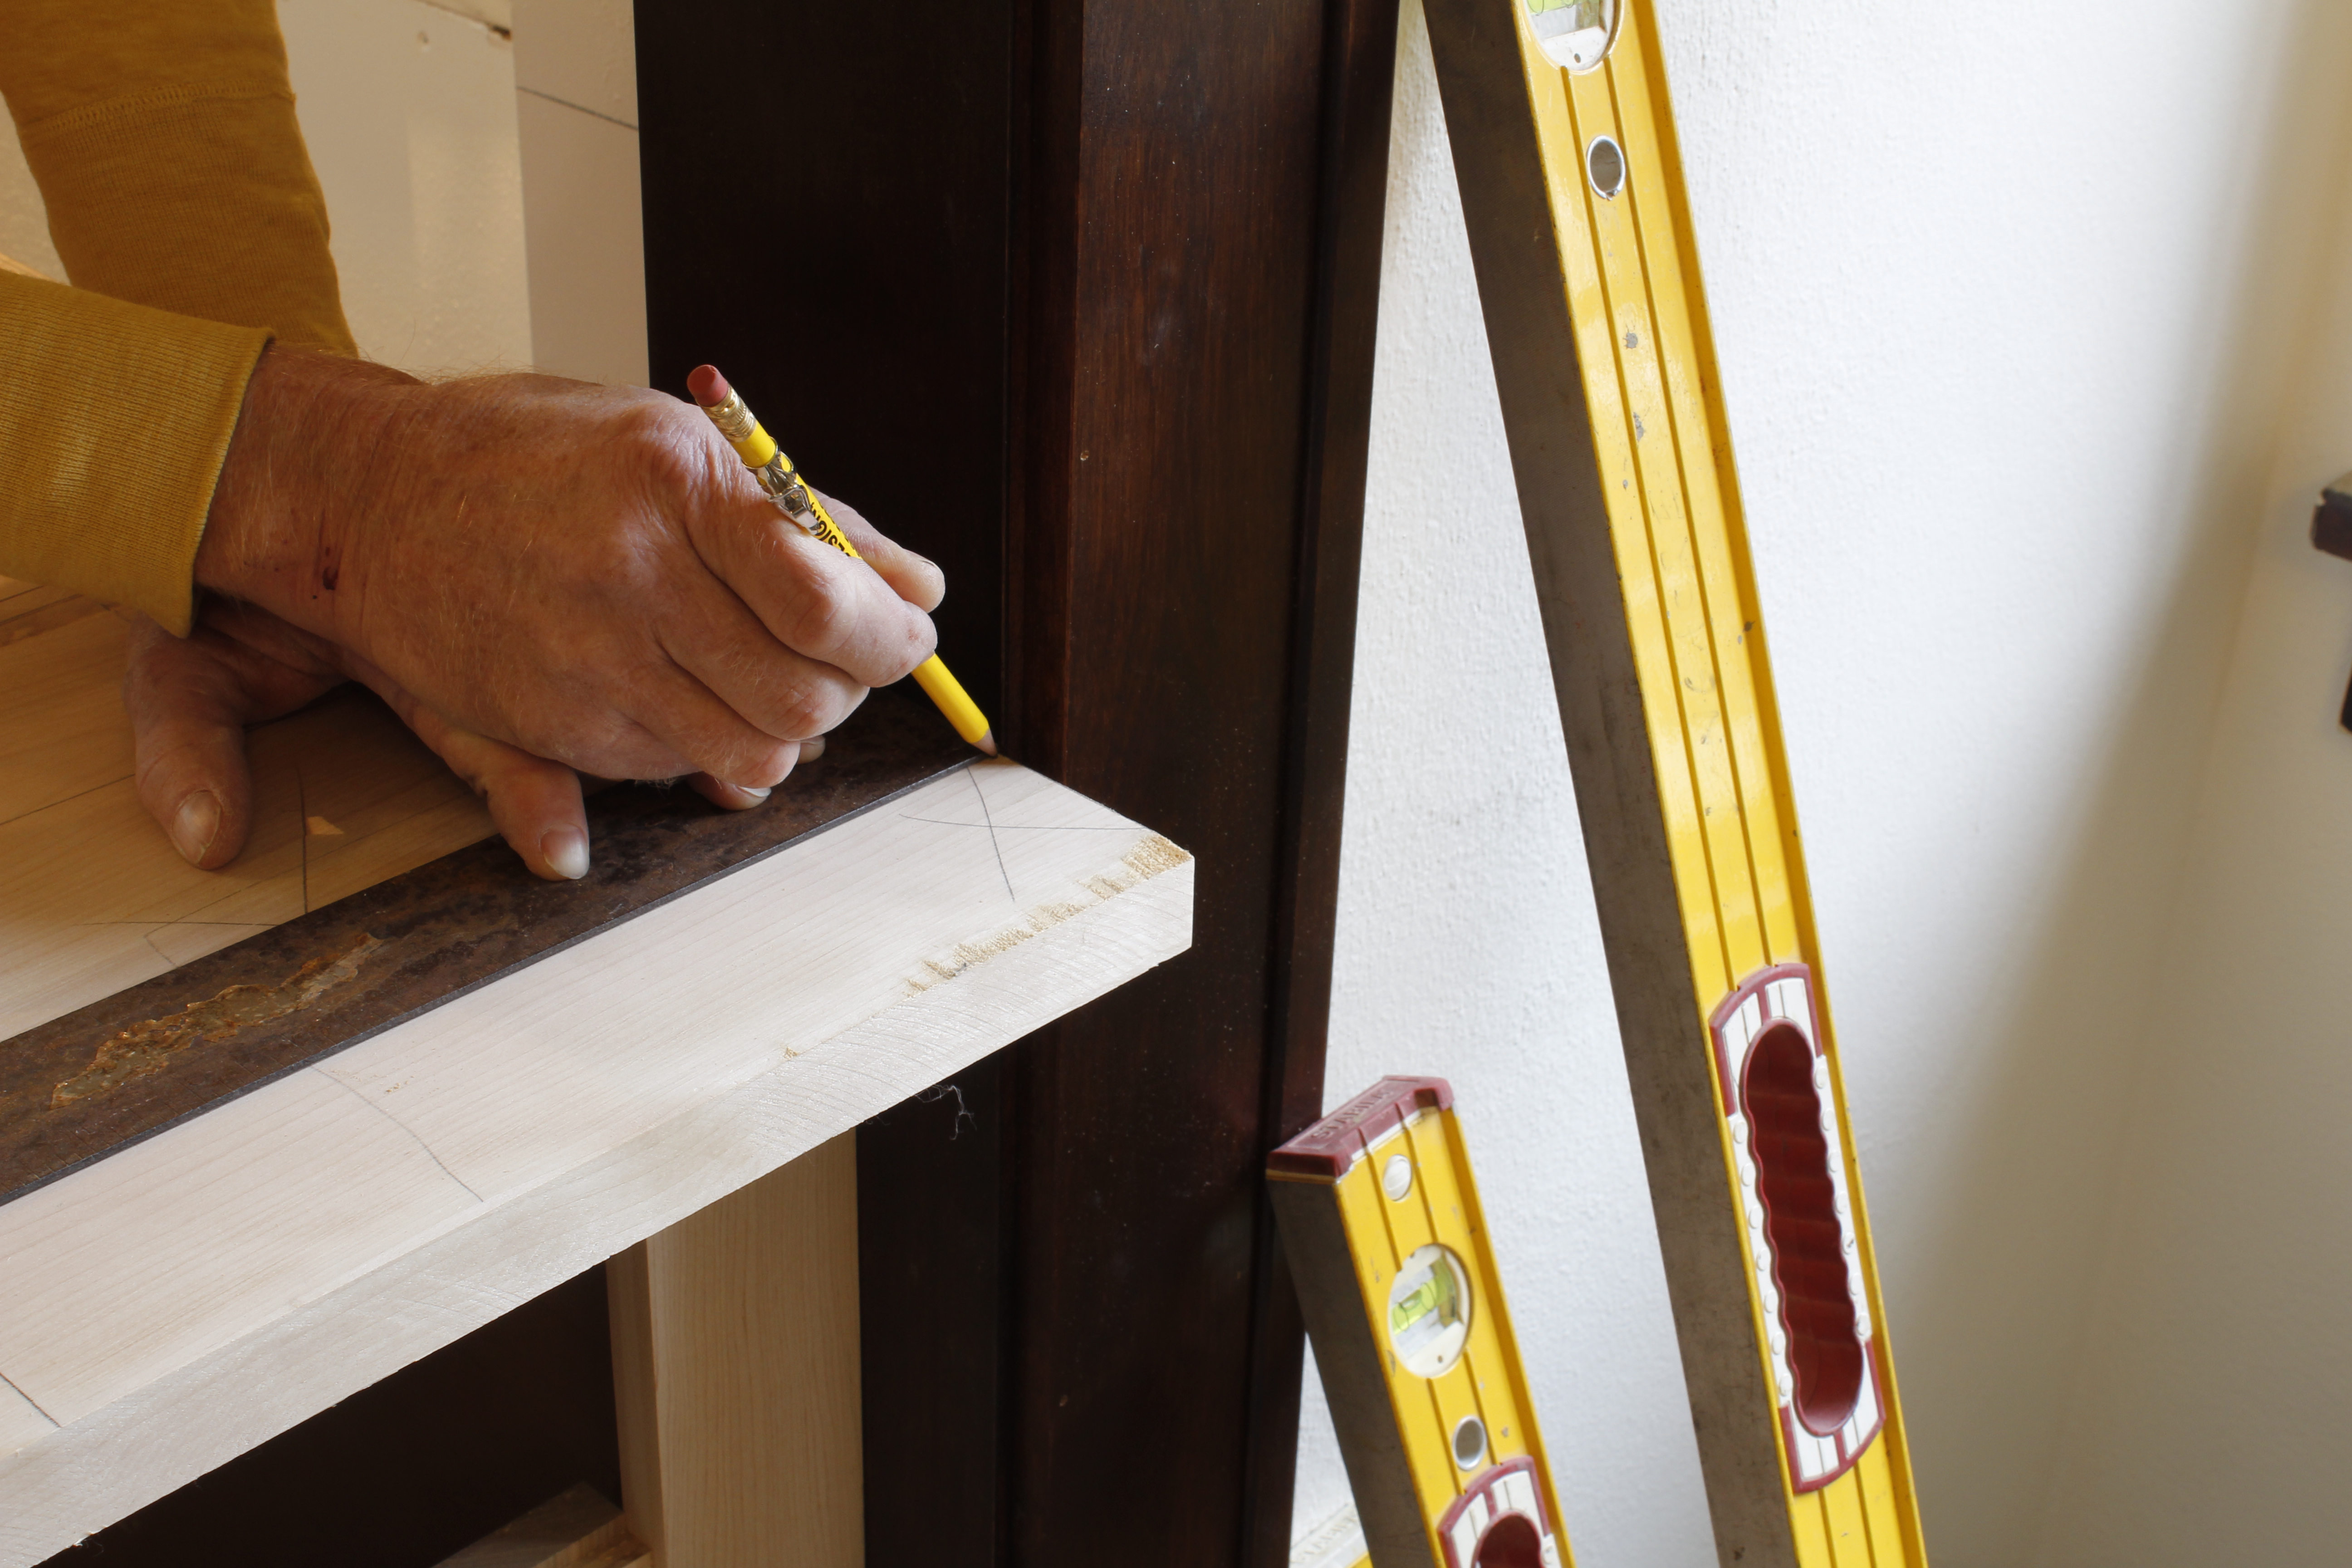
The pencil tip is at the edge of the jamb, which is about 5/8″ behind the front face of the vertical casing.
Next Mark checked the angle of the jamb to the wall/section of the counter that would fit into the inside corner. You should never assume a jamb is square.
I thought it would look extra-sharp if we allowed the counter overhang on the dining room side to wrap around the jamb to the edge of the vertical casing. That meant cutting a U-shaped notch instead of a straight line. Mark made these cuts using a Fein tool fitted with a saw blade.

Telling detail. Note how the counter overhang is notched around the casing so as to fill in the little gap that would otherwise have been left between the counter end and the vertical casing. I took a little more off the notch around the jamb at the front (i.e. the little tooth-shaped section at the right here) to allow the counter to shrink without splitting. (Note: The edge at the front here was still rough from the saw.)
Step 5
As with any situation where perpendicular cabinets form an inside corner, it’s crucial to allow enough space for drawers or oven/dishwasher doors to open without running into protruding handles.
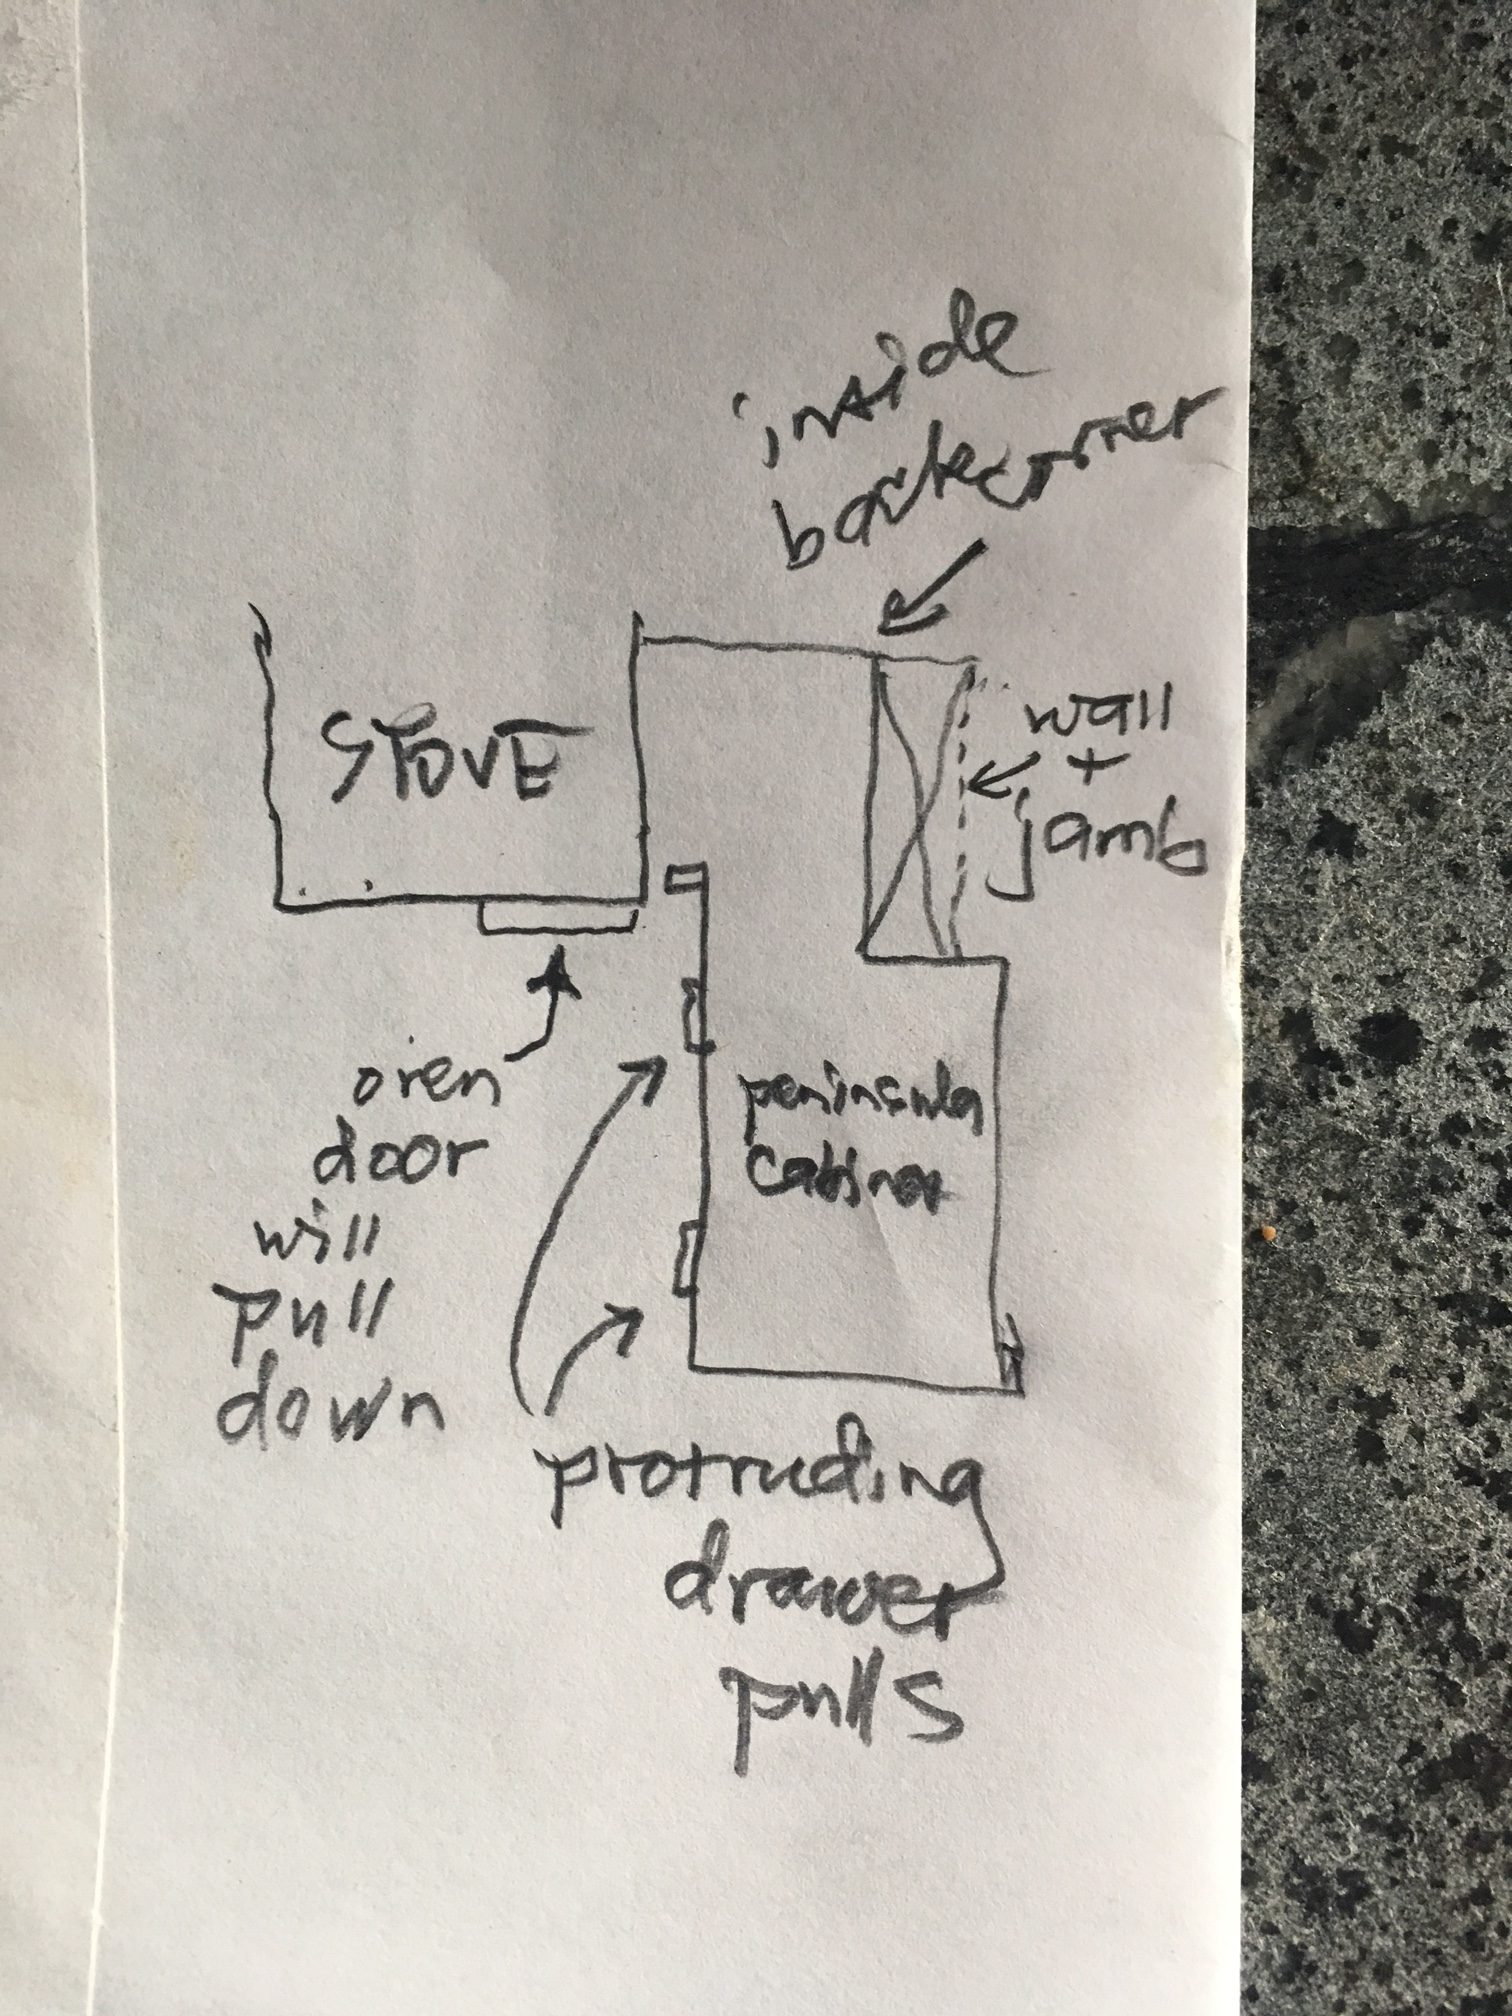
Plan view. The filler strip is the little rectangle sticking out between the front of the peninsula cabinet and the stove.
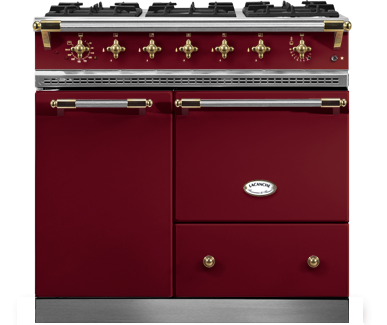
The stove, a LaCanche Bussy, will have a pull-down oven door on the right side like this one.
The peninsula cabinet has a vertical filler strip screwed to its face to allow the oven door to open downward without hitting the drawer handles. This meant our counter had to come out by the same amount to fill in the counter-height space to the right of the stove.
To lay this shape out on the counter we measured to the end of the filler strip and transferred that measurement to the top of the counter.
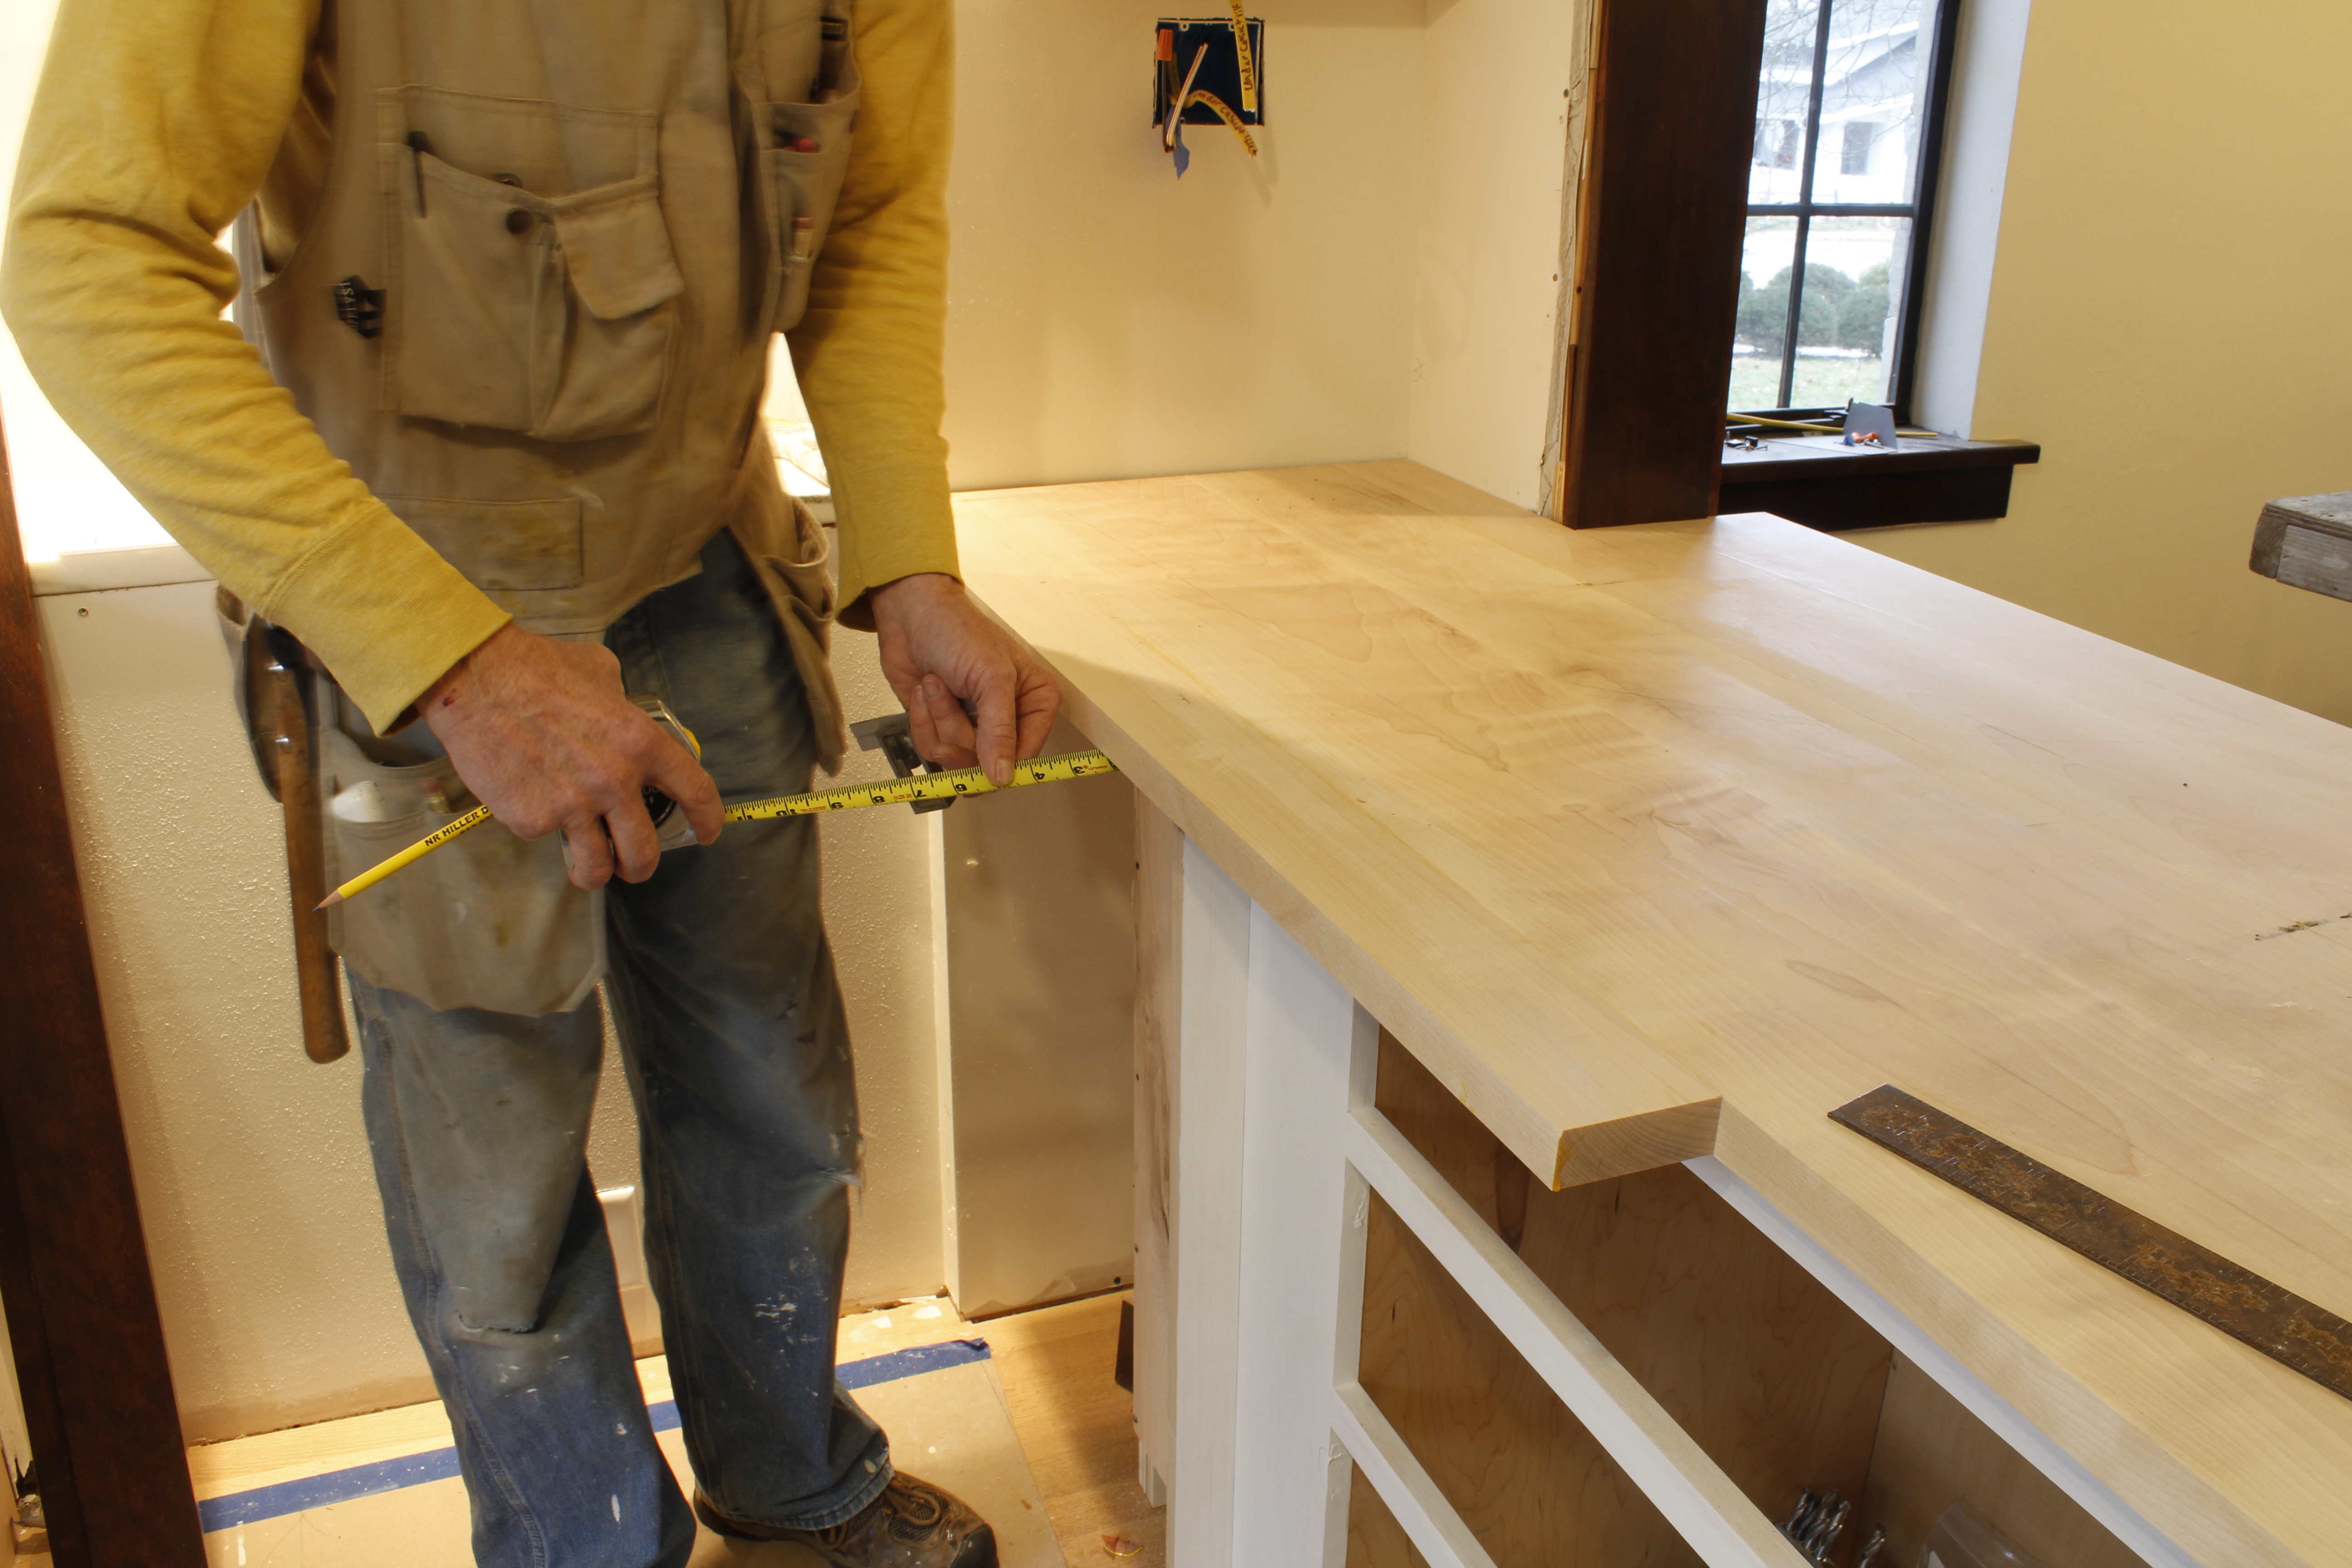
See the narrow vertical filler strip at right angles to the face of the peninsula cabinet in this image? It’s a spacer designed to allow the oven door (which will be where Mark is standing) to open downward without hitting the pulls on the peninsula cabinet drawers. Mark is holding the end of the tape measure against the peninsula cabinet’s face frame to gauge the amount of overhang required to fill in the space at counter height to the right of the stove.
Since Mark framed the stove opening and installed the cabinets, he knew the opening from the back of the stove recess to the front of the oven-door filler strip was square. (You should never assume such things without checking.) He continued the line at this distance back to the wall and marked it in pencil for me to cut when I brought the counter back to my shop to sand and finish.
Step 6: Not quite there!
If you have a filler strip like this one, don’t forget to allow the counter to overhang it at the front by the same distance as the rest of the counter overhangs, in this case 1″. It would be all too easy to cut this L straight across, then realize you’d forgotten to allow for the 1″ overhang.
Step 7
Now all that remains is to cut the dining room side of the counter so that there’s a consistent overhang, then mark and cut the open end. We marked the end of the peninsula base cabinet on the underside of the counter, squared each mark up onto the top surface of the counter, then added an inch for the overhang and joined the lines. That was a satisfying final cut.
To see the finished counter in place, check back later in the week ending December 14.
*The “cased opening” refers to the opening in the wall between the kitchen, at left, and the dining room, at right; the jamb is the vertical section of trim that conceals the framing, and the casing is what’s commonly called “door trim,” in this case composed of casing with one eased edge, bordered by a piece of trim called a backband.
Further Reading: A Woodworker’s Guide to Custom Cabinets
Here are some supplies and tools we find essential in our everyday work around the shop. We may receive a commission from sales referred by our links; however, we have carefully selected these products for their usefulness and quality.