We may receive a commission when you use our affiliate links. However, this does not impact our recommendations.
Which one(s) to choose. With the myriad glues available today – and I’m not talking about brand names – the glue or glues you select may be all that stands between failure and success of your glue joint and your project.
Delve into the characteristics and properties of the 7 families of glue and adhesives.
OK, so you consider yourself a woodworker. Let’s say that your neighbor asks you what appears to be a simple woodworking question: “What’s the best glue to use when making something out of wood?” How would you answer that? Most modern woodworkers use pretty much one type of glue or more specifically one “color” of glue. So with some trepidation you answer by saying, “Yellow glue (sometimes referred to as carpenters’ glue) is the best glue for woodworking.” Would you really be comfortable with that response or would you question your own answer?
Really, in the world of woodworking, “What’s the best glue?” is one of the toughest questions, with lots and lots of varying opinions. However the fact is that yellow glue is one of many choices, but not always the best choice.
I tell people all the time that the goal of woodworking is to make furniture that your children’s children will fight over to see who gets those pieces grandpa made – not fight to see who has to take those pieces.
In 20 plus years, if your work requires maintenance because the glue joints have fallen apart, your title as a world-class craftsman would no longer stick. (I just couldn’t resist that.)
A hundred years ago an article like this wouldn’t have existed because there was basically only one type of glue. Possibly in the future an article like this won’t exist either because science might develop that perfect glue for every application.
Who knows – it might be that someday we’ll no longer work with “liquid” glues that require spreading on the mating surfaces, but work with a “solid” material that comes in thin sheets that you simply cut to size and place between the mating surfaces.
To activate this space-age glue might involve pressure or heat or maybe flashing the joint with some magic ultraviolet wand. Or imagine that someday we might have something called “peel and stick” glue for joinery. Sound weird?
Today, both of these processes already exist and are currently a common practice in the veneering and furniture industry. It’s possible that this technology could be heading straight toward us.
By the way, before we go any further, there are people who make a big deal about the definition difference between glue and adhesive. Technically, glues are biological products derived from animals or plants, and adhesives are man-made products that are derived from synthetic materials.
Usually the word adhesive is used as a broader term because it is more inclusive in that it would include mastics, sealants and cements. But the dictionary defines both glue and adhesive as substances that stick things together. For the sake of continuity I’ll use the word glue throughout most of this article because it seems to me to be a more natural term for woodworking.
In order to understand glues today and to make the best choice, there are a lot of issues that need to be discussed. Strength, grain direction, dimensional change, durability, compatibility, dependability, the curing process, the effects of water, the quality of “fit” of the mating pieces, storage, handling, availability and cost are just a few matters to consider when making your choice.
So to answer your neighbor’s question as to the best glue to use when making something out of wood, the correct answer should be, “It depends.”
History of Glues
One of the earliest. Still a big player in woodworking today, hide glue is held in high esteem by true period reproduction furniture makers and luthiers.
Glues have been used to hold items together for centuries. Some of the first glues were made from natural gums, saps, plant resins, animals and fish. These early glues were used for everything from broken pottery to making long bows.
The Egyptians used animal glues to bond together everything from fine arts to their highly decorated wood furnishings. Early Native Americans used a sticky substance to help hold the seams together in their birch-bark canoes.
The first commercial glue factory that specialized in manufacturing glue from the hides of animals began in Holland in the early 1700s. In 1910 a new product called Bakelite was developed. This began the plastic era and within a year plastic resins were introduced into the market. During World War II there was an urgent need to develop new synthetic products such as polymers and rubbers that could be used to hold all types of materials together under a variety of conditions.
But it was the Space Age that really blasted the adhesive industry into the stratosphere. Most of the glues that are now commonly used in the woodshop were developed within the last 60 years.
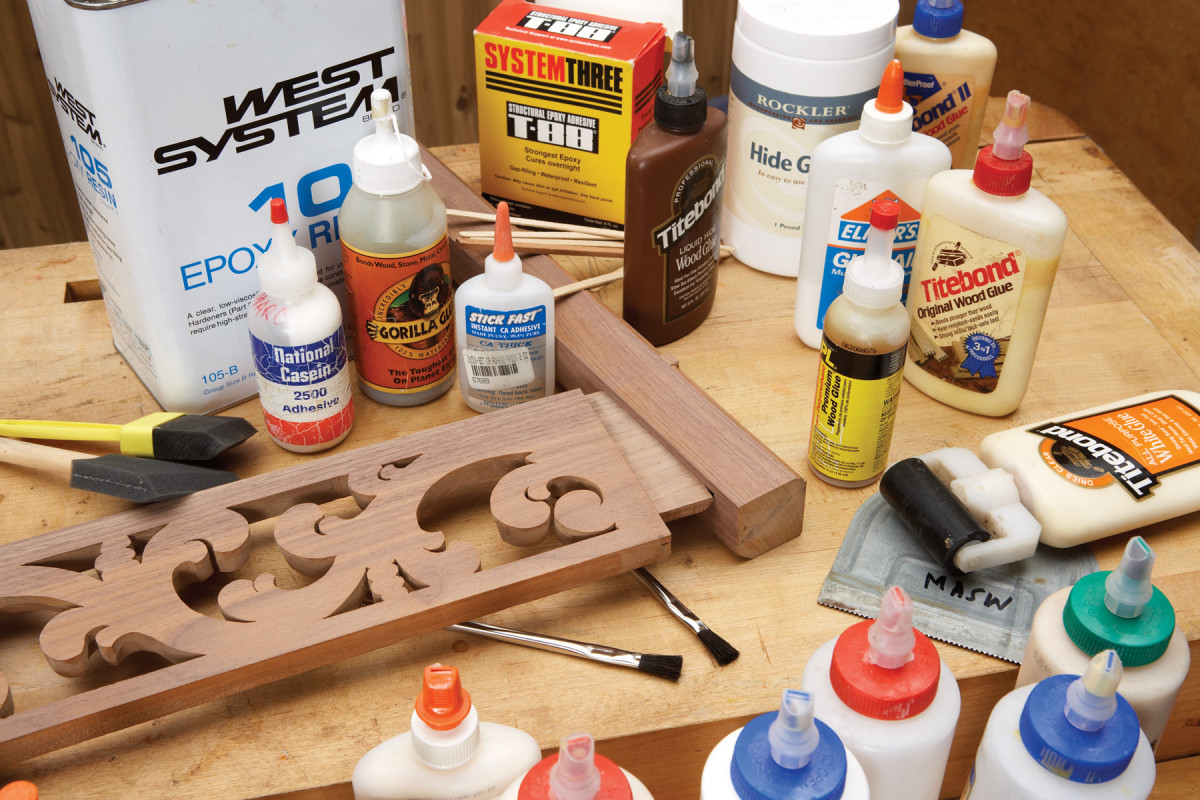
Today there are many different types of glues including white and yellow polyvinyl acetate (PVA), hide or animal glues, resin glues such as urea formaldehyde, epoxies, polyurethanes, super glues (cyanoacrylate) and contact adhesives.
These seven families of glues are the focus of this article. Each varies in how it dries, gets hard or cures, and all have different characteristics when exposed to heat, water and solvents. Once finally cured, each has a different degree of rigidity or flexibility in the ways that it transfers and distributes stresses.
Remember, you don’t have to limit yourself to just one type of glue throughout the entire project. Variety is the key to using modern adhesives.
How Glues Work
In order for adhesion to work, some type of action has to take place between the mating surfaces with the glue as the tie. I used to envision that adhesion was purely a mechanical process where the wet liquid glue penetrated the porous surface of the wood through the pressure of the clamps. Then when it dried, it anchored itself to the pores by holding them tightly together. But it’s a little more involved than that.
There is also a natural phenomenon that takes place through something called specific adhesion. Specific adhesion is the natural attraction of similar molecules that are held together and can’t be pulled apart – imagine two panes of glass and how they cling together. To separate them, the panes would have to be slid apart.
Now imagine that those two panes of glass are separately exposed to air, dust and dirt. Once they are brought back together they can easily be pulled apart.
Specific adhesion depends on three main factors: intimate contact, compatibility of mating materials and two clean surfaces.
If adhesion is the process of glue bonding to the wood, then cohesion involves the building of a strong network within the glue, reaching from one piece of wood to the other.
Glues for the most part complete the job after the glue turns from a liquid to a solid and cures hard. There are basically three ways this occurs. Be aware that some glues cure through multiple curing processes.
A trick in reverse. Polyvinyl acetate glues dry as the water evaporates from the emulsion. If you wish to extend your “open time,” purchase a glue that indicates a longer open time.
Evaporation. Any glue that contains water or solvent (such as PVAs and contact adhesives) dries when the fluid it contains is spread and evaporates into the air or is absorbed into the fibers of the wood. The surrounding air often plays a larger part in the dissipation of the solvent or water. The molecules of the glue during this process are drawn together and attach to one another.
Chemical reaction. Epoxies, urea formaldehyde, cyanoacrylate, polyurethane glues and cross-linking yellow glues all cure chemically. This is a process where a combination of materials are added together to cause the curing process to start. As long as these materials are independent, they remain in an unchanged state.
Reactions can be initiated by mixing resin and hardener together such as with epoxy, applying water as with polyurethane glue, by adding a catalyst such as with urea formaldehyde, or by merely drying as with contact adhesive or a cross-linking PVA. One by-product of this chemical reaction is heat. All chemically reactive glues, once mixed, gave a specific “pot life,” which means that you have just so long until the glue turns into a bowling ball.
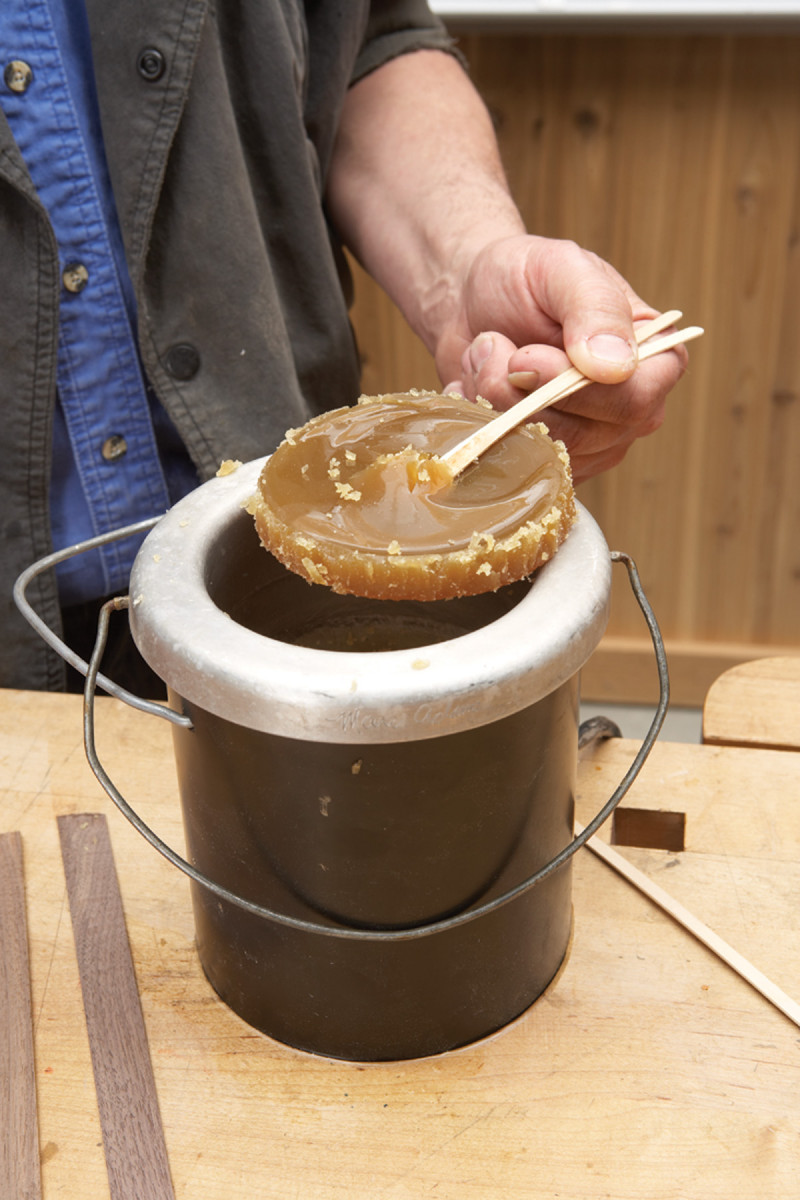
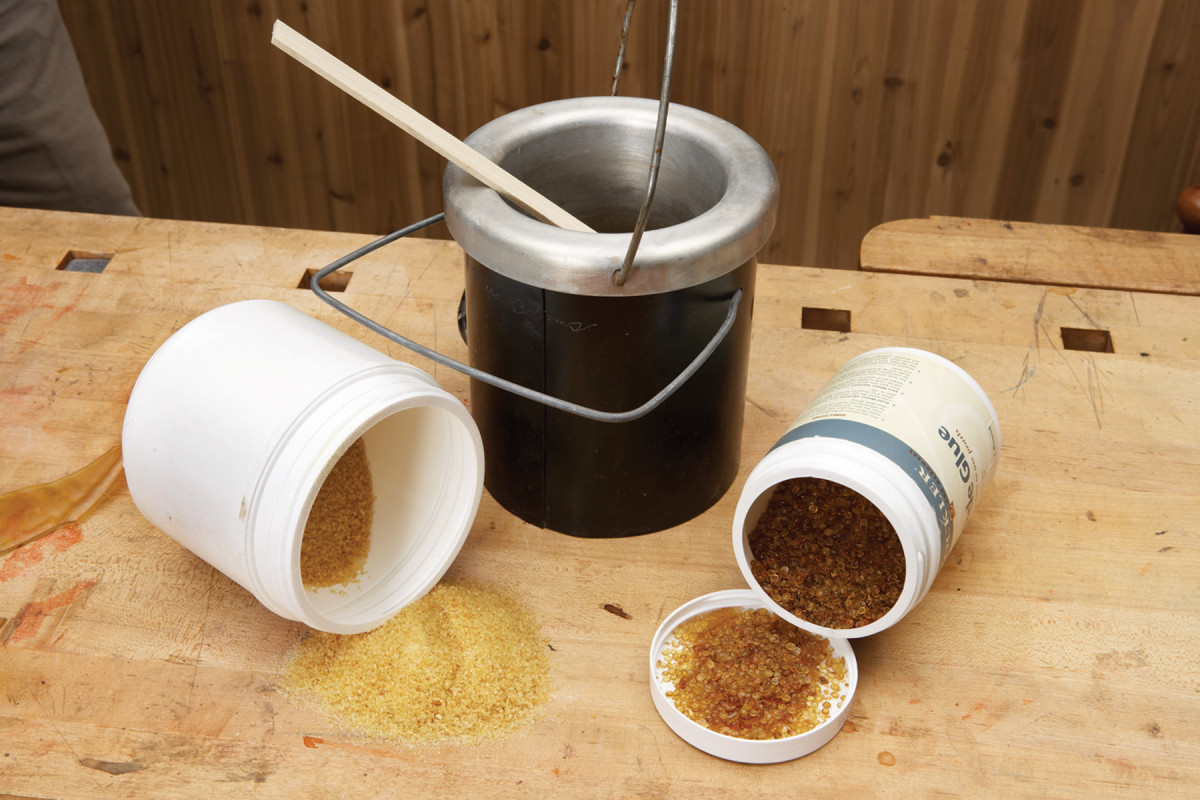
Thermal transformation. Many glues react to heat. Hide glue must be mixed with water, then properly heated before use. Below 110º F, a gelled clump can be pulled from the pot.
Thermal conversion. Some glues work by the presence or absence of heat. Heat is the most common catalyst for contact adhesives, urea formaldehyde and epoxies, and is required for preparing hide glue for use.
Hide glue works best at a specific temperature (around 145° Farenheit) and starts to gel at temperatures of less than 110° F. I’ve also been told that if you apply heat to contact adhesive during the evaporation process that it helps to vulcanize the rubber and increase its strength and elasticity. Urea formaldehyde and epoxy set much faster with the introduction of applied heat during the curing phase.
Classification of Rigidity
It is important to understand that the ultimate strength of any glue joint is a function of the glue surface area. The more surface area, the stronger the joint. However some glues, by the way they are formulated, have different degrees of rigidity and have different characteristics when it comes to heat, moisture and solvents.

Right glue for the job. Rigidity is most important when working with bent laminations. Avoid glue “creep” by using a thermoset glue.
Thermoplastic or semi-rigid. Thermoplastic glues are the most widely used adhesives in woodworking. They are generally resistant to moisture, but are not waterproof. All thermoplastic glues soften with heat and get hard when cooled. It’s possible to reactivate cured thermoplastic glues by re-heating the bond to soften it, then applying pressure during the cooling phase to reactivate the bond. Thermoplastics typically are not as strong and stiff as the wood itself and they can allow the joint to creep during dimensional change. White and yellow glues, hide glue and instant glue fall into this category.
Thermoset or rigid. Thermoset glues are generally more costly than thermoplastic glues, but would be the glue of choice if creep resistance or hardness is the main consideration. As a matter of fact, thermoset glues are rigid enough to support high, long term static loads without deforming. They become permanently hard and rigid when heat is applied and are very water-resistant.
Thermoset glues cure through a chemical process. Urea formaldehyde and epoxy are both examples of thermoset glues. Quite surprisingly I’ve been told that in the context of wood gluing, bonds made with thermosetting glues are no stronger than those made with most PVA glues.
Elastomeric or flexible. Elastomers are substances that have rubber-like properties. They can stretch and return to their original shape. Elastomeric glues can be waterproof and may benefit from exposure to heat in the curing process, but they are also fairly weak and can fail in response to excessive heat.
Contact adhesive falls into this family, as do certain plasticized PVA glues such as Titebond’s Molding & Trim glue. These glues are somewhat flexible and can be sensitive to loss of strength with elevated temperatures – more than normal PVA.
Water and How it Affects Both Wood and Glue
We already know that water is present in living trees. Fresh-cut wood can be totally waterlogged and no glue, including polyurethane, can effectively bond to the saturated fibers. For the best glue bonds, wood should be at least thoroughly air dried or, better yet, kiln dried to less than 10 percent (7 percent is ideal).
If the moisture in the wood is too high, glue will not absorb fully and could be easily squeezed out during clamping, which would create an unusually thin glue line making for a very weak joint. On the other hand, if the moisture content is too low, the wood will absorb glue too rapidly and that decreases the working time.
Water in wood has an impact long after the glue cures. In time, as wood swells and shrinks, stresses develop that can be great enough to rupture the adhesive bond or the wood, whichever is weaker. These ruptures can develop when adjacent pieces of wood have different grain directions, different shrinkage coefficients or have been subjected to extraordinary moisture conditions.
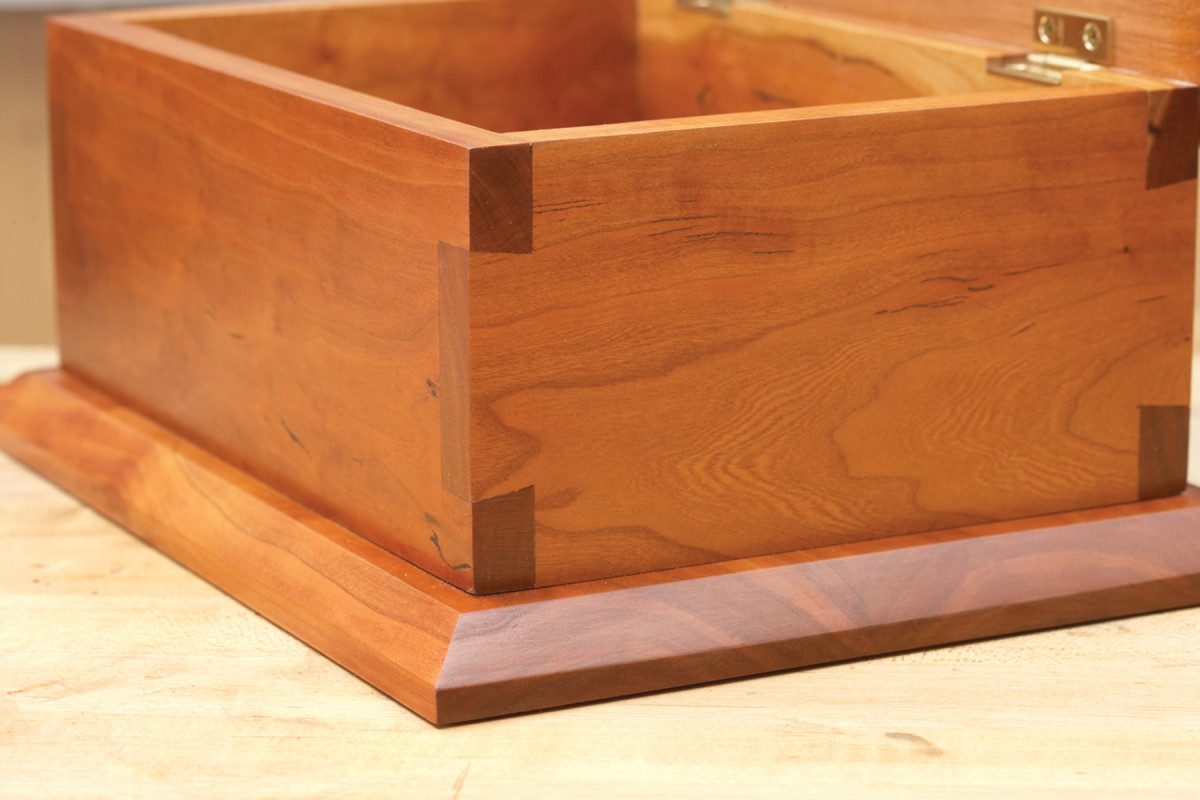
How it moves. In traditional dovetail joints, wood moves in the same direction. This causes less stress on the joint and is less likely to result in glue failure.
Usually when joinery involves two pieces of wood that are glued long-grain-to-long-grain or end-grain-to-end-grain, movement is harmonious between both pieces so glue failures are unlikely. However a high percentage of woodworking joinery includes long-grain-to-end-grain joints that create opposite force directions that can all too often result in some kind of joint failure. It is vital in any gluing process that all the wood being bonded be conditioned to the same moisture content and ambient temperature as the glue for the best results.

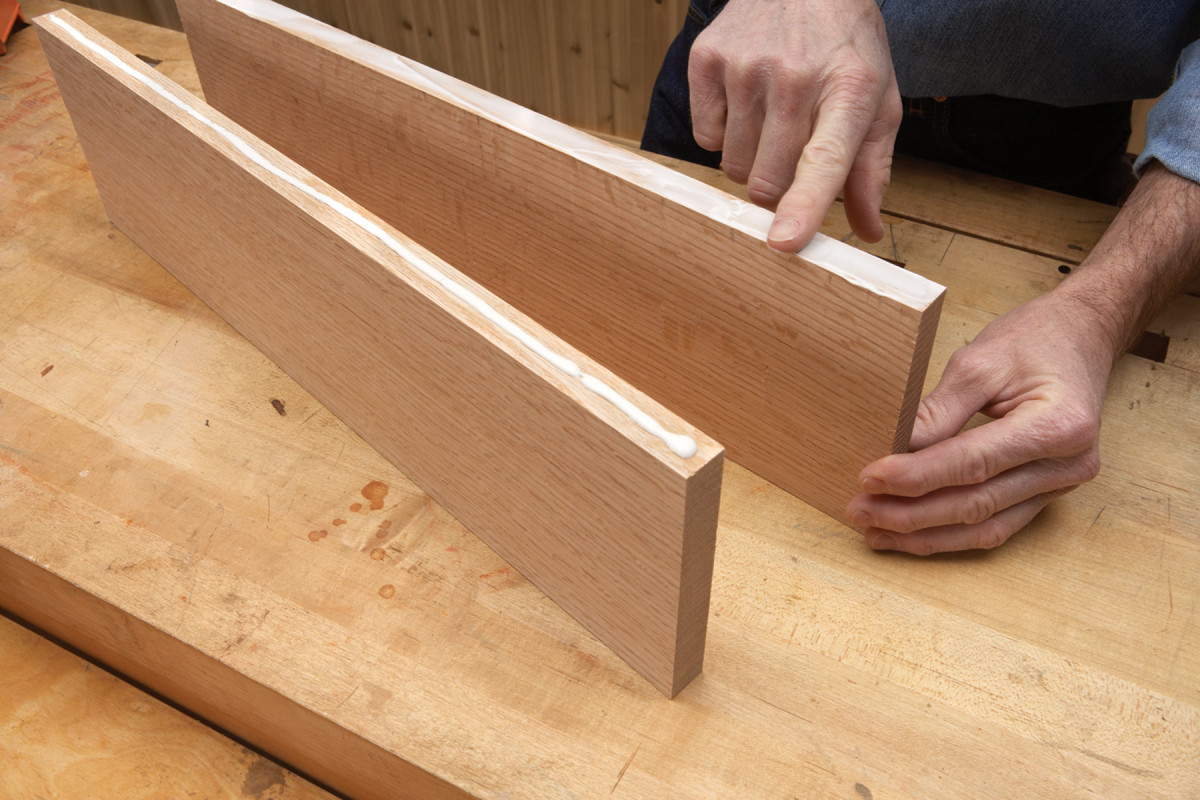
Choose, but choose wisely. Typical cross-grain orientation of joints such as this mortise-and-tenon requires glue with more elasticity – PVA glues are a good choice.
Don’t forget that exotic lumbers (such as teak, cocobolo and rosewood) typically are higher in resins, extractives and oils, and have a tendency to repel water and inhibit bonding.
If your projects include exotic lumbers or woods about which you are unsure regarding their ability to absorb water, do a quick water-drop test. Simply place a drop of water on the surface and watch what the water drop does over time. If the drop does not absorb into your wood, then water-based glues might not be a good choice.

A little drop will do you. Information from a drop of water is a great indication of whether water-based glue would be appropriate for your project – if it soaks in, you’re golden.
Glue and Water
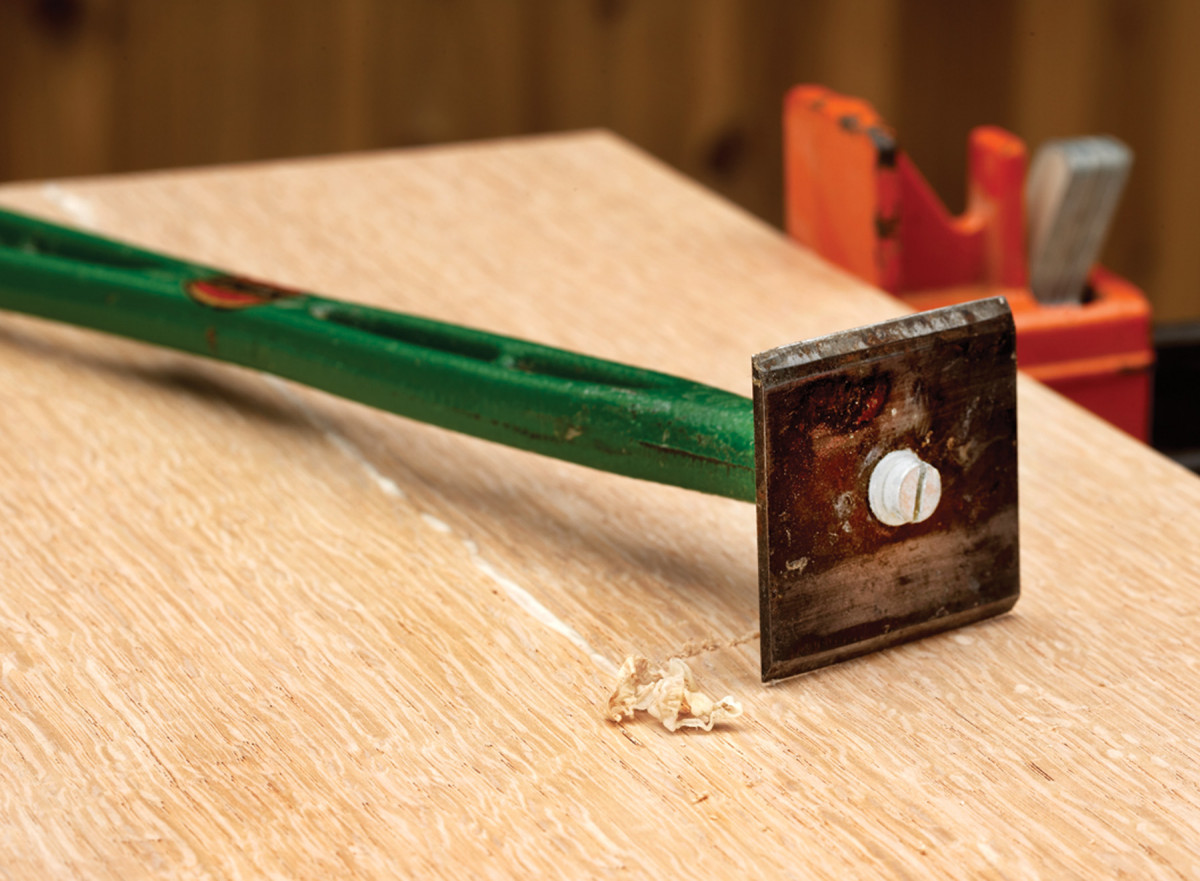
Water is used as the carrier for most wood adhesives, primarily because water readily absorbs into wood, is cheap, non-toxic and nonflammable. But water brings on a series of its own conditions. Usually a bottle of white or yellow glue contains about an equal share of solid content and water. Any glue that contains water will raise the moisture content of the wood surrounding the joint, and this causes a raised glue line. If boards are surfaced before the moisture content of the glue line equals that of the remainder of the wood, the glue joint will shrink after surfacing, resulting in a sunken joint (as demonstrated below).
 Wettability is an important process by which water from the glue can wet, spread and absorb into the fibers of wood. It is vital that the water in the glue absorb into the fibers of the wood. Compression, torn grain, burnishes, planer or jointer snipe or contamination from oil or debris can restrict wood fibers from absorbing the water from glue. This could cause the bond to fail. Good glue surfaces should be free from these defects.
The pH of the water in the glue does one other nasty thing. As the water in the glue comes in contact with both the tannins in the wood and iron from the clamps, it can cause a nasty dark stain. This will not happen with plastic or aluminum clamps.
These stains can be sanded out, but with delicate woods and veneers it is better to place waxed paper between the clamp and the wood.
Waterproof Ratings
The testing standards to determine the classifications of glue bonds are quite rigorous. Testing is done by the American National Standards Institute (ANSI). Glues are classified as water-resistant, waterproof or low water-resistant.
Water-resistant glues are tested by soaking the cured glue joint in water for four hours before baking it for 19 hours. In order to be rated as a Type II water-resistant glue by the ANSI standards, the joint has to stay together through three rounds of this punishment. If the glue holds, then it passes.
Usually these glues are used for exterior exposure in which there will be some protection from the elements. They are also good choices for cutting boards and bathroom cabinets.
Waterproof glues are boiled for four hours then baked for more than 20 hours then boiled for four hours again before being cooled down under running water. This test involves taking the glue through extreme temperature and humidity conditions as quickly as possible. After all this, the glue joint must withstand a strength test while it’s wet. If the wood breaks before the glue bonds, the glue has done its job and earns the Type I rating by ANSI.
Low water-resistance glues will not stand up to frequent contact with water or high humidity and should not be used for exterior exposures. Just because a glue isn’t water-resistant doesn’t mean that it’s not strong. Hide glue and most PVA glues (because they are not tested or rated to Type II or Type I) are classified as low water-resistant glues and are perfect for common joinery on interior furniture or cabinets.
Handling, Storing and Using Glues Safely
Everyone who reads this article is probably guilty of not putting the cap back on the bottle. But how our glues are stored and handled can have as big an impact on the bond as the actual gluing process. Some glues are ready to use right from the bottle, some require mixing and some require heat. All glues should be stored to avoid extreme temperatures, humidity and light. The following are specific issues involved with handling, storing and using glues safely.
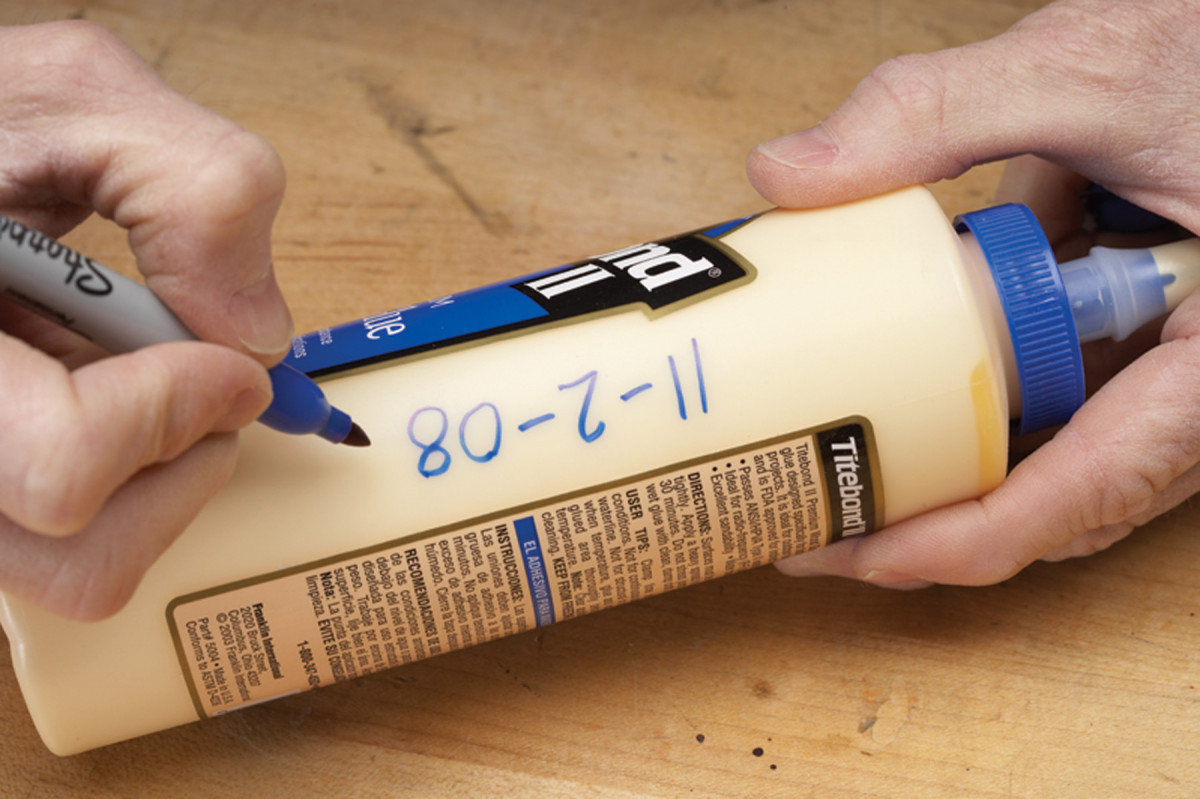
Better safe than sorry. Date your glue bottle as it’s opened. This is the simplest way to ensure your glue is OK to use and not past its prime.
Shelf life. If it is true that shelf life could be a factor in the effectiveness of glue (and I believe it is), then we need to know what the timetable is of the products we use. Time passes fast for glue that sits on a shelf in your shop. We are a date-oriented society today; we buy our eggs and bread based on dates. If I pick up my glue bottle that I’ve had for the last who-knows-how-long, I’ll continue to use it until it becomes so thick that it can’t spread.
The “wetting” process with old glues isn’t as effective as it was when it was new. I suggest that on the day that you open your glue bottle you take a marker and write the date on it in bold print – now you know.
A good rule of thumb is that most water-based glues remain fully functional as long as they continue to flow and spread normally. It is recommended that when you buy glue you only purchase the amount that you think you will use in a year or two. Whenever you buy solvent-based glues only buy what you expect to use in six months to a year. Hide glues, in their solid state, will keep indefinitely as long as they remain moisture-free.
We have all been told that we can extend the life of our glues by storing them in a cool environment. There are two concerns with this. First, the temperature of your refrigerator might be too cold and could cause water-based glues to freeze. Second, it is vital that if you refrigerate your glues, you take them out in time to return them to the same ambient temperature as the wood. Never apply cold glues to warm wood or vice versa.
Pot life. Once two-part glue is mixed, the pot life, or working life, begins. You can manipulate the pot life by heating or cooling the mixture or by changing the mix ratio. Sometimes the size of the container can slow down or speed up the chemical reaction. Beware that mixing causes friction and that friction can quickly be converted into heat and heat is almost always a catalyst to these glues.
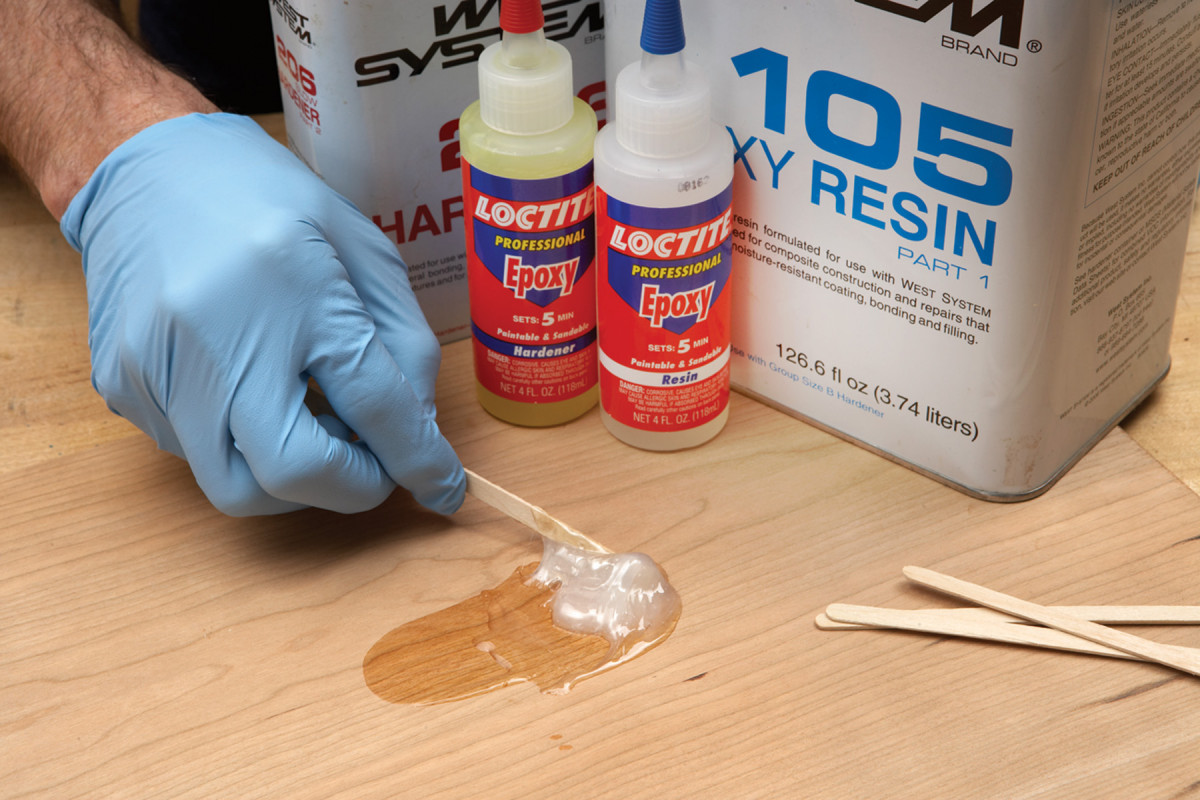
It’s downhill to the finish line. Mixing the two parts of an epoxy creates heat. The faster you mix, the sooner the epoxy will set up.
I always stir my two-part glues slowly, and I keep in mind that once initial contact takes place the working life begins. Today some epoxy manufacturers provide static mixers that thoroughly blend the two together without applying additional heat.
Freeze-thaw stability. Water-based glues are prone to freeze at 32° F and below. Some water-based glues are designed to handle the occasional freeze/thaw cycle and others just can’t. Freezing can break down the polymers rendering the glue useless. Some PVA glues have a tendency to have a “cottage cheese” look after freezing. If this happens shake or stir the glue back to its original condition once it has reached room temperature.
Dale Zimmerman, senior technical specialist at Franklin International (the manufacturers of Titebond products), told me that as long as you can stir your glue back to the way it was before it froze (no lumps), it will work just fine. This cycle can happen many times without any real effect on the performance of the glue.
Working temperatures of glues. When working with PVA it’s recommended that white glues be applied in temperatures higher than 60° F and yellow glues in temperatures higher than 55° F. The reason it needs to be relatively warm is because as the glue dries, the loss of water pulls the adhesive particles together with enough force to form a continuous film. If the drying temperature is too low, the glue particles will not be fluid enough to unwind and entangle and form a tough network. The dried film in the joint will appear whiter than normal. This is known as “chalking.” When chalking occurs the glued joint loses strength and that could result in a failed bond.
Chemically reactive glues need heat to cure – the warmer the better. It’s recommended that urea formaldehyde, super glue, epoxy and contact adhesive be applied in temperatures greater than 70° F. Polyurethanes can go down to 50° F but will take much longer to cure.
Clean up/disposal. Cleanup with water-based glues is a little easier than with solvent-based glues. Most directions for PVA glues say that you can clean up the excess squeeze-out with a warm damp rag (not soaking) before the glue dries. This is probably OK, but I prefer to let the glue dry and just scrape it off. If you scrape it off before it gets too hard there will be less of a chance of pulling up small chunks of wood fiber.
Just wait for it. A soaking rag is not the answer to removing glue squeeze-out. The best method is to scrape the seam after the glue begins to set.
However I’ve witnessed lots of people who take wet sopping rags and just saturate the entire area around the glue joint with water. This just can’t be good for the wood or glue. Manufacturers tell us that most PVA glues can be thinned with pure water by no more than 5 percent by weight or volume. There is a huge difference between a damp rag and a sopping wet rag in the volume of water.
Wood by nature is hygroscopic – it’s always seeking moisture. Once the excess water has thinned the squeezed-out glue from the joint, the water that now is on the wood surface is contaminated with watered-down glue. As the wood absorbs the water/glue solution, it will “size” the wood around the joint and act just like a finishing conditioner that might inhibit the absorption of stains.
Earlier we discussed several processes that glue goes through in order to become hard. All of those processes required the wood to dry in a very specific manner. A high volume of excess water can change the delicate balance of this process.
Solvent-based glues will have specific solvents that are recommended by the manufacturer, so you should always wear gloves when working with these glues. Urea formaldehyde can usually be cleaned up with water. For polyurethane and super glues, companies recommend that acetone be used. And clean up for epoxy glues varies according to the formulation.
The best way to avoid a waste-disposal problem is to prepare only the amount of glue needed for your job. If the glue is anything other than PVA or super glue, it is recommended that this product be disposed of by a licensed hazardous waste handler or saved for household hazardous waste collection. However, if the glue has hardened, it may be thrown in the trash destined for a landfill.
Safety Precautions
All glues in liquid form should be handled with care. PVA and hide glue are by far the safest and are considered non-hazardous. They can produce pungent smells and have a slight acidic pH that could cause some skin irritation with prolonged contact.
Solvent-based glues are much more of a hazard. It’s a good idea to always wear gloves, eye protection and the appropriate type of respirator. Make sure you always have good ventilation.
These types of glues are skin and lung irritants and allergy-sensitizers, so they could cause burns to skin and eyes. Most of these are flammable or in part flammable, so extra care must be taken when working around furnaces with pilot lights or any kind of an open flame.
Epoxy, urea formaldehyde and contact adhesives use solvents that if inhaled in high concentrations present certain health risks. And polyurethane glues do not have solvents but can produce hazardous fumes if they are exposed to extremely high temperatures.
Never use solvents to clean glues off your hands. Activators for super glue contain small amounts of solvent that rapidly evaporate. Super glue is considered to be of low toxicity, but its activators are generally flammable and hazardous. Instant glues bond so rapidly and strongly that even a little sloppiness can result in an undesirable situation (wonder how I know that).
The final concern is working with glues after they have cured. I do a lot of grinding, shaping and sanding which makes a lot of dust. These hard bits of resins can be brutal on your eyes and lungs. Always wear a dust mask and goggles to protect yourself from these cured particles.
Here are some supplies and tools we find essential in our everyday work around the shop. We may receive a commission from sales referred by our links; however, we have carefully selected these products for their usefulness and quality.