We may receive a commission when you use our affiliate links. However, this does not impact our recommendations.
Dovetail jigs can produce excellent results in a short amount of time. The key is knowing how to adjust the jig to achieve a perfect fit.
Not everyone’s ready to tackle hand-cut dovetails. Here’s how to get the most from your router and jig.
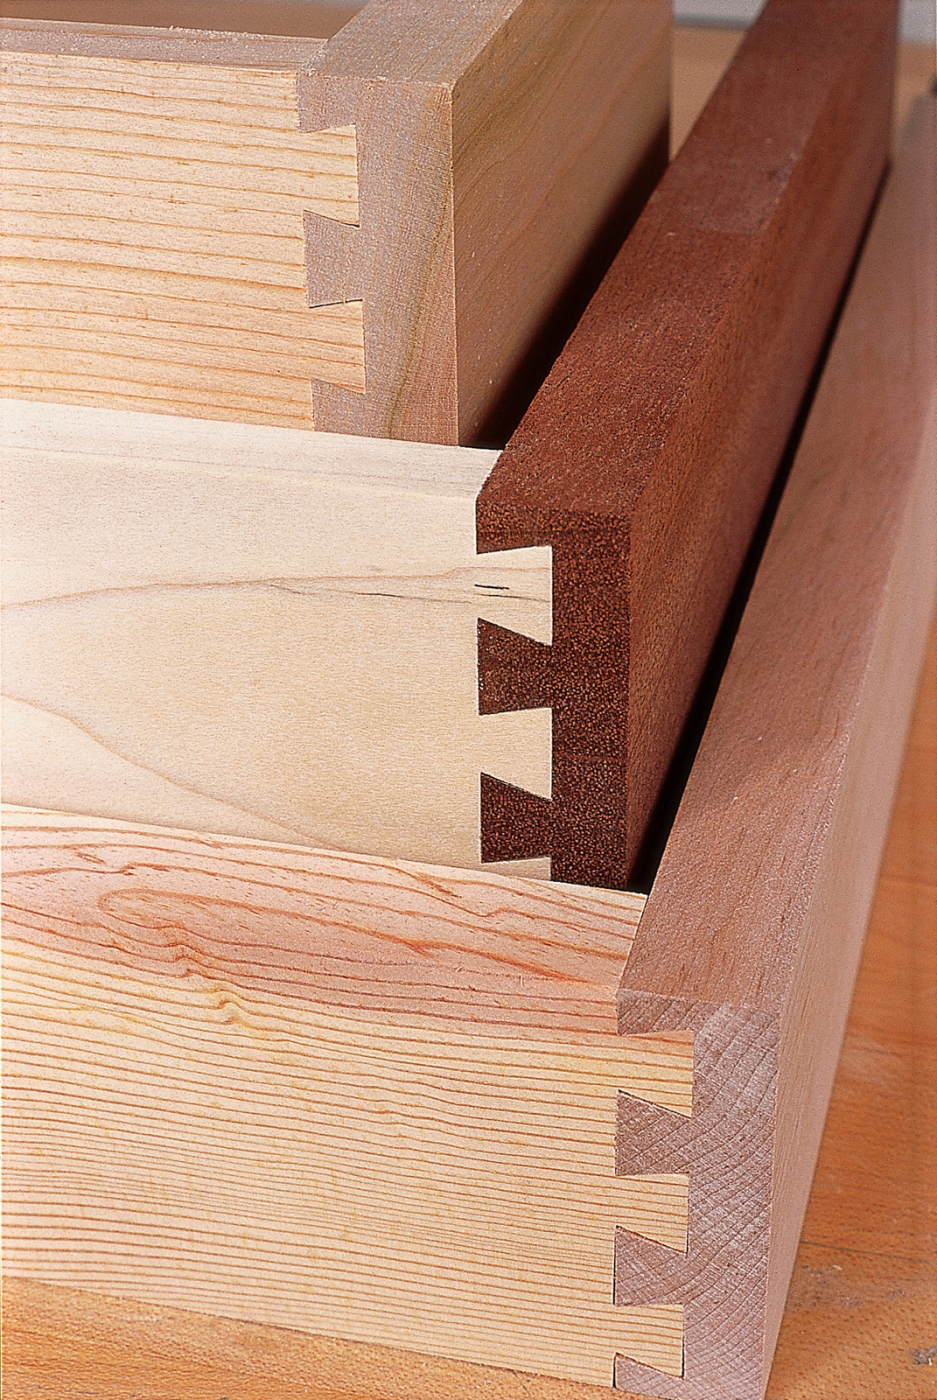
Dovetails are prime joints. Long history, great appearance and cachet. Used in boxes, drawers and carcases. But for many woodworkers, cutting dovetails the traditional way – with saw and chisels – is an insurmountable challenge.
If you aren’t ready to tackle hand-cut dovetails, there are plenty of router accessories on the market to help. There are so many in fact, and they have so many variations in setup and operation, that I’m going to narrow my focus to the most common: the half-blind dovetail jig.
The typical half-blind dovetail jig consists of a metal base with two clamping bars to hold the workpieces. A comb-like template rests on the top to guide the router in cutting both pieces at once. The appropriate bit and bushing are packaged with the jig. Usually you use a 1⁄2“, 14° dovetail bit and a 7⁄16” guide bushing to make the cuts.
Use any router, which is to say, the one you have. I typically use a 2-horsepower fixed-base model. The ability to plunge is irrelevant, and plunge routers generally are awkward for work on the edge owing to their high centers of gravity. Brute power doesn’t contribute anything. When the urge to rout half-blind dovetails seizes you, get out your jig and clamp it at the edge of your workbench. Presumably, you’ll have stored the instructions and the right bit and guide bushing with the jig.
Select your materials and make sure all like parts are jointed and planed uniformly. Not all the parts must be the same thickness. The fronts can be 3⁄4” thick, and the sides and backs 1⁄2” thick, for example. Or 3⁄4” and 5⁄8“. Everything can be 11⁄16“. Just be certain the fronts are consistently sized, the sides are consistently sized, and so too the backs.
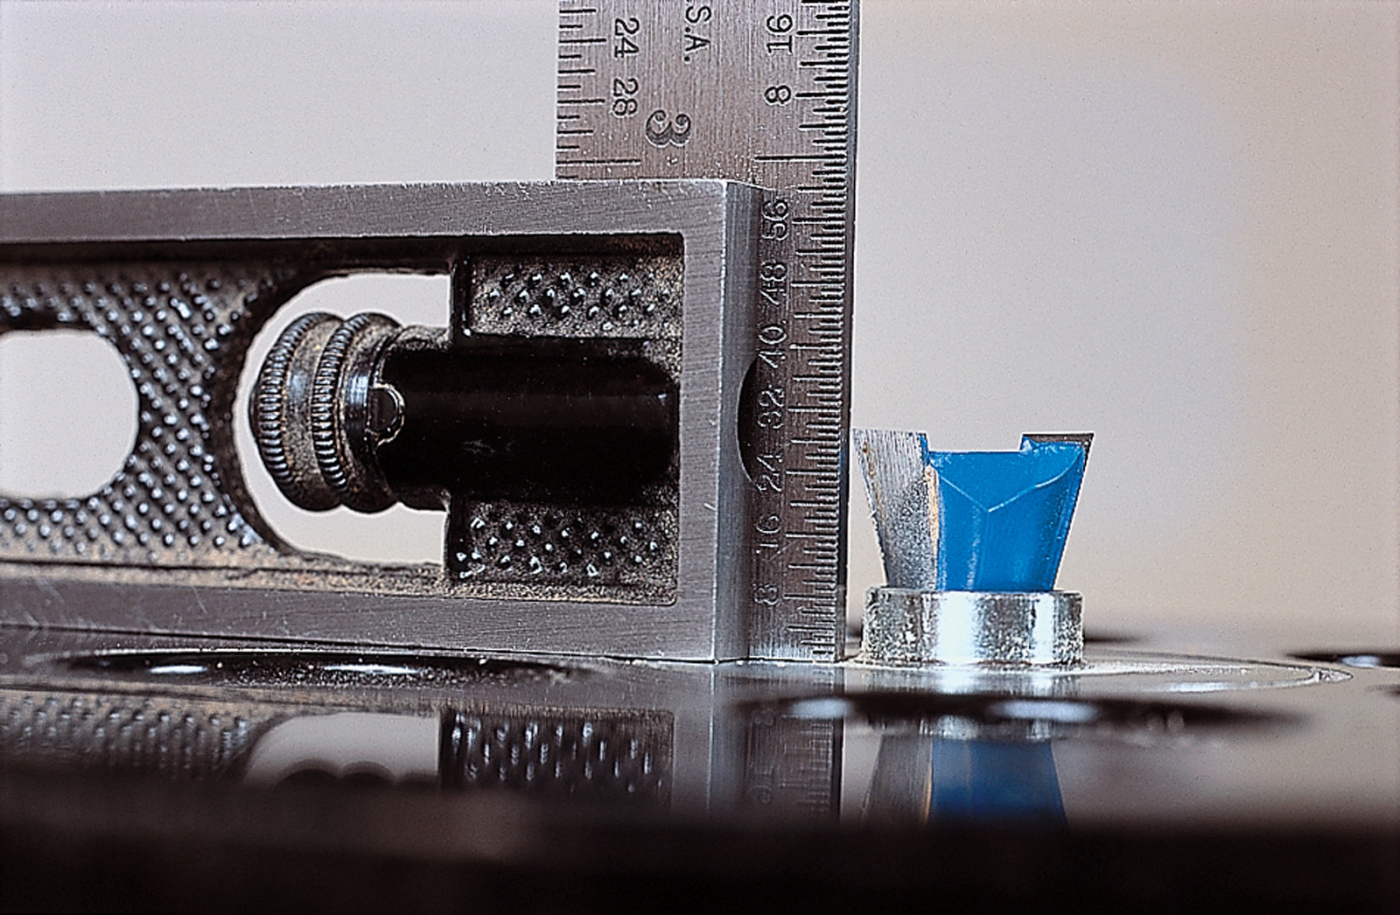
In setting the depth of cut, you must account for the template thickness as well as the cut itself. Use a small machinist’s square to set the bit extension from the baseplate.
Set Up the Router
Install the guide bushing. (If you have a centering mandrel, use it to center the bushing to the bit’s axis.) Adjust the router so the collet is relatively close to the bushing. Carefully insert the dovetail bit through the bushing and into the collet. Tighten the collet nut.
Adjust the depth of cut next, as shown on the facing page. When you do this, turn the bit slowly by hand to absolutely ensure that the bit doesn’t contact the bushing. The cutting end of the bit is too large to pass through the bushing. If you use a steel bushing, it will damage the bit’s carbide, so you want to avoid accidental contact.
Check your jig’s instruction for the recommended depth-of-cut setting. It’s often in the 2 1⁄32” to 2 3⁄32” range, depending upon the thickness of the template. A good generic starting point is 3⁄8” plus the template thickness (to get an accurate measurement of the template, use dial calipers).
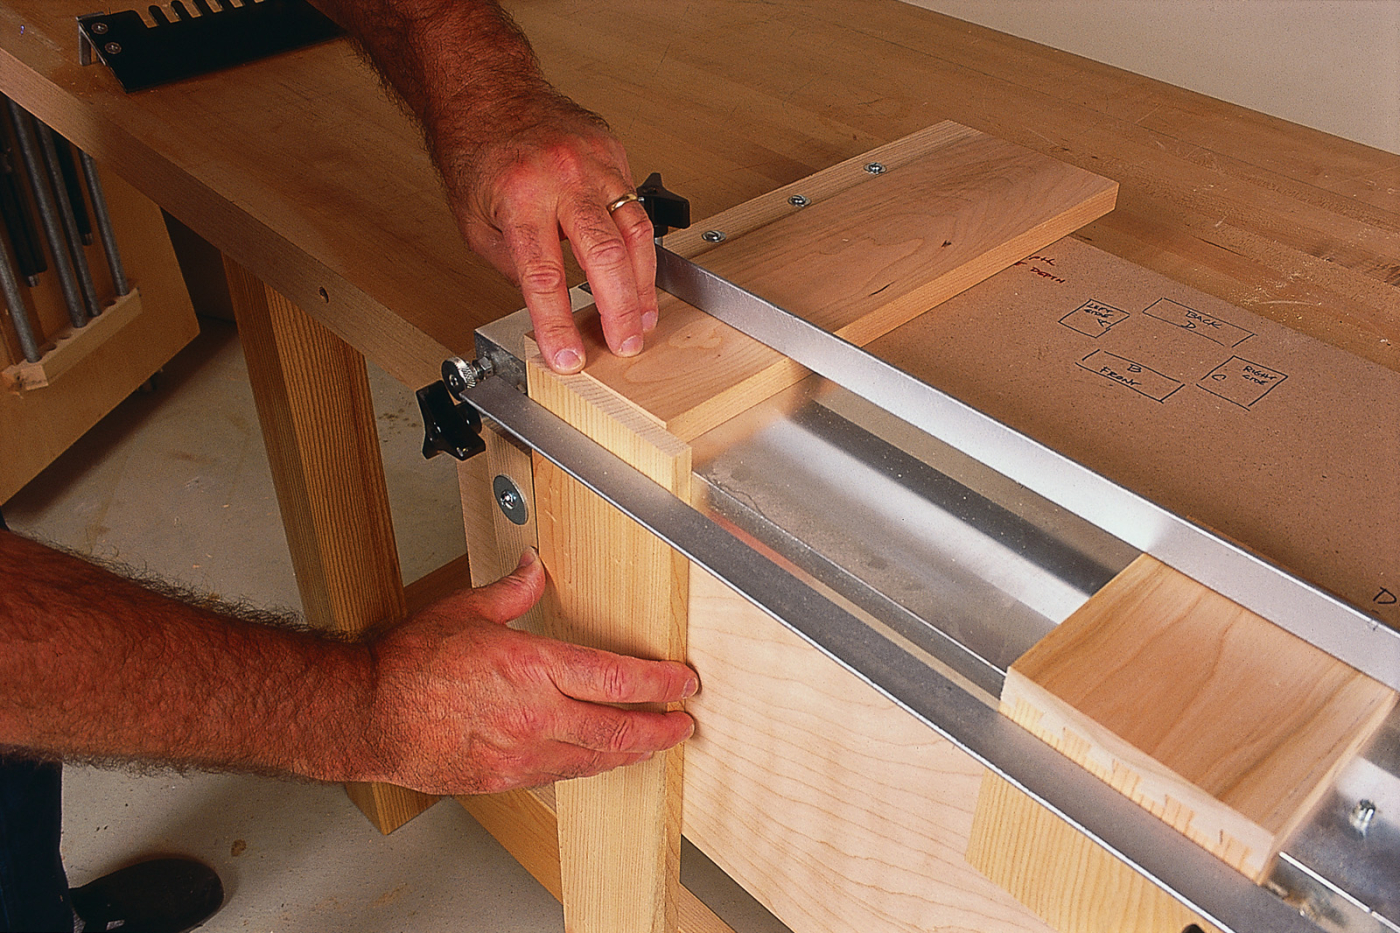
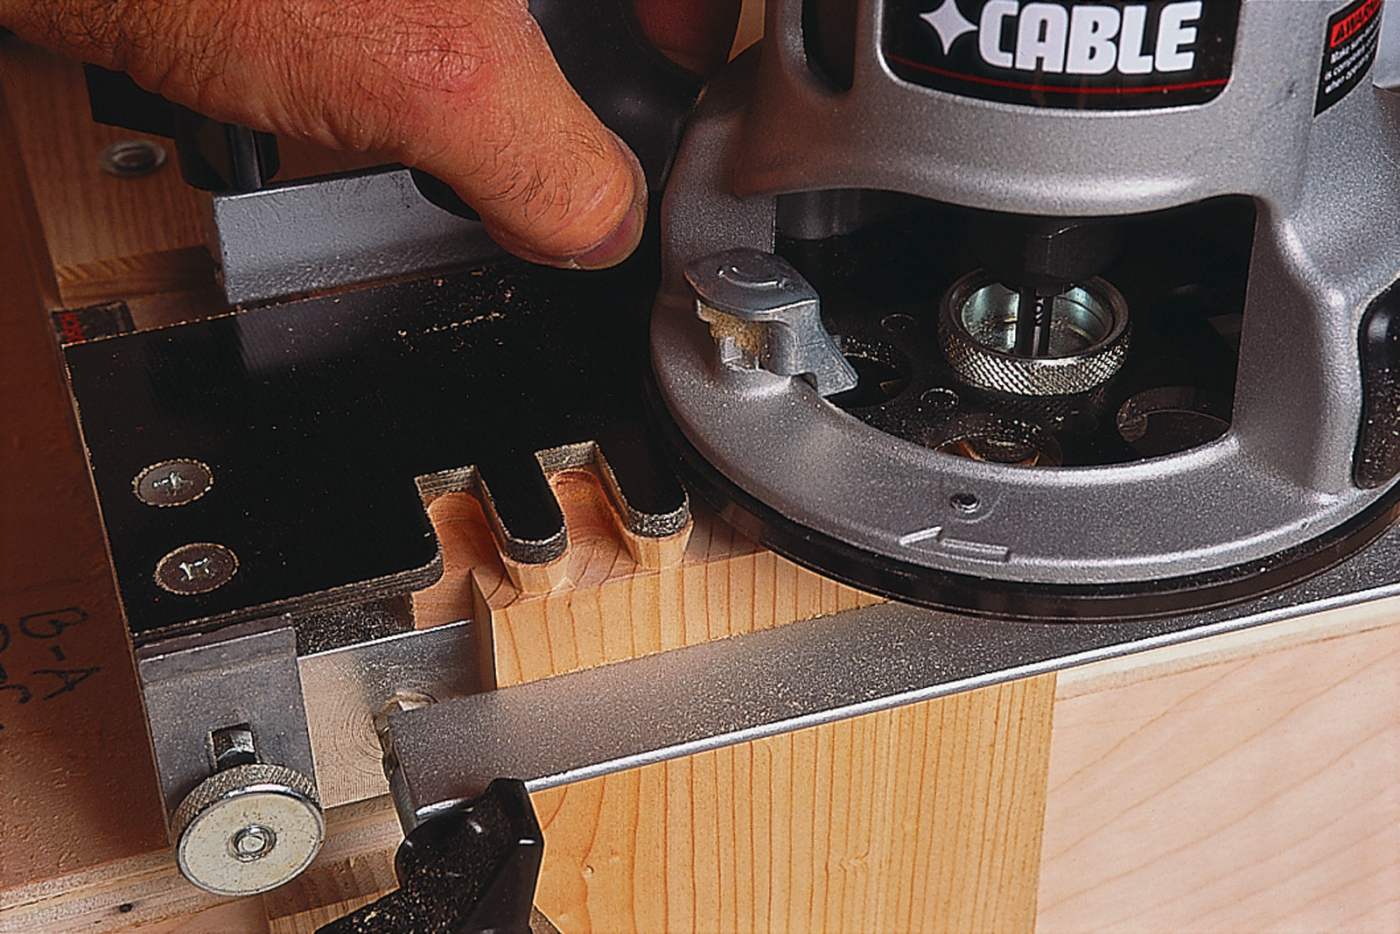
Line up the workpieces carefully as you clamp them in the jig. Snug the end of the socket piece (it’s on top) against the inner face of the tail piece (it’s on the front). Make sure the pieces are flush against the guide pins or stops. (The pin on the jig is hidden by the socket board and clamping bar.)
Clamp the Work in the Jig
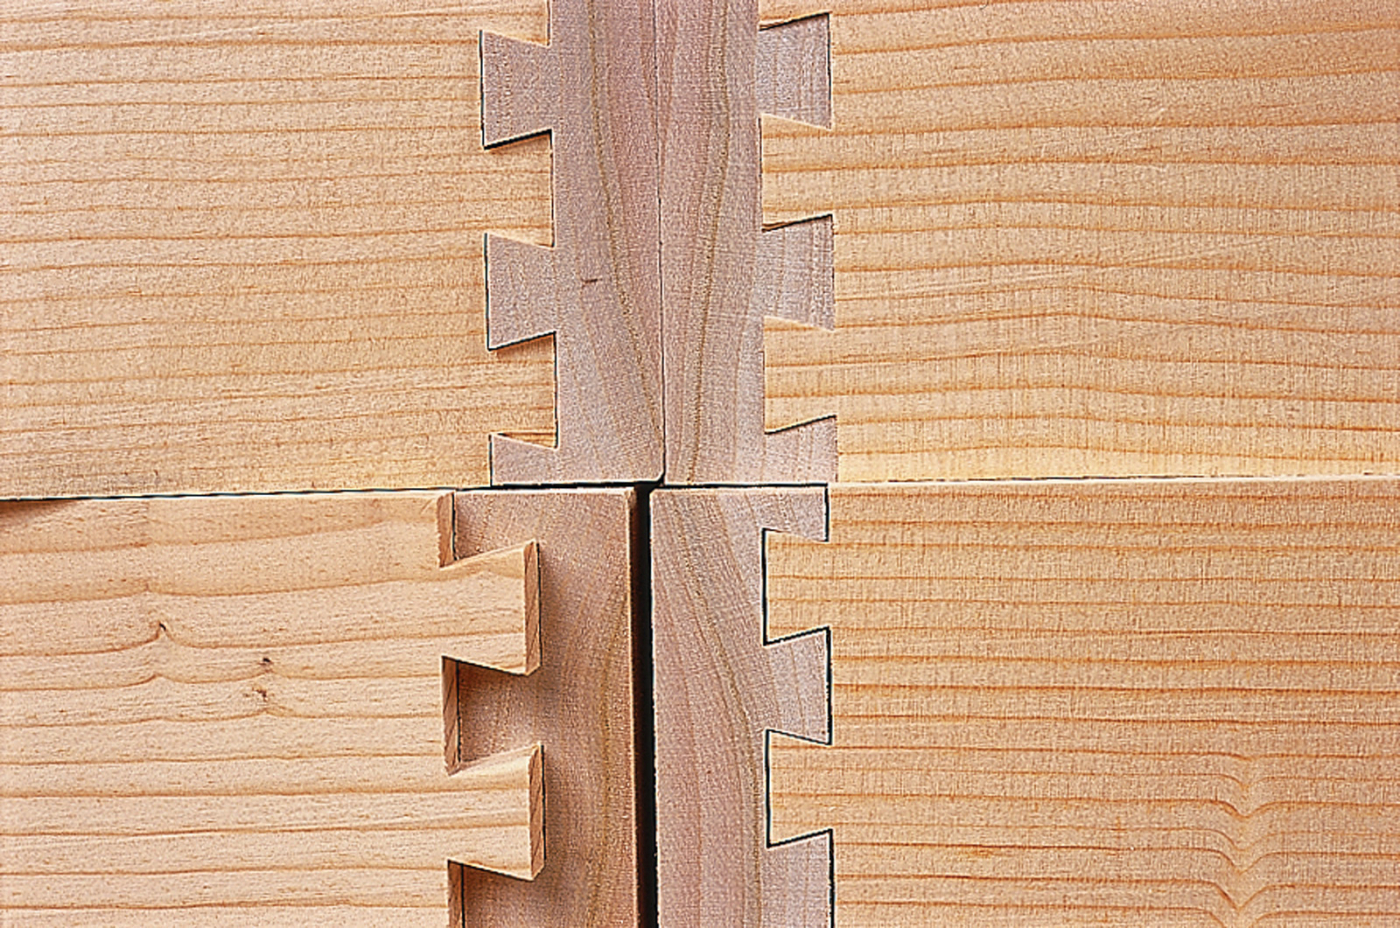
The work has to be clamped in the jig in a particular way. When you cut following the template, tails are formed on the front board in the jig, and sockets into which the tails nest are cut simultaneously into the top board.
So the socket piece – and that’s always the drawer front or back – is on top. The tail piece – the drawer side – is at the front. Alignment is critical: The tail board overlaps the end of the socket board, and its end must be flush with the upper face of the socket board. The boards must be perpendicular to each other. In addition, the tail board is offset. Both boards are clamped in the jig with their “inside” faces out.
Here’s an easy way to do it. Roughly position the tail piece in the jig, with its top end well above the jig. Slip the socket piece under the top clamping bar, and butt it tightly against the tail piece. Clamp it firmly. Now loosen the clamp holding the tail piece and lower it until its end is flush with the other workpiece. Clamp it firmly.
Chipping along the shoulder of the tail piece is a problem. To eliminate this, make a shallow scoring cut across the tail piece first. A climb cut – where you feed the router from right to left – is most effective here. Just be sure the router doesn’t get away from you.
Both pieces need to be against the alignment pins or stops. These pins align the parts so they are offset exactly 7⁄16“, which is half the center-to-center spacing of standard router-cut half-blind dovetails (7⁄8“). Every jig has these pins on the right and on the left. Use those on the left for now.
The template must rest flat on the work. Its fore-and-aft alignment is critical to the fit of the joint, but don’t worry about it for now. Use the out-of-the-box setting for your initial test cuts, and adjust as necessary.
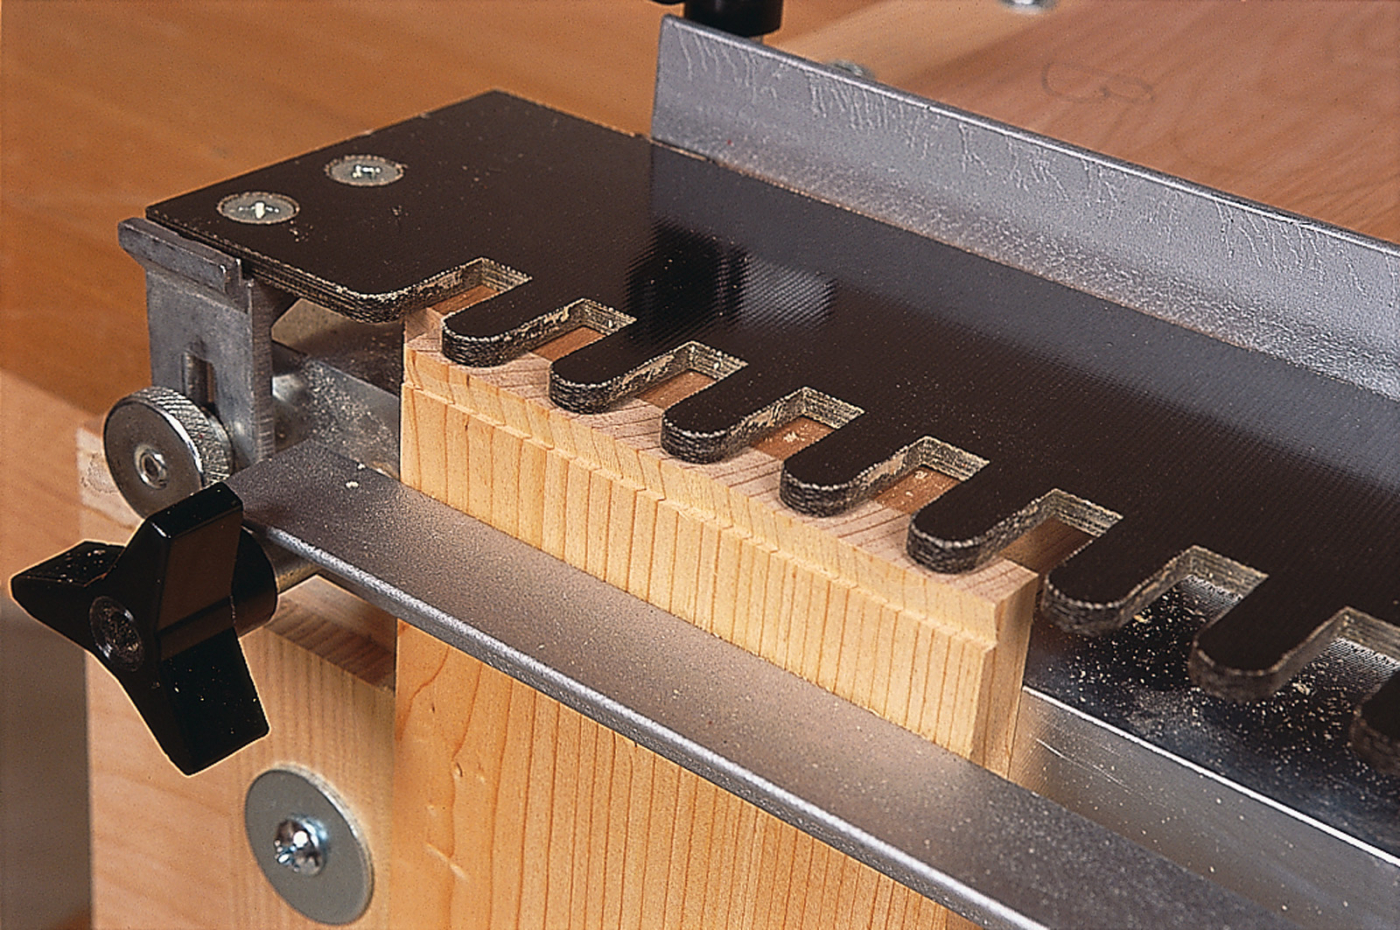
Move the router along the template, feeding the router into each slot and keeping the guide tight against the template as you come out of one slot and round the finger into the next slot. Any little bump on either tail or socket will prevent assembly of the joint.
Cut a Test Joint
Rest the router on the template with its bit clear of the work. Switch on the router, and make a quick, shallow scoring cut across the tail piece, feeding from right to left (yes, this is a climb cut).
The purpose of this cut is to prevent tear-out along what will be the inside shoulder. What often happens is that the bit blows out splinters as it emerges from each slot of the jig’s template. If there’s no shoulder established first, these splinters can run down the face of the drawer side, defacing it.
Now rout the dovetails, slot by slot, beginning on the left and working to the right. Feed the router into each slot of the template, then back it out. Keep the router firmly against the template as you round the tip of each template finger; you want to completely form each tail – no little lumps.
I usually zip back through the slots after the first pass, just to be sure I didn’t pull out of a slot too soon, leaving that socket only partially cut. Don’t just lift the router from the template. The bit will ruin both the cut and the template. Instead, turn off the power and pull the router toward you, getting it well clear of the jig before lifting it.
Take a good look at the work and be sure you haven’t missed a spot. If you have, re-rout it before moving anything clamped in the jig. Remove the template, unclamp the work, and test assemble the joint.
Fine-tune the Setup
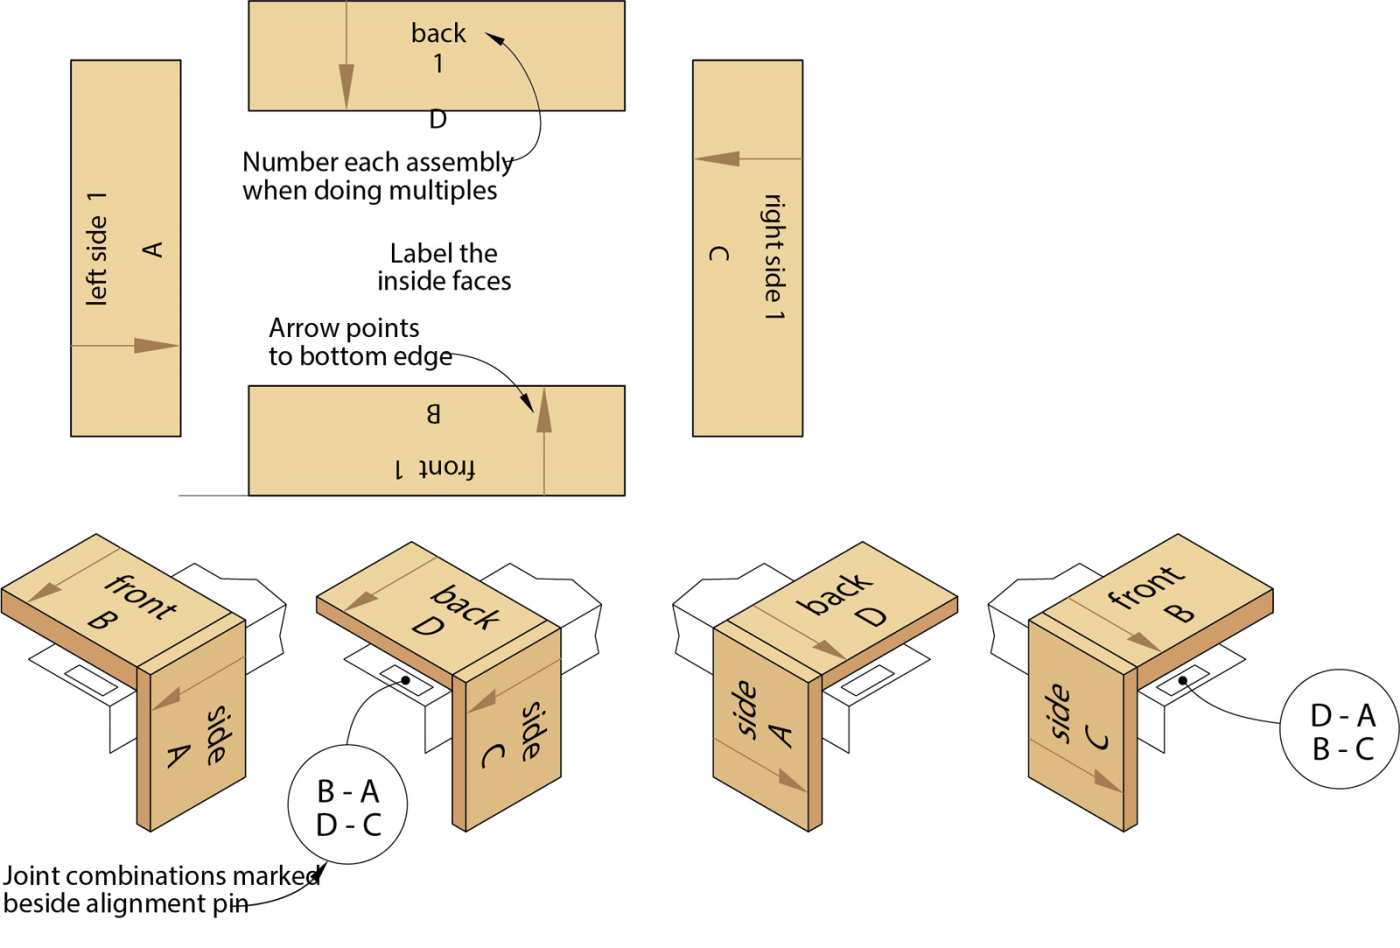
Organizing the parts: Keep the pieces organized by marking the parts of the drawers as shown in the drawing above. Mark your jig with the letter combinations that are shown on each side of the dovetail jig.
Slip the test pieces together. Maybe something’s not quite right. Perhaps the fit is too loose. Or too tight. Or the sockets aren’t deep enough. Or the parts are a little offset. All of these ills are cured with some fine-tuning.
The bit’s cut depth is the primary control of fit. The way it works is shown in the drawing, “Setting Depth of Cut,” below. The cut – the socket – is always the size of the cutter. But when you alter the depth of the cut, the width of the material left between sockets changes. Because you are cutting both tails and sockets at the same time, the material between the sockets is in fact the tail.
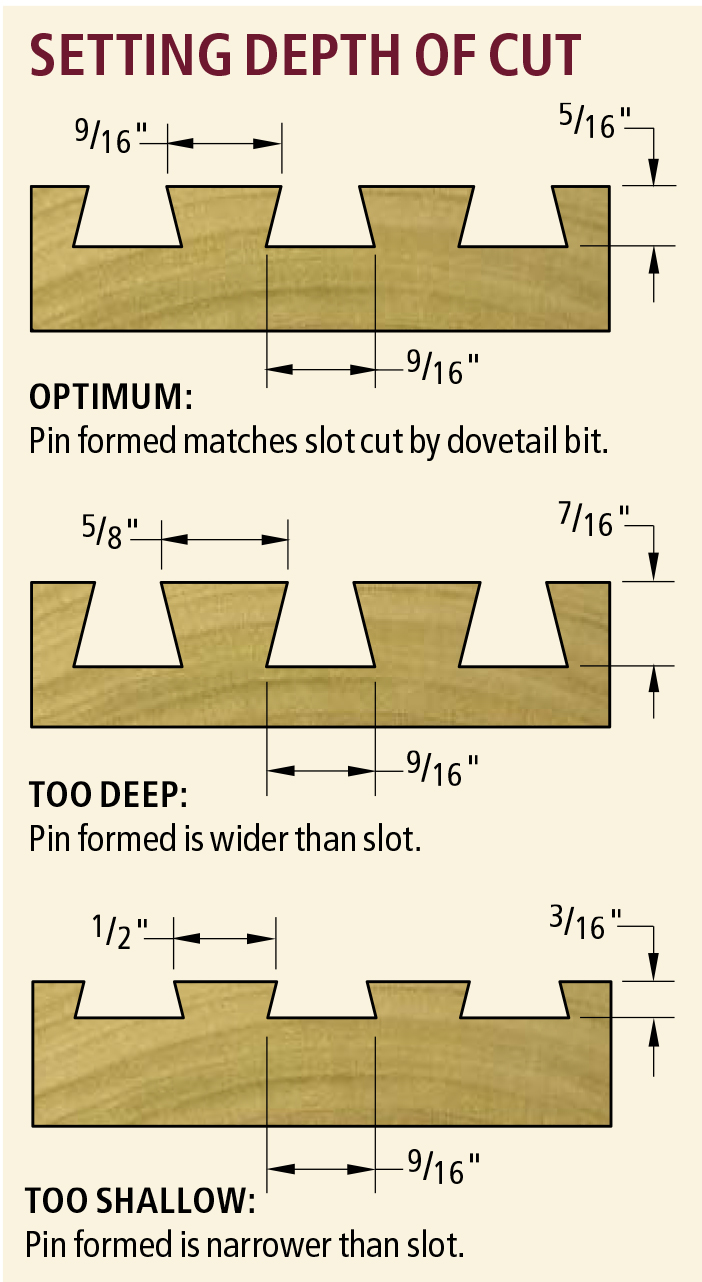
In practice, this aspect of the setup is at the same time deceptive and frustrating. The transition from “no fit” to “perfect fit” is abrupt – just a 1⁄32” change can make all the difference. What often happens is that you lose confidence in the adjustment regimen after one or two incremental changes with no apparent effect. “Well, this isn’t getting me anywhere!” you think, and start adjusting in the other direction. And you seesaw between increasing and decreasing the cut depth, never hit the right setting, get totally frustrated, and shelve the jig, never to use it again.
Take heart. Remember that woodworkers have been using these jigs for decades, and that routers have been pretty primitive tools for most of that time. You can do it. Be patient, methodical and persistent. Here’s what you do:
• Reduce the cut depth to loosen the fit.
• Increase cut depth to tighten the fit.
Once the depth of cut is dead on, analyze a new test cut and determine if other adjustments are needed.
The relationship of the joint surfaces is controlled by the template’s fore-and-aft position. Ideally, the surfaces are flush when the joint is seated tightly.
• If the side is recessed, the pin is short and the socket is long. Shift the template back.
• If the side is proud of the front’s end, the pin is long and the socket is short. Shift the template forward.
Your jig’s instruction sheet should explain exactly how to accomplish this. Generally, the template bracket sets against a nut on the mounting stud. Turn the nut and the template moves. These studs usually are 1⁄4“-20 bolts, so a full turn of the nut will move the template in or out 50 thousandths of an inch.
Look at the edges next. When the joint is assembled, the adjoining edges should be flush. If they aren’t, you may not have had the workpieces snug against the alignment pins. Or the pins may be slightly misadjusted.
If your test joint doesn’t fit fit exactly, the nature of the misfit cues you how to correct it on your next cut. If the tails are tight or loose in the sockets, adjust the cutting depth. If the tails fit, but aren’t flush, adjust the position of the template.
Any other problems you have will have stemmed from misalignment of the workpieces in the jig. Make sure the top surface of the socket piece is flush with the top end of the tail piece, that they are at right angles to each other, that the template is square to the workpieces, and so forth.
When you’ve successfully fine-tuned the setup using the alignment pins on the left, cut a test joint at the other end of the jig. Do any additional tuning needed there.
Dovetailing the Good Wood
Before starting on the actual project parts, make sure you’re organized. The parts are worked “inside out.” If you are doing drawers, the sides always go on the front of the jig, and the fronts and backs always go on the top. Some joints are cut on the right side of the jig, others on the left. It’s easy to get mixed up, whether you’re dovetailing one drawer or 50.
A good way to avoid confusion is to label the parts on what will be their inside faces, as shown in the drawing “Organizing the Parts” at left. Where you put the labels is as important as what they are. The letters are always associated with a particular part. Put the letter at the bottom so you know which edge goes against the alignment pins. On the jig itself, mark the two-letter combinations beside each pair of alignment pins, as indicated in the drawing. As you clamp the parts into the jig, orient the letters toward the pins, and check the combination. If it isn’t on your list of two, you are at the wrong end of the jig.
Here are some supplies and tools we find essential in our everyday work around the shop. We may receive a commission from sales referred by our links; however, we have carefully selected these products for their usefulness and quality.