We may receive a commission when you use our affiliate links. However, this does not impact our recommendations.
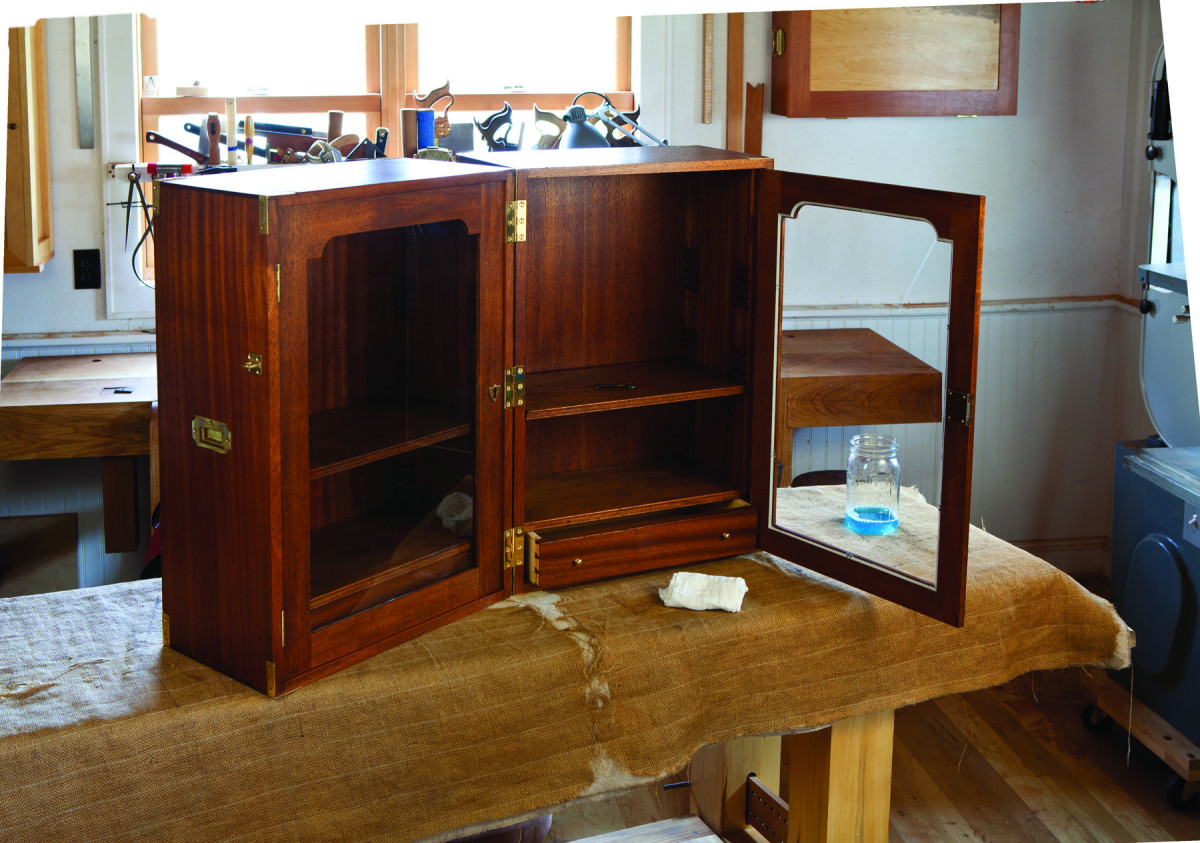
Though not as lightweight as an eReader, this portable library is far more stylish.
Bookcases that fold up like a clamshell were common among British travelers of the 19th century. Soldiers, students, clerks and the clergy were all fond of this easy way to take a library with them anywhere in the world.
This version of a portable bookcase has been designed to simultaneously hold two different sizes of modern books, both 81⁄2” x 11″ and 6″ x 9″ editions. Or you can move the shelves around to accommodate odd sizes of books in your personal library.
On its face, this is a deceptively simple project. It is but two boxes hinged together. But once you immerse yourself in the details – how the drawers, doors and shelves all work together – you’ll find the project is a bit of a puzzle. It’s fun to unravel – if you can identify the obstacles ahead of you and sidestep them with grace.
Bookcases such as this were typically made from mahogany, walnut, oak or a local exotic species. I made this version using sapele (Entandrophragma cylindricum), an African relative to the three true mahoganies. Before you process a single stick of timber, however, I think it’s best to first purchase the hardware for the bookcase. The hinges in particular will guide you as you position the brasses on the bookcase.
Joinery: Easy & Odd
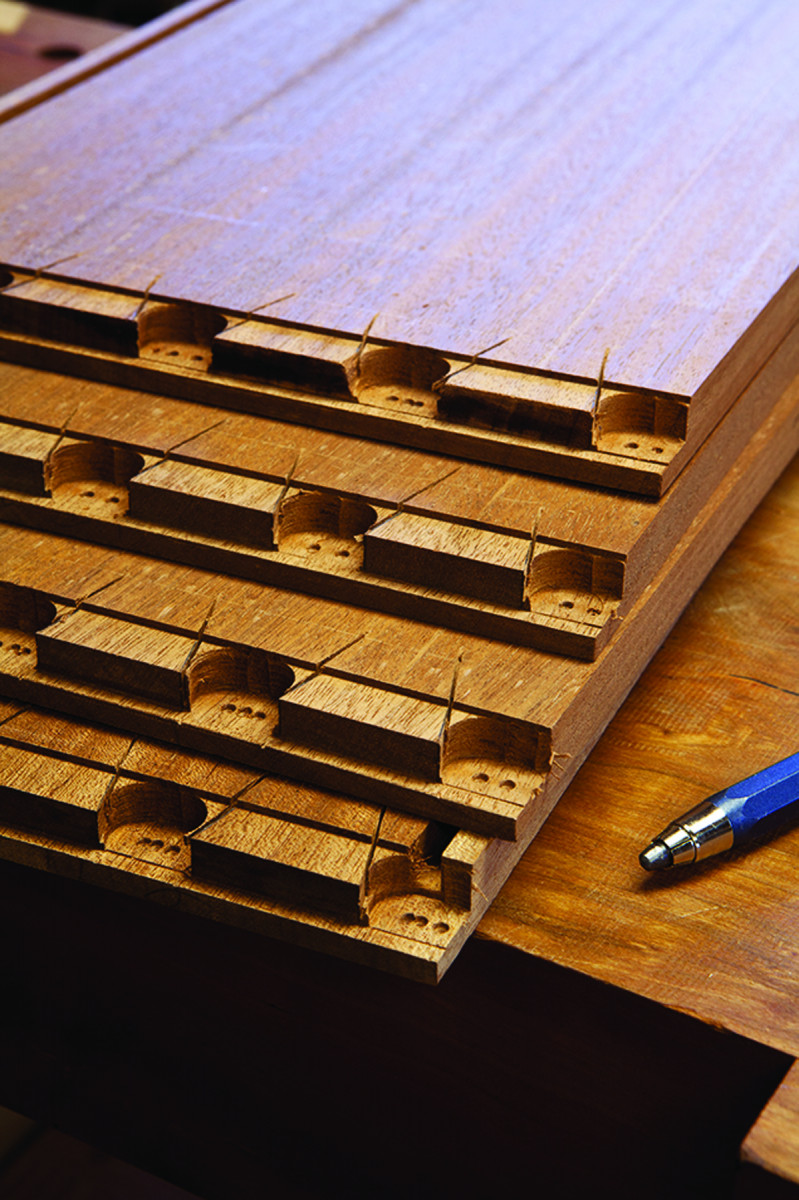
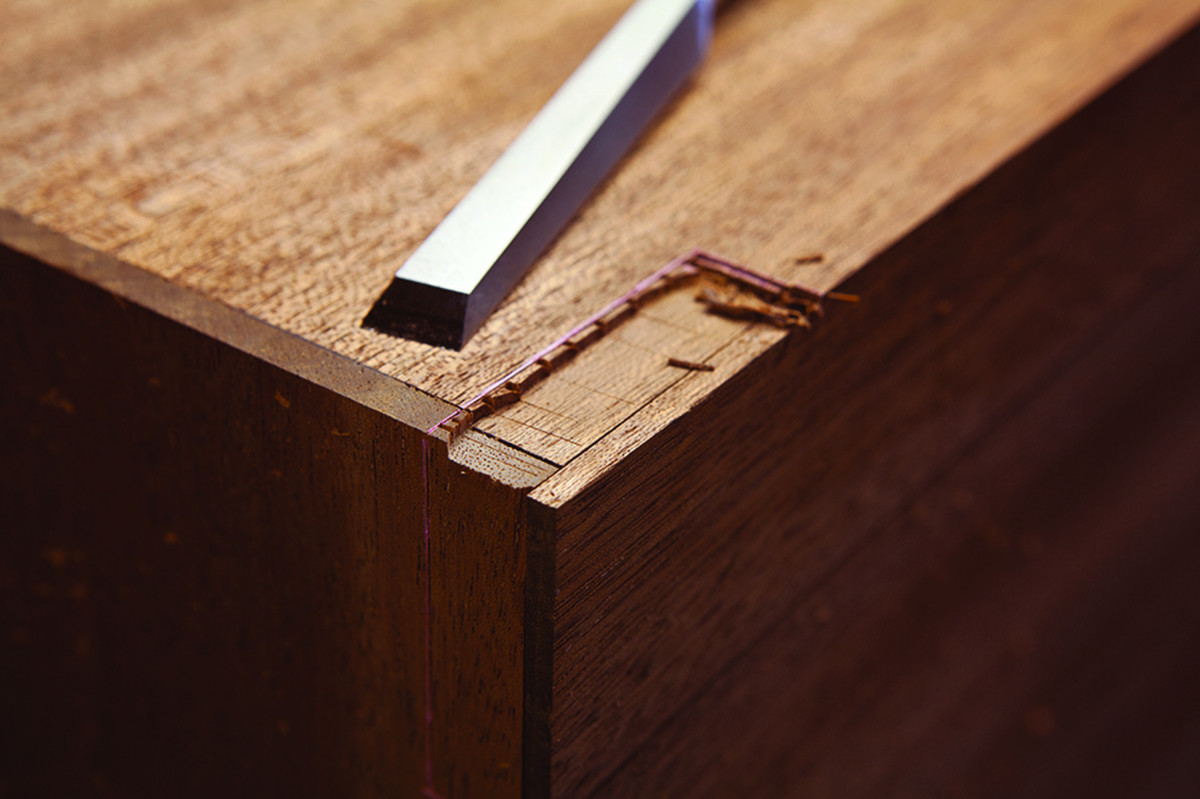
They’ll never show. Full-blind dovetails are easy to cut – once you realize they only have to fit together. They aren’t for showoffs.
For the most part, the joinery on this bookcase is straightforward. The sides, tops and bottoms of the cases are joined using full-blind dovetails (the easiest dovetail ever invented). The back is attached to the carcase with the only oddball joint in the project. The back is rabbeted and grooved to both float in the carcase and provide a clean-looking exterior. The doors are joined with typical mortise-and-tenon joints. The drawers are built like many pre-industrial drawers.
Sneaky dove. A knife with a dropped point makes it easy to get into the joint and mark your pinboard. Another option: Use an awl with a bent tip.
One last thing before we start: You probably think the shelf standards are difficult to make. They aren’t.
Invisible Dovetails

Puzzling pieces. The back, which is horizontal on the bench, has a rabbet and a groove to allow it to mate with the carcase, which is vertical in the photo.
Many campaign pieces are built using full-blind dovetails. From the outside, the joint looks like just a rabbet, but the pieces hold incredibly tight. On many campaign pieces, the tails would typically go on the top and bottom boards; the pins were on the sides. So that’s how I laid out my joints.
Begin on the tailboard by cutting a 1⁄4“-wide x 1⁄2“-deep rabbet on the ends of the top and bottom boards. This rabbet creates the lip that covers the end grain of the pin board.
I also cut a second shallow rabbet (shown in the photo above) to help align the boards when I transfer my marks to my pinboard. This second rabbet is optional.
Lay out your tails – four per corner is enough. Cut the tails and remove the waste between them. I used a Forstner bit in a drill press to hog out most of the waste and finished things up with a chisel.
Transferring the marks to the pin board is easy. Position the tailboard on top of the pinboard just as they will be assembled. Place a heavy handplane on top of the tailboard to help the pieces stay put as you knife in the shape of the tails on the pinboard.
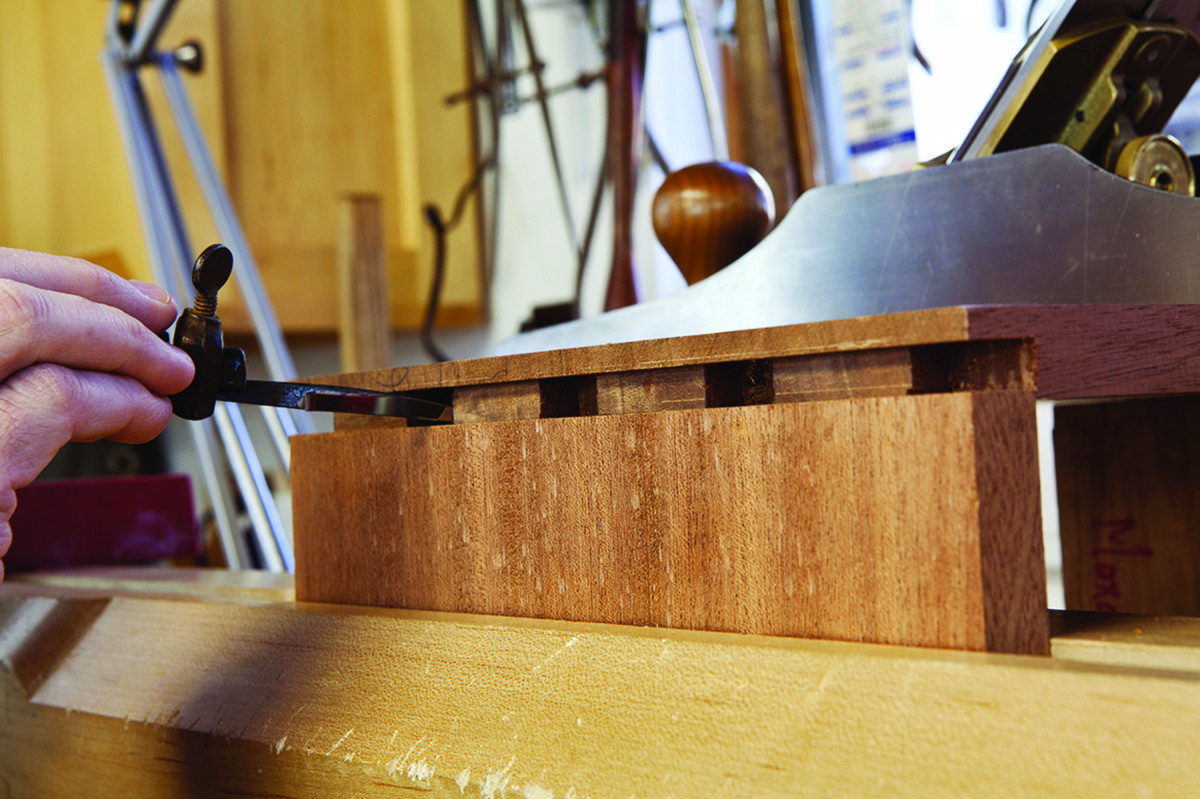
Wacky Back
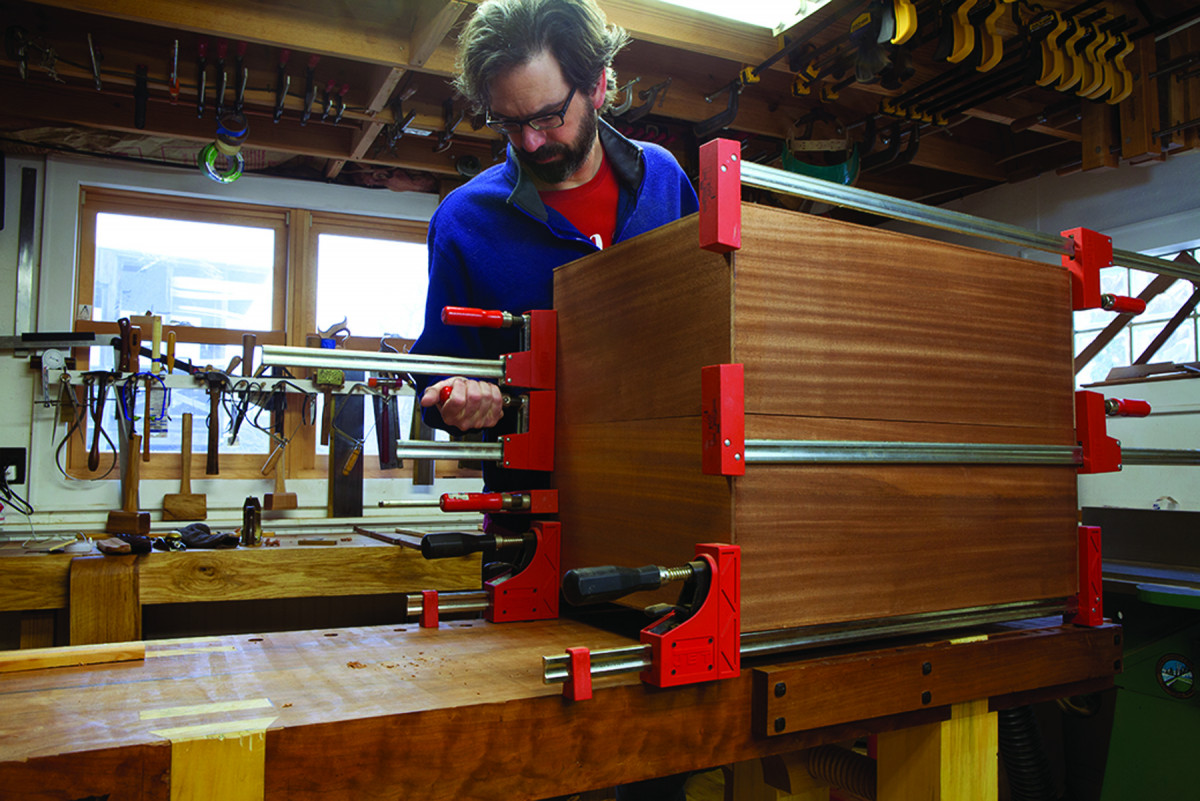
Come together. Clamping the two carcases together during glue-up ensures they will be the same shape when the clamps come off.
The back of each bookcase floats in grooves in each carcase. The groove is straightforward: It is a 1⁄4” x 7⁄16” groove that is located 1⁄4” from the back edge of each side, top and bottom board. But the back itself looks odd. Its four edges are both rabbeted and grooved. This unusual joint allows the back to float and also allows the back to extend to the four edges of each carcase.
Here’s how to make it: Cut a 1⁄4“-deep x 3⁄8“-wide rabbet on all four edges of your back pieces. Then plow a 1⁄4“-wide x 13⁄16“-deep groove in the middle of the four edges of each back. See the photo below (left) to view the result.
Before you glue up the carcases, remove all the machine marks from the interior surfaces. I’ve made a few of these bookcases; here is the best way I’ve found to glue these together.
Glue and clamp up one of the carcases. Adjust it until it is square. Then glue up the second carcase. Place it on top of the first carcase – just as they will be hinged together in the end. Use clamps to adjust the second carcase to match the shape of first one. Then clamp them together along their seams.
This procedure gives you two square carcases that mate up, without a lot of trimming one carcase to match the other.
Folding Bookcase Cut List
No.ItemDimensions (inches)MaterialComments
t w l
❏ 4 Case sides 3⁄4 x 10 x 26 3⁄4 Sapele Full-blind dovetails
❏ 4 Case tops & bottoms 3⁄4 x 10 x 18 1⁄2 Sapele 1⁄4” lip for dovetails
❏ 2 Backs 3⁄4 x 18 1⁄2 x 27 1⁄4 Sapele Rabbeted & grooved
❏ 8 Shelf standards 1⁄2 x 2 x 22 3⁄8 Sapele
❏ 2 Adjustable shelves 1⁄2 x 8 3⁄4 x 16 1⁄4 Sapele
❏ 2 Fixed shelves 1⁄2 x 8 3⁄4 x 17 Sapele
❏ 4 Bottom shelf supports 5⁄8 x 8 3⁄4 x 2 7⁄8 Sapele
❏ 2 Drawer fronts 3⁄4 x 2 7⁄8 x 15 3⁄4 Sapele *
❏ 4 Door stiles 1⁄2 x 2 x 25 3⁄4 Sapele
❏ 2 Top rails 1⁄2 x 3 x 15 1⁄2 Sapele **TBE
❏ 2 Bottom rails 1⁄2 x 2 x 15 1⁄2 Sapele
*Cut drawer sides, backs and bottoms in secondary wood; **TBE = Tenon both ends
 Birds’ Mouth Shelf Supports

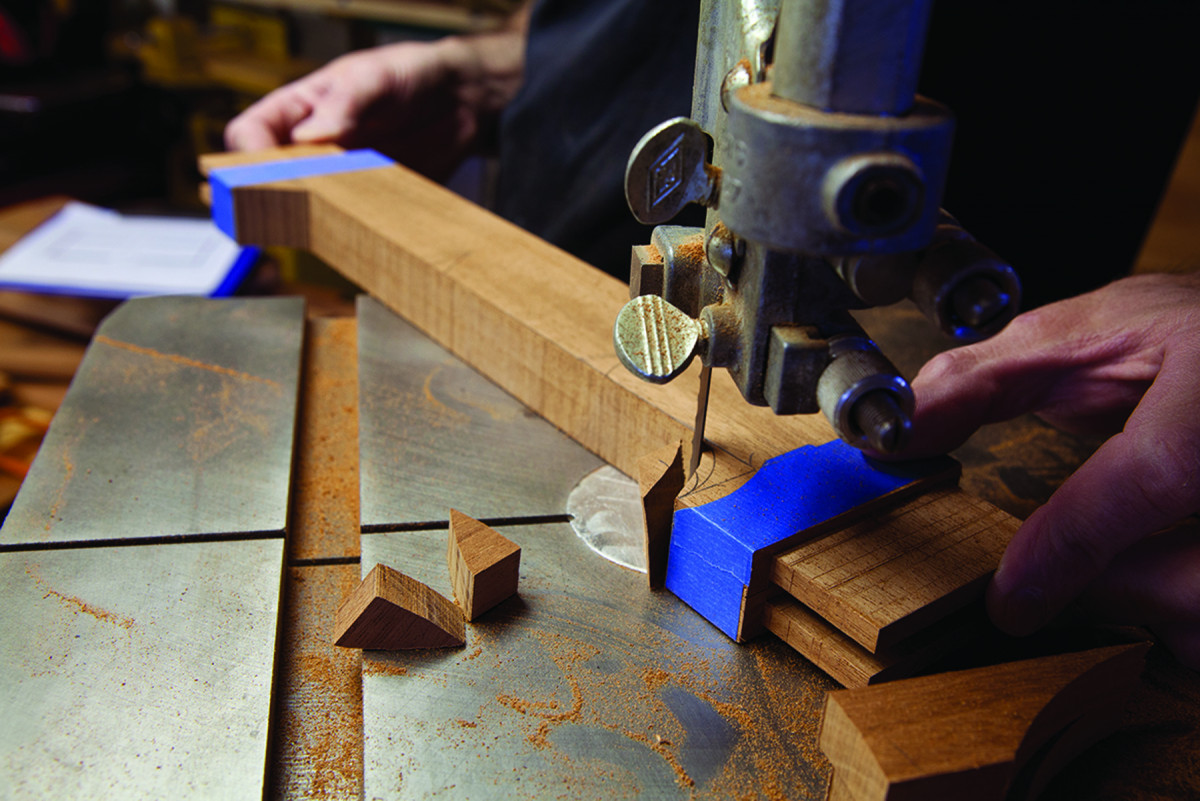
Easy birds. The birds’ mouth shelf supports are cut simply and directly using a dado stack and a table saw. Note the stand-off block clamped to the fence.
The notched shelf supports are surprisingly easy to cut with a table saw.
The best plan is to make the angled notches on a wide piece and rip the 2″-wide pieces free afterward. This saves time and allows you to rip away the torn long edges that result from cutting across the grain.
On the table saw, install a stack dado set on the arbor with enough chippers to make a 5⁄8“-wide dado. Tilt the arbor to 15° and lock it. Cut the birds’ mouth notches using your slot miter gauge and the table saw’s fence (use a stand-off block to prevent the work from binding between the blade and the fence).
Cut the first angled notch into the work. Then move the fence 5⁄8” and make a second cut. Move the fence 5⁄8” and make the third. Keep going until you have all the notches you want.
This technique works tremendously well. However, if you are worried about the case sides bowing out, square the bottom of the notches with a wide chisel. A historically correct option is to use a series of dados instead of the angled notches.
Installing the Guts
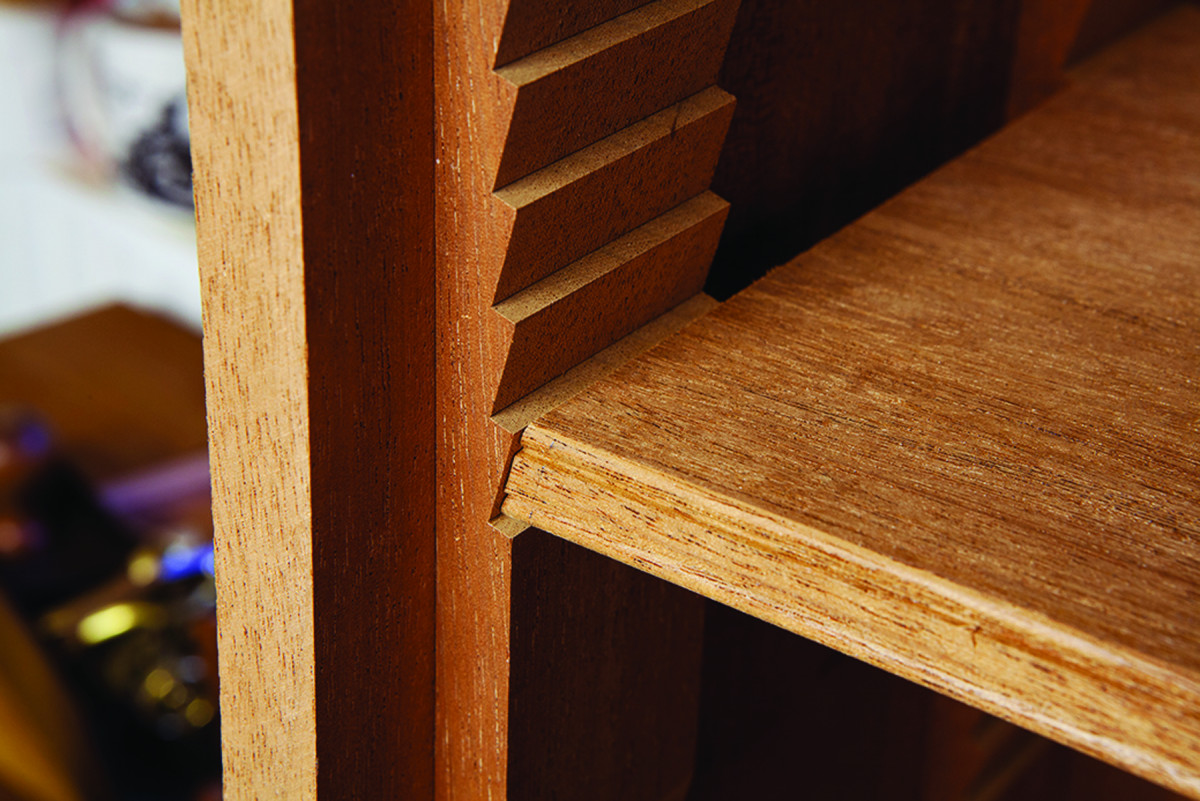
Nicer than metal pins. The birds’ mouth shelf supports are so easy to make, you’ll wonder why anyone uses ugly metallic channels.
All the interior components of the carcases are glued and nailed. The boxes at the bottom of each carcase that surround the drawers are made of three pieces nailed together. Glue the bottom shelf supports to the interior walls of each carcase. Then glue and nail the fixed shelf on top of them. Done.
Once those drawer boxes are complete, you can glue the shelf standards to the interior walls of the carcases. Place one standard at each back corner. Place two more at the front of each carcase. When the glue is dry, cut the adjustable shelves to width and length.

Mind the gap. This is going to sound like overkill, but it works. Measure the gap between the cases at the top and bottom using a dial indicator. Use clamps and shims as shown to adjust the gap. You will be surprised how dead-on you can get the gap.
The width of the shelves is easy – the adjustable shelves are the same width as the fixed shelves. The length, however, is trickier. Each end of each shelf is angled at 15° to fit into the shelf standards. With each shelf I cut one end at 15° and then sneaked up on the final length. I made sure that both shelves could fit in either carcase – in every slot and when turned 180°. Don’t make them too sloppy, however, or they will rack too easily when you push them into place.
Attach the hinges that join the two cases. The only thing that is critical here is that the gap between the two carcases be dead-on identical. That ensures the pieces will line up like you intended.
Build the Doors

Good joints. Resist the urge to use stub tenons on this door. The glass is heavy and will place considerable strain on the joints. My tenons are 11⁄4″ long.
The doors are joined using straightforward mortise-and-tenon joints. I used a hollow-chisel mortiser to make the mortises, so I could get away with making 1⁄4“-wide mortises in 1⁄2“-thick material without splitting the material. If you cut these mortises by hand, use a 3⁄16” chisel instead.
The only wrinkle in these doors is the inside curve on the top rails. My recommendation is to tape the two pieces together and cut the curve on both simultaneously (as shown on the previous page). This ensures the curve will be identical, which is important because any difference will be noticeable.
All together. Small differences in the curves on the top rails are noticeable and jarring. Cut and refine the joints simultaneously to ensure they are identical.
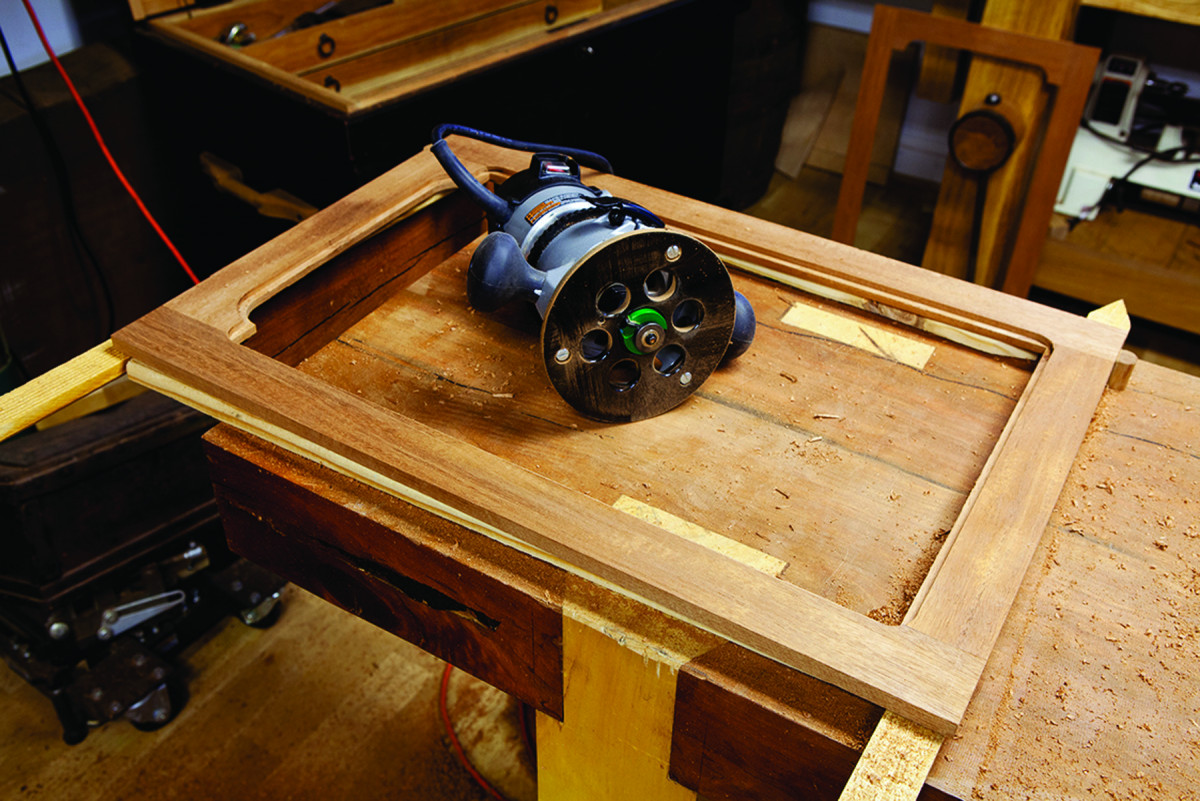
Glue up the doors, then cut the 1⁄4” x 1⁄4” rabbet that will hold the glass on the backside of the doors. I used a router with a rabbeting bit. Then I squared the corners with a chisel. Now install the doors in both carcases.
Here’s the only critical point of the operation: Make sure half of the hinge’s pin extends out of the carcase. That will allow the door to fully open so the shelves and drawer easily clear the door as they as removed. Then install the locks and the exterior hardware.
Installing Campaign Hardware
One leg. With hardware for the corners, first make the mortises for the long and skinny legs.
The brasses are the most distinctive feature of campaign furniture, and there are a lot of bits on a typical piece. Here are the strategies I use for the three most common parts: corner brackets (2″ x 3⁄4“), corner guards (2” x 3⁄4“) and pulls.
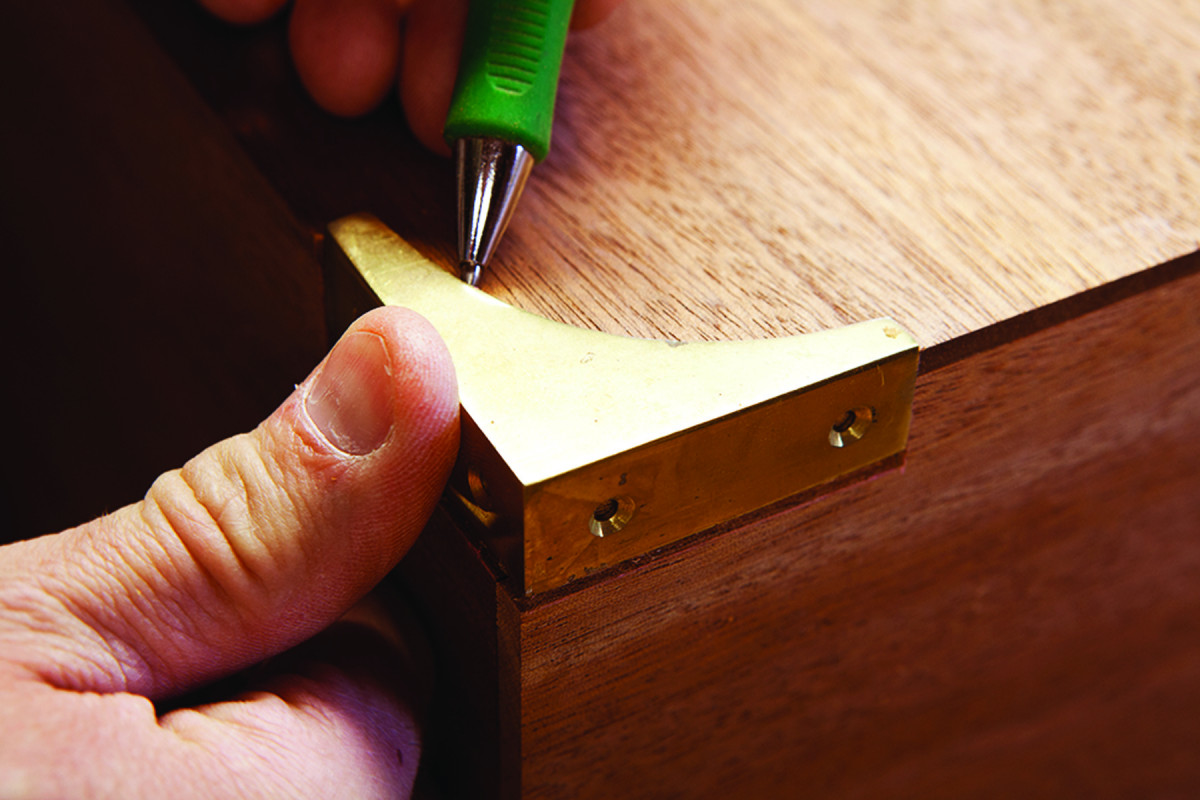
Now trace. With the two legs mortised, you can drop the corner guard in place and trace its shape on the wood. Chop the waste away and your corner guard should fit.
Corner brackets are simply L-shaped pieces of brass and are easy to install. Set your gauge to the length of each leg of the bracket, taking the reading from the outside of the piece of hardware. Use the gauge to mark the location of the bracket on the carcase. Chop out the waste with a chisel and clean the floor with a small router plane. To ensure the bracket fits tight, pare the sharp corner of the mortise away – or dent it with a hammer, which is my preference.
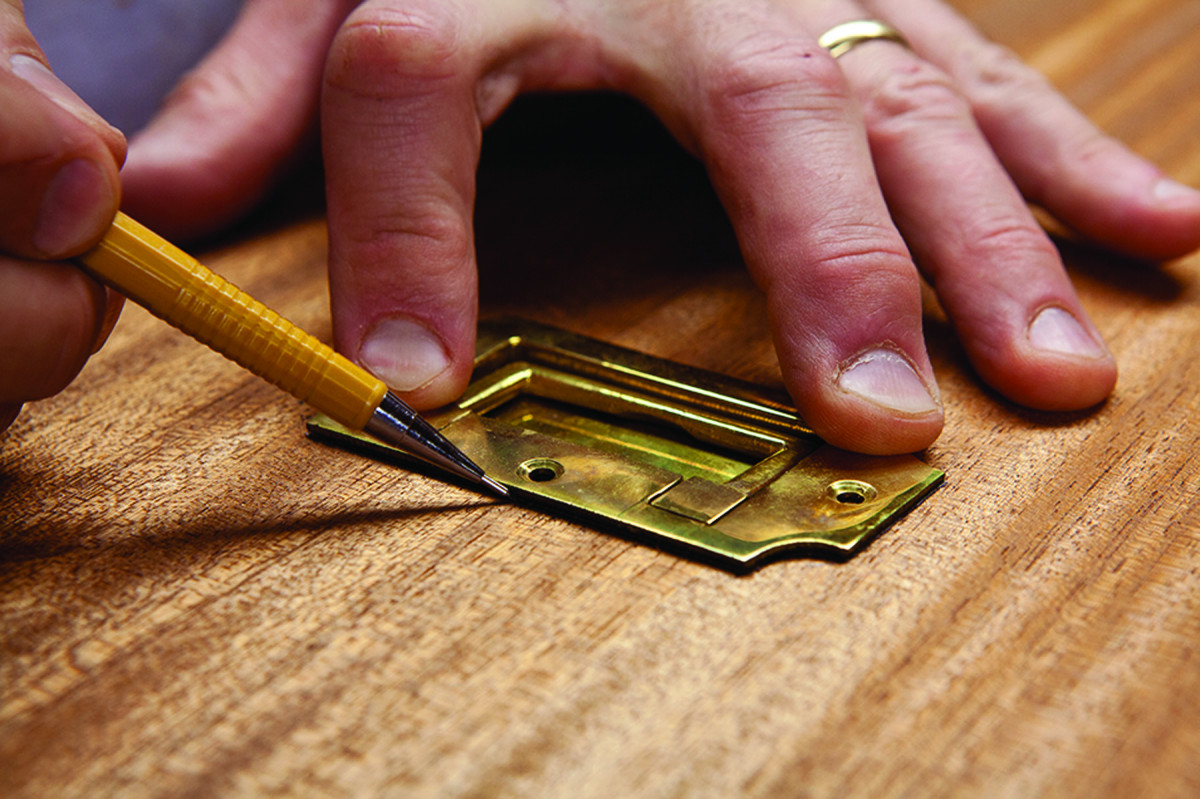
Corner guards are similar to brackets, but they also have a third surface that covers the entire corner of a piece. They are used on the tops of campaign chests, typically. With this bookcase, they are on the back corners.
First recess. The deep recess is the same basic shape as the structure shown on the back of the pull.
You install them like they were simple brackets. Set your cutting gauge to the length of one of the legs and chop away the waste that will allow two legs of the guard to nest in place. That will allow you to then trace the shape of the third surface, which typically is a fancy curve or ogee, directly on the work. Chop that waste away and your corner guard is ready to screw down.
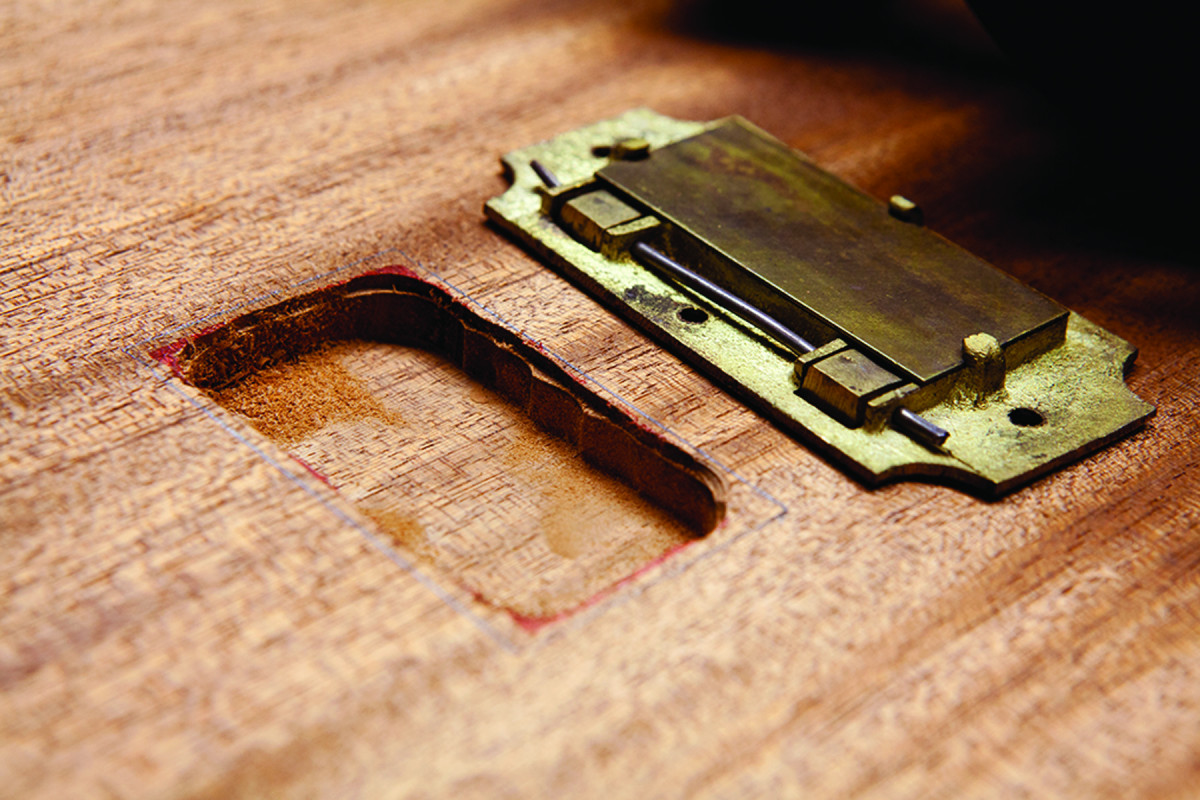
The third typical piece of campaign hardware is a pull with an integral backplate. First make a deep recess in the work that is the width and the length of the structure on the back of the pull. It doesn’t have to be exact – it just has to allow the backplate to sit flat on the work.
And trace. With the backplate flat against the work, trace around it with a mechanical pencil. Chop away the waste and fit the backplate until it is flush.
You can hog out the waste with a drill, chisel or router. Whatever is handy. Then drop the pull into the recess and trace around the backplate. Chop and pare that second shallow recess so the pull sits flush.
— CS
Two Dovetailed Drawers
Routed back. Usually I cut a rabbet for the glass before assembly, and I use a rabbet plane. But because of the tricky curves and corners on the top rail, I opted for a router.
Many of these folding bookcases featured two or three drawers for holding writing materials. My drawers are typical for the early 19th century: The back corners are joined using through-dovetails. The front corners are joined using half-blind dovetails. The bottom slips into a groove plowed in the sides and drawer front.
I used white pine as the secondary wood for the drawer sides and bottom. However, if you are going for the 100-percent pure campaign look, consider using sapele for the drawer sides and bottoms as well for a case made entirely of a rot- and bug-resistant wood, through and through.

Hide that groove. If you plan your dovetails with care, you can bury the groove for the bottom in the bottommost tail, as shown here.
Bugs, heat and moisture are also the reason for the brass corner guards on campaign furniture. Not only do they protect casework from hard knocks, they keep it together if the glue fails.
Finishing Up
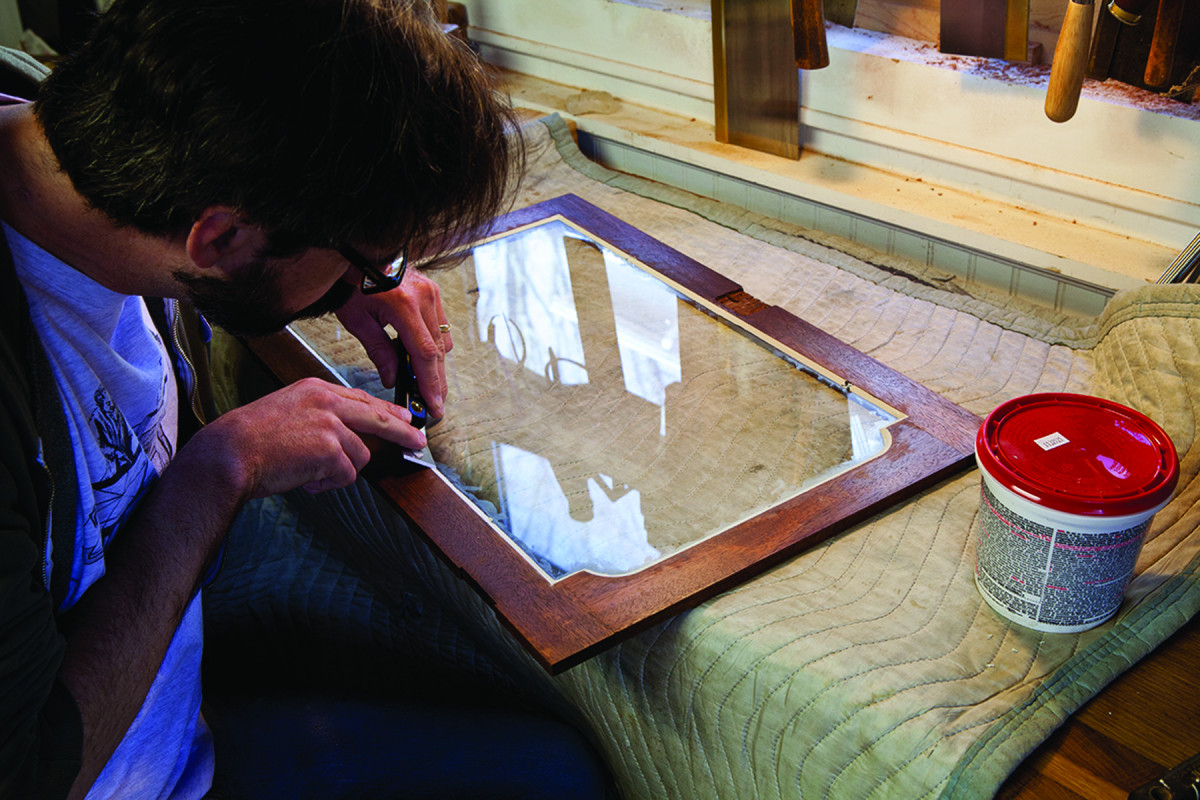
Window glazing. Applying window glazing is like working with Play-Doh (and it takes about as long to dry). Still, it gives the door a traditional look.
The finish for campaign pieces is fairly simple: shellac and wax. I applied two coats of garnet shellac then applied a black wax to fill the pores of the mahogany and supply some contrast.
The doors each have a piece of single-pane glass that is secured with traditional glazing points and glazing compound.
These folding bookcases were typically placed on top of a chest of drawers, meaning you could have a library with you wherever you traveled. It was a surprisingly modern idea for the 19th century. And while these bookcases weigh more than my current ebook reader, this bookcase will outlast the plastic contraption – a tradeoff I’m happy to make. PWM
Chris is the editor at Lost Art Press and the author of the book “Campaign Furniture.” He can be reached at chris@lostartpress.com.
Here are some supplies and tools we find essential in our everyday work around the shop. We may receive a commission from sales referred by our links; however, we have carefully selected these products for their usefulness and quality.