We may receive a commission when you use our affiliate links. However, this does not impact our recommendations.
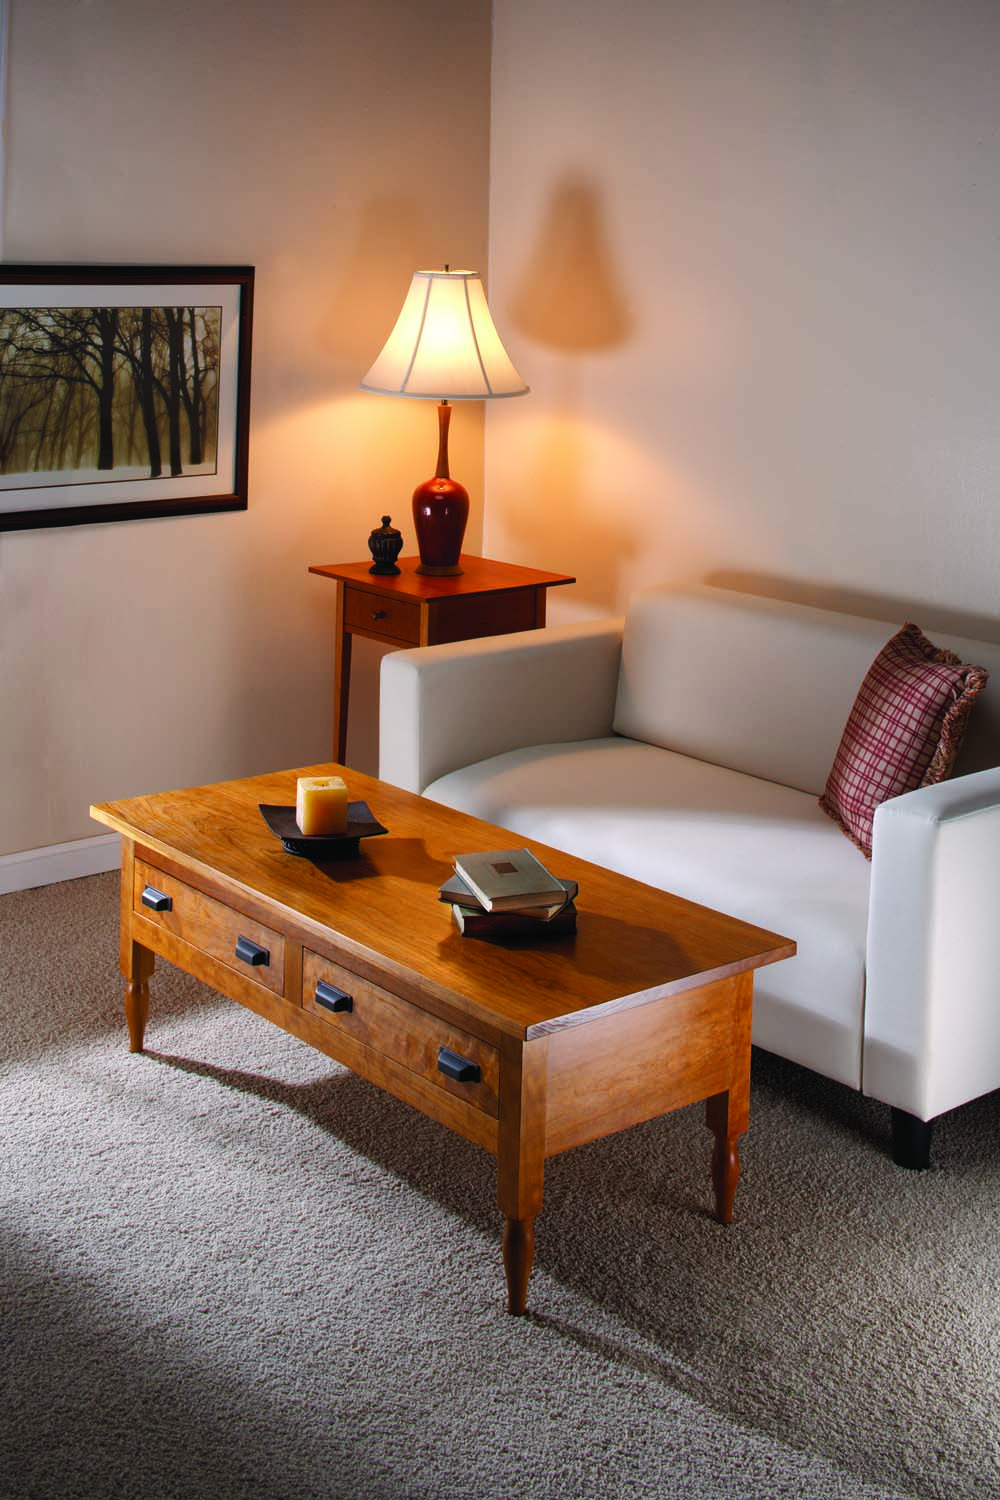
Designed to complement. This Shaker-inspired coffee table picked up design cues from pieces already in my living room, and thus serves to tie together all the wood furniture therein.
Coffee tables didn’t exist as a furniture form until the 1920s (when they were known as cocktail tables). So while there is no true Shaker coffee table, I needed a table to put in front of my couch that would work well with the other Shaker-influenced furniture in my living room. And to my mind, that’s one of the best things about being a woodworker – the ability to design and make exactly what you want. So that’s what I did.
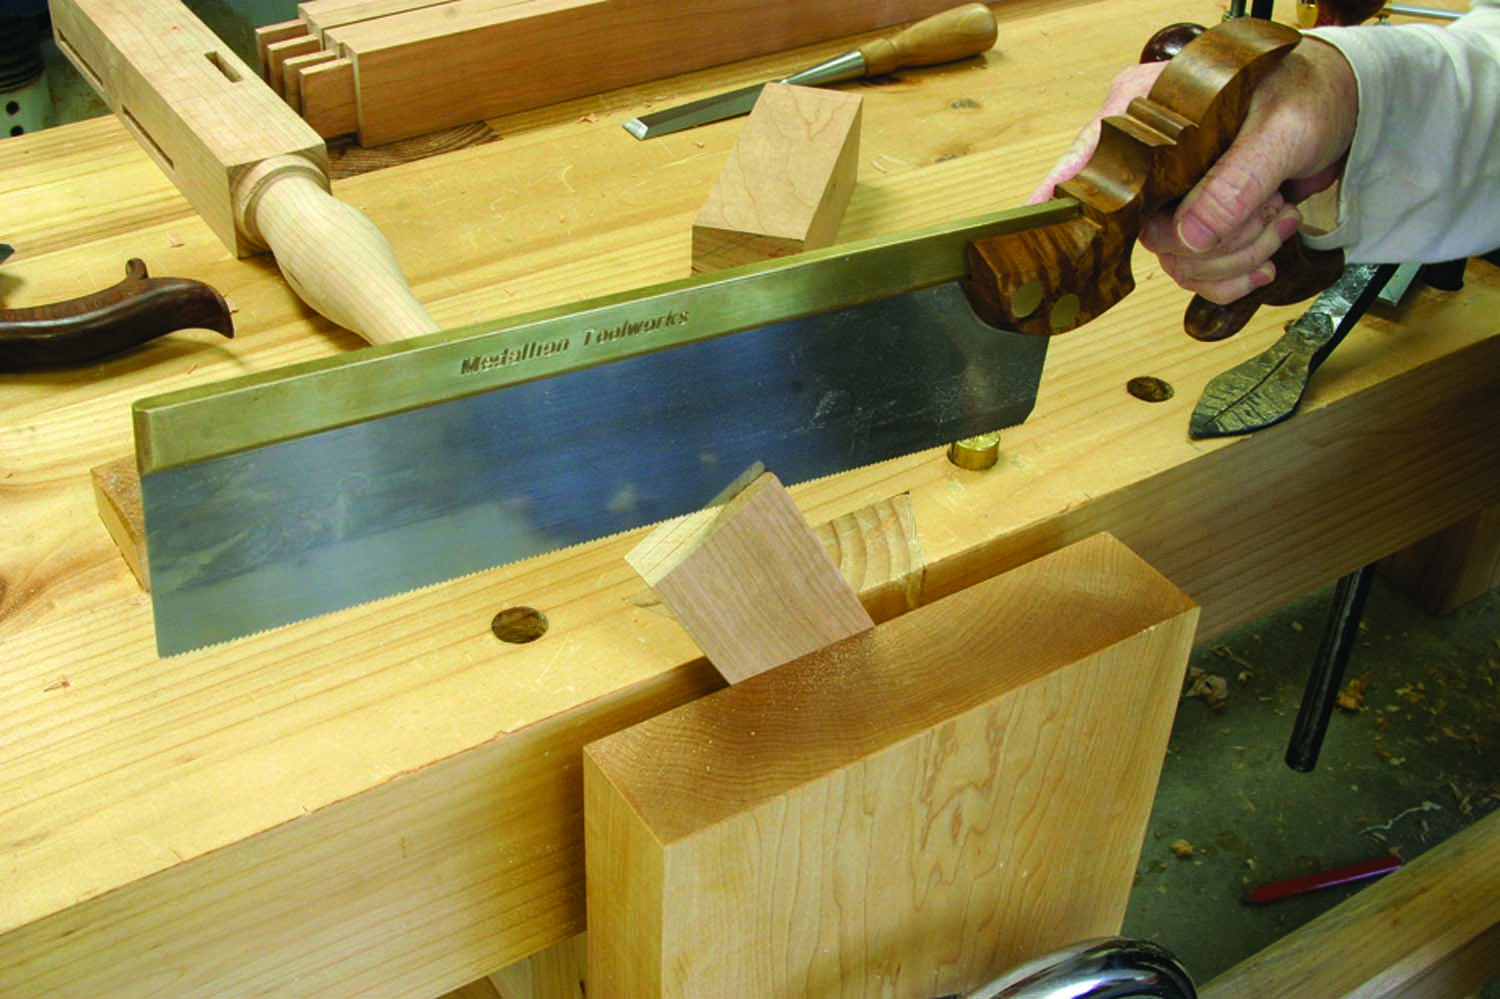
Hand-cut. To cut a good tenon by hand, it’s best to tilt the workpiece at 45° or so in your vise so you can saw to two lines. Then tilt it toward you to saw down to the baseline on the other side. With those two cuts made, there’s a V-shape of waste to saw out of the middle, with the workpiece straight up in the vise. Make the shoulder cut using a crosscut saw and a bench hook.
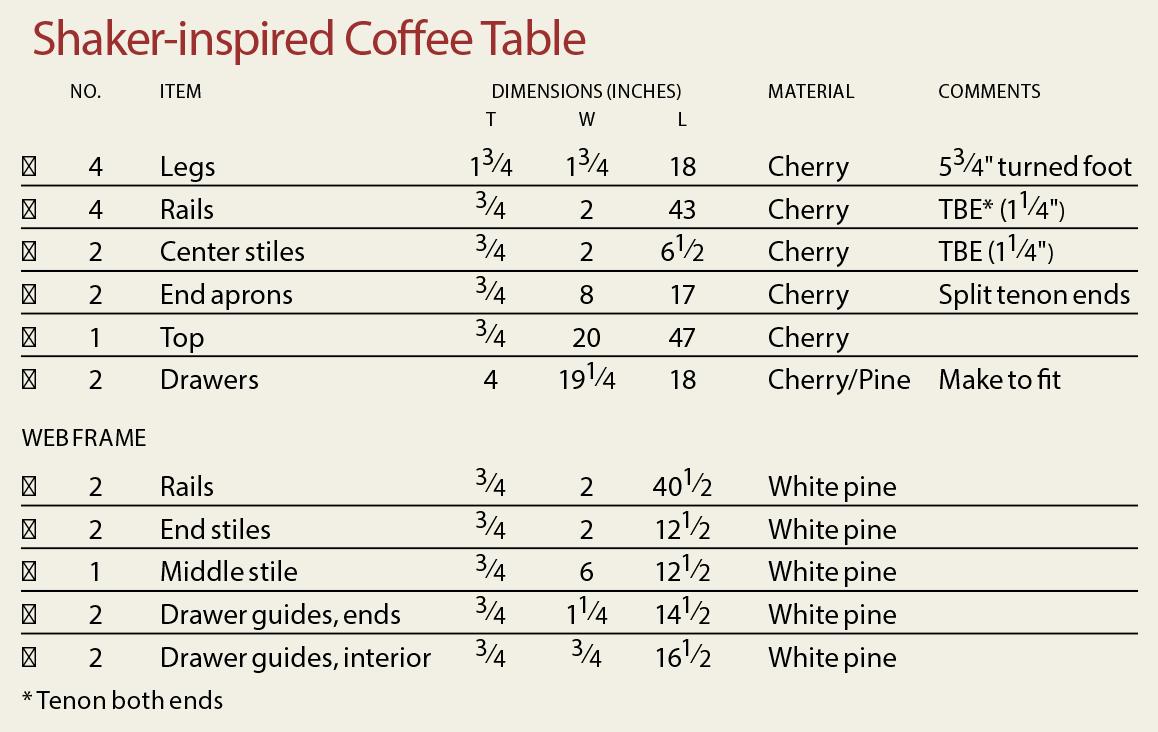
This table has the same turned feet and post-and-rail base construction that I used for my stepback (from the February 2009 issue, #174), I used the same hardware as on the “Bibliophile’s Bookcase” (from the December 2009 issue, #180) and all three pieces are built from cherry. They’re clearly part of the same family, but different enough that they don’t look like a store-bought suite.
Best Foot Back
I began by squaring six pieces of 8/4 stock for the legs (my turning skills are at best sophomoric, so I wanted two extra legs in case something went terribly wrong).

Pleasing arrangement. I tried a bunch of different leg arrangements until I had all the best faces facing out – the white wood on the front right leg in the picture is on the far side of the table from my couch; only the cats will notice it.
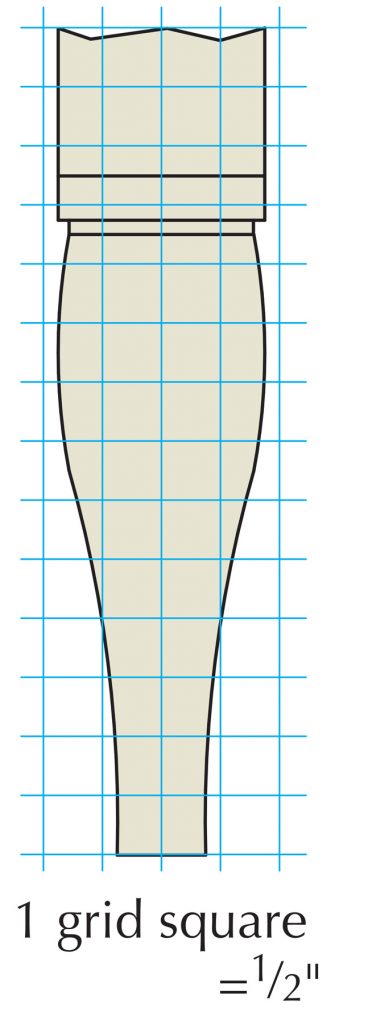
I labored over one foot until I was satisfied with its appearance, then set that one directly behind the lathe so I could look at it as I turned the others. Though I used calipers to get the top bead and swelling close to the same size on each foot, they’re not identical. That doesn’t bother me. They’re close enough that, when spread apart to the four corners of the table, you don’t notice the differences except with close scrutiny.
After all the feet were turned, I decided on the final leg arrangement, (which was in part dictated by the glaring white sapwood on the corner of one leg that had to face to the inside), then marked out the mortise locations. I cut the 11⁄2“-deep mortises with a 1⁄4”
hollow-chisel mortiser.
Rails, Stiles & End Panels
With the legs done, I moved on to the rails, stiles and end panels. After cutting the four rails, two middle stiles and two end panels to size, it was time to tenon. I wasn’t feeling adventuresome enough to cut all the tenons by hand, so I loaded up the dado stack in the table saw to make the tenons on the rails and end panels. Because the middle stile on each side doesn’t have to be as structurally sound, I decided to practice my handsaw skills by cutting the tenons on those two pieces by hand – and they actually fit better right off the saw. I had to clean up the table saw tenons with a router plane, but had very little work to do on the hand-cut ones – next time, it’s handsaws for all joinery cuts.
Because the tenons on the end panels traverse 71⁄2“, I decided on split tenons (I’d cut the mortises accordingly). I sawed straight down, coped out the majority of the waste, then cleaned up the resulting shoulder with a chisel.
Base Glue-up
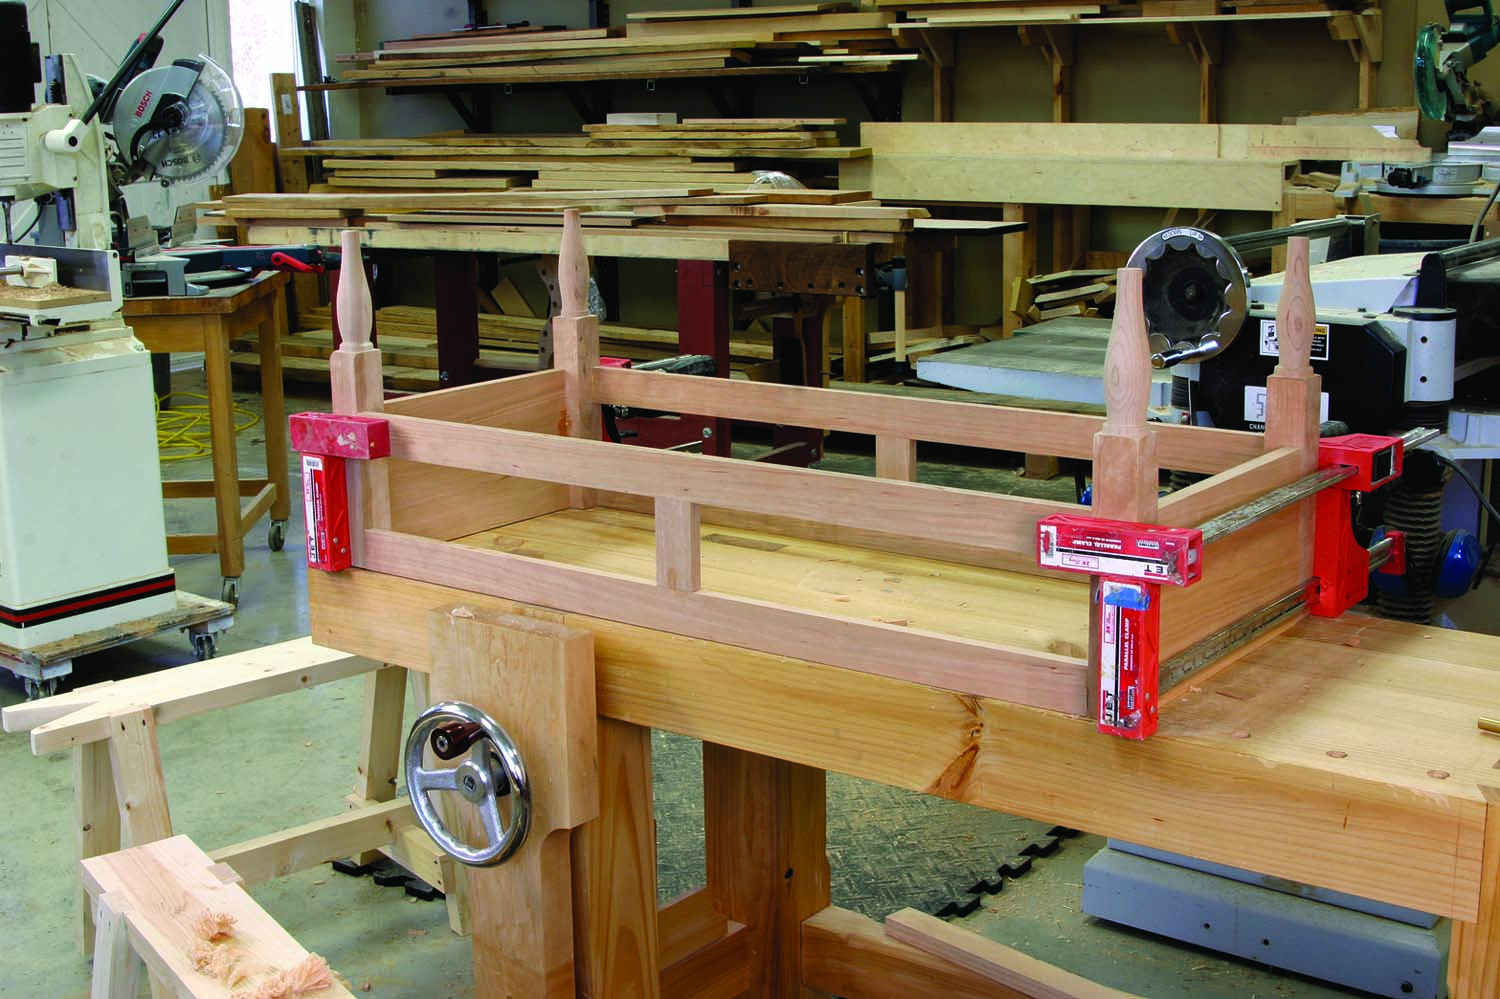
Front assembly. It’s quite a trick to apply glue and get all the tenons in place before a sticky mess ensues. I’ve seen it done – but I have yet to achieve it.
With all the pieces for the base done, it was time to get out the glue. I started with the front and back assemblies, and because there are mortises in the top and bottom and on both ends, I had glue dripping everywhere. So much for my sanding-avoidance techniques – I had to wipe off the drips with a damp rag, which raised the grain on my carefully planed surfaces.
After those two assemblies dried, I glued in the two end panels, checked everything for square, then set the completed base aside to dry.
Top(ic) of Debate
My next step involved some debate amongst the editors. Is it better to attach the top before making and fitting the drawers? Or is it better to make and fit the drawers with the top unattached, so you can easily reach inside the carcase to make adjustments?
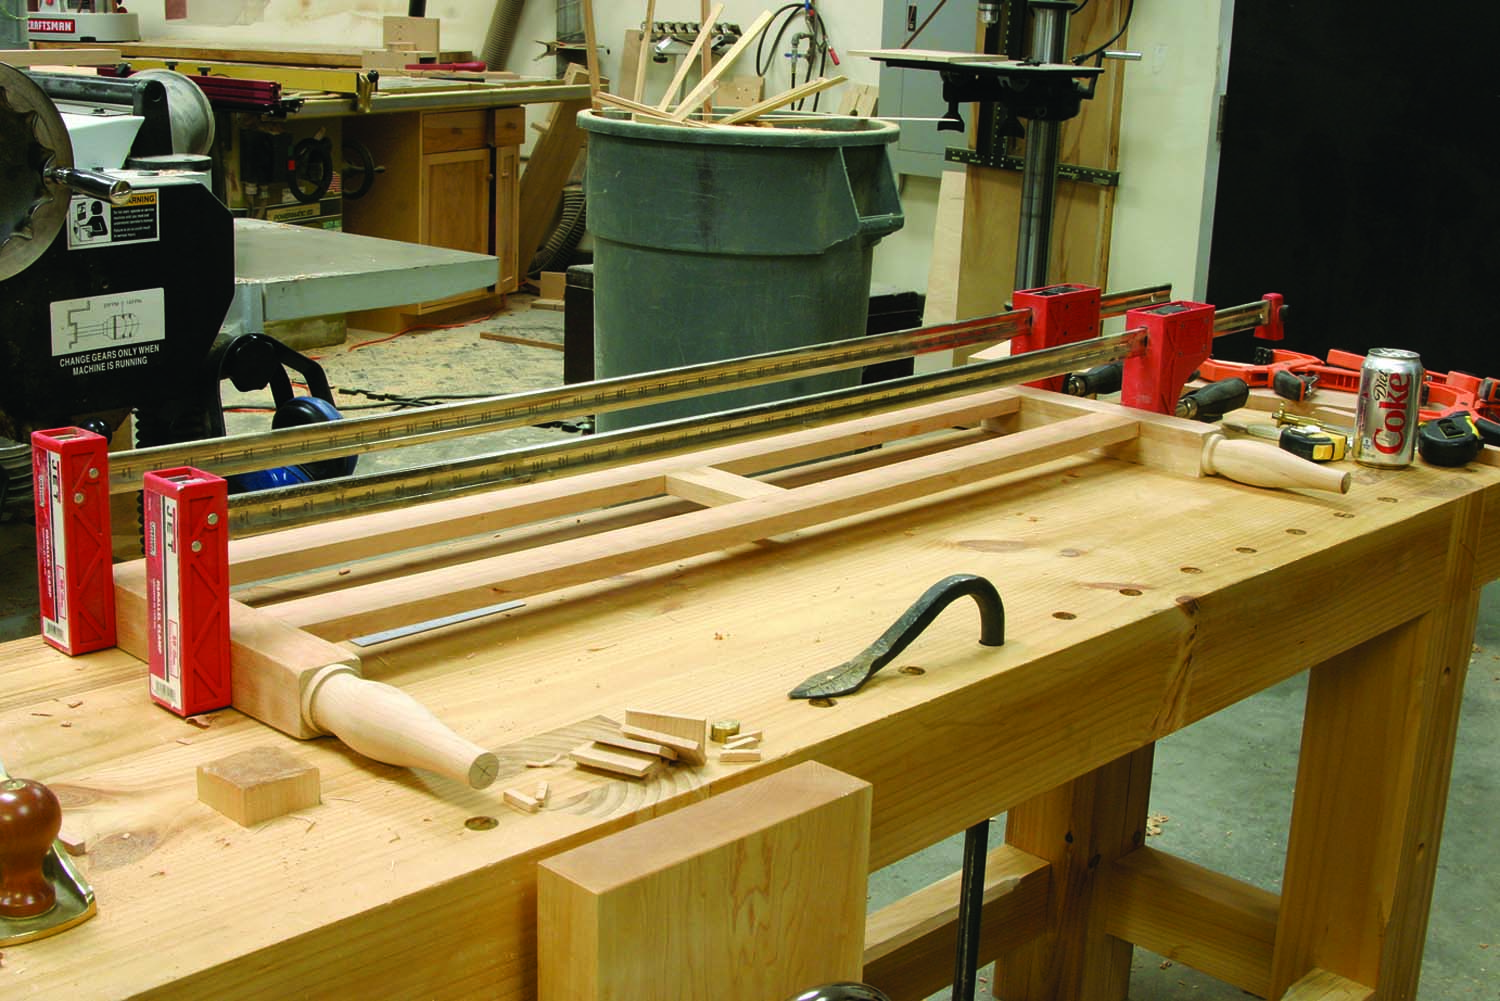
Halfway there. With the base done, the project is starting to look like a table.
I decided to make and attach the top first, perhaps in part because a top made the thing look closer to finished, but also because I had some trepidation about fitting the through-drawers. I was concerned the base might shift a little as I tightened the buttons to secure the top, and that would affect the drawer fit (three out of four editors agreed).
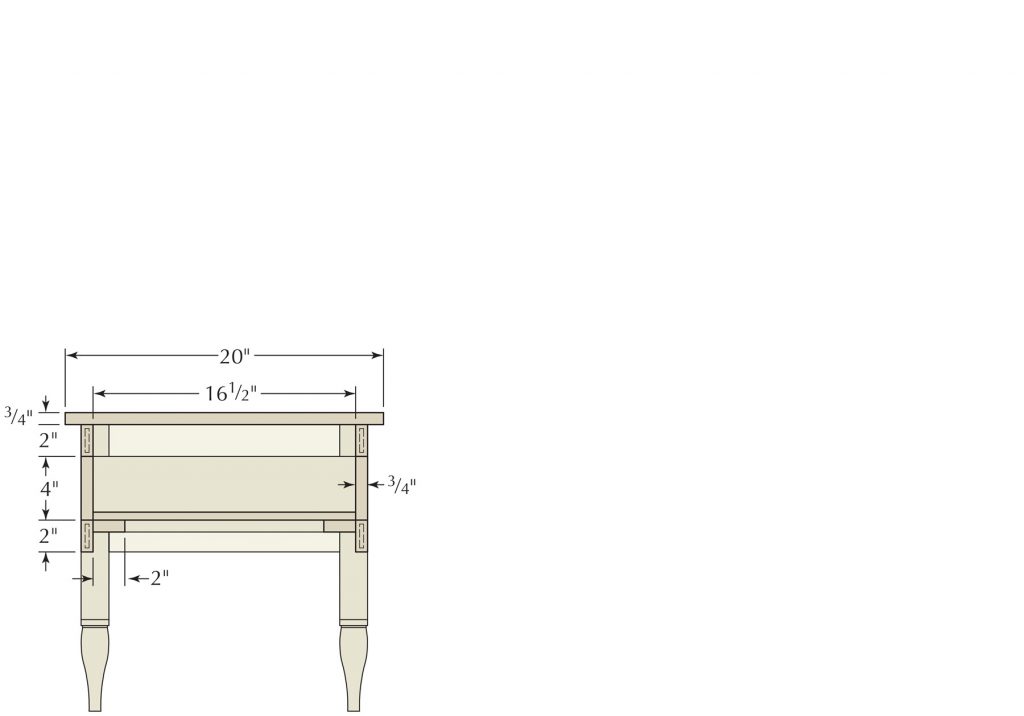
So it was on to the top. I wanted a two-board glue-up to make the 20″ panel, and the piece of wood I’d bought with that in mind was 11″ wide. But, there was sapwood running at an angle on both edges, so I couldn’t simply cut two pieces to length and join them in the middle. Instead, after cutting each piece of the panel a couple inches overlong, with the face that would become the top facing up on the band saw table, I cut off the sapwood where it met the heartwood at what would become the glueline. (The sapwood was wider on the bottom, and I wasn’t concerned with a white stripe on the bottom center; nothing except spiders will see it.)
I then straightened those cuts at the jointer, and glued up the panel. What resulted was a parallelogram, which I squared up at the table saw after the glue was dry.
To attach the top, I cut white oak buttons (from scrap that was underneath my bench), drilled and countersunk screw holes in the buttons, then screwed them to the top, with the tongues fitted in 1⁄4” mortises that I cut on the inside edges of the table with a biscuit joiner. There are two buttons on each side and one on either end (and I have a few extras stored in one of the drawers that I can add later if necessary – say, if in the July heat and humidity it starts to curl up at the corners).
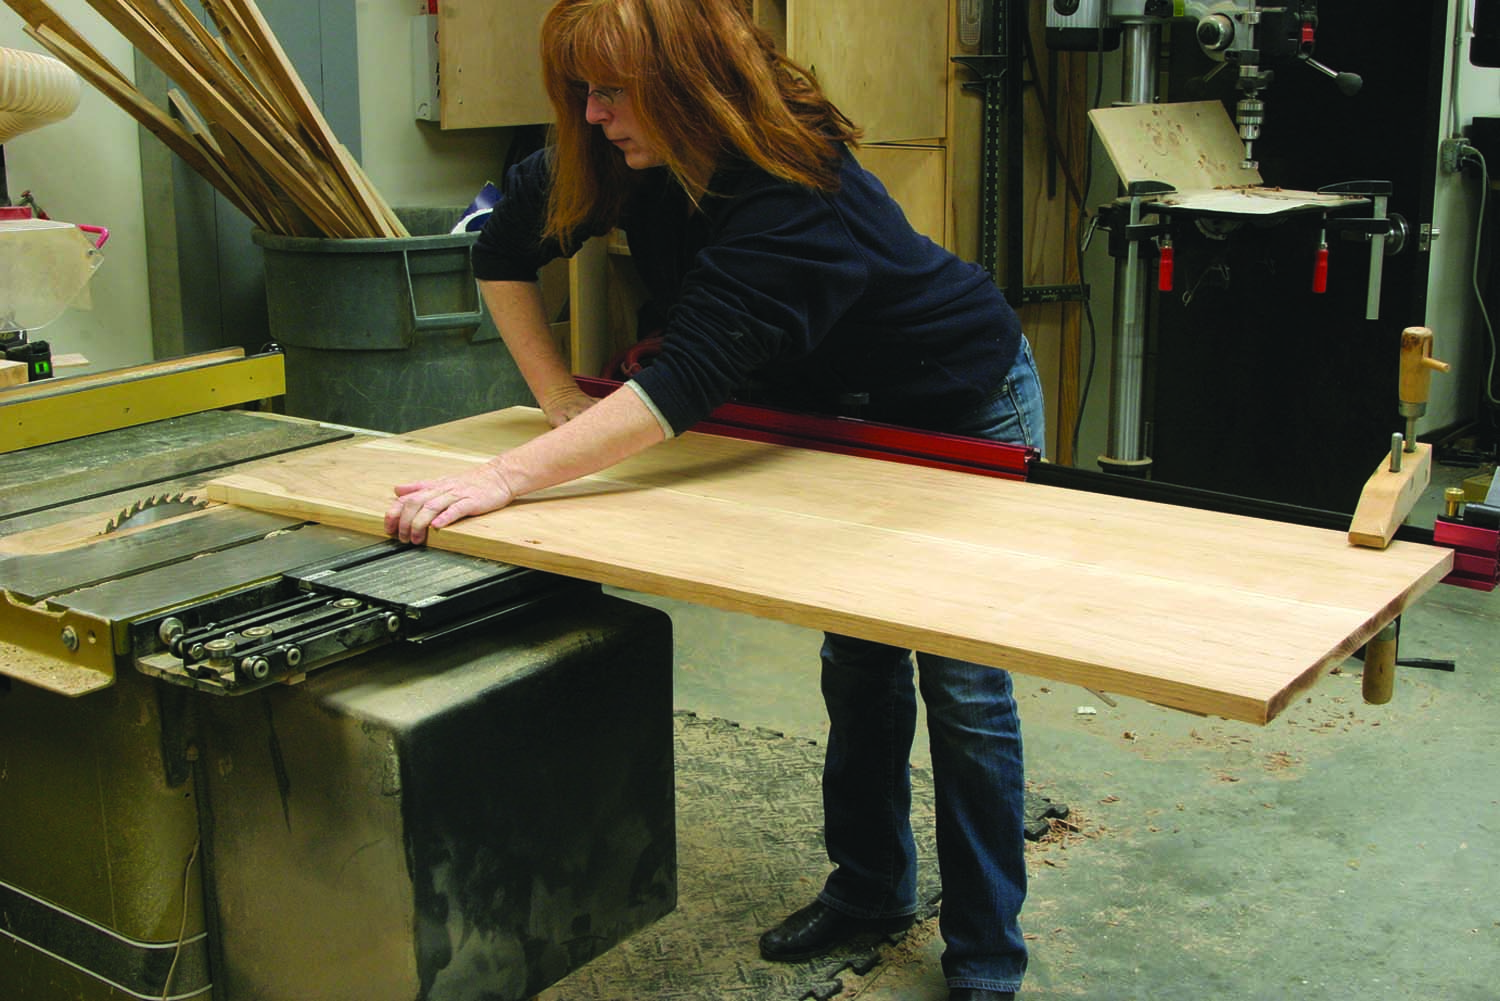
A helping hand. With a panel this long and no roller stand, it’s helpful to have another person support the end of the board through the cut. But if another person isn’t around to help, a handscrew attached to the crosscut sled will do (though you have to use more downward pressure to keep the piece flat to the saw table to compensate for some sag).
Web Frame
Typically, the web frame on which the drawers rest would be notched around the legs. But I’m cheap (and perhaps a bit lazy) and wanted to use the 3⁄4” pine scraps that were under my bench.
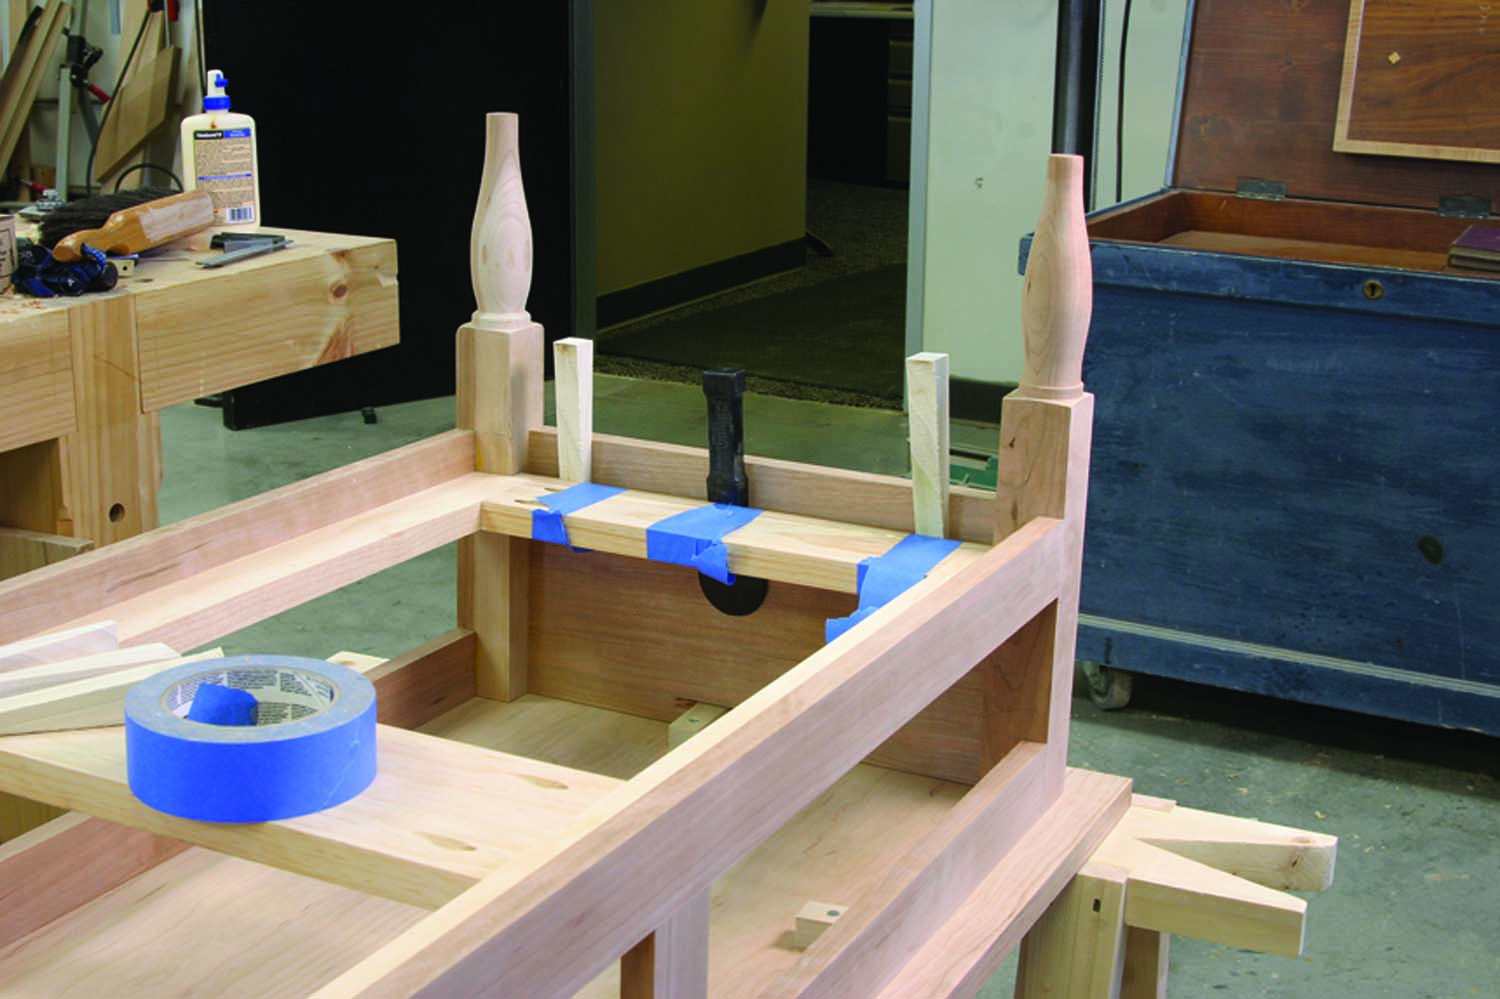
Wedge, please. The drawer guides on either end were simply butted against and glued to the web frame. Tape and wedges held them in place while the glue dried.
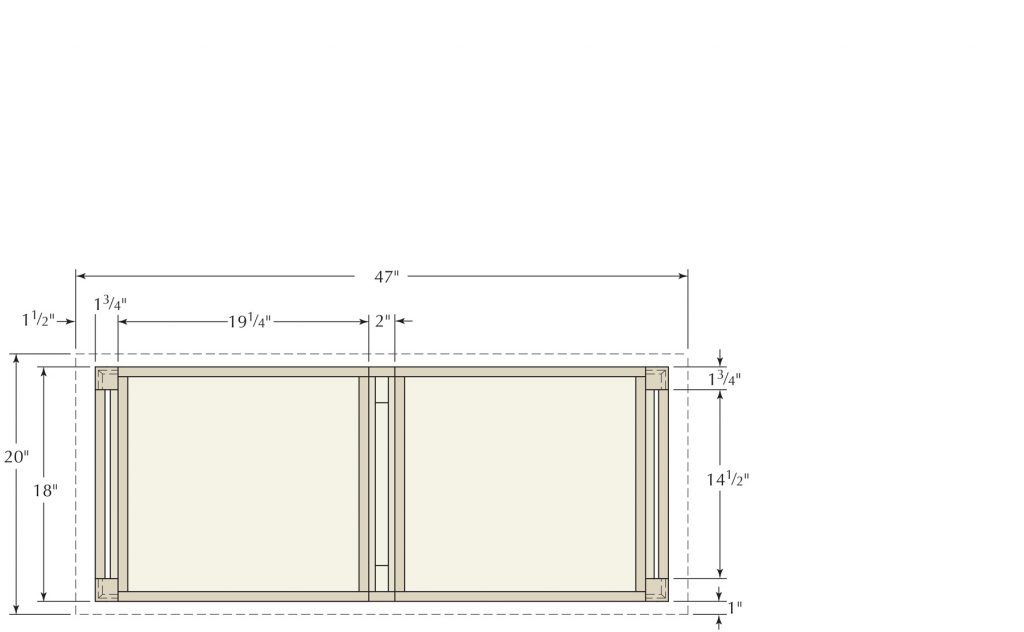
I had no pieces wide enough to work as stiles notched around the legs, and no pieces long enough to use as notched rails. Nor could I use mortise-and-tenon construction without milling some longer pieces. So instead, I used pocket screws to make a web frame that stretches from end to end on the inside corners. It’s simply glued in place to the front and back rails. That made it easy to locate the drawer guides on each end. I simply butted a 3⁄4” x 11⁄4“x 141⁄2” piece in at each end against the frame, then taped and wedged them in place while the glue dried. The 3⁄4” x 3⁄4” 161⁄2“ interior guides run from center stile to center stile, and were installed with glue after the drawers were done, so I could easily achieve a good fit.
Drawers
With but two drawers to make, the final steps in the build should have been a cakewalk. Of course, they weren’t.
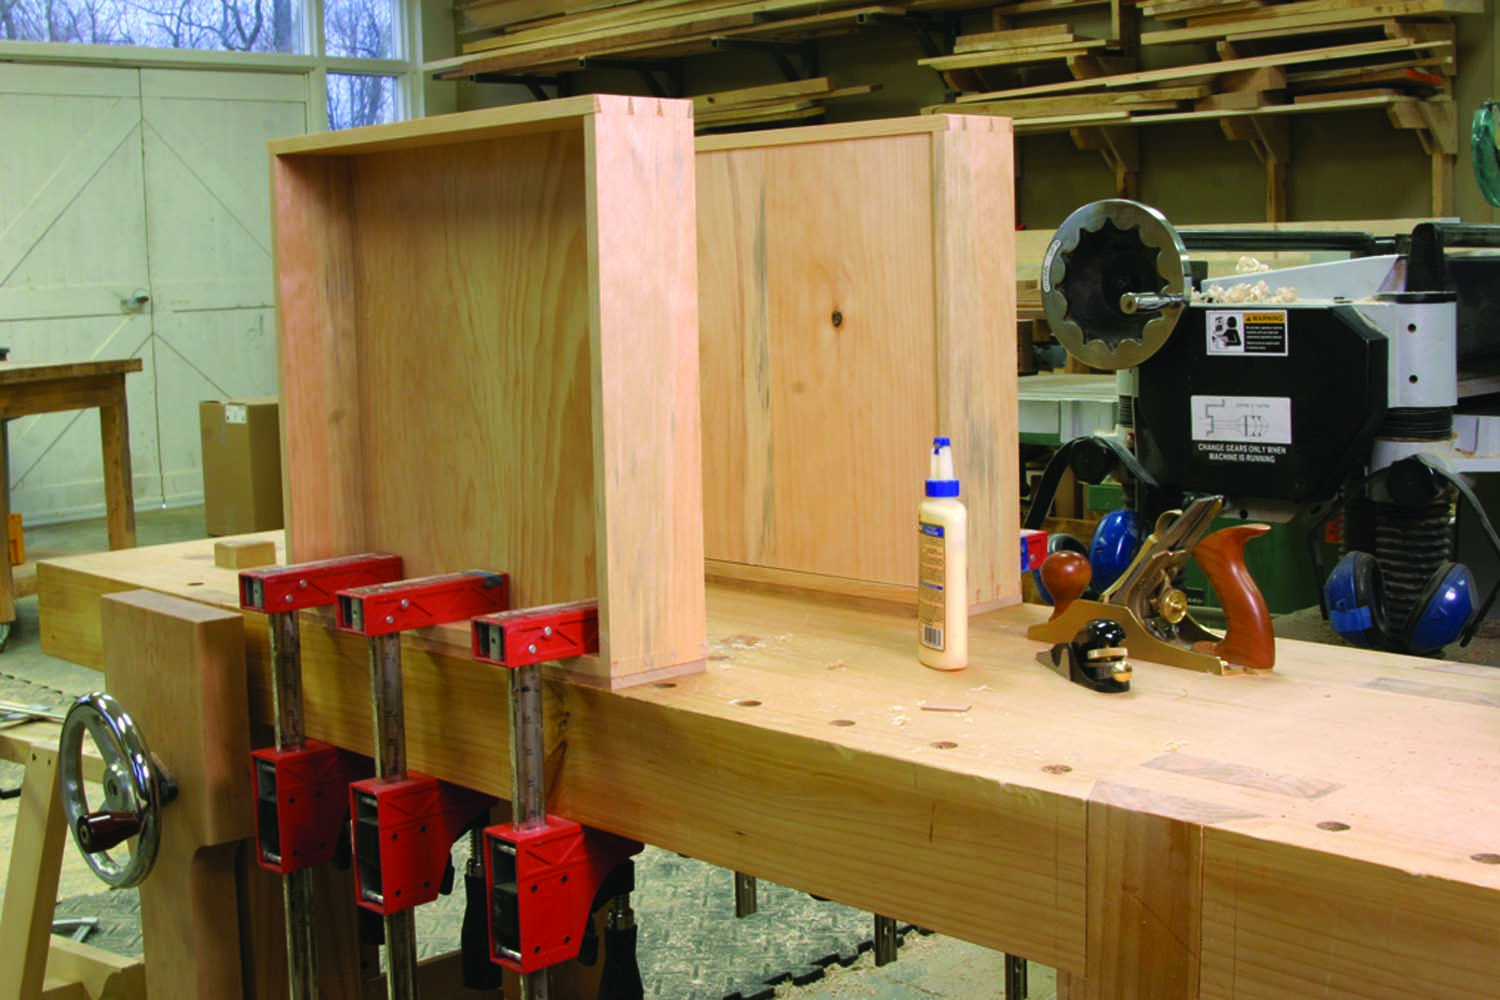
Falsies. The drawers are through-dovetailed with 1⁄4″-thick pieces of cherry glued to each front. Clamping the glue-up to your benchtop helps to spread the pressure evenly across the face.
I’d picked out some nicely figured cherry for the drawer fronts; it was a little twisted but it was close to 7⁄8” thick, so I thought that if I cut the four fronts just a little overlong, I’d be able t o take out the twist as I milled each front. Nope. By the time the pieces were flat, they were just a hair under 1⁄2” thick – too thin for half-blind dovetails.
But gosh was the figure nice; I was determined to use those pieces as my fronts. So instead of cutting half-blinds for the eight drawer corners, I made through-dovetailed pine drawers that were 1⁄2” too short for the openings, milled the cherry fronts down to 1⁄4” thick and cut them to size, then glued them on to each pine front. Had I been a little smarter, I’d have used cherry for the front substrate and you’d not be able to tell they weren’t through-dovetails. But the drawers were glued up by the time I realized that, and they fit well – it seemed like asking for more trouble to remake them.
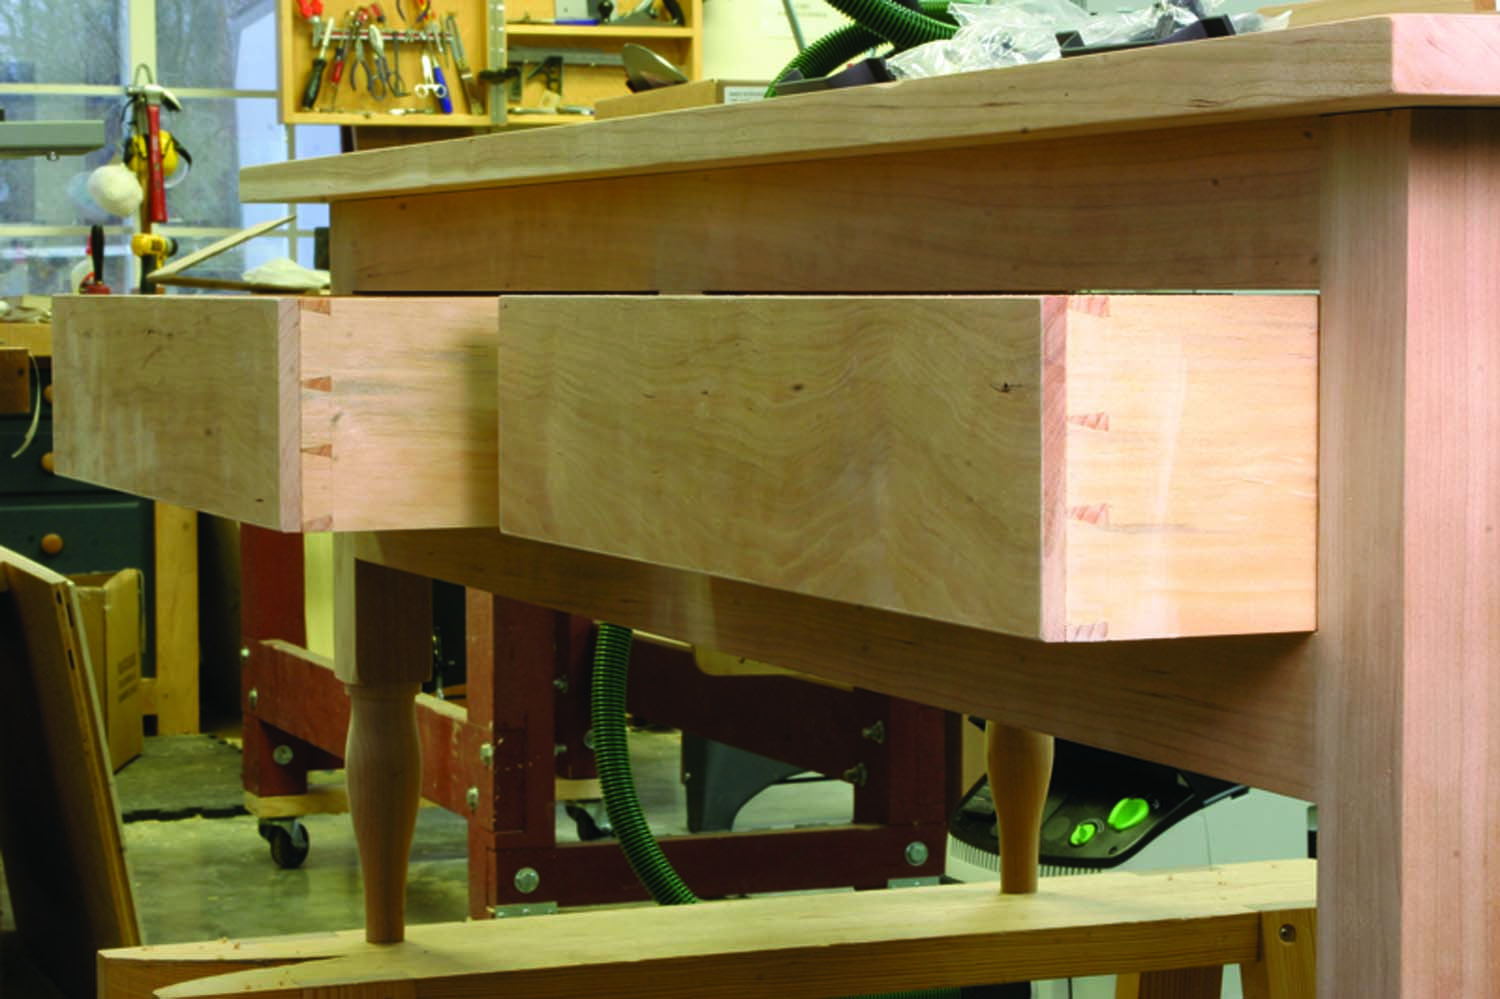
Tails of deception. You have to look closely at the completed drawers to tell they aren’t constructed with half-blind dovetails.
One of my drawers was a wee bit short of perfectly square, so I had to add a narrow shim on one guide to even up the reveals. Once everything looked good and fit tightly, I planed a couple thousandths off the bottom side of each drawer and waxed the guides for a smooth ride.
After sanding the base up to #220-grit (the top is planed), I sprayed on two coats of amber shellac topped with two coats of dull-rubbed-effect pre-catalyzed lacquer, then went over it with a brown paper bag to remove any dust nibs and dull the finish a bit more.
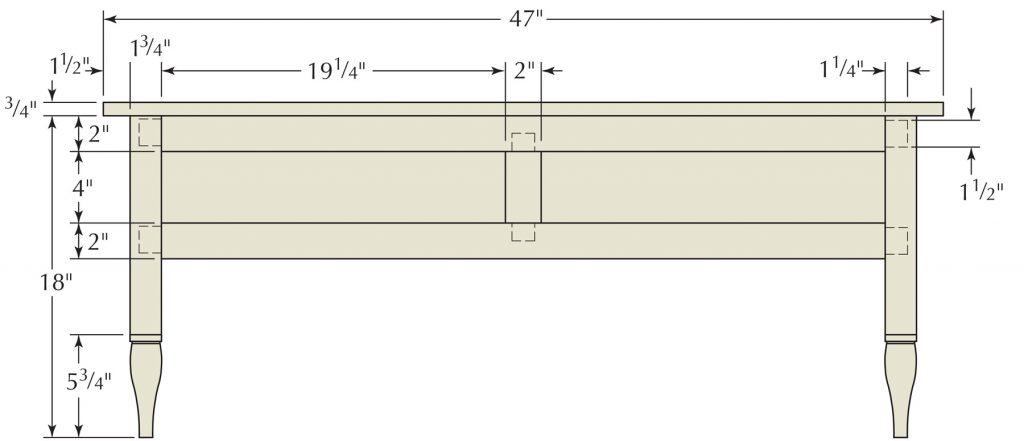
While the design picks up on the other pieces in the room, the height was determined by the height of my couch cushions. I wanted to stretch out my legs and not have the edge of the table bite into my calves. But after I got the table in place, my ratty old couch looked even worse in comparison … so I ordered a new one. But I neglected to check the cushion height. I’m waiting for it to arrive, and keeping my fingers crossed.
Additional Reading: Read “Four Good Ways to Make Drawers.”
Additional Reading: The article for the bookcase that goes with this table is available on our web site, free.
Additional Reading: Read about making these drawers.
MODEL: Click here for the SketchUp model of the Shaker-inspired Coffee Table.
Here are some supplies and tools we find essential in our everyday work around the shop. We may receive a commission from sales referred by our links; however, we have carefully selected these products for their usefulness and quality.