We may receive a commission when you use our affiliate links. However, this does not impact our recommendations.
 Turn a log into a sculptural statement piece.
 Turn a log into a sculptural statement piece.
PROJECT #2101 • Skill Level: Intermediate • Time: 4 days • Cost: $200
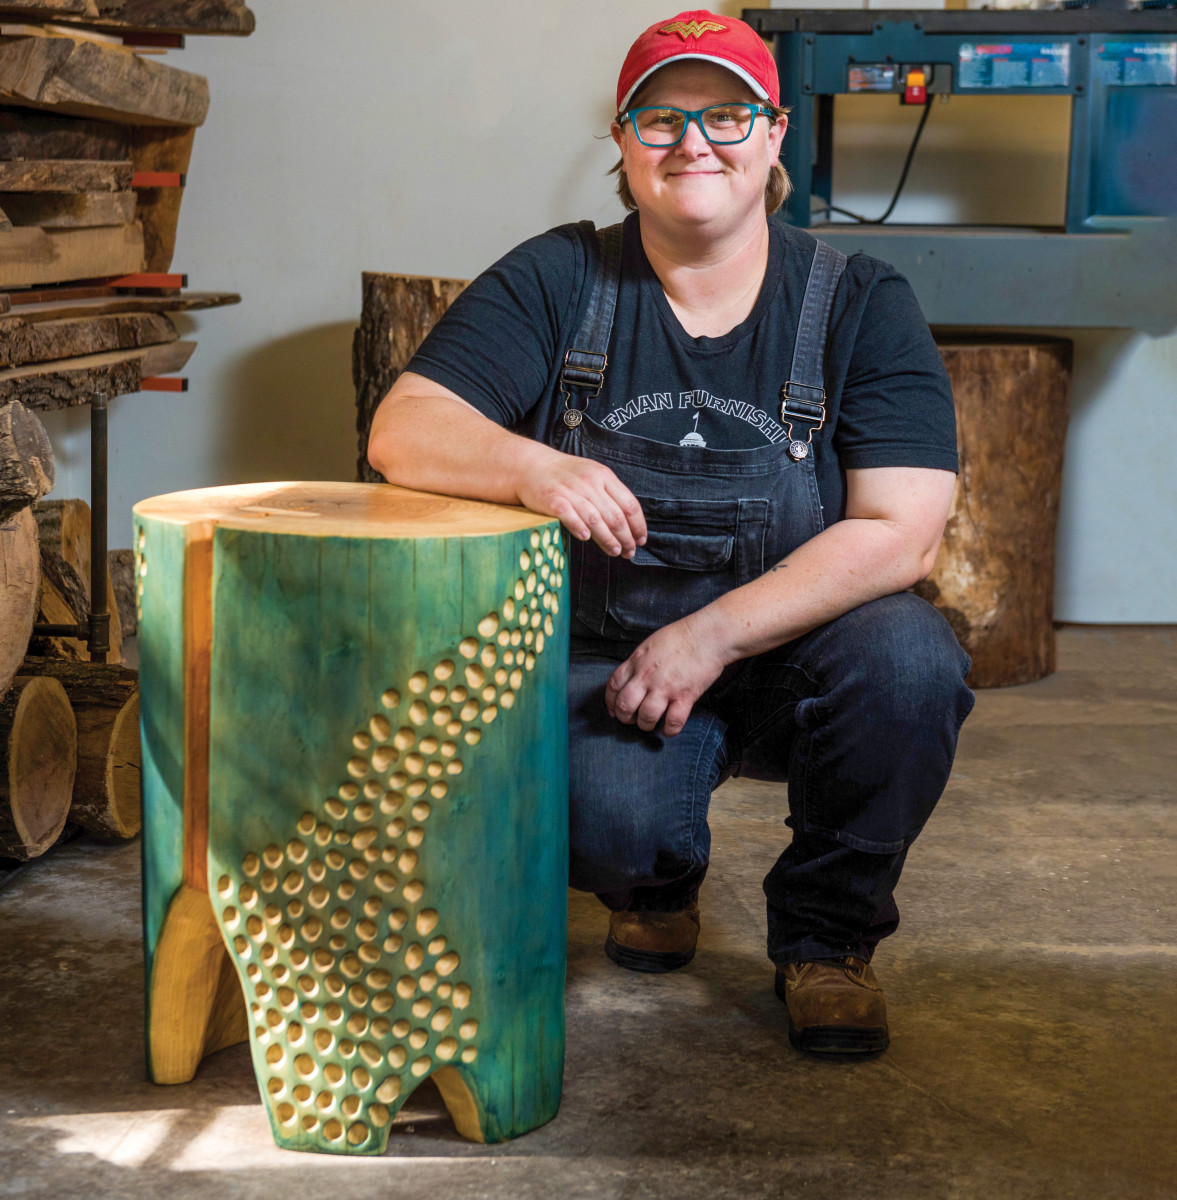
Have you ever come upon the opportunity to get some logs either due to a downed tree on your property or somewhere else within your community? A very familiar story is someone has to remove a very beloved tree and they want to have it turned into a piece of furniture. However, once they learn about the process to have the tree milled into useable lumber and the price associated with all of that, the tendency is to decide to do nothing further with the tree. There are other options, such as creating a unique piece of furniture with a log from the tree like a side table. That is just what I have done with a log cut from an ash tree that had to be felled to the emerald ash borer.
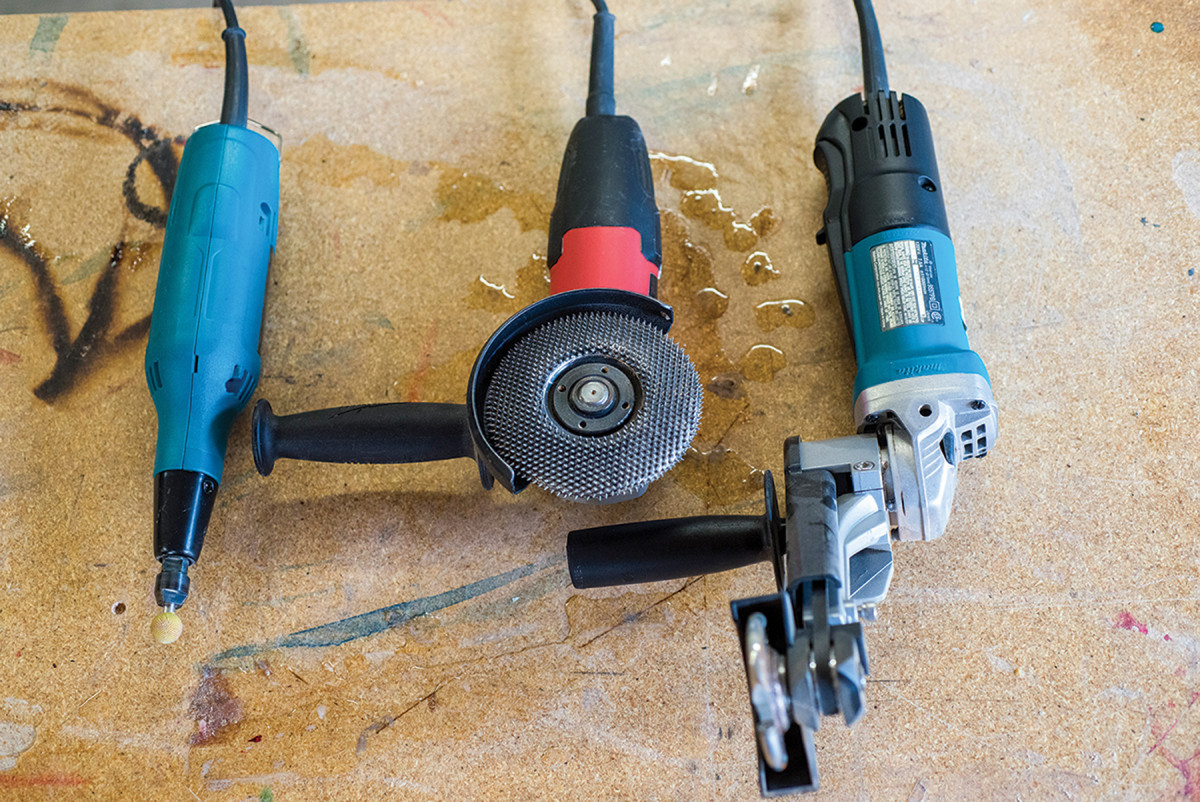 Carving Tools
There are 3 tools that are really my ready and steady go-to tools for power carving. The first (from the right) is my Manpa 3″ multicutter with a Makita angle grinder. This thing removes material quickly with basically no kick-back and without needing to get too worried about the direction of the grain. I like to think of it as a very powerful, very fast-moving chisel. It is removing material in chips, not in dust.
Next in line (middle of picture) is an angle grinder outfitted with one of Kutzall’s extreme line of carving dishes. There are different shapes and different levels of coarseness to choose from, all of them easy and safe to use. Just know, when using the carving dish, this is when it gets super dusty. It’s like taking sanding and putting it on steroids to allow for you to smooth and remove material efficiently.
Last, but most certainly not least is my die grinder paired with various 1/4” shaft carving burrs. There are so many different burr shapes, sizes and levels of coarseness to choose from. No matter what texture of detail I want to add to my carving, there is a burr option out there for it. You can find the most variety of burrs through Kutzall and Saburrtooth.
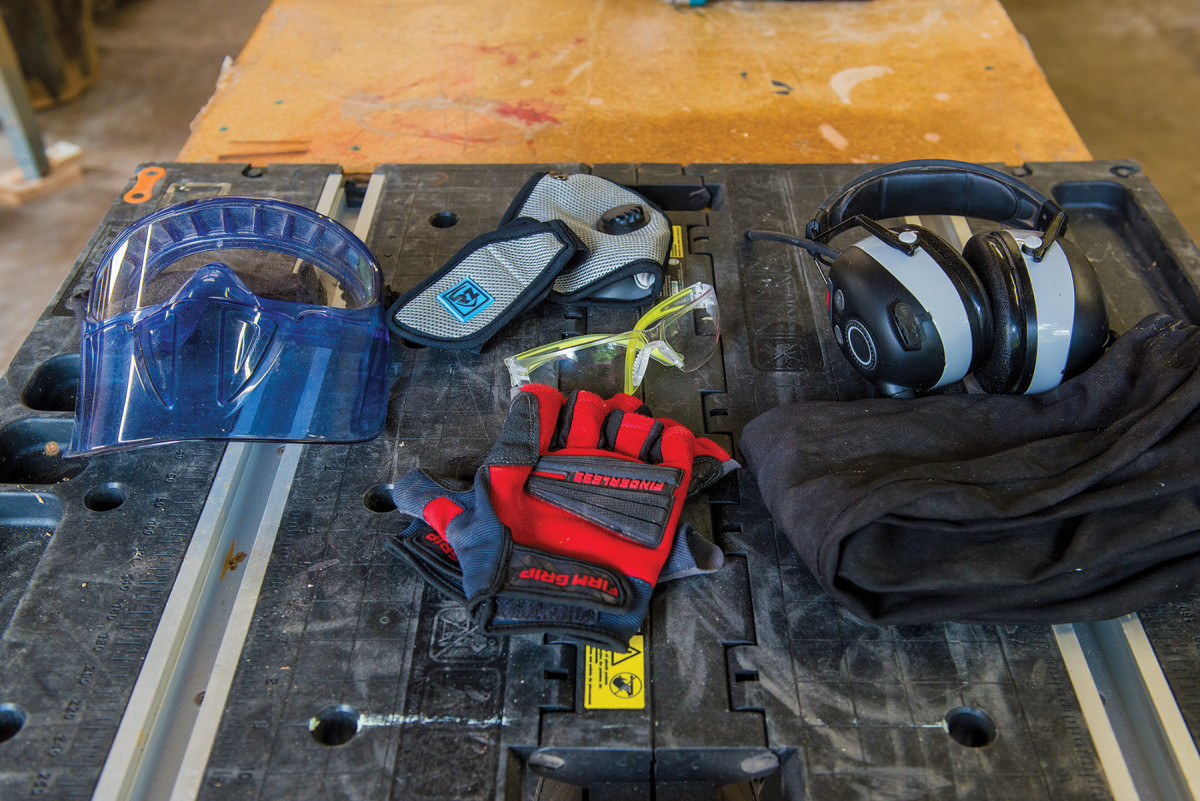 Carving Safety Gear
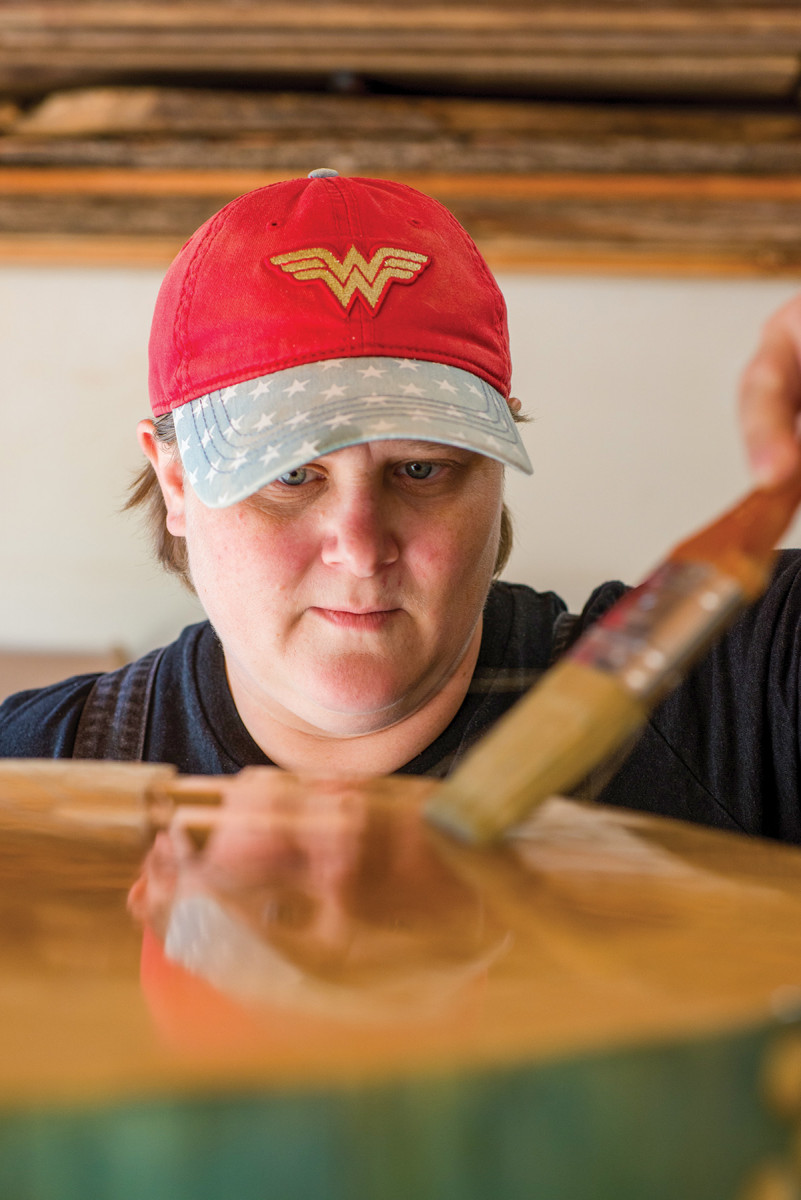
Power carving gets messy fast. There are chips and dust flying everywhere. Plus, you have the vibration of the angle grinder that you could be holding for hours. Oh, and let’s not forget the sound of the grinder. There is quite a bit of safety gear that I put on before I can get started with a carving project.
Safety glasses, dust mask, fingerless gloves and hearing protection are on no matter which carving tool I am working with. I know that a good amount of people sees work gloves as a potential risk for injury when working with power tools. I would totally agree if they are full gloves. That leaves potential for loose fabric being near a spinning tool, and that is when disaster can strike. However, I don’t think that risk exists with fingerless gloves. With the amount of power carving that I do, I am constantly fighting a tennis elbow injury from gripping the grinder for so much time. The fingerless gloves help me grip the grinder, cuts down on the vibration, and I don’t have the risk of the fabric near the spinning tool. The gloves and the safety glasses are more than enough to protect my hands and eyes from flying sawdust when using the carving dishes or the carving burrs.
When it comes to using the multicutter though, I need to suit up a bit more. The multicutter shoots wood chips and shavings right back at me. When planning to use the multicutter that I generally switch over to my full-face shield with built-in safety goggles and welding sleeves or a long-sleeved shirt for my arms. These keep my eyes safe from flying shaving and keeps my arms safe from thousands of tiny cuts and slivers. You could also use one of those protective capes used for turning if that’s more comfortable for you.
Getting Started
The process is really pretty simple, you start with working from the largest tool down to the smallest. First, you need to get the log to the right size for a side table, which will be somewhere between 18 to 22 inches long, and the best tool for the job is a chainsaw. If you are either sourcing a log right from the lot of a tree service or working with a tree service to take down your tree, you can usually have them cut the log to the length you want.
Once the log is cut there is a decision to be made; work with it green, let it air dry for a few years, or throw it in a wood kiln and dry it for a few months. Working with it green will make it easy to carve, but you are at risk of it warping as it dries and having to be reworked in the future. If you decide to dry it, whether by air or by kiln, it is best to wait until it hits 12% moisture or lower before carving, this will give you the best chance of success. A moisture meter lets you check it regularly to see when it gets to that 12% level.
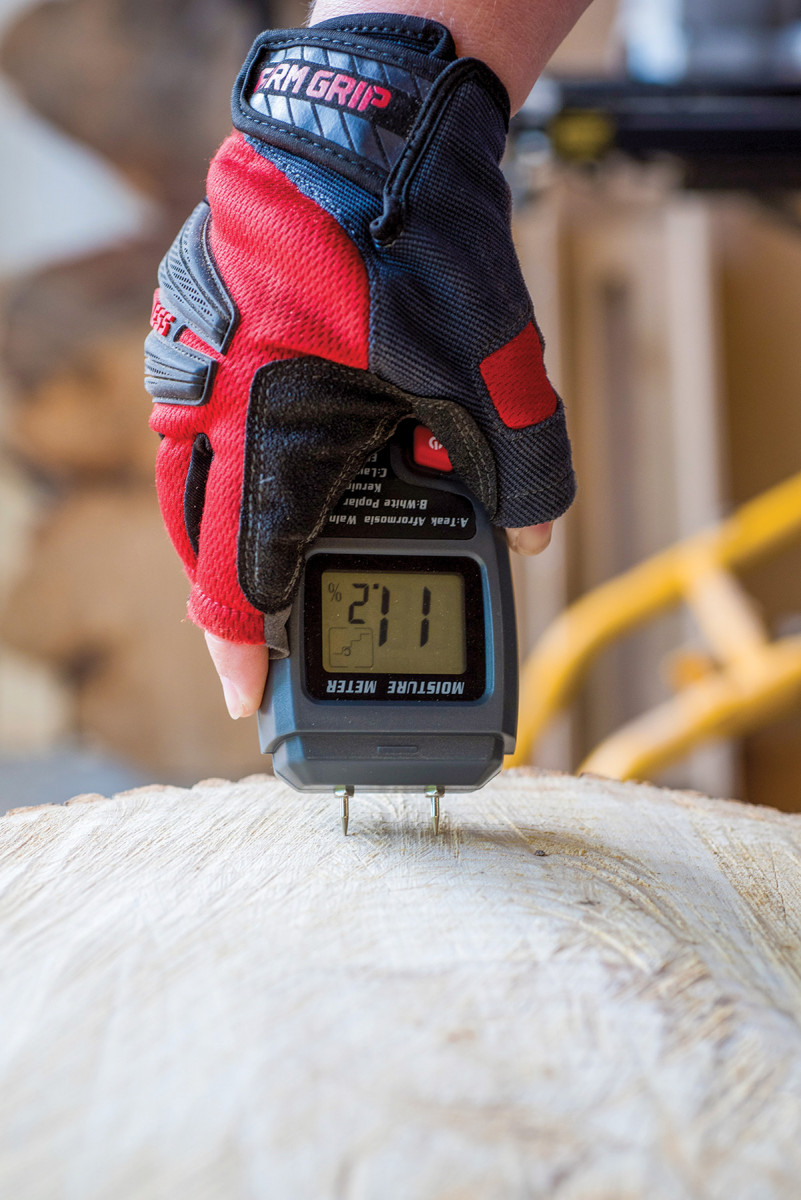
Moisture meter to check level of moisture in log.
Now no one finds a side table useful if it is wobbly. This leads to the next step and next couple of tools in the process; leveling both the top and bottom of the log using an angle grinder and a belt sander. There are two different attachments or discs that I use with the angle grinder, both produce quite a bit of wood chips and saw dust.
For safety, I always work with the guard on the grinder. For PPE, I make sure I have a full-face shield, safety glasses, dust mask, and hearing protection at a minimum. To reduce the strain on my forearms from gripping the tool and the vibration of the tool, I wear fingerless work gloves. The fingerless work gloves still keep loose fabric away from a spinning tool while also reducing strain on my muscles.
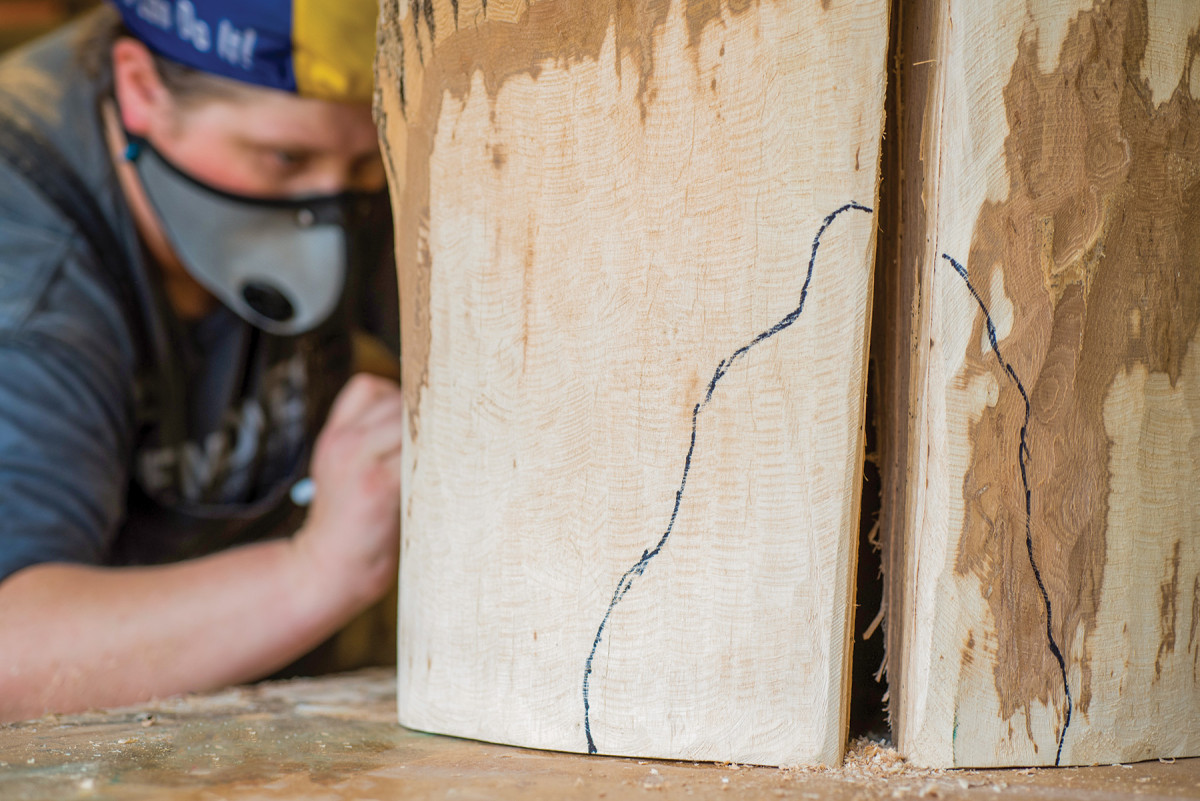
To get started with leveling the log, look for the flattest side, and place that one on the floor, use shims if needed to make sure the log does not rock around. Then measure up from the floor to the finished height you desire for the table plus 1/2 to 3/4 of an inch and mark around the log with chalk or a sharpie. This is the line you will be working down to.
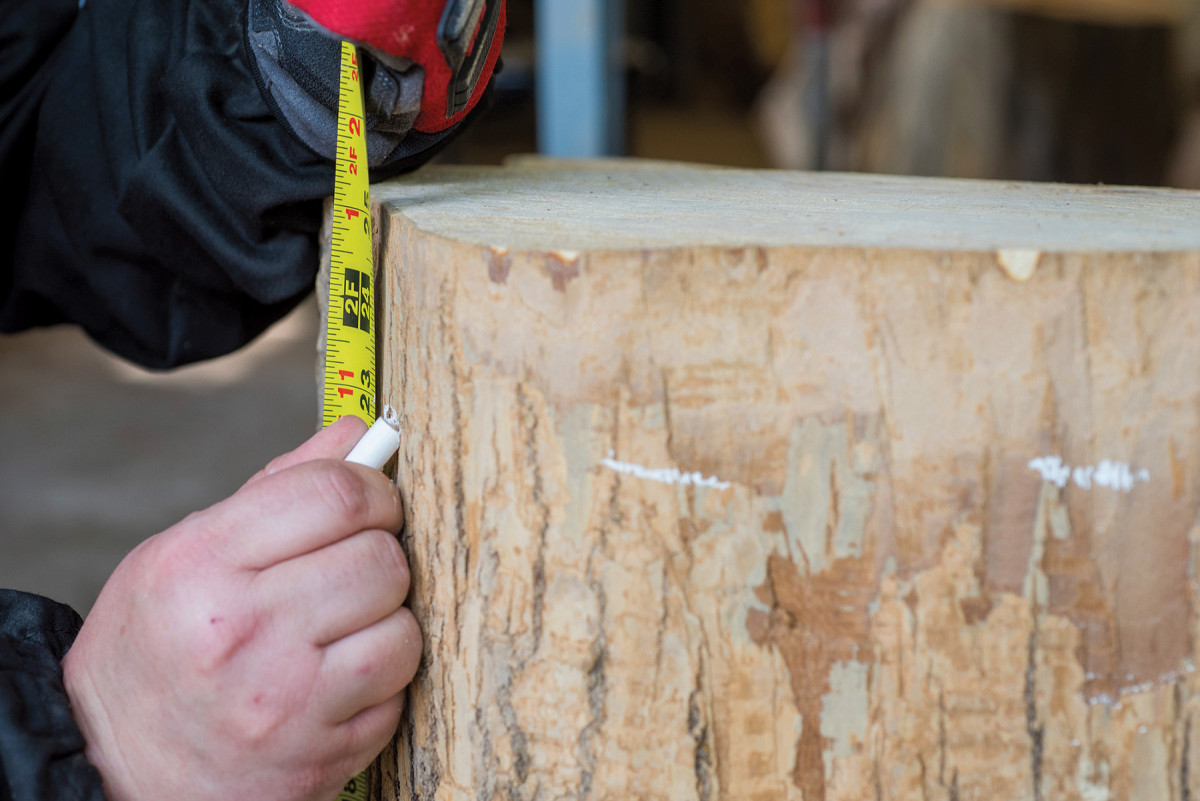
Marking line to work for leveling log.
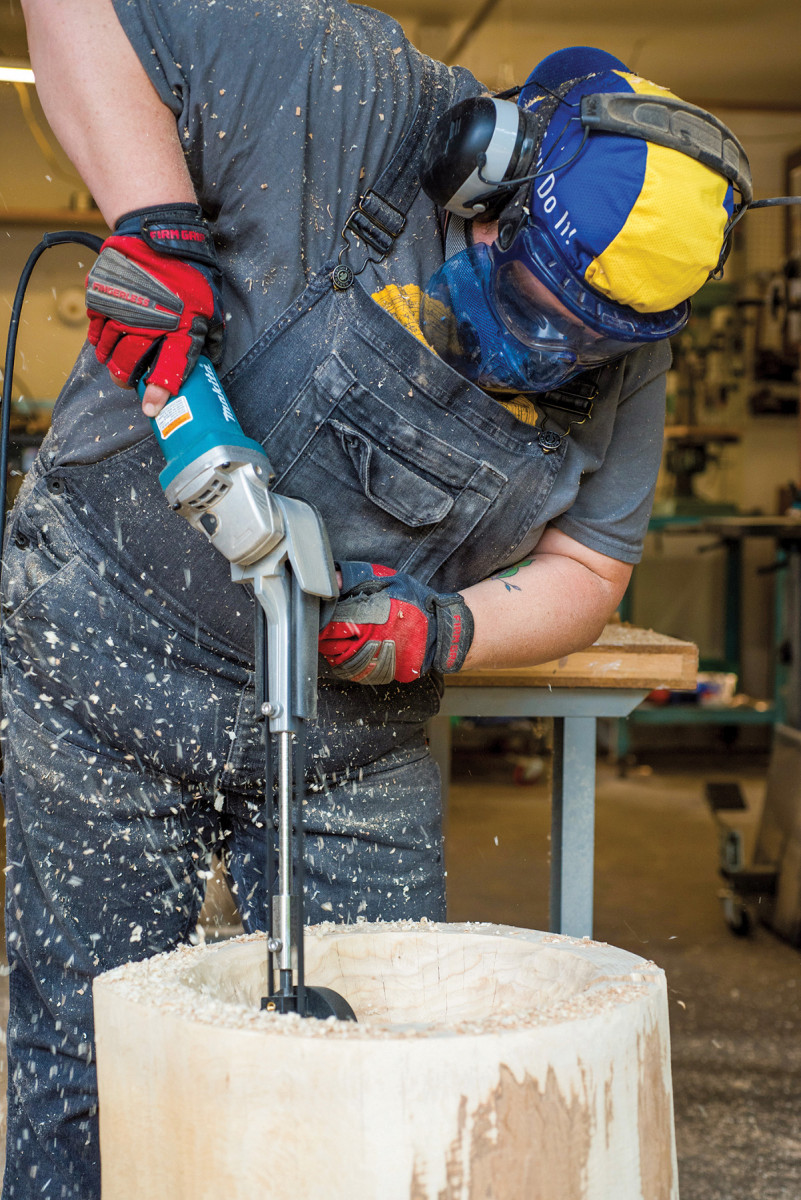
I start with using my Manpa Tools multicutter on the angle grinder. It is a full attachment with a gear, belt, and round disc with 3 cutting edges. The multicutter will remove a large amount of material the most efficiently. Once I get close to the marked line, I switch over to an angle grinder with a Kutzall carving dish on it. This will still remove a good amount of material and will get rid of the machining marks from the multicutter. Once I am within 1/16 to 1/8 of an inch above my line, I will then move on to using a belt sander with no finer of grit then 60 grit. I use a level to check for flatness.
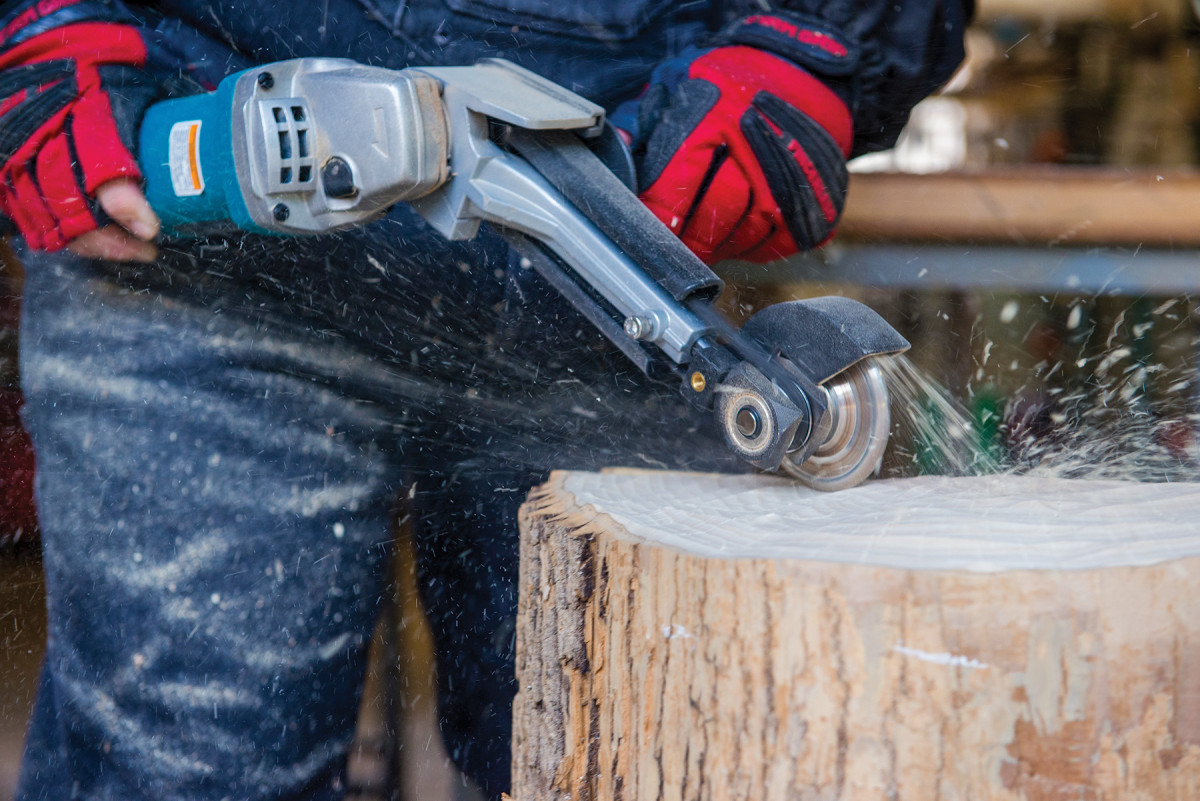
First, I use a Manpa multicutter with an angle grinder, to quickly remove material for log leveling.
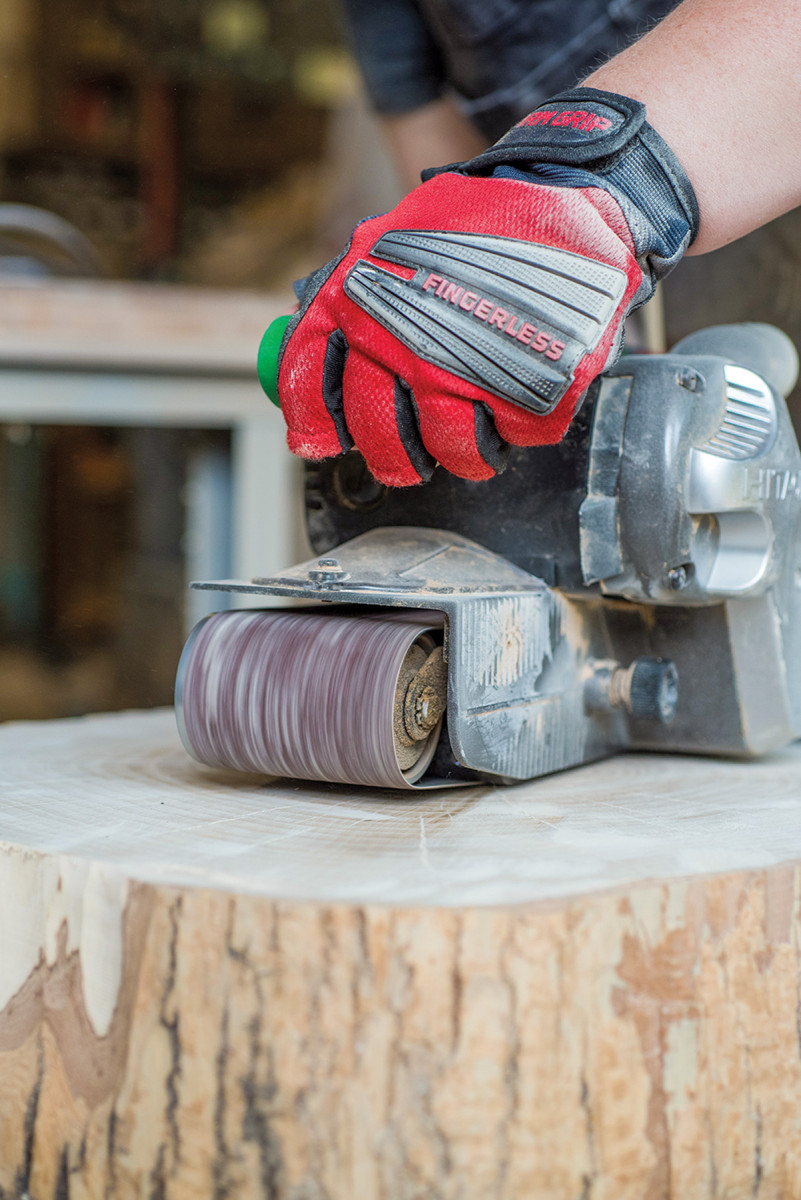
Then I grab a belt sander to reach level.
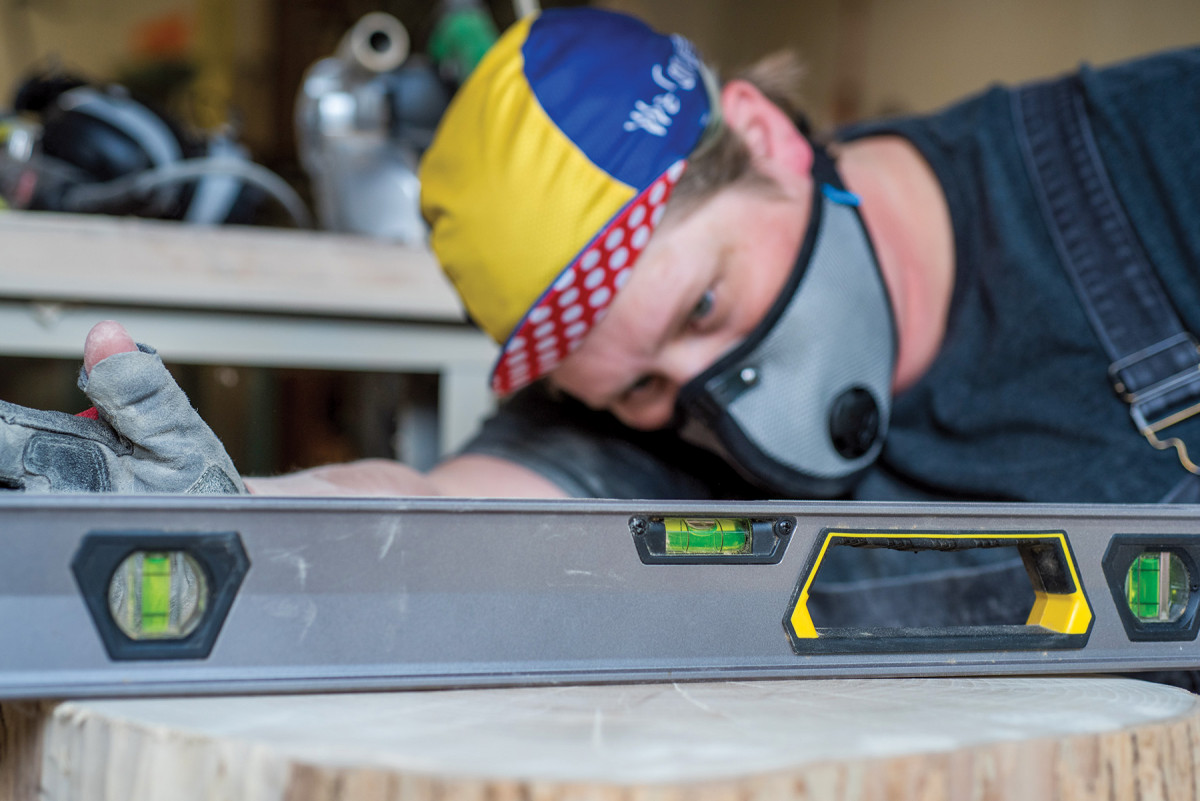
I grab a level to check the surface.
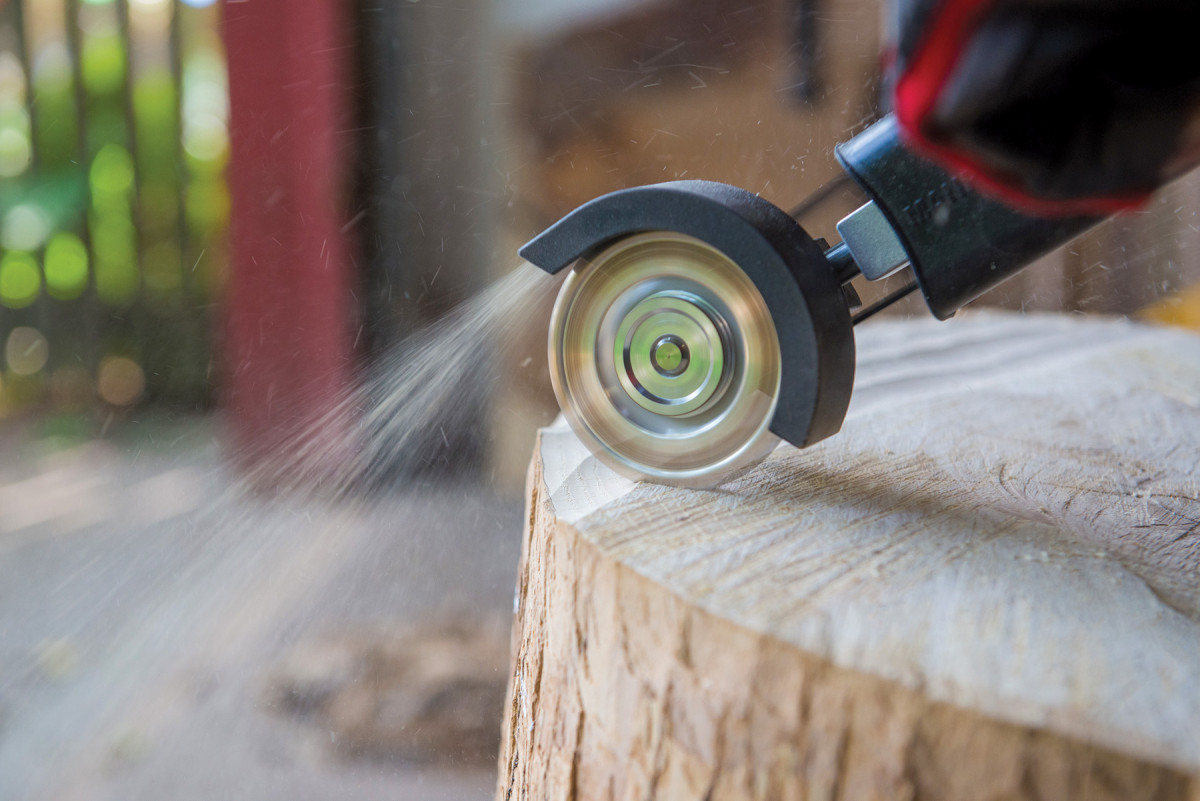
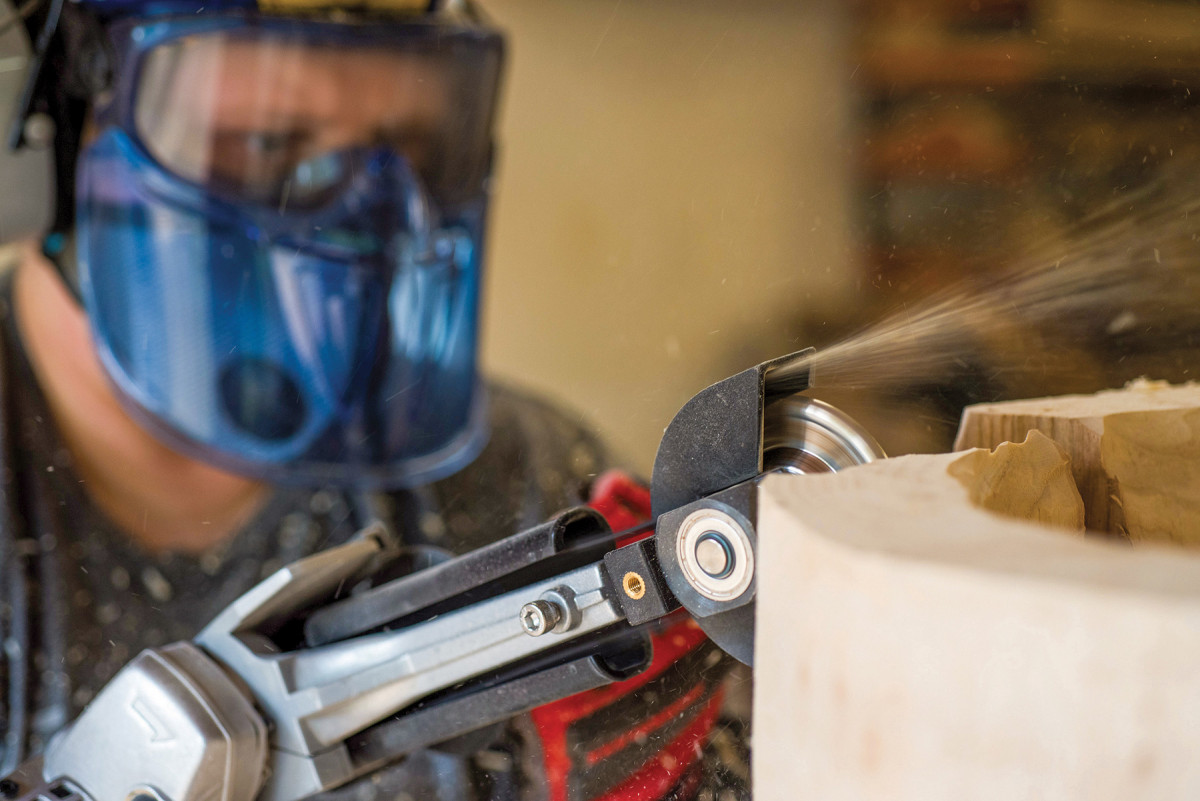
Once I reach a flat and level surface, I flip the log and do the process all over again, this time marking a line at the finished dimension for the height of the table and working down to that line with the multicutter, carving dish, and belt sander. Lastly, I remove the bark from the exterior of the log. This can be done either with a chisel and mallet, or the multicutter and carving dish. Just note, using the angle grinder for this work creates a large amount of fine dust, so keep that safety gear on!
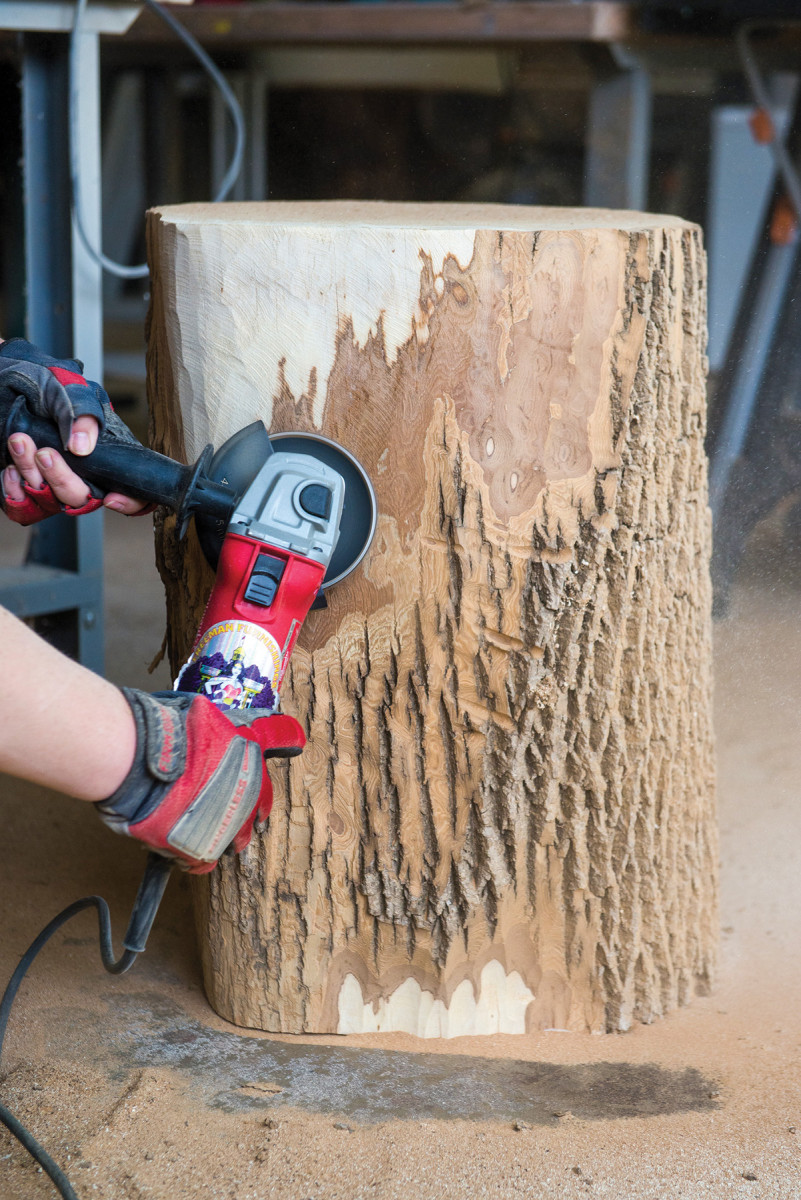
I remove bark from outside of log with Kutzall carving dish and angle grinder.
Refining a Design
With the log flat, level, and bark removed, it’s time to move on to roughing out the legs and overall design. This process is about two things; first, removing material to reduce the weight of the table, and second to reach your desired aesthetic. For this design, I wanted to hollow out about half of the log from the underside, leaving about a 2“ wide ring all the way around and then create multiple cutaways through that ring to make my legs.
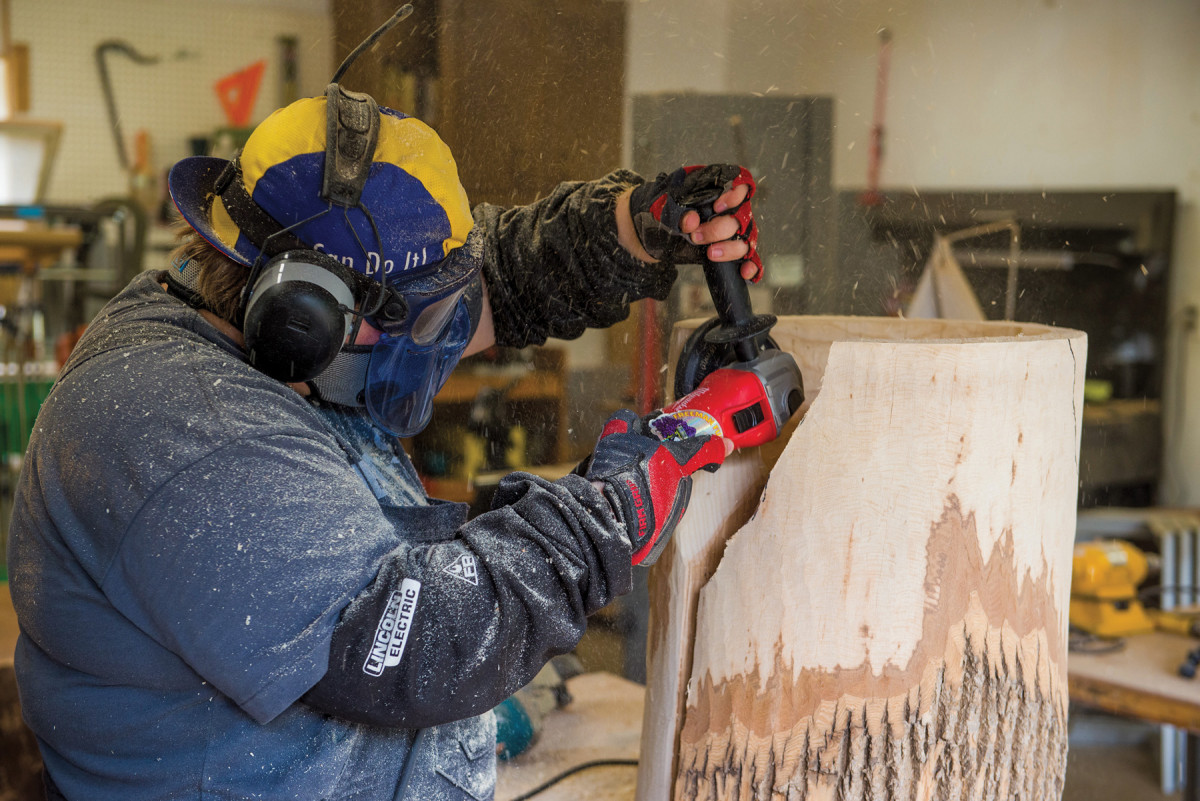
To hollow out the log, I went with my multicutter again. I started with the 4“ blade, then down to the 3“ blade. As I got deeper into the log, I added an extension bar in order to be able to still get access safely without having to fight for position of the tool. After reaching my desired depth and getting the hollowed space as consistent as possible in width, I switched over to the carving dish to smooth out the surface and remove the tool marks of the multicutter.
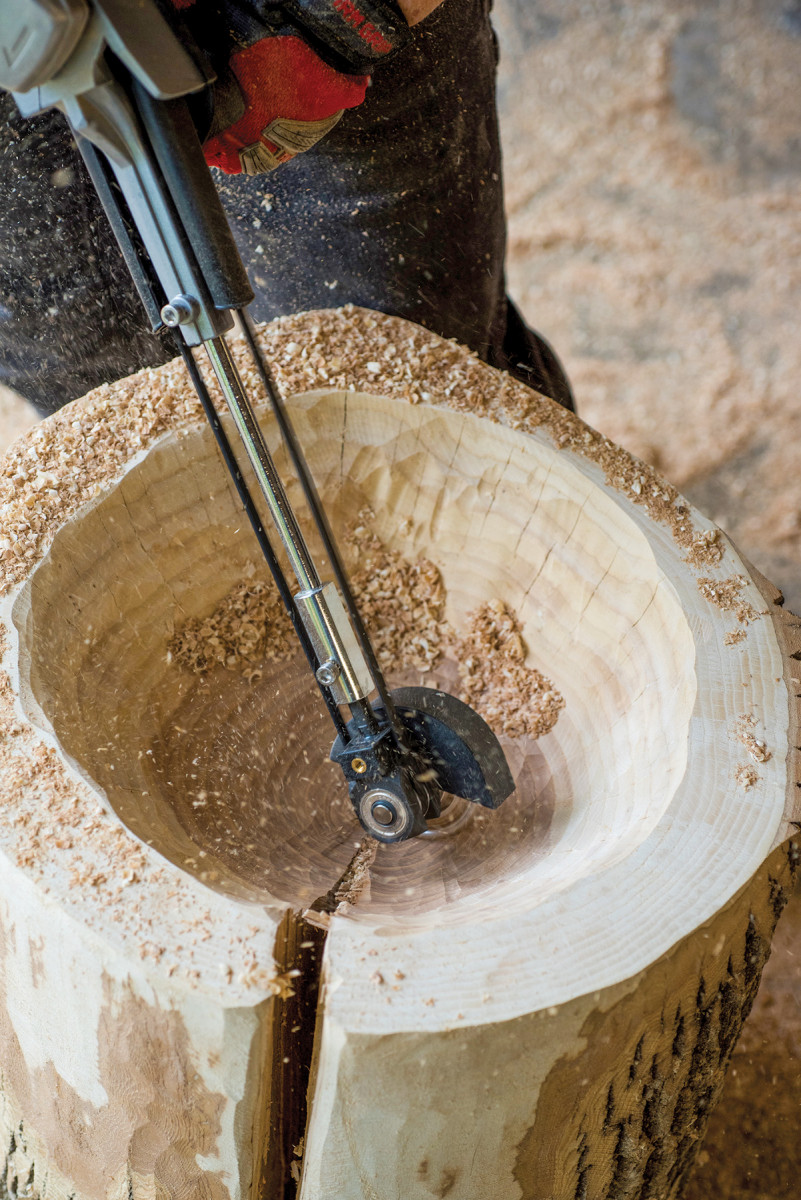
The multicutter with extension arm on an angle grinder is used to hollow out base of table.
Now on to sketching the cutaway portions for the legs. To do this, I just use a black sharpie and draw right on the outside of the log where I want to remove the material. The cutaways did get a bit tricky. I used the multicutter to cut along the sketched outline to remove the material from the outside of the log all the way through to the inside hollowed space.
I sketch out a cutaway for the legs of table with a marker.
Though I was removing the material from the surface of the log, I was also creating a side surface. The side surface was a bit difficult to keep consistent with the multicutter and was very dependent on the size of the cutaway. After using the multicutter, I used the carving dish on the larger cutaways, and used a die grinder with a Kutzall rotary carving burr for the smaller cutaways. The carving dish and burr were used to reach the desired final design.
I use the multicutter to remove the bulk of material for table leg cutaway.
A carving dish on angle grinder removes the remainder of material on large table leg cutaway.
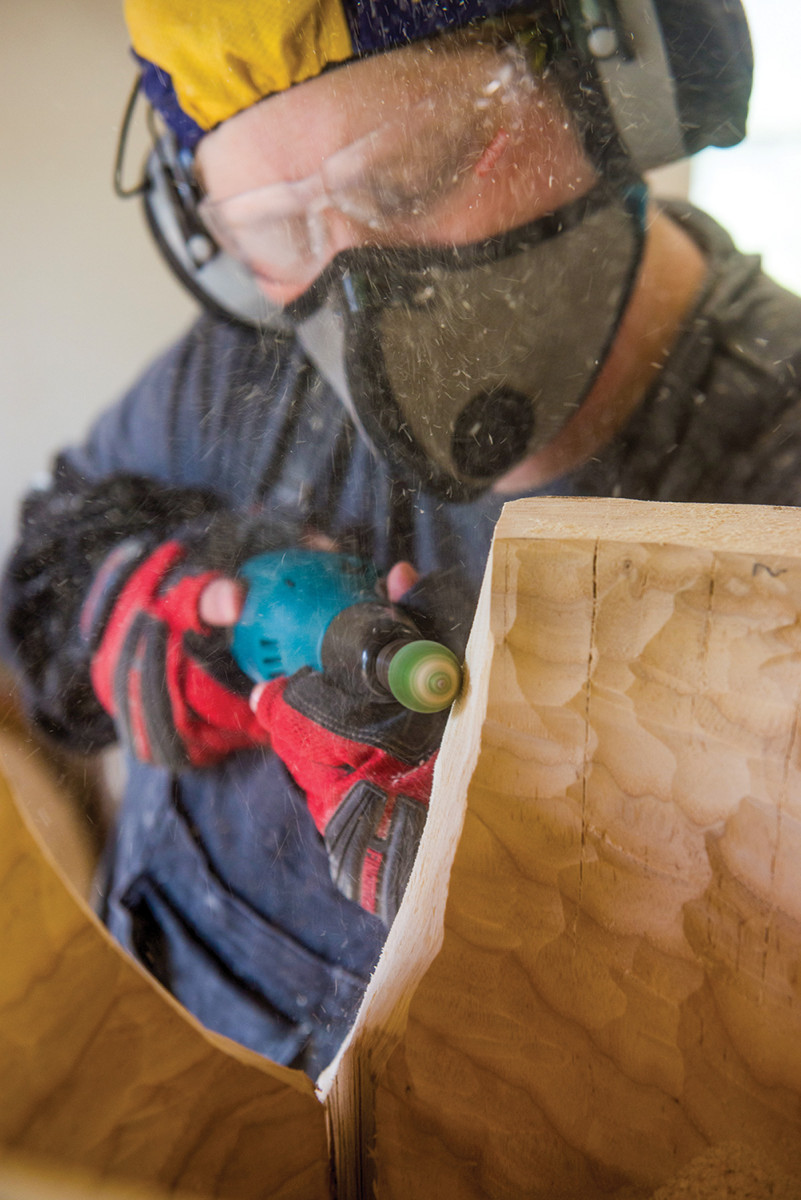
Then I switch to a die grinder with a carving burr for removing the remainder of the material.
Adding Texture
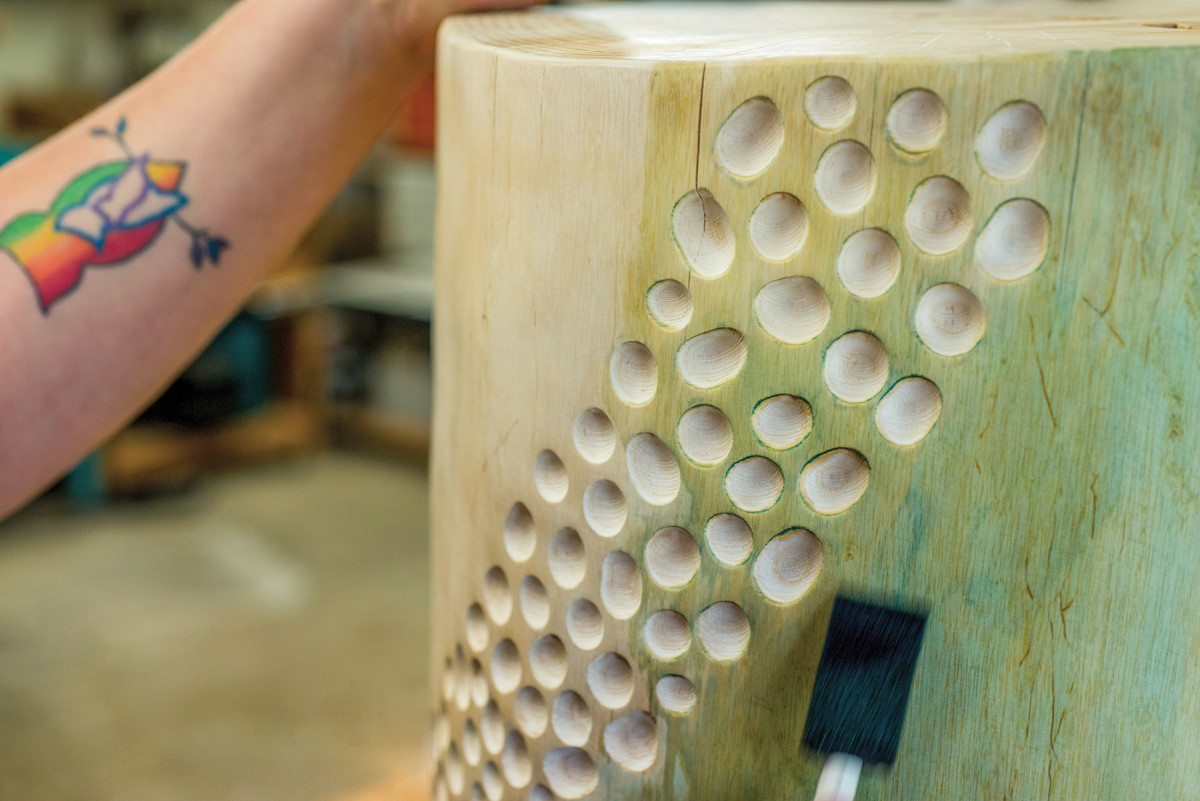
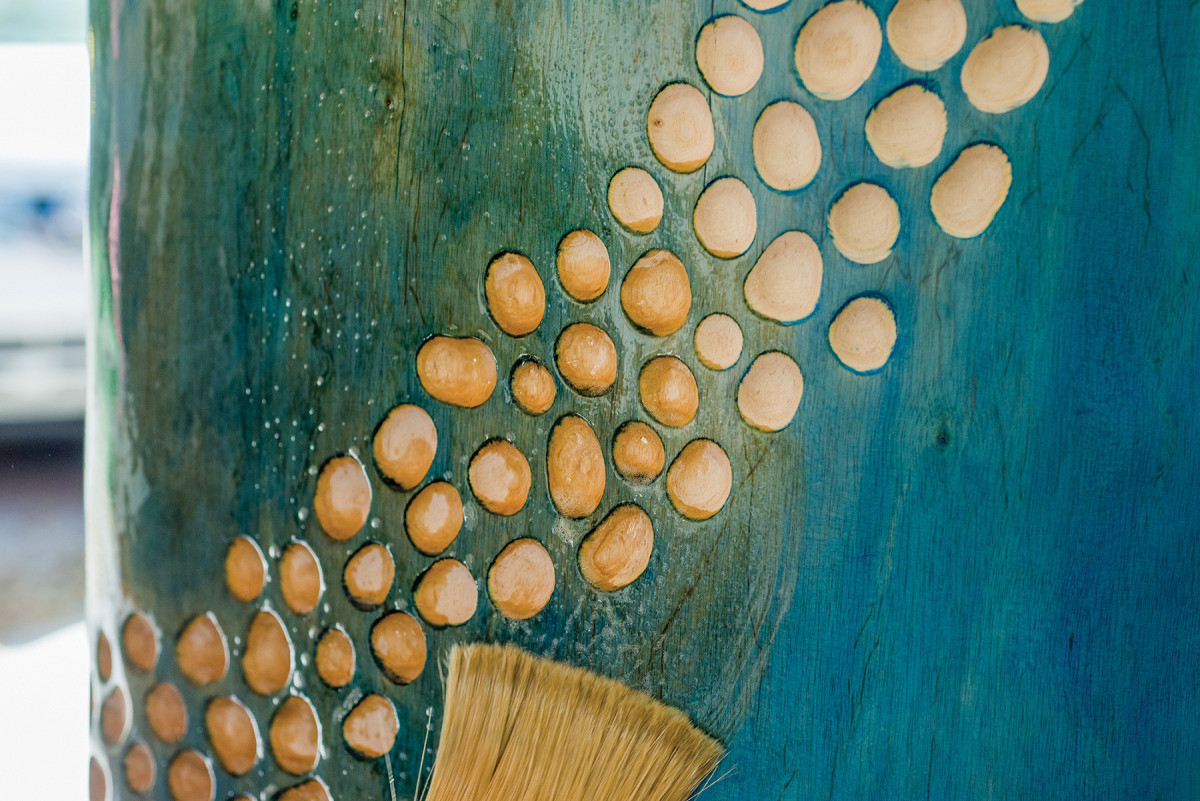
Once the legs are done, this may be a good stopping point for moving onto sanding and finishing. Really just depends on the overall design you have in mind. I enjoy adding some sort of texture feature, which is exactly what I have done with this table. I really like to add divots as a feature, and so I again pulled out my sharpie and just freehand sketched general shapes and patterns for the divots. There are many different ways you can add texture to the outside surface of the table. You could add waves or more of a textured feathered or line look. All of this can either be done with various shapes of carving burrs, carving dishes or different shapes of multicutter blades.
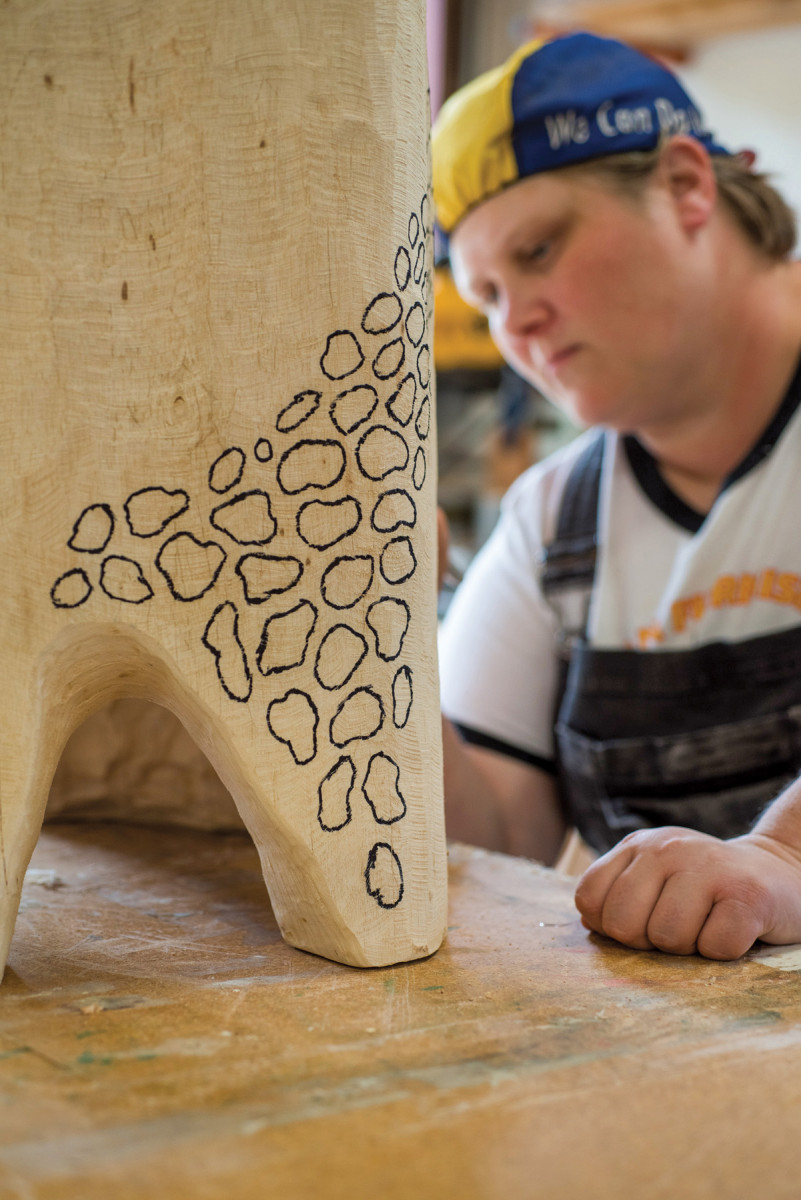
Texture is one of my favorite flourishes. First, sketch shapes and patterns for creating this divot texture.
The tool to use to add the texture is dependent on the type or shape of texture you want to add. Carving the divots is a two-part process for me. The first part is to use a coarse grit ball carving burr with my die grinder, and I carve every divot to shape. The second part comes after I have sanded the whole table up to 180 grit. Then I take a fine grit ball carving burr with the die grinder and go back over every divot, really working to remove the tool marks from the coarse grit burr.
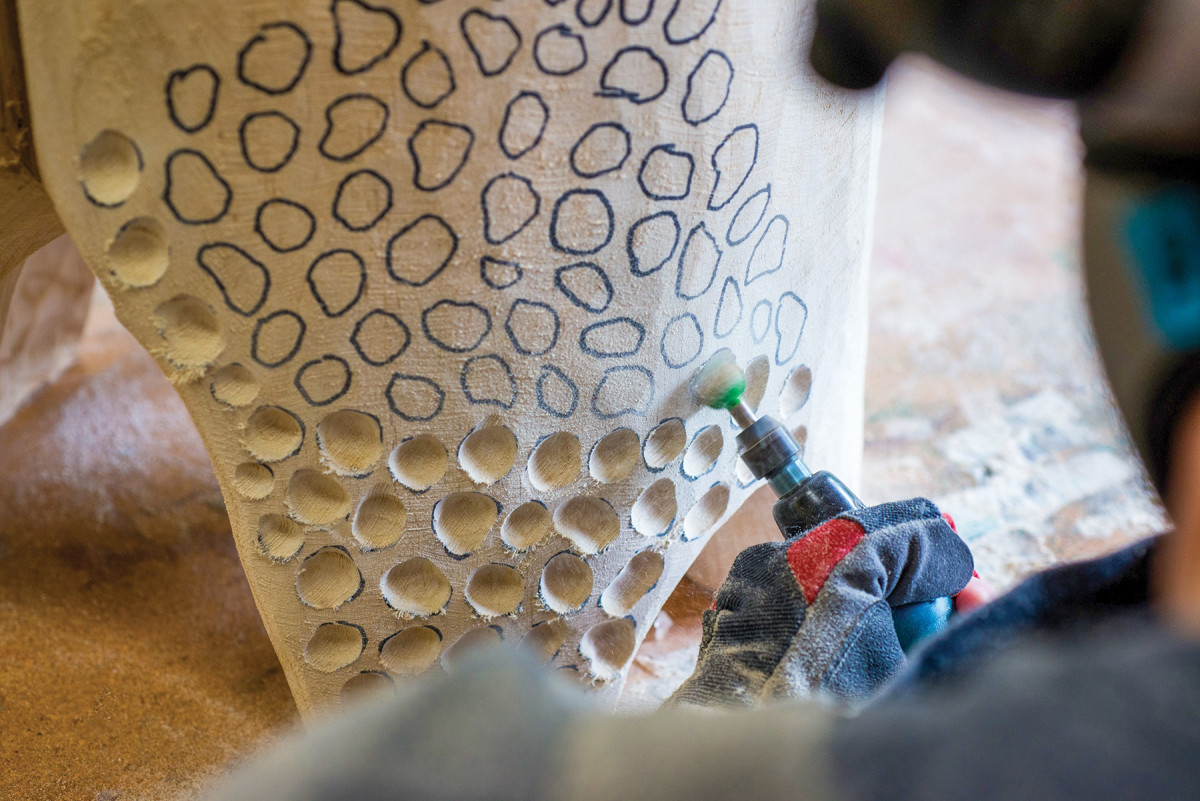
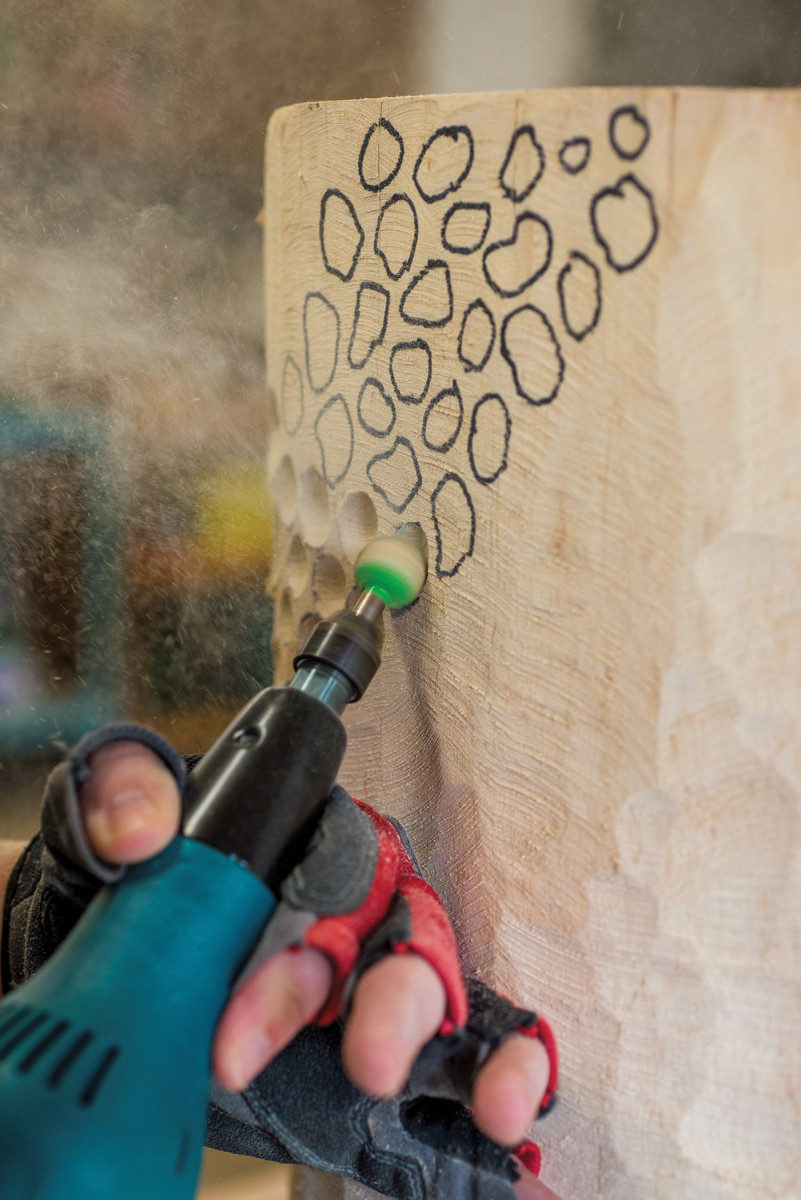
Then, just carve the divots with a ball burr and die grinder.
Dealing with Defects
After the first carving of the divots, and before sanding, I wanted to address the large crack in the ash wood log I was working with. Since my log has been drying for 3 years and the moisture level is below 12%, I know that the crack is pretty much stable. However, it does still cause a gap in the tabletop surface that I would rather not leave fully open. There are two different ways to approach this. One is with resin, and the other is with a wooden key. I have used resin on other log tables before, however, I have found that over time, with wood movement, the resin can start creeping above the surface and cause the need to re-sand the top. This is a decent-sized crack in the log and I just did not want to have issues due to wood movement in the future, so no resin this time. This leaves the wooden key method.
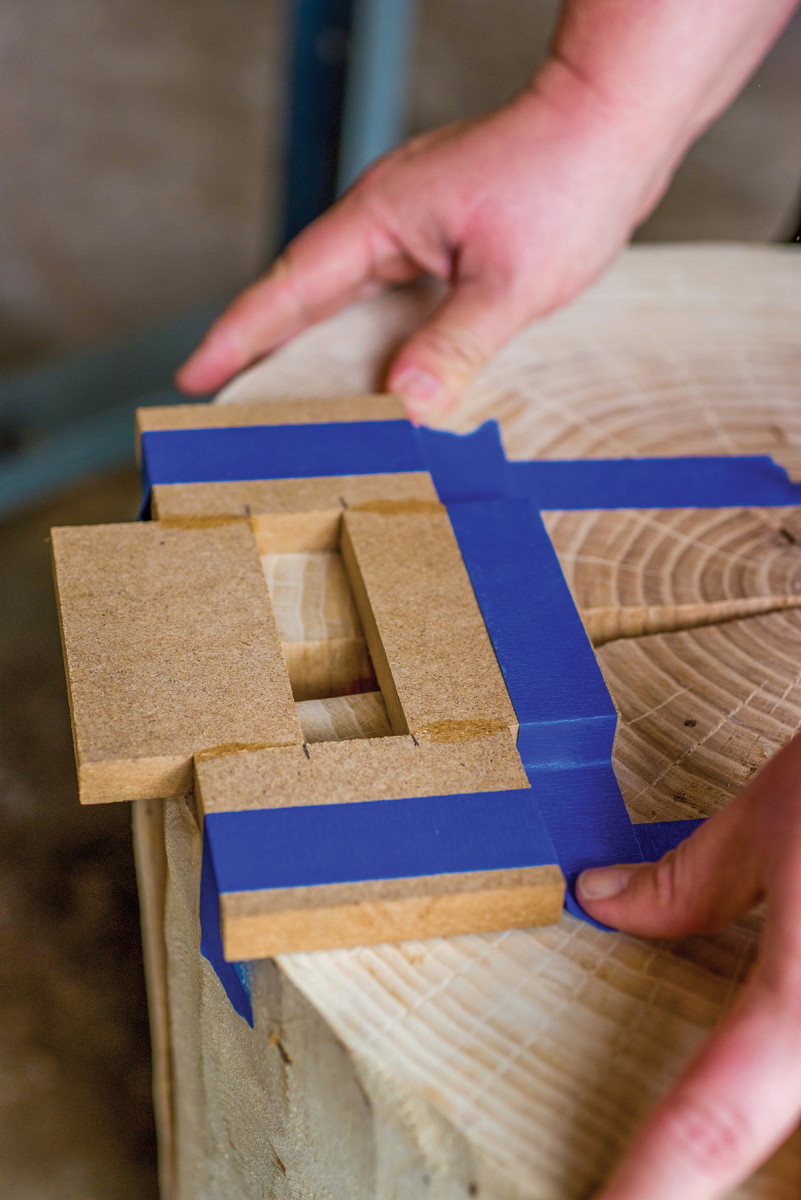
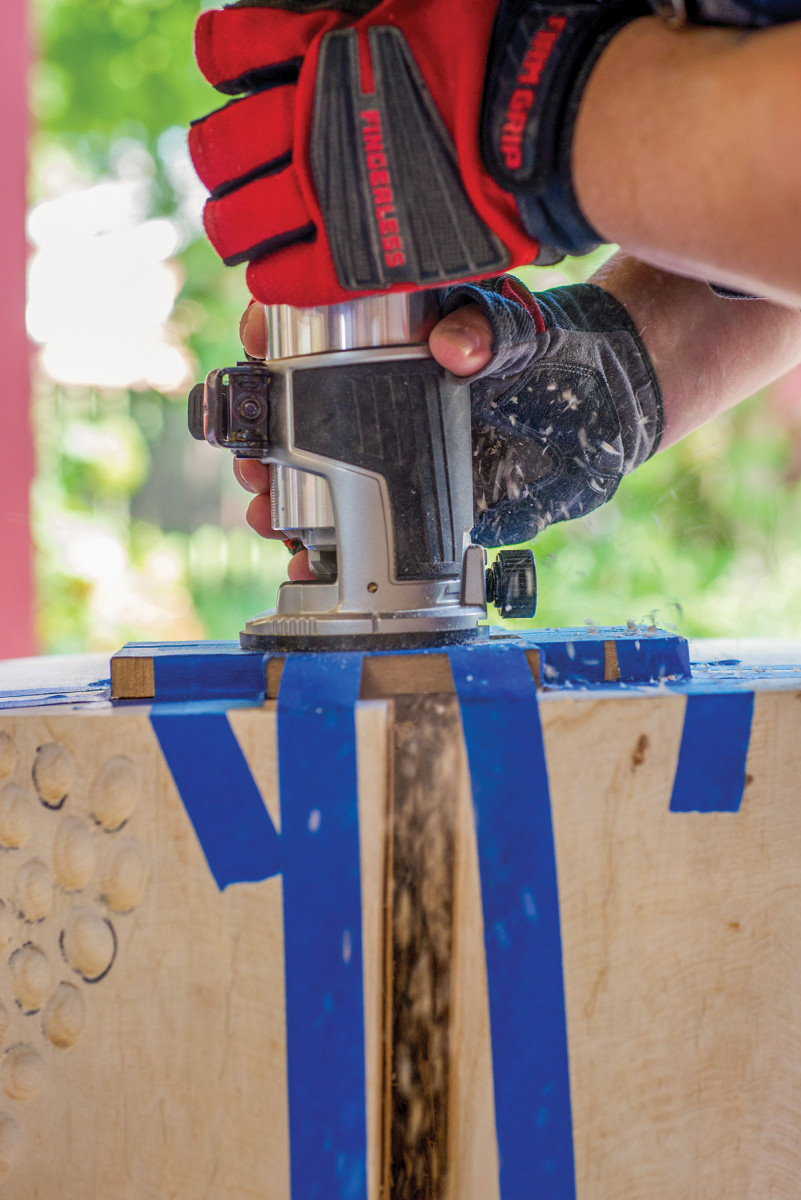
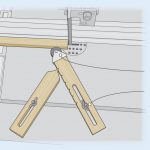
I use keys to stabilize cracks. First, I make a template and then cut the wood key slot with a palm router.
Now, if I was truly worried about the crack propagating further across the log, I would want to use some sort of bowtie or butterfly shape to keep that from happening. However, the use of a wooden key in this instance was more of a preference then a need, so I kept my wooden keys simple, going with a rectangular shape. I happened to have some scrap Birdseye maple in my shop that I thought would make a nice contrast with the ash, and that is what I used. To cut the slots for the key in the top of the log, I made a quick rectangular shaped jig out of some scraps and used my palm router to cut the key hole. Then I cut the maple to fit. I got the maple just slightly undersized and did end up mixing some ash wood sawdust and wood glue to do a tiny bit of filler work.
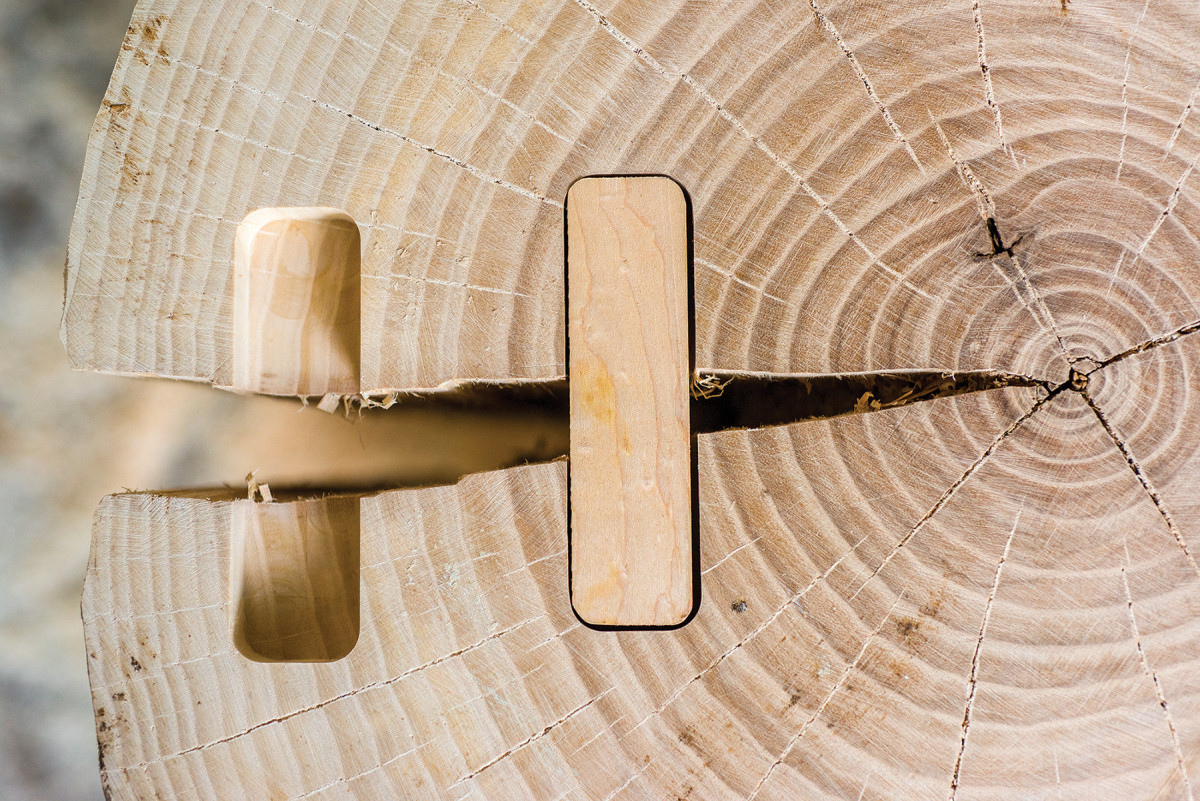
Then I fit and glue in the key.
Sanding and Finishing
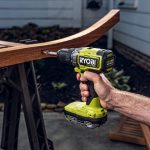
With the keys placed and everything dry, it’s time to move on to sanding. Sanding curved surfaces can get tricky. In general, I use a few different sanding attachment options with my power drill for anything curved and then my orbital sander and belt sander for flat surfaces like the top and bottom of the table. For the attachments for my drill I used a smaller pad that fits 2“ sanding discs for the hollowed-out portion on the underside of the table and along where the leg cutaways are. Then for the outside of the table I used a larger pad that fits the standard 5“ sanding discs you use with orbital sanders. I worked the whole table, besides the top, up to 220 grit. I paused at 180 grit on the outside surface to go back over the divots with the finer grit burr and then used a 220-grit flap disc across it all. For the top, I went up to 320 grit.

Sanding up to 220 grit on outside of the table. This is where the details matter.
The last, but perhaps the most satisfying part of the whole process, is the finish. For log tables especially, I would highly recommend using some sort of an oil-based finish because it really soaks in and helps strengthen the wood fibers. I enjoy adding a pop of color though before applying final finish. So, for this table I applied a teal dye that I made by mixing powdered Keda dye with vinegar and water. I applied the dye twice in order to get the depth of color I desired. After letting the dye fully dry, I then went with a danish oil top coat, following the directions on the can for application.
I applied a teal dye to the outside of this table.
I finish with a couple coats of Danish oil.
There are so many different design options for creating a log side table, really the options are endless. So, next time you find yourself with a good-sized log, before milling it up into lumber, consider turning it into a unique side table.
 Katie Freeman is a carver and furniture maker in Iowa. You can hear her every week interviewing other makers on the Maker Mom Podcast. Learn more at freemanfurnishings.com.
Here are some supplies and tools we find essential in our everyday work around the shop. We may receive a commission from sales referred by our links; however, we have carefully selected these products for their usefulness and quality.


![Build a Rustic Dog Bed [Video]](http://www.popularwoodworking.com/wp-content/uploads/bfi_thumb/dummy-transparent-olcy6s63it1p9yp7uhusjas7c8kahafrhg9su7q9i0.png)