We may receive a commission when you use our affiliate links. However, this does not impact our recommendations.
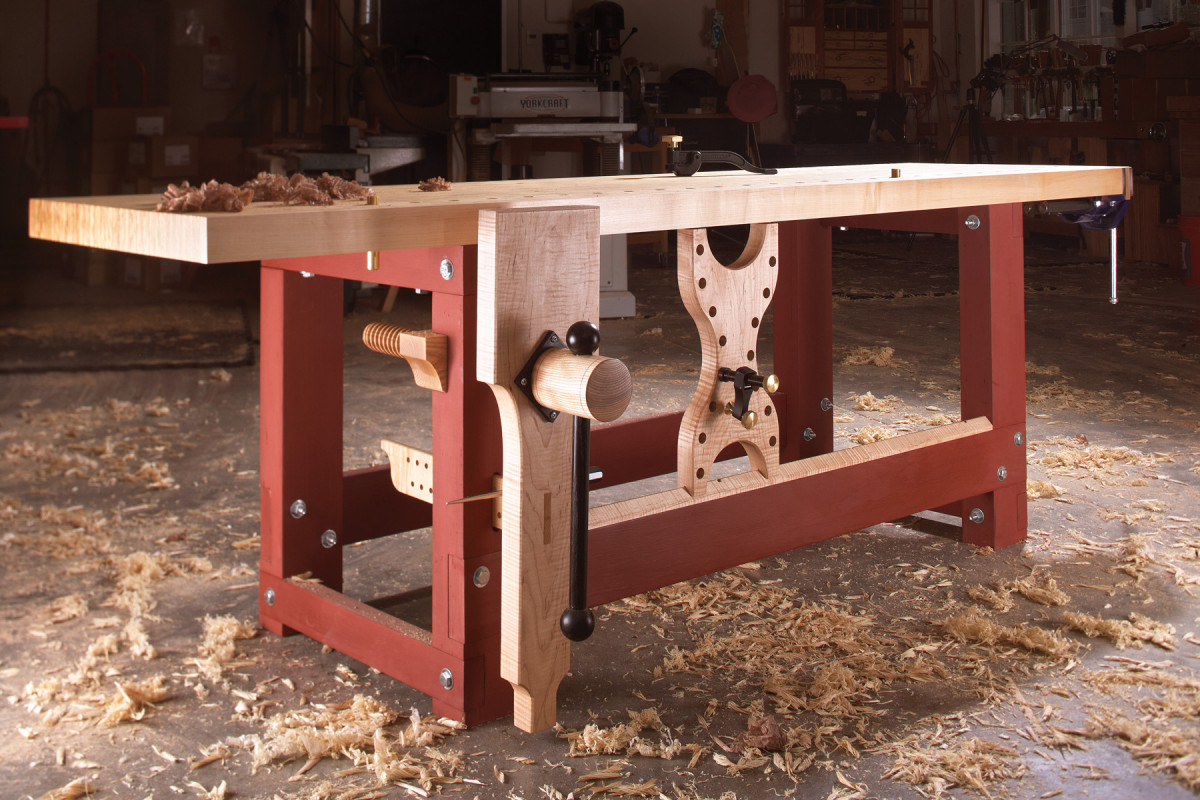
Tradition meets technology when we marry an 18th-century workbench design with modern laminated veneer lumber.
Editor’s note: This article originally appeared in the November 2009 issue of Popular Woodworking. A follow-up post from 2014 should address any questions on how the workbench wore with age.
When it comes to workbench designs, I think it is difficult to improve on the 18th-century designs developed in Europe, England and the United States.
These behemoths are far simpler to build than the contemporary and common Euro-style bench, yet the old benches also offer better workholding, superior mass and less maintenance. In fact, there is only one true advantage offered by the Euro-style benches, and that’s portability.
Modern Euro-style benches are bolted together and can be knocked flat and shipped by truck or rail. The ancient benches are about as portable as a pregnant brontosaurus.
After building and working on more than a dozen different workbench designs, I resolved to fix this problem with the ancient benches, and I set my sights on turning one of my favorite French workbench designs from the 1700s into a bench that could be disassembled in less time than it takes to knead a baguette.
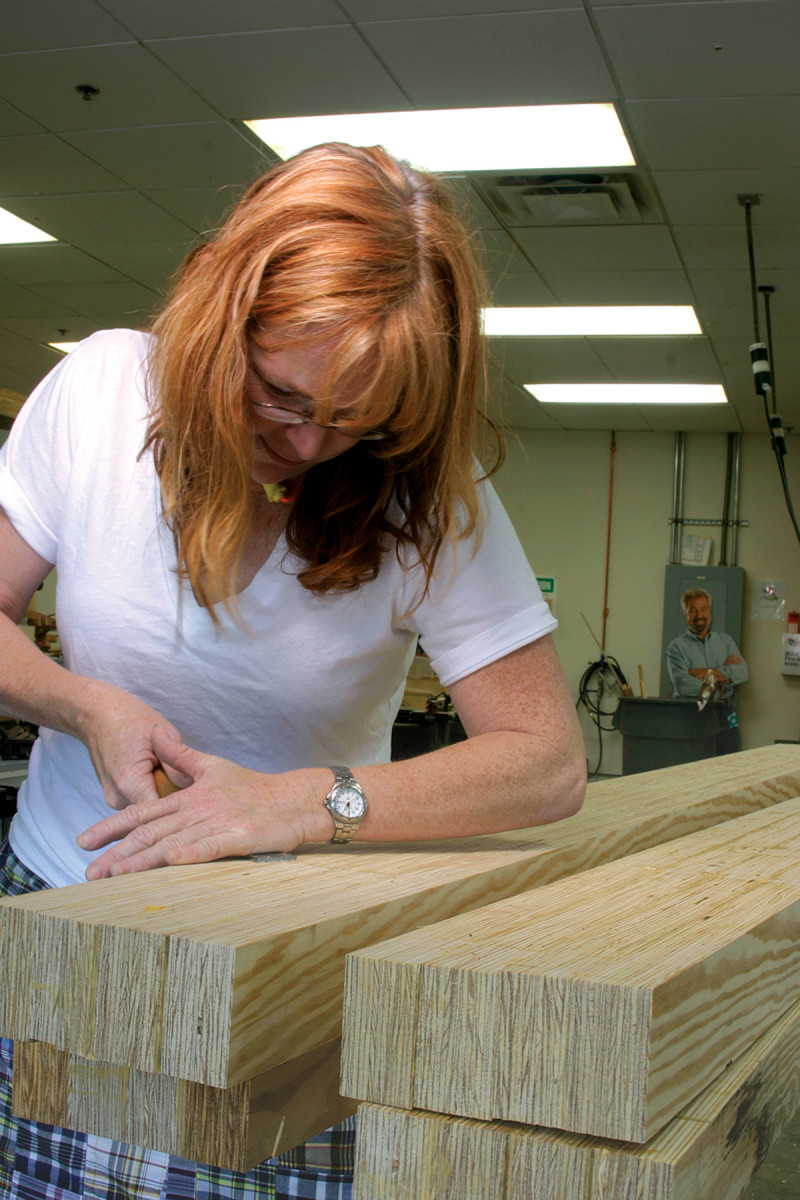
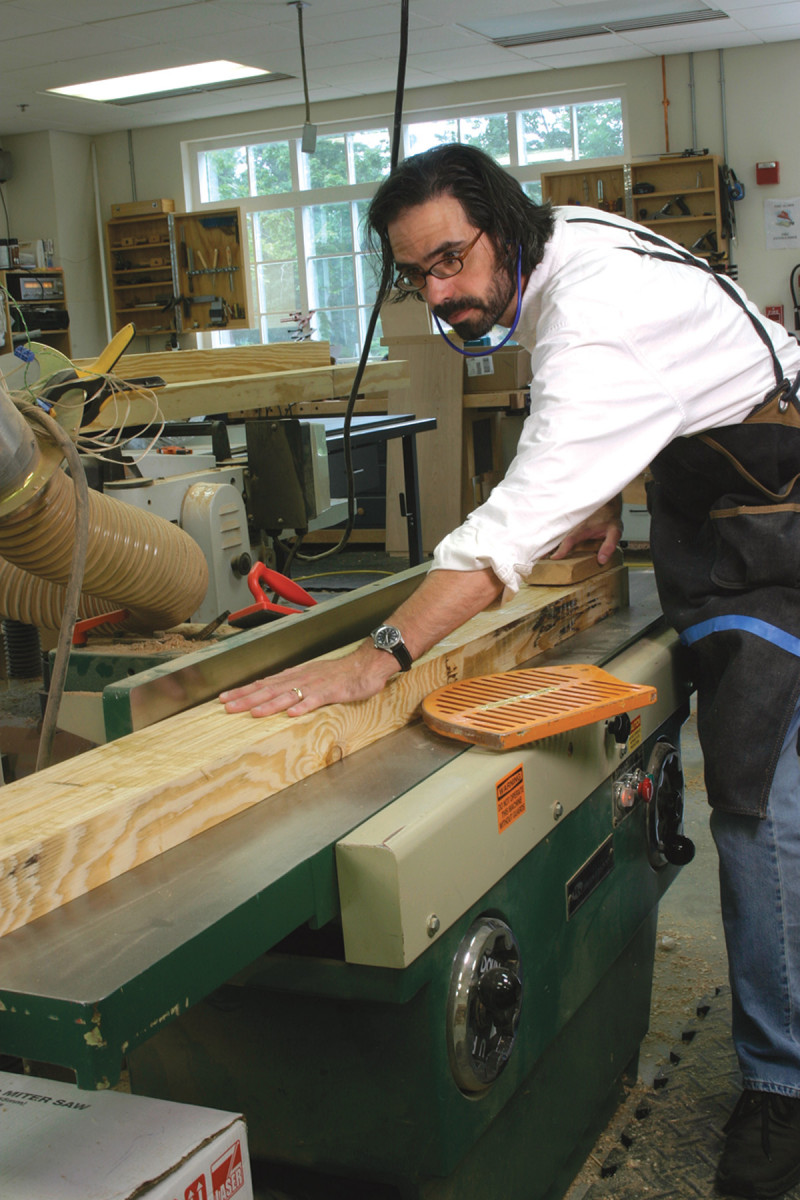
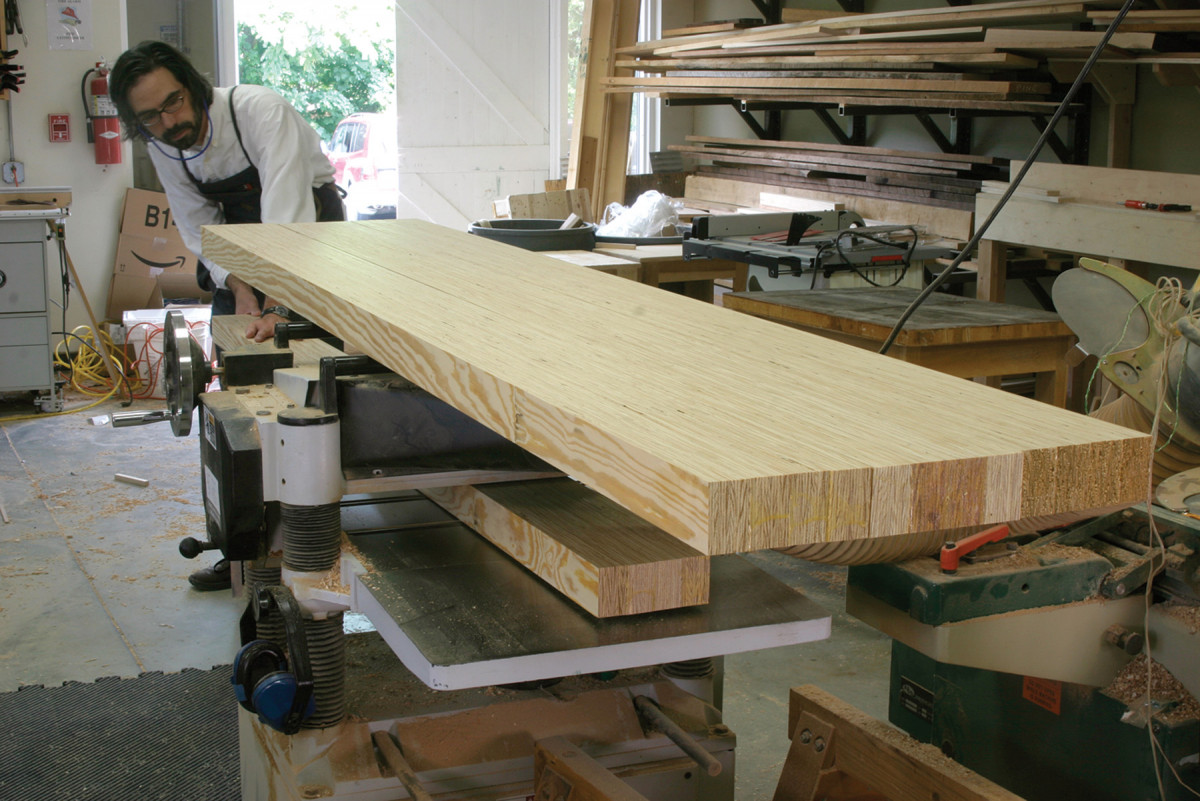
Ripped and ready. We began by ripping down the LVL 2x12s we needed for the benchtop and were surprised by how easily the material cut on the table saw with a combination blade.
This design was first published in André Roubo’s “The Art of the Woodworker,” an 18th-century masterpiece that explained everything from carpentry to woodworking, marquetry, carriage-building and garden furniture. The workbenches in Roubo’s volumes are monolithic and simple, yet they excel at making it easy for you to work on the faces, edges and ends of boards and assemblies.
Since 2005 I’ve been working on a version of Roubo’s bench and am impressed daily with its versatility. I also have a crick in my back from moving this bench in and out of trucks to demonstrate it at woodworking shows. It is one solid chunk of wood.
With a little design work, I easily transformed Roubo’s bench into a version that was ready for the traveling Cirque du Soleil. But I wasn’t satisfied that I had pushed the limits of the bench’s design.
After writing the book “Workbenches: From Design & Theory to Construction & Use” (Popular Woodworking Books), I was besieged by people who wondered if you could use engineered wood (such as plywood or MDF) to build a good workbench. I’ve used Baltic birch to make a number of workbench tops, but I’ve never been thrilled with cabinet plywood (it’s unreliable these days), MDF or OSB (all of which sag like wet croissants). After doing some research I came across a material that you don’t see much in woodworking shops: laminated veneer lumber (LVL).
About LVL
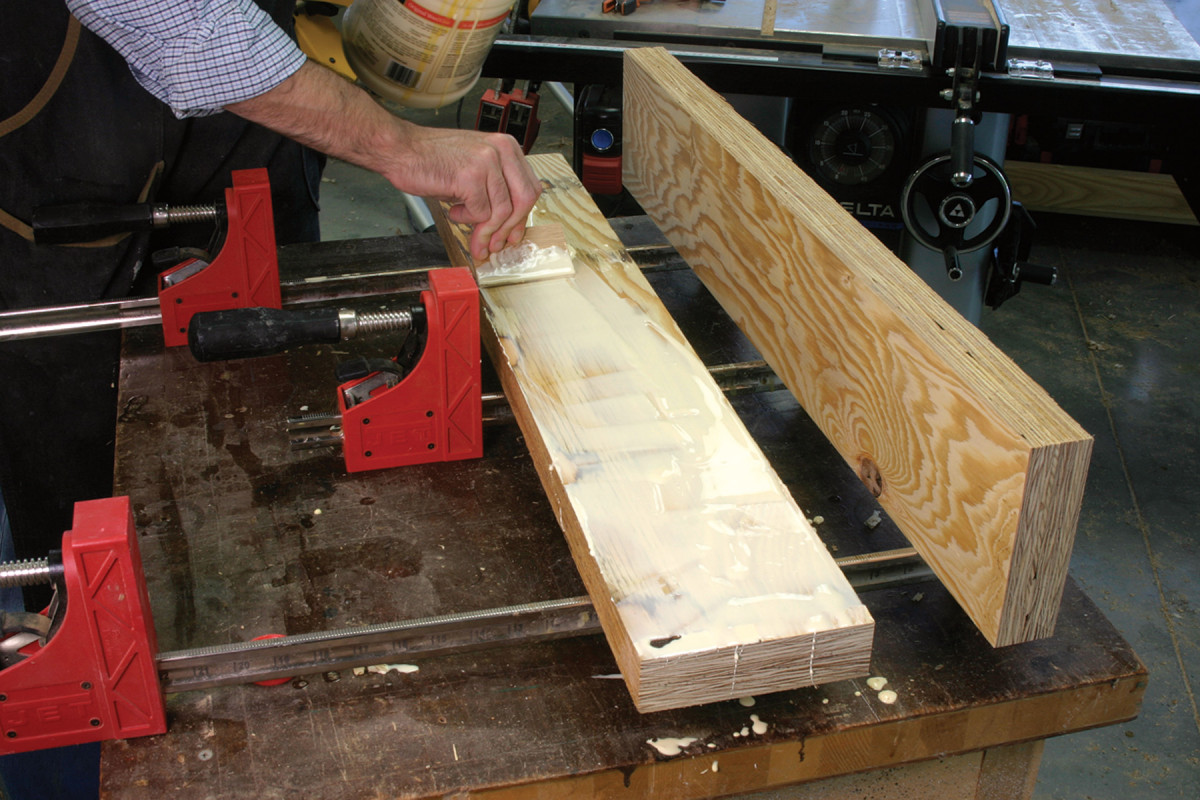
Scraping glue. After gluing up four strips into a chunk, we scraped off the excess yellow glue before dressing the lamination on the jointer. After all, the knives were already taking a beating from the glue between the plies so removing any glue we could was an act of kindness.
This layered material is like plywood in some ways and like solid wood in others. It is typically made up of many thin layers of veneer (such as yellow pine or poplar) that are glued into pieces that are basically sized like dimensional softwoods (2x12s, 4x4s etc.).
Unlike plywood, all the plies in LVL have their grain running in one direction – the length of the board – just like solid wood. But unlike solid wood, LVL beams have a lot of stiff glue sandwiched between the wooden plies. They are typically used as joists to span long distances in residential and commercial construction.
LVL beams are stiff, relatively cheap and easy to find at commercial lumberyards. But for the woodworker, there are a lot of question marks when it comes to working with the stuff. How stable is it? How easy is it to joint, plane, saw and rout? Will the glue tear up the cutters of our tools?
As luck would have it, Managing Editor Megan Fitzpatrick was ready to build a real woodworking bench after making do with the too-short spare workbench in the magazine’s shop. And she was game to try out the LVL. So we bought enough material for an 8′-long version of Roubo’s workbench and got to work.
LVL Workbench Cut List
No. item dimensions (inches) material comments
T W L
❏ 1 Top 2 1⁄2 x 24 x 96 LVL With maple banding
❏ 4 Legs 3 1⁄4 x 5 x 31 1⁄2 LVL Glued from 2 pieces
❏ 2 Long stretchers 1 5⁄8 x 5 x 60 LVL Half-lapped into legs
❏ 4 Short stretchers 1 5⁄8 x 3 x 24 LVL Half-lapped into legs
❏ 1 Leg vise chop 1 7⁄8 x 8 x 33 Maple
❏ 1 End vise chop 1 7⁄8 x 3 x 17 Maple Screwed to vise
❏ 1 Board jack 1 7⁄8 x 9 x 23 Maple Long; trim to fit
❏ 1 Board jack track 1 5⁄8 x 1 1⁄4 x 50 Maple Bevels on long edges
❏ 1 Garter 3⁄8 x 3 3⁄4 x 3 3⁄4 Maple
❏ 1 Parallel guide 1⁄2 x 2 7⁄8 x 17 1⁄4 Maple
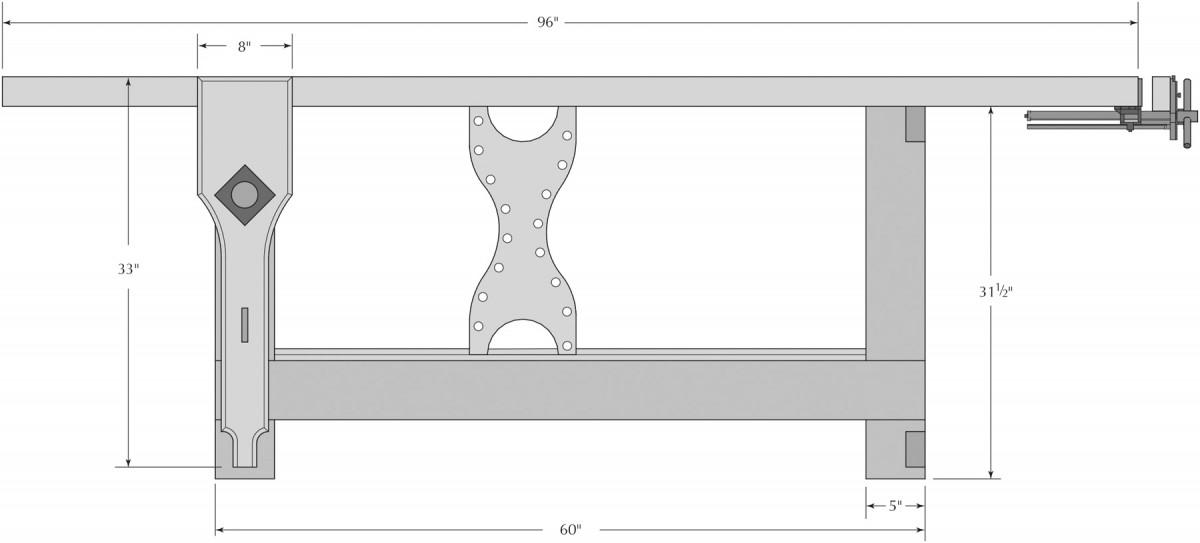
Elevation
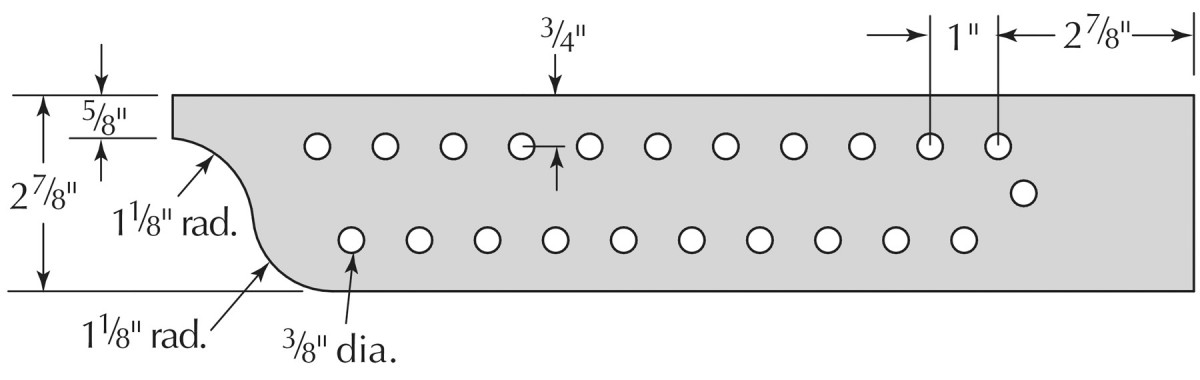
Parallel Guide
Dog hole pattern
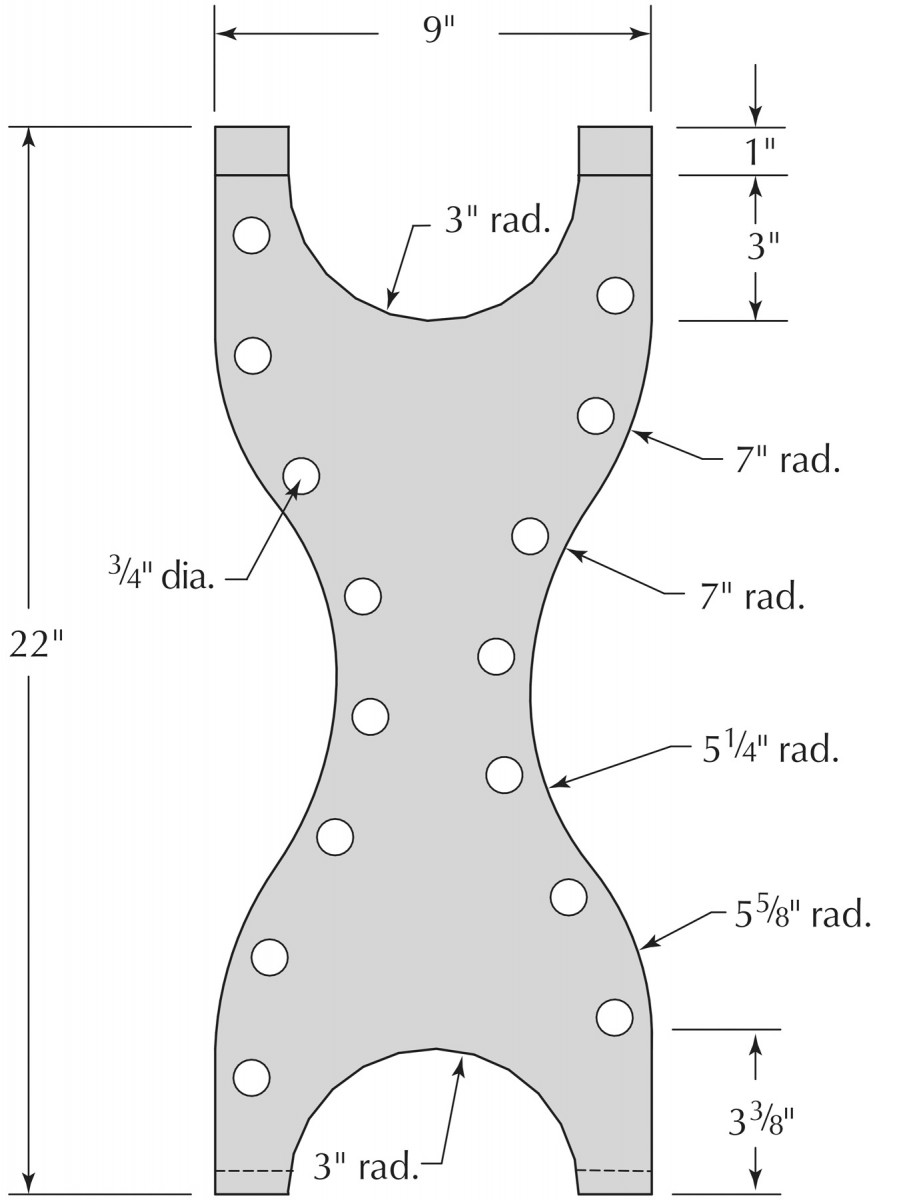
Deadwoman
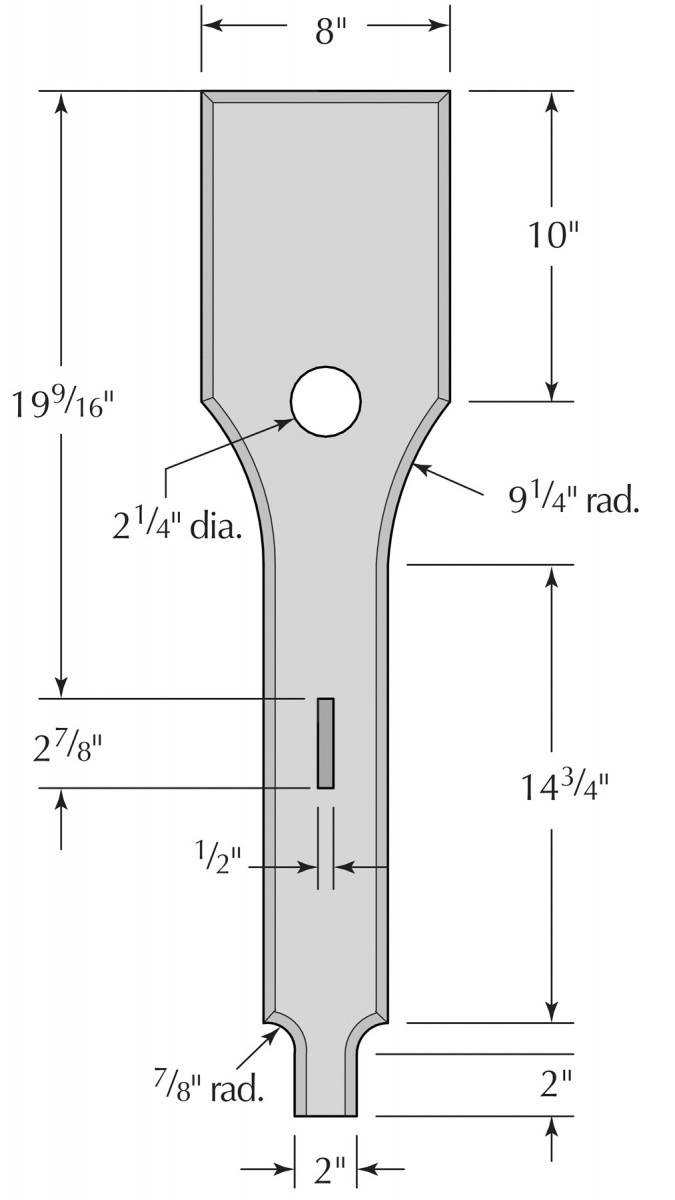
Leg vise chop
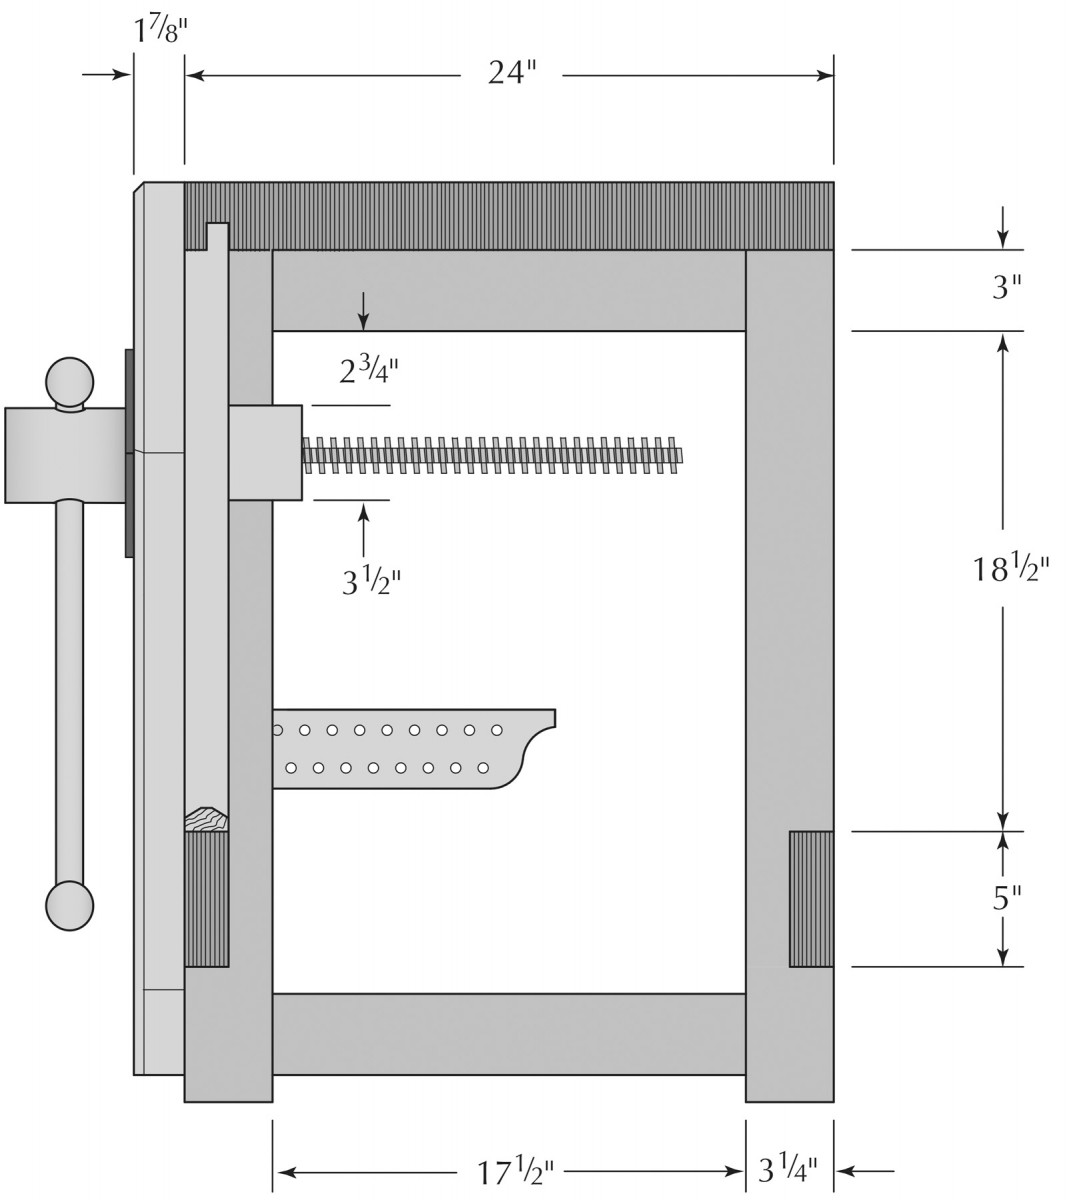
Section
A Top of Many Laminations
Jointing with carbide. Our jointer has a carbide-insert cutterhead, and it had no problems dealing with the glue in the LVL. I was more worried about the planer, which has high-speed steel knives.
I think it’s best to begin by building the benchtop. Then you can hump it onto sawhorses and use it as a work surface to build the base. You can indeed build a bench without having a bench – I’ve done it many times.
We ripped each LVL 2×12 into four 23⁄4“-wide strips. Then we jointed the solid-wood faces of each strip. The nice thing about LVL is that the faces are thick enough to withstand a couple passes on the jointer before you cut through the laminations – it’s like thick, old-school veneer.
After slicing into the LVL on the table saw we learned some of the finer points of this engineered material. Because of the laminations, there really aren’t any stresses in the planks. It cuts easily, like nice plywood.
The bad thing about LVL is the seams. Every 6′ or so there is a scarf joint where the laminations overlap one another. These seams determine the direction you should run the material over the jointer. We jointed one of them in the wrong direction and the reward was a big splintery bite at the seam.
Planing is no problem. We were surprised by how well the planer’s knives fared after dressing all the laminations for this project. After dozens of passes through the machine, the knives didn’t look any worse for the wear.
The material is fairly consistent. The first plank was dimensionally perfect in thickness and width. The second one was not. One end was a little thicker than the other (about 1⁄16“) and the plank had a pronounced crook – but only on one edge.
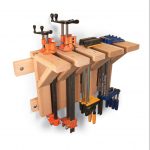
After ripping them, we turned all the strips 90° and prepared to glue them face-to-face. To keep the glue-ups manageable, we glued four strips into a chunk. Then we repeated this operation three more times. When the glue was dry in these laminations, we jointed and planed the four laminations and glued the four pieces into two large laminations. Then we carefully glued these two laminations into a benchtop that was about 24″ wide.
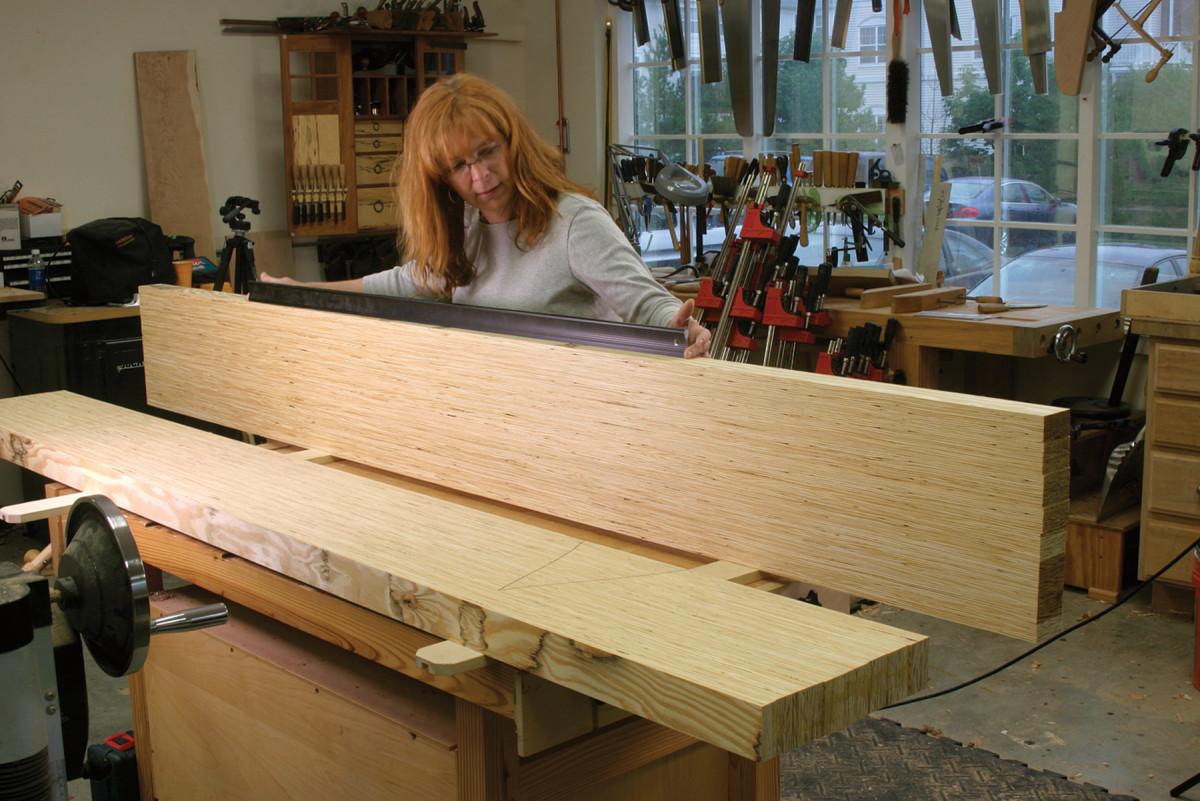
Looking for bumps and hollows. When dealing with an 8′-long edge, it can be difficult to find the source of the problem with an edge. We balanced a straightedge at several places along the edge, then pinched the ends of the straightedge. If the straightedge rotated easily, there was a hump under it. If the corners dragged and there was light under the straightedge, we had a hollow on that edge.
We used yellow glue through most of this project and didn’t have any problems. When gluing LVL made using yellow pine, we recommend you keep it clamped at least five hours. Yellow pine has resin that resists glue penetration.
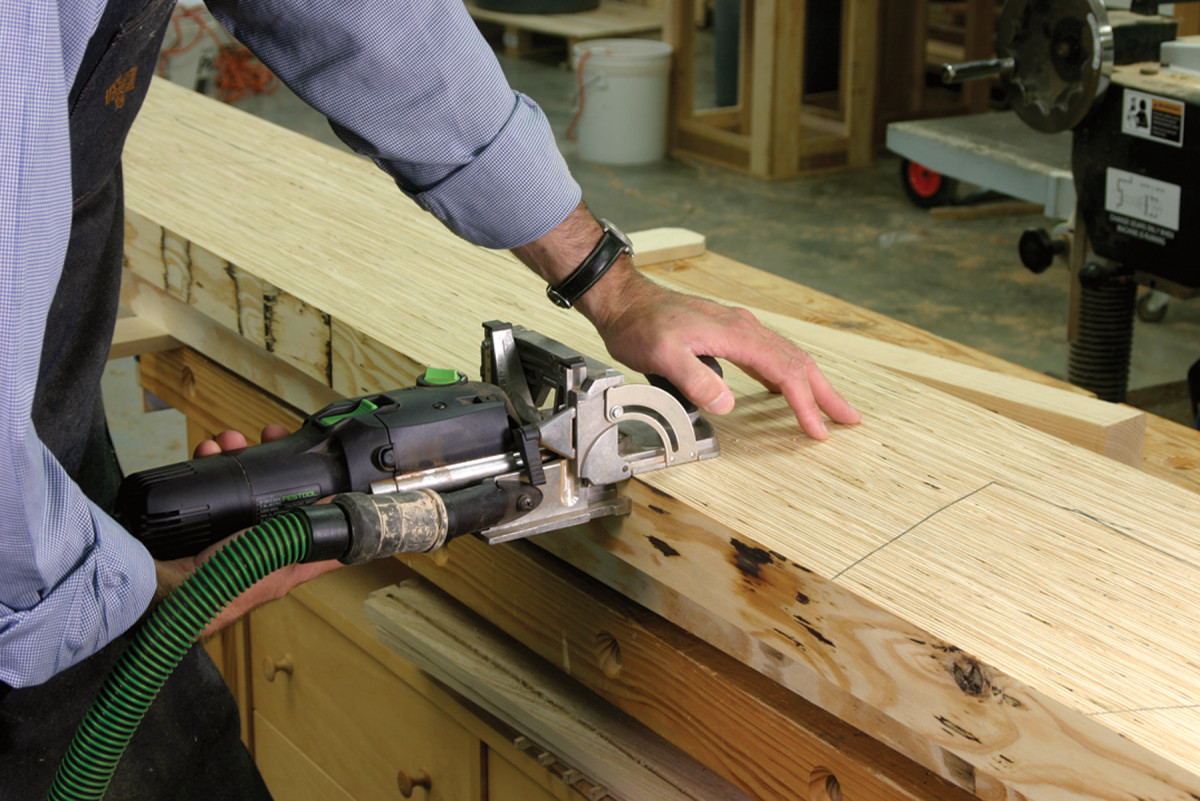
Dominos will do ‘ya. You can use almost any method to align the two edges you are gluing up for the top: biscuits, splines or even dowels. We have a Festool Domino in the shop, and it’s perfect for this sort of accurate work.
Of course, there are some other important details you should know about when working with this material. We didn’t want to run the LVL through the machines any more than we had to, so we took extra care to line up all the laminations as we clamped them. The extra care paid off, and when we glued the two final 12″-wide laminations together we jointed their mating edges and decided to take an extra precaution: some Dominos.
The Base: Beef & Nuts
Joint and glue. Joint the inside face of each of your leg pieces and glue them together. When the glue dries, joint and plane the legs to their final thickness and width. Planing the legs to width ensures they will all be consistent.
This is the simplest base I could design that is both robust and completely functional. Each leg is made from two lengths of 5″-wide LVL that are face-glued. Then you cut half-lap joints in the legs using a dado stack in your table saw and bolt everything together using 1⁄2” hex-head bolts, washers and nuts.
Triangles and squares. Note the “cabinetmaker’s triangle” scrawled across the tops of the four legs. This helps you keep all the legs oriented as you mark out the half-lap joints for the stretchers.
Once we got the legs glued up, building the base took less than six hours, and we stopped several times to take pictures (and we got coffee, which is as important as glue in our shop).
Begin by gluing up the legs using pieces that are slightly oversized. Let the adhesive cure, then joint and plane all four legs to a consistent final thickness. The length of your legs is, naturally, what will determine how tall your workbench is. The cutting list and drawings will produce a benchtop that is 34″ from the floor – the same height as a typical table saw.
The way to determine the correct bench height is to measure from the floor to the joint where your pinky finger joins your hand. That will be a good height for most hand- and power-tool operations. If you work only with power tools, you might consider raising things 2″. If you work only with old-style wooden-bodied handplanes, you might consider lowering the benchtop about 2″.
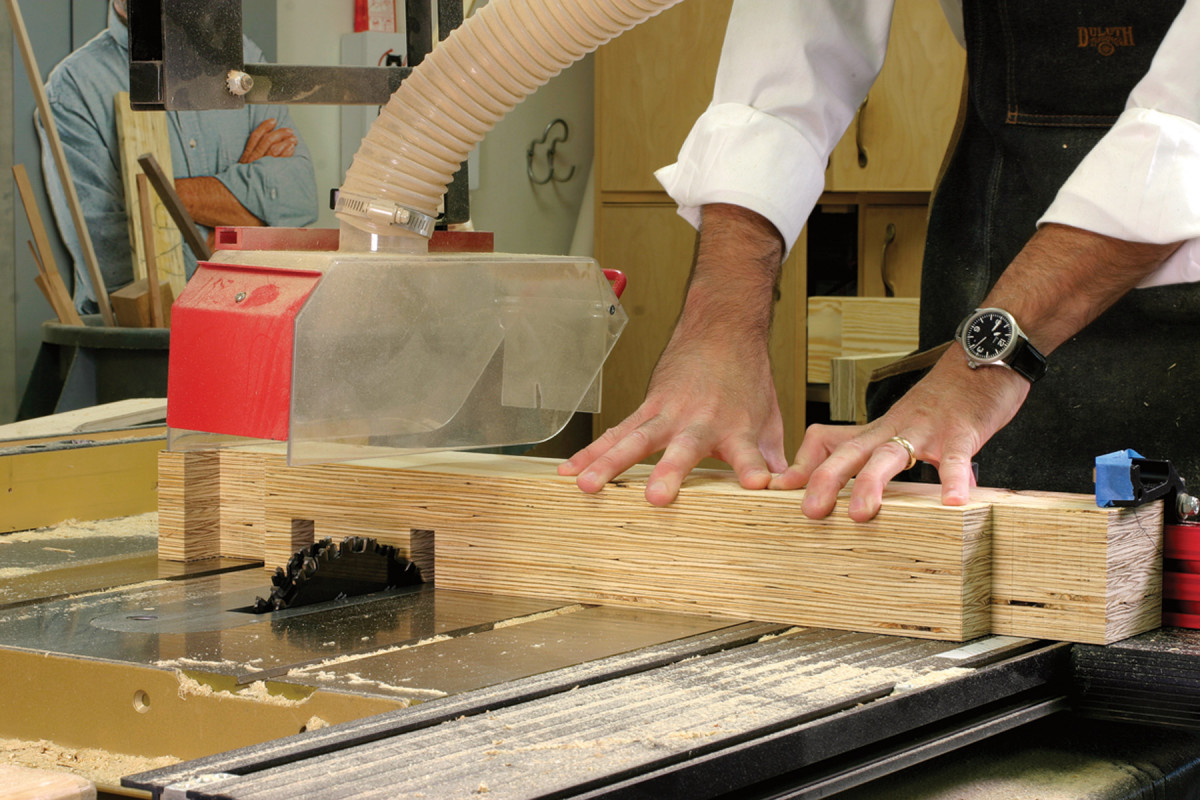
How high? This high. The actual height of the dado stack isn’t important. What’s key is that the cutters be just as high as your stretchers are thick. Place a sawtooth at top dead center and compare it to a stretcher.
Once you determine the final length of your legs, crosscut them to length and lay out all the half-lap joints on the four legs. The leg that will get the leg vise will get a few extra cuts, but we’ll get to that in a minute.
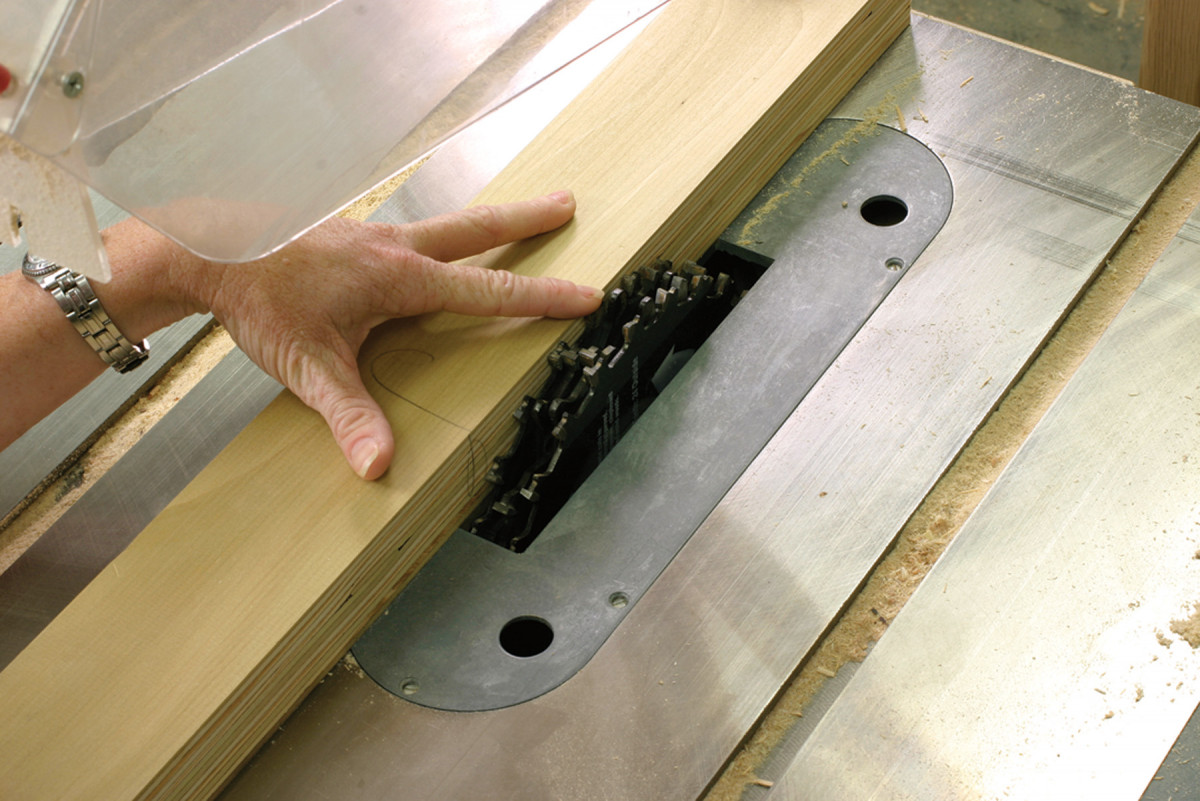
The whole stack for half-laps. This is a lot of meat for a table saw to remove, but our cabinet saw was up to the task. If your saw isn’t, a band saw will remove most of the waste and the dado stack can clean up the cuts.
Put all the chippers from your dado stack on the arbor of your table saw. Raise the arbor until it is 15⁄8” high – exactly the thickness of all the stretchers. Lock the saw’s arbor in place and make a test cut on a piece of scrap LVL.
If your saw breezes through the material, then you are good to go. If, however, it balks at the task by slowing down, you’ll need to first remove most of the waste using a band saw.
Removing the waste using a dado stack is simple work. To determine the stopping and starting place for each cut, we used the stop on our table saw’s miter fence. Then we lifted the stop and wasted the remainder between the start and stop points on the legs. It really is simple work. Just keep alert and watch that cabinetmaker’s triangle for guidance.
The Kitchen Test For Workbenches
I wish there were a simple test to separate a good workbench from one that should live the rest of its life as a plant stand. You know, something simple like an instant pregnancy test, but without having to drag your bench into the lavatory.
I developed such a test for my book on workbenches. I call it “The Kitchen Test,” but I need to come up with a better name for it. In a nutshell, here it is: Pretend you have three pieces of woodwork in your shop and you need to secure them on your workbench so you can work on their faces, edges and ends.
One piece is a kitchen cabinet door that measures 3⁄4“ x 18“ x 24“. The second is a kitchen drawer that is 4“ x 18“ x 18“. The third is a piece of baseboard for the kitchen that is 3⁄4“ x 6“ x 48“.
Now pick two (or 10) workbench designs and pit them against one another. Which bench would grip these three pieces of work in each of the three positions (for working the faces, edges and ends) with the greatest ease?
Some benches require a lot of extra accessories (bench slaves, bench hooks etc.), and some don’t. But it really is quite surprising how a lot of benches fare in this test. There are significant differences. Some bench designs can handle all nine operations. Some can easily accomplish only about half. — CS
About that Leg Vise

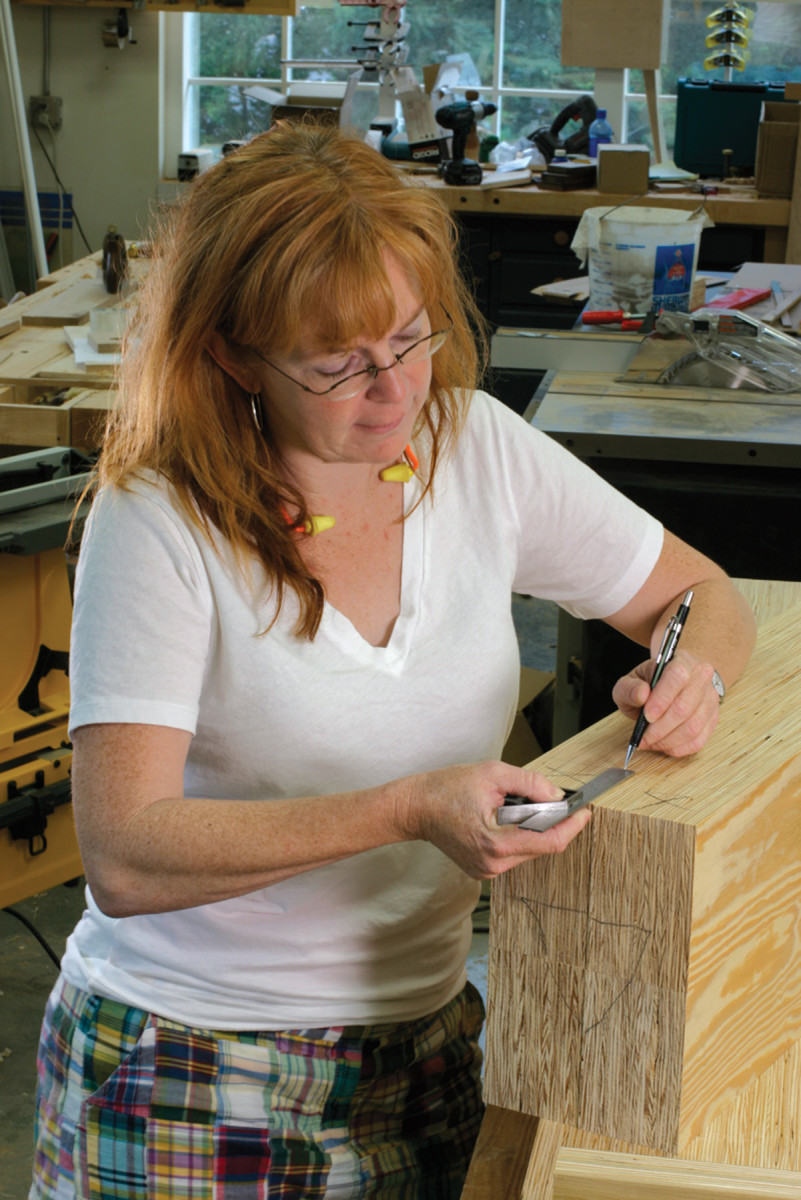
Snug, square and traced. Put the vise screw through the 2″ hole and snug up the vise block on the backside of your leg. Square up the block then trace its outline on the leg.
This workbench uses a traditional leg vise in the face-vise position. The leg vise is a simple, robust and almost-forgotten form of vise. Other vises might be easier to install, but few can beat the leg vise when it comes to making it just what you need for your style of work.
The only thing you need to buy to make a leg vise is a vise screw. You can buy a quality metal one for less than $40. We purchased a wooden one. It cost more ($165), but it looks nicer, moves faster and doesn’t ever mark your work with grease. Both metal and wooden vise screws do a great job of holding your work. So go with your heart or your budget.
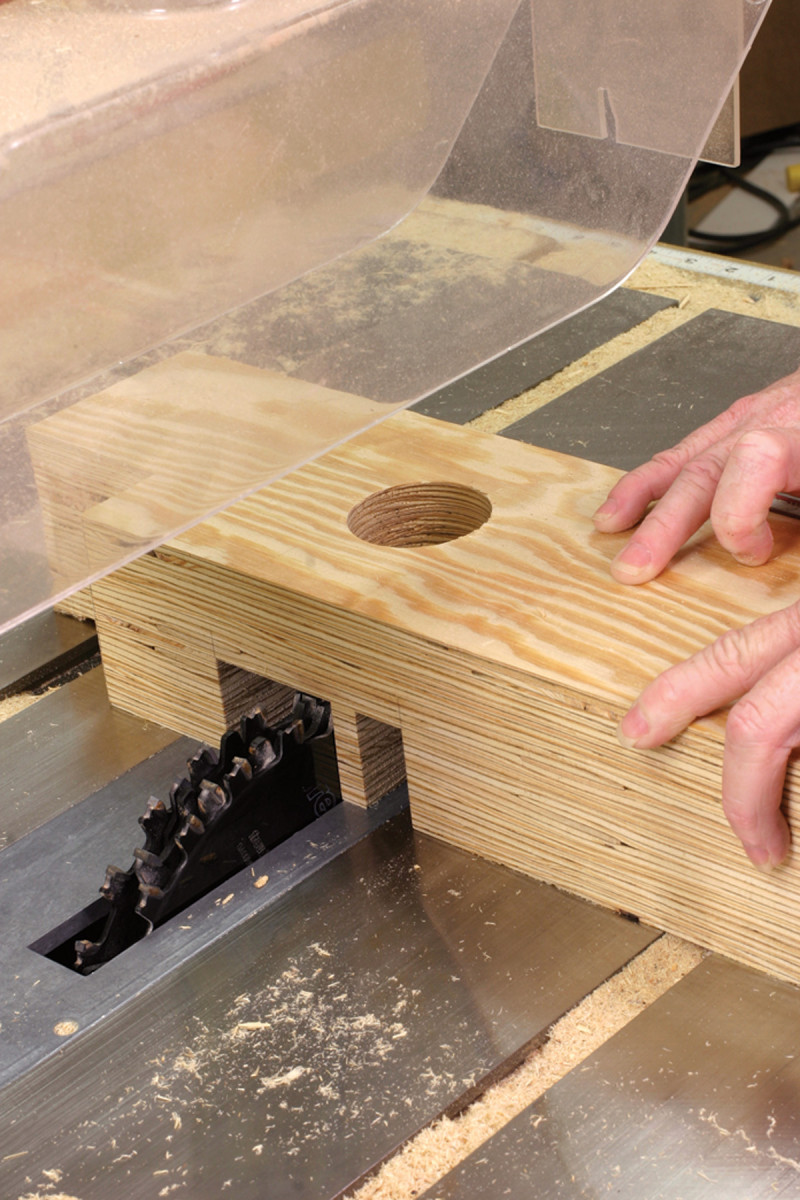
Right wasted. Use your dado-stack set-up to remove the waste for the threaded nut block. Be careful to work right up to the lines and test the fit of the block into the dado.
One quick word on where you should place this vise on your bench. If you are right-handed, put it on the left front leg. If you are left-handed, put it on the right leg. This traditional set-up will assist you when planing – you always want to plane into a vise’s screw.
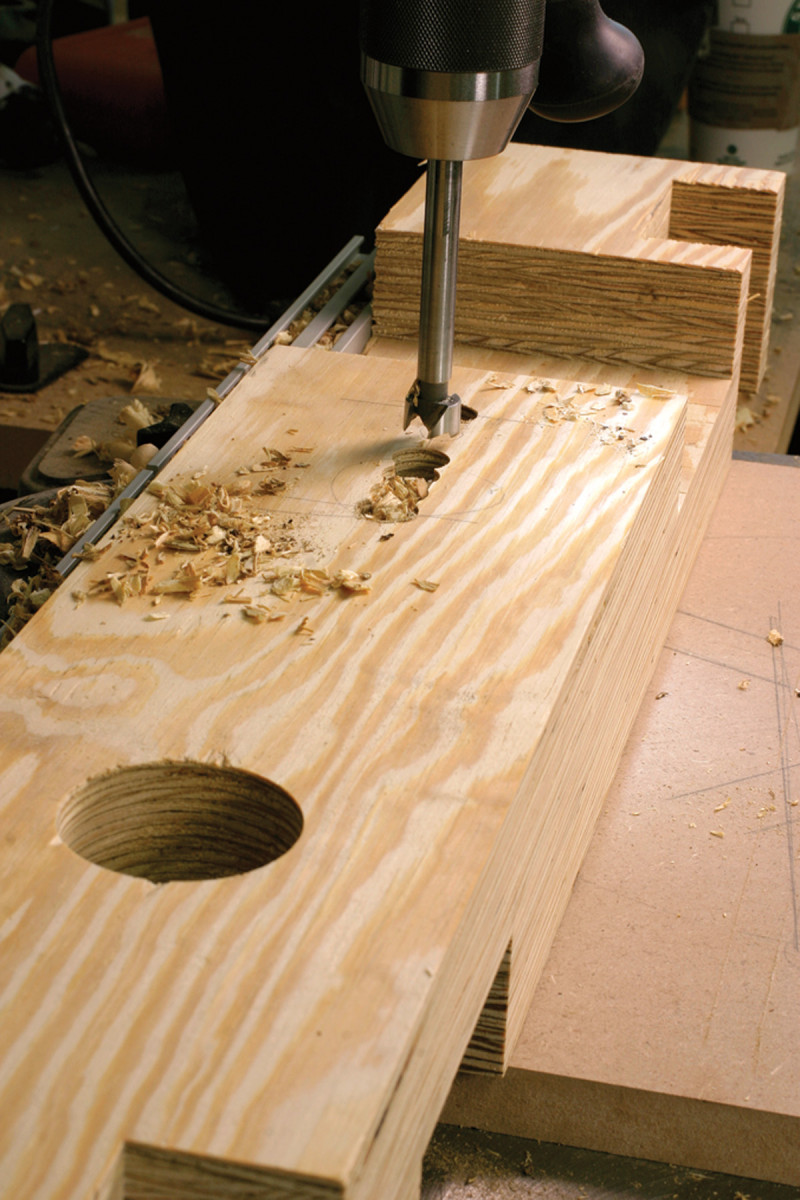
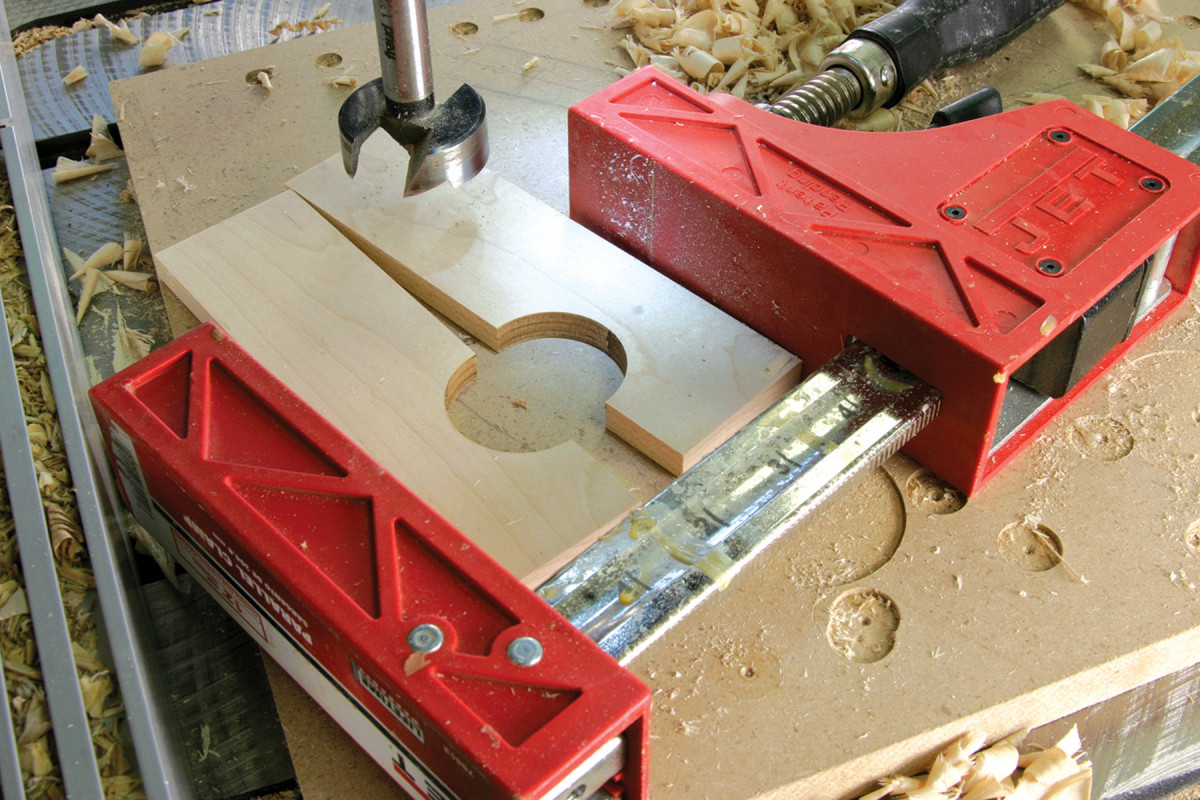
To install the wooden screw, you need to first drill a 2″-diameter hole in the leg for the screw. Then you’ll have to waste away a chunk of the leg to hold the vise’s threaded nut block. Here’s the easy way to make everything line up.
Drill the hole and insert the wooden screw through it. Spin the nut block onto the screw and snug it up onto the backside of the leg. Square up that block with a try square then trace its position on the leg.
Holes to guide you. The through-mortise in the leg allows the parallel guide to pass freely in and out. You don’t need to square the ends of this mortise. Leave them round. The parallel guide is narrow enough to pass through.
Go back to the table saw and waste away the area between those marks. The nut block should fit great and the threaded hole will be lined up perfectly with the hole in the leg.
Before plunging headlong into assembly, you need to make one more critical cut for your leg vise. You need to make a 5⁄8“-wide x 3”-long through-mortise to accommodate the vise’s “parallel guide.” The parallel guide is a length of 1⁄2“-thick wood that is bored with holes and attached to the wooden front chop of your vise.
The parallel guide has a couple important jobs. One, it keeps the chop parallel to the leg. Without a parallel guide the chop can spin and sway. Two, it acts as a pivot point for the chop.
By putting a small rod of metal through one of the holes in the parallel guide it causes the vise’s chop to pivot toward the benchtop when the metal bar hits the bench’s leg.
To use the parallel guide, you just slide the metal bar into the hole that most closely matches the thickness of the work you want to hold in the chop. Then close the jaw. Yes, you do have to stoop on occasion to remove the metal bar, but it’s really not a big deal. Plus, with the metal bar in the hole closest to the chop you can clamp anything between 3⁄8” thick and 7⁄8” thick. That covers a good deal of work.
To bore the through-mortise, set up a fence and a 5⁄8“-diameter Forstner bit at your drill press. Make repeated plunges through the leg until the mortise is clear.
A Too-easy Assembly
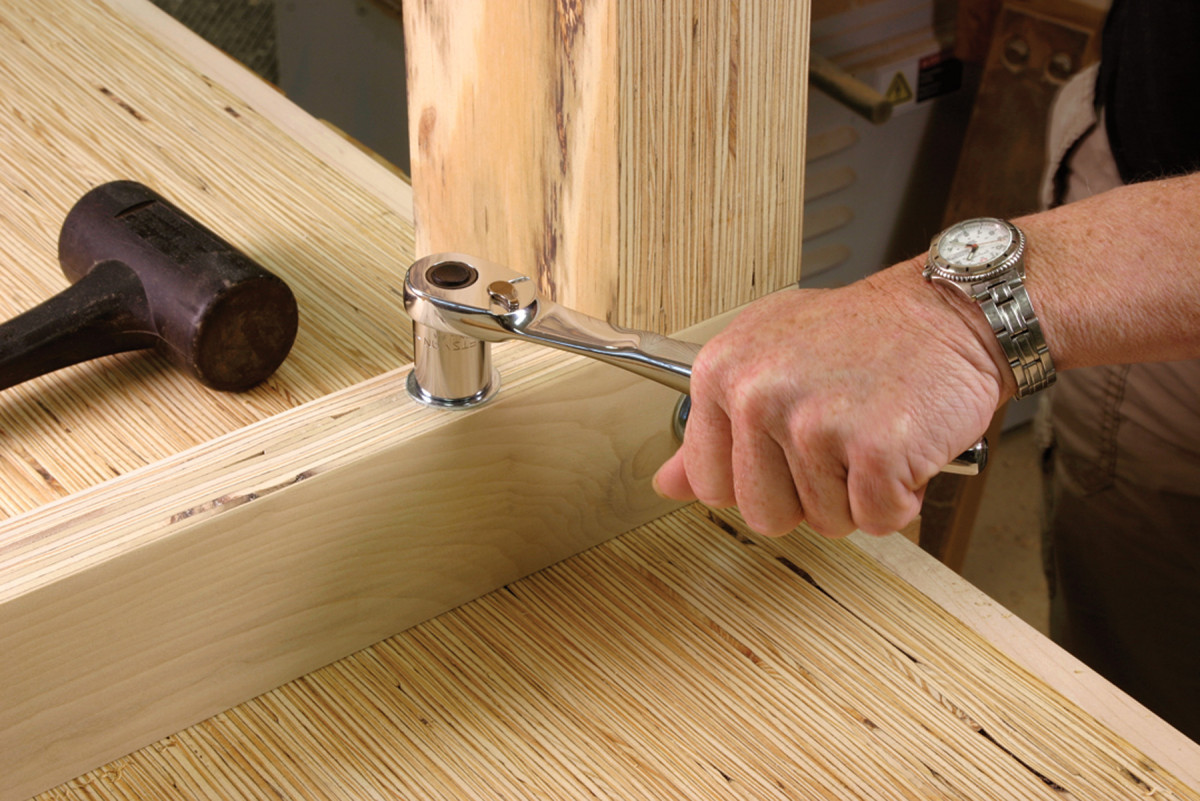
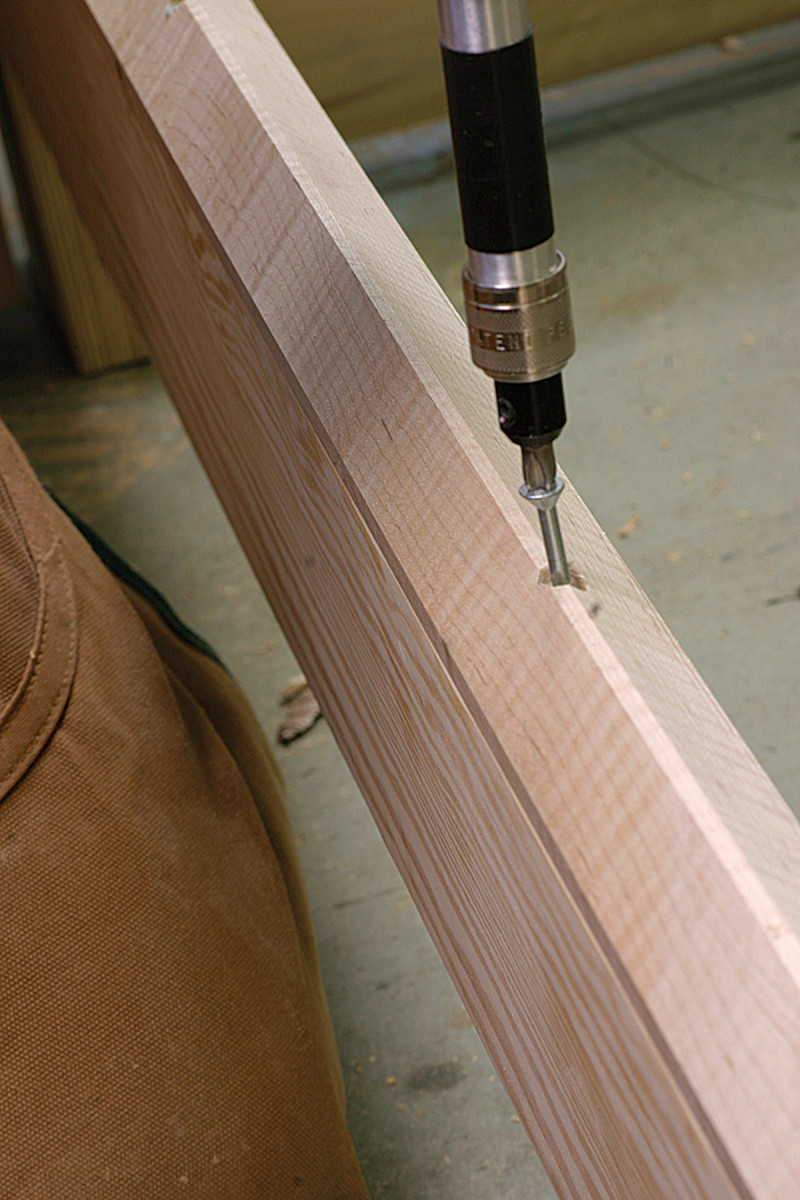
Ratchet to attach it. Use 1⁄2″ lag bolts to secure the base to the top. The pilot hole for the lag bolt should be the diameter of the bolt minus its screw threads.
Now comes the fun part: Assembling the base. First you want to bore 5⁄8“-diameter holes through all the half-laps to accommodate the 1⁄2“-diameter hex-head bolts. Use the drawings as a guide to mark all the holes in the stretchers. Bore these on the drill press. Then place the stretcher on its mate and use a 5⁄8” Forstner bit to punch the location of the mating hole on the leg.
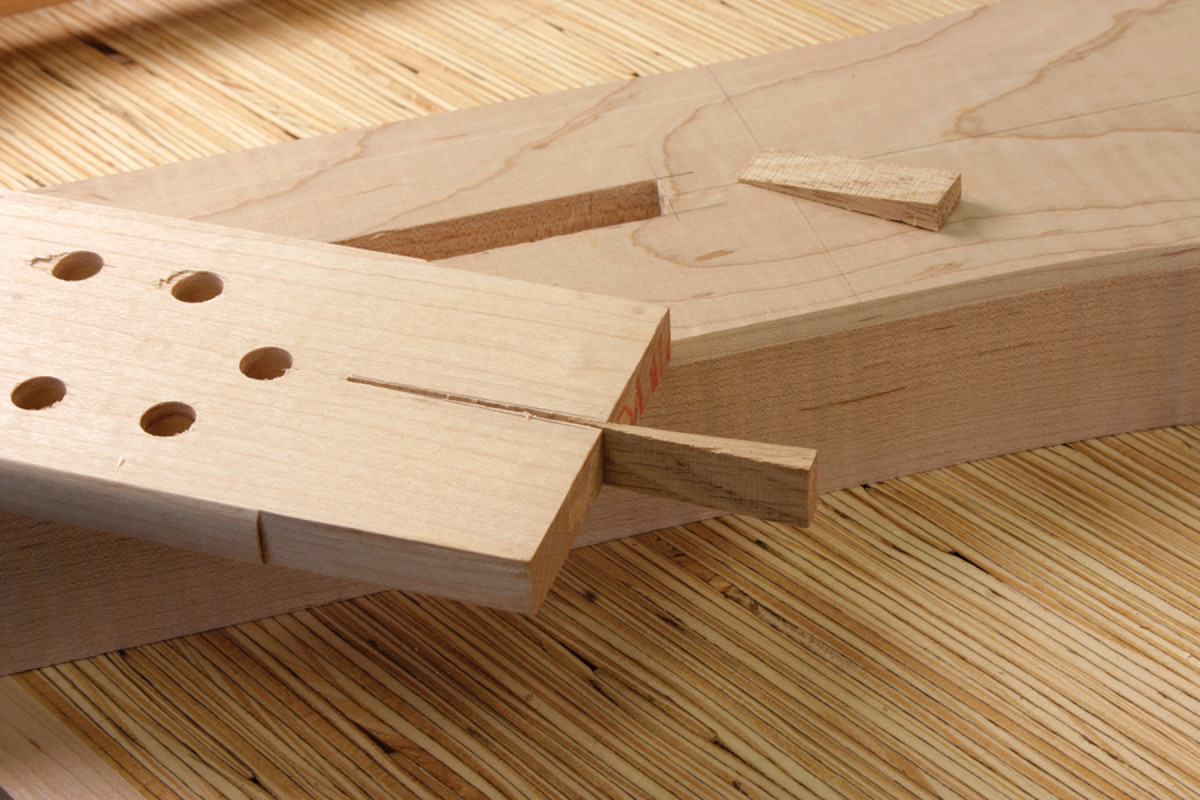
Ready for wedging. Here’s the parallel guide right before we glued it in place and wedged it with a sliver of oak. We cut a kerf down the middle of the tenon to give the wedge a place to go.
Then remove the stretcher and bore the mating hole in the leg using the same bit. You could take an extra step and counter-bore all the holes for the bolts, washers and nuts, but I decided against it. I didn’t want to risk ripping apart the laminations inside the LVL when I tightened the hardware.
One more detail here: You need to bore two 5⁄8“-diameter holes in each top stretcher to attach the base to the benchtop with lag bolts. Make these holes about 6” from each end of the top stretchers.
With those holes drilled, assemble the base.
Getting on Top of Things
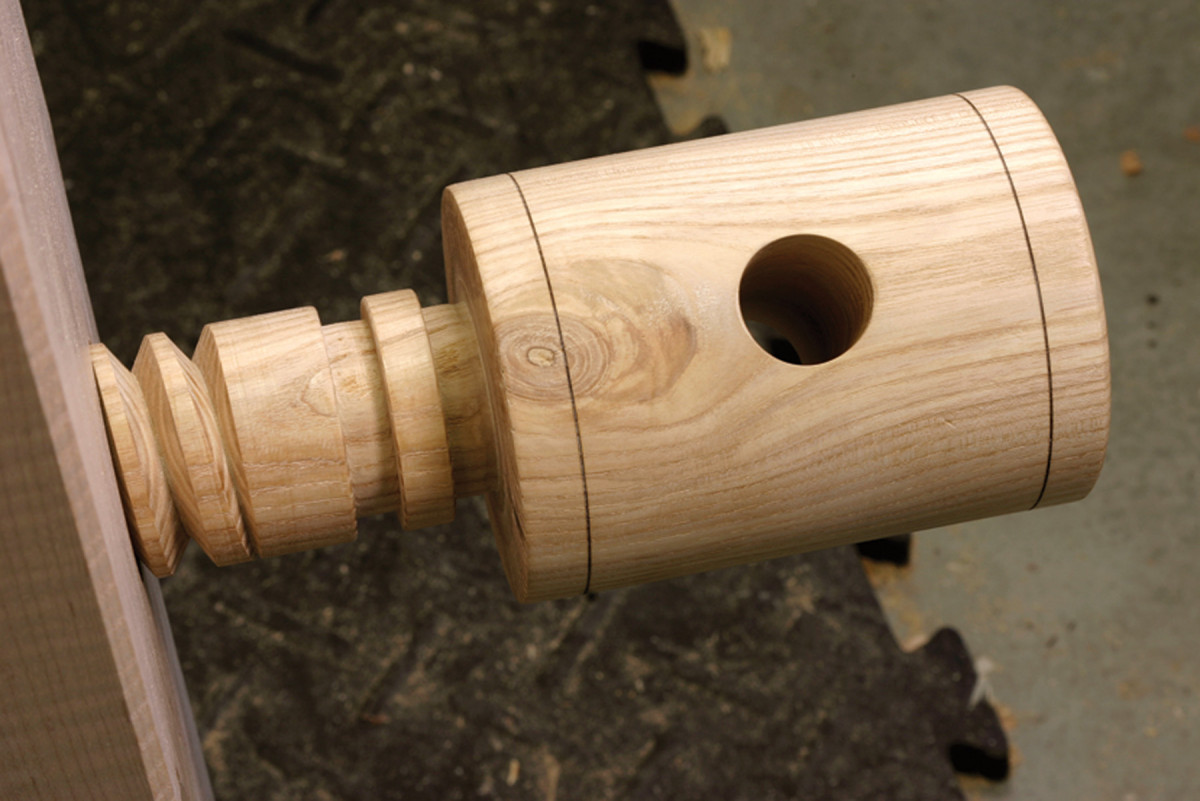
Two garter grooves. This wooden vise screw has two garter grooves. One is by the hub (for exterior garters) and the other is a little bit down the shaft (for interior garters).
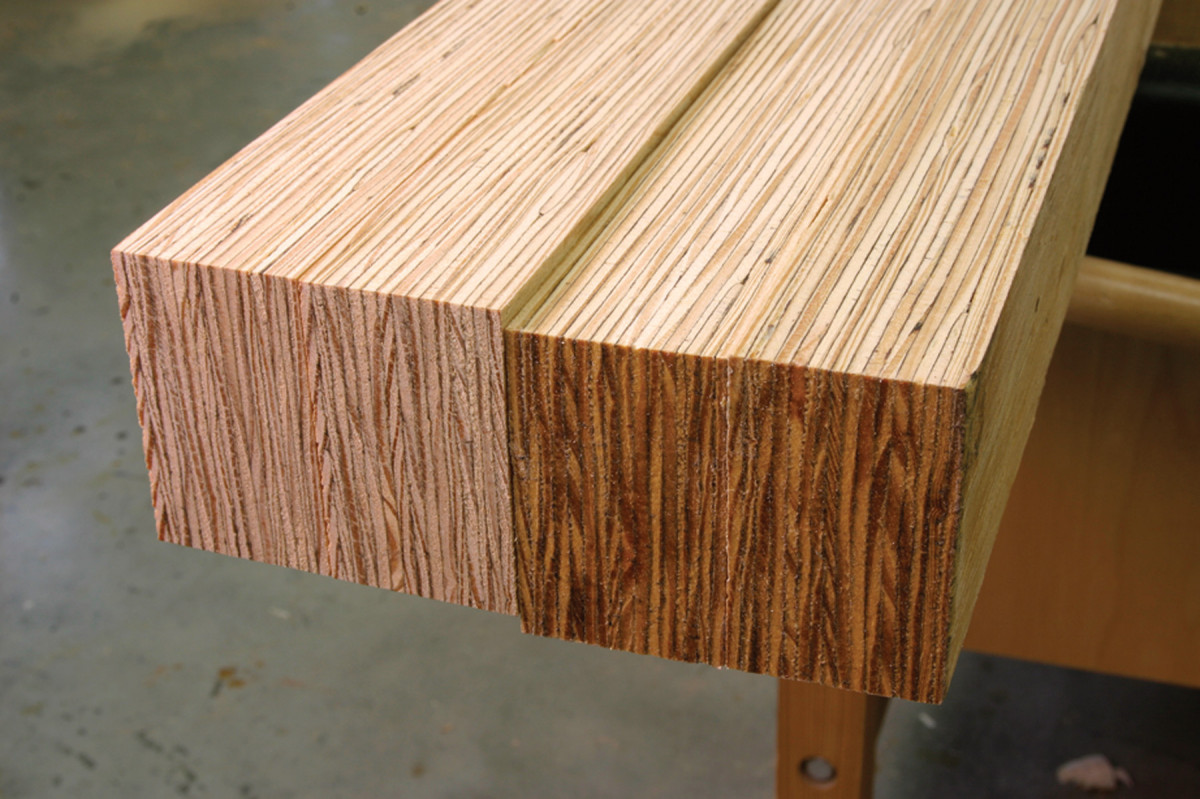
While the LVL top was stiff and the bench’s top looked good, the front and back edges looked like they had a nasty skin disease because of the exposed glue and partial plies. So we decided to laminate strips of solid 5⁄8“-thick quartersawn maple to the front and rear.
We had to rip down the top a bit to end up at the target 24″ width. Except for humping the top up onto the table saw, this was a surprisingly easy operation. We made the maple pieces a little wider and longer than necessary so we could trim them flush after gluing them in place.
Can’t-miss garter hole. Clamp the two halves of your garter together and bore the hole right through them. Our garter hole needed to be 15⁄8″ in diameter to match the dimension of the shaft of the vise’s screw.
Once the maple is glued in place and the adhesive is dry, trim it flush with a plane. Then you can trim the ends of the benchtop to length. This operation was the most difficult machine operation when building the bench.
We trimmed the top using a circular saw and an edge guide. I’ve used a similar setup to trim about a dozen benchtops without incident, but the LVL was a bear to crosscut. It kept deflecting the blade of the circular saw. After four or five attempts we had to switch to a saw with a thicker sawplate to get an acceptable result. This is one place where a thin-kerf sawblade is not your friend.
And Now to the Vises
Garter, disassembled. To assemble the leg vise, drop the vise screw through the hole in the chop and fit the garter in its groove. Screw the garter pieces down and you’re ready to bust some walnuts with your vise.
The vises and sliding board jack are simple work if you do things in the right order. Here’s the first rule: Don’t cut the chop or the board jack to their final shapes until you have to. They are easier to work on when they have long straight edges.
Resists dust. Some sliding jacks run in grooves that are plowed in the lower stretcher. These grooves fill with dust. By making the track for the board jack triangular in section, sawdust won’t interfere with the movement.
To make the leg vise’s chop, first bore a 2″ hole through the chop then thread all the parts together on the assembled bench. Now you want to mark where the parallel guide will attach to the vise chop. Transfer the location of the mortise through the leg to the chop. Then use your drill press to make a 1⁄2“-wide x 21⁄2“-long through-mortise.
Wear a dust mask. When you rout LVL, the misery begins. The stuff kicks up a lot of stinky, fine, super-nasty dust. Wear a good dust mask, even if you normally throw caution to the wind.
Square up the corners of the mortise then fit the parallel guide into the mortise. The goal here is to shave the thickness of the guide so it fits tightly in its through-mortise. And to trim the width of the guide so it runs smoothly in the through-mortise in the leg. This takes a little massaging.
Once you get the tenon and mortise playing nice, you can bore the array of 3⁄8” holes in the parallel guide. The holes are on 1″ centers and the two rows are offset by 1⁄2“. The first hole in the middle of the parallel guide is 5⁄8” from the tenon’s shoulder. This is the hole you will use the most. Then cut the ogee shape on the back of the guide and cut your chop to its final shape.
Glue the parallel guide in place and wedge it. We used liquid hide glue here because it is reversible (just add heat and moisture). That’s always a good idea when dealing with a part that might need to be replaced some day.
A Garter for the Leg Vise
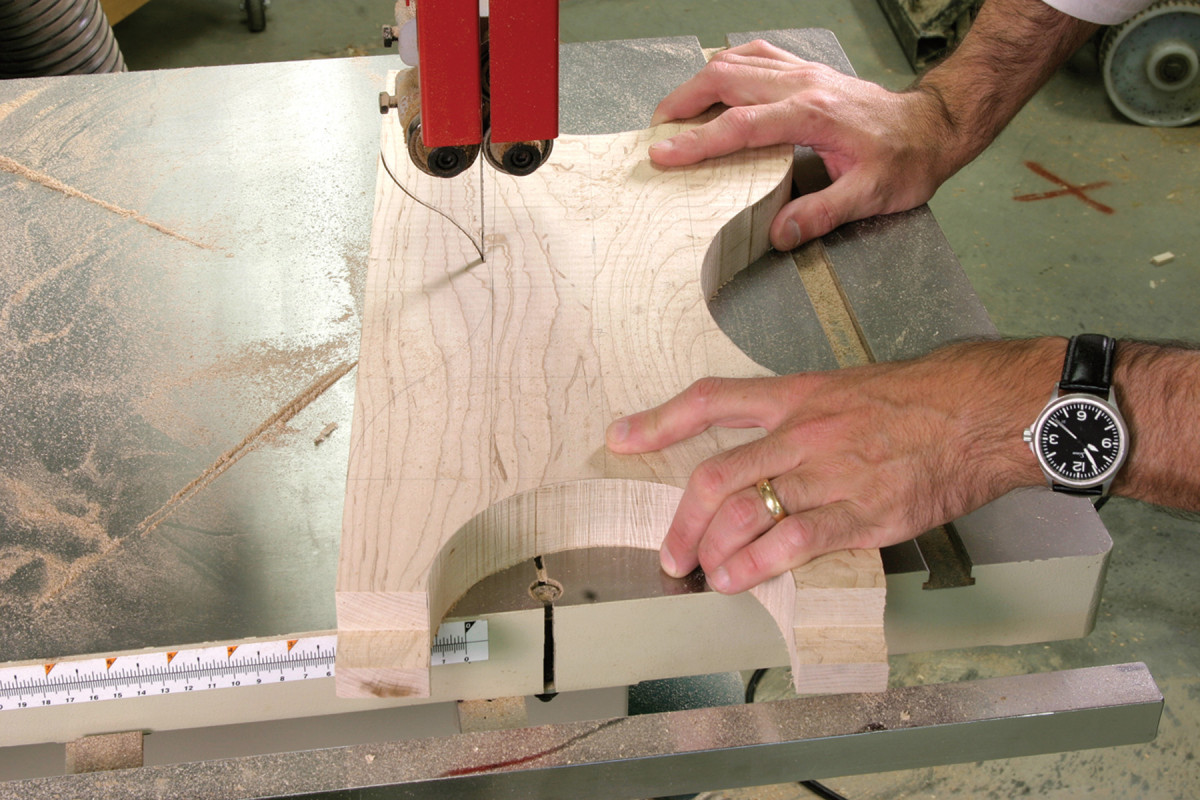
Cutting curves. These curves actually are more than eye appeal. They are convenient places to grab the board jack to slide it or to sneak a clamp into.
The job of a vise garter is to lock the vise screw and the vise chop together, allowing them to move in and out in tandem. Usually you need to add a garter if you are using a wooden vise screw – metal vise screws have this function built into their casting.
You can use a vise without a garter, but it’s not as convenient because you’ll sometimes have to manually pull the vise chop away from the workbench after you release the screw’s tension on your work.
There are two basic kinds of garters: Interior garters and exterior garters. Both work the same way; the only difference is in their location. Exterior garters are mounted on the surface of the vise chop. Interior garters are driven into a mortise in the vise chop that intersects with the hole for the vise screw.
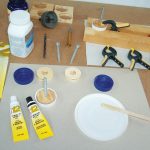
How do they work? Let’s look at some photos. The photo below shows the ash wooden vise screw from BigWoodVise.com. See the two grooves on the shaft? One is right up against the hub, and the other is a little ways down the shaft. The groove next to the hub is for exterior garters. The other groove is for interior garters. So this vise screw will work either way.
We’re using an exterior garter for this leg vise (I think they’re easier to install), so the first step was to plane down some hard maple so it fit easily into the garter groove. These grooves are about 3⁄8” wide.
Then we cut the garter stock to width (33⁄4“), ripped it in half and bored a 15⁄8” hole through the middle while the pieces were clamped together, then cut it to length.
Now assemble the leg vise. Put the garter around the groove and drop the screw into the vise chop. Then screw the garter to the vise chop. Don’t use glue – you want to be able to remove the garter for repairs to the vise someday.
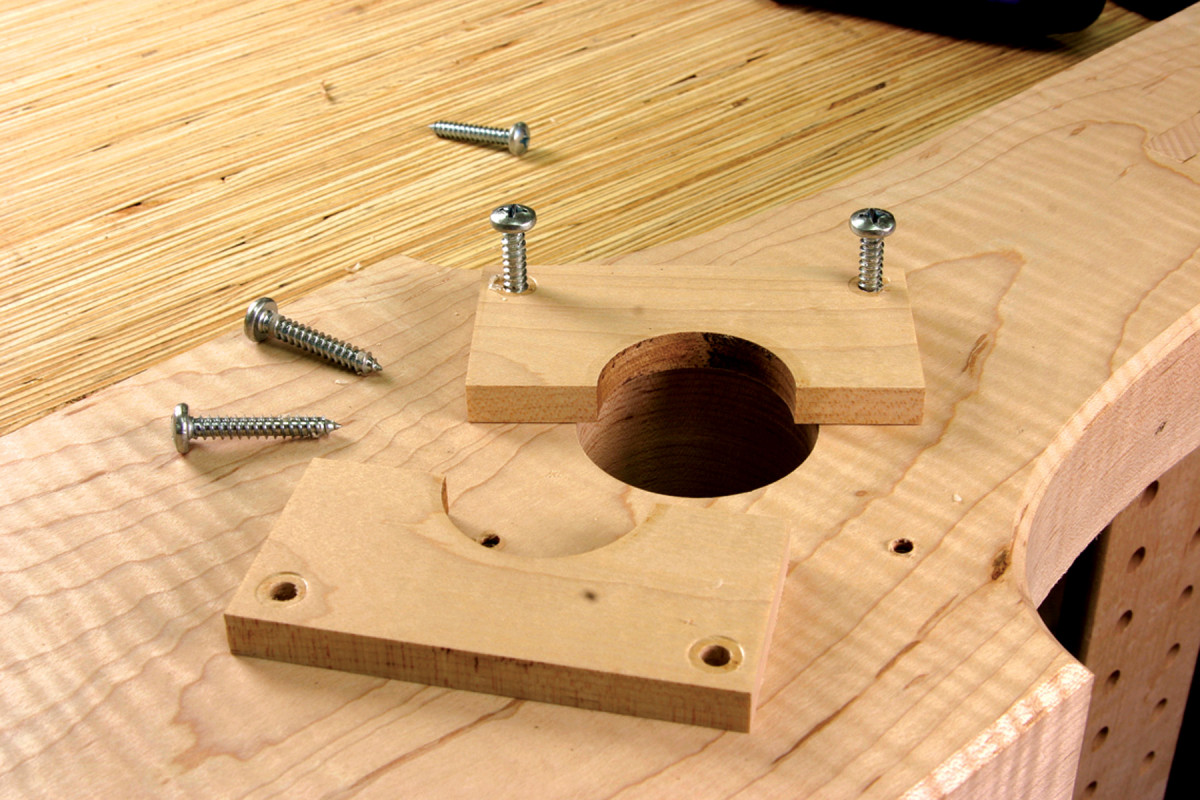
The photo above right shows how everything locks together. You can see the 2″ hole through the vise chop, the two halves of the garter and the 15⁄8” hole that is created when the garter is screwed down.
To complete the leg vise, screw the threaded nut block to the leg. We used deeply countersunk 3″ screws.
The quick-release vise on the opposite end of the benchtop is easy to install. If you bought the vise listed in the Supplies box from Lee Valley, it should be a simple job with no shimming. Place the vise at the end of the benchtop and install it with lag bolts (which is OK) or with hex-head bolts, washers and nuts that go through the benchtop (which is permanent).
The Sliding Board Jack
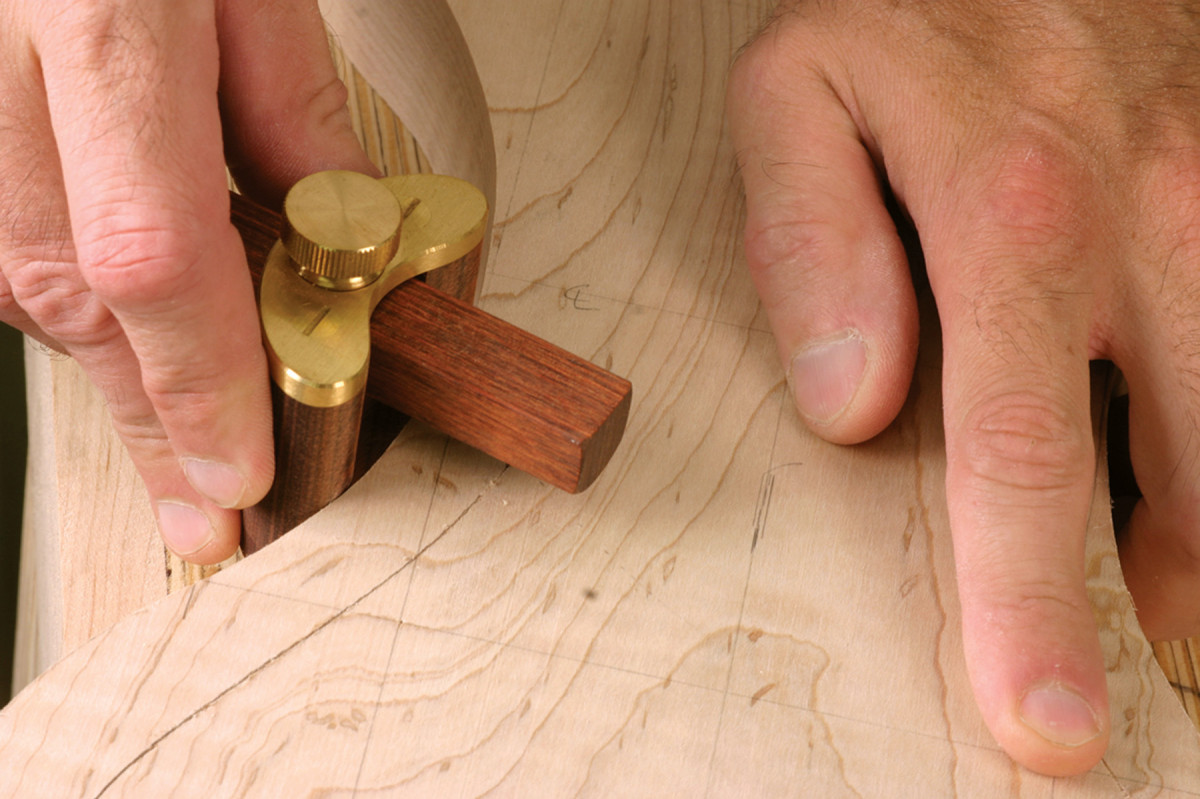
A special marking gauge. Because I do a lot of work with chairs, I have this marking gauge with a special fence that allows it to follow curves. If you don’t have a gauge like this, it’s easy to modify your standard gauge. Take some 3⁄4″ dowels, plane a flat on them and glue two short sections to the back of your fence. Turn your fence around and you’ll have a gauge that does two operations.
Some people call the board jack a “deadman,” but because this is Megan’s bench we’ve been calling it the “deadwoman.” The job of the deadwoman is to help you clamp things on edge, whether it’s a single board or an assembled panel or door. You can place a simple peg in one of the holes to support your work from below. Or you can use a clamp if you need things immobilized.
The deadwoman slides freely across the front of the bench. The bottom of the deadwoman perches on a piece of maple that has a triangular top. The top of the deadwoman has a tongue on it that fits into a groove in the underside of the benchtop.
Begin work by ripping two 45° bevels on the long edge of a wide piece of 8/4 maple. Then set the sawblade to 90° and rip the triangular part free. Screw it to the front stretcher of the bench.
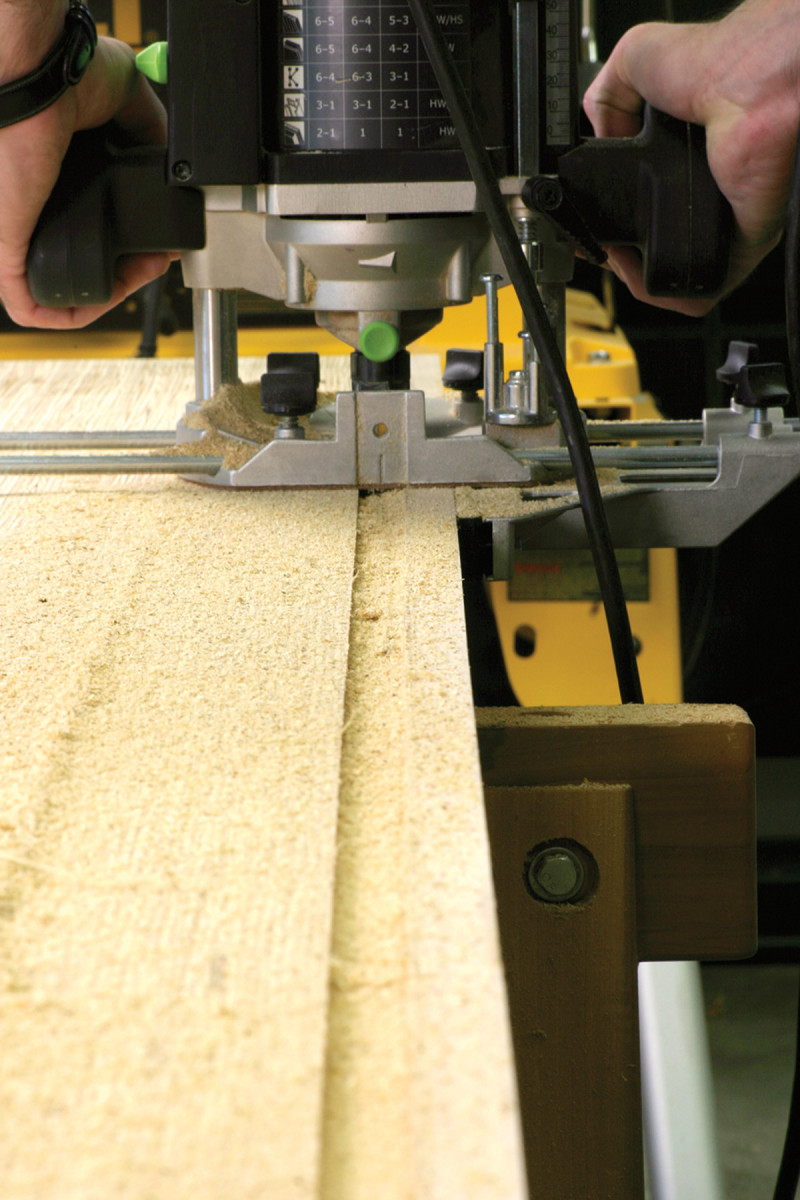
Now cut the complementary triangular shape on the bottom of the deadwoman. We cut this shape using a miter gauge and the blade tipped to 45°. With those two pieces fitting, cut the groove in the underside of the top. This groove is 3⁄4” wide and about 1″ deep. We routed it using a plunge router, a 3⁄4” spiral upcut bit and an edge guide. The LVL is tough stuff to rout, so take it easy.
With the groove complete, you can cut the matching tongue on the top of the deadwoman. The easiest way to do this is by using a dado stack in your table saw and a miter gauge.
Then you can lay out and cut the curvy shape to the deadwoman. This ogee shape is based on historical forms I’ve seen, but you can choose any shape you like. Even just a straight (boring) board will do the job.
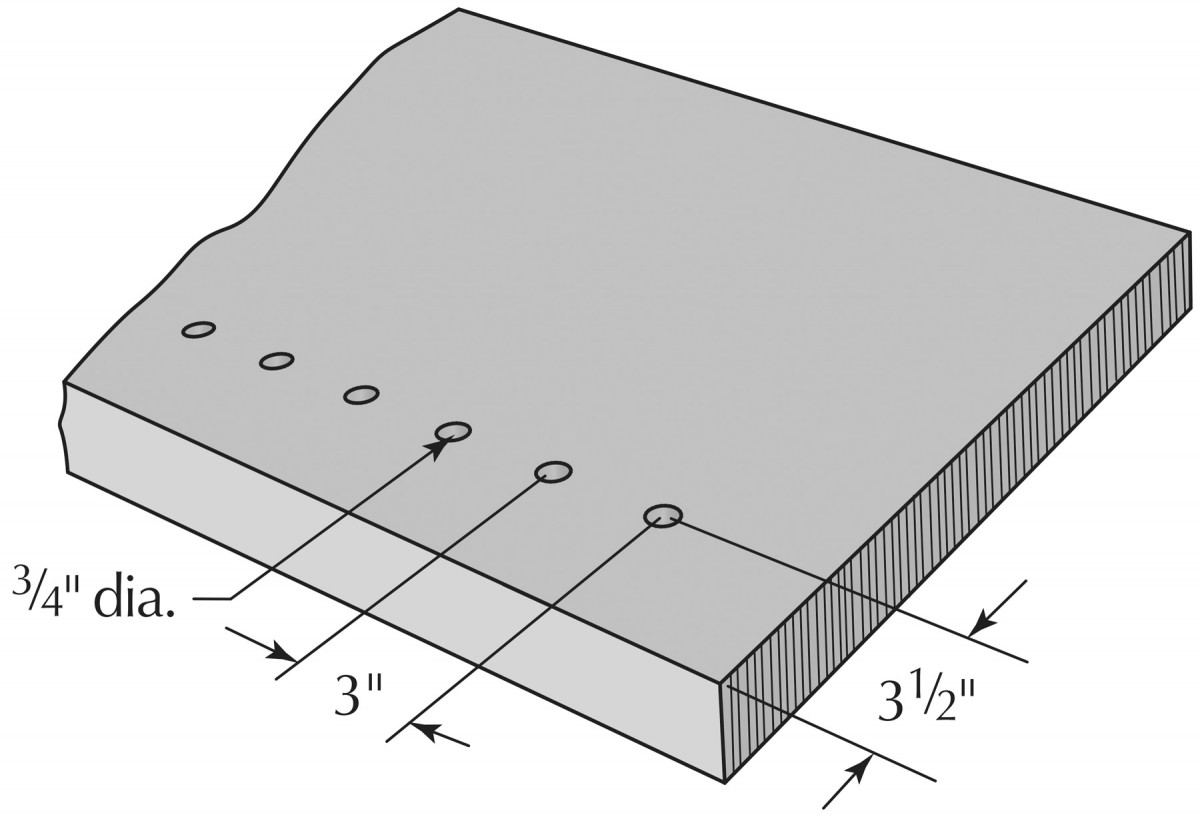
Lay out the 3⁄4” holes in the deadwoman using a marking gauge and dividers. The two rows of holes are offset (like the holes in the parallel guide). The number of holes and their spacing depends on how tall you are making your bench. In our example, these holes are about 21⁄4” apart.
The last bit of boring work is to make the holes in the top for dogs and holdfasts. The row of dogs along the front edge is in line with the metal pop-up dog in the quick-release vise. The holes are on 3″ centers. That’s a lot of holes, but you’ll be glad you have all those holes as you use the bench. Most people bore too few.
Holdfast holes, however, are another matter. You only need a few well-placed holes to work along the back of your workbench (which is where holdfasts do a lot of work). The reach of the holdfasts is about 9″, so put the holes on 18″ centers and line them up with the holes for the dogs.
We routed all these 3⁄4” holes with a plunge router and a plywood template. It plunged almost deeply enough to make it through the top. So we had to finish off each hole with a little drilling.
Flattening and Finishing
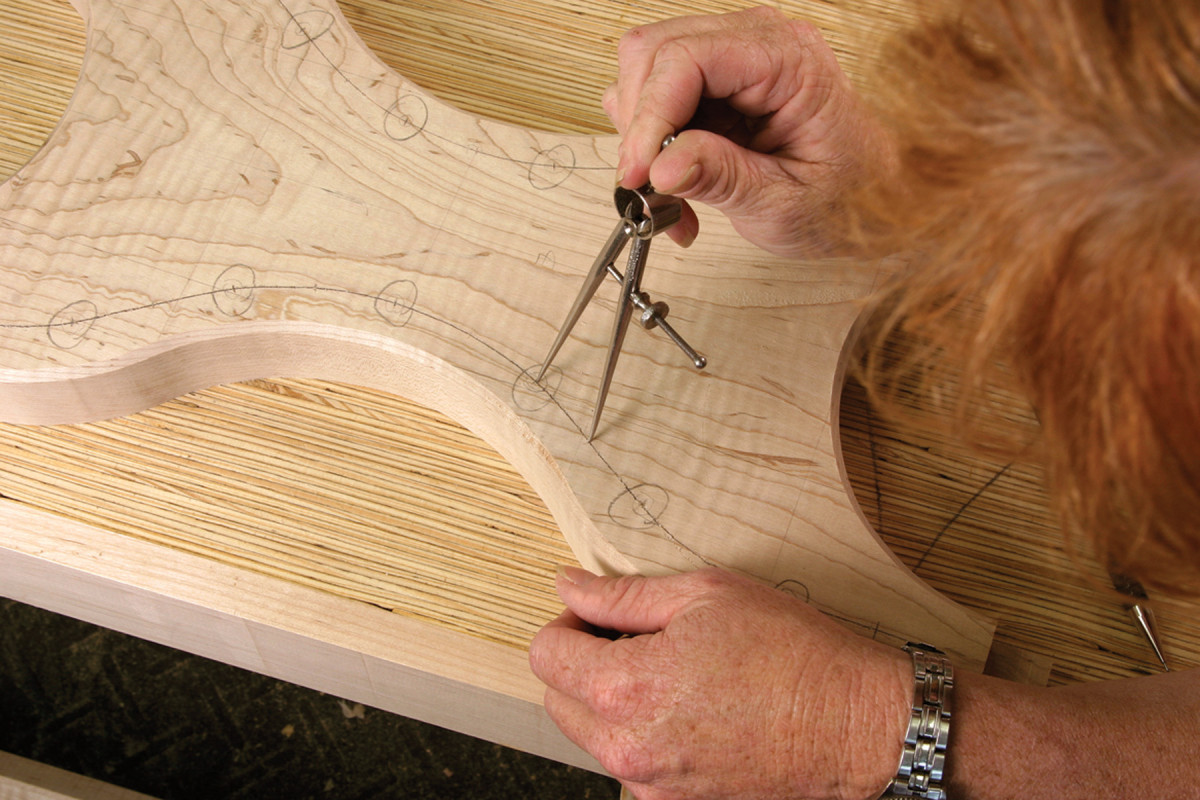
Walk it off. Dividers are the absolute best way to space the holes in the deadwoman. To offset the holes, simply bore a hole at every other mark left by the dividers.
We flattened the benchtop using handplanes, which had no problems with the adhesive in the LVL. That was a pleasant surprise after all the nasty router dust. We’ve posted an online tutorial on how to flatten your benchtop with handplanes on our web site (you can link to it from popularwood
working.com/nov09). If you prepared your top with care, flattening it should take only about 30 minutes.
As far as finishing the workbench, there are a lot of recipes out there that we’ve tried. The goal is to protect the bench from glue and spills, but not to make it slick. A glossy film finish can make your work slide around too easily.
We prefer a simple boiled linseed oil and varnish blend (such as Watco or something we mix ourselves) for the top and vises. You can wipe on a couple coats and be done with it. The linseed oil helps resist water in glue and the varnish provides a little bit of a barrier against spills. And the finish won’t be slick.
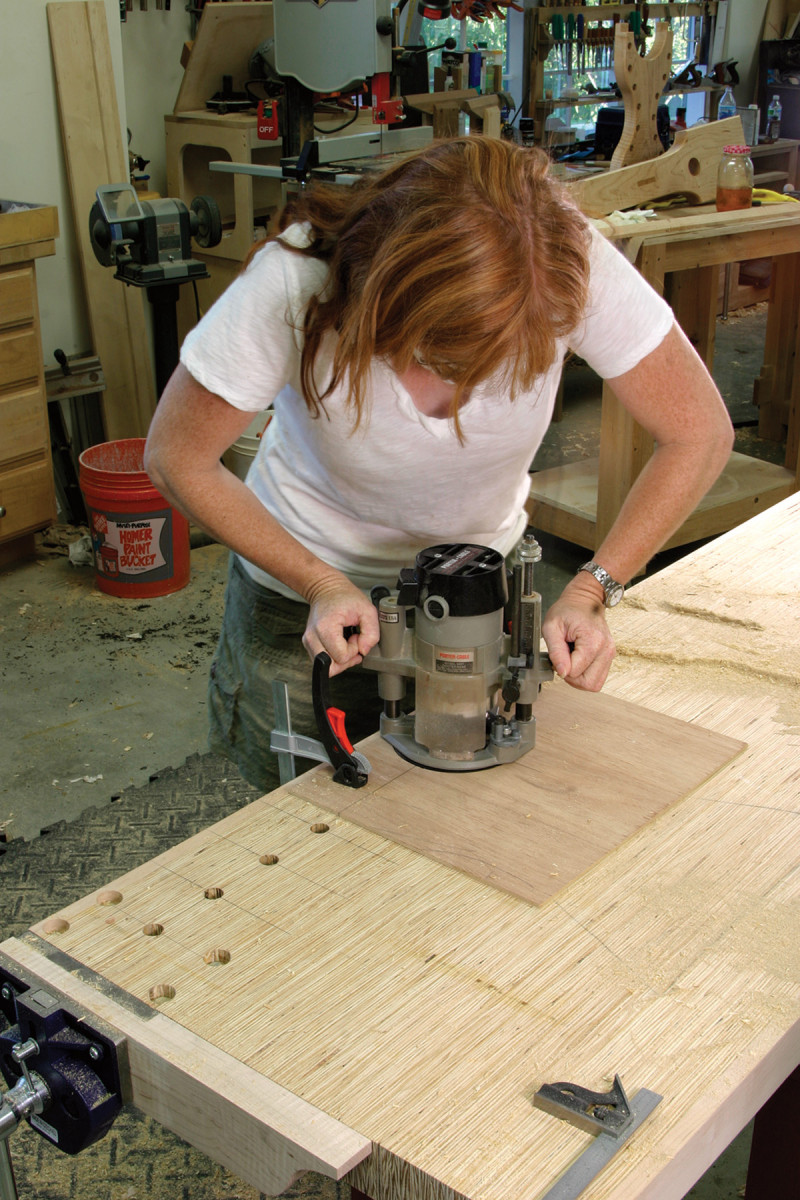
More nasty dust. The 3⁄4″ upcut spiral bit and template makes short work of this operation. Lay out all your holes on the benchtop, then position the template and make your plunge. The template is marked with crosshairs that align things with your layout marks.
We painted the base using red milk paint. Milk paint is durable and easily covers the LVL. The first coat looked great. The second coat looked even better. And a couple coats of wax deepened the color.
All in all, we’re pleased with the bench, both with the way it comes apart and the way it functions. The test ahead will be to see how the LVL holds up. How sensitive will it be to the seasonal changes in humidity? How easy will it splinter or dent when bashed?
After working with the material, I have high hopes. Perhaps next year Megan will weigh in on how well her bench is faring and we’ll be working more with LVL. If, however, you spot her browsing the Sjöberg benches at the local Rockler … . PW
Supplies
8 ■ hex-head bolts: 1⁄2” x 31⁄4“, plus washers and nuts
8 ■ hex-head bolts: 1⁄2” x 5″, plus washers and nuts
4 ■ lag screws: 1⁄2“ x 5″, plus washers
4 ■ hex-head bolts or lag screws to attach end vise, 3⁄8“ diameter
1 ■ Lee Valley small quick-release vise
1 ■ Veritas Hold-down 05G14.01
Click here to download the 3D Google SketchUp Model of Megan’s LVL Workbench.
Click here to view a video of Glen Huey’s method of drilling bench dog holes.
Here are some supplies and tools we find essential in our everyday work around the shop. We may receive a commission from sales referred by our links; however, we have carefully selected these products for their usefulness and quality.