


We may receive a commission when you use our affiliate links. However, this does not impact our recommendations.
Use vital hand-tool techniques to build storage for your saw collection.
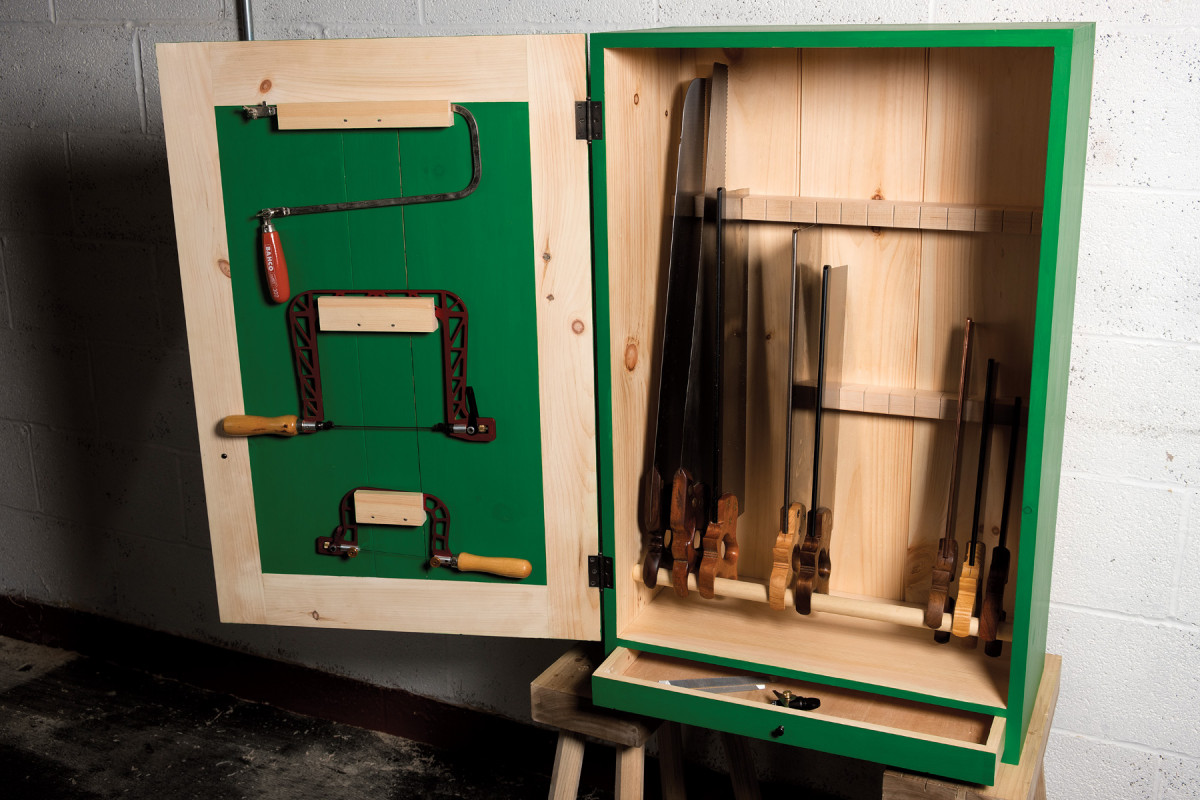
Gazing into my Anarchist’s Tool Chest and realizing my saw till was bursting at the seams, I had to face a sobering fact: I was in the grip of a backsaw addiction. I had two choices. Either I could trim my collection down to the regulation issue three backsaws – dovetail, carcase and tenon – or I could build a wall-mounted saw cabinet to hold my full collection.
This project was the result of choosing option number two. The bonus? Building the cabinet provided the opportunity to use many of my saws, with an emphasis on dovetail, dado and mortise and tenon joinery.
Materials and Design
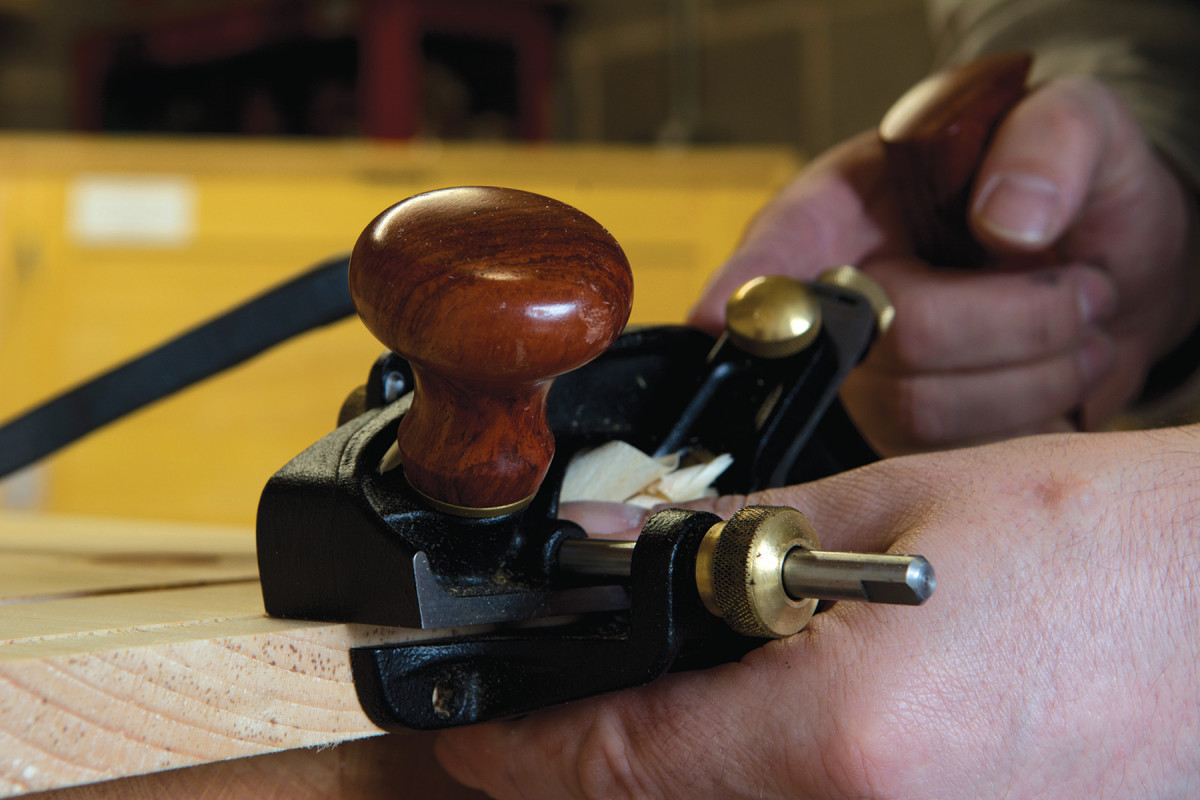
Rabbets by hand. A rabbet or moving fillister plane makes quick work of the rabbets for the casework.
I built my saw cabinet out of what is sold in the UK as Canadian yellow pine (Pinus strobus, aka Eastern White Pine) as it is lightweight, strong, and dimensionally stable. Other similar softwoods would be appropriate, and hardwoods would also be fine although you may want to beef up the French cleats to account for the extra weight of a hardwood cabinet. The kerfed blocks which capture the saw plates are hard maple, to provide wear resistance, while the rail on which the saw totes rest is a length of 1” hardwood dowel of the sort most timber yards and big box stores sell. You could, of course, turn your own rail if you have a lathe and want some extra practice. See the cut list at the end of this article for the components.
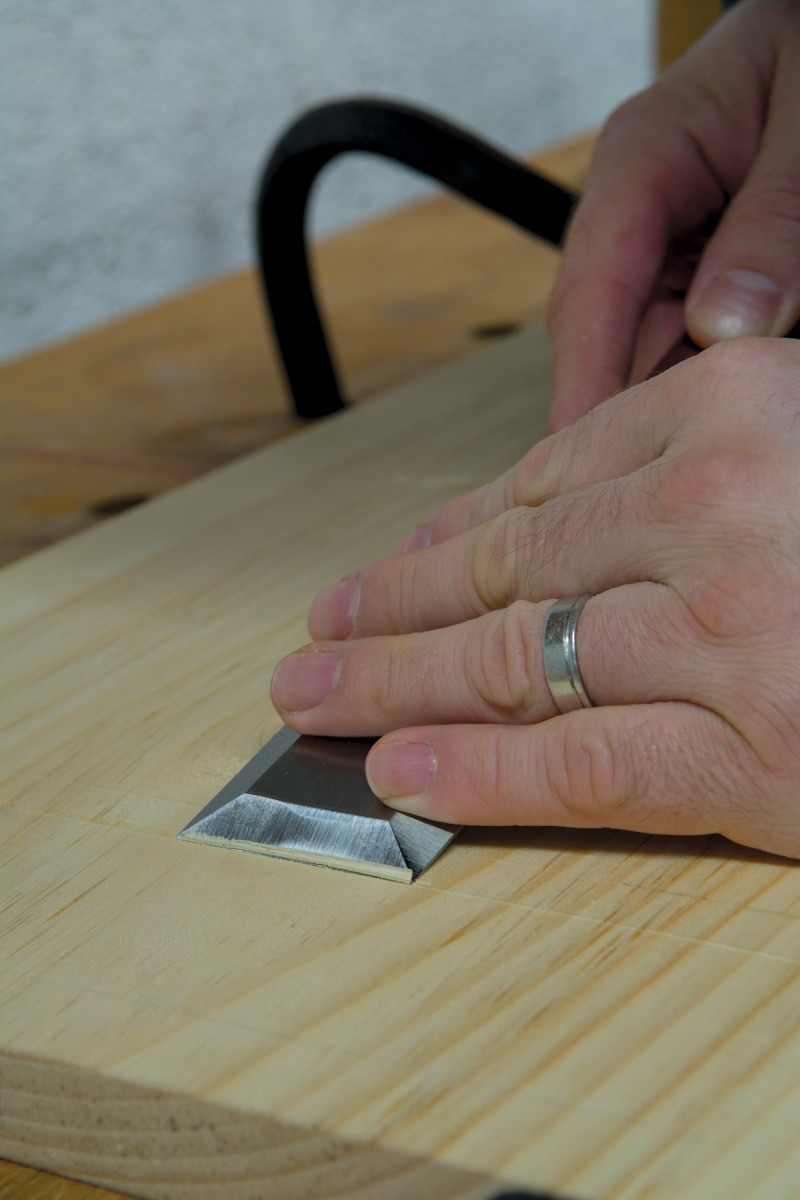
Saw guide. For a first-class saw cut, pare a channel into your knife line to guide the saw.
This design will accommodate 14 saws, including full-sized 28″ handsaws; if you want to store a 30″ mitre saw then increase the length of the sides. Saw totes can vary in size, and while the rail holds all of my saws so that they do not rest on the partition below you might want to start by laying your saws on a full-sized drawing to make sure that your particular saws will not bottom out on the partition.
Joinery
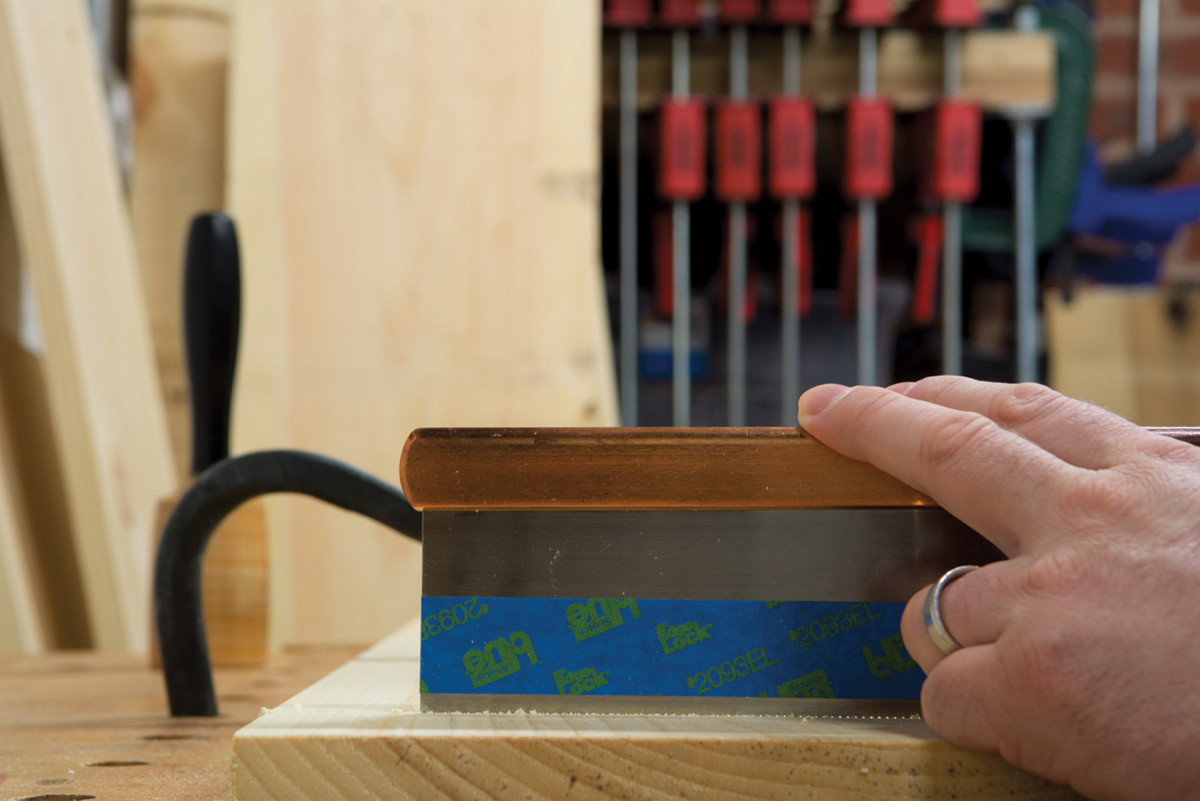
Light pressure. Gently resting your fingers on the back of the saw keeps it from jumping out of the cut.
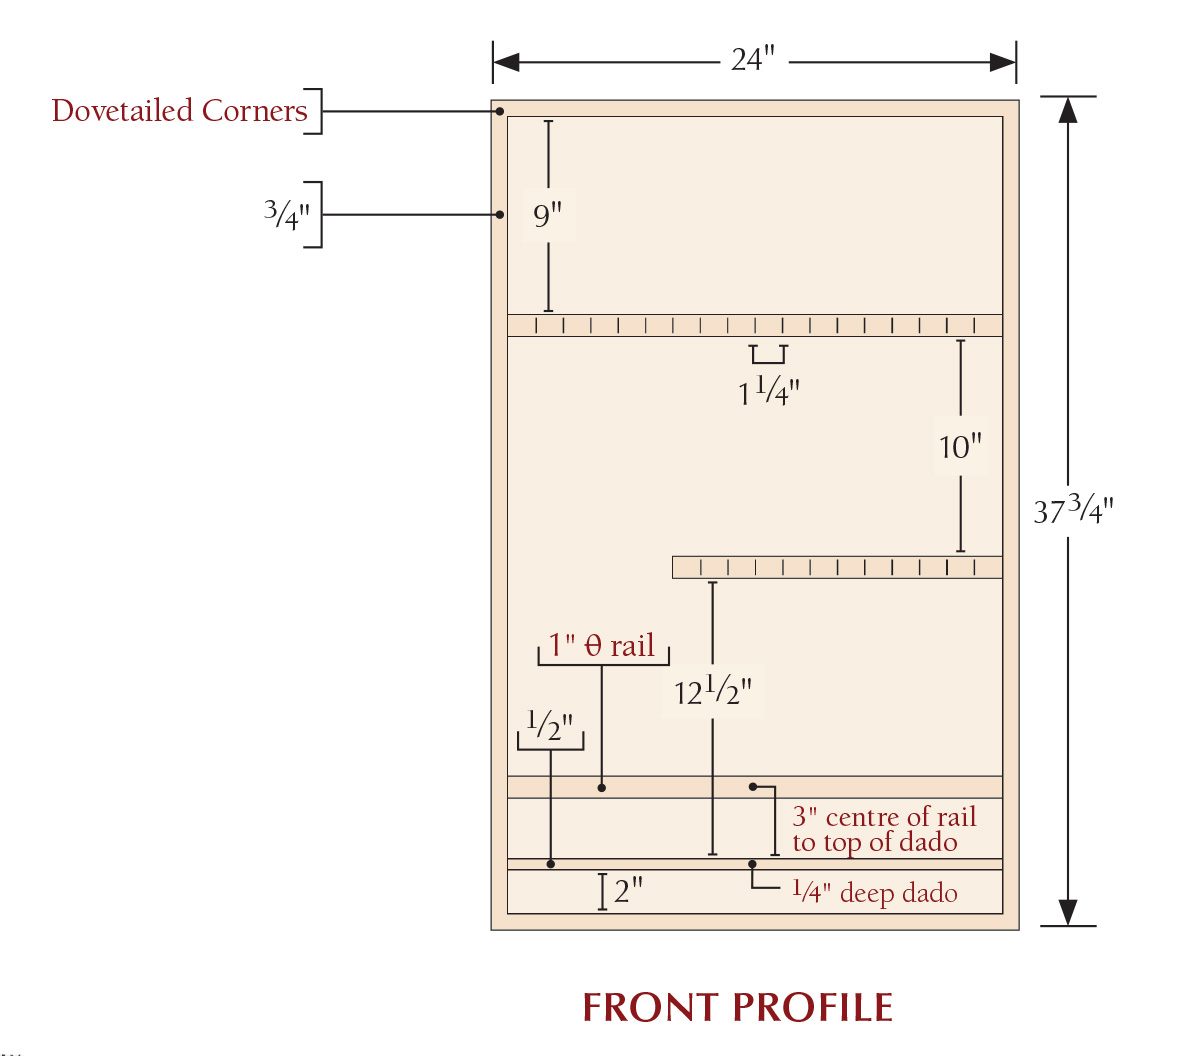
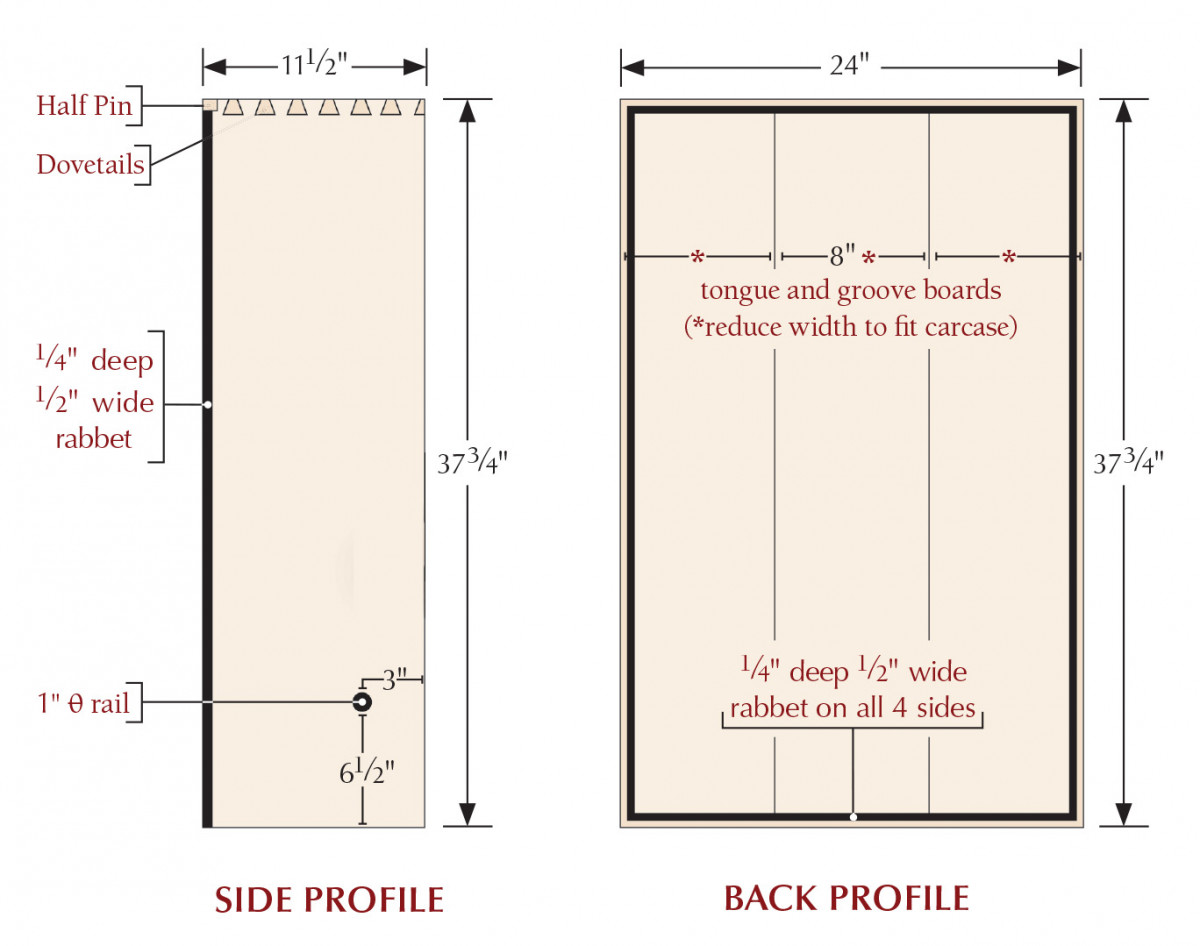
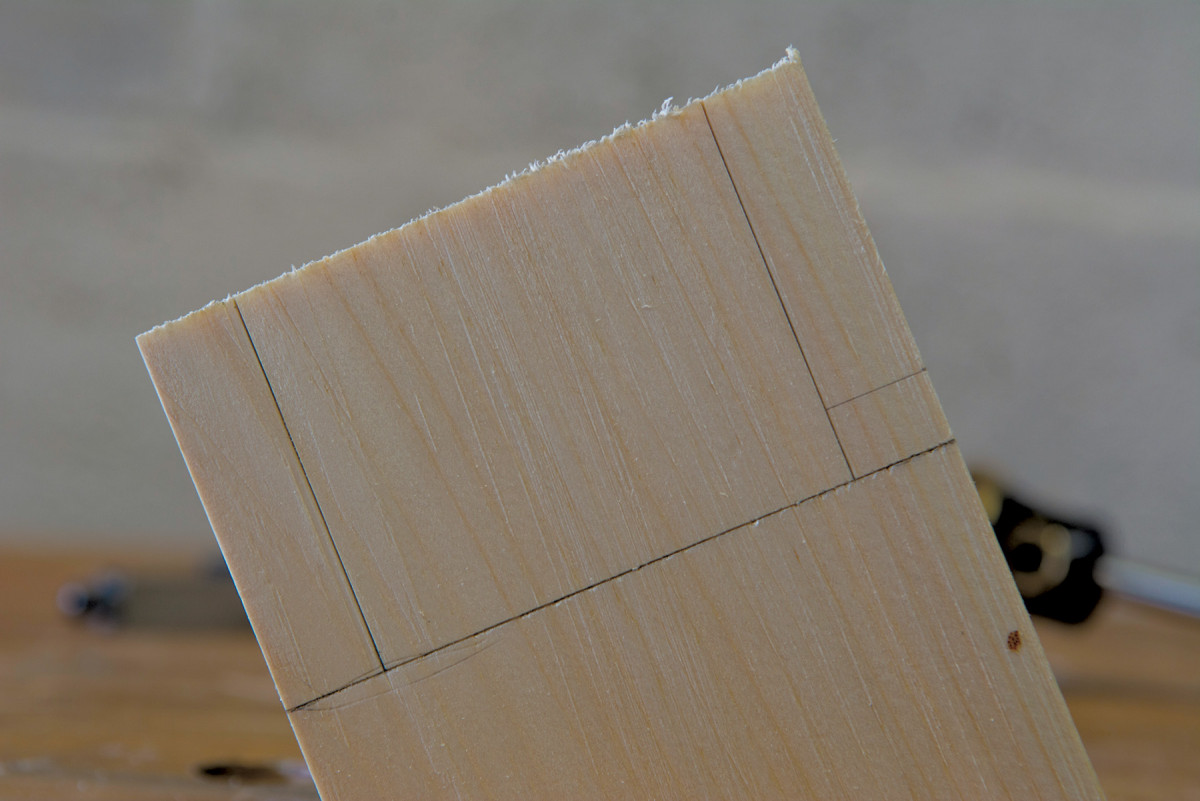
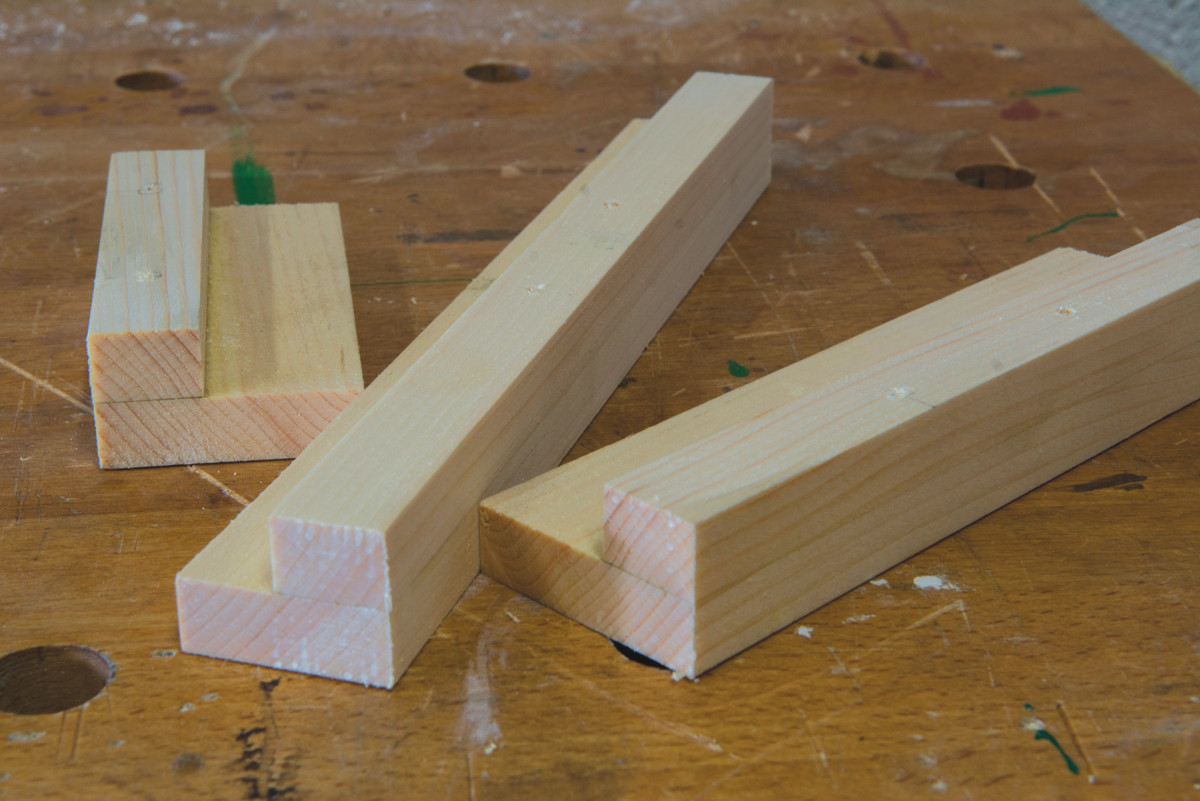
The casework is joined by through-dovetails at each corner. There are a number of steps before you are ready to dovetail. First, plane a 1⁄2” wide, 1⁄4” deep rabbet on the rear edge of the sides and ends to accept the tongue and groove backboards. Next, layout the dado for the partition separating the drawer from the main body of the till. The dado is 1⁄2” wide, 1⁄4” deep, and situated 2 3⁄4” from the bottom edge of the carcase sides.
There are several ways to cut dados, and here is how I do it. Lay out the sides of the dado with a sharp marking knife. Deepen the knife line with a wide chisel (I use a 2″ butt chisel) and then pare into the chisel line from the waste side, to provide a v-shaped groove deep enough for the set of your saw to be below the surface of the workpiece. This groove will guide your saw and is known as a “first-class saw cut.” Cut the walls of the dado with a fine crosscut saw, gently resting fingers of your off-hand on the toe of the saw to keep it in the cut. Chisel out the majority of the waste and clean up the bottom of the dado with a small router plane, working from both ends to the middle.

Production work. Gang cutting the tails makes for efficient dovetailing. Cutting the same side of each tail helps keep a consistent angle, before cutting the opposite side of all of the tails.
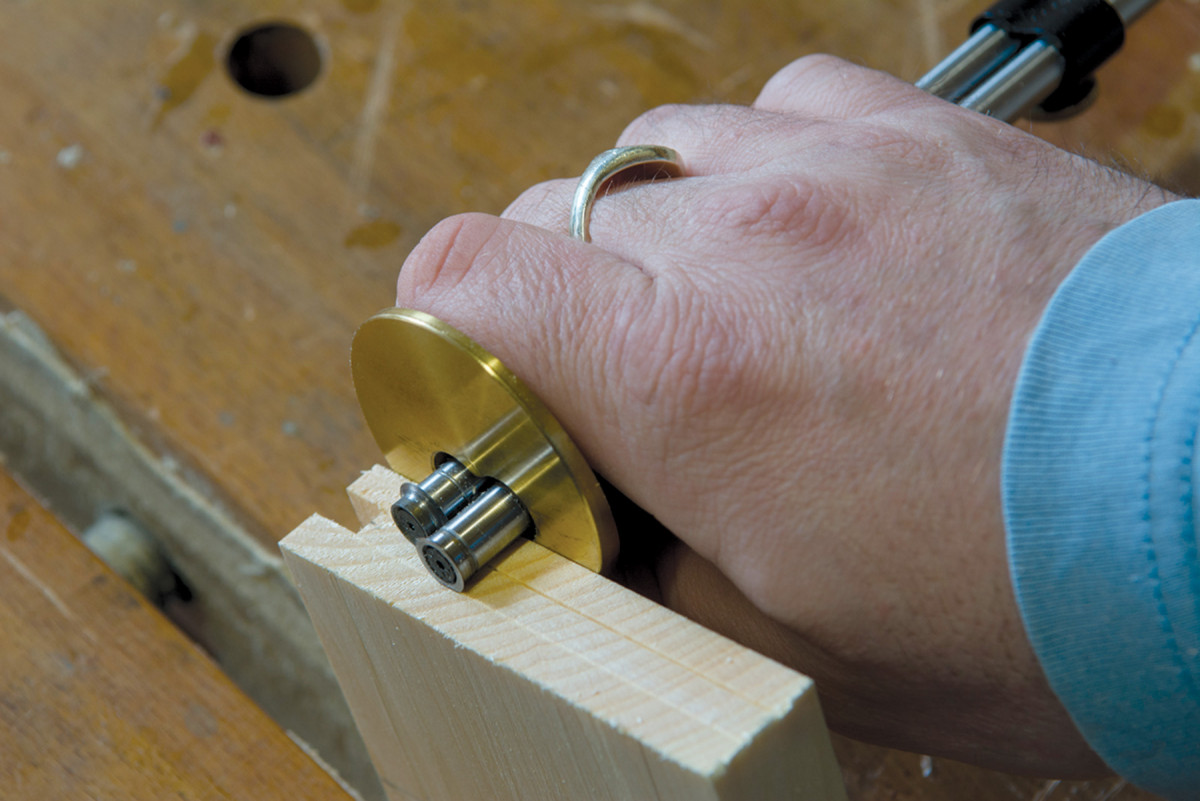
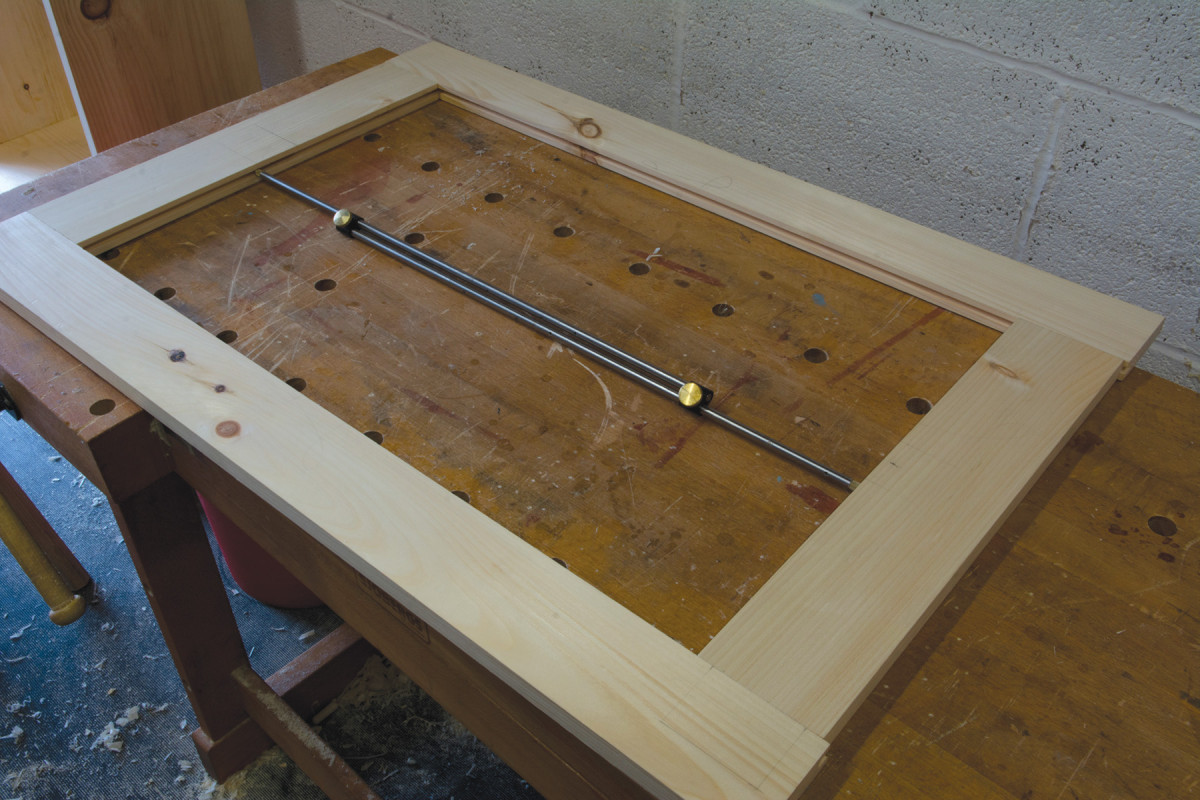
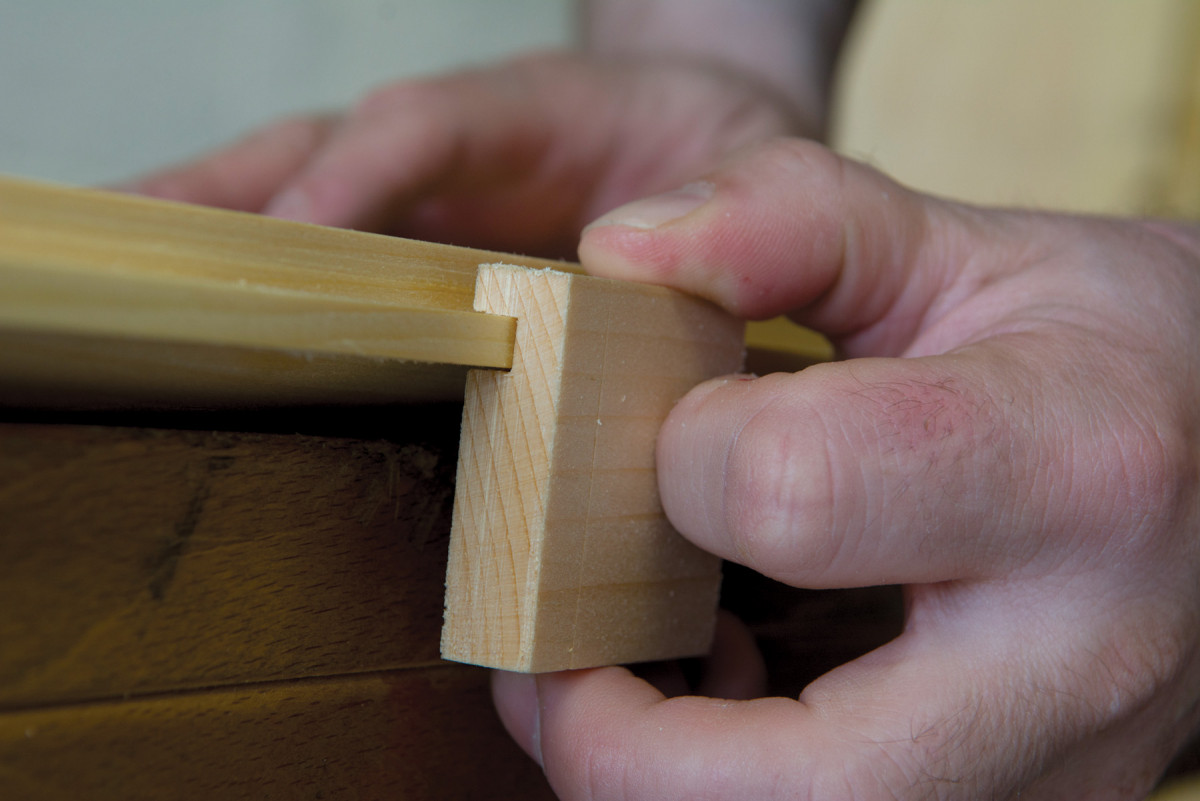
Finally, drill a 1″ diameter mortise in the sides to accept the rail on which the saw totes will rest. This mortise is 6″ from the bottom, and 3″ in from the front edge of the cabinet. Clamp both sides together and drill through them at the same time to ensure that the mortise lines up.

The captured half pin hides the rabbet on the rear edge of the casework.
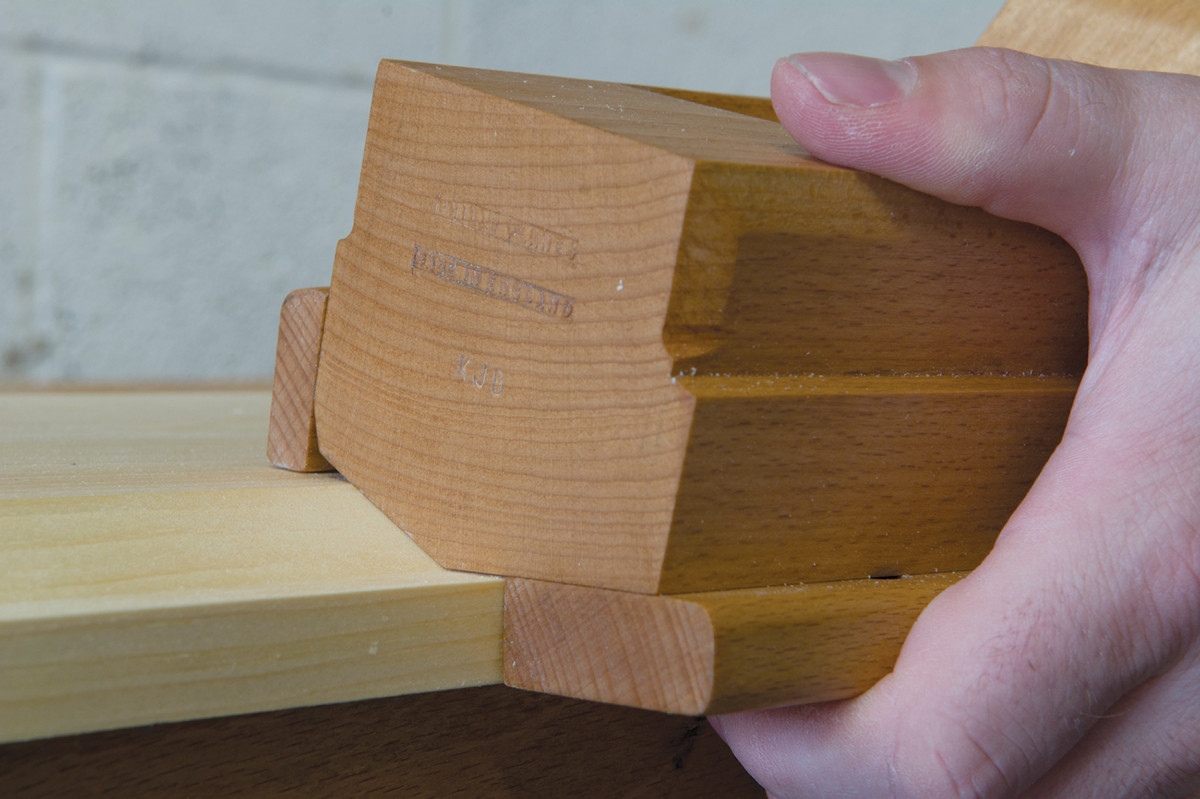
Because I cut my dovetails tails first, I also planed a shallow (1⁄16” deep) rabbet on each end of the tail boards. The dovetails are standard through-dovetails; I used six tails per side, and the tails are on the sides of the casework while the pins are on the ends. The only unusual feature is that the pin at the rear corner is a captured half-pin to account for the rabbet, so lay out a separate baseline for the half-pin. I gang-cut the tailboards and then lay out the pins for each corner.
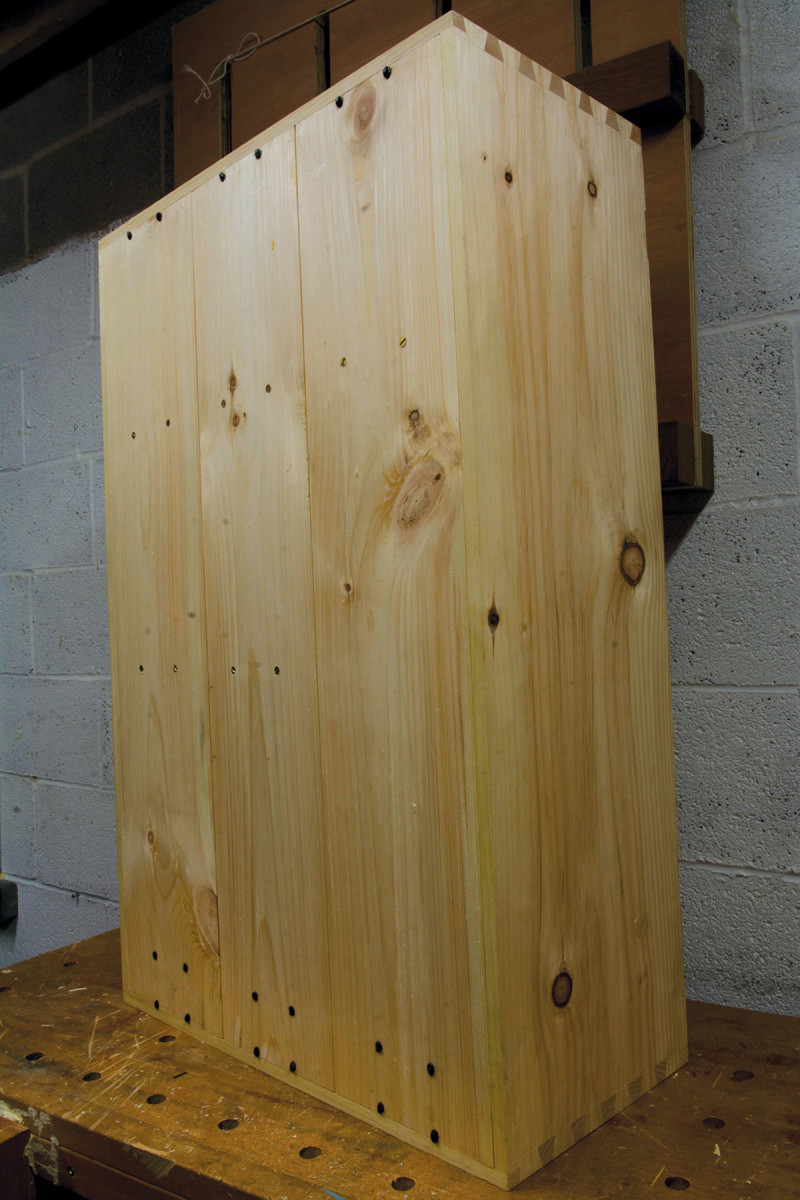
With the dovetails cut, assemble and glue the four sides together, including the rail. Leave the rail overlength at this stage and allow the excess to protrude through the mortises. Once the glue has cured, fit and glue the partition, making sure the partition is flush to the rabbet at the rear of the casework. Let the glue fixing the partition cure, and then clean up the exterior of the casework with a smoothing plane.
Backboards
The three backboards are joined with tongue and grooves, and are held in place with a combination of cut nails and glue. They should be a friction fit into the carcase, so take your time getting them snug. I started with fitting the two outer boards, and then adjusted the middle board to fit the remaining space. Tongue and groove both edges of the middle board, and just the inner edge of the boards going on each side. A no. 49 plane makes quick work of the tongue and groove.
Once the panels are tongue and grooved and fitting nicely, glue just the long edges of the two outer boards into the rabbets on the case sides. Then nail the boards to the top and bottom of the case and to the rear edge of the partition. I used 4d wrought head nails from Tools for Working Wood, as these have excellent holding strength and look great. The nails securing the ends of the boards need to be angled slightly so that they pass through the boards and into the ends of the casework; a small bevel is useful for sighting the angle while drilling the pilot hole.
Homemade Saw Cabinet Cut List
No.ItemDimensions (inches)
t w l
Casework
❏ 2 sides 3⁄4 x 11 1⁄2 x 37 3⁄4
❏ 2 ends 3⁄4 x 11 1⁄2 x 24
❏ 1 partition 1⁄2 x 11 x 23
❏ 3 backboards 1⁄2 x 8* x 36 3⁄4*
❏ 1 rail 1″ dia. – 25
❏ 4 cleats 1 x 3 x 24
Drawer
❏ 2 drawer sides 1⁄2 x 2* x 11*
❏ 2 drawer F & B 1⁄2 x 2* x 22 1⁄2*
❏ 4 drawer bottom 1⁄4 x 10 1⁄2* x 1
Door
❏ 2 rails 3⁄4 x 3 1⁄2 x 22
❏ 3 stiles 3⁄4 x 3 x 35
❏ 2 panels 3⁄4 x 8 1⁄4* x 29*
Internal Fittings
❏ 1 backsaw kerfed block 1 1⁄4 x 1 3⁄4 x 22 1⁄2
❏ 1 handsaw kerfed block 1 1⁄4 x 1 3⁄4 x 15
❏ ** frame saw hangers 1⁄2 x 2 **
*Fit to carcase
** Number of frame saw hangers and neccessary length
depends on frame saw collection
Door
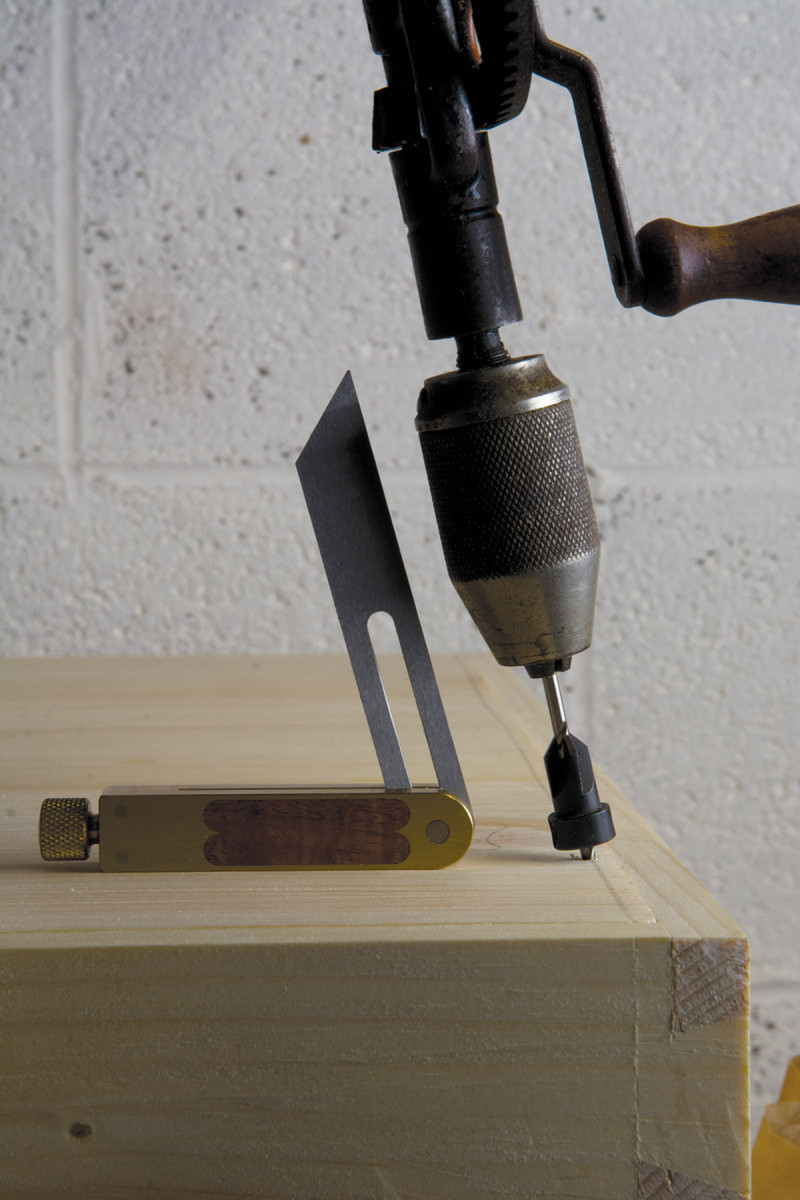
Drill reference. A small bevel helps to sight the angle the pilot hole for the cut nails on the backboards.
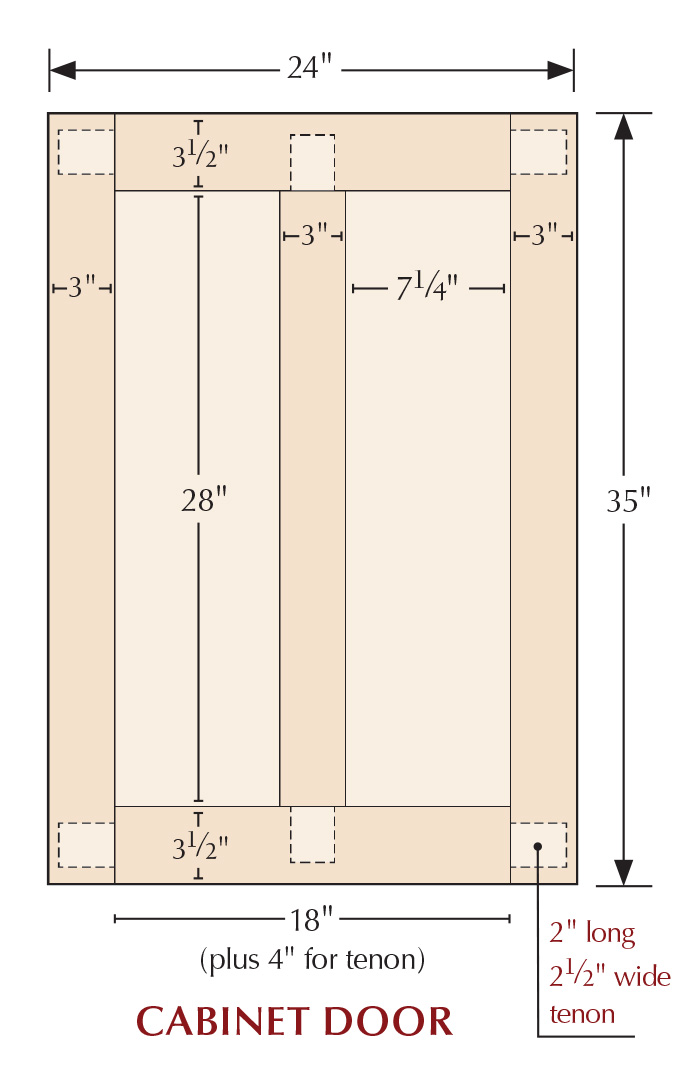
The door is quite standard frame and panel construction. The rails have a 2″ long tenon on each end to fit into the stiles, and a 2″ deep mortise to accept the tenon of the middle stile. Start with the rails and the two outer stiles. Plough a 1⁄4” wide, 1⁄2” deep groove on the inner edge of the four frame components, and then set a mortise gauge to the same spacing – leave this marking gauge set as you will need it for the middle stile and for the panels. The tenons are 21⁄2” wide and have a haunch on the outer edge, sized to fit the groove ploughed on the stile. Use the marking gauge you just set to lay out the tenons on the rails, and then cut the tenons. I use the same “first class saw cut” method described above to guarantee clean tenon shoulders and a good gap-free fit.
Chop the mortises on the stiles (they should be 1⁄4” wide and 2 1⁄2” deep) and assemble the four frame components to check for square. I find it helpful to lay the frame on top of the carcase at this point to make sure everything is the right size.
In the groove. Layout the tenons with a marking gauge set to the dimensions of the groove.
Next up is the middle stile. Use a bar gauge to work out the length of the middle stile and allow for a 2 1⁄2” long tenon on each end. Plough a 1⁄4” x 1⁄2” groove on both of the long edges of this piece and layout the tenon using the same marking gauge settings as you did for the tenons on the rails. The only difference is that there is no haunch on the tenons of the middle stile. Layout the mortices on the rails so that the middle stile bisects the frame into two equal sections. With all the joinery cut, assemble the frame to check for square and measure the spaces for the raised panels (don’t follow the cut list for this part of the build – your frame might be a slightly different size to mine).
Haunched tenon. The layout of the tenon – note the haunch on the right hand side.
The raised panels fit into the grooves of the frame on all four sides with a 1⁄2” wide 1⁄4” thick tongue. The tongue should be laid out so that the backs of the panels are flush to the back of the frame. This will allow you to hang frame saws on the inside of the door. Use the same marking gauge as for the tenons and mortises to mark out the tongue. The front face of the tongue is created by raising the panels. I used a panel raising plane for this, although in a pinch you could use a jack plane. Once the panel has been raised to the edge of the tongue, flip the panel over and cut the second side of the tongue using a moving fillister plane. A 1⁄4” wide groove cut into a piece of scrap is useful for telling you when the tongue fits, and it is best to err on a slightly loose fit rather than being too tight.
When you come to assemble the door for the final time, glue both rails into one stile then slide in the first panel. Glue the tenons of the middle stile into the rails, and then slide in the second panel before fitting the final stile. The panels float in their grooves to allow for seasonal movement, so make sure that only the tenons and mortises are glued.
Drawer
Make middle stile to fit. A bar gauge measures the internal length of the frame for the middle stile.
The shallow drawer is big enough to hold a set of saw files, as well as the Veritas file holder. Because I planned to milk paint the saw cabinet, and because this is a piece for the workshop, I used through-dovetails for all corners of the drawer. You could use half-blind dovetails for the front, or even a simple nailed drawer, when it comes to workshop furniture it is all down to preference and the time available for the build. Use the cut list as a guide, but be sure to fit the components to the cabinet on your bench rather than following the numbers slavishly. If you decide to dovetail the drawer then placing the tails on the sides will reduce wracking when pushing and pulling the draw in use.
Internal Fittings
Do it by hand. Raising the panels.
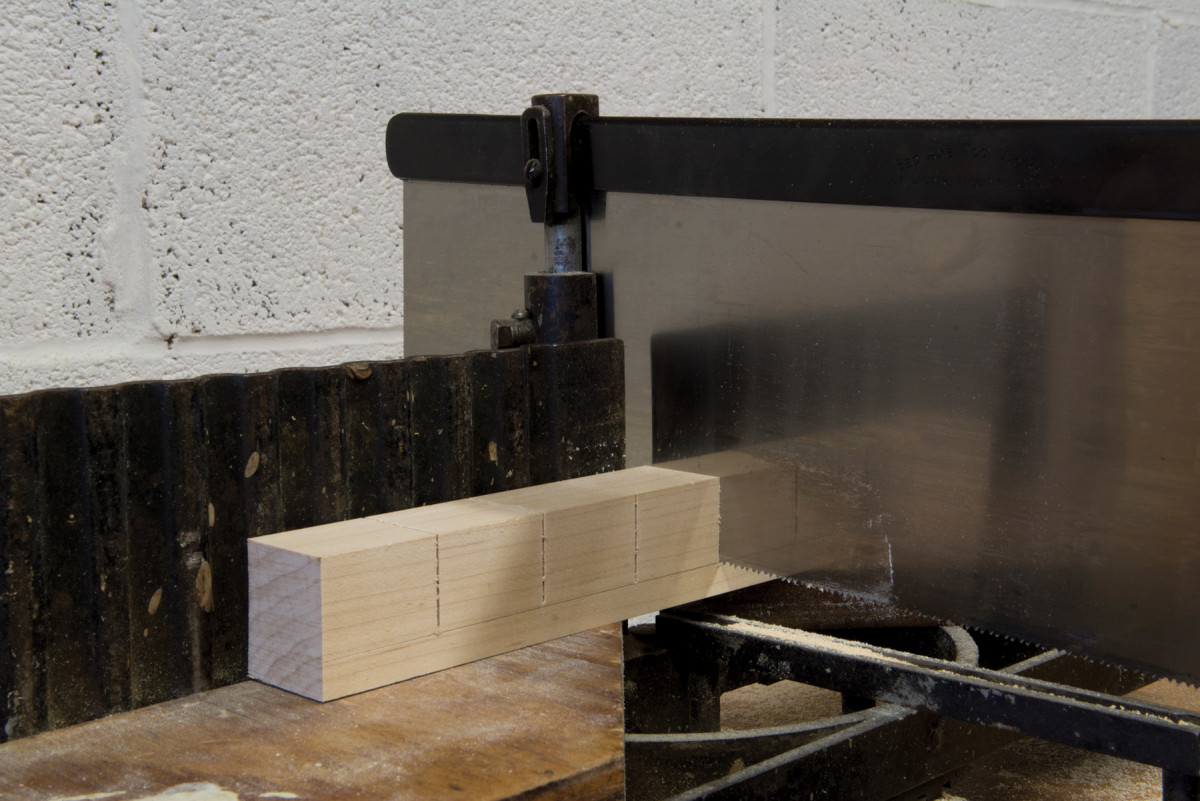
The internal fittings are all simple to make. Start with the kerfed blocks which hold the saw plates. There are two blocks – one extending the full width of the cabinet for handsaws and large backsaws, with a shorter block half the width of the cabinet for smaller backsaws. Depending on the nature of your saw collection you may want to adjust the lengths of these blocks. Lay out the kerfs for the saw holders on 1 1⁄4” centers with a pair of dividers and mark their 1 1⁄4” depth on the sides of the blocks.
Sample mullet. A mullet the same size as your groove will tell you when the tongue is the correct width.
To make the kerfs I used a mitre saw mounted in a mitre box – this ensures neat kerfs which will be wide enough to fit most backsaws. If you don’t have a mitre box then a cross-cut backsaw will suffice. Test the fit of your saws and use a cross-cut filed hand saw to widen slots as necessary. Use a chisel to cut a chamfer on each edge of the kerf – this will guide the saw plates into their resting place when you put saws in the completed cabinet. Drill pilot holes through the rear of the blocks, making sure that the screws are spaced between the kerfs, and through the backboards of the cabinet. I used 11⁄4” No.8 screws to hold the blocks in place, four evenly spaced screws is enough for the short block, and I used six for the full-width block.
Brackets for the frame saws. These simple tool holders are fast to make and work surprisingly well.
Frame saws take up a disproportionate amount of space in my toolchest, so I decided to mount them on the inside of the door of the saw cabinet. Each hanging bracket is made of two pieces of 2” wide 1⁄2” thick stock. Glue the two pieces together so that they overlap by 3⁄4“.
Quick kerf. A miter box makes quick work of kerfing the saw holder.
Once the glue has cured, plane one side flush so that the bracket is an L-shape, and cut the bracket to length based on the size of your frame saw. It is easier to glue and work the brackets when they are larger pieces, so I made two large brackets one of which I cut down to provide hangers for my two smaller frame saws. The brackets are then fixed to the inside of the door with 2d headless cut brads.
Finishing Up
Cut nails. You can see the three rows of cut nails securing the backboards and the brass screws holding the kerfed blocks.
Before applying any finish, cut the mortises for the butt hinges and drill holes for the door and drawer pulls. Hinge installation is an article in itself, and I’ll defer to Nancy Hiller’s excellent advice in the online extras. Once you have fitted the hinges, remove all the hardware and apply your finish of choice. I used five coats of Emerald Green milk paint by General Finishes, applied with a foam brush. Finally, I installed two French cleats on the cabinet to prepare for hanging the cabinet in my shop.
Cutlist and Supplies
Handmade Saw Cabinet Cutlist
Supplies
Diagrams
Front View
Side View
Back View
Door
Here are some supplies and tools we find essential in our everyday work around the shop. We may receive a commission from sales referred by our links; however, we have carefully selected these products for their usefulness and quality.


Articles like this are the reason I buy the magazine. It is relatively simple, uses hand tools, and is cheap to build.