


We may receive a commission when you use our affiliate links. However, this does not impact our recommendations.
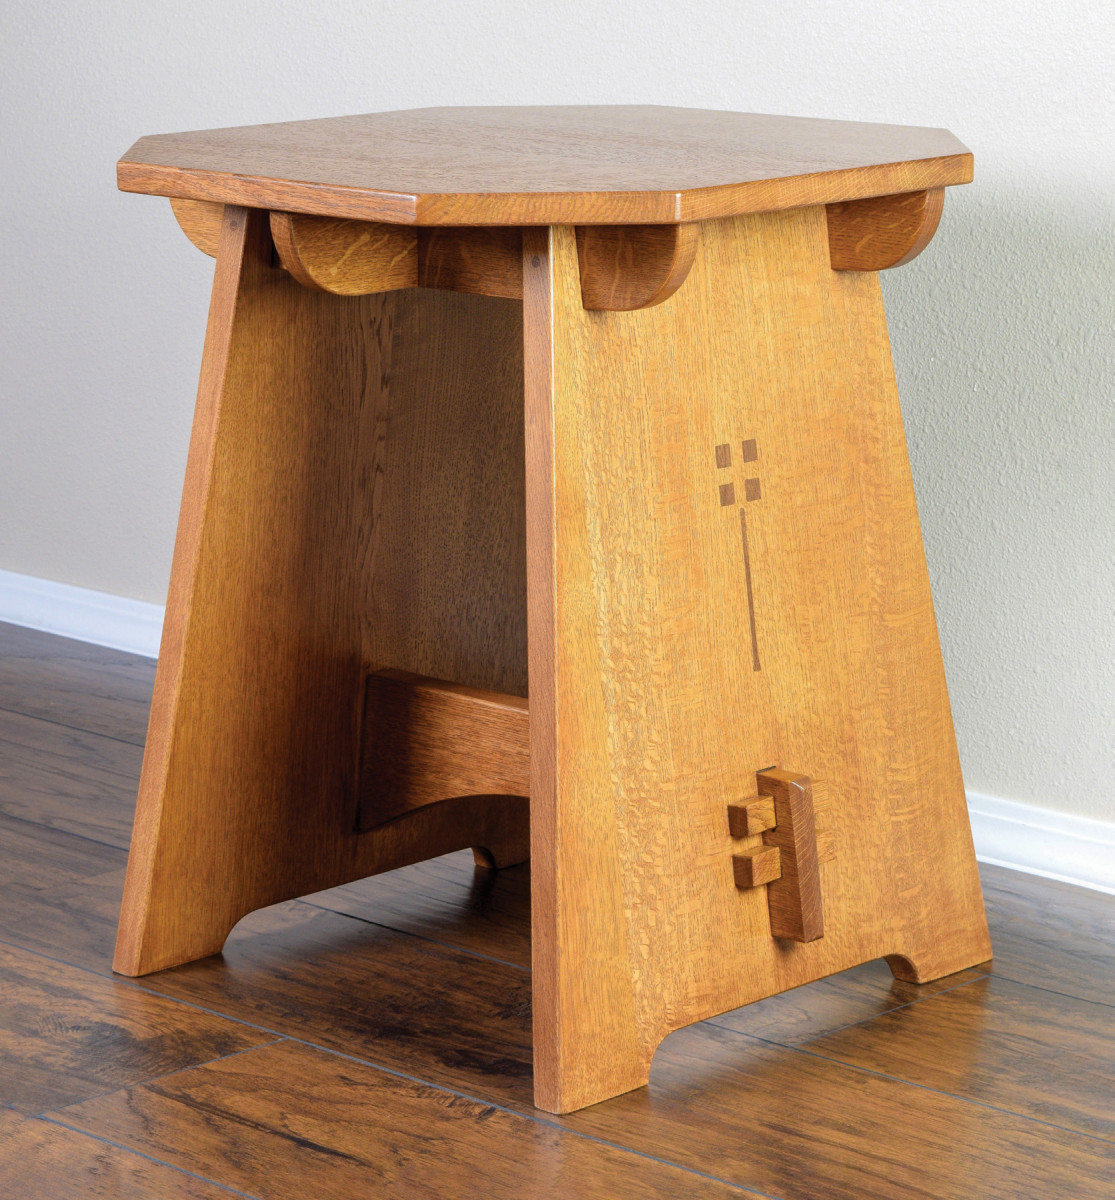
Angles and an artful inlay set this Arts & Crafts-inspired design apart.
I’ve been fascinated by interesting little tabouret tables lately, and it seems the more complicated the design, the more I’m intrigued. Tapered sides, angled joinery, and curved shapes all tend to invite the eye for a closer look. This small side table is an original design and is unique because it doesn’t have square legs. Rather, it uses solid side panels for structural support, which actually simplifies construction. If this table had square legs attached to the panels, it would require compound angles on the legs. By using solid panels instead, there are only simple angles, with no compound angles to contend with.

1. This wedged double tusk tenon I used on a dining table build looked a little bit like a dragonfly to me, which started me down the path to designing the dragonfly side table.
I first imagined the dragonfly wedges after building a dining table in 2012. Instead of the usual single wedged tenons, I made two opposing wedges, driven toward each other. I remember thinking it looked reminiscent of a dragonfly, and just needed a few tweaks to complete the effect. It wasn’t until I built this dragonfly side table that I had a chance to implement the idea.
Start with the Panels

2. Tilt a combination blade to 7° and bevel one end of the side panel. Now set the rip fence to 201/4″, and flip the panel end-for-end to bevel the other end.
Make the three panels required for the table—you’ll need two side panels, and a tabletop panel. The one-inch thick side panels are 201/4“ long x 16“ wide. If you leave the side panels a little extra-long, it’s helpful when it comes time to bevel the top and bottom edges. The tabletop panel is 3/4“ thick and 181/2“ square. Glue the panels together and set them aside to dry.
Make the Rails
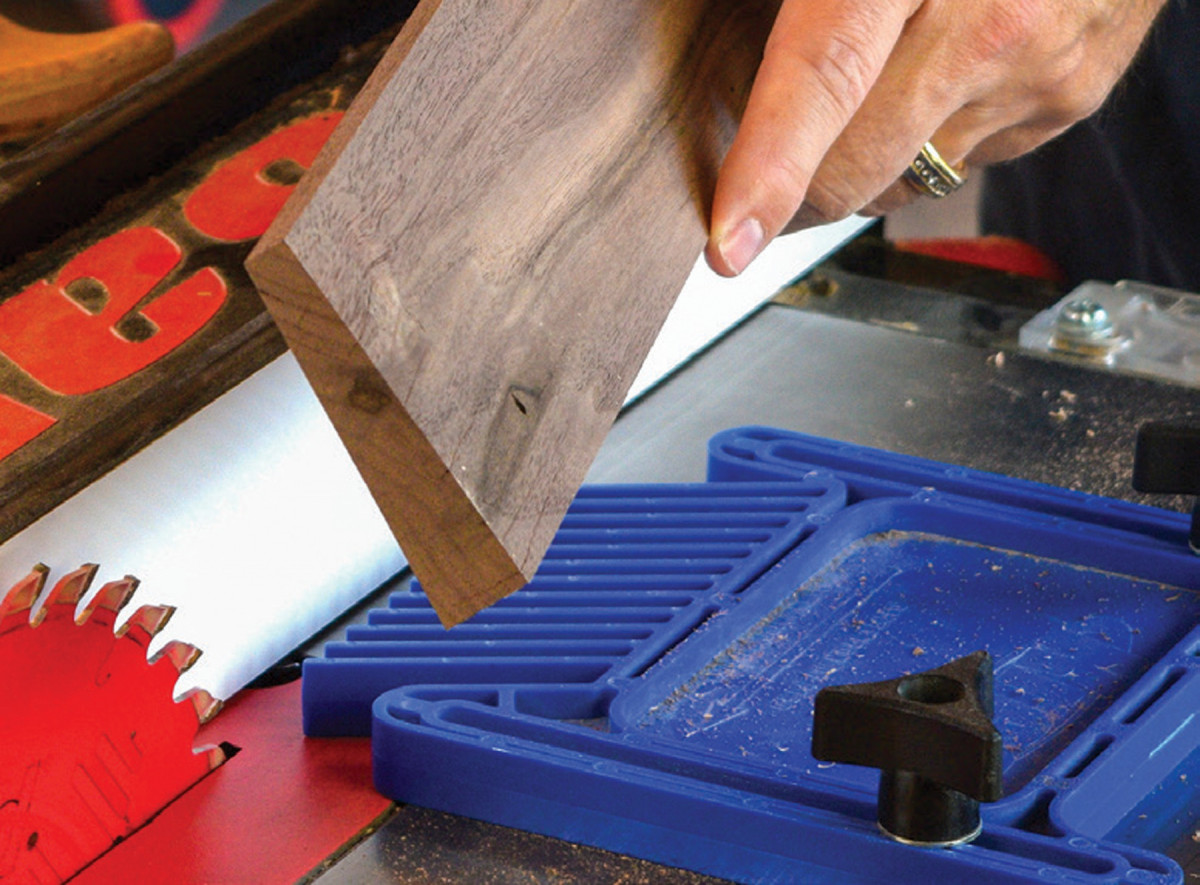
3. While the combination blade is still on the tablesaw, and angled to 7°, bevel a scrap board to help with the next step.
Once the panels are accounted for, there are only four more large components to make. Three rails to support the top, and one lower arched rail. The three rails are all the same size—171/2“ long x 21/4“ wide and 3/4“ thick. Rip and crosscut the three rails to final size, but wait to cut the ‘round corbel’ shape on the ends. We need to take care of the half-lap joinery before we cut those curves.
4. Now square the arbor to the table, and switch to a 3/4″ wide dado stack. Attach the beveled scrap board to the auxiliary fence of a miter gauge, and securely clamp the side panel in place. Cut to your layout lines with a single, slow pass. The blade height for this operation is 21/4″.
Also make the single lower arched rail at this time. The lower rail is made from 1“ thick stock, and measures 18“ long x 41/2“ wide. Now take a moment to angle the ends of the lower rail to 7°. Like the other three rails, we’ll wait until the joinery is done before cutting any curves.
Side Panel Joinery
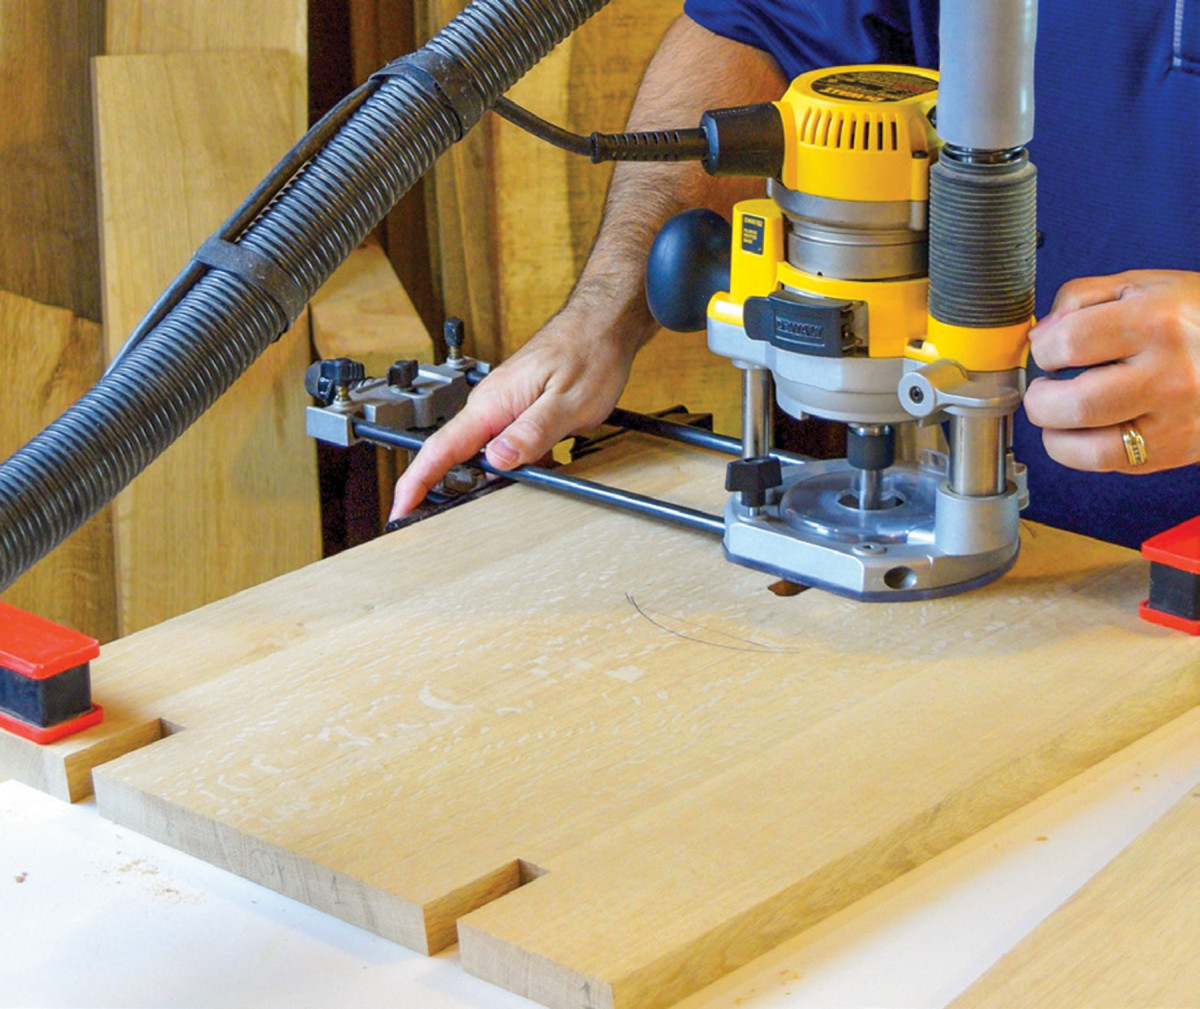
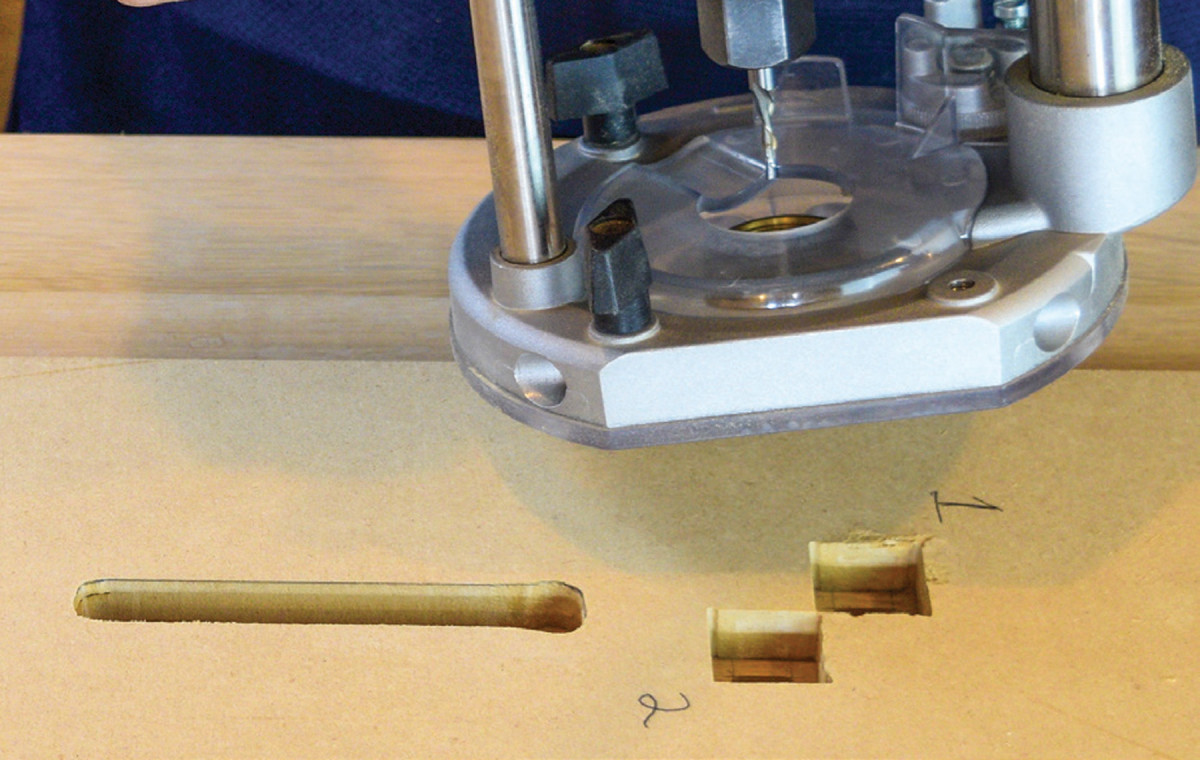
5. With a router equipped with a 1/2″ spiral downcut bit and edge guide, form a 4″ long x 3/4″ wide mortise in each side panel.
Now is a good time to re-visit the panels and sand them smooth, at least to level out the joints between boards and remove any dried glue. I used a drum sander to clean up the panels, but a random orbit sander works too.
6. Form tenons on the ‘lower arched rail’ with a dado blade and miter gauge with auxiliary fence. Keep the end grain tightly butted against the rip fence.
Cut the side panels to finished dimensions to prepare for the next step. Angle the table saw blade to 7° and bevel the top of each side panel. With the same setup, repeat this process to bevel the bottom of these panels as well.
7. Plane the tenon cheeks to fine-tune the joint fit, and to remove scoring lines from the dado blade.
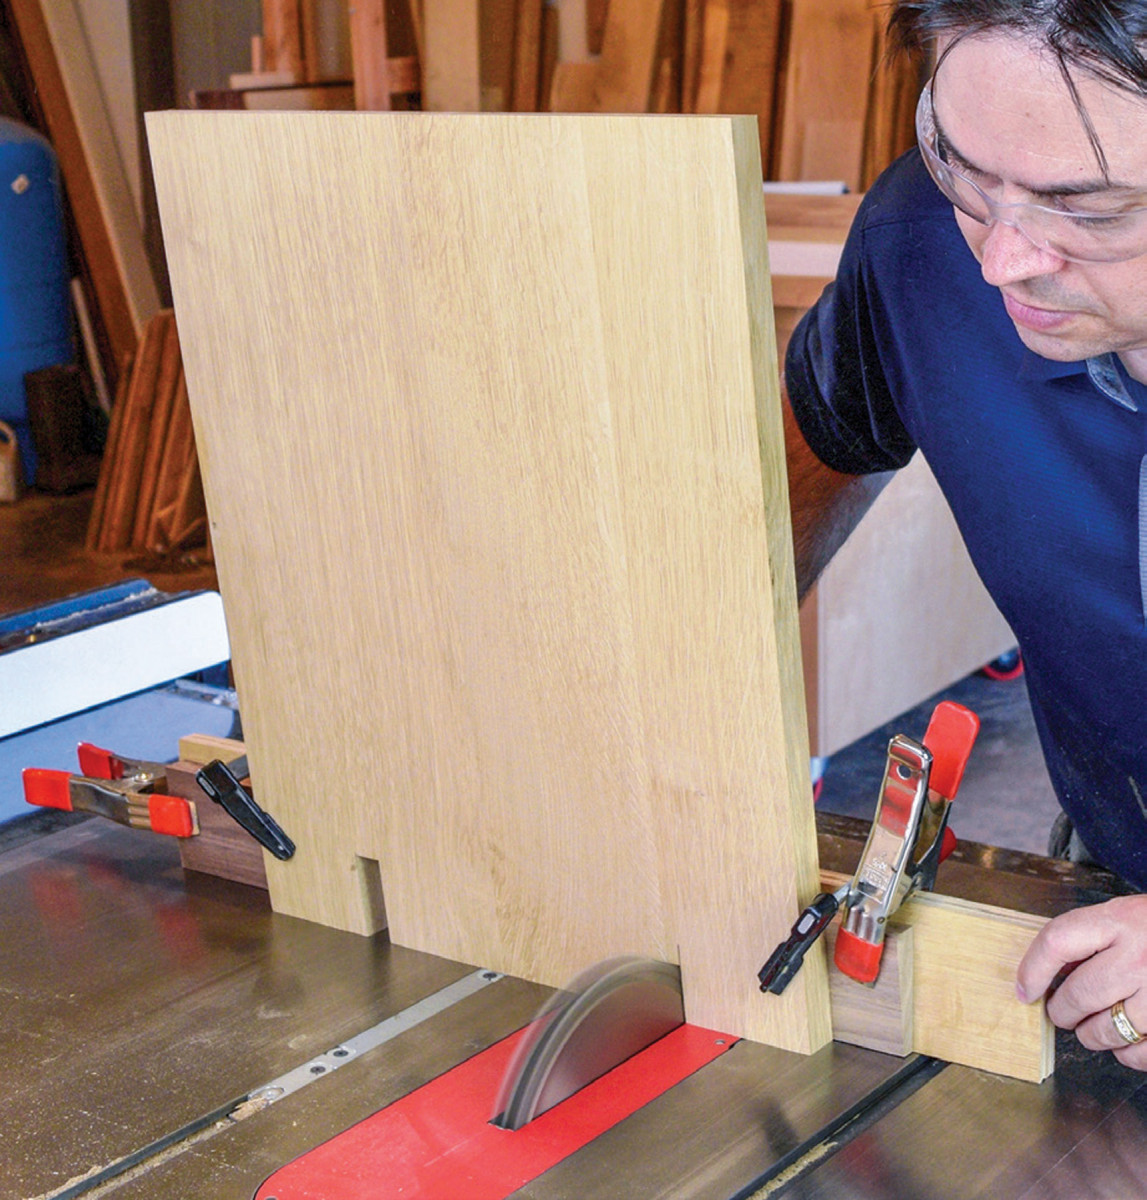
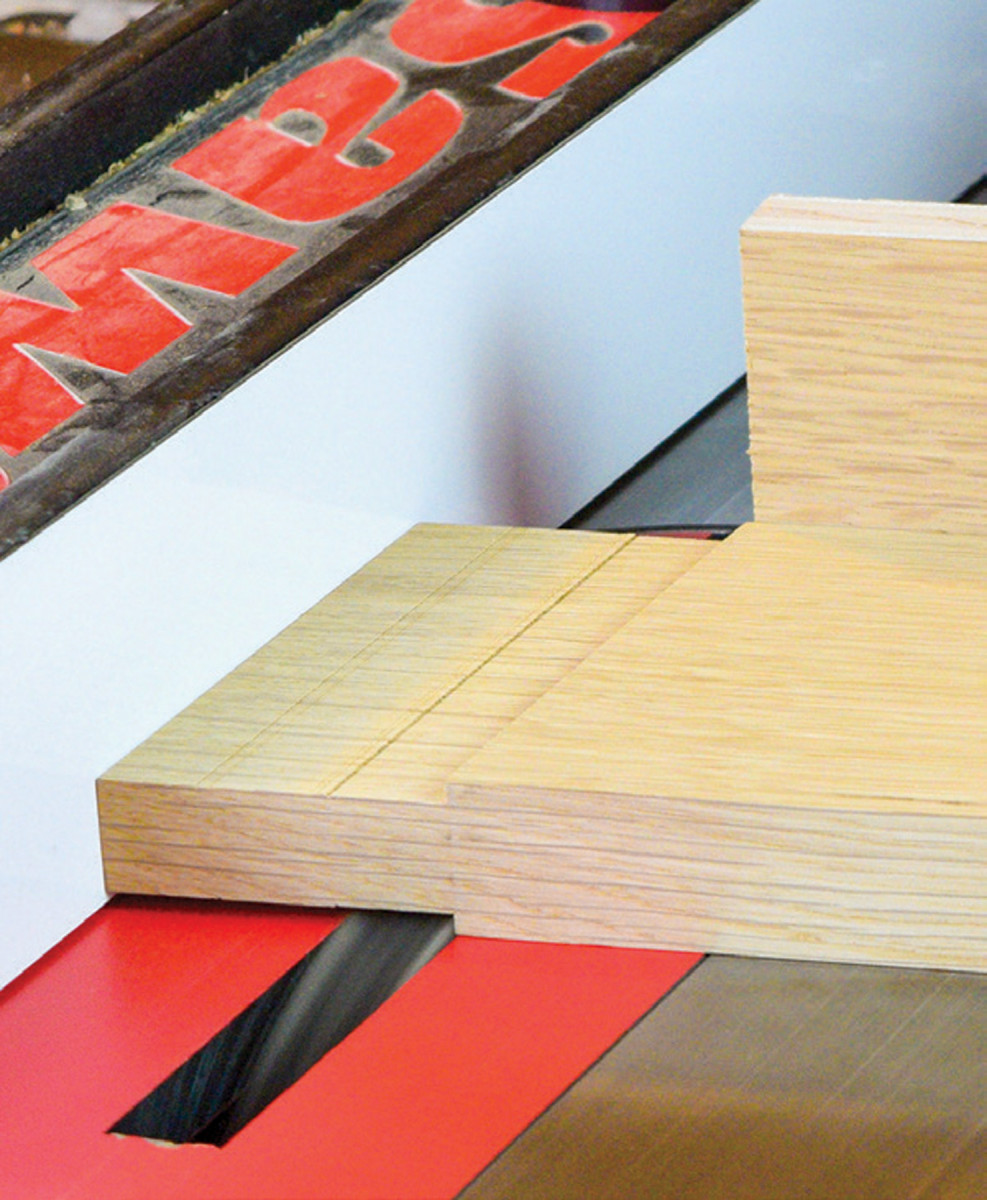
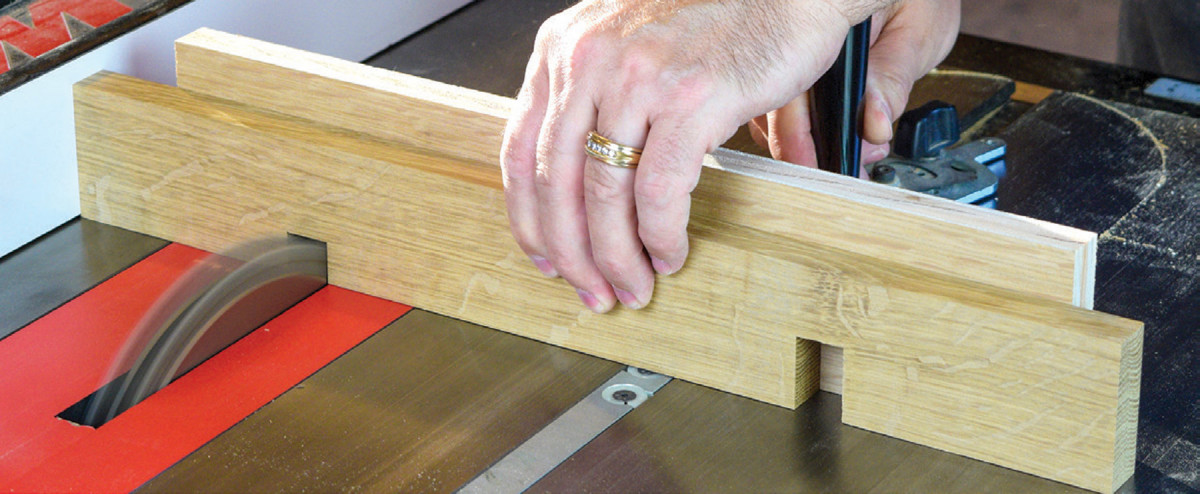
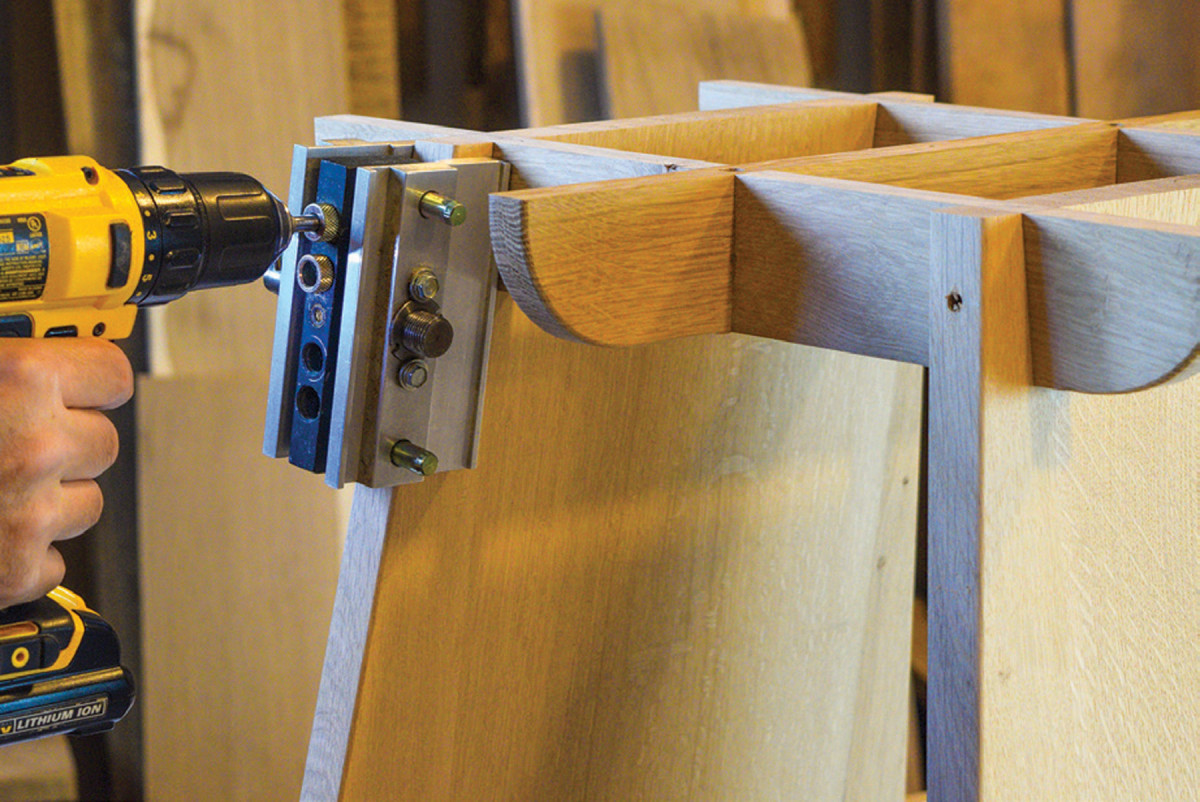
Now layout the angled bridal notch locations atop the panels. These notches will receive the two stretcher rails. To setup the table saw for these interesting angled cuts, you’ll need a 3/4“ wide dado stack, and a scrap board angled to 7°.

8. Head over to the bandsaw, and setup for a rip cut to trim the tenon shoulders. The fence is set 1/4″ away from the blade.
The scrap board should be about 20“ long and 3“ wide. Once the scrap board is beveled, attach it to the auxiliary fence of your miter gauge. This will help tilt the side panels forward as you complete the angled notches with a dado blade.
9. Now reset the bandsaw fence for a crosscut to remove the waste. Hold the end of the tenon against the fence to complete these cuts.
The dado blade is set to a height of 21/4“ for this operation, and the notches are 8“ apart. Be sure to clamp the panels to the auxiliary fence to control the panel as it passes over the dado blade. This step also determines the “show face” of the side panel, so be sure to enter the cut from the outside face.
10. Two of the upper rails receive a single, centered half-lap cut.
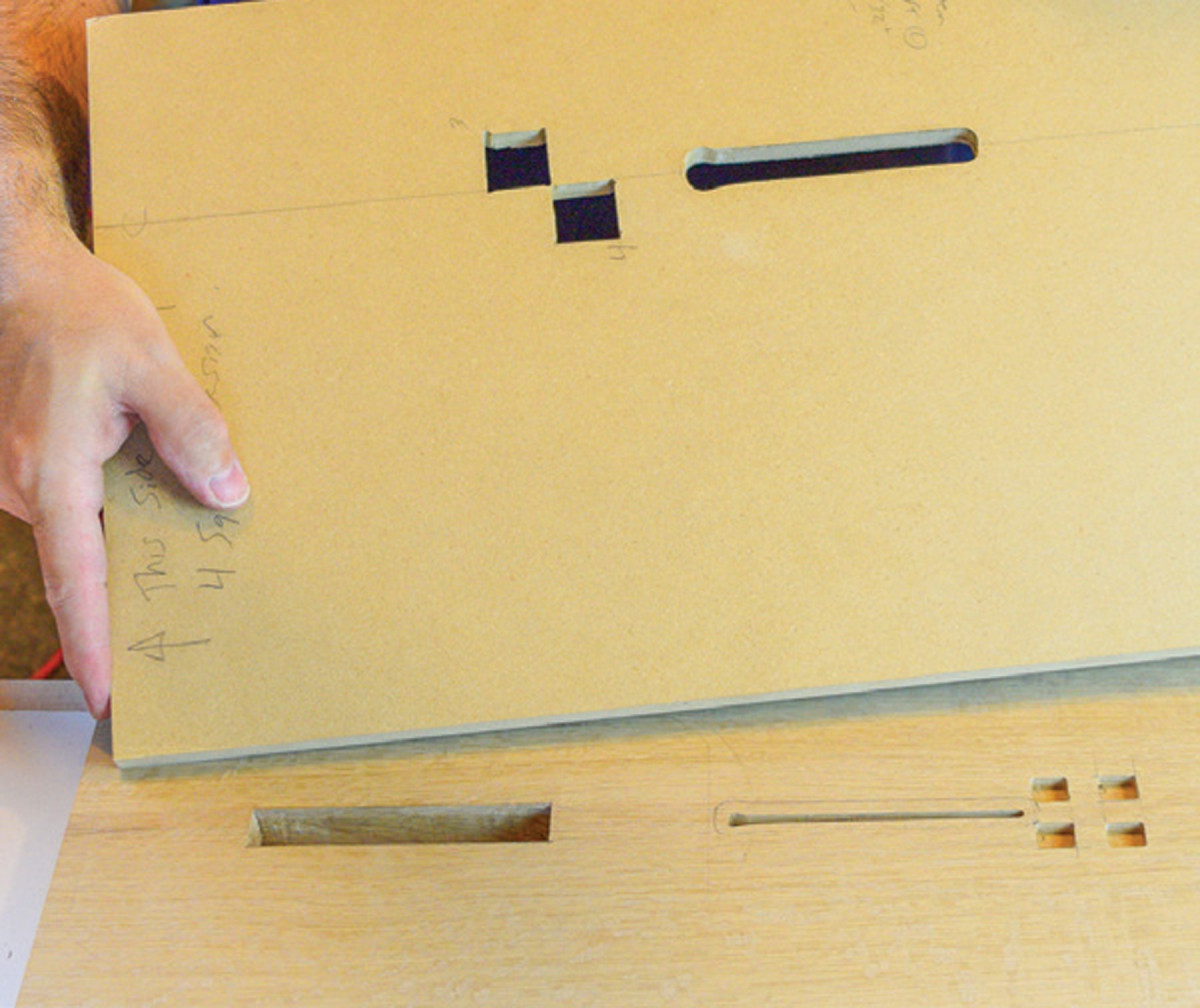
Next, cut a single mortise in each panel. These are through mortises and are best made with a router and edge guide. Lay out the mortise location and cut the 3/4“ wide x 4“ long mortise from both sides, to ensure it’s centered on the panel. I used a 1/2“ spiral downcut bit to make the mortise in multiple passes.
11. The third upper rail needs two notches, spaced 8″ apart.
I started with a shallow pass from the front of the panel and finished with successively deeper cuts from the back of the panel. At this point the mortises are nearly complete, and only a little handwork remains. Using a sharp chisel, angle the end walls of the mortises to approximately 7°.
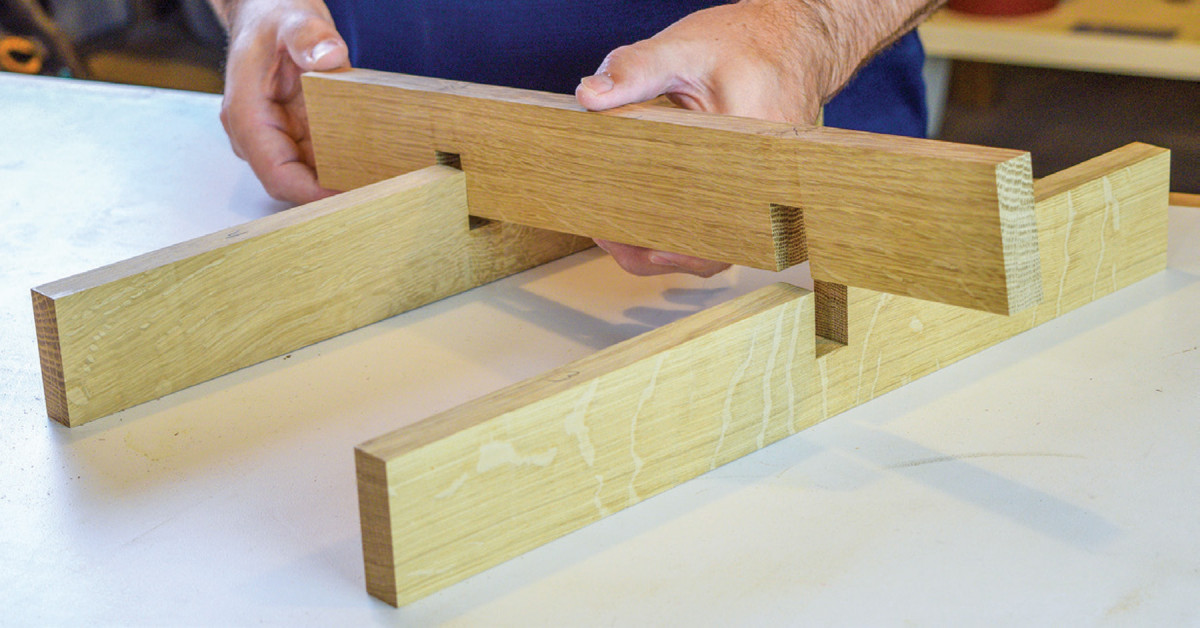
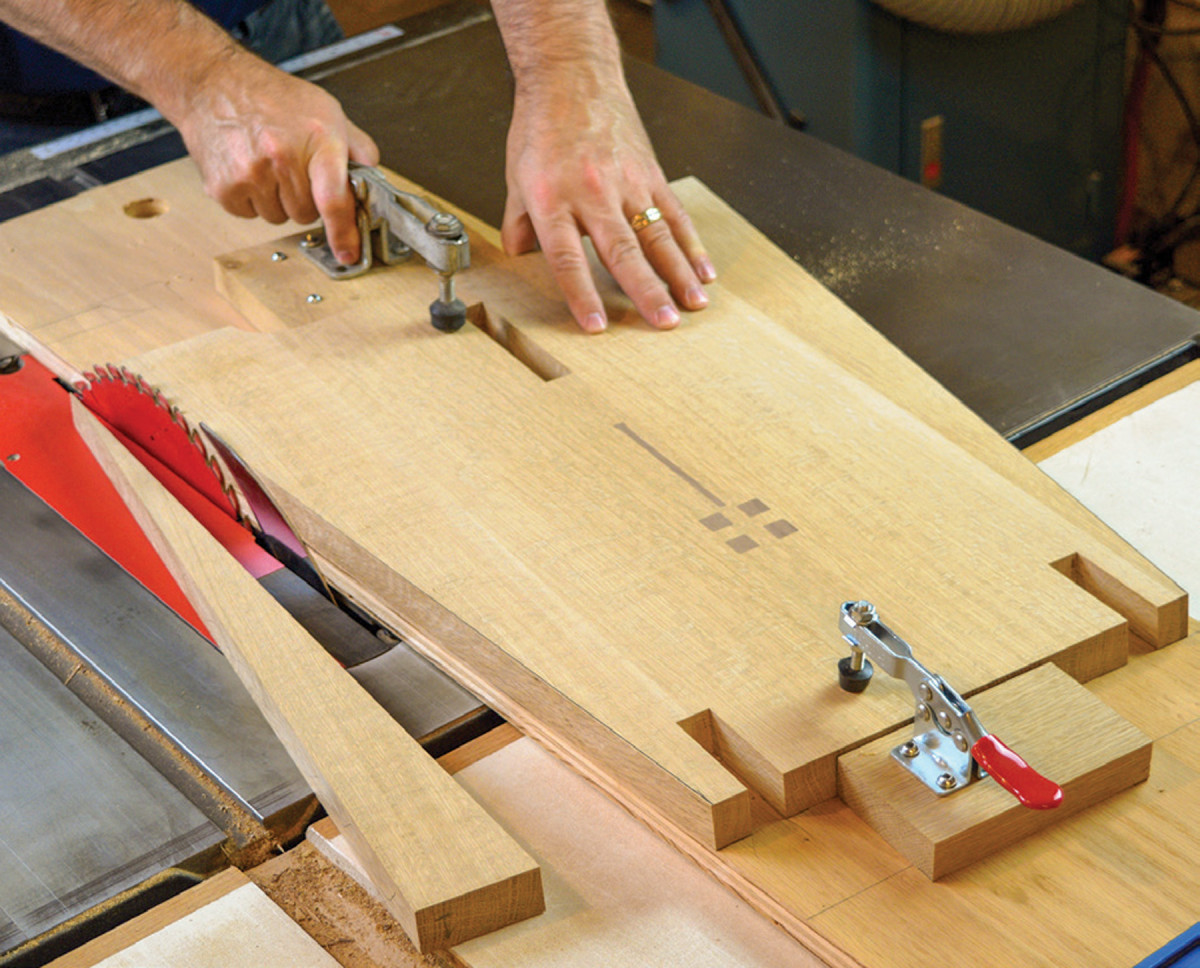
12. Test fit the rails to make sure the gridwork comes together as it should.
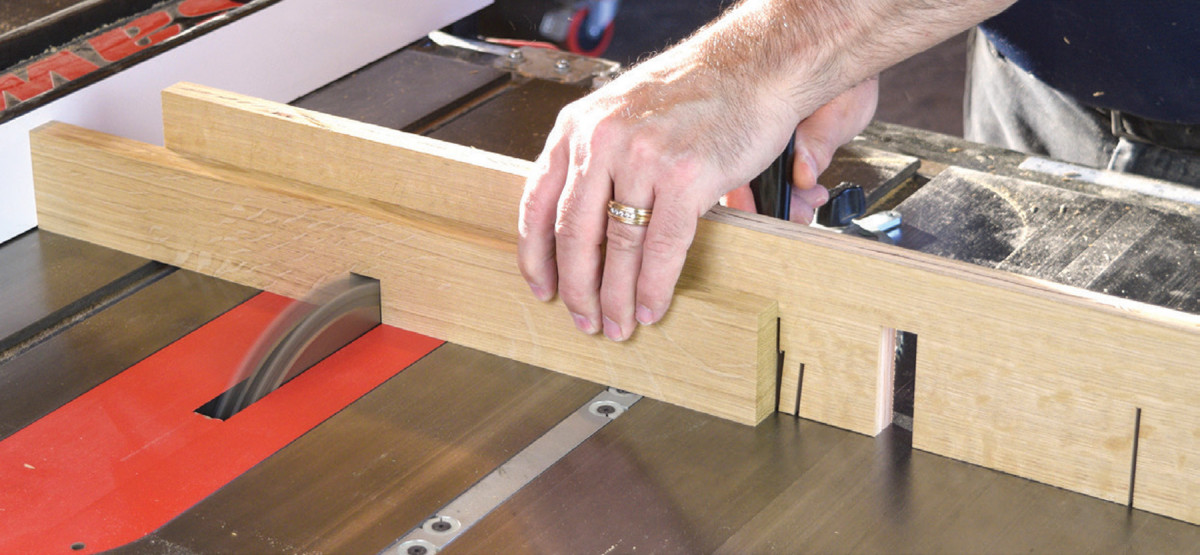
With the dado blade still setup on the table saw, take a moment to cut the tenons of the lower arched rail. Use a miter gauge with standard auxiliary fence for this step. Angle the miter gauge to 7° and butt the end-grain of the rail against the rip fence.

13. Dry assemble the parts you’ve made to see how everything comes together. This is a great opportunity to mark the projection of the through tenon as well.
Raise the blade incrementally and make multiple passes until the tenon fits into the mortise. You can complete all cheek cuts in this manner; however the shoulder cuts need to be made with a bandsaw or handsaw. Cut close to the line and make any adjustments as needed until the tenon seats fully into the mortise.
Half-Laps in Upper Rails
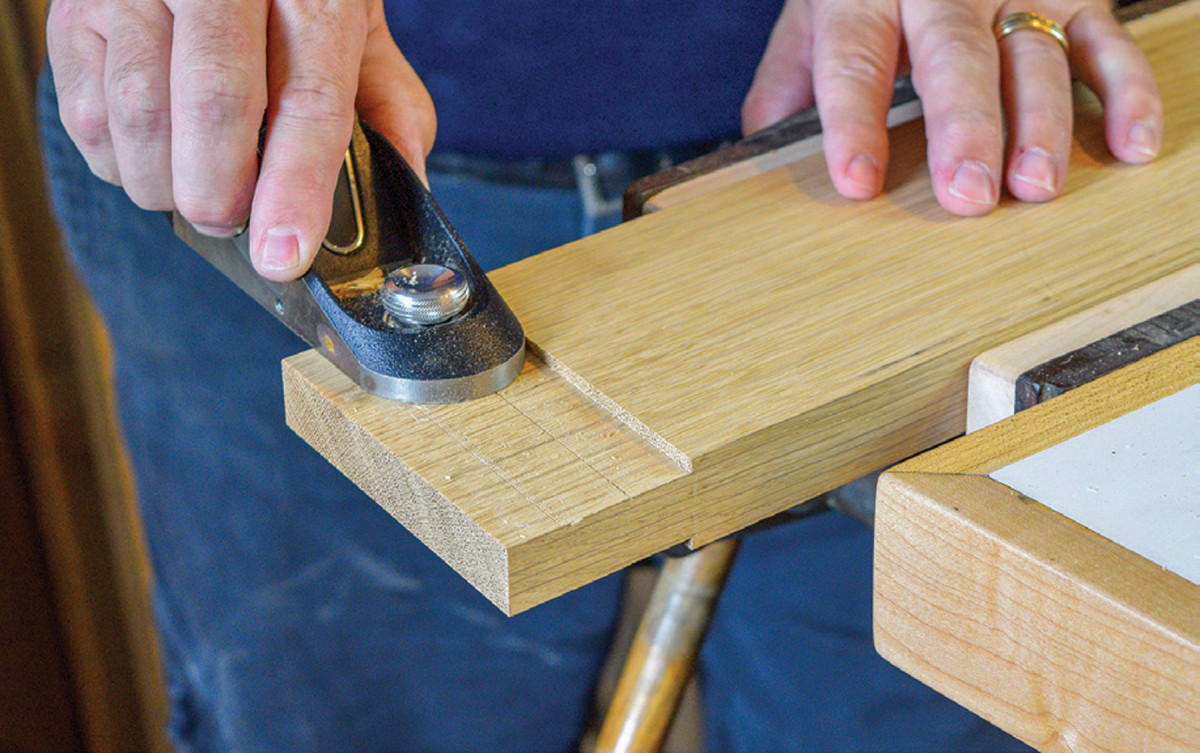
14-15. Start with a 3/8″ chisel to remove most of the waste. ‘Take the line’ closest to the shoulder but stay about 1/8″ away from the distal line. A bevel gauge is set to 7° is a good reference as the chisel work is completed.
 Retrieve two of the three ‘upper rails’ you made earlier and set out to make the half-lap joints. You’ll need a 3/4“ dado stack, set to a height of 1 1/8“ and a miter gauge with auxiliary fence. Form a centered dado notch on the top edge of these two rails. Now grab the third ‘upper rail’ and cut two dado notches in the bottom edge, spaced 8“ apart. This completes the gridwork that will support and anchor the top panel.
Tenon Keys Form Dragonfly Wings
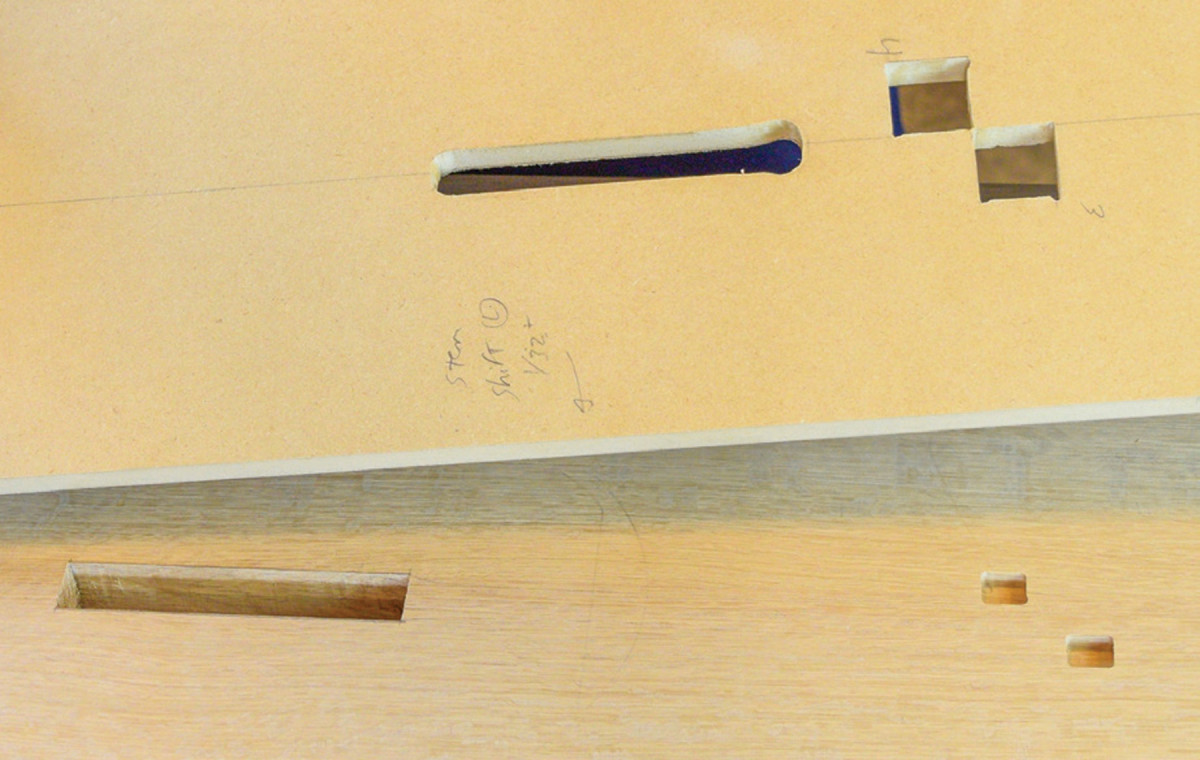
16. By flipping the template this way and that, this funny looking little template helps create the floral inlay.
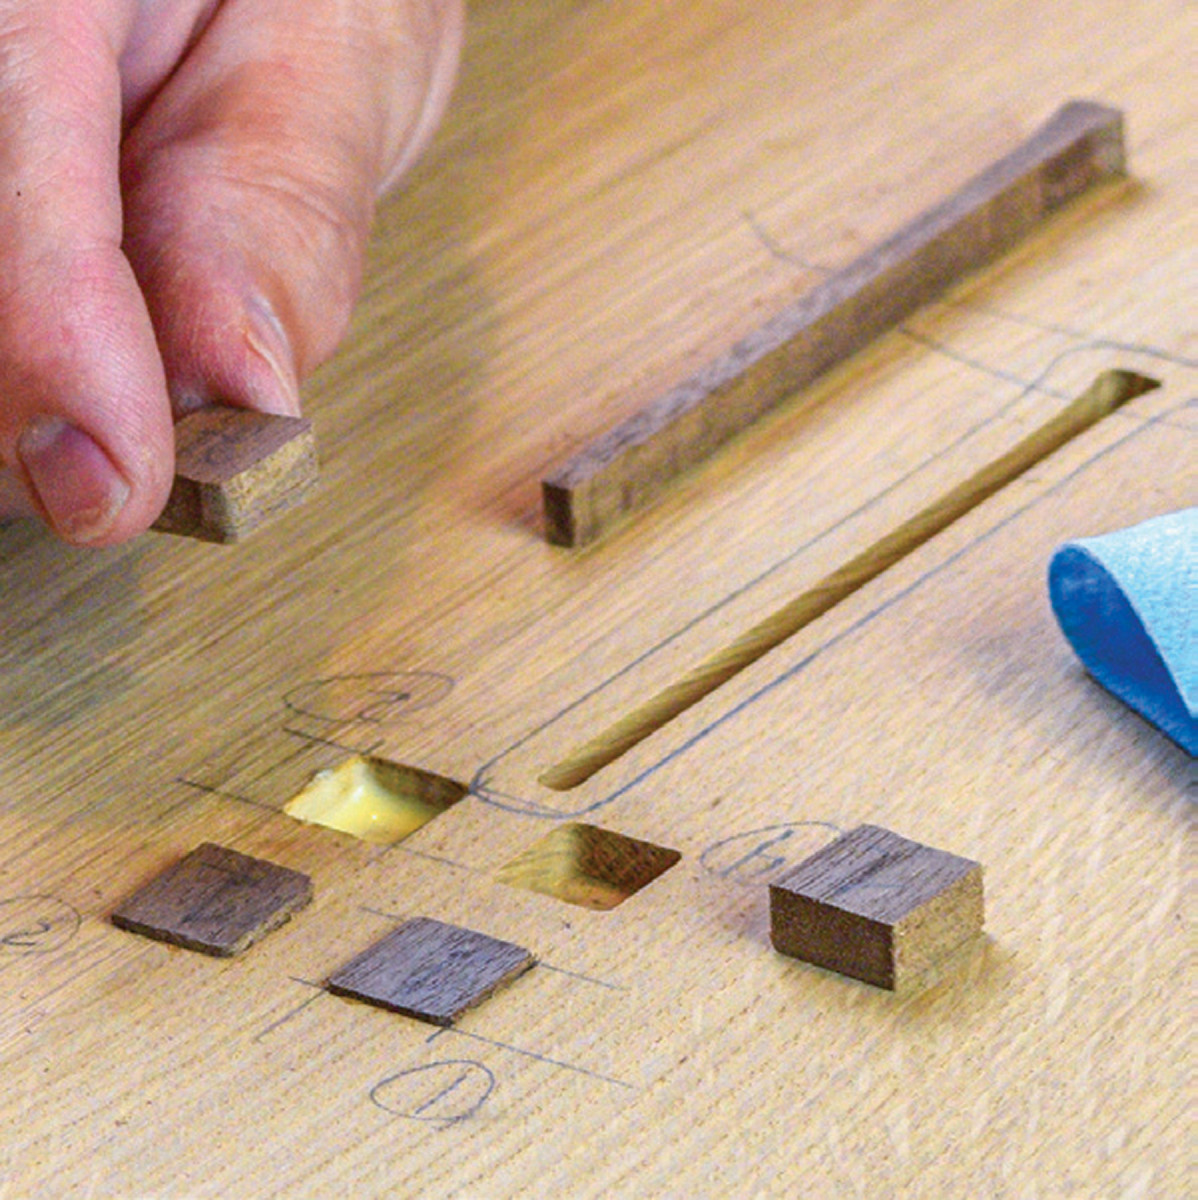
It’s fairly common to see keyed tenons on Arts & Crafts style furniture. I wanted to take the design a step further and use four keys per tenon to suggest a stylized dragonfly. Chop angled mortises in each tenon and cut wedges to fit.
17. Rout two squares, then flip the pattern to rout two more.
The finished keys are 11/2“ long x 3/4“ wide, and taper from 5/8“ down to 7/16“ thick. Just make sure the keys don’t intersect as you drive them home.
18. Finally, flip the template lengthwise and rout the slender stem shaped recess.
Despite their somewhat decorative feature, they’re also functional tenon keys, and hold the table tightly together. Although keyed tenons were historically designed for large knock-down furniture, this small end table will be permanently assembled.

19. Use the same template to cut the inlay pieces. Remove the spacer ring from your inlay bushing kit, and rout several of each shape. Number the squares on the template to correspond with the recesses you formed earlier.
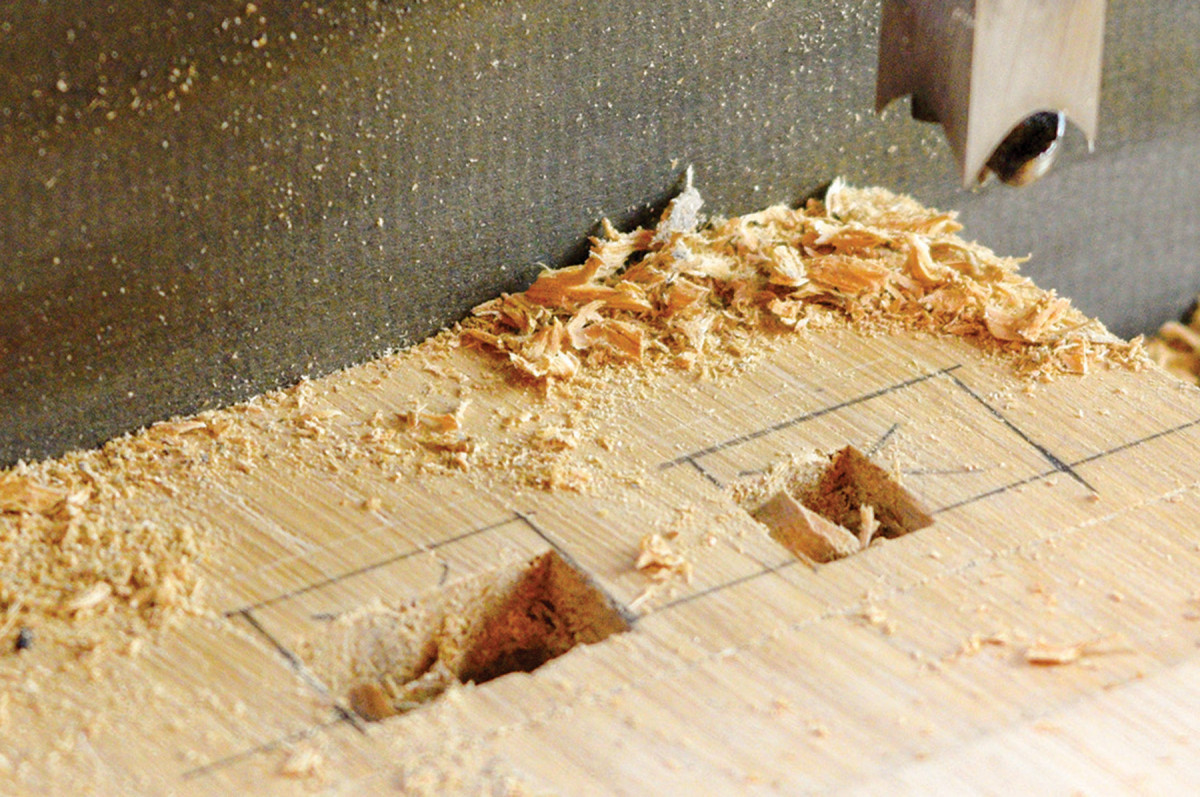
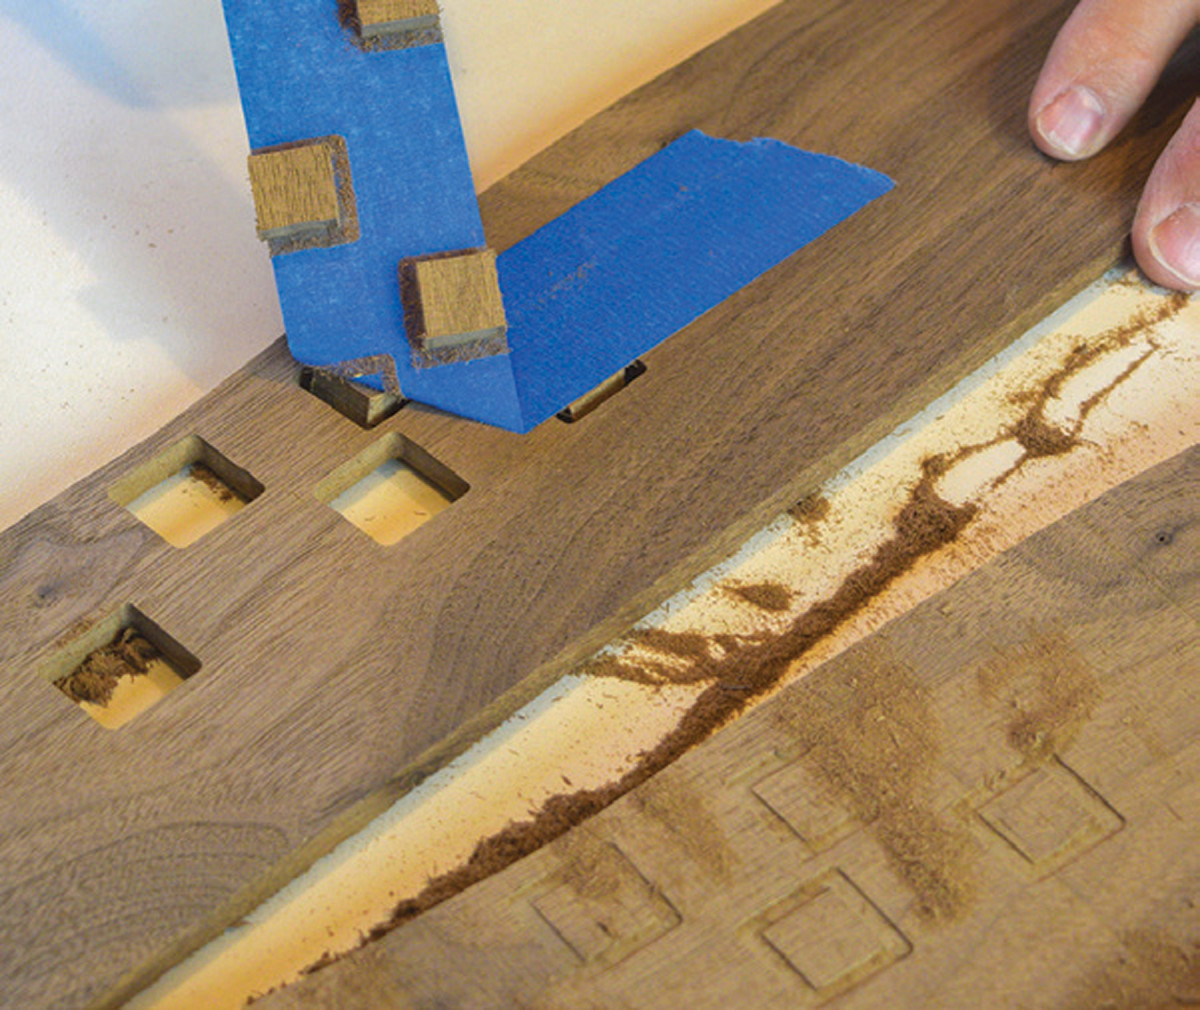
Mark the locations of the four mortises that will receive the wedges or “wings.” I started at the mortiser to rough out the opening but left the outer edge intact.
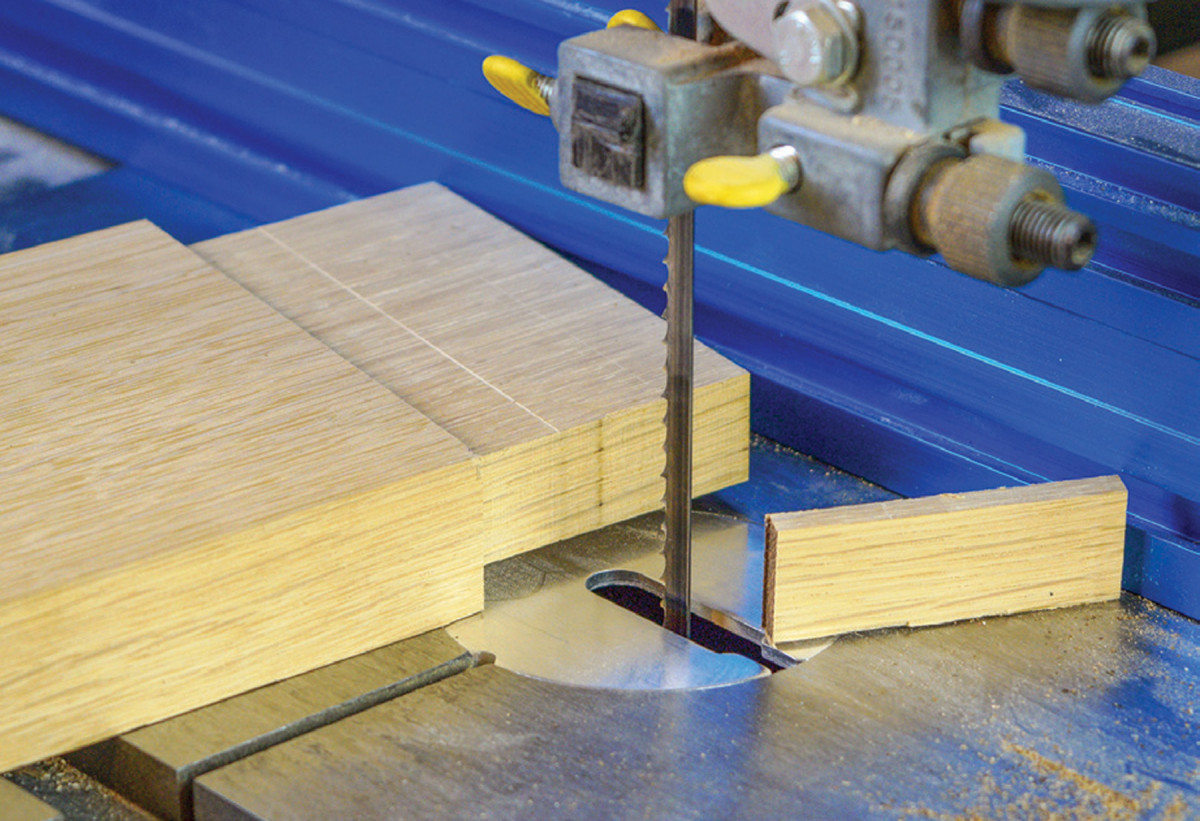
20. Painters tape holds the pieces in position as you resaw the board to release them.
Then I came back and completed the angled end of the mortise by hand. The outer edge of these mortises needs to be angled at 7° to fit the wedges. Aim for a shallow “V” shape that comes to a peak in the center of the tenon.
21. Ease the corners slightly with a sanding block, and glue them in place. Don’t force the fit, they should easily tap into position with a finish hammer.
Start with a 3/8“ chisel to remove most of the waste. ‘Take the line’ closest to the shoulder but stay about 1/8“ away from the distal line. A bevel gauge set to 7° is a good reference as the chisel work is completed.
Panel Inlay
22. Here an MDF template is adhered to the side panel with double-sided carpet tape. A bearing-guided bit follows the template to complete this light trimming cut.
For the inlay process, I find it easiest to use a router and inlay bushing kit. Make a 2/3rds size reversible template to guide the router while cutting the floral inlay. It functions just like a full-size template, but I ripped it to 111/2“ wide so my mortiser would reach the square holes.
23. Angle the side panels at 7° with a tapering sled. The panel is secured to the sled with toggle clamps, and the sled is guided by a wooden runner underneath.
Once the template is complete, clamp the template to a side panel and install the spacer ring on your inlay bushing kit. Follow the template squares in a clockwise direction to carve out the first two recesses. Next flip the template over and complete the other two squares.
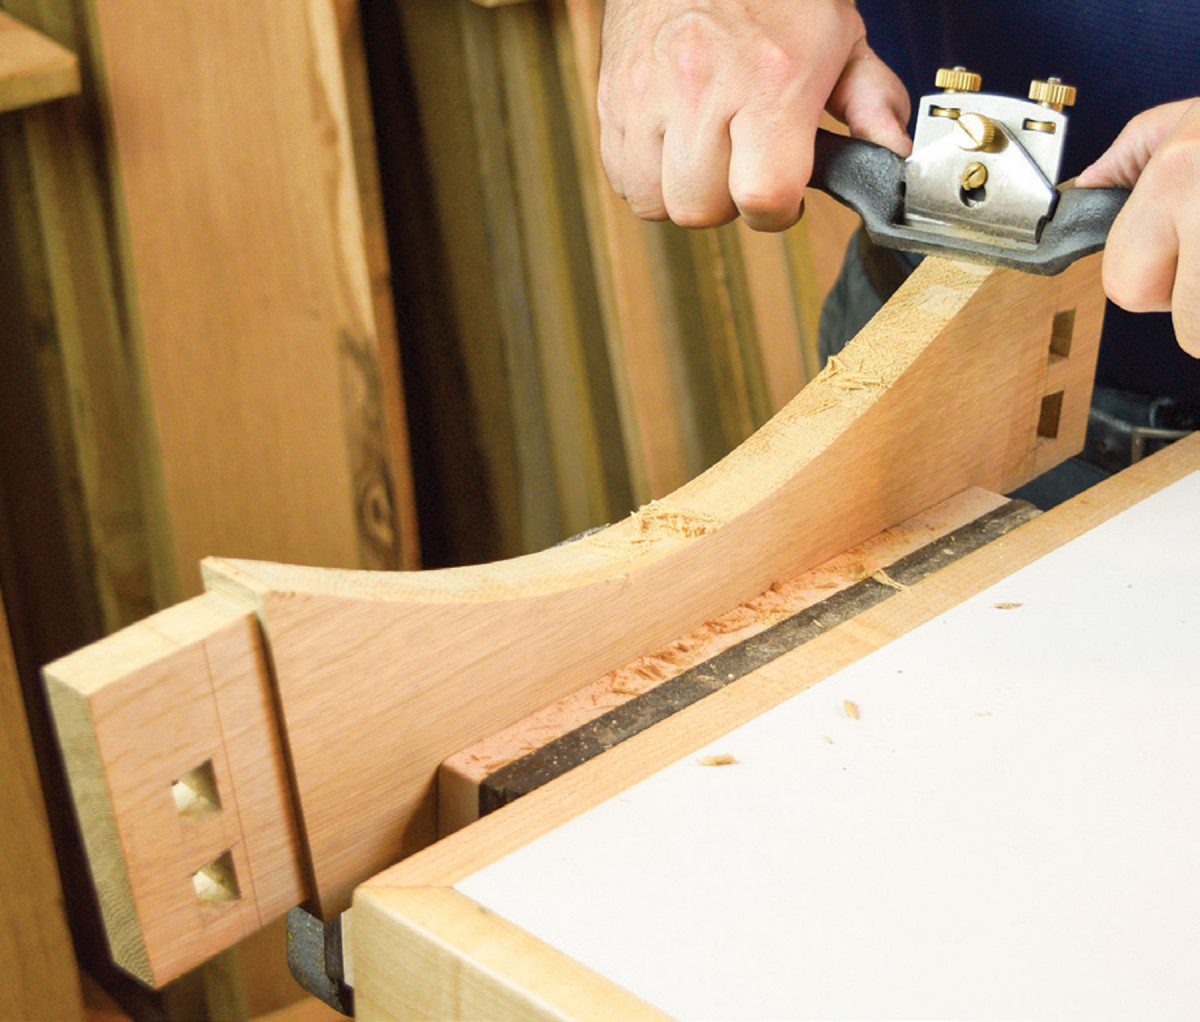
24. Refine the lower rail with a spokeshave. Work ‘downhill’ from one end, then reverse the rail in your vise, and repeat from the opposite end.
Since the floral template is oversized, compared to the actual inlay, the cutouts won’t all fit on one board. To get around this limitation (and to save template material) I laid out the stem shape upside down on the template. This means you not only flip the template width-wise to get the ‘four squares’ pattern, you also flip the template lengthwise before routing the stem portion of the pattern.

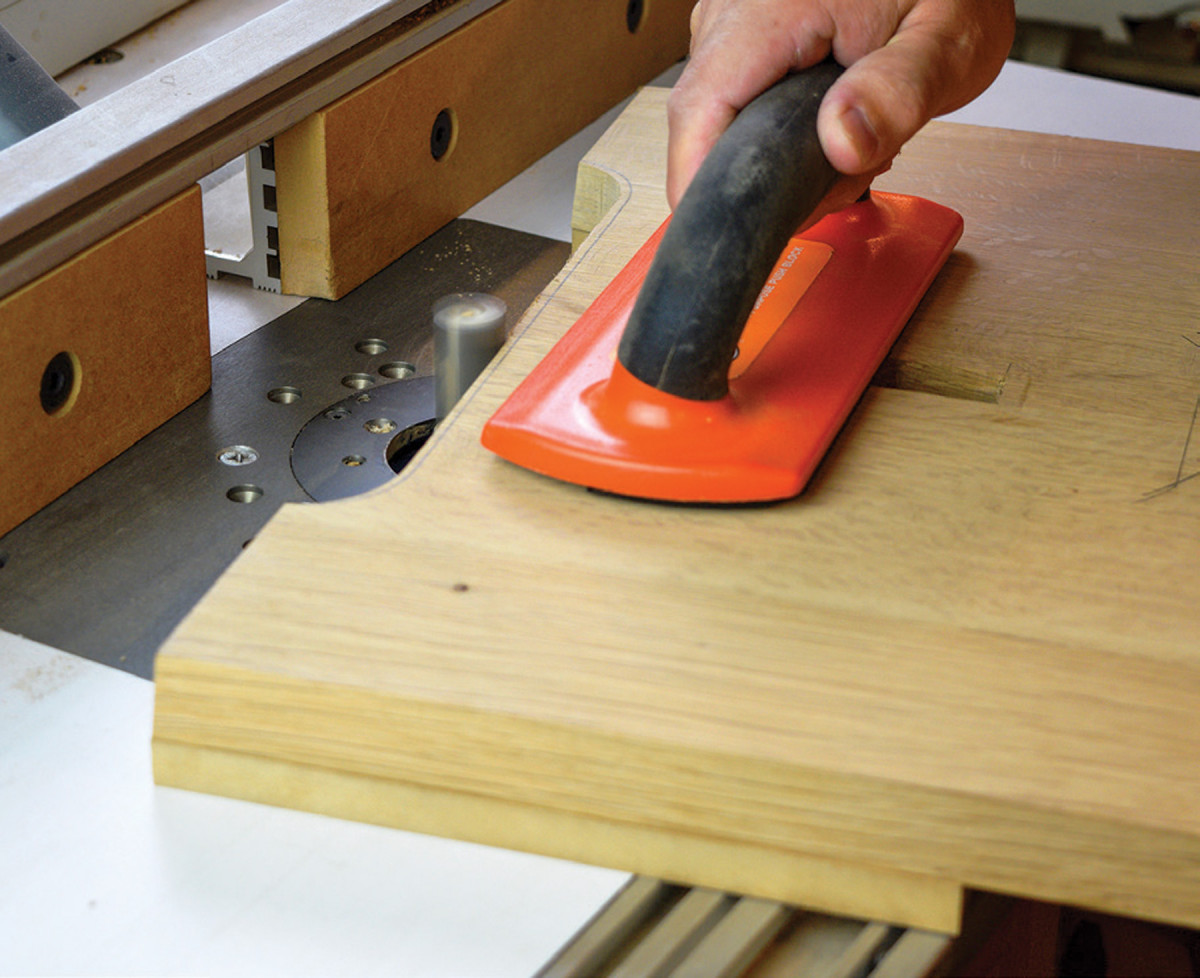
25. Cut a 21/4″ radius on each end of the upper rails. Work through progressively finer gits to sand the shape smooth.
Then move the template to a walnut board to cut the small inlay pieces. Clamp the template in place, and remove the ring from your inlay bushing kit. Make a single clockwise pass in each opening, being careful to maintain contact with the template. When the routing is complete, cut the walnut pieces free at the bandsaw by resawing the board. You may need to lightly sand the corners of each piece to help them drop into place. Since the inlay fits so snugly, you can’t really do a test fitting. Once you feel the inlay piece start to find its way into the recess, go ahead and commit to a permanent assembly. Glue the pieces in place and tap them into position with a finish hammer. Once the glue sets, plane or sand the inlay flush.
Lifted Shape
26. Start by gluing the side panels together with the lower rail. Install the wedges and let the glue cure. For the second phase, build the gridwork assembly with glue and a pair of screws. Bring the gridwork assembly into place, and secure it with glue and pegs.
Now create the lifted shape at the bottom of each panel. This subtle curve helps the panels look more like proper legs, and I think it lightens the look too. You could simply cut this shape out and sand it smooth, but I made a routing template instead. Cut the lifted shape on the template and use it to pattern rout both side panels.
Angle the Panels
27. A self-centering doweling jig helps guide a 1/4″ brad point bit. Drill through the joints and glue short lengths of oak dowel in place.
Now that all the joinery for the side panels is complete, they can be angled to final size. Mark a line starting at the bottom corner of the panel, angling inward at 7°. For reference, the top of the panel should be about 11“ wide. Complete the angled cuts with a tapering sled at the table saw, or a circular saw with straightedge guide. Be sure to save the angled cutoffs, as they make perfect wedges for the dragonfly wings.
Arch Lower Rail
This is a good time to finish a few tasks on the lower rail, such as forming the arched shape that graces its lower edge. Use a bowstring or flexible ruler to strike a fair curve on the lower rail. The curve should leave the rail 21/4“ wide at the apex. Cut the curved shape at the bandsaw, and trim to your line with a spokeshave.
Now take the time to chamfer the through tenons and ease any exposed edges of the lower rail.
Round Corbel Cuts
 Likewise, the curves can be established on the three upper rails as well. Draw the curved shape on the ends of all three upper rails. The curve is a simple quarter-circle, with a 21/4“ radius. Rough cut the shapes with a bandsaw or jigsaw, and sand them smooth. Just make sure you mark the curve on the correct edge — with half laps cut on top and bottom of the rails, this would be an easy mistake to make.
Octagon Top
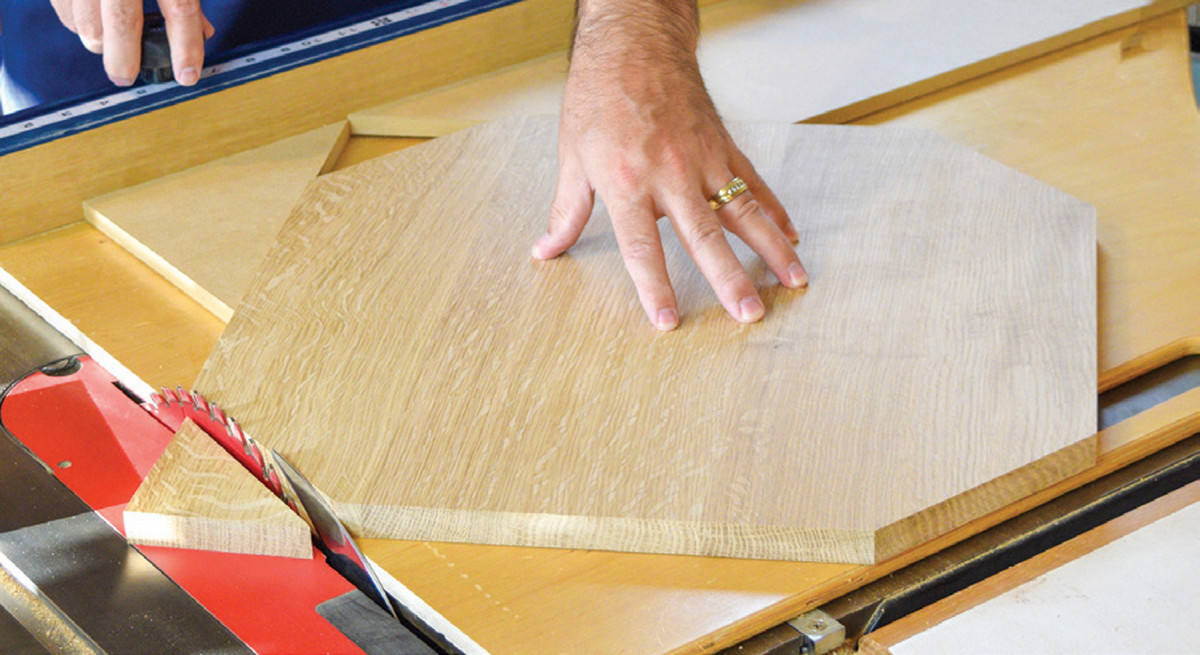
 Locate the tabletop panel that you made in an earlier step and cut it to 181/2“ square. Then mark points 4“ back from each corner and connect the dots with a pencil. Trim to your lines to form a roughly octagonal shape. Ease the edges and sand the top smooth.
Final Assembly
28. Position the top panel on a crosscut sled to trim the corners. Scraps of MDF with opposing 45° agrees are attached to the sled, to hold the top panel in position as you make the cut. Now simply rotate the panel 90° for the next cut.
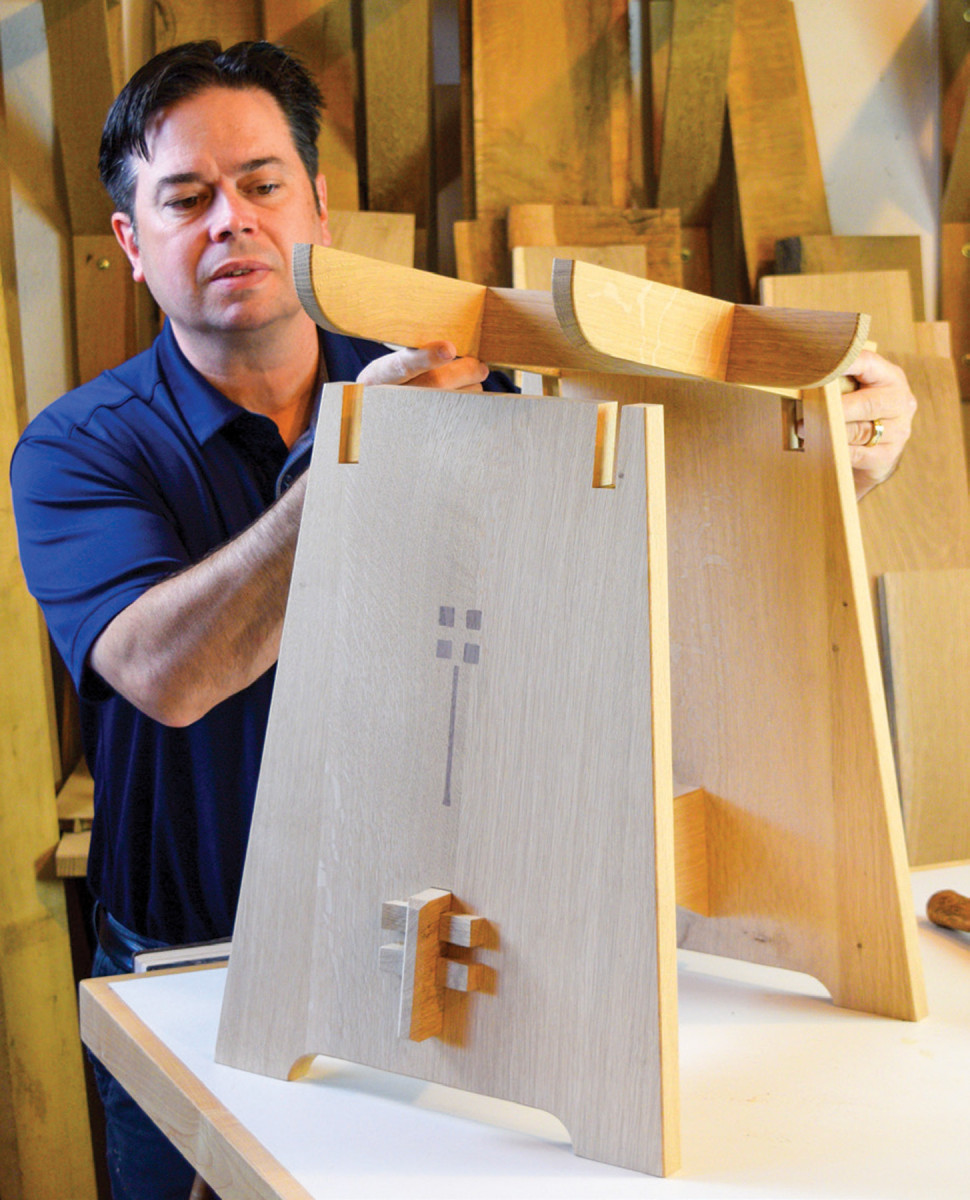
Press the upper rails together to form a gridwork. Then drop the gridwork into the bridal notches and position it symmetrically. If everything comes together as it should, finish sand the parts and do a final inspection for dents and dings. Glue the table base parts together and set aside to dry. As with any through tenon joint, you’ll get cleaner results if you only apply glue to the base of the tenon. To ensure this table lasts for years to come, I drilled for 1/4“ dowels through the bridal joints. A self-centering dowel jig, mounted on the angled panels, makes this an easy task.
Finishing
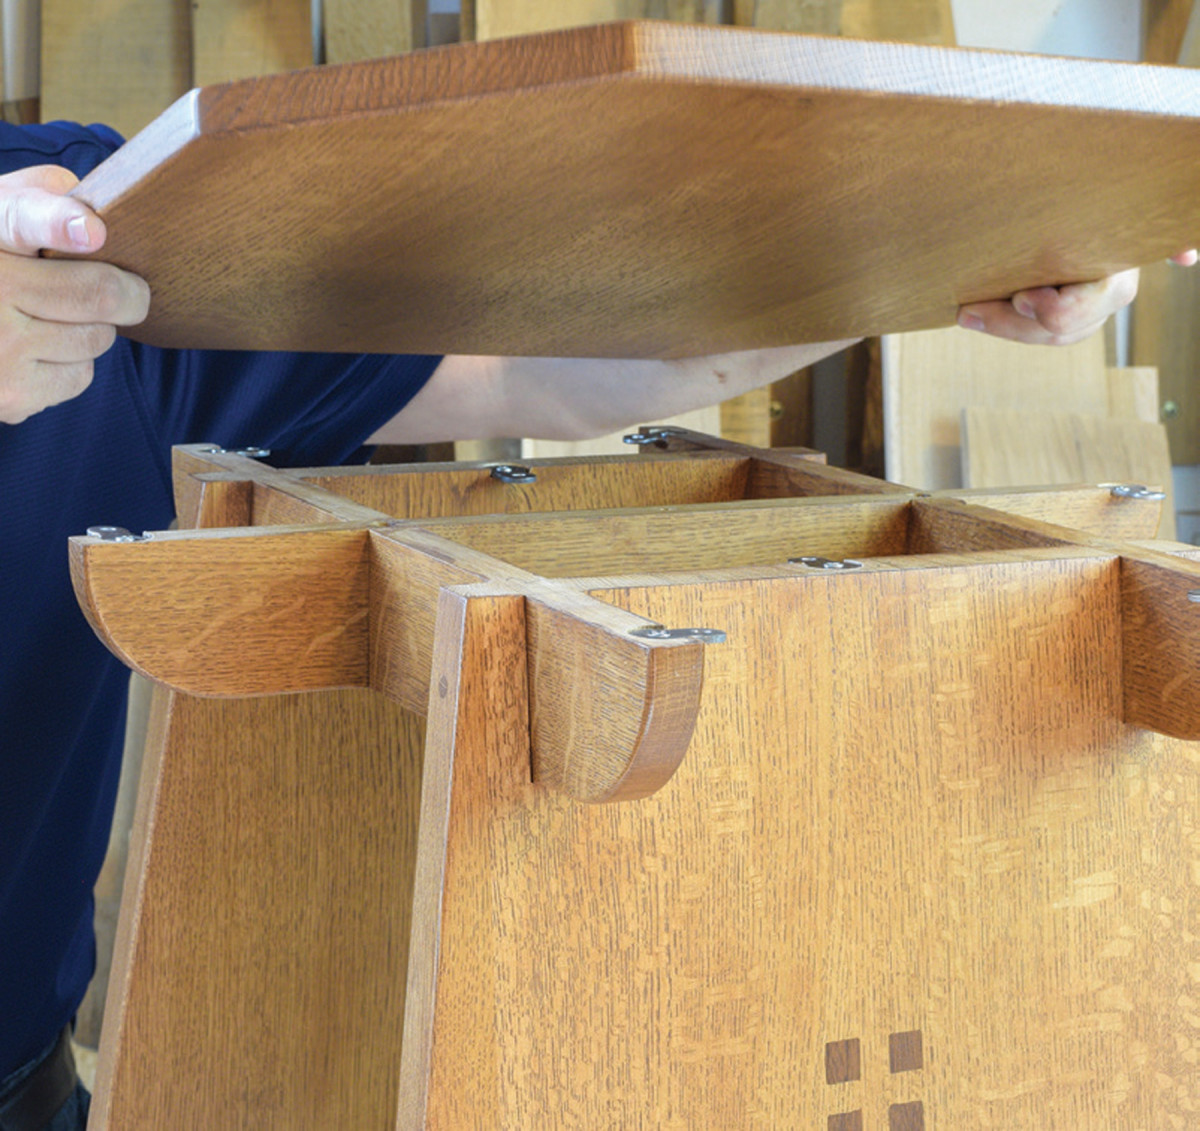
29. Position the top so the grain is running the same direction as the side panels, and secure it with eight ‘figure 8’ fasteners. In addition, a single #8 x 21/2″ screw is driven upwards, through the center of the gridwork assembly, to securely anchor the top panel in place.
There’s already a lot going on with this little table—from the inlay to the exposed joinery—so I chose to keep the finishing schedule short and sweet. I applied a medium toned oil based stain and let that dry overnight. For a topcoat, I sprayed two coats of pre-catalyzed lacquer in a satin sheen. I like to wet-sand the final coat for an extra-smooth finish. Once the final coat is dry to the touch, spray on some soapy water, and sand with the grain using a 1200-1500 grit soft sanding sponge. Buff the table with a soft rag and put it on display in your favorite room.
Here are some supplies and tools we find essential in our everyday work around the shop. We may receive a commission from sales referred by our links; however, we have carefully selected these products for their usefulness and quality.


Beautiful design and execution…