We may receive a commission when you use our affiliate links. However, this does not impact our recommendations.
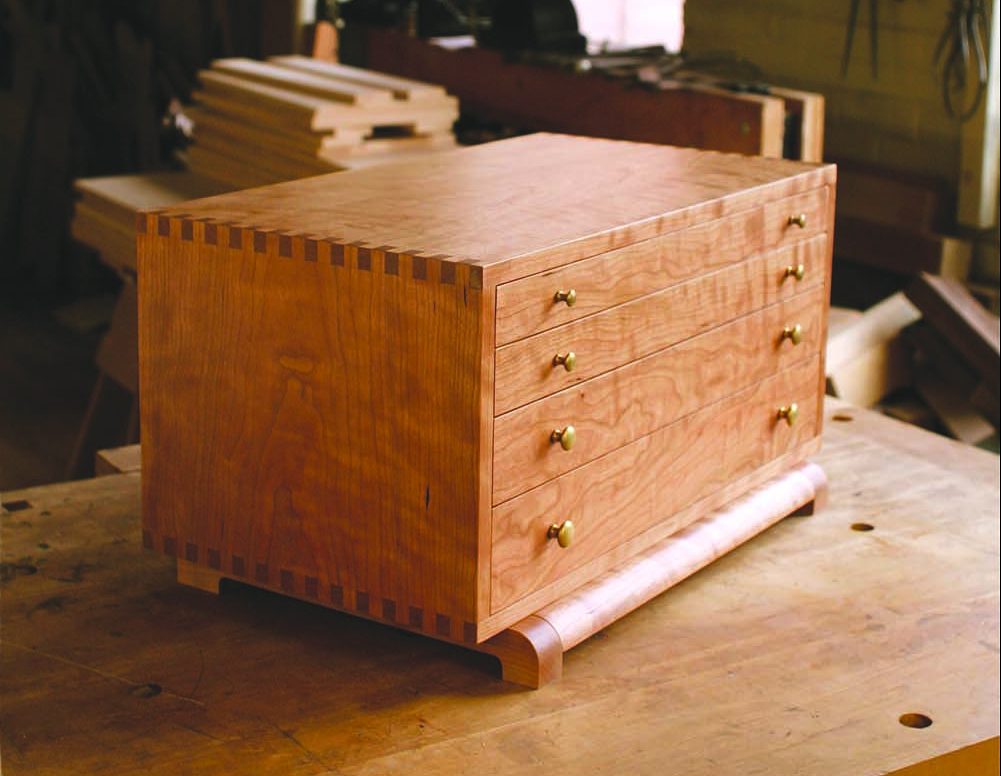
Machinists and mechanics keep their small tools in a chest with shallow drawers. I do, too—except mine is custom-built, sized to exactly fit what I want to keep close at hand. And it’s more than a merely functional metal box: Made from figured cherry, matched all around, my tool chest is a daily reminder that grain matters.
The drawers in this chest are side-hung, which maximizes the amount of storage space inside the chest. The whole unit is as compact as could be, and even contains an additional drawer hidden behind its lower rail. I fitted out some of the drawers with interior dividers, but didn’t make them permanent. You never know when a new small tool might come along to join the crew!
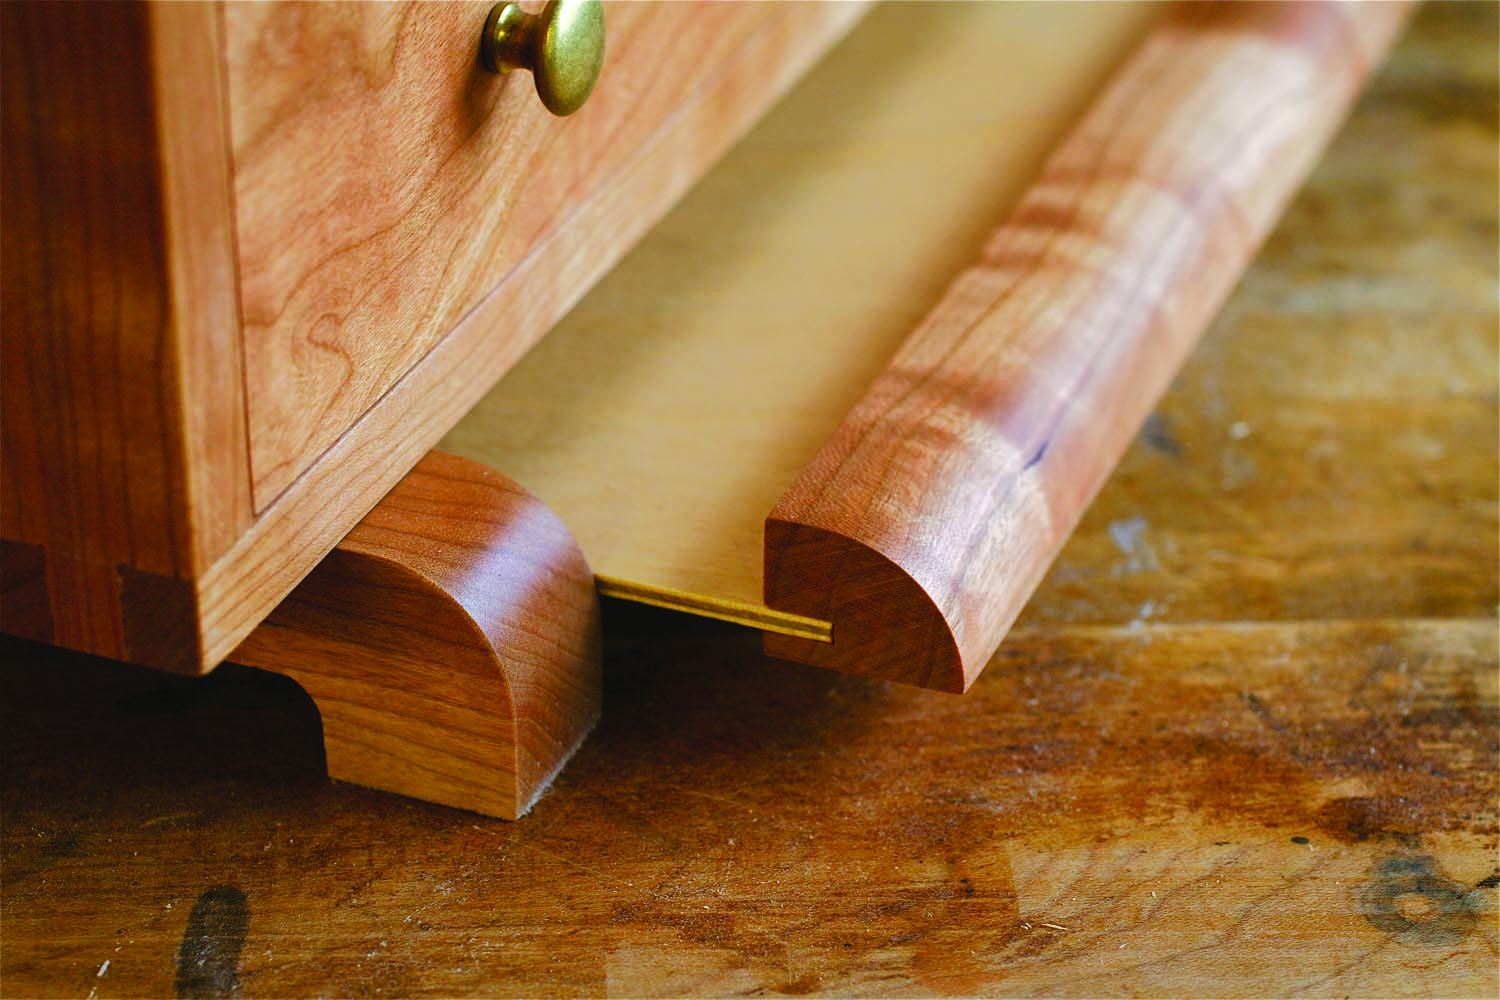
A secret drawer hides behind the chest’s front rail.
Size the Case
Photo 1. Take stock of what you’d like to store in your chest before you begin building it. Arrange your tools and supplies, then estimate the width, depth and height of the drawers you’ll need.
To get started, take stock of what tools and supplies you would like to store in your chest. Lay them out as they might sit in the drawers and take some measurements to determine the number, length, width and height of the drawers you’ll need (Photo 1). Make a full-scale drawing of one side of your chest—similar to Fig. 02, but including the drawers—to confirm your measurements and nail down the position of each drawer.
Here’s how I arranged the tools in my chest: The top drawer holds various important small items that would get lost in a larger drawer; the second drawer holds marking and measuring tools; the third drawer holds my favorite files and rasps; the bottom drawer contains boxes of screws and other fastening supplies.
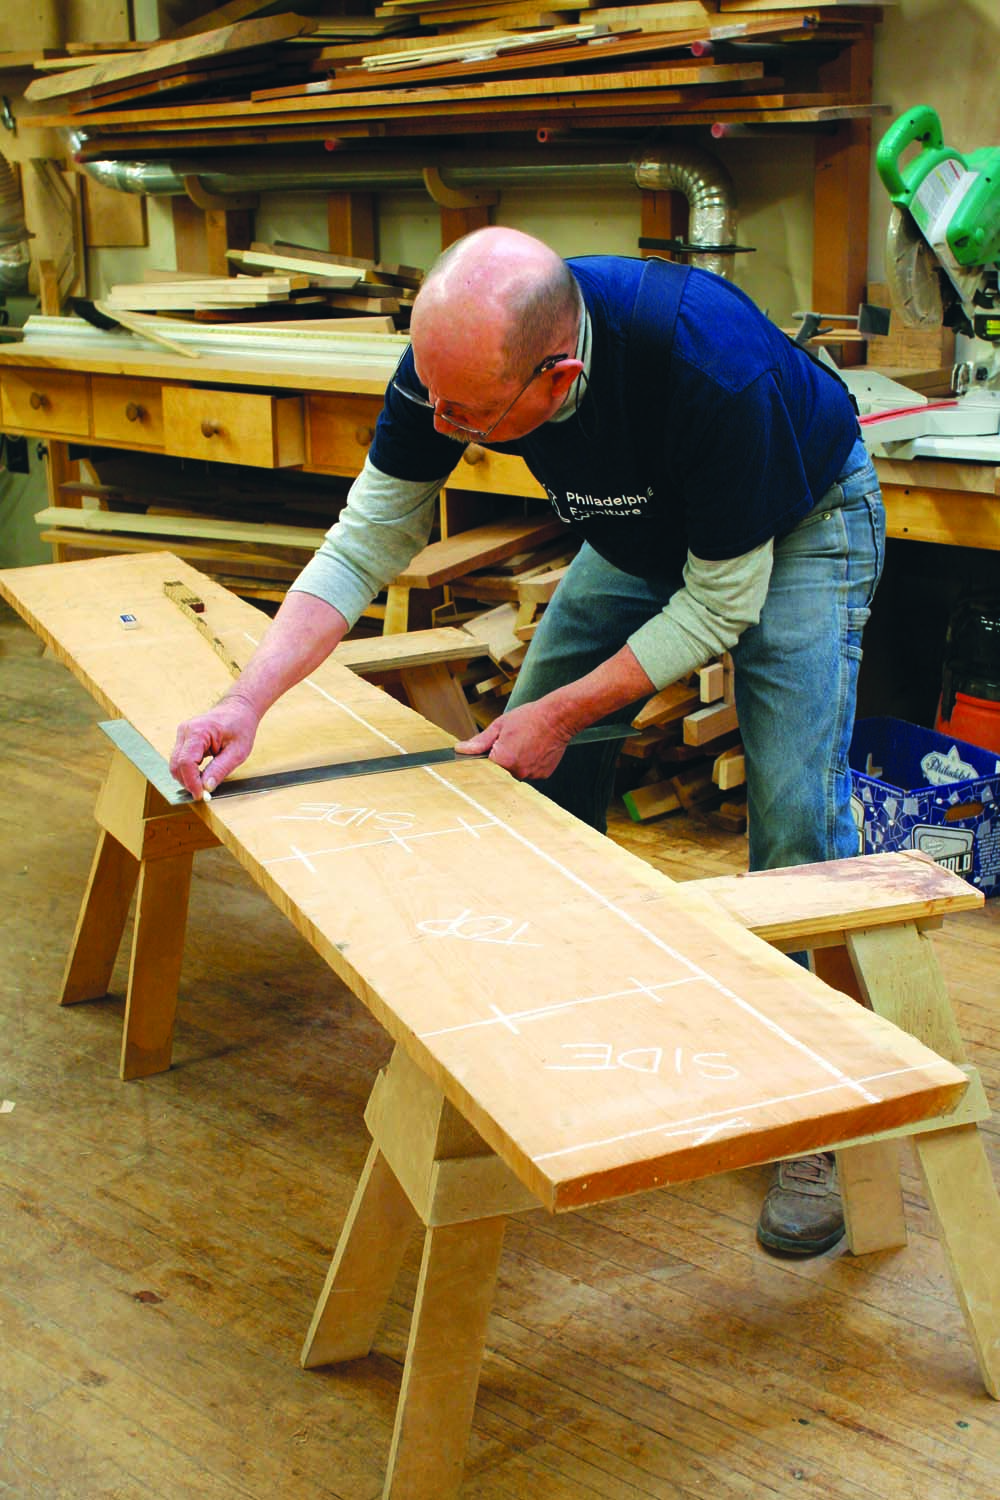
Photo 2. Lay out the parts of your chest before you begin cutting. Ideally, you can arrange the sides and top of the chest in sequence, as well as the drawer fronts.
Once I figured out how deep the drawers would be, I looked for a board wide enough and long enough to build the chest from a single plank, so all the grain would match (Photo 2). I wanted all the drawer fronts to come from one wide piece, so the front of the chest would look like a single board. And I wanted the wood’s figure to wrap around the sides and top, as if the board had just been folded at the corners.
The top and bottom (A) and sides (B) of the case are only 1/2″ thick. If you’re starting with 4/4 (1″) lumber, don’t take the wood down to this thickness right away. In order to make accurate box joints, your pieces must be absolutely flat, and I’ve learned the hard way that wood may not stay flat if you reduce its thickness too rapidly. It’s best to be conservative and remove only 1/8″ or so in one session, let the wood rest for a few days, re-joint it, then plane again. Be sure to plane some additional wood to the same thickness for making test cuts with your box joint jig.
Determine the exact width of your side, top and bottom pieces by the number of fingers your box joints will have. I think box joints look best if the fingers are longer than they are wide; on this box, the fingers are 1/2″ long (the thickness of the material), but only 3/8″ wide. When I make box joints, I’ve found that it’s easier to keep track of the cutting process if I make an odd number of fingers—this means that the box joints on the top and bottom pieces begin and end with full fingers. Multiplying an odd number (in this case, 27) by the width of the fingers (3/8″) gave me an overall width of 10-1/8″ as a target.
Don’t rip your boards to a theoretical width such as this, however: Do a real-world test. Set up your box joint jig, fine-tune its setting until the joints fit right, then cut 27 fingers (or whatever number you want) on a slightly wider test piece. Measure the width that they add up to—it may be a little more or a little less than your math indicated.
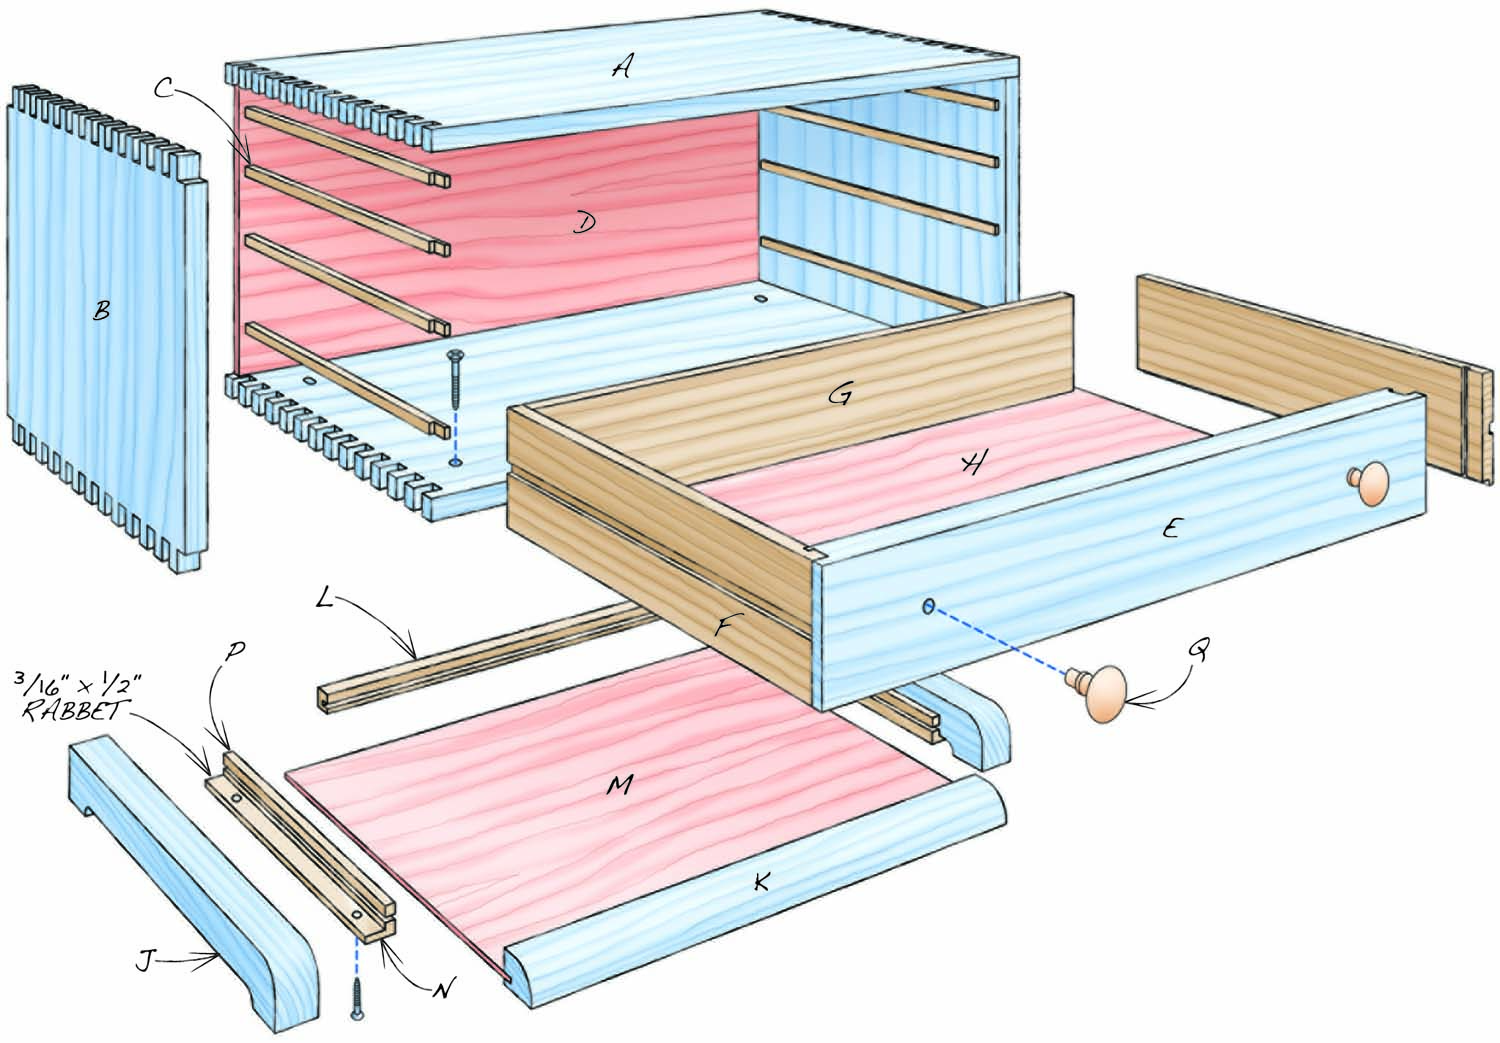
Fig. 01. Exploded View
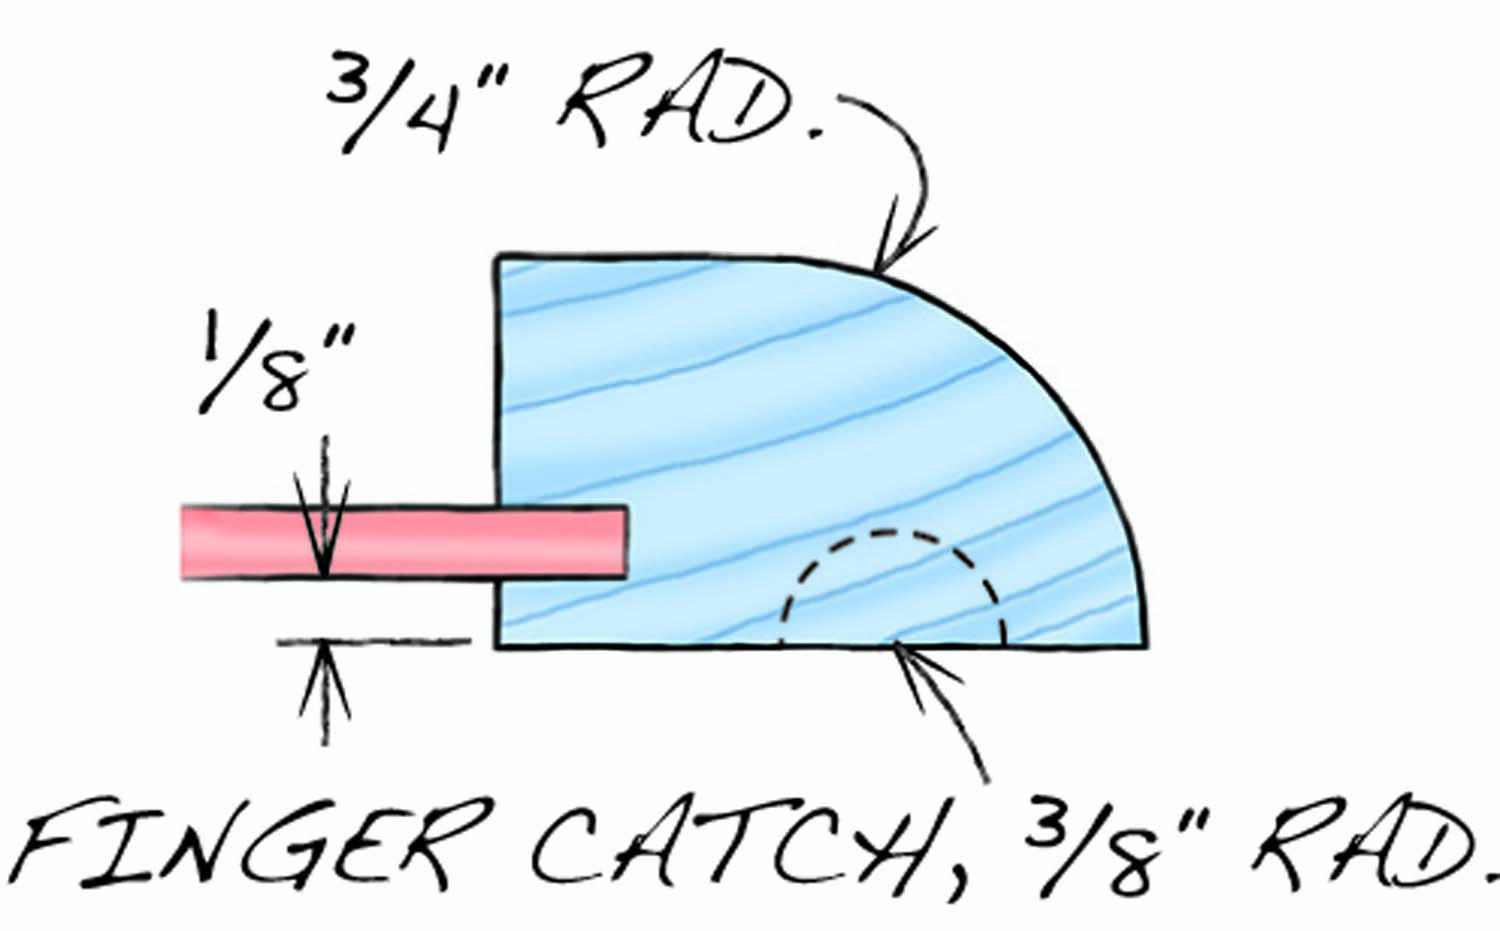
Fig. 02. Hidden Drawer Front
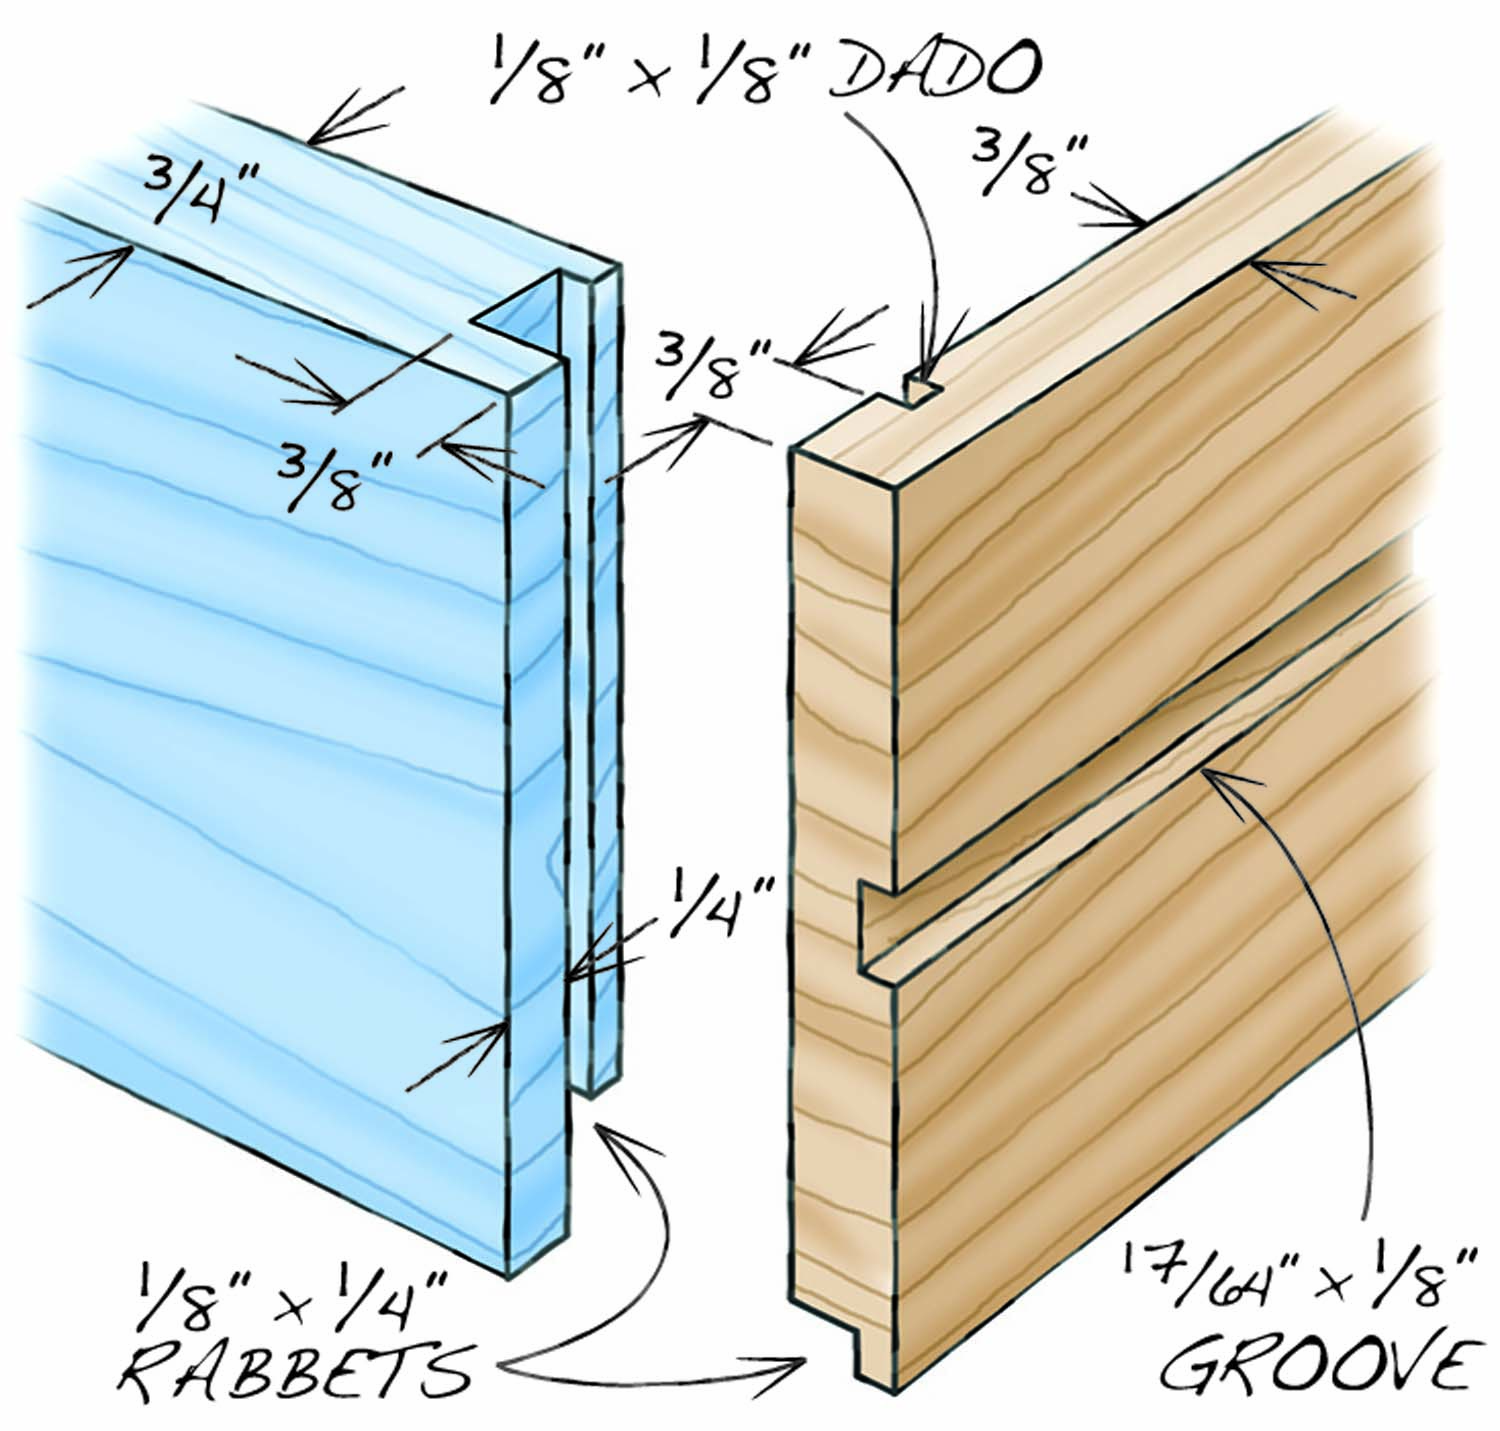
Fig. 03. Drawer Details

Fig. 04. Feet Setback
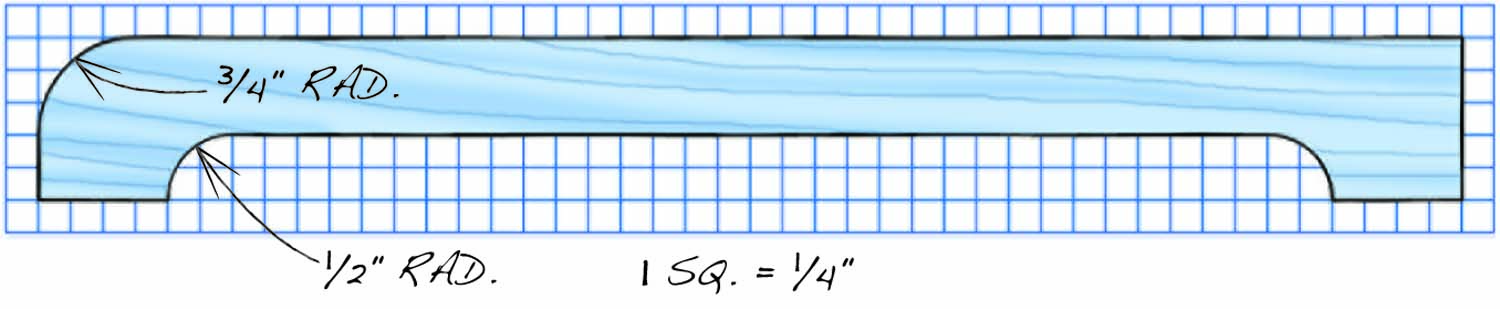
Fig. 05. Sled Foot Pattern
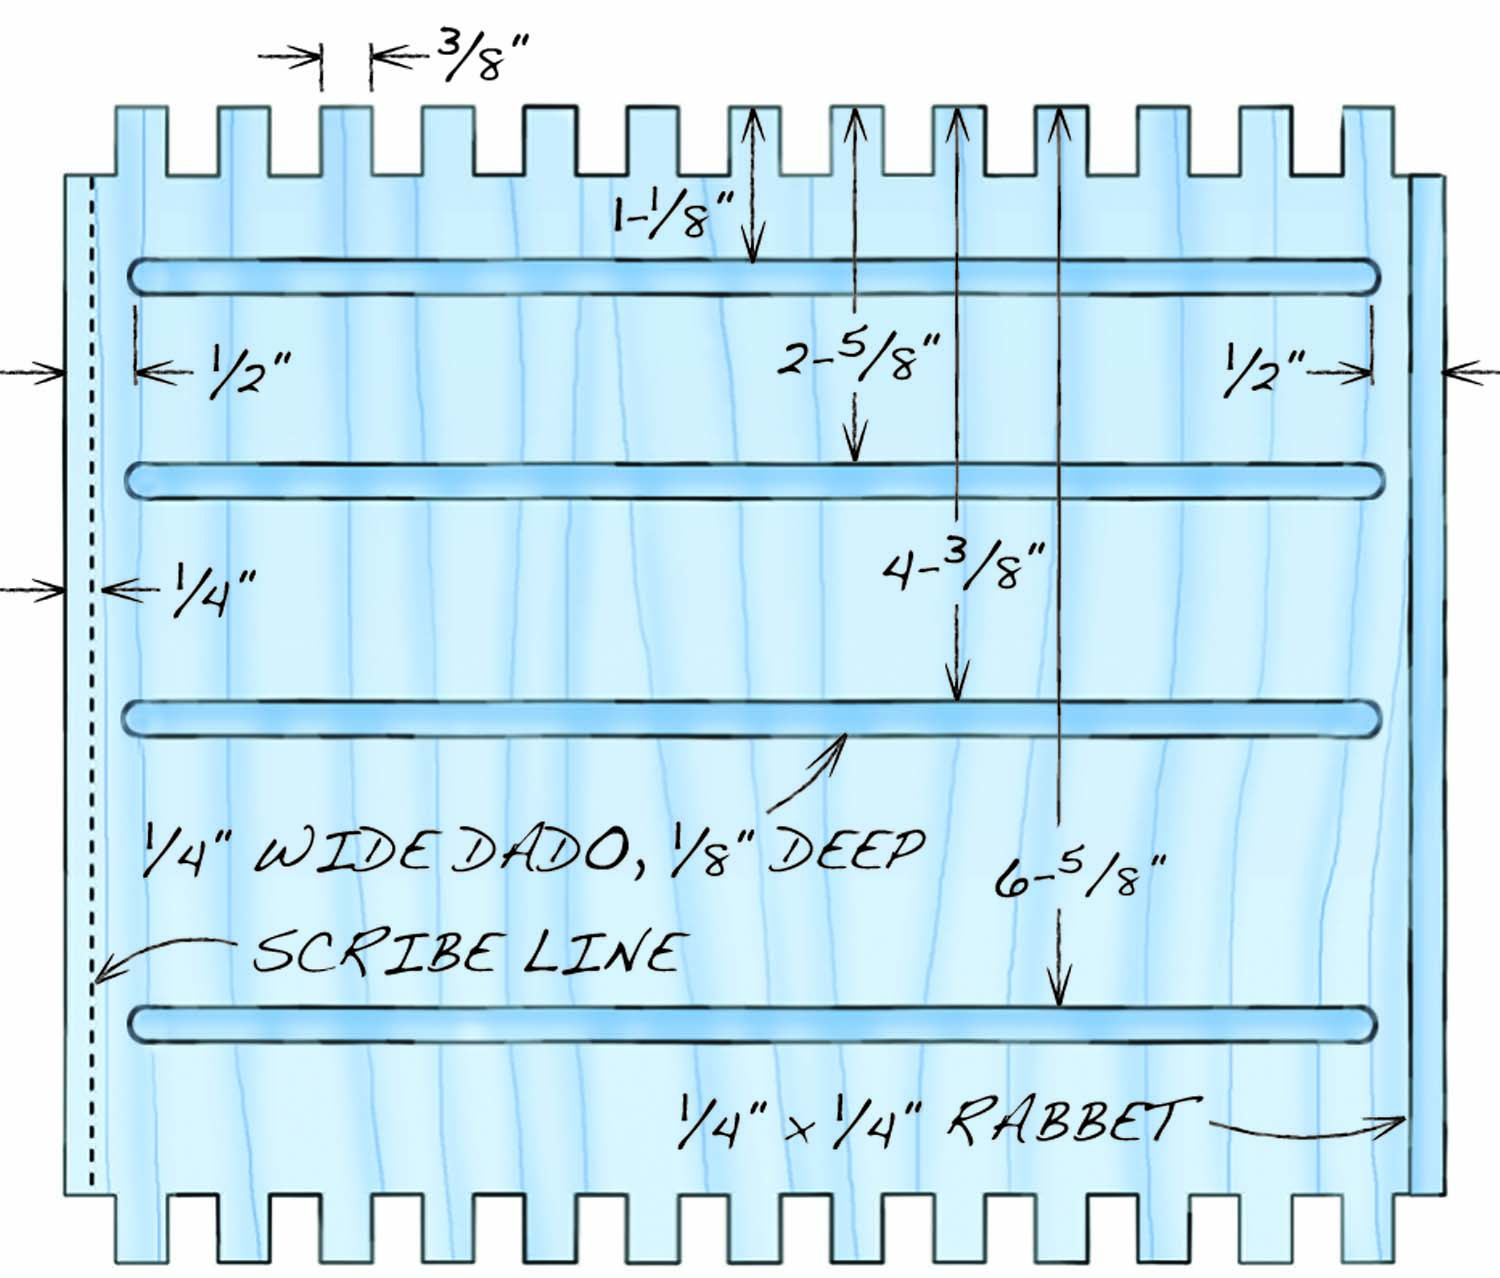
Fig. 06. Dado layout
Cut List
|
Craftsman’s Tool Chest |
|||||
|
Overall Dimensions: 9-3/4″ H x 10-1/8″ W x 18″ L |
|||||
|
Section |
Part |
Name |
Qty. |
Th x W x L |
|
|
Cabinet |
A |
Top and bottom |
2 |
Cherry |
1/2″ x 10-1/8″ x 18″ |
|
B |
Side |
2 |
Cherry |
1/2″ x 10-1/8″ x -8-1/2″ |
|
|
C |
Drawer hanger |
8 |
Soft maple |
1/4″ x 1/4″ x 8-1/2″ |
|
|
D |
Back |
1 |
1/4″ Baltic birch ply |
1/4″ x 7-1/2″ x 17-1/2″ |
|
|
Drawer fronts |
E1, E2 |
Fronts 1 & 2 |
1 |
Cherry |
3/4″ x 1-1/2″ x 17″ |
|
E3 |
Front 3 |
1 |
Cherry |
3/4″ x 2″ x 17″ |
|
|
E4 |
Front 4 |
1 |
Cherry |
3/4″ x 2-1/2″ x 17″ |
|
|
Drawer sides |
F1, F2 |
Sides 1 & 2 |
2 |
Soft maple |
3/8″ x 1-1/2″ x 9-1/2″ |
|
F3 |
Side 3 |
2 |
Soft maple |
3/8″ x 2″ x 9-1/2″ |
|
|
F4 |
Side 4 |
2 |
Soft maple |
3/8″ x 2-1/2″ x 9-1/2″ |
|
|
Drawer backs |
G1, G2 |
Backs 1 & 2 |
1 |
Soft maple |
3/8″ x 1-3/8″ x 16-1/4″ |
|
G3 |
Back 3 |
1 |
Soft maple |
3/8″ x 1-7/8″ x 16-1/4″ |
|
|
G4 |
Back 4 |
1 |
Soft maple |
3/8″ x 2-3/8″ x 16-1/4″ |
|
|
Drawer bottoms |
H |
Drawer bottom |
4 |
1/8″ Baltic birch ply |
1/8″ x 9-1/2″ x 16-3/4″ |
|
Feet |
J |
Foot |
2 |
Cherry |
1″ x 1-1/4″ x 10-15/16″ |
|
Hidden drawer |
K |
Front |
1 |
Cherry |
3/4″ x 1″ x 13-1/2″ |
|
L |
Back |
1 |
Cherry |
1/2″ x 1/2″ x 12-5/8″ |
|
|
M |
Bottom |
1 |
1/8″ Baltic birch ply |
1/8″ x 10″ x 13-1/2″ |
|
|
N |
Lower guide |
2 |
Cherry |
5/16″ x 3/4″ x 8″ |
|
|
P |
Upper guide |
2 |
Cherry |
1/4″ x 1/4″ x 8″ |
|
|
Drawer pulls |
Q1 |
Pull 1 |
2 |
Brass |
3/8″ dia. |
|
Q2 |
Pull 2 |
2 |
Brass |
7/16″ dia. |
|
|
Q3 |
Pull 3 |
2 |
Brass |
9/16″ dia. |
|
|
Q4 |
Pull 4 |
2 |
Brass |
5/8″ dia. |
|
Build the Case
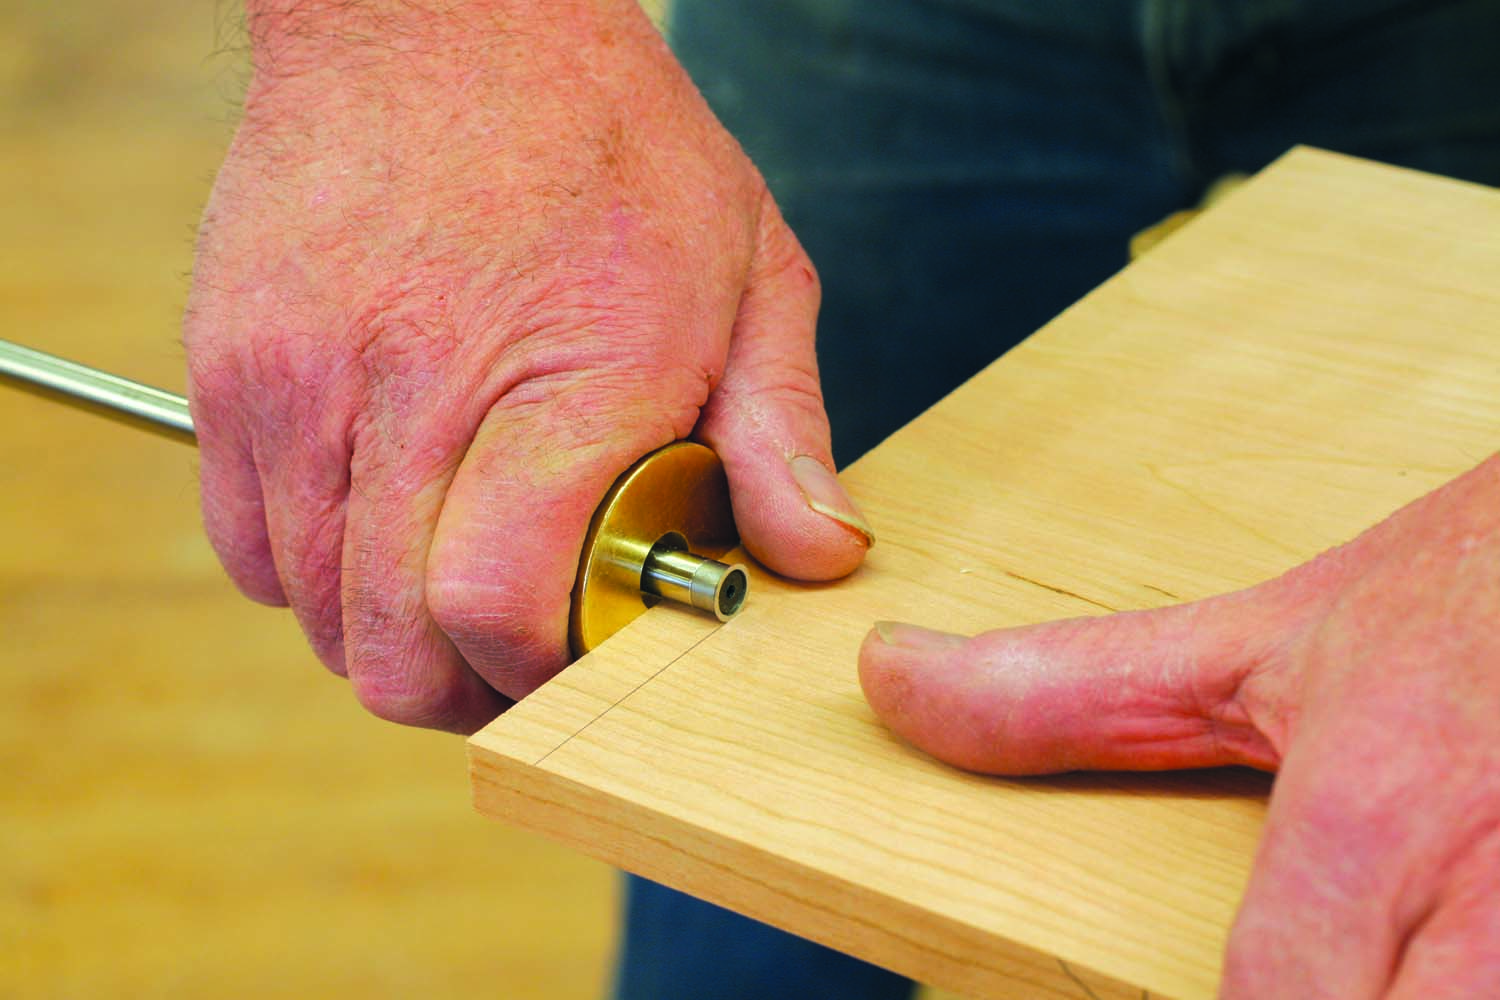
Photo 3. Use a marking gauge to score finger-joint base lines on the top, bottom and sides of the chest. These lines will help prevent tearout when you cut the joints.
Cut the sides, top and bottom to final width and length. To prevent tearout when making the box joints, use a wheel or knife-style marking gauge to score base lines for the joints (Photo 3). I want my box joints to be about 1/64″ proud when they’re glued up, so this line is 1/2″ plus 1/64″ in from the end of the board. (I leave the scribed lines on the finished piece as a mark of craftsmanship.) Score both sides of each piece, then cut all of the joints (Photo 4). I use a shop-made tablesaw sled that I’ve designed.
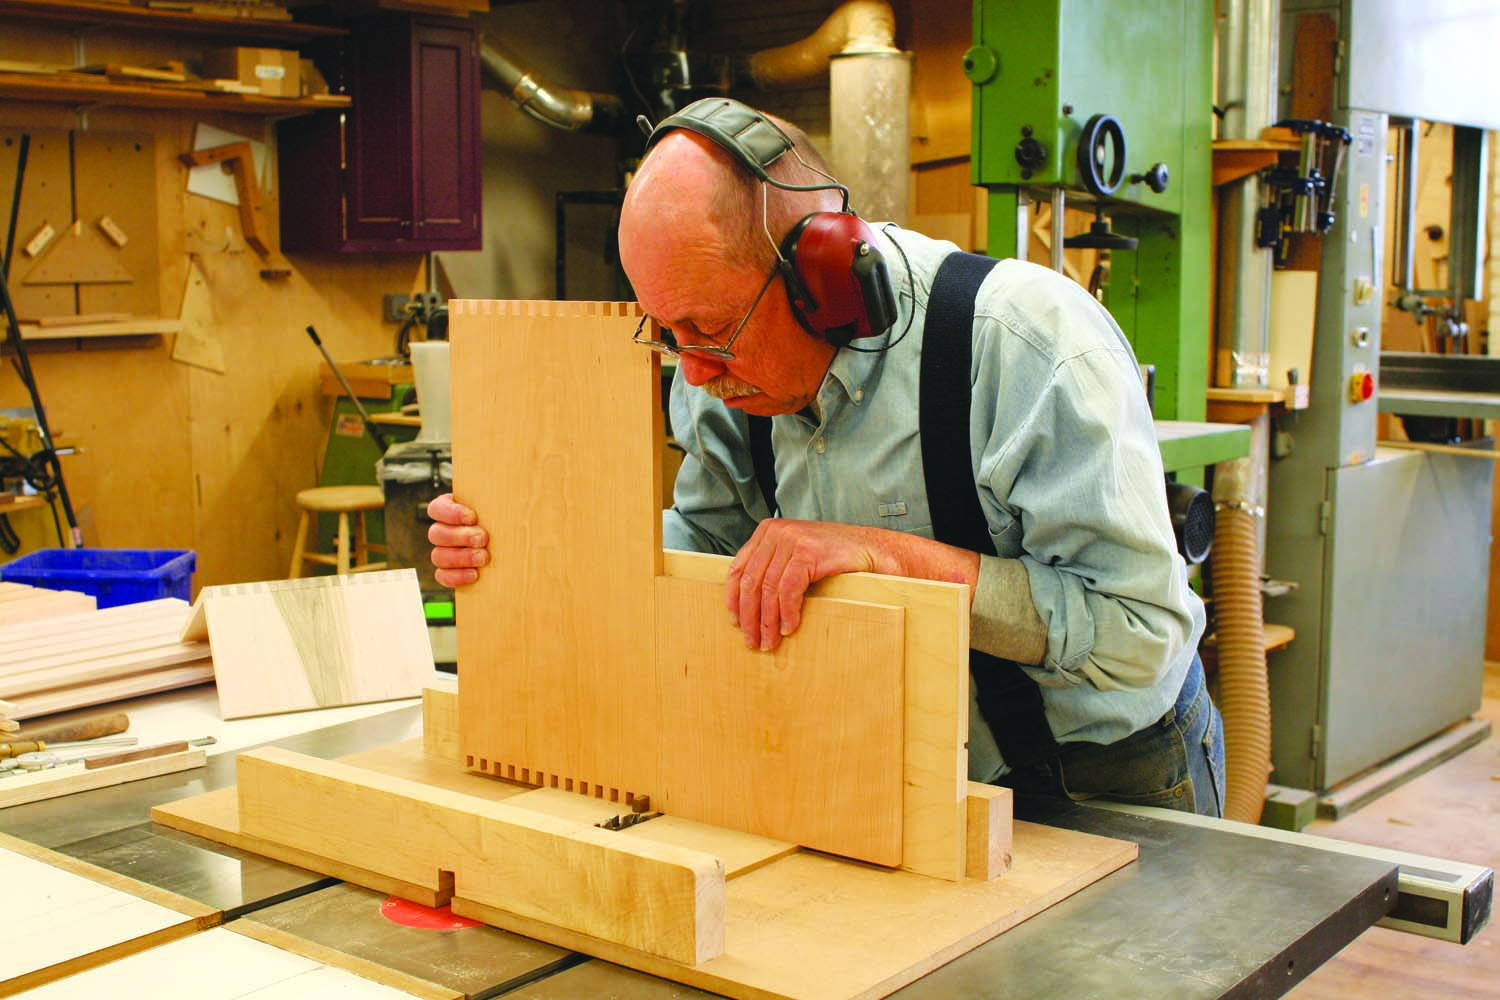
Photo 4. Cut the box joints with a dado set. I use a special sled with a tall fence. I butt up a scrap piece to the workpiece to ensure that the joints are square.
Next, cut stopped dadoes in the sides to receive the drawer hangers (C)—the small strips that the drawers will hang from. Set up your router table with a 1/4″ upcut spiral bit and raise the bit 1/8″ high. These dadoes must be absolutely straight; I’ve found that the best way to ensure this is to trap each side between two fences (Photo 5). In addition, clamp two blocks, front and rear, to one of the fences to determine the beginning and end of each cut. Rout both of the case’s sides at the same setting, then move the fences for each subsequent pair of dadoes. Don’t sweat the precise location of the start and stop blocks each time you move the fences. It’s OK if the ends of the dadoes don’t exactly line up; you’ll be able to correct for that later, when you install the drawer hangers.
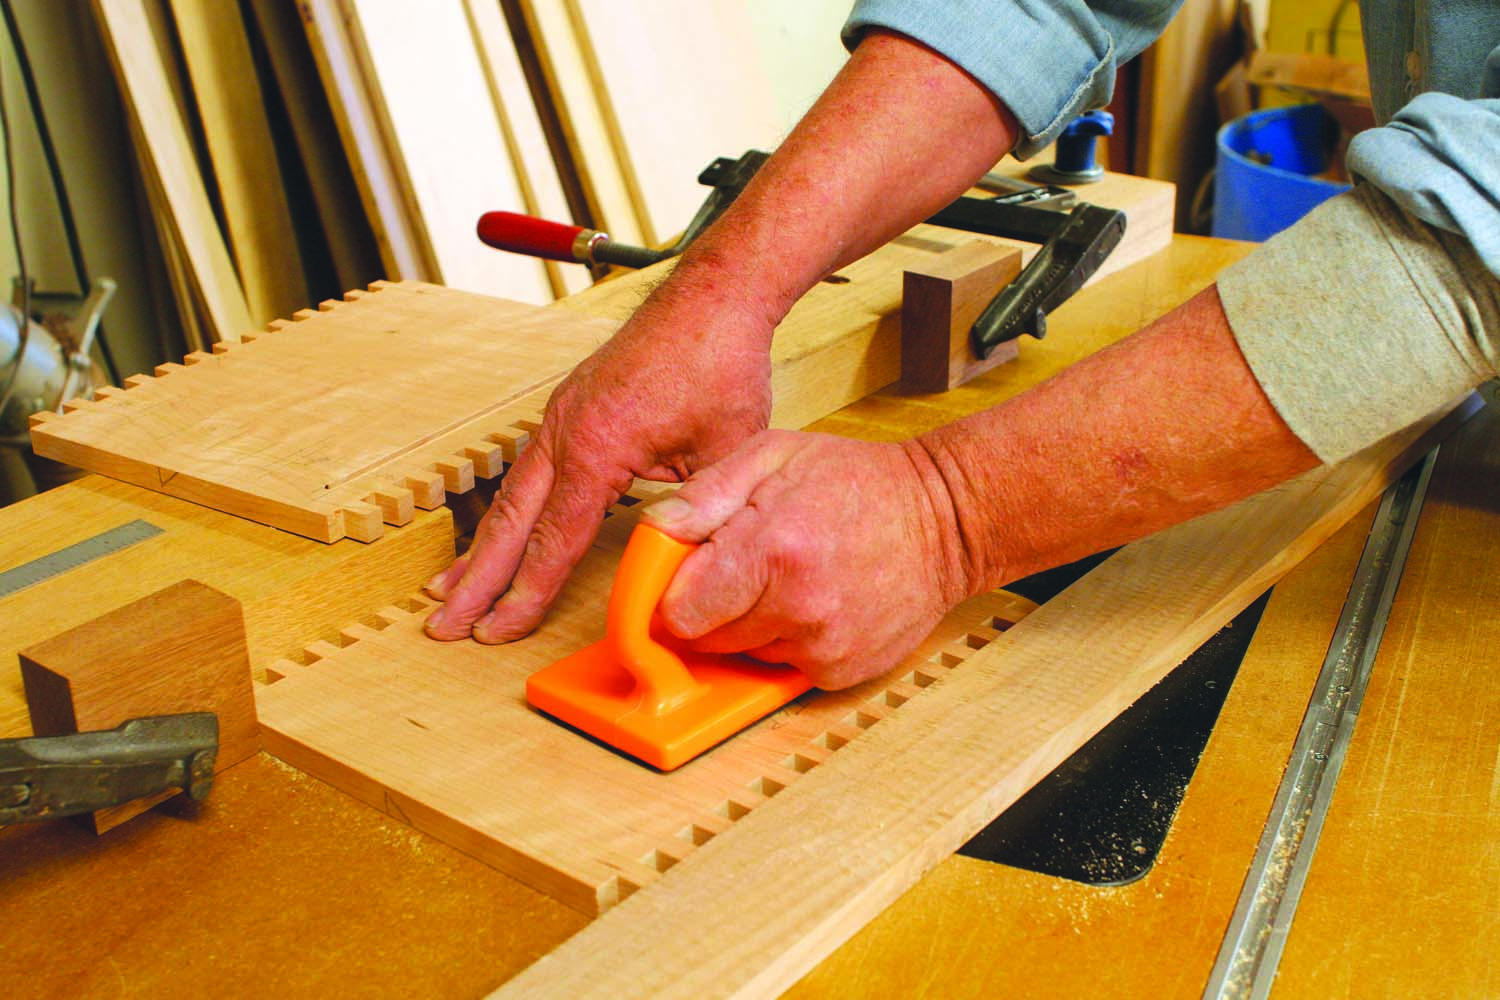
Photo 5. On a router table, cut stopped dadoes in the sides of the case to receive drawer runners. To make a straight, accurate cut, trap the sides between two fences.
Cut a rabbet in the sides to receive the case’s back (D). Don’t cut a similar through rabbet in the top and bottom pieces; this would create a visible hole in the box joints. The back doesn’t really need to be let into all four sides of the case, but if you prefer this arrangement, use a plunge router to stop the rabbets in the top and bottom pieces. Alternatively, you could cut all four rabbets after the case is glued together, using a rabbeting bit with a guide bearing.

Photo 6. Glue up the case. The fastest way to apply the glue is with a syringe. To speed up the process, I put glue only on the side pieces and skip every other finger.
The case is ready to glue together. Gluing dozens of box joints requires speed, so I use Elmer’s Glue-All, a white glue that has a longer open time than most yellow glues. I use a syringe to quickly apply the glue on the side pieces (Photo 6), then use a plastic card to spread the glue. (To save time, you don’t have to put any glue on the top and bottom pieces.)
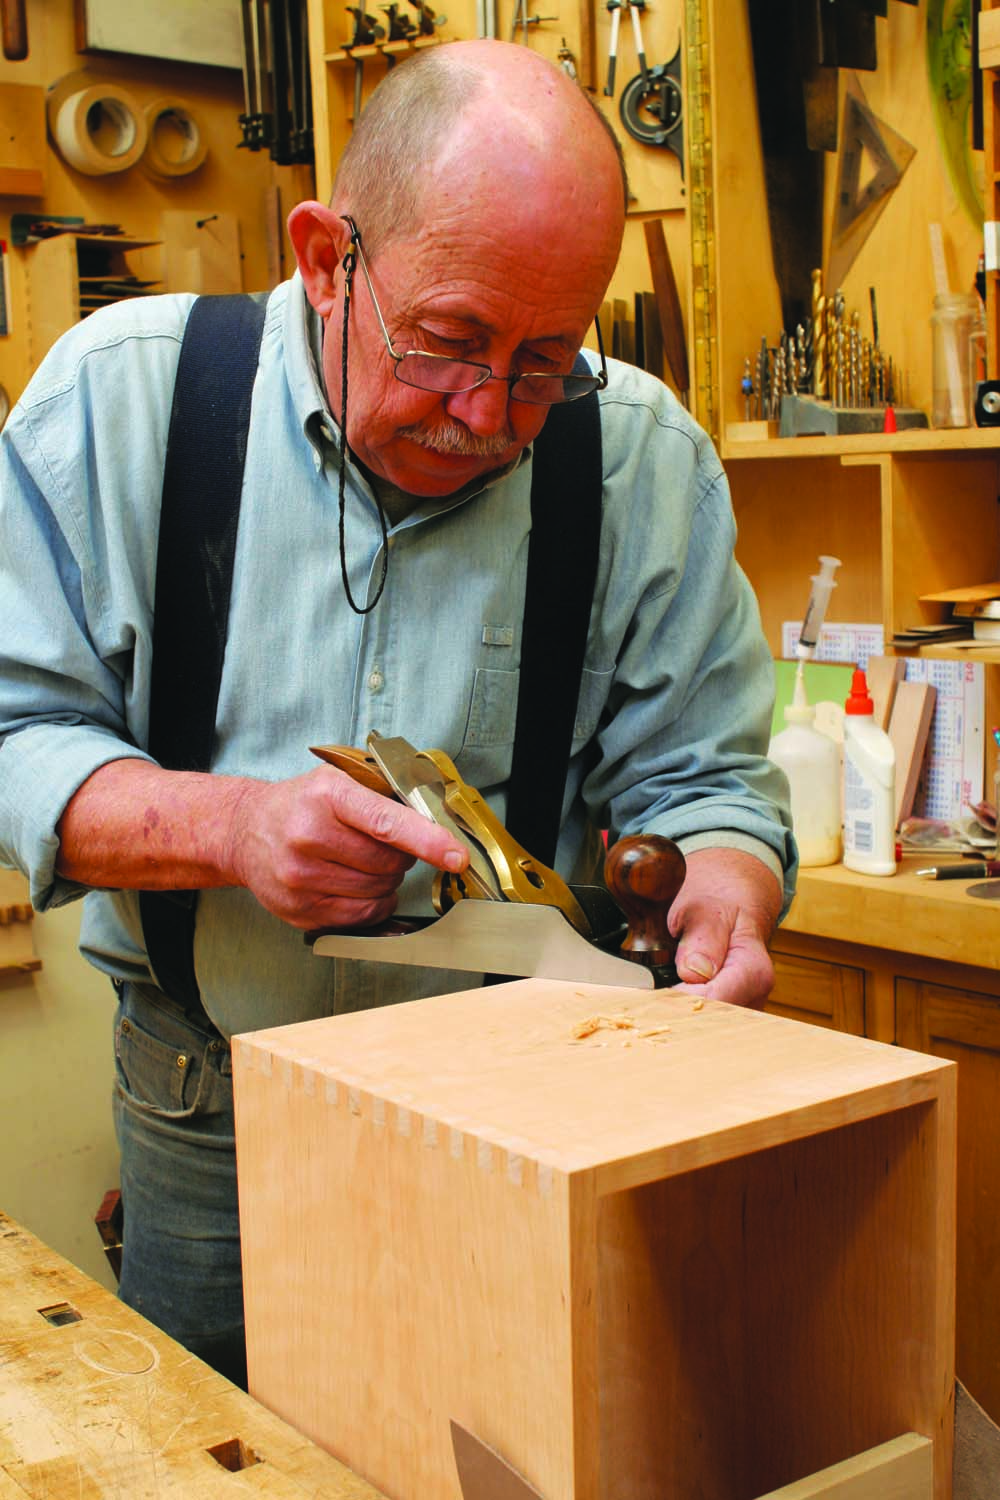
Photo 7. Even up the joints with a plane. A random orbit sander would work as well, but if there’s a lot of waste to remove, using a plane is much faster.
Tap the pieces together with a mallet and a block. Drive the joints home as far as you can, then use clamps to bring the joints up tight. Don’t use too much pressure—this could bend one or more pieces and throw the case out of square. Measured the diagonals to ensure that the case is square, then remove the clamps and clean up the glue squeeze-out. After the glue dries, plane, scrape or sand the joints even (Photo 7).
Make the Drawers
The fronts (E1 – E4) and sides (F1- F4) of the drawers are exactly the same width. Thickness these pieces well ahead of time, but leave them about 1/16″ extra-wide and 1/4″ extra-long. Make sure that one edge of each piece is dead straight before you rip the piece to final width.
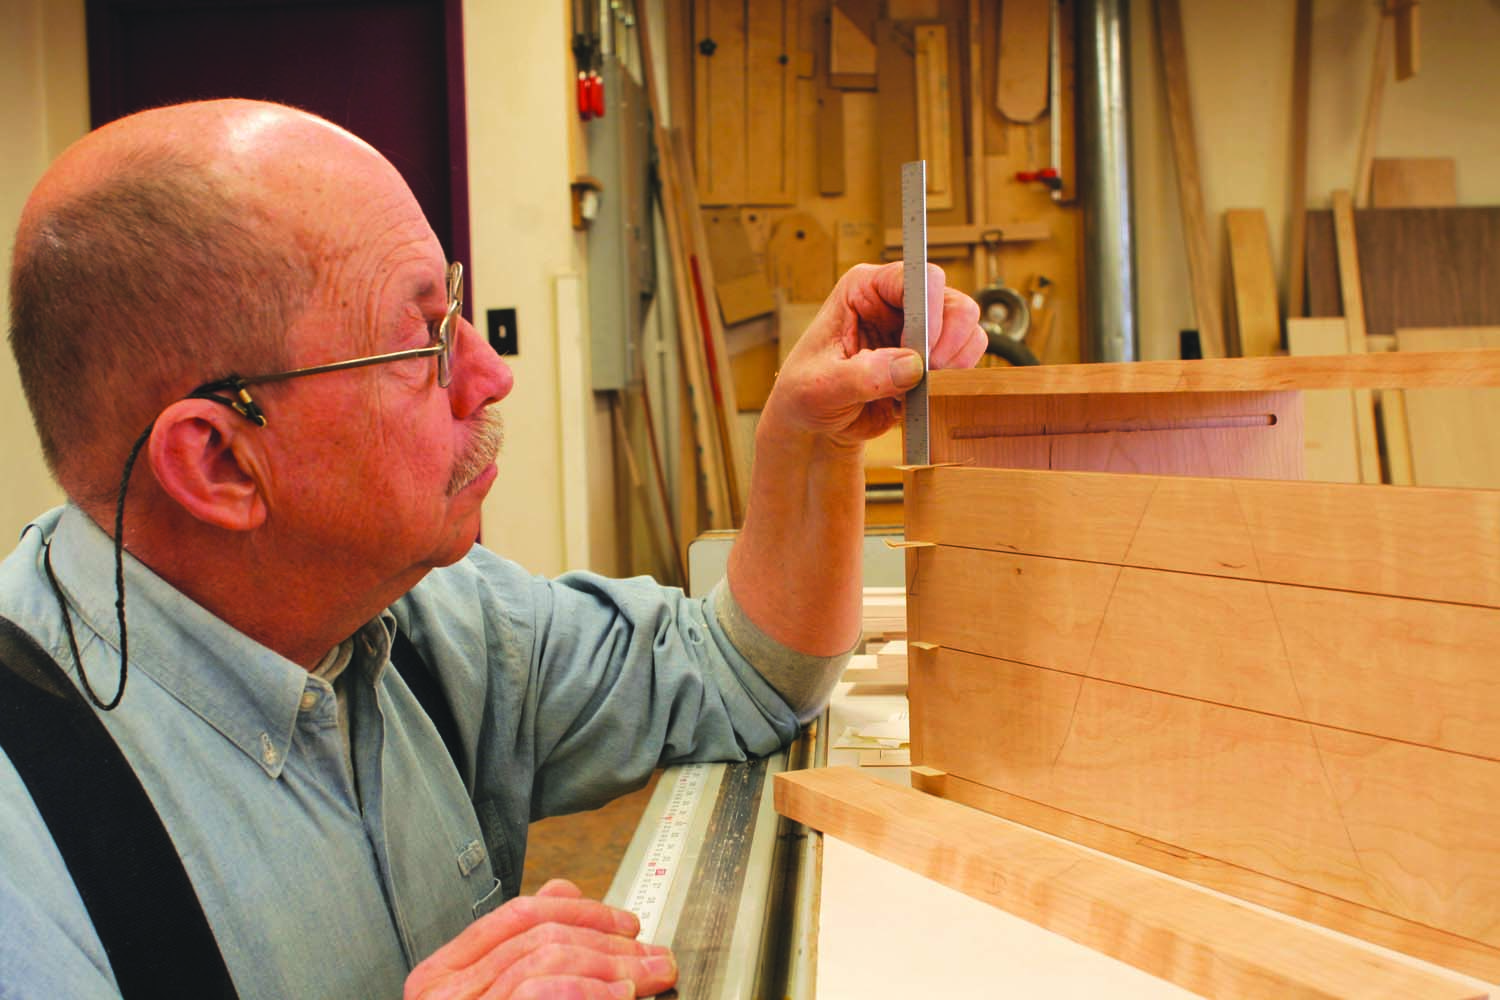
Photo 8. Stack the drawer fronts inside the case, placing shims in between. Measure the last front so it fits just right. Rip the drawer sides the same width as each drawer front.
Rip the fronts and sides at the same time, starting with the lowest drawer. As you cut the fronts, stack them inside the case (Photo 8). Place shims on the bottom of the case and on top of each front to create 1/32″ gaps between each drawer. (Make the shims from three pieces of manila file folder taped together.) When you get to the top drawer, measure the opening to obtain an exact fit. Subtract 1/32″ from the distance to allow for a gap above the drawer. Cut the fronts to exact length, so they fit snugly into the case. Trim the sides to final length as well.
Now you can move on to hanging the drawers. First, make the stock for the drawer hangers—it should fit snugly into the stopped dadoes. Cut the stock into pieces that are about 1/2″ extra-long. Place four of these pieces into the stopped dadoes on one side of the case.
In the next step, you’ll cut grooves in the drawer sides to receive the hangers. These grooves should be about 1/64″ wider than the hangers so the drawer will slide freely. Make the grooves with a dado set, using shims to get their width just right.
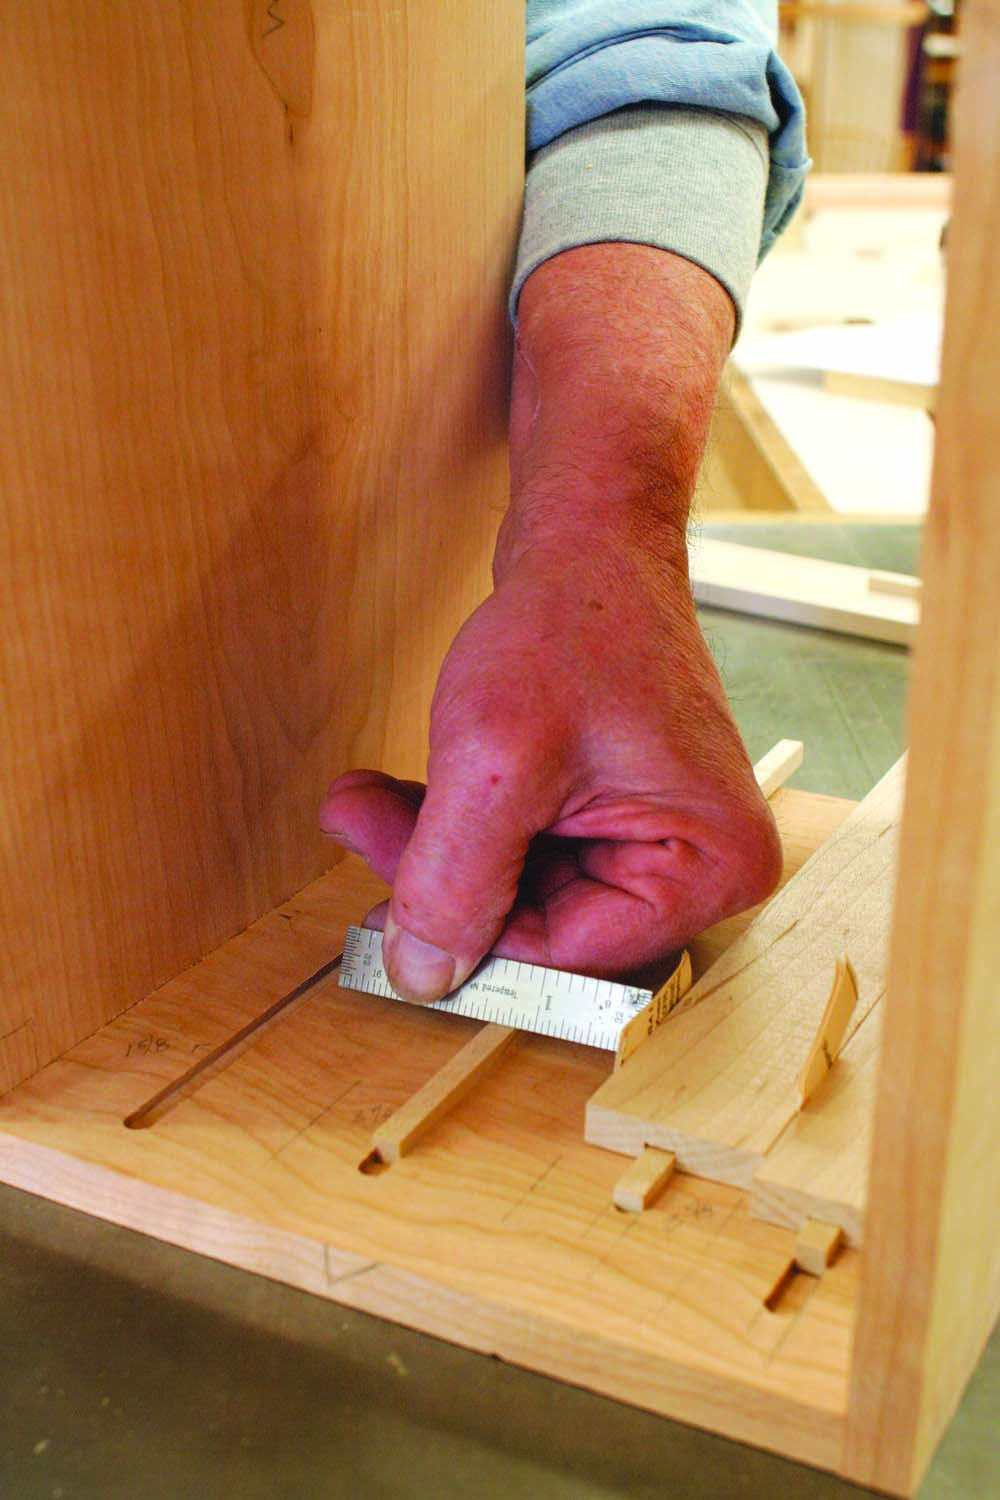
Photo 9. Install drawer hangers in the case, then cut grooves in the drawer sides to match. Use the same spacers between the sides when you take a measurement for each groove.
Cutting these grooves in the correct position on the drawer sides requires careful marking and accurate measuring. First, mark the bottom edge of each drawer side—this edge will go against the saw’s fence. Place a shim against the inside bottom of the case and measure the distance to the first drawer hanger. Set the tablesaw’s fence this distance from the blade, then cut grooves in the two appropriate drawer sides. Place one of these sides in the case, engaged with the hanger, bottom edge down (Photo 9). Place a shim above this drawer side, measure the distance to the next hanger and repeat the process.
The next steps depend upon how you intend to join the drawers. The simplest method is to cut rabbets on the ends of the drawer fronts, then glue and pin-nail the sides to the fronts using 3/8″ long 23-ga. micro-nails. Although rabbeted and nailed joints aren’t all that strong, gluing the plywood bottoms (H) to the front and sides of a drawer will minimize the amount of stress on its corners, so this joint is strong enough.
A nailed rabbet doesn’t have much curb appeal, however. Your eye certainly won’t linger on it each time you open a drawer. For better looks—and a stronger drawer—I recommend using a half-blind tongue and rabbet joint (Fig. 03). These joints requires some careful tablesaw work, but you can use the same setups for each drawer, regardless of its size.
After making the joints, cut rabbets along the bottom edges of the drawer fronts and sides to receive the drawer bottoms. Temporarily assemble the drawer fronts and sides and cut the bottoms to fit. Temporarily install the bottom and cut the drawer backs (G1-G4) to length—they just butt between the drawer sides.
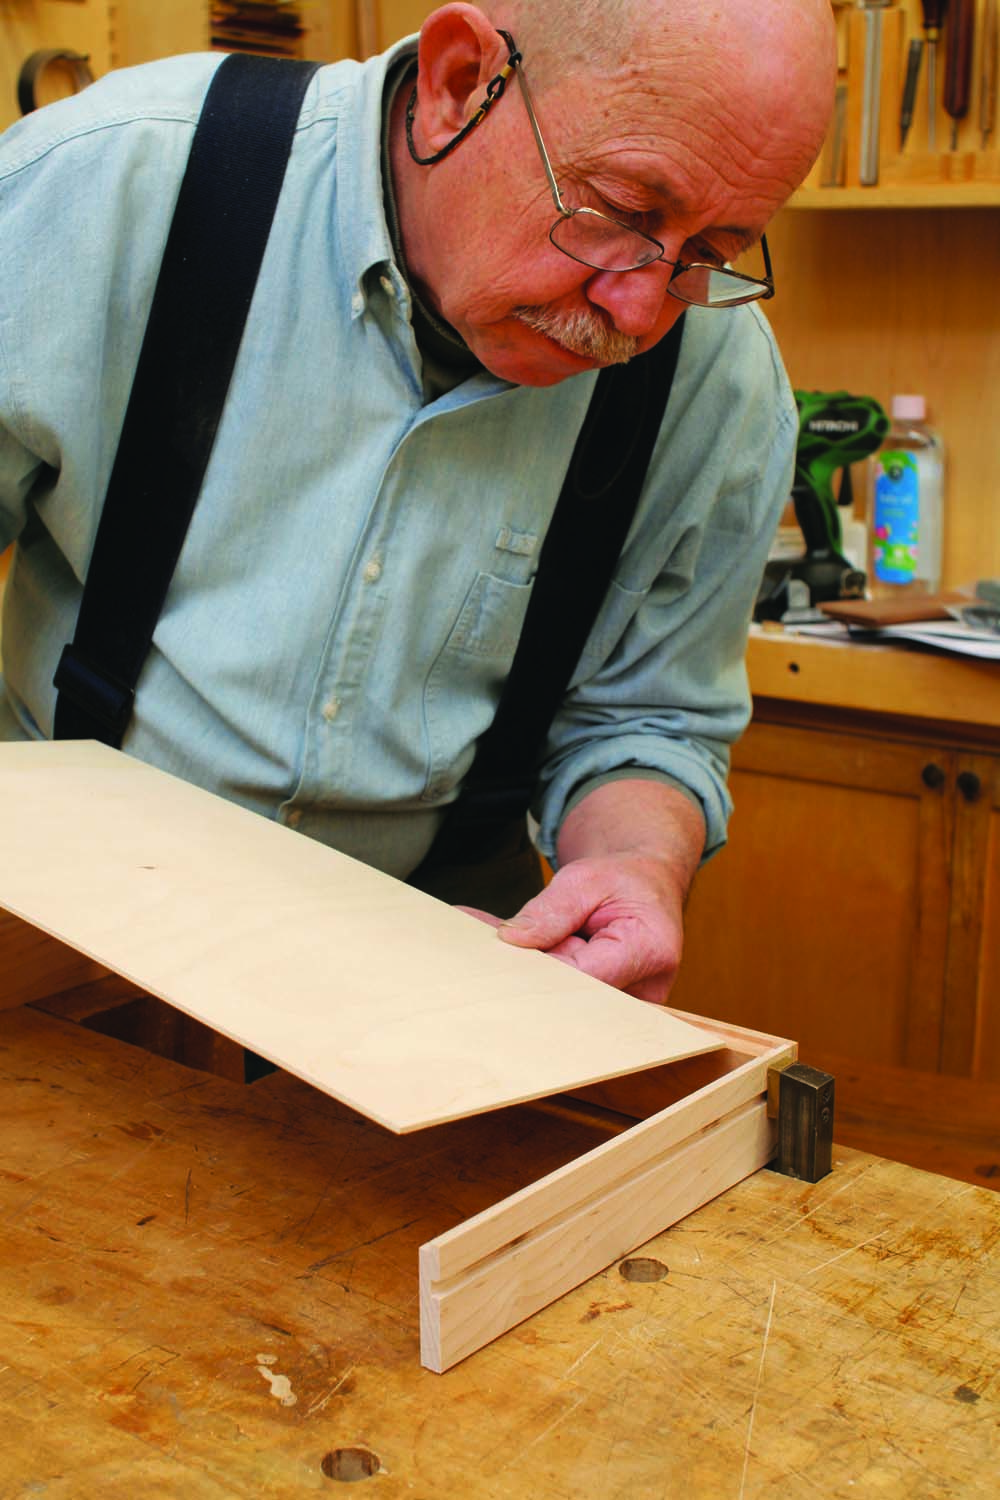
Photo 10. Glue the front and sides of the drawers together. Add the drawer bottoms at the same time to keep the drawer square. Add the drawer backs and slide the drawers into the case.
Glue the drawers together (Photo 10). The best method is to join the front, sides and bottom all in one shot on top of a flat bench or board. This ensures that the drawer will be flat and square. Use micro-nails or weights to hold the bottom in place while the glue dries. Glue the backs last.
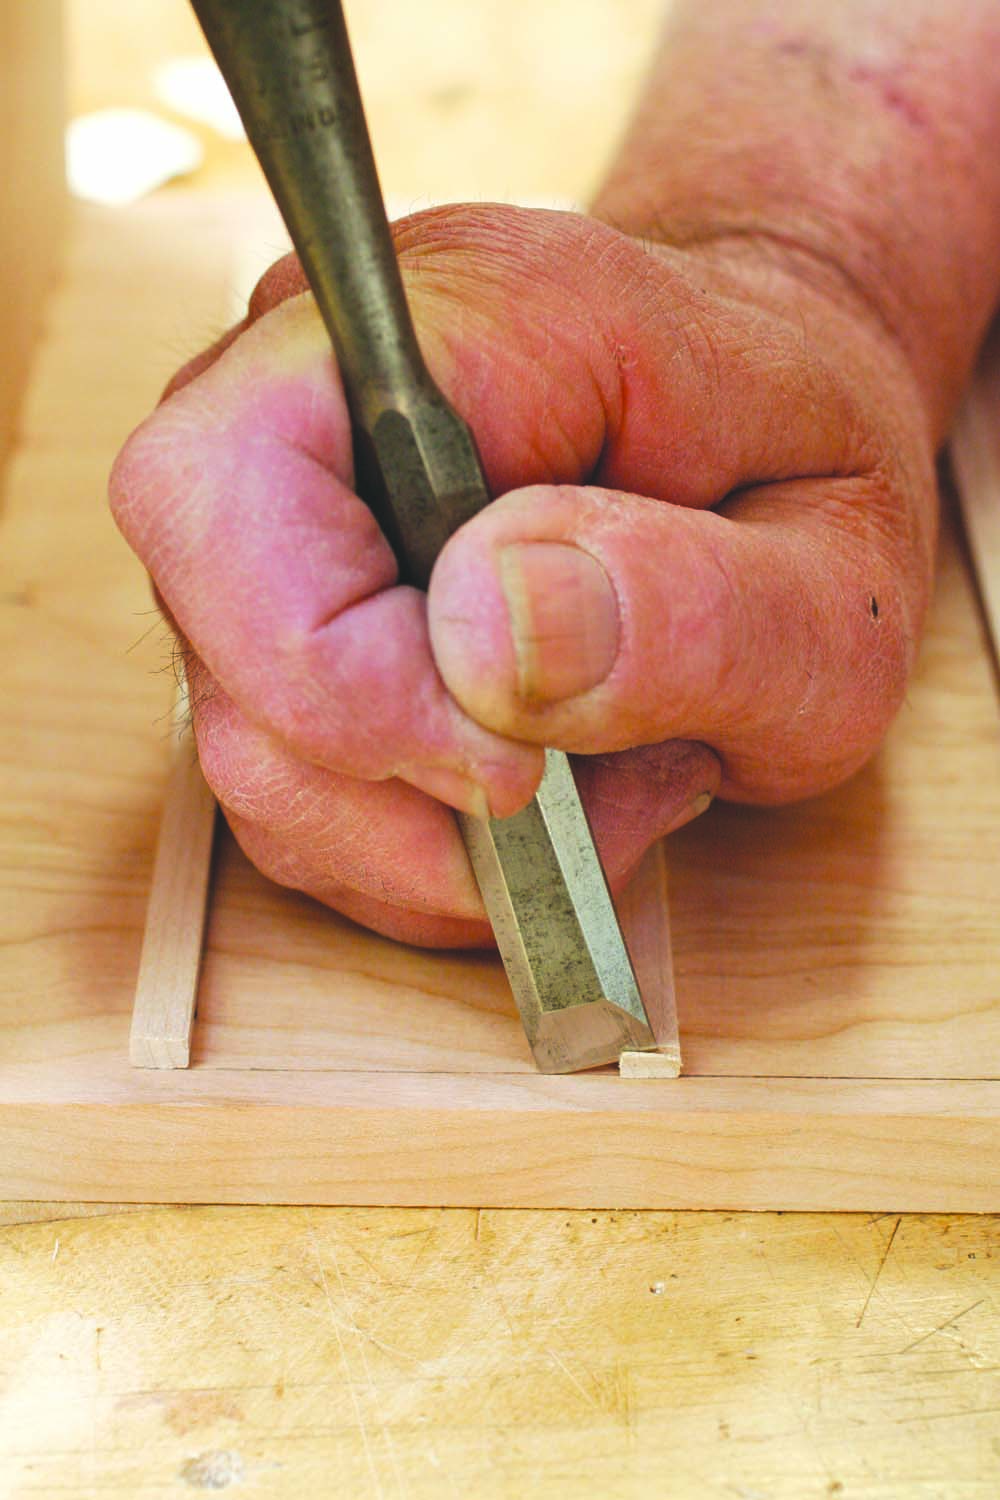
Photo 11. Trim the drawer hangers so their ends all line up. The ends serve as stops for the drawers.
Next, you’ll install the drawer hangers. Notice that their front ends are lipped (Fig01). Make these lips a good 1/4″ longer than necessary, to accommodate any differences in the lengths of the stopped dadoes. The front ends of the hangers will butt up to the drawer fronts, stopping the drawer’s travel. You’ll want the drawer fronts to be even with the case’s sides, so the exact setback of the hangers is quite important. I’ve found that the best method of creating this setback is to set a marking gauge to the thickness of a drawer’s lip, then scribe lines with the gauge on both sides of the case. Glue in the hangers so they extend about 1/16″ over the line, then gradually pare the hangers to exact length with a chisel (Photo 11).
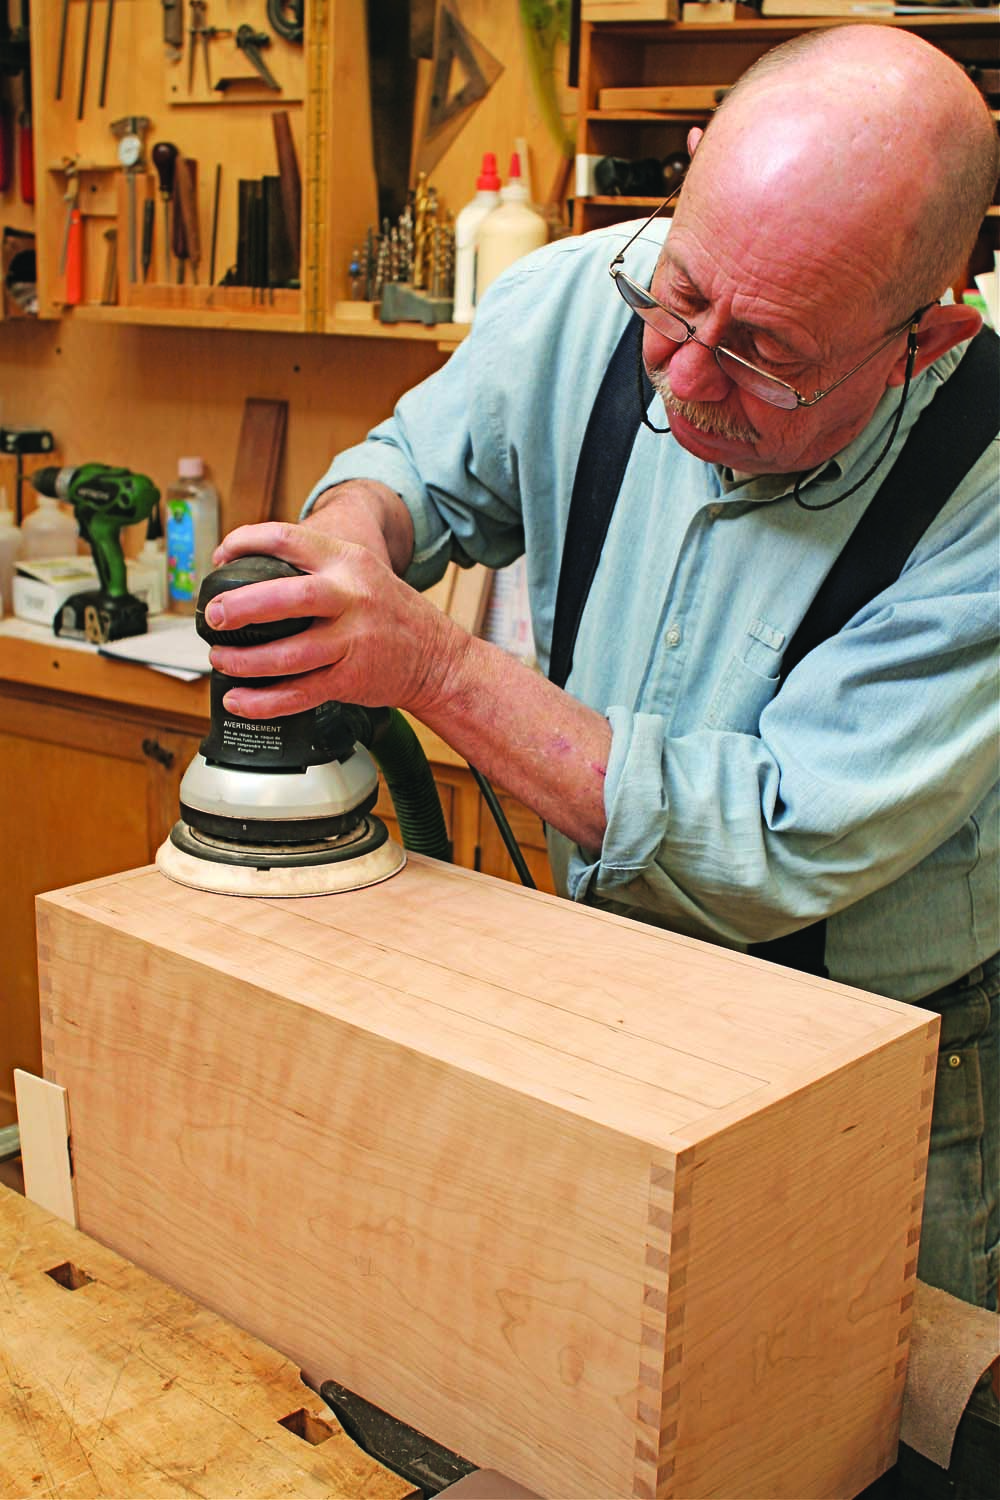
Photo 12. Sand the drawers level with the sides of the case.
Sand or plane the sides of the drawers until they slide well, with a minimum of racking. Install all of the drawers and use a random-orbit sander to level the drawer fronts even with the case (Photo 12). Use 80 grit sandpaper for this job, then move on to finer girts to make the wood smooth enough for finishing.
Feet and Hidden Drawer
The feet (J) and front (K) of the hidden drawer have the same rounded profile. The easiest way to make this profile on all three pieces is to use a 3/4″ radius bit in a router table. Once you’ve made the feet, fasten them to the case with screws in countersunk holes. (Note: the rear holes should be elongated, so the case isn’t restrained from shrinking or swelling with changes in humidity.)
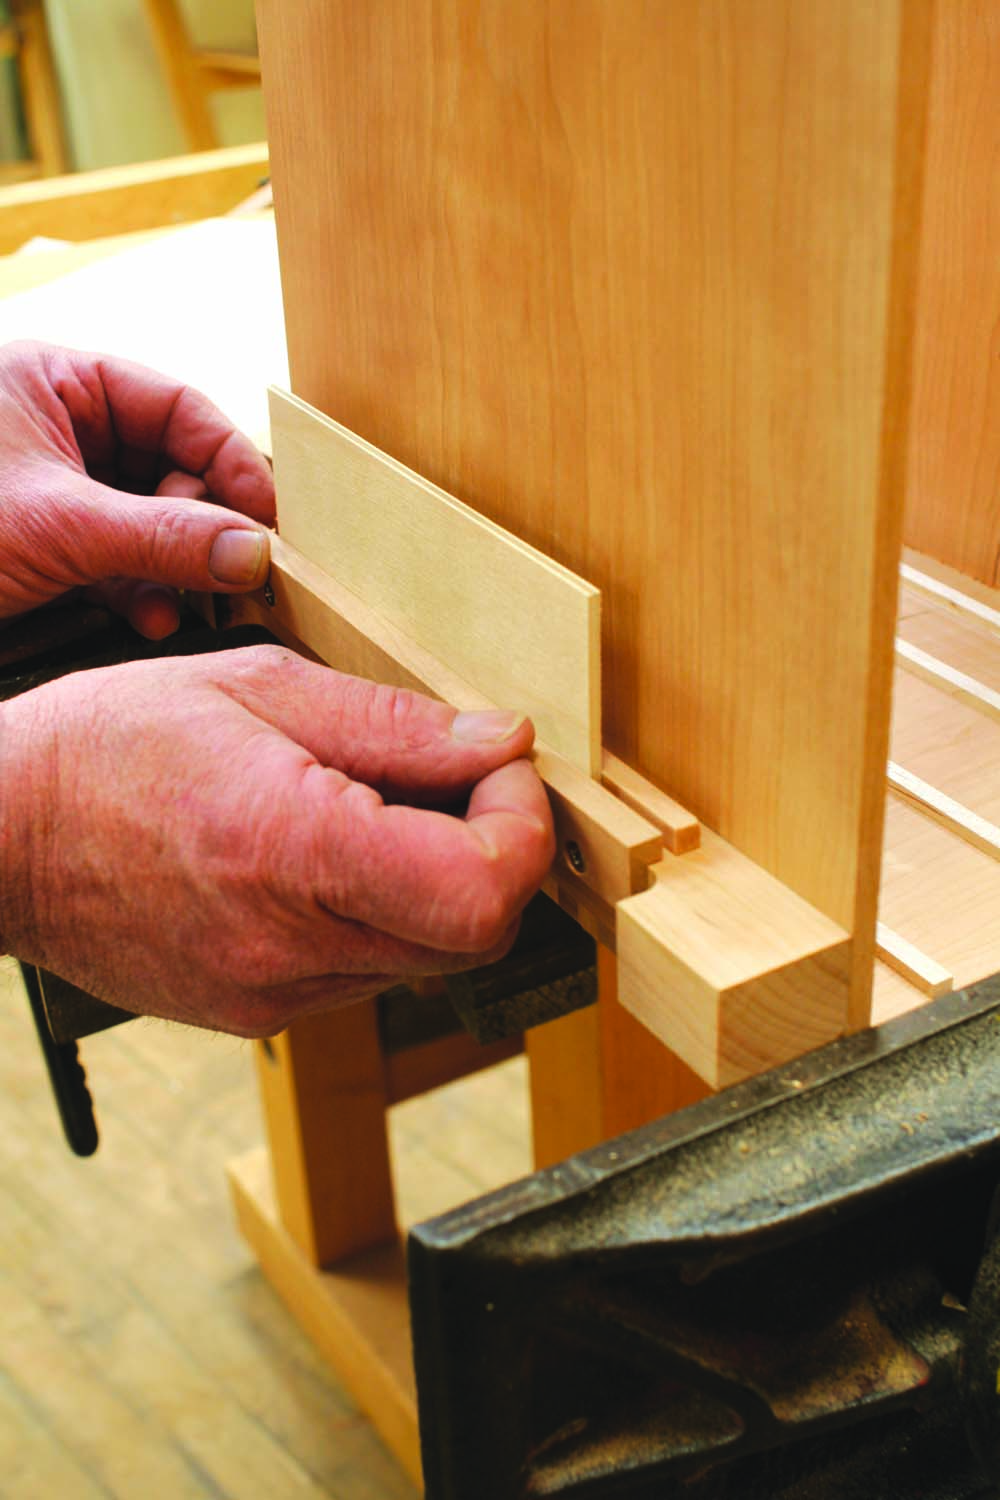
Photo 13. Install the guides for a secret drawer underneath the case. Set the distance between the guides using a scrap piece of the plywood you’ll use for the drawer’s bottom.
Make the guides for the hidden drawer (N and P). Fasten the lower guide to the feet first, then slip in a scrap piece of drawer-bottom material (M) above the guide to determine where the upper guide should go (Photo 13). Glue the upper guide in place.
When you make the front of the hidden drawer, rout or carve a small recess underneath it for a fingerpull. In addition, rout a rabbet in the piece to receive the drawer bottom. Glue the bottom to this piece and add a back (L) to the drawer, so things don’t slip out.
Here are some supplies and tools we find essential in our everyday work around the shop. We may receive a commission from sales referred by our links; however, we have carefully selected these products for their usefulness and quality.