


We may receive a commission when you use our affiliate links. However, this does not impact our recommendations.
This time-honored finishing approach helps highlight – not hide – the beauty of your workmanship.
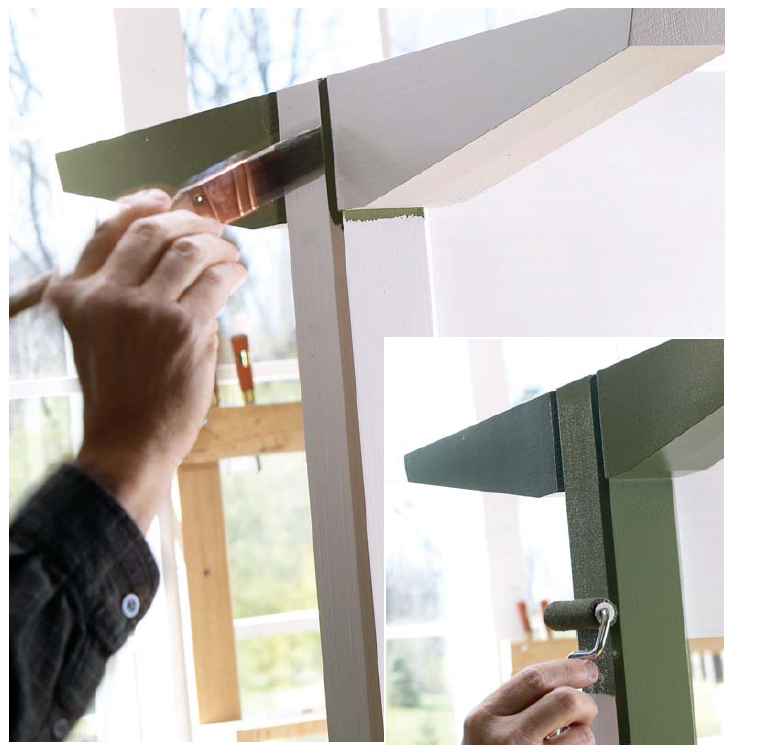
When painting wood furniture, trim the corners with a small brush and feather the edges of the paint line. Then, roll paint over the flat surface of the same piece, making sure to first pick up the wet edge you just painted with the brush. This will help you avoid unsightly lap lines to produce a professional-looking finish.
Painting wood furniture isn’t quite like slapping a new coat of color on your living-room wall. First, you need to make sure you have the correct tools. And it doesn’t pay to skimp – spend the extra dosh for top-quality paintbrushes. Assuming you clean them correctly after every use, they’ll last for years to come and give the best results, every time.
The Tools
While there are a number of good-quality brushes, Rick Gayle, who’s been a professional painter for more than 20 years (and is a woodworker), recommends Purdy – nylon bristles for latex paint and natural bristles for oil-based paints. They’re available at most any hardware or paint store.
I’ve done a fair amount of painting, of both furniture and walls, but it never occurred to me that rollers were appropriate for furniture painting until Gayle introduced me to the concept.
While it won’t work for turned table legs, a roller is wonderful for laying down an even layer of paint on an apron, tabletop or any other piece with a lot of flat real estate. Look for 1⁄4″ or 3⁄16″ nap roller covers to match the size of frame best suited to the job. The Premium XL Touch-up Kit (from Sherwin-Williams) comes with its own small roller tray and two extra roller covers, and is easy to clean. Don’t go for cheaper foam covers; they tend to bring air bubbles to the surface of the paint film. Also, lay in a good supply of #150-grit and #320-grit sandpaper, some clean lint-free rags and a couple plastic pint containers such as you might find at the deli counter.
Putties, Primers and Paints
Now that you have your tools, it’s time to select products, and again, go for the good stuff – it pays off in the long run.
If you have shallow divots or small cracks to fill, Gayle suggests using a lightweight non-shrinking spackle, such as Red Devil One Time, Dap Fast or Crackshot. For deeper holes, consider an automotive filler such as Bondo. Then, move on to primer. Look for an easy-sand primer such as Porter Paints 184 Sta-Kil Primer/Sealer, Sherwin-Williams Easy Sand Alkyd Primer, Kilz 2 or Kilz Premium. Avoid “full-bodied” general purpose primers; they’re too thick for furniture projects.
Now, select your paint. It used to be that oil-based (alkyd) paints were tougher than acrylics and latex-based products. While that’s still technically true, Gayle says that acrylics and latex paints have improved so much in the last several years that now they’re darn near as tough as their oil-based brethren. Plus, with mineral spirits running $9 a gallon and unlikely to come down in price, cleanup of oil-based paints is not only more time consuming, it’s a lot more expensive. (Latex and acrylics can be cleaned up with dish soap and water.) And then there’s the drying time. With latex or acrylics, you can prime and paint the first coat in one day, with at least a couple hours of drying time in between (though we don’t recommend two finish coats of paint in one day, no matter what it says on the can). With alkyds, the drying time is a lot longer.
If you take our advice and decide on a water-based product, our expert recommends Sherwin-Williams Proclassic Waterborne Satin or Semi-gloss. If you insist on an oil-base, consider Porter Paints Promaster 2000 Interior Alkyd.
–Megan Fitzpatrick
p.s. – Buy our new book, “Classic American Furniture,” for the full article on painting wood furniture (not to mention 20 elegant furniture projects). Available now!
Here are some supplies and tools we find essential in our everyday work around the shop. We may receive a commission from sales referred by our links; however, we have carefully selected these products for their usefulness and quality.


Thanks Megan,
I guess I was always puzzled as to the why behind the actions of those fellows. I do prefer the look of a brushed finished when it come to paint (just weird that way I guess) but I am going to give it a try on some projects I have sitting that are in need of some paint. Thanks for the information I will have to play around with some of the techniques and see what I like best.
Megan,
Thanks for the information, I sometimes get tired of the oil varnish and wax regimen and its nice to have some concrete ideas related to painted finish’s. I do have a question though, did Rick express or perhaps maybe you have tried, brushing out the paint after rolling it on? As an electrician for many years I would witness painters do that from time to time. Thanks for the info and I will need to get my hands on the book above.