


We may receive a commission when you use our affiliate links. However, this does not impact our recommendations.

The cover story for the April 2016 issue (#224) is Caleb James’s article on making matched sets of Roubo-style moulding planes (the three sizes for which he reaches the most: Nos. 4, 6 and 8). To whet your appetite (and so I can show off the gorgeous opening image shot by Daniel Dubois, whom you really ought to follow on Instagram), below is a preview: a “sidebar” Caleb wrote about how to heat treat O1 steel using a simple setup and one clever jig (that is not a click-bait line – promise).
The issue mails to subscribers in mid-February, and will be on newsstands at the beginning of March.
Heat Treating O1 Steel
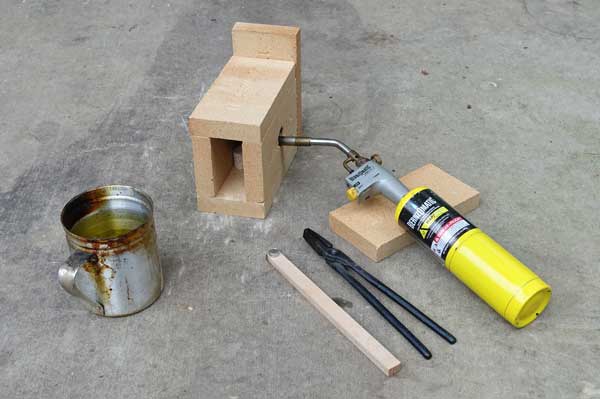
A firebrick enclosure helps to evenly distribute heat on the tool steel.
Heat treating O1 tool steel is simple. In short, bring it to critical temperature, quench it in vegetable oil, then temper it in an toaster oven or regular kitchen oven for one hour at 400˚.
Hardening steel is the easy part; minimizing warpage is another. The road to success is to evenly heat the metal. Creating an enclosure with something such as fire brick will help you achieve this.
Heat the steel slowly using a simple MAPP gas torch. Heat more slowly than you think. If one side is hotter than the other when you quench it in the oil it will warp. So heat slowly.
There are a few methods to determine when you have reached critical temperature. Avoid relying on color because ambient light will affect the color you see. Just like a flashlight appears brighter at night than in daylight, so too color alone in changing light conditions can be deceptive. The simplest way to check that you have reached critical temperature is to use a magnet, because O1 tool steel loses its magnetism at approximately this temperature. The stick of maple shown above has a rare-earth magnet glued to the end; it’s a simple tool for safely checking the steel as it reaches critical temperature. Just periodically remove the steel briefly from the flame and check with the magnet.
Another option is to watch the surface quality of the steel. It will change when critical temperature is reached because the carbon begins to flow within the steel and some decarburization takes place at the surface, thus changing how it looks. It can be described as the steel “sweating” or having a “flushed” appearance. Accompanying this change will be a noticeable uptick in the “brilliance” of the steel. In other words, rather than seeing a particular color change you would simply see the color become more radiant.
Once critical temperature is reached, quench the steel in oil by plunging the blade straight down vertically, not leaning to one side or the other. Now immediately move to your oven to temper for one hour at 400˚. — Caleb James
Here are some supplies and tools we find essential in our everyday work around the shop. We may receive a commission from sales referred by our links; however, we have carefully selected these products for their usefulness and quality.


So do you put the bevel and any shaping on the steel before you heat treat?
I really hate to What benefits is this treatment of O1 steel supposed to endow on the material? I ask because the information in the article will not imbue the material with any functional benefit.
That 400 temperature is the maximum operation temperature of the material. It has absolutely nothing to do with altering the chemistry of the material.
Heat treated hardening of O1 steel requires heating temperatures of 1450 – 1600 F to induce a phase change and become austenite (the steel will remain magnetic until the phase change and not at any point before that). Heat at those temps is maintained until the phase change has penetrated to the depth you require.
Following the heating cycle the austenite is quenched in water or brine which cools the steel and creates another state change. If the steel is cooled quickly is becomes martensite which is very hard but brittle. If cooled slowly the steel will be annealed (pearlite). Afterward the steel is tempered is ready to be made into something!
The information above simplifies the process, but heat treating outside those temperature ranges or post heat processes simply isn’t a thing. Can’t be done.
Instead of wasting your MAPP and probably your steel (quench at 400 F will not harden even the outermost layer of the steel but is almost guaranteed to destroy the temper) there are other ways to actually harden O2. Find someone into ceramics or stained glass and ask them to heat your steel and quench it there. If your local vocational school has a machine shop or welding program they’ll likely have at least one kiln,furnace,oven and may not even want to charge you as it’s a useful lesson for the students.
Before everyone gets upset, the information above is taken directly from Machinery’s Handbook 29th Edition. If you’re going to do anything remotely serious with metal spend the $90 and buy yourself a copy of Machinery’s Handbook (it has materials data for woods too).
Tempering in your kitchen oven can be hazardous. Not from the standpoint of burning the house down, but from your wife finding out what you are doing in her oven. Since my wife has retired, I had to get myself a toaster oven to temper my irons.
Back when I was making knives, I quenched O1 in olive oil, the cheapest gallon size I could buy. The advantage is that it smells like baking oatmeal cookies. Learned that from Bob Loveless. I quenched O1 in water (by mistake) once. The blade cracked in a dozen places. Never tried it again.
two things i would like to point out, the oil used for oil hardening is recommended to be above ambient, roughly 100-150F is the recommended temp. and the part should go in when its “cool enough to touch but too hot to hold” as they say. the other thing i would like to add is imho a2 is not that much different to harden and normalize as oil hardening or water hardening steels, or 1040 for that matter, a2 requires a higher heat (i think it’s 1600F vs 1400F of o1, i forget offhand you can look it up however in any good metallurgy or heat treat man) and longer soak times.
I agree with gilgaron to start out with 1095 simply because it uses water to quench and the 2 steels have nearly identical properties once finished. the O in O-1 is for oil quench, the W in W-2 is for water quench.
I would (wood, for aperitif?) love to make a set, and look forward to this issue. One question – If I buy the set of plane blades (For example the tapered Molding Plane Iron Blanks from Lie-Nielsen), will I still have to do this process? Thanks.
May I ask a question regarding: “Once critical temperature is reached, quench the steel in oil by plunging the blade straight down vertically, not leaning to one side or the other. Now immediately move to your oven to temper for one hour at 400˚.”
I think the word “immediately” is throwing me off. Does he mean plunge it down once for a quick quench and then move to the oven, or plunge it until it cools considerably, (below 400 degrees? )and then move to the preheated oven?
Thanks and Happy New Year.
I think the benefit comes from shaping the steel in it’s annealed (soft) state. since hack sawing hardened a2 isn’t going to be an option, that presents challenging ways to remove material. Also, I believe a2 is not as friendly for DIY hardening.
Cool – looking forward to the Roubo-based planes article. I’m trying to build a bookstand from the Book of Plates.
whet vs wet…. I learned something today
Please help me understand the advantages of heat treating O1 steel vs buying the harder A2 steel. Buying A2 steel would give you a harder edge without the risk of warping the tool. Better edge durability vs. A2? Or is this article aimed at folks who already own O1 tools?