We may receive a commission when you use our affiliate links. However, this does not impact our recommendations.
 With less than a week before Woodworking in America commences, I’ve been scrambling to gather enough benches for all the classrooms – and I thought I had them covered without hauling my “Petite Roubo” back downstairs from my study. But no. My little bench will now be making the trip across the river.
And that meant I had to quit procrastinating on installing the vintage Sheldon quick-release vise I bought several months ago. So, after getting a kind neighbor to help me flip the bench onto sawbenches, I spent the last couple evenings doing just that.

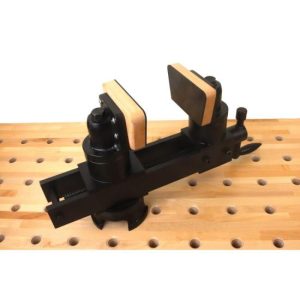
The challenge: Inset a vintage Sheldon vise into the end of my bench.
I wanted the plate that attaches to the underside of the bench to be flush with the end of my bench, so that meant chopping out a 7/16″-deep mortise to match the thickest part of the vise’s plate. And unfortunately, the plate was not consistent in thickness, so in the end, I had to do a lot of fiddling around with shims to get it to seat properly and be square to the end of my bench.
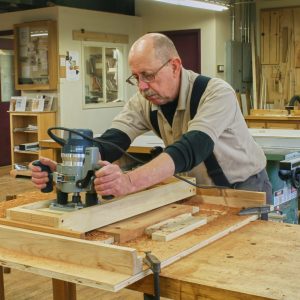
After using a cutting gauge to lay out the edges of the mortise, I sawed away as much of the waste as possible. That wasn’t much; most of the waste removal had to be accomplished using a mallet (or in my case, a hammer – I need to bring home one of my mallets) and chisels.

Waste removal. After sawing corner to corner of my mortise layout, I removed the waste then carried on with a hammer and chisel to remove the rest.
This was a bit tedious, and because white pine compresses readily, I had to keep my chisels sharp to avoid tearing out chunks rather than making clean cuts. So it was up and down the stairs between the bench and the kitchen sink to use my sharpening stones a few times during the process. (Hand tools are excellent exercise!)
Then, it was time for a mortise on the underside of the bench into which the central channel of the vise must fit. I sawed the right and left edges from top back corner to front bottom corner.

Another mortise. The center of the attached plate has a channel in which the movable part of the vise travels. This mortise accommodates that channel.
In hindsight, I suppose I could have oversawn the back edge for easier waste removal, as one typically does on half-blind dovetails. But I didn’t. It was back to the hammer and chisel to remove the waste down to the mortise floor.
The final step in getting everything to fit snug – or snug enough – was to chamfer the bottom edge of the plate’s mortise to accommodate irregularities in the cast iron. Then, I used two carriage bolts and one wood screw to secure the plate in place from the underside of the bench.

Secured. I used two 5/16 x 3″ carriage bolts and a #12 wood screw at the back to attach the vise’s bottom plate to the underside of my bench.
While the plate is flush to the end of the bench (which is, after all the desired outcome) I do wish I’d had time to go for perfection. But no. My shims are evident, and I’ll just have to live with the shame. Or I can trim 7/16″ off the end and give it another shot. But not today.
I have matching shame on the chop’s side. Yes – there are shims there, too. Because the plates of the vise don’t meet flush across their surfaces from top to bottom, the chop needs an angle that starts 5/32″ in at the bottom tapering up to nothing 3″ up.

Dog access. I cut a channel under the chop’s dog hole so it’s easy to push the dog into working position when needed.
I did not have time to deal with such shenanigans (nor did I have the proper tools at my ready disposal) – so I cut what may be temporary shims and used those to hold the chop at the required angle. Those shims are held in place by the chop, which is screwed to the movable plate. Perhaps after the conference, I’ll remove the current chop and make it properly (this one is not particularly attractive wood anyway, and I’d rather make a thicker chop and add a decorative end). But this one will work for now.
I drilled a 3/4″ dog hole in line with the holes on my benchtop, and cut an access channel in the bottom of the chop, so the dog can be easily pushed up from underneath.
I also added a shiplapped shelf that sits on cleats underneath the bench.
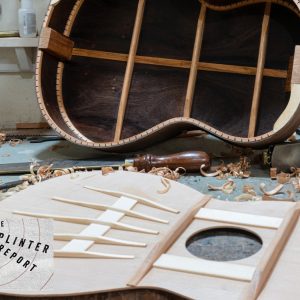
I have two more small items to tick off the workbench list by Wednesday night: Add a couple holes along the back edge for holdfasts, and add a tool rack at the back left corner (the bits for which can be seen atop the bench in the opening photo).

Here’s the installed Sheldon vise, ready for use (although I do still need to make or buy a bench dog for it).
This bench (which I built last year with Christopher Schwarz’s help) is pretty much an exact copy of the one for which Chris provides step-by-step instruction on the DVD “Build an 18th-century Workbench” and in “The Workbench Design Book.” Except unlike his, mine doesn’t have a fancy cherry top. And it’s 5″ shorter. And because I’m not a masochist (and was on a tight deadline for WIA 2010 at the time), I used machines for the more taxing operations. Also, I’m willing to bet no shims were used during Chris’s end-vise install…or at least that he’s not so foolish as to admit it.
p.s. If I can figure out the math and achieve mortise perfection (and find time to do it), I may in the future trim that 7/16″ off the end and give this install another try. If I can seat the attached plate at the perfect angle to accommodate getting the movable plate to meet the end flush, I’ll be much more satisfied. Or I can accept that this is a workbench, and that the vise works just fine as is. What would you do?