


We may receive a commission when you use our affiliate links. However, this does not impact our recommendations.
 In cleaning up the shop this past weekend, I came across the prototype for the Krenovian wall cabinet I built for the April issue and was reminded of how helpful it was in working out and hopefully improving the design – even though I failed to mention it in the article (I’m wordy as it is, so something has to be left on the cutting room floor). I build prototypes using a lot of different methods and for different reasons depending on the project at hand. And while I’ve ruined more than one decent board as a result of not building a prototype, I’ve never regretted any of the time spent working out the details on either offcuts of plywood, MDF, foamboard or whatever happens to be in the scrap bin (er, scrap corner) of my shop.
Prototypes are great for gauging the overall proportions and weight of a piece because they show you how the piece will look in three dimensions. And because they make it easy to alter details – stock thickness, moulding and profile treatments and, in some cases, joinery details – I’ve come to rely on them heavily. Below are a few details on how I built the prototype for this particular cabinet, as well as a few notes on how it was useful.
Do you find that prototypes are a good way to refine your own work? If so, how do you build them and what about them do you find useful? If you don’t find prototypes necessary, what takes their place in working out the proportions and details of a piece?
To see the original James Krenov piece that inspired my version, take a look at Krenov’s own “A Cabinetmaker’s Notebook.” It’s long been one of my favorites, and one of the very first places I go when I need a little workshop inspiration.
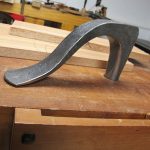
 The Big Picture: Overall dimensions of both the cabinet and door parts are worked out in plywood before I start cutting the actual stock.

Simple Construction: Scrap plywood is simply butt-jointed and screwed together. It can be easily disassembled if parts need to be trimmed down. In this case the overall depth of the piece decreased by a full inch only because it looked too overwhelming when mocked up – I couldn’t see this on paper or in my SketchUp drawing.

Whatever is Quickest: Because it’s so quick to set up and use on the fly, I join the doors using a Festool Domino, though they could be screwed together instead. Prior to having the Domino, I’ve even mocked up doors using double-sided tape at the joint, or by using masking tape across the width of the joints.

Give Yourself Options: It’s worth taking the time to try door parts of different widths. On this cabinet I wanted to find that sweet spot between bulky and frail. It’s amazing how much of a difference 1/8″ can make on the door rails or stiles.

Try Something Non-Traditional: By mocking up the doors using loose-tenon Domino joints that were slightly off center, I was able to flip the stock so that I could envision the offset of the door rails against the stiles – one of my favorite features on this piece. You might not even notice it at first, but it creates a shadow line that draws your eye to the detail. After seeing it on the prototype, I was much more comfortable using thinner door rails.
Here are some supplies and tools we find essential in our everyday work around the shop. We may receive a commission from sales referred by our links; however, we have carefully selected these products for their usefulness and quality.


Thanks for this article. Now when my better half says “So – you’re gonna build this TWICE?” I can say, “See? The other guys are doing it too!”
I agree mock-ups are a great idea, but believe the best approach is to build it using SketchUp. You get most of the same benefits, but never need to commit any wood to the mock-up.
Matthew, this is great food for thought and information.
One time I did a 1/2 scale prototype of complex piece. Created problems with mixing measurements taken from prototype without doubling. Visually, it helped. For real production, it caused grief.
These days I’ll mostly create elements or sections to scale using whatever is convenient. Commonly I’ll use the actual joinery as I find compound angles need to be worked through in the real world. My brain has spent too much time in two dimensional graphics mode to handle compound angles.
As some have said, most of my work is for our family, so I am willing to wing it. Guess that makes almost all my work a prototype.
Where function is high priority (usually I work to form) such as desk or dining table, I’ll make plywood top to scale and set it on anything available to judge working height, leg clearance, space appropriateness.
I love diving in the deep end, but as my work becomes more complex (or simple, but semi-unique) I like to work out details before I commit the special materials.
Thanks for the sliding dovetail video. I’ve seen and read and used before, but always good to refresh or see another approach. Currently, I’ve been working on prototype for desk elements which will have sliding dovetailed cleats into the underside of the desktop. On my prototype cleat and leg assembly I put dovetail on the cleat just to go one more step visually even though I’ll not be doing prototype top. Guess what, I discovered that it is possible to put the dovetails on the wrong side (underside rather than top side of cleat). Maybe that will save me from ruining the real thing down the road. We shall see.
Thanks
Matt
My living room is lit by a series of prototype Greene and Green style lamps I made as prototypes in working out the details for the final versions. So far the prototypes have been providing illumination for 22 years… I’ll get around the the real thing sooner or later.
Actually, I wish I had mocked up a cabinet for a set that I did for SWMBO. It turned out that what looked perfect in Sketchup and was planned to reach from just under eye level to the ceiling was decided to be 4 inches too high upon installation.
Fixing it at that stage left an unplanned 4″ space between ceiling and cabinet tops. NOT at all what was planned, and while not looking exactly like crap, did not look like perfect custom cabinets anymore, ether.
A full scale mockup would have been worth it’s weight in finely figured and finished curly maple.
Good piece. Worth the read. Thanks.
For anything new or important, I usually build a prototype to work out the details. I think that it reduces the waste of good materials. A local lumber yard sells “barn pine” 1 x 12s and they are cheap. It’s rough and full of knots (some the size of saucers) but it works like wood so I enjoy the process better than using plywood and foam board. Sometimes I cut example joinery but mostly just use coarse drywall screws. Sometimes pocket screws. Sometimes gaffers tape. Glue is used only if absolutely necessary. When I am done, the prototype’s components can be dissembled and re-cycled or used as kindling.
You have to be careful with this process though. I made some night tables some years ago and my sister in-law got a look at the pine prototype. She really wanted it. I was not too thrilled with her showing this to her friends as an example of my work, but what can you do! Family! I could have gladly made her one in her choice of wood, but she wanted the (very) knotty pine one. Such is life.
Building custom desks for people means getting the dimensions right for comfort, space, and to fit particular equipment.
My customers like pencil drawings, SketchUp and sometimes basswood scale models, but they really appreciate using a simple prototype/mockup with parts that can be adjusted easily.
After this has been in place for a week or so we agree on the right dimensions before I start measuring the wood to build the real thing.
I leave the prototype in place while the desk is built so my customers can work.
Add one more prototype fan, especially if the final recipient of the item will not be the maker.
Sometimes, the mock-up is as simple as MDF, plywood, cardboard, and foam insulation, all held together with tape, screws, and/or hot melt glue.
I’ve gone so far as to build floor to ceiling built-ins from foam and cardboard, with the shelves and doors drawn or pasted on, so not so visual folks can get a better idea of how the item will work in it’s surroundings. “No, the real piece won’t be pink, brown, and blue… ”
Sketchup and paper can co a long way towards a better picture, but sometimes, a full-size, 3D mockup is really valuable.
I’m a big fan of prototypes, especially when I’m doing joinery, layouts or angles that I’ve not used before. Such was the case when I made Roy Underhill’s Mystery Mallet seen here: http://lumberjocks.com/pastorglen/blog/28617
I used poplar for the prototype, because it was available and easy to tool.
I also used a prototype to make my bench vise — using some scraps of yellow pine, maple and 3/4″ oak plywood. I actually used the prototype for about 6 months, and it held up far better than I expected. By the time I made the real one, I know some changes I needed to make, and the finished product was much better.
Funny that I should read this post. Just yesterday I bought a sheet of 3/4 inch foam insulation board for the purpose of prototyping the dimensions of my next project. I’ll use hot glue and/or fast set construction adhesive to join the ‘parts’ together.
Although foam probably wouldn’t be useful for such things as doors, testing sizes and proportions works great. It’s easy to cut, light weight, and the biggest plus is inexpensive (~$8 for a 4×8 sheet). And if the foam is too distracting, it can be quickly painted.
Foam board is also available in other common wood dimensions, such as 1/4 inch, 1/2 inch, and 1 inch.
I make prototypes, but more for general functional testing such as determine the right dimensions.
So for example I thought we wanted a side table by the front door. I made a prototype out of a cardboard box and a piece of plywood. This gave me insight into the required dimensions (even longer) and also showed that we really did need a table there.
Now that the table is done the plywood got recycled for a prototype coffee table that we will use for game playing and I learned that the table works better at a height of around 2 feet instead of the common 18″ height.
Don’t ask how long we live with these prototypes.
While I credit my kreg pocket hole jig with getting me back into woodworking, as I transition to traditional joinery, I still find pocket holes great for two things – the first is making quick jigs.
The second, and more relevant, is prototyping. I can quickly use cheap lumber and pocket screws to transform my napkin sketches into full sized prototypes where good and bad ideas become readily apparent. Pocket holes are strong enough to try out a chair, and the kreg brand screws are very nice quality – I’ve taken apart and reassembled the same joint several times with very little loss of strength.
Bonus: the pieces can be knocked down and used as templates once tweaked.
Made my first prototype as I’m working on my first completely original design: https://www.facebook.com/photo.php?fbid=2204581413332&set=a.2204578973271.82300.1811304893&type=3&theater. If helped me make several design decisions that I couldn’t see from my two dimensional sketches. Placing the prototype table next to my bed helped reveal another flaw, as well (too short).
I’m a hobbyist woodworker. I’m from the school of Damn the torpedoes, full speed ahead!
However, if I did this for other people, I would be much more meticulous in my deliverables.
I will do prototypes to get a feel for uncertain dimensions, or to model some small part of the whole that I think may be troublesome. Finally, I’ll build a ‘prototype’ from pine if I design something that I haven’t seen before on the premise that someone smarter than me already discarded the idea.