


We may receive a commission when you use our affiliate links. However, this does not impact our recommendations.

There are numerous jigs for cutting dovetails with a router. My go-to is the Keller pro series model 1601. It’s simple to use, though unlike jigs that cut pins and tails in one fell swoop, it takes two operations (and two different cutters) — one for tails, another for pins. The resulting joint is so attractive, with wide tails reminiscent of hand-cut joints, that I think it’s worth the extra time.
The following is a basic guide to cutting dovetails with a Keller jig. Although I’ll be referring to drawers, the same basic principles apply whether you’re dovetailing a trunk, a jewelry box, or a dresser.
1. On your marks.
As with any drawer making technique, it’s critical to keep your parts in order; one misaligned piece can result in a dogleg instead of a rectangle. So be sure you mark each piece of every drawer with its location (e.g., “4 R” for drawer number 4, right side) and mark the face and edge with whatever symbol you use. I use the traditional English face mark, seen here. (It’s just how I was taught.)

Start with the tails, keeping the face edge (at left in this picture) in the same direction for every cut.
2. Get set.
Start with the tails. For these, you’ll need the straight-fingered template and the dovetail cutter fitted with a bearing, which you can buy with the jig from Keller. I cut so many dovetails for built-ins that I keep a dedicated router set up for pins and tails.

Cut the tails first. Be sure you keep the face edge on the same side of the template for every cut. The cutter should protrude by the thickness of your stock (in this case, 1/2″) + 1/2″ for the thickness of the template + about 1/32″ waste for cleaning up the pins and tails. To allow for this waste at each end of each part (fronts, backs, and sides), I add 1/16″ to the overall length.

The cutter should protrude by the thickness of your stock + 1/2″ for the template + a little bit to allow for cleanup. It’s critical that the bearing protrude enough to make firm contact with the template.
Plan the layout of the tails with the groove for the drawer bottom in mind. In this case I was using Blum Tandem drawer slides, which require a 1/2″ cavity below the drawer bottom, so the drawer groove starts 1/2″ from the bottom edge of the drawer and extends up by the thickness of the drawer bottom — in this case, 1/4″.

The tail template is set on the end of my first drawer side. The pencil mark at the left of the “finger” just right of center in this image tells me where the center of the tail will fall; I set up my cut so that the groove for the drawer bottom would fall at the center of a tail, hiding the groove from sight once the drawer has been assembled.
Another consideration to bear in mind when planning your layout is the location of the tail or pin at the top edge of the drawer. You don’t want to have a thin sliver of material that can break off. It’s best to plan for about half the thickness of a pin or tail, depending on the height of your parts; if my layout ends up too close to the edge of a pin or tail, I’ll usually rip a bit more off the width of the drawer parts (i.e. the “height” of the drawer once it has been assembled and installed in the case). If you always use the same slide hardware (I do not; the hardware varies, depending on the requirements of each job), you can standardize your drawer sizes based on the dovetail template spacing.
Once I have determined where the bottom edge of the drawer side will fall relative to the template, I make a mark on the template that I can use to align each part.

Looking at the “back” of this drawer side (the side you can’t see when you’re routing), you can see the line I made along the right edge of the workpiece. It says “PW” and has a “V” arrow with its point hitting the line as a visual guide. The other marks are from previous jobs and fall at different points along the template to account for variations in the width of the workpiece on a given job.
Once you have the position worked out, clamp the template onto the end of your workpiece. Be sure the template is sitting squarely on the end and is firmly in contact with the piece all the way along its width; if the template is cocked up at one end, you’ll produce tails that are too shallow at that end. (In other words, the joint won’t fit.) For wide pieces, I use a clamp on each side.
3. Go.
Set the router squarely on the template and turn it on. Move smoothly in and out of the spaces between the “fingers” until you reach the end of the cut. Leave the router resting on the template while you turn it off, then wait until it has stopped completely before lifting it off; otherwise, you run the risk of cutting into your template. (Don’t ask how I know this.)

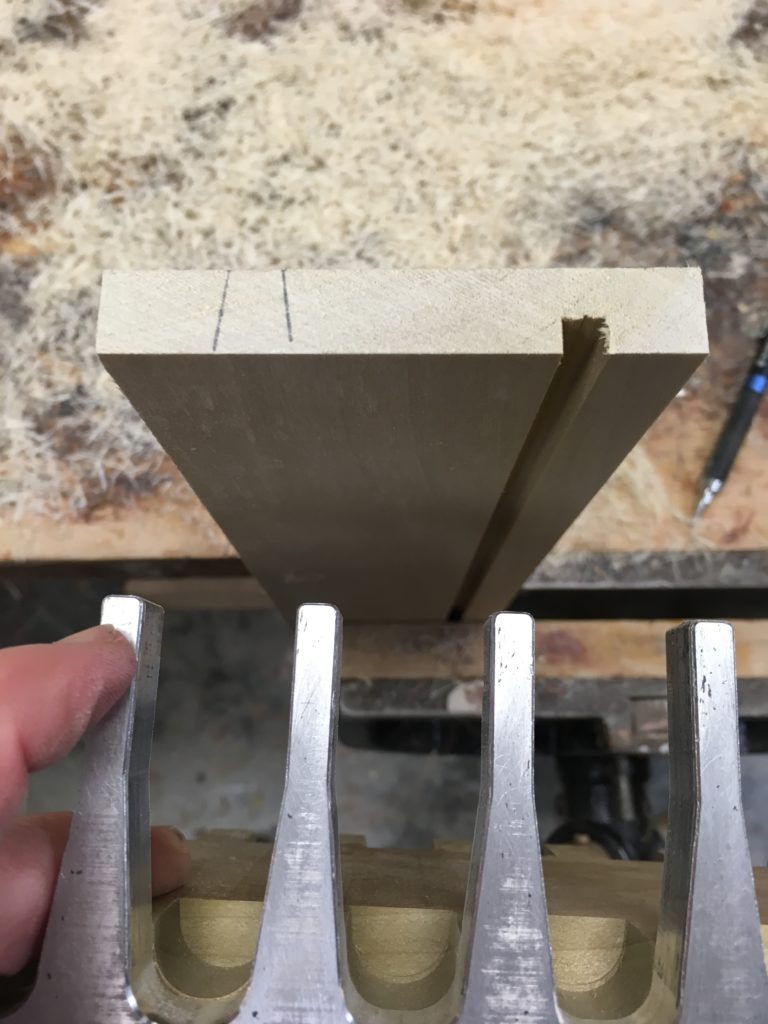
Tails cut. To mark the pins, clamp the front (or back) of the drawer in the vise and lay the corresponding corner of the side on top, exactly as it will go when the joint has been cut. Trace one pin or one tail with a sharp pencil (I use a mechanical pencil for this). You only need to trace one pin or tail to locate the template accurately. You can see my marks at the right end of this set.
4. Pins.
As with hand-cut dovetails, the pins are laid out based on the tails, as you can see in the illustration above. (Yes, I cut tails first. This post is not about that controversy.) When all the tails are cut, set up the pin cutter in your router. It should protrude by the same amount as the tail cutter did.

The cutter for pins is straight and has a bearing that follows the tail-shaped contours of the jig. Because I make so many drawers when working on kitchen cabinets, I keep a dedicated router set up with each of the Keller cutters.
Here is the mark that will guide how I position the tail template. Clamp the drawer face in the vise with the wide part of the tails facing away from you to avoid covering yourself in dust from the router.

Ready to go: The pin template is clamped in place. Note that the waste will be ejected away from the user. Also note that, as I described above, the groove will be concealed at the drawer’s side by a tail.

Half inserted dovetails show a good fit.


