


We may receive a commission when you use our affiliate links. However, this does not impact our recommendations.

It fits.
A board with a straight, flat face with one square edge is widely considered a fundamental requirement for precision work such as joinery. Given this basic condition, all good things are possible (at least, in principle): accurate measurements, square shoulders, straight tenons. But a current dining table commission challenged how I think about this set of conditions and forced me to come up with an alternative that would facilitate solid work.
This story begins with a client for whom I’ve been building furniture and cabinetry over the past dozen years. She has extraordinary taste, in the true sense of “extraordinary”; every job becomes an adventure. And every piece I have made for her has proved to be something I’m honored to have had a part in making.
We started the design discussion at the table she’s currently using, a roughly made potting bench pulled out of her garage. She pointed out features she loves: the texture of the planks that form the top (joist material from a builder’s yard; the texture she loves comes primarily from the contrast between early and late wood); the uneven joints between those planks, which are simply nailed or screwed to the base; the long, narrow proportions that make dining a more intimate experience by bringing people closer together across the table; and the chunky legs (made from something like 4x4s, if I recall correctly).
This is a client who told her professional floor finisher, a friend of mine, that she wanted him to make the floor look as though he didn’t know what he was doing. He swallowed his pride, came up with a system she loved, and went to work. The floor is unlike any other I have seen — and stunningly lovely.
If anyone else asked me to design and build a dining table using a potting bench as a guide, I would probably tell him or her to find another cabinetmaker. But I have learned to trust this client’s instincts.
What we came up with, following protracted research and discussion, was the following:
- The legs would be made from reclaimed barn timbers
- The top would be 8/4 quartersawn white oak
- Leave all tool marks, worm holes, and waney edges on the legs as they are
- Do not flatten the planks for the top, nor straighten the edges to join them
- Leave the roughsawn texture of the top as-is, but for a light sanding to remove potential splinters
- Join the top to the base with through tenons
- Most shocking of all, there would be no apron nor stretchers: just four legs and a top.
I always explain the pros and cons of materials and design, and this brief produced a list composed almost entirely of cons. At one point my husband suggested that perhaps the table should be based on a Schwarz Roman workbench design, but splayed legs were not part of the vision.
With a top of white oak 2″-thick, I wasn’t worried about sagging. Racking was my main concern in the absence of an apron. But at 6-1/2″ and 7″ square respectively, these old barn timbers were so large that I realized the top could, at least in principle, provide a similar expanse of flat, square material that would prevent racking, as long as the joints were well made.

Yes, go ahead and laugh. We did. Would you want to make a table using this stuff for legs?
And there’s the rub. These timbers were handhewn, totally rough, twisted, and out of square. How was I going to make mortise and tenon joints fit snugly enough to create a stable structure — and not just any joints, but through joints that would be a decorative feature? The solution: create a flat, square end that would provide a reliable reference point analogous to that of the flattened board with one squared edge.
I called my friend John Dehner, who spent years as a timber framer. Surely he would have some insight. Our first job was to cut the timbers in half to give us four legs. I have no machine in my shop that I would trust to cut this kind of material accurately; the only way I could see doing it was by hand. With material this big and this hard — even the softwood was old-growth — I wanted to minimize the number of cuts we’d have to make. So the first step, breaking the two timbers down to get four legs, also needed to produce a square end.
Step 1: Mark
After texting my client an image of each timber and asking whether she wanted them arranged in a specific way, I marked each to indicate its location relative to the table top. The oak piece was the more handsome, not least because it contained a couple of old mortises. So I arranged the legs to have one mortised face in view as you enter the dining room from the kitchen and the other visible from the living room. As with any structure, it’s critical to mark your stock so you can keep the parts oriented consistently.
With no even surface or square edges, we couldn’t just put a square on the timbers and mark a line. Fortunately, the concrete floor is one of the best features of my shop. It’s flat and smooth — great for layouts and glue-ups (if not for aging joints). We decided to use it as a reference point to scribe a flat, square line around the middle point of each timber.

Level and plumb
We clamped a scrap 2×4 to the bench top to help steady the timber while we fussed to get it level and plumb. The idea here is the same as for scribing cabinets to fit irregular spaces: Get the work piece level and plumb, as you want it to stand when it’s finished, then use a scribing tool to trace the line of the floor (or wall, or ceiling) onto it.
The timbers were 6′ long. I marked them at 3′, planning to cut the opposite end of each to 30-1/2″ (for a 30″ high top with 1/2″ protruding tenons) once we’d produced a square end.

Unusual scribing tool. A 3′ piece of scrap beadboard came in handy for transferring the line of the floor onto the timber. The carpenter’s pencil comes into its own when you have to mark such rough stock.
Step 2: Cut

Indelicate. The BadAxe Bayonet proved its mettle on this job, cutting an accurate kerf that would guide a panel saw.
The first cut was critical. We needed it to produce a flat and square end that would guide the rest of our cuts. So we started the cut with a BadAxe Bayonet backsaw, starting at the far corner, then kerfing the close corner, and finally joining the two. We cut about 1/2″ deep, then repeated this process on each other side.
With the kerf established, we made a small notch with a chisel to guide a panel saw and finished the cut with that.

I never thought it would come to this. Chiseling a sharp wedge amid beetle tracks and adze marks.
At this point I regretted that I had not bought a BadAxe D8 panel saw when that model debuted; my old saws struggled with the timbers, but we got the job done. (And this job convinced me to buy a BadAxe panel saw.)
After we cut the first end, we used a tape measure to mark each leg to length, then repeated the cutting process described above.
Step 3: Lay out the tenons

The smooth, flat end produced by the first cut gave us the reference point we needed to lay out the tenons. My mortise gauge has never been wound out this far.
At last we had a basic reference point. But how to mark out tenons when the faces of the timbers were still so out of whack?
Since there would be no apron or stretcher system, it wouldn’t matter if the legs were slightly out of square with the edges of the table top. All that mattered was that (a) the tenon be a good fit and (b) the shoulders, i.e. the great expanse of real estate at the top of each leg, be square (parallel to the floor) and flat. But even without worrying about squareness, I needed a flat surface for my mortise gauge to run against. I grabbed a piece of scrap 1/4″ plywood and attached it to the first leg with a pair of wire nails, taking care to keep it stretched straight. (It wanted to bend, following the shape of the leg.) You could use thicker stock, but in this case the legs were so large that I was pushing the capacity of my mortise gauge, which is made for furniture, not timber framing.
After marking the cheeks on the end grain, I measured in from the outer face of the leg to produce a shoulder about 2″ wide. For maximum strength, the tenons would need to be as wide (note: I am not referring to thickness, but width; I would use the word “long,” were that not so apt to be confused with the literal length of the tenon) as possible; but the client wanted minimal overhang (1/2″) for the top. Had I left the tenons the full width of the legs, I was concerned that the short grain at the end of the table top might break out if the table were pushed; to resist racking, I would need to leave a good bit of meat at the end.

To clarify the description of “width” above, take a look at this picture of the finished joint with the tenon partially inserted. The line at the right, just before the big X, indicates the end of the table top, about 1/2″ past the outside face of this leg. I didn’t want to chop the mortise that close to the end of the table, as doing so would have produced a joint held in by too-short grain. So I came in about 2″ from that point, ending up with a tenon about 4-3/4″ wide.
On three of the legs the inside face was sufficiently close to square that I simply left it as part of the tenon; the fourth was so chewed up that I trimmed about 1/2″ off with the Bayonet, creating an additional shoulder.
Next I used a square to extend the cheek lines onto the faces.

Then I used a cutting gauge to mark the length of the tenon on all four faces.

Step 4: Cut again
Now it was back to the saws. John and I shared the cutting of the first tenon, then he did the rest of them while I worked on the mortises. We cleaned up the tenons and their massive shoulders with chisels and a Lie Nielsen block plane. There was much sharpening that day.
Step 5: Lay out the mortises
Because the table top, at 90″ x 31-1/2″ x 2″ thick, was going to be so large and heavy, I decided to chop the mortises before putting the top boards together. I made a convincing case for straight edges on the outside of the table top, and my client gave the OK to run those over the jointer. (Besides being helpful for accurate mortise layout, the straight edges add aesthetic value. I was going to have to cut the ends of the table square, so having all four edges of the top clean and flat would make for a nice contrast with the many points of roughness.)
I marked the position of each mortise with the corresponding number of its leg, then marked the two outer faces of the leg on the table top in pencil as a guide based on which I could then transfer the dimensions of the tenon. Remember, with this table each leg was going to be an independent support, so what mattered most was getting a good mortise-to-tenon fit.

My client wanted minimal overhang, so I figured in an overhang of 1/2″ at each long side of the table and at the ends. (In this photo the top board is left long; the area at the right of the lines is waste.)
To determine the position of the mortise on the outer edge (the tenon cheek that would lie parallel with the long side of the table), I used a tape measure, then used a pair of marking gauges. (I could have used my mortise gauge, adjusting the fence, but John was still sawing tenons, so I wanted to leave it at the same setting.)


I did the same with the shoulder at the end of the table, coming in about 2-3/4″. After laying out the mortise, I used a knife on the cross-grain cuts.
Step 5: Mortise
This job was far too large for my mortiser, and even if it hadn’t been, I would have cut the mortises by hand, because that’s the only way I know how to get the clean finish for a through tenon. I drilled close to each corner with a 1/2″ bit, then used a jigsaw to remove most of the waste. I did the rest of the clean up with chisels. Then I tested the fit and removed more material as necessary.
Almost there. Although this tenon appears to fit less than perfectly, the gaps you see around the edges here are shadow lines formed by the small chamfer I planed to ease the tenon into place. I was ecstatic to find it an insanely good fit.
I sawed a pair of kerfs in each tenon and bandsawed a batch of wedges using Chris Schwarz’s method.
Final steps make a table
The three boards of premium quartersawn white oak that make up the table top are joined with Festool Dominos. (Don’t worry; the quartersawn figure will be more visible when the table’s finished than it is here.) The kiln staining and other marks (other than the epoxy in the picture below) will be left as original decorative elements.
After cutting the top to length and cleaning up the ends, I mixed up a batch of slow setting epoxy and with the aid of a helper, set the top and hammered home the wedges. The table is rock solid.
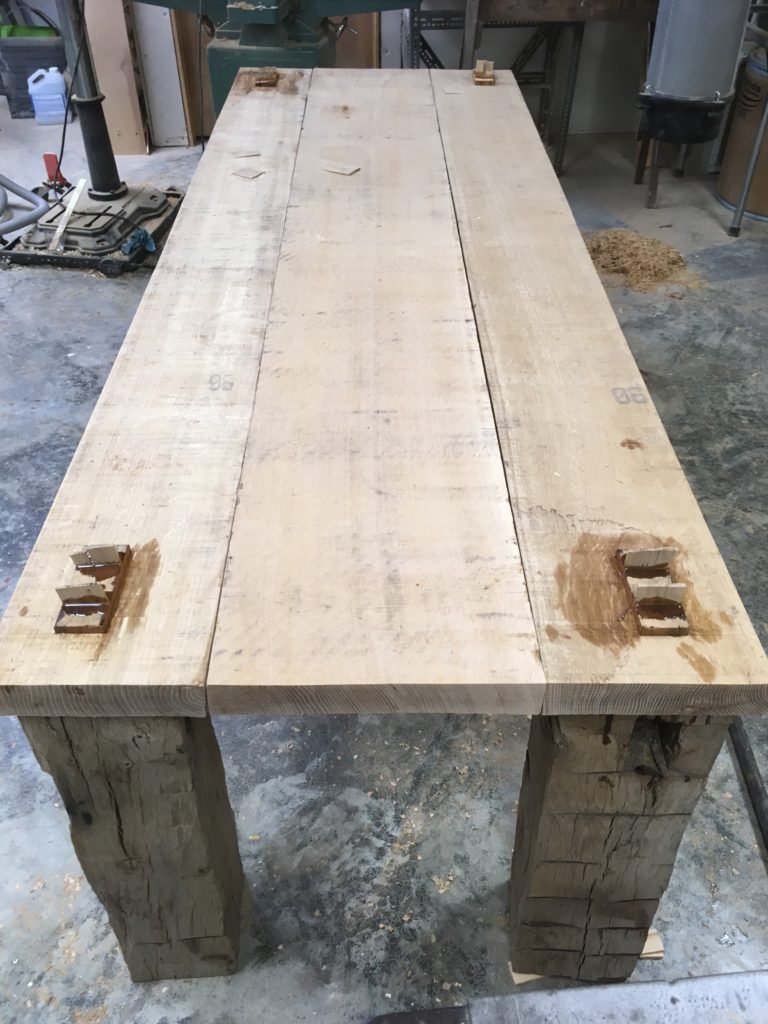
Just after glue-up. Please spare me any invocation of Fred Flintstone. Everything about this table, including the joints between the three boards that comprise the top, has been planned and made with meticulous care. The proportions, materials, and warm simplicity will contrast with starkly minimalist white plastic chairs.
– Nancy Hiller
 Available from ShopWoodworking.com
Making Things Work:
Tales From a Cabinetmaker’s Life
By Nancy R. Hiller
Honest, earthy, and wryly humorous, this collection of tales drawn from more than 30 years of experience at shops in England and the United States is thought-provoking as well as entertaining. We follow Hiller as she stumbles into furniture making after dropping out of Cambridge University, finds employment in one, then another, English workshop, grapples with monotony, sexism, and self-doubt, attempts escape, and eventually makes peace with her vocation.
Purchase your copy!


