We may receive a commission when you use our affiliate links. However, this does not impact our recommendations.
 Some machines are easy to set up to collect dust and chips while others defy all attempts. On the easy list are most stationary machines: Plug the hose into the port and it works pretty well. On the contrary list are miter saws (more to come on that, but part of my solution is a trash can below the saw), but the number one offender is the drill press. There are just too many different operations and set-ups to hook something up and forget about it.
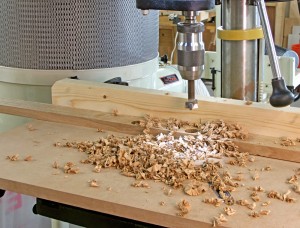
Here’s a case in point: I’m making a new chisel rack and had to drill 22 one-inch diameter holes in a piece of oak about 42″ long. Here’s the pile of junk after drilling the first four holes. It’s quite a pile and those chips get between the work and the fence and they keep me from using my incredibly clever method of lining up the holes.
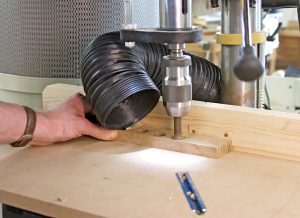
But there is a solution that works as advertised, the “Stay-Put” hose. In addition to being effective, it retails for $10-$15 at nearly every online woodworking supplier. It looks like a regular piece of hose, but instead of flopping back when you bend it, it stays bent.  That lets you twist it and scrunch it to nearly any conceivable shape so you can aim it right where you want it. I attached a clamp to the drill press column to hold the three-foot length of Stay-Put in place, and set it close to the business end of the Forstner bit. This picture is about seven holes later in the process.
I have this set up so that I can use it at the drill press, or at another nearby mess-maker, our hollow-chisel mortiser. It works great on either machine, my only gripe is that I would have preferred a longer length. But that’s a minor quibble, this is a great idea at a reasonable price. It let me place the hose to avoid a mess, and I can see my layout lines.
 After setting the fence, I made a mark from the center of the bit over to the fence. On one edge of my board, I used my combination square to step off equal distances along the length of the board. (This technique is detailed in the June 2011 issue of Popular Woodworking Magazine). Once the chips were out of the way, it’s easy to line up the pencil marks on the edge of the board with the line on the drill press fence.
Here are some supplies and tools we find essential in our everyday work around the shop. We may receive a commission from sales referred by our links; however, we have carefully selected these products for their usefulness and quality.


If you think the drill press is bad for dust extraction, try a lathe. shavings clog the tube, and dust doesn’t reach it.
And it is nice to see the keyless chuck. If you don’t have one on your drill press yet then resolve yourself to acquire one. It’s the best thing I’ve done to improve my drill press since I purchased it twenty years ago. You won’t regret it! You can get them from about $30.00 and up. I got mine from Enco for about $65.00. And you don’t need a high end one for a lowly woodworking drill press.
I had the same setup as karincorbin but I now use the same setup as Robert. This piece of hose is very stable when you bend it, it stays where you put it. I have another piece attached to the dust port of my table saw because I had to make a slight turn to attach the main dust collection hose. Now if someone would just come up with a good way to contain the dust from a sliding compound miter saw that is attached to a workbench.
If all the spaces for the holes are equal, this may be faster for equally spacing drilled holes:
Instead of measuring the location of each hole onto the board, mark the center of the first hole on the board, extending the line to the edge. Align the bit with the mark and the board to the fence. Drill the first hole and mark the fence with a line matching the line of the board. I stop the drill and lower the stopped bit into the hole to keep it aligned. Measure across the fence the distance of each hole and place a second line on the fence. Now move the board to align the hole’s center-line with the second line on the fence. Drill the second hole, then transfer the mark from the fence to the board with a line at edge, to show this hole’s center. Move that line to the second line on the fence, drill and repeat. It reads more complicated than it is in practice and goes quickly.
Nice looking chuck! Is that an Albrecht?
There is an setup that is along the same lines made for drill presses. It is a kit with hose, clamp, nozzle. Has the same stay bent in place feature.
http://www.ptreeusa.com/dpdustcollector.htm