We may receive a commission when you use our affiliate links. However, this does not impact our recommendations.
One of my favorite tasks in the shop is making solid-wood tabletops. Over the years I’ve made quite a few, and I’ve developed some methods that remove most of the risks and drudgery that spoil the fun. If you’re not careful, it’s easy to make some mistakes that will leave you wishing you had used plywood instead. We hear from a lot of readers who struggle with this, and it’s a hurdle worth clearing.

My first rule is that to end up with a flat top, start with flat boards. I’m pretty careful in choosing and milling the pieces. Wishful thinking might tell you that warped, cupped and twisted pieces will magically become flat with the application of glue and clamps, but that won’t happen. The only irregularity you might be able to correct is a slight bow along the length of a piece.
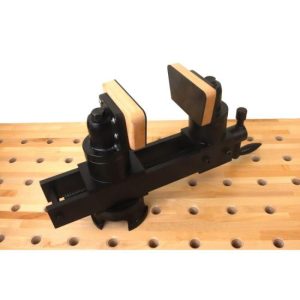
My second rule is to do the assembly on a flat surface. The setup shown in the photos is one I’ve used for a long time, and I wrote an article about it in issue #4 our sibling publication, Woodworking Magazine. The I-beams stay nice and straight, and the boxes they are sitting on can be arranged several different ways. The top will be a reflection of the surface you glue it together on , put it together on a twisted surface, and you’ll end up with a twisted top. The smaller sticks going across the beams are from the scrap bin, but I take the time to joint an edge of each, and to rip them all to an identical width. This top uses splines to keep the edges aligned, which was the subject of an article in issue #6 of Woodworking.

Rule three is to do as much work as possible on individual boards and to arrange them for appearance first. This may sound like a repeat of rule one, but if there are any defects or rough patches, get them fixed so you don’t have to lean over to reach the middle of the top. When you run the boards through the planer, send them all through at the same setting so they are a consistent thickness. I had a small drum sander available when I made this, and I sent each board through it before gluing. The oft-repeated advice of arranging boards with the growth rings in alternating directions is nonsense. If your stock is stable and flat at the begining, it will tend to stay that way. If it is still gaining or losing moisture when you assemble it, it will likely warp.
Rule four is to get the glue-up right so you don’t have to work hard after gluing. In the picture above, I’m putting the first three of five boards together. This extra step lets me make sure I have good seams and a flat top to start with. When the glue from this stage has had an hour or two to dry, I add the remaining boards.

The splines keep the edges even, and if you’re not using them, take care to keep the edges aligned as you clamp. I usually keep a rubber mallet handy for this; if an edge raises up somewhere, a few smacks with the mallet can put it back where it belongs. I put all the boards next to each other and mark their relative positions by drawing a triangle across the surface. I gather clamps, glue, a wet rag and an old paint scraper before gluing. If you’ve never done this before, I’d recommend a dry run , arrange all the boards and clamp them together just to get a taste of what the process will be like.
When I put the glue on, I stand each piece on edge and try to get just enough glue on an edge so that it almost squeezes out. The easiest mess to clean up is one you don’t make. When you set and tighten the clamps, be sure they are in a position where the force of the clamp is centered on the edge of your board. With fancy clamps like the ones pictured, you don’t have to worry about this so much, but if you’re using pipe clamps it can be an issue. When I use pipe clamps I alternate them so that adjacent clamps are above and below the panel.

If some glue does squeeze out, I remove it immediately with the paint scraper or the back of a wide chisel, then I wipe the glue off the tool with the wet rag. If any glue remains on the surface of the wood, the wet rag will remove it. If all goes well, there won’t be much work to do when the clamps come off. Yellow glue will set up enough to take the clamps off in an hour or two, but it can take 10 or 12 hours to completely cure.
After the glue is dry there will be some slight planing and scraping to be done , mostly cleaning up the seams and getting the entire top ready to finish. Being careful while putting the top together will keep this as pleasant finishing work, not major aggravation.