


We may receive a commission when you use our affiliate links. However, this does not impact our recommendations.
 A must-have tool for the lumberyard
by Greg Paolini
In addition to my truck and a pile of cash, there’s always one other thing I take to the lumberyard or mill – a lumber rule. Also known as a grading stick, a lumber rule is a simple tool that instantly shows how many board feet are in a piece of rough lumber. This helps me keep track of how much wood I’m buying, and helps to prevent big surprises when the sawyer hands me the bill.
Lumber rules are available commercially, costing $50 or more, but by understanding how board feet are calculated you can easily create your own lumber rule, suited to the thickness and length of lumber you most often buy, Best of all, these custom rules are made from shop scraps, so they cost nothing except the few minutes it takes the make them.
Understanding Board Feet
A lumber rule is nothing more than a stick with a few different scales inscribed on it. Understanding how those scales are derived is paramount to creating and using a lumber rule. Therefore we need to have a good grasp of board feet.
Essentially, a board foot is any combination of length, width, and thickness that equals 144 cubic inches of rough lumber. Another way to express this is: Length x Width x Height (or thickness)/144=Board Feet. This formula will be the foundation for creating the scales on our lumber rule.
For example, suppose you’re determining the scale for a lumber rule to be used with 5/4 lumber, and specifically 5′-long boards. Using the above formula, plug in the variables that are known. The math will look like this:
L=5′ or 60″
W=Unknown
H=5/4 or 1.25″
(L x W x H)/144=Board Feet
(60″ x W x 1.25″)=1 board foot or 144 cubic inches
75W-144
W=1.92
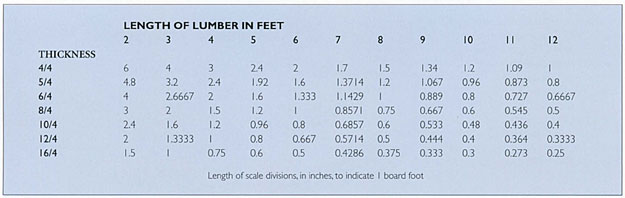
A 5/4 board that is 5′ long will contain 1 board foot of lumber for every 1.92″ of width. Using this formula, you can figure out every scale for any thickness or length of board you want. If you’re not really into math though, I’ve supplied a chart (below) that covers most variables.
Making the Lumber Rule
To make the rule, grab some scraps of 1/2″ or 1/4″ plywood. A piece of 1/4″ ply about 2″ wide and 24″ long will work nicely for the body of the rule, allowing ample room for three or four scales per side. Attach a couple pieces of 1/2″ plywood, 2″ x 3″, to both faces of one end of the body for the rule hook (Image 1, below). All that’s left is to draw the scales.

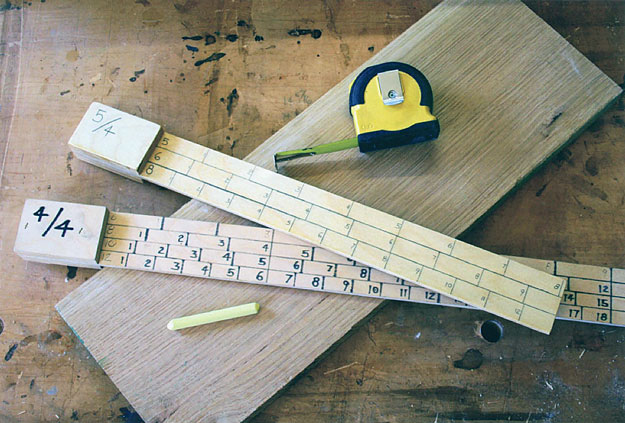
Before you draw your scales, give some thought to what lumber sizes you buy most. You’ll want to make lumber rules that are geared toward those sizes. For example, I purchase a lot of 4/4 and 5/4 lumber, in lengths from 3″ to 10′. Therefore, I’m going to want a 4/4 and a 5/4 lumber rule capable of measuring those lengths.
That doesn’t necessarily mean I’ll need two separate rules with six or eight scales on each, though. I can make one rule, using one side for 4/4 and the other for 5/4 lumber. Additionally, scales for only 5′-, 6′- and 8′-long boards on each side will work fine, provided they’re coupled with some quick mental calculation. For instance, a 10′-long board can be measured with the 5′ scale by doubling the reading. Conversely, a 3′ board is measured with the 6′ scale by halving the reading.
The same logic can be applied to boards of different thickness as well. 8/4 lumber can be measured using the 4/4 scale by just doubling the reading. Triple the reading if you’re measuring 12/4 lumber, and so on.
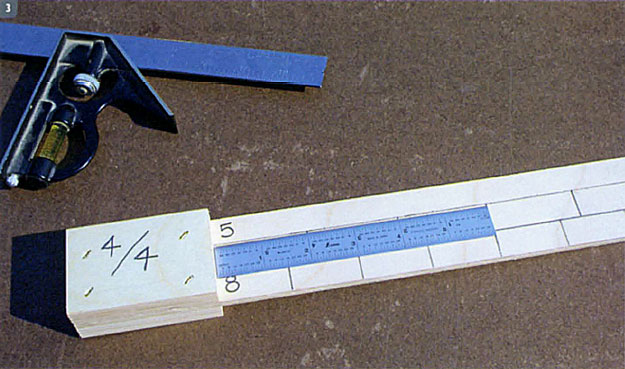
Use a combination square to draw lines along the length of the rule (Image 2, below). These lines will separate your different scales. A spacing of 1/2″ is enough to avoid crowding the scales.

To finish up the lumber rule, we’ll need to place cross marks on the scales using the chart to figure out the proper graduations. On my 4/4 rule, I need scales for 5″, 6″ and 8″ boards. Using the chart (below), in the thickness column, I follow along 4/4 to the right until it intersects with the column for 8′-long lumber, the result being 1-1/2″ graduations.
Next, I place a cross mark every 1-12″ along the 8′-scale of the lumber rule (image 3, below).
Repeat the process for the remaining scales, using a square and pencil to draw the graduations (image 4, below).

Because some of the divisions don’t translate into the fractions woodworkers commonly use, you may want to use an engineer’s scale, which is graduated in tenths of an inch, to lay out some of the scales. You can darken the scale with a fine-tip marker if desired. now, with a new lumber rule in hand, it’s off to the lumberyard!
Using the Lumber Rule
Lumberyards typically stack lumber by species, thickness and length, which makes it easy to select the appropriate scale to use.
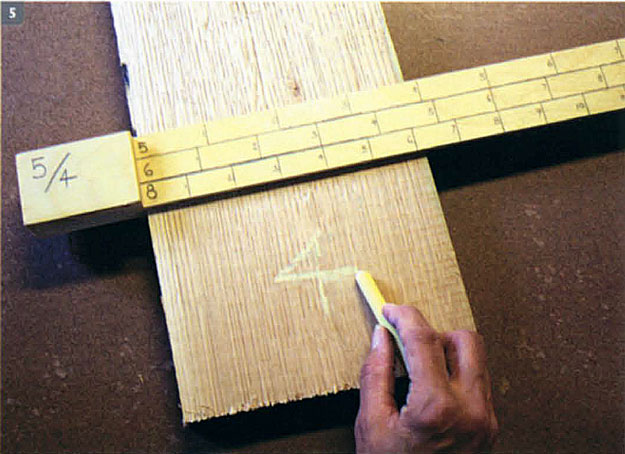
Once you know the thickness and length of the boards in your pile, reading the lumber rule is as simple as laying it across the board, and nothing the mark on the appropriate scale for the length of board you’re measuring. I usually mark one piece with the number of board feet it contains using chalk (image 5, below). Alternatively, you can place boards of the same lengths edge to edge, and gang measure them.
If a board tapers along its length, general practice is to measure the width, one-third of the length away from the board’s widest end.
Closing With a Few Tips
Figure on buying 50 percent more lumber than your project calls for. This will give you more choices for final wood selection and grain matching when crafting your project. In my experience, you’ll need that much extra lumber to accommodate for machining and jointing operations as well.
If your measurements don’t exactly match your sawyer’s, keep these things in mind. The lumberyard jas much more experience measuring than you and I. If your measurement is reasonably close to theirs, you’re on the right track. Also, some lumberyards may add “shrink” to their measurement. Shrink is the term used to describe how much lumber the yard loses due to normal drying of the lumber. This number seems to range in the 8- to 9-percent range. Some lumberyards add shrink to their measurements, others factor it into the price per board foot.
If you and your sawyer arrived at the same measurements, but not the same scale price, it could be because of thickness and wide-board premiums. Typically, lumberyards will charge more per board foot for lumber derived from thicker or wider stock. While prices for thicker stock are usually listed on a price sheet, wide-board premiums are not so straightforward. The definition of a wide board varies. It can be as narrow as 8″, but is typically in the 10″- to 12″-wide ranges. Wide-board premiums can cost you an extra 20 percent or more, and are at the discretion of the yard, so find out ahead of time.
Armed with your new shop-made lumber rule and a little knowledge about lumberyard operations, there should be no surprises when you step to the counter at the lumberyard and pay for your wood. Unless, of course, you’re like me and pick out five times more lumber than you had planned on buying.
Greg Paolini designs and builds custom furniture and cabinetry in western North Carolina.
This article first appeared in Woodwork Magazine, April 2008. For every issue of Woodwork Magazine (26 years’ worth) visit shopwoodworking.com.
Here are some supplies and tools we find essential in our everyday work around the shop. We may receive a commission from sales referred by our links; however, we have carefully selected these products for their usefulness and quality.


