We may receive a commission when you use our affiliate links. However, this does not impact our recommendations.

The longer I’m a woodworker, the less I like systems of measurement. Whether you’re a machinist who works in metric, an imperious advocate of imperial, or a Bob who measures in “bobs,” there is one thing that is true about all these systems: They invite error.
When you add, subtract, multiply or divide these measurements, you are doomed to make a mistake. We transpose numbers. We “burn an inch” when we use a tape measure by reading on the wrong side of the line. And we simply back ourselves into a difficult corner when we need to divide the face of a board into five equal spaces with 1/8″ between each space.
The solution, for me, is to reject measuring systems and rely instead on two things:
1. Direct readings. (Put the door stile up to the door opening. Mark the length of the stile. Make the cut.)
2. A lot of dividers.
This Christmas I didn’t get any woodworking tools from my spouse or kids. Usually they try to get me a small tool to make my life a little easier (last year was a couple screwdrivers and a Japanese-tooth keyhole saw). But I was delighted when I opened a box from my mom and it was filled with four pairs of rusty old dividers.
My mom has a booth at an antique mall in New Mexico and she sometimes picks up some cool stuff there. She got these dividers for me to hang on the wall, but they are simply too cool for the shelf. There are lots of different kinds of dividers available, and if you troll eBay for a few minutes you can find a lifetime supply for little money. Here are three vintage types that I like.
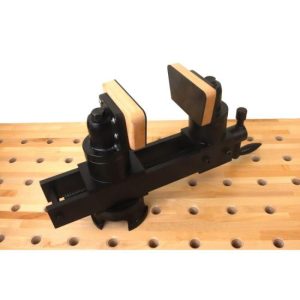
Forged dividers. These are blacksmith-made and show up in 18th-century tool catalogs. I don’t know if mine (shown above) are that old, but I do feel like wearing a powdered wig when I pick them up. In essence these dividers are made by taking one long bar of iron and flattening it out the middle. Then the smith curves the two ends over until they touch. The flattened part in the middle is thin and springy, which tends to open the points. A threaded rod and wingnut through the middle of the dividers makes them hold their setting. Mine are signed by W.H. Wilson, who I suspect was the owner. These have an organic shape, almost like they are skeletal. If you see some, snatch them up.

Riveted dividers. I don’t see this form as much. It is basically two bars of iron that have been hinged together and riveted. A tight fit and friction makes the tool hold its setting. When I got these out of the box they were rusted shut. A little Liquid Wrench and elbow grease loosened them up. Now they work like new.

Wing dividers. This is a common form and quite clever. For big measurements you simply loosen the nut and one leg swings free. For small measurements there is a spring between the legs. When you lock in a small setting you can micro-adjust your final setting by turning the screw on the side of the dividers. It’s super cool early technology.
For most woodworking, I use dividers that have legs that are between 4″ and 6″ long. Bigger dividers are pretty unwieldy, though I do use them for laying out cubbyholes and the like.
I think you are going to be hearing a lot more about these tools in the future. George Walker uses them a lot (check out his blog on design). And one of the most-requested classes at Woodworking in America was how to use dividers to lay out your work.
So thanks for the dividers, mom. It’s just like the time you bought me a case of beer for my 21st birthday.
– Christopher Schwarz