We may receive a commission when you use our affiliate links. However, this does not impact our recommendations.

Tips & Techniques for Fantastic Oak Finishes
By Dave Munkittrick
Like a movie star, oak possesses
natural good looks. Unlike a movie star, however, oak is easy to work with—even during finishing. Oak’s distinctive grain pattern (see photo below) is what
people are responding to when they say, “I love the look of oak.” The best finishes for oak celebrate its grain. In this article, I’ll highlight some key finishing tips and techniques used to create the multilayered finishes that bring out the best in oak. Check out the recipes that make use of these techniques in “4 Proven Oak Finishes” below.
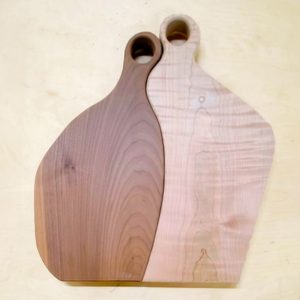
Earlywood and latewood stain differentlyFinishing oak is like finishing two different woods at once. The large, visible pores in the earlywood soak up stain much more aggressively than the relatively smooth latewood does. |
Click any image to view a larger version.
|

Avoid disasters; make samples firstAlways, always, always make samples before you begin to apply finish. Most finishing disasters can be avoided with this basic step. Making samples gives you the opportunity to tweak a recipe until you get the look you want. Be sure to make the samples out of scrap from the project you’re finishing to get the most accurate preview of how the finish will look. Sand and finish the samples to the same level as your project and apply a topcoat. Finally, accurately measure and record every step, including dye concentrations, mixture ratios, when to scuff-sand, number of topcoats, etc. There’s nothing worse than hitting on the perfect look only to realize you don’t know how you got there. Key to a good finish: proper sandingI sand oak to 220 grit. Although lots of people stop at 180 grit, I find going one more step really polishes the dense latewood and enhances its contrast with the coarse earlywood. |
 |
Scuff-sand carefullyScuff-sand with 280- or 320-grit paper between coats of shellac and varnish. A light touch is all that’s needed. Care must be taken not to sand through one layer of finish into the next. I typically scuff-sand after each coat of shellac. The sanding removes dust nibs and leaves a scratch pattern for the next coat to grip. Tip: Scuff-sand the dye coat on quartersawn oak to make the ray fleck really pop. Because the rays are so dense, the dye tends to sit on the surface where a light sanding can easily remove it. This makes the rays lighter than the surrounding wood. |
 |
Create a ground color with dyeMany great oak finishes begin with a “ground color” dye, typically a yellow or reddish brown. The ground color establishes the finish’s predominate undertone. Apply the dye liberally to bare wood with a brush or spray bottle. Blot up any excess with a clean rag. Even when thinned to manufacturers’ recommendations, dyes produce very strong colors. To avoid too strong a color or problems with lap marks, I recommend thinning the dye 50 percent beyond the bottle directions. You can always add a second or even third application of dye for a darker look, but it’s a lot harder to go from dark to light. Tip: I use a spray bottle to mist the wood with water before I put on the dye. The damp wood takes the stain more evenly than dry wood. |

|
Add a barrier coat of shellacShellac sealer brings the dyed oak to life. At the same time, it creates a barrier that prevents dyes or stains from bleeding into the next layer of finish. The barrier coat also creates distinct, well-defined layers that really add depth and beauty. Shellac is also used as a barrier coat between a colored glaze layer and the final topcoat. Be sure to use dewaxed shellac that’s thinned to a 2-lb. cut. (A 2-lb. cut simply means 2 pounds of dry shellac flakes were dissolved in one gallon of alcohol.) This is a thin mix that’s easy to brush and, because it’s dewaxed, it’s compatible with any topcoat. If you buy ready-mixed in the can, be careful: There are also cans of shellac labeled as a “finish and sealer” that use a more concentrated 3-lb. cut and contain wax. Read the label carefully. It should say something like “universal sanding sealer” and “100-percent wax-free formula.” |
 |
Glaze deepens the grain contrastA glaze layer is the secret ingredient to a great oak finish. A dark glaze emphasizes oak’s beautiful strong grain. Glaze is nothing more than a thick stain applied over a sealed surface. Apply the glaze with a stiff brush across the grain. This helps push the pigment deep into the wood’s pores. The glaze is removed with a pair of rags. The glaze left in the open pores of the earlywood turns it very dark. At the same time, the sealed latewood takes up very little stain. The result accentuates the natural contrast in oak’s grain. You can control the color strength on the latewood by either wiping the wood clean or leaving a little glaze behind. Use one rag to pick up the bulk of the stain. When it becomes saturated, it will leave a thin layer of color behind. Use the dry rag to clean up stain in corners or molding profiles. If the glaze ends up too dark or dries too quickly, don’t panic; just wipe the surface with a rag soaked with mineral spirits and start over. Tip: Cut the bristles of a disposable brush in half. The short, stiff bristles make it easy to scoop the thick gel out of the can and push the stain deep into the wood’s open pores. |

|

Topcoating protects the colorA protective topcoat adds depth and durability. Typical topcoats are oil-based or water-based varnish or lacquer. They protect the finish you’ve labored so diligently to create, as well as the wood beneath it. Be sure to seal the glaze layer before a topcoat is applied. Dewaxed shellac is the perfect sealer because it’s compatible with any topcoat you choose. |
 |
Four proven finishes for oak
A good finish should highlight the best characteristics of the wood it goes on. I’ve put together four finish recipes that make the most of oak’s contrasting grain. The first three recipes use two different color layers, each separated by a seal coat of shellac. Light penetrates and reflects back through the layers, giving these finishes stunning depth and beauty. The fourth is a simple, out-of-the-can recipe that produces a surprisingly good-looking finish.
The layered finishes start with a ground color of water-based dye. I like water-based dyes because they don’t bleed back out of oak’s pores like alcohol-based dyes do. Next, a barrier coat of dewaxed shellac seals in the dye. Shellac dries fast, allowing you to move through the steps quickly. A second layer of color, called a glaze, is applied over the sealed dye. The dark glaze fills the open-pored earlywood, increasing its contrast with the light-colored latewood. I use a gel stain for the glaze because it doesn’t run all over or bleed back. Another coat of shellac seals in the glaze. The dewaxed shellac allows you to use your favorite topcoat.
Mission oakThis finish is designed specifically for quartersawn white oak. Sanding the dye coat ever so lightly really enhances the ray flecks. 1. Apply a 50-50 mix of Trans Tint Dark Mission brown and medium brown dye to the bare wood and let it dry. 2. Very lightly scuff-sand the dyed wood with 320-grit paper. 3. Seal the dye with a barrier coat of wax-free shellac. 4. Scuff-sand. 5. Glaze with Varathane dark walnut gel stain. 6. Seal with wax-free shellac and scuff-sand when dry. 7. Apply a topcoat of your choice. |
 |
Golden oakThis is a classic oak finish familiar to any antique lover. The glaze layer darkens the open-pored earlywood and contrasts beautifully with the brownish-gold latewood. This finish looks best on red oak. 1. Trans Tint honey amber dye to the bare wood and 2. Seal with shellac and scuff-sand when dry. 3. Glaze with Varathane dark walnut gel stain. 4. Seal with shellac and scuff-sand when dry. 5. Apply a topcoat of your choice. |
 |
Deep, dark, red oakThis finish looks great on plainsawn red oak boards and is impossible to get straight out of a can. The red dye is incredibly strong. But the gel stain is applied without a barrier coat so it darkens both the earlywood and latewood. 1. Apply Trans Tint bright scarlet to the bare wood and let it dry. 2. Apply Minwax jet black mahogany gel stain. 3. Seal with wax-free shellac and scuff-sand when dry. 4. Apply a topcoat of your choice. |
 |
Simple, but nice, oak finishThis finish is as easy as it gets. Its results are not as spectacular as those of the other three recipes. But it makes up for its plainer look with ease of application. 1. Apply two coats of Rockler’s Mission Oak Wipe-On gel stain. 2. Seal with shellac and scuff-sand when dry. 3. Apply a topcoat of your choice. |
 |
Sources(Note: Product availability and costs are subject to change since original publication date.) Woodcraft, woodcraft.com, 800-535-4486, Zinnser Bulls Eye Seal Coat; TransTint Dyes: honey amber, #128481, bright red, #128488, medium brown, #128484, dark Mission brown #128486. Rockler, rockler.com, 800-279-4441, Mission oak wipe-on gel stain, #34921. Home Centers and Hardware Stores, Varathane dark walnut gel stain; jet Minwax gel stain black mahogany. This story originally appeared in American Woodworker September 2005, issue #116.
|