We may receive a commission when you use our affiliate links. However, this does not impact our recommendations.
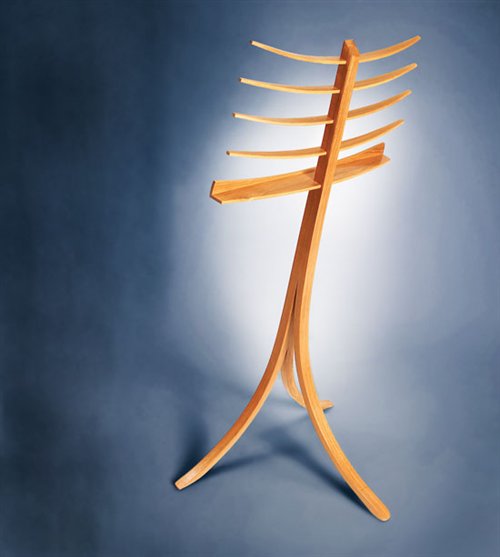
Steam Bent Music Stand
“Learning to bend wood with steam takes practice, just like playing an instrument.”
By Seth Keller
| Bending wood with steam always intrigued me, but I never tried it. The process seemed mysterious, complicated and maybe even dangerous. But one day a beat-up old music stand motivated me to give steam bending a try. My first two or three attempts weren’t successful, but I learned with each failure and became more confident with each attempt.
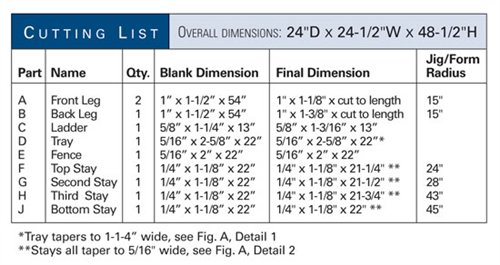
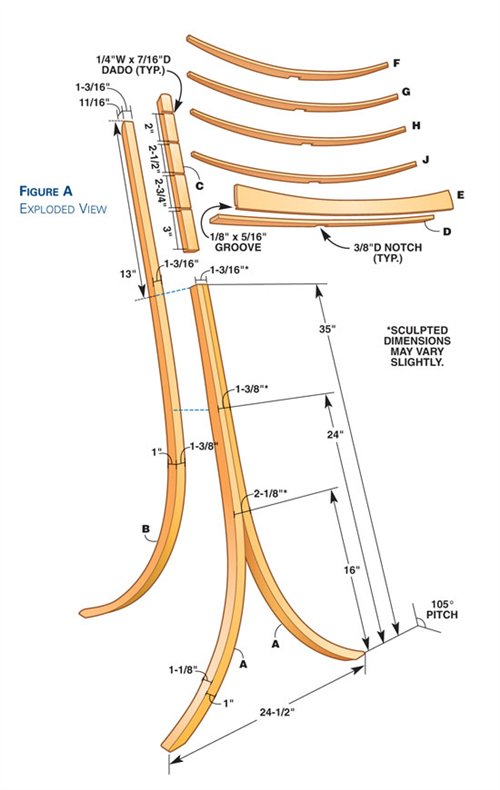
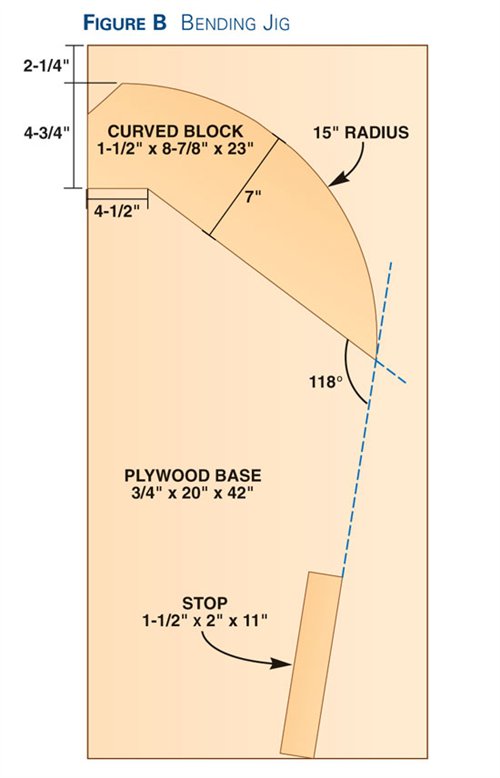
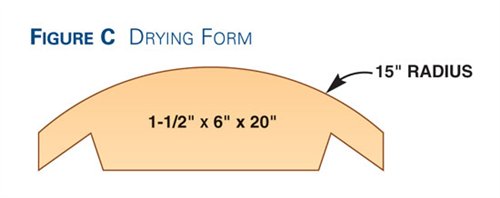
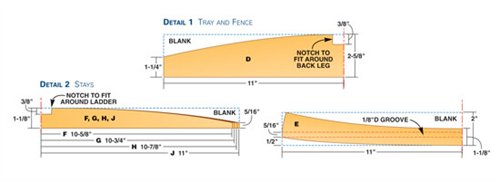
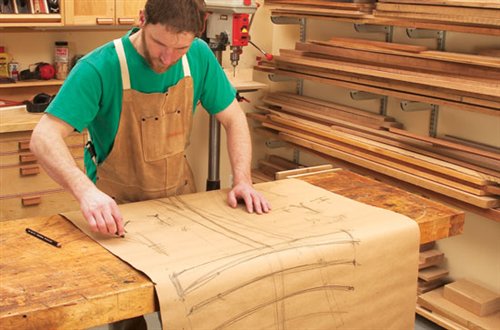
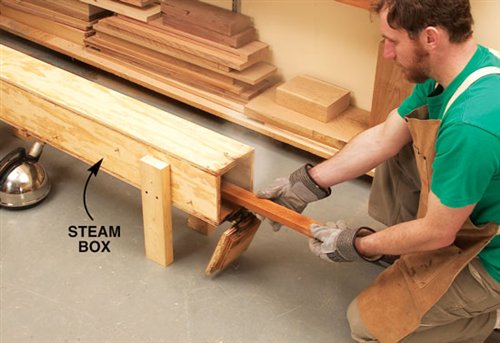
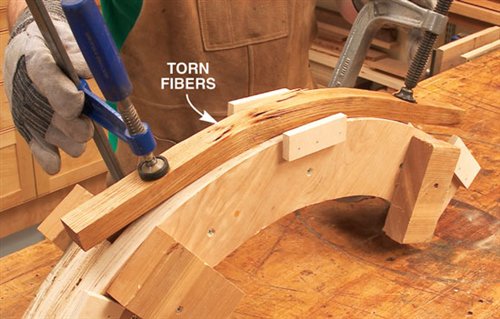
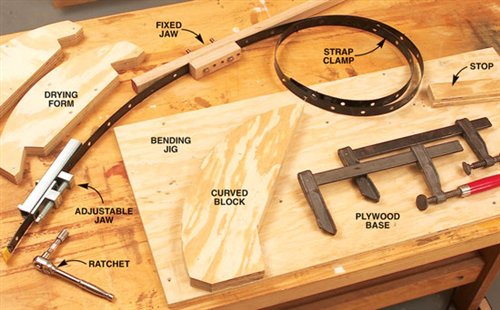
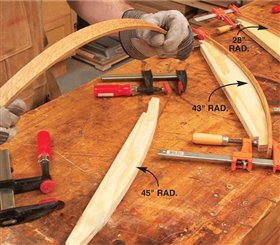
One thing I can tell you is that steam bending is as much art as it is science. So many variables affect the way each piece of wood bends, the outcome can be difficult to predict. I’ve found that the best way to achieve consistent results is to control as many variables as you can. First, use the right wood. White oak, the species I chose, is one of the best. Straight grain is a must and each piece should be as defect-free as possible. Many experts recommend using green wood, but once I refined my technique, I had good luck bending my kiln-dried white oak boards. A bending jig and a pair of drying forms are crucial for success. Their curves must be smooth and consistent. The jig and forms I used for this project came from the scraps of 3/4”-thick exterior grade plywood that were left after I built my steam box. I laminated two pieces of plywood to make some of the curved parts; others are just one piece thick. Once the wood comes out of the steam box, it begins to loose its flexibility in a minute or less, so you need to work fast. It’s best to engage a friend’s help and choreograph all of the steps by making dry runs. This music stand requires only five board feet of lumber, but I recommend buying at least four times as much, so you can practice and refine your bending techniques. I resawed 8/4 stock to make all the parts. Tailor Your DesignWhile dreaming up and designing my stand (Photos 1 and 2), I made some critical decisions. To simplify the construction, I decided the stand would be non-adjustable. Then I decided it would be used when I was seated. Finally, I adjusted its backward pitch to suit my playing posture. The bending jig and drying forms can be easily modified if you want to make aesthetic changes. My Big BreakAt first, most of my bending experiments failed (Photos 3 and 4). The turning point came when I discovered Lee Valley Tools’ Veritas strap clamp and instruction booklet on steam bending (see Sources, below). The booklet shows how make bending jigs and drying forms to use with the strap clamp. These tools, along with my steam box and kettle made all the difference (Photo 5). Bend the Leg BlanksI started by sawing a bunch of leg blanks (Fig. A, right, Parts A and B, and Cutting List). I planned to use some of them for test-bending and I wanted to have more than three bent blanks to choose from for the base. I’d already built a steam box (see “Simple Steam Box”), so next I built a bending jig for the leg blanks and a pair of drying forms (Figs. B and C). I cut the curved profiles on the bandsaw and used my disc sander to smooth the curves. Then I screwed and glued the curved block and stop to the base. After experimenting with different lengths of time, I settled on steaming each leg blank for one hour. To maintain the recommended 200-degree temperature in the steam box, I had to refill the kettle 2-3 times per one-hour cycle. Once the blank was removed from the steam box, I learned that every second counted. The faster it was bent and clamped onto the jig, the better it conformed. Taking one minute longer made a huge difference in the amount of springback (the tendency to straighten out) when the blank was removed from the jig. I discovered I couldn’t work fast enough to successfully bend the leg blanks by myself, so I enlisted a partner. While the first blank was steaming, I fastened the bending jig to my workbench and set up the strap clamp so it was less than 1/4-in. longer than the blank. We made sure we had clamps, gloves and everything else we needed before we removed the blank (Photo 6). Pre-setting the strap clamp paid immediate dividends, because tightening it only took a couple of twists with the ratchet. Our dry-run do-si-dos through the bending process also paid off, because clamping the blank to the jig and completing the bend took only seconds (Photos 7 and 8). Occasionally, we had to reduce the strap’s clamping pressure as we bent a blank around the form, to keep the curve from buckling. We also had to make sure the blank stayed seated on the base of the bending jig. If it rode up on the curved block, we whacked it back down with a mallet. After an hour, we took the bent blank off of the jig, removed the strap and immediately clamped the blank to one of the drying forms (Photo 9). As we’d started steaming another blank as soon as the first one was bent and clamped, we were ready to repeat the bending process. When all three blanks were bent, we headed to the golf course: The blanks had to stay in the forms for three days to stabilize. Turn the Blanks into LegsI squared up the three blanks I’d chosen to use for legs in two steps. First I jointed one edge (Photo 10). Then I planed the opposite edge. I left both front leg blanks 1/16” oversize in width. I milled the back leg blank to its final width. Next, I returned to the jointer to create flat gluing surfaces on the top portion of each blank (Photo 11). After jointing, the top ends measured about 11/16-in.-thick. The last step was to get rid of the black stains left by the metal strap clamp. I used a hand-held scraper. Build the BaseWhen I glued the front two legs together, I aligned the terminus points of their jointed faces (Photo 12). I removed all the squeezed-out glue before it dried. Then I marked and trimmed the feet (Photo 13). I trimmed the front leg assembly to its final height and then hand-planed it to final thickness, making sure to create a flat gluing surface for the back leg. To determine the stand’s tilt, I clamped the back leg so it extended 13-in. above the front leg assembly (Photo 14). After cutting the back foot, I glued the back leg to the front assembly, taking care that it remained centered. I used a level to make sure it was plumb. After the glue had dried, I shaped the base by planing, scraping and sanding. My belt sander was particularly effective! I aimed for uniformly smooth arcs and curves. Install the Ladder and TrayAfter milling the ladder (C) to size and length, I used my dado set to cut the 1/4-in.-wide dadoes that accommodate the stays. The distance between dadoes decreases from bottom to top, so the spaces between the stays are graduated. Next I notched the tray blank (D) to fit around the back leg (Fig. A, Detail 1) and dadoed the fence blank (E) to accommodate the tray. I shaped both pieces by bandsawing and sanding and then glued them together. To install the tray assembly, I let it rest on top of the the front legs as I slid it around the back leg. Then I glued on the ladder, with the tray assembly sandwiched—but not glued—in between. After the glue had dried, I removed the tray assembly to finish shaping the top of the stand. Bend the StaysI milled a boatload of stay blanks (F-J) so I’d have enough to experiment. I used the slots in the ladder to gauge their thickness—I wanted a snug fit. They required only about 15 minutes in the steam box, not nearly as long as the leg blanks. They didn’t require the strap clamp for bending, either. I managed to waste a bunch of them at first, by trying several times to bend them all together on the same form. Finally, I gave in and made four bending forms, one for each stay (Photo 15). Here are their radii: 24-in., 28-in., 43-in. and 45-in. I still steamed the blanks together to save time, but I removed each one separately and clamped it on its own form. I learned that I only had to leave these blanks on the forms overnight. Final AssemblyUsing my tablesaw’s crosscut sled, I notched each bent stay blank to fit the ladder. After trimming each blank to length, I shaped its back edge (Photo 16 and Fig A, Detail 2). Then I sanded the stays and softened their sharp edges. After gluing in the tray assembly, I installed all the stays at once (Photo 17). For the finish, I sprayed on three coats of lacquer from an aerosol can. It was much easier than wiping or brushing. For a super-smooth finish, I sanded lightly with 280-grit sandpaper before spraying the final coat. Source(Note: Product availability and costs are subject to change since original publication date.) Lee Valley, leevalley.com, 800-267-8735, Veritas Steam-Bending Instruction Booklet, #05F15.01, Veritas Strap Clamp for 1-1/4” Material, #05F10.01. Cutting ListFig. A: Exploded ViewFig. B: Bending a JigFig. C: Drying FormDetail 1: Tray and Fence, Detail 2: StaysThis story originally appeared in American Woodworker July 2007, issue #129. |
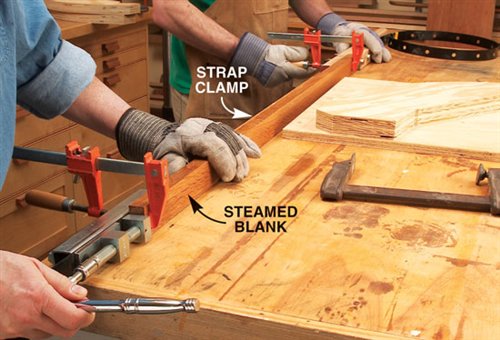
Click on any of the images to view a larger version
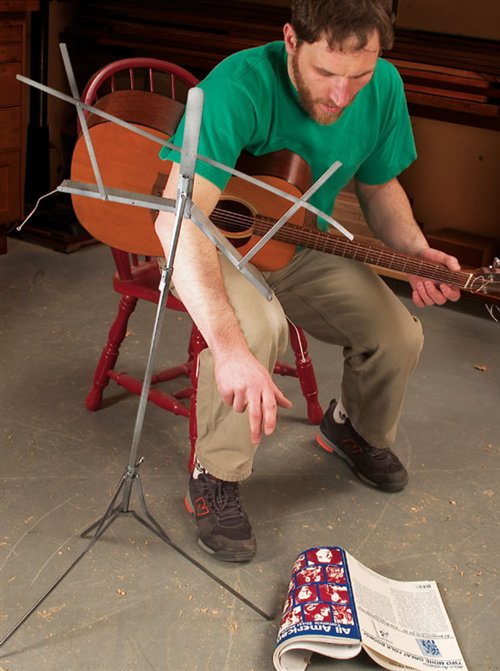
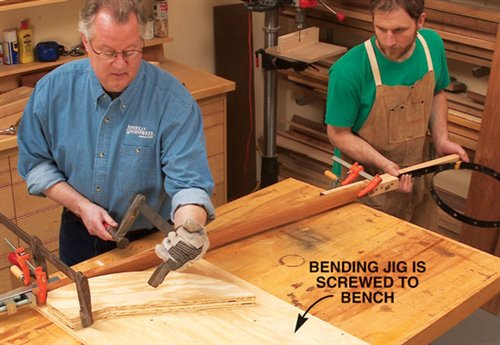
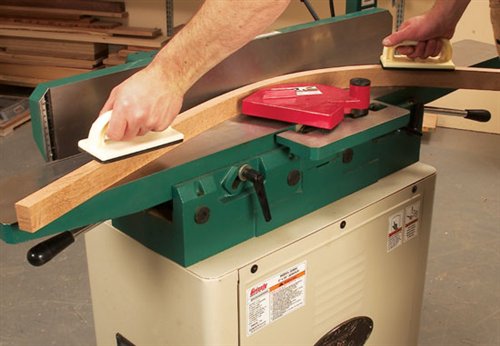
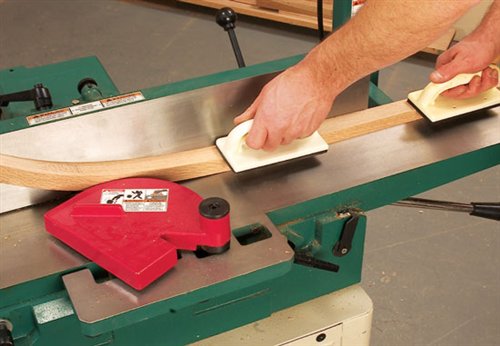
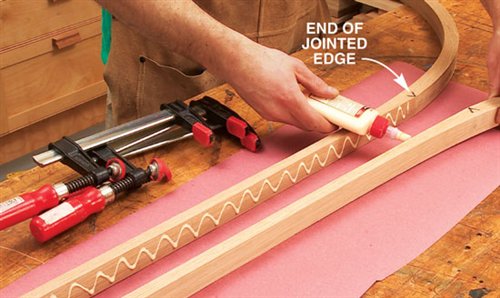
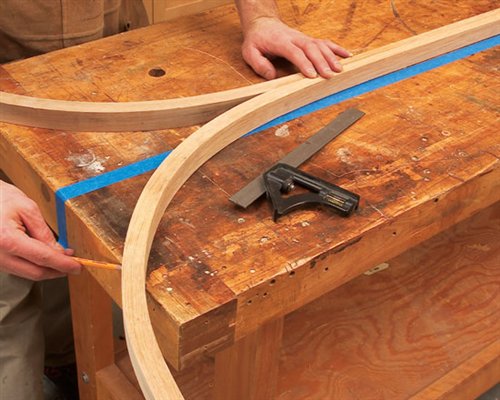
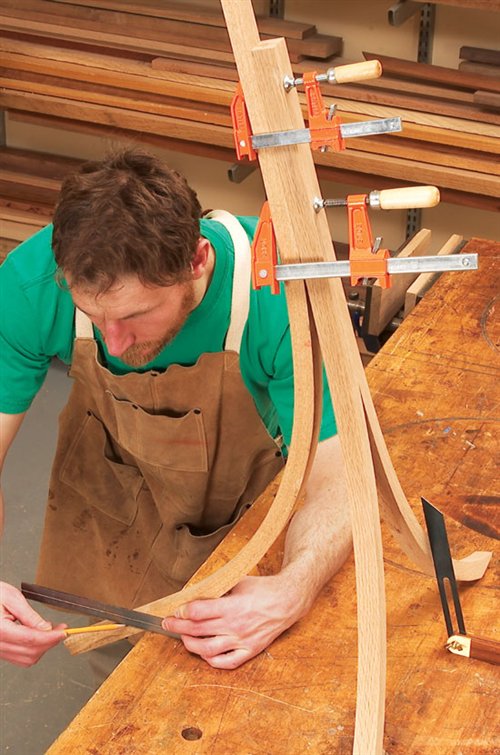
1. After many years together, my flimsy music stand and I experienced the ultimate falling out. Rather than buying another utilitarian stand, I got the crazy notion to design and build one that would, somehow, visually represent the music I play. 2. I drew full size sketches to find inspiration. I wanted the stand to echo the blues music I love, so I decided to bend the wood, just like those soulful blue notes. This seemed the perfect opportunity to try steam bending, something I’d always wanted to do. 3. I built a steam box to experiment. I quickly learned to wear gloves: Steamed wood is extremely hot. I also learned you have to work fast to bend it. Once the piece is removed, its flexibility lasts less than a minute. 4. My first attempts at bending steamed pieces were disasters. Every time I tried to bend and clamp a piece over a form, the fibers on the outside face tore apart. What was I doing wrong? 5. I discovered that I needed a strap clamp and a dedicated bending jig to successfully bend the thick, kiln-dried pieces I was using. The strap clamp (see Sources, below) wraps the steamed piece and keeps its fibers from stretching and tearing apart as it’s bent. The bending jig must be securely fastened to a work surface. I also made drying forms that matched the bending jig, so I could bend three leg blanks in a single day. 6. Bending the steamed leg blanks is definitely a two-person job. We needed to work efficiently as we pulled the blank from the steam box and clamped it in the strap clamp. So we rehearsed the entire bending process first, to choreograph our steps and make sure all the tools we needed were close at hand. 7. As soon as my partner clamped his end of the blank/strap clamp assembly to the bending jig’s curved block, I immediately started the bend. Every second counts. He quickly added another clamp to help the blank conform to the curved block. 8. Once the blank was clamped to the stop, we could relax. The entire bending process, from removing the steaming blank to applying the last clamp, takes less than a minute. 9. After an hour in the bending jig, I transfered the bent leg blank to a drying form. This way I could immediately reuse the bending jig. After transferring the second blank to another drying form, I left the third blank on the bending jig. 10. I discovered that the bent leg blanks had to be edge jointed, because they were always slightly twisted. To joint a perpendicular edge, I had to swivel the bent blank as I made the cut, while keeping its outside face flush against the fence. 11. I created a flat gluing surface on each leg blank by jointing the top portion of its outside face, above the bend. I made the same number of passes on each blank, so their remaining thicknesses matched. Because of the bend, each pass lengthened the jointed surface. 12. Before I glued the two front legs together, I marked the points where their jointed surfaces ended. I aligned these marks when I clamped the legs, so they would splay equally. 13. To mark the front assembly’s feet for trimming, I turned my bench into a T-square. The last thing I wanted was a leaning stand! I positioned the assembly so the legs’ splay was the correct width at the bottom edge. Then I aligned the shaft with a perpendicular strip of masking tape. 14. Establishing the stand’s backward tilt was another head-scratcher. My solution was to clamp the back leg in position and allow it to fall behind the table. When the tilt angle was correct, I marked the back leg for trimming. 15. To get the graduated
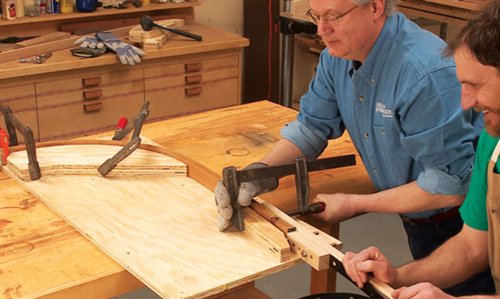
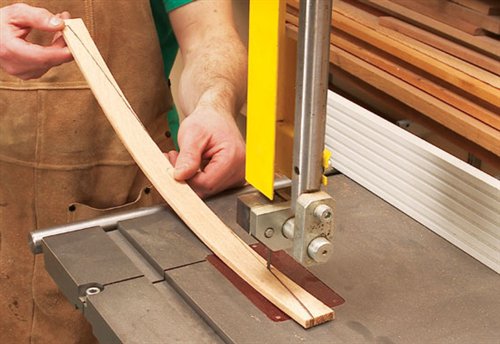
16. I decided to lighten the appearance of the stays, because their rectangular shape made the stand look top-heavy. Shaping their backs and graduating their lengths did the trick.
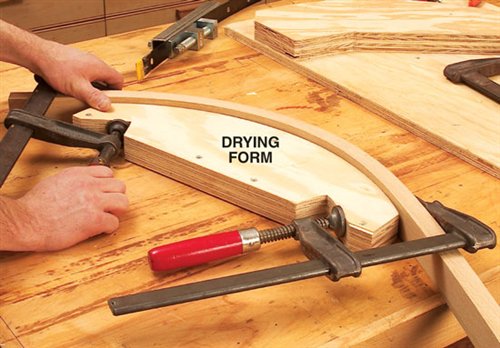
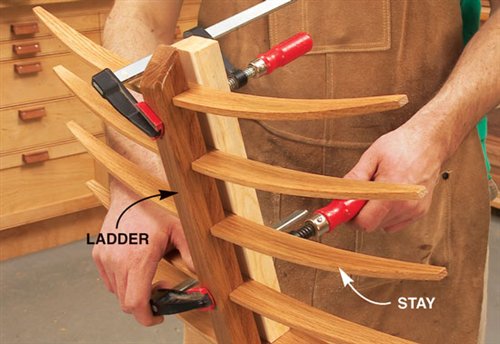
17. Keeping the stays in the same plane was vital, so my sheet music would lay flat. To make them coplanar, I had to fully seat all their slip joints in the ladder. Clamping with a flat board did the trick. Now my music soars, but my sheet music stays put!
|
Here are some supplies and tools we find essential in our everyday work around the shop. We may receive a commission from sales referred by our links; however, we have carefully selected these products for their usefulness and quality.


