We may receive a commission when you use our affiliate links. However, this does not impact our recommendations.
 Impossible? No. Impossibly easy.
 Impossible? No. Impossibly easy.
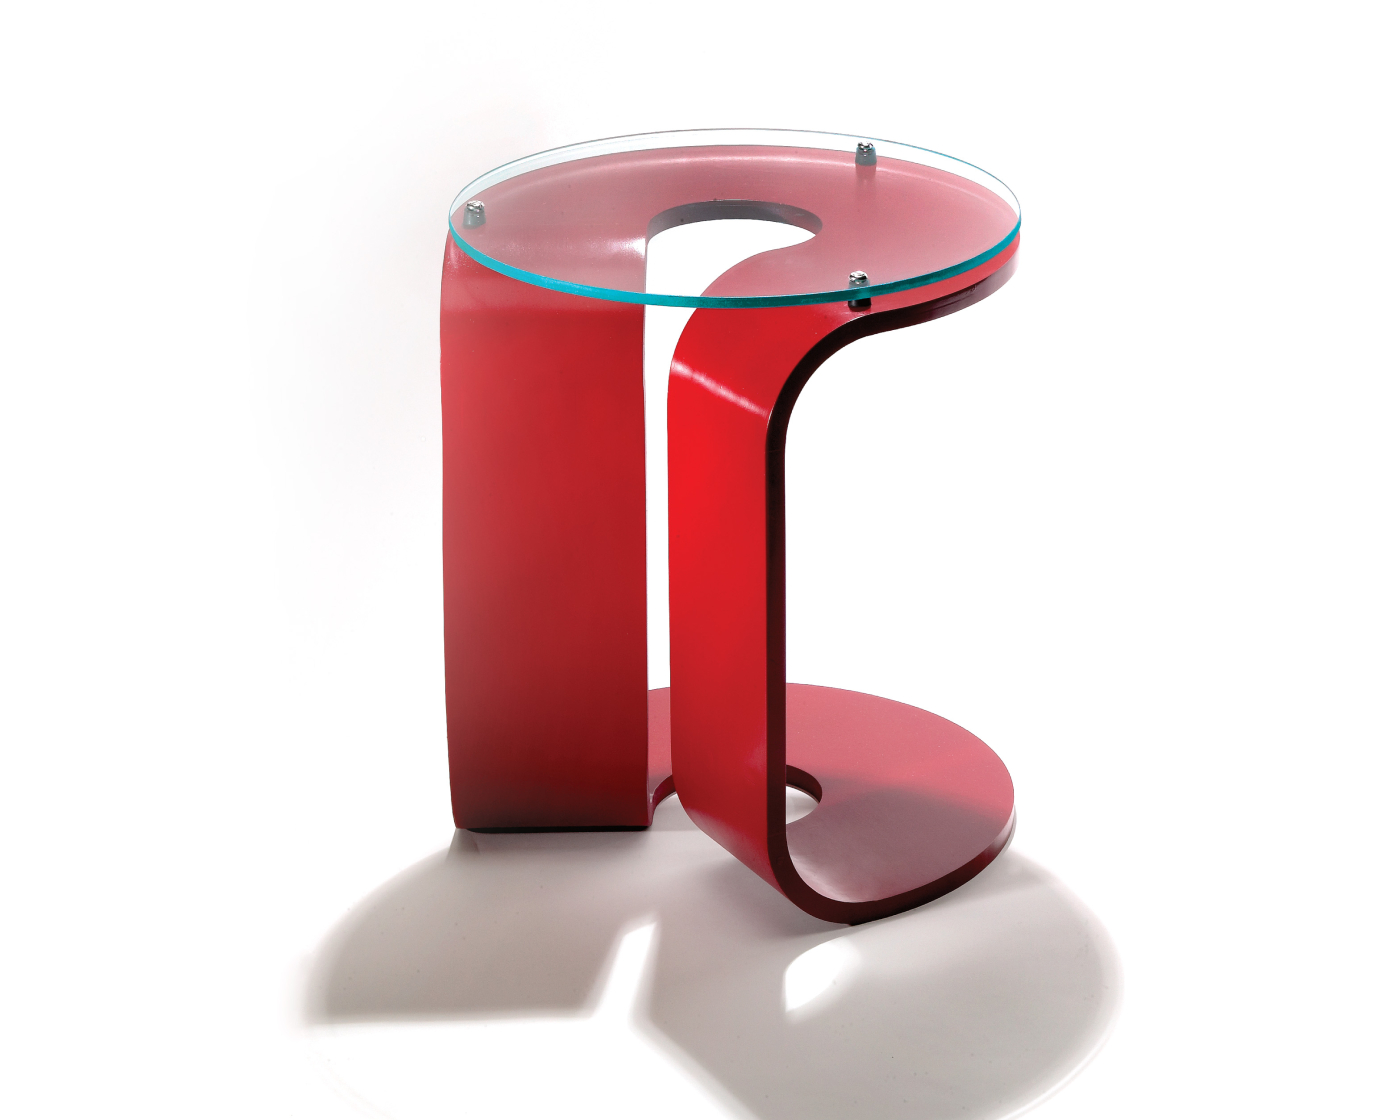
If architect and furniture designer Alvar Aalto (Finland, 1898-1976) is considered to be one of the founding fathers of modern design, then Eileen Gray (Ireland, 1878-1976), who shared his profession and time on Earth, must be a founding mother. For my ribbon table, I borrowed design elements from his sensuous bentwood stacking stool and her machined glass-top side table. I guess that makes me a modern grandson.
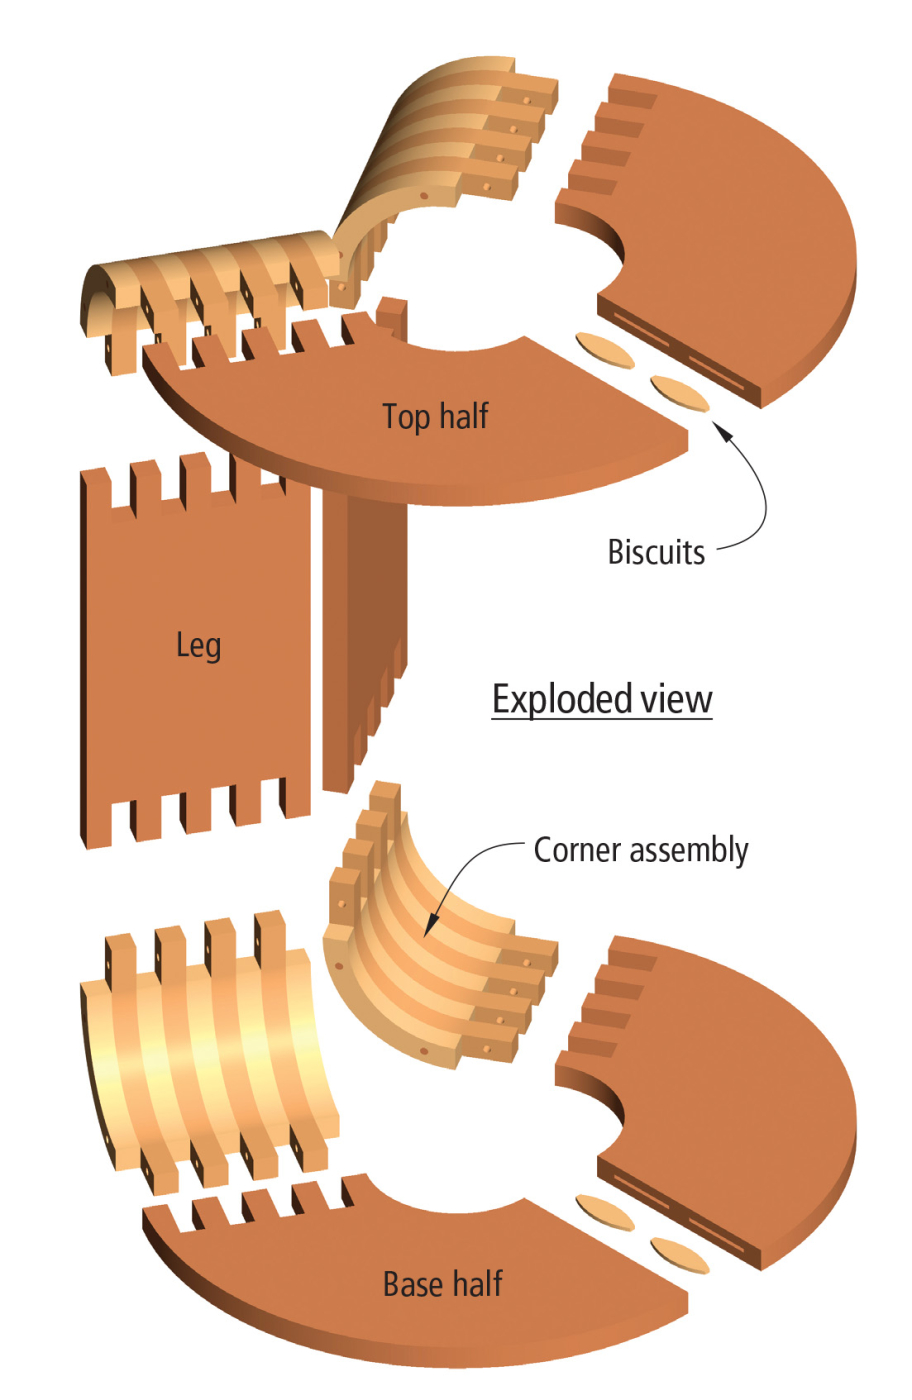
The stability and strength of Baltic birch plywood made it my material of choice. Aalto could bend it two ways but I wanted to up the ante by twisting it in the third dimension. Segmented, radiused corners, combined with a variation on finger joinery connecting the straight vertical pieces, proved to be a successful way of pulling off the illusion. The top and bottom are made from two pieces, biscuit-joined together.
Careful Layout
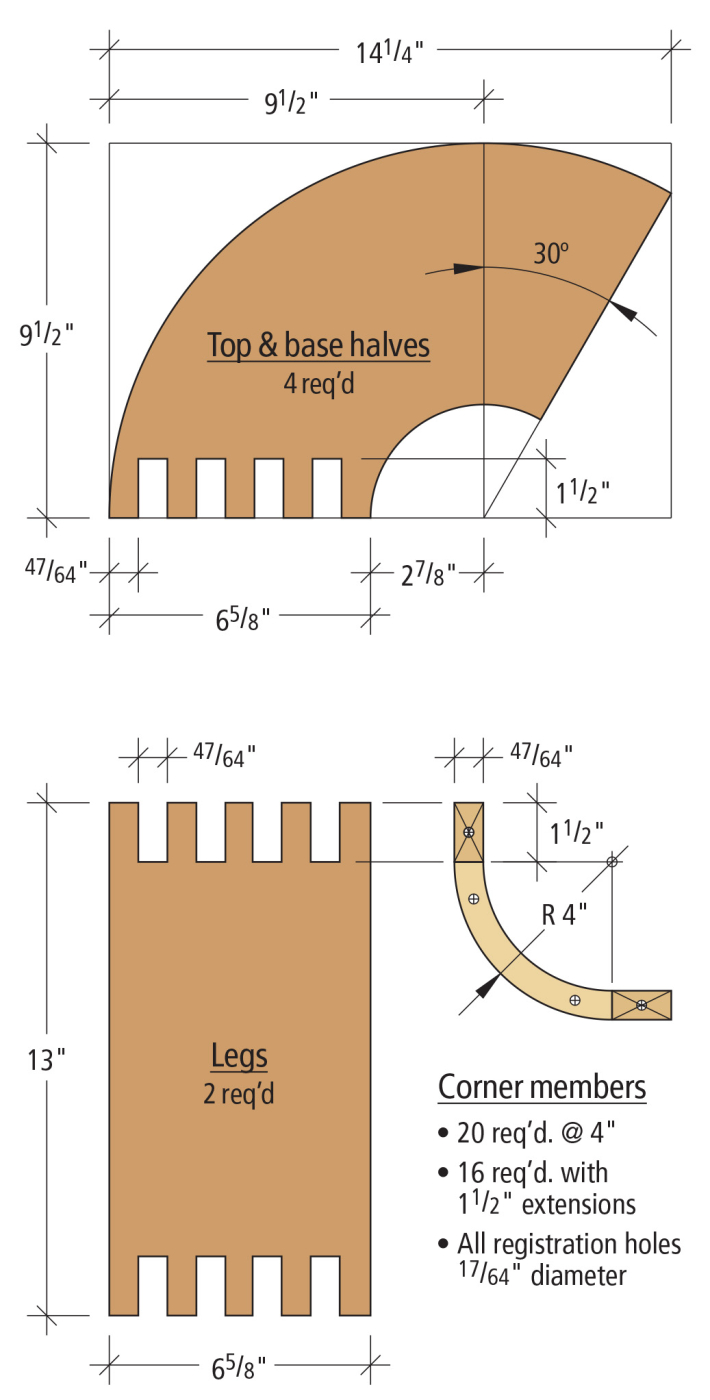
I can tell you that the outside radius of the arcs is 4″, and that the length of the straight finger extensions is 11⁄2“, but I can’t give you the exact width. That’s something you’ll have to measure because the width of the bends must be equal to the thickness of the nominal 3⁄4” stock you purchase. I used my dial caliper to come up with the 4 7⁄64” dimension shown in the illustrations. So what’s the big deal about a 1⁄64” variation from true 3⁄4“? A lot when you’re trying to bring so many surfaces into alignment from so many directions.
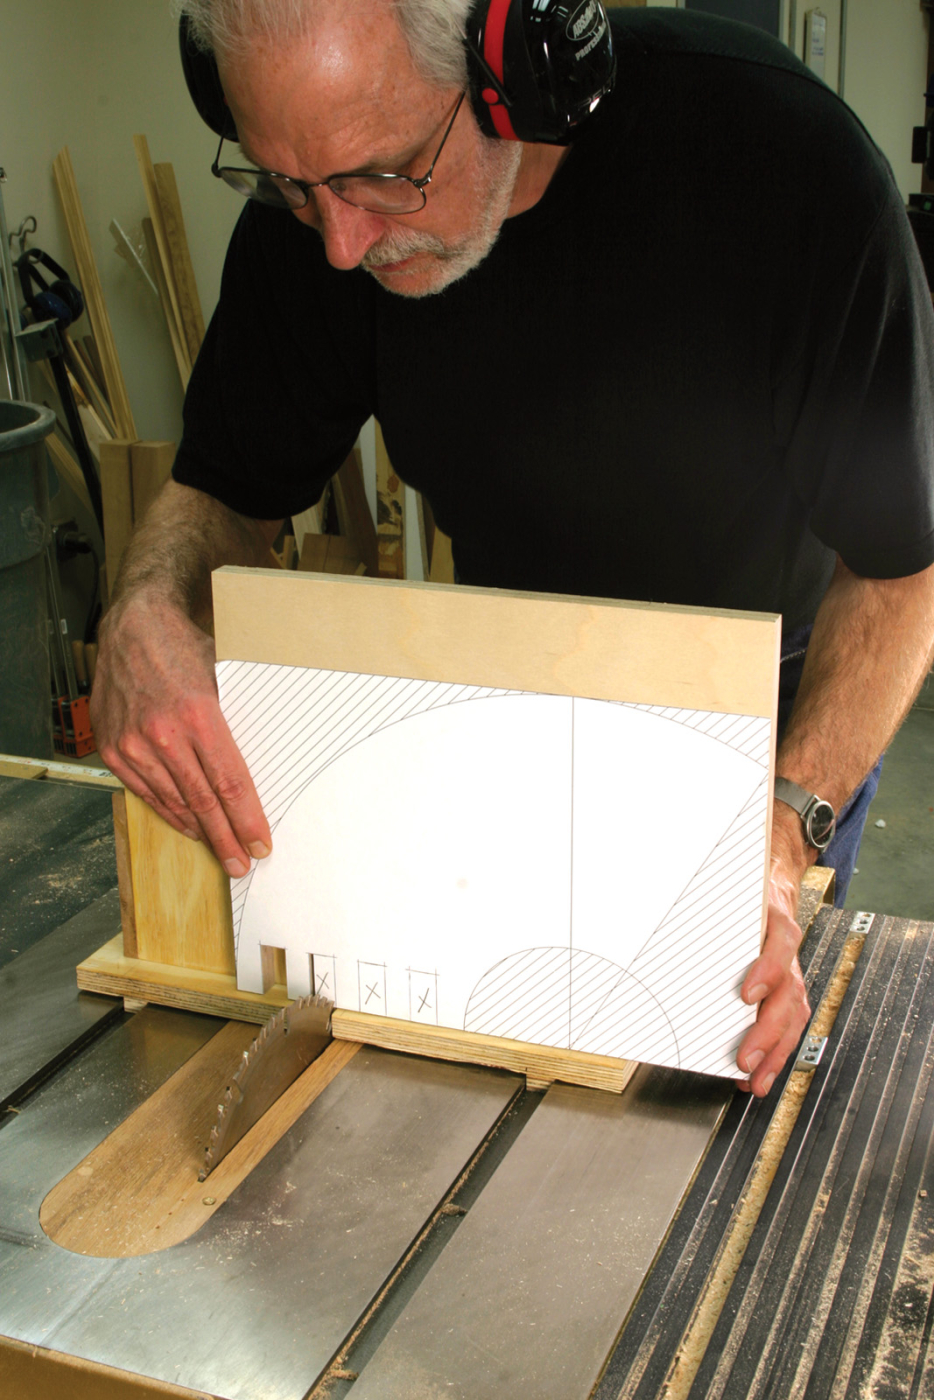
I printed nested corner patterns on standard copier paper after generating them through the CAD software on my computer. The same accuracy, however, is achievable by using a square, a dime-store compass and a ruler.
A Whole Bunch of Holes
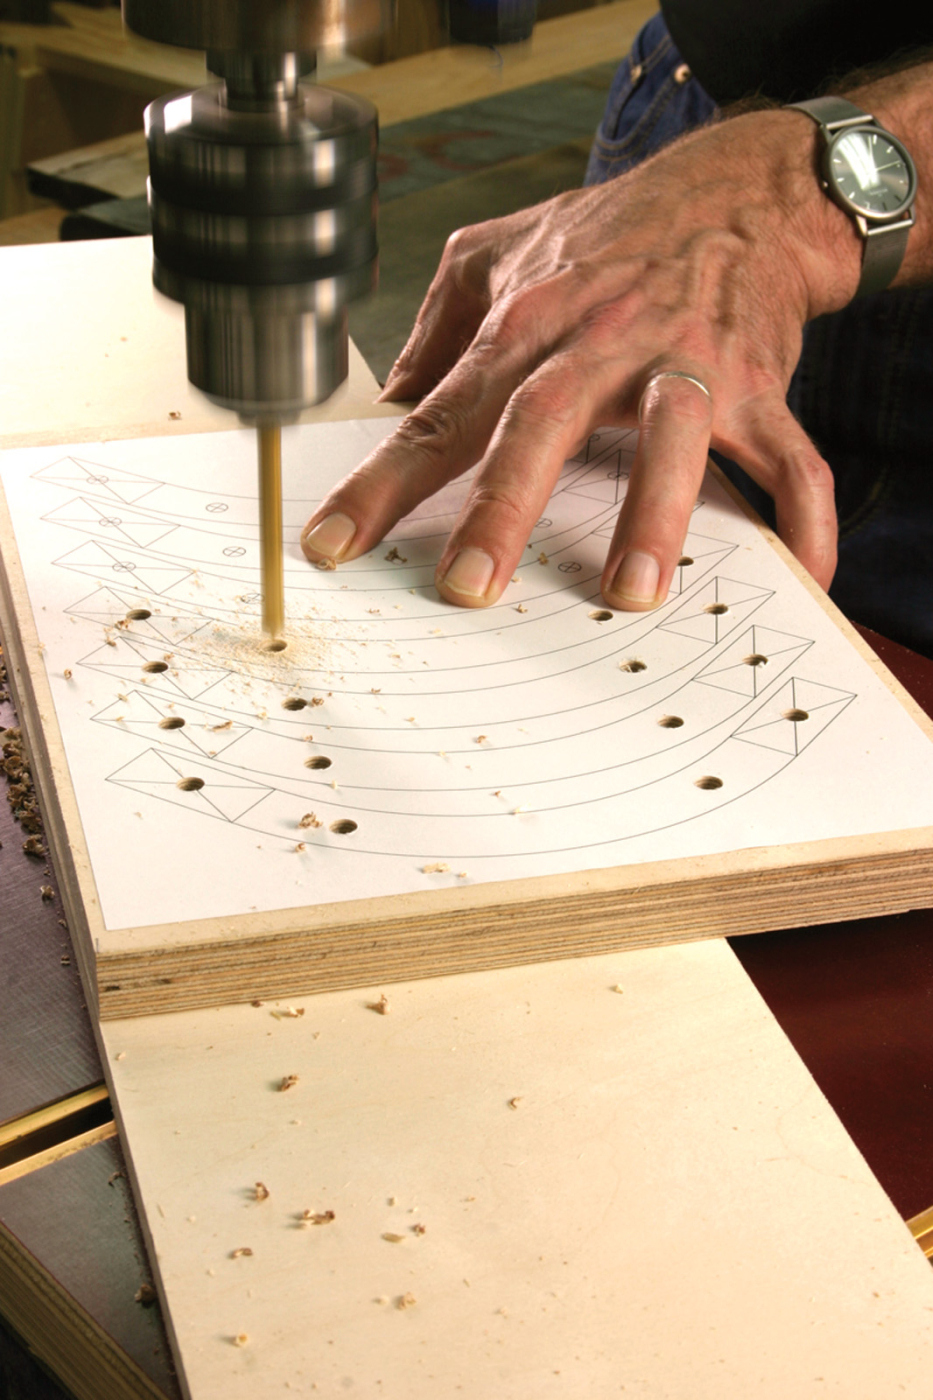
This obligatory “Man Drills Holes In Board” shot is here to remind you that accurate drilling, with a backup scrap to prevent tear-out, is key to a number of forming and glue-up steps. A 17⁄64″ brad-point bit clears the way for the 1⁄4″ registration dowels.
With a 17⁄64” brad-point bit secured in your drill press, drill the four registration holes in each of the radial corner segments. Four holes may seem excessive until the segments fall prey to the flush-trimming bit. It’s amazing how a little cylinder of metal, with two innocent-looking cutting edges, can exert enough force to bend 3⁄4” plywood as if it were overcooked spaghetti. I tried to get by with only the two inner holes and ended up with chatter marks at the unsecured extensions of the arcs.
Rack of Ribs
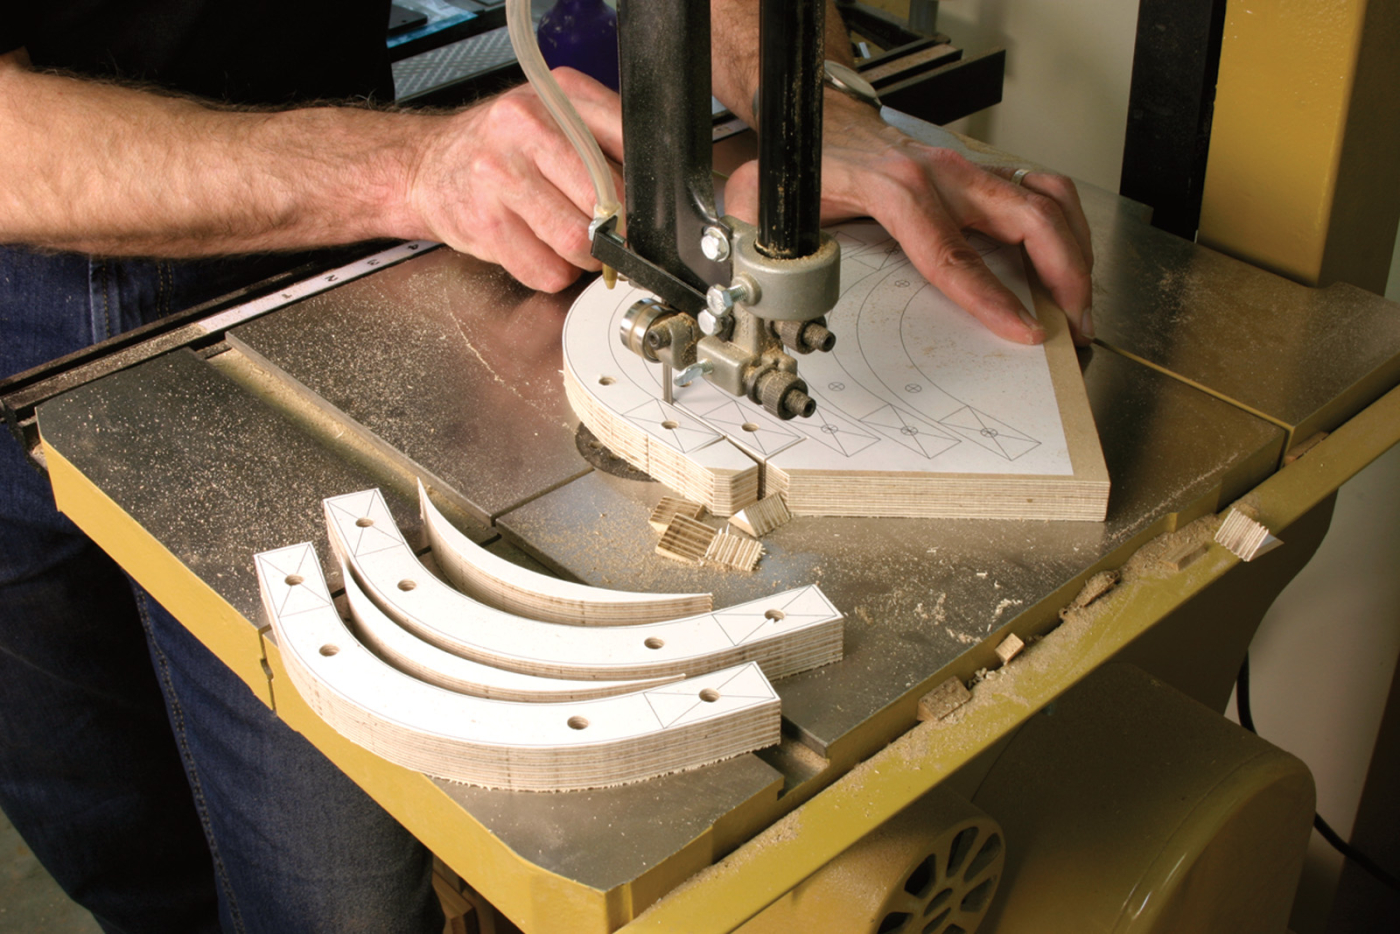
Nesting the patterns for the corner segments produces a minimum amount of waste. Make the cuts just outside the lines. You’ll be a band saw master by the time you get to your 36th smiley.
You know that I’m a band saw guy if you’ve seen any of my previous projects. There’s something about becoming “one with the blade” and tracking a cut 1⁄32” outside of a line that gives me repeated doses of obsessive/compulsive satisfaction. So much for my problem. Your task will be to rough-cut 36 arcs out of a rectangle. After nesting your patterns on the stock to minimize the waste, start rough-cutting slowly and carefully, staying just outside the lines. You’ll have the rhythm in no time.
A Passion for Sanding?
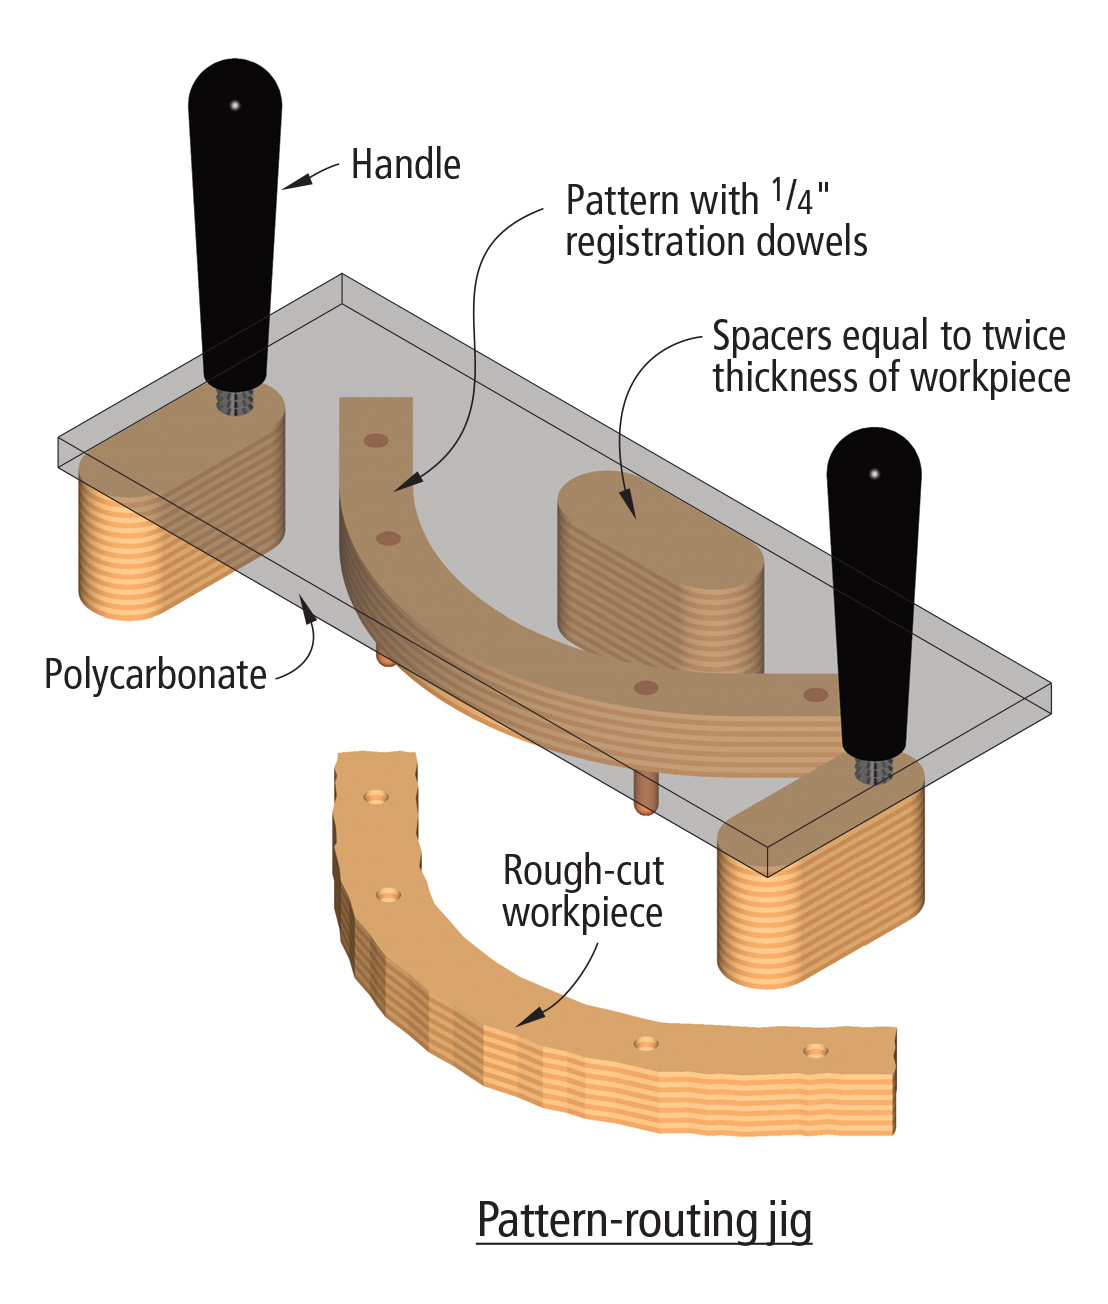 Pattern routing the corner segments isn’t really necessary if your idea of the perfect day in the shop is one devoted to sanding. If that doesn’t float your boat, read on. The router-table jig that I made for handling these small parts consists of a rectangle of 3⁄8” polycarbonate plastic, two purchased jig handles, one finely tuned pattern, four 1⁄4” registration dowels, and spacers consisting of two layers of the plywood stock. The spacers need to be arrayed around the pattern in a manner that prevents the jig from tipping as you run it over the router table. Remember to always feed the parts against the rotation of the bit, never with it. When the dust has cleared, you’ll have a perfectly matched stack of bends.
Here’s the whole story on the pattern-routing jig – one perfected pattern mounted to the bottom of the plastic guard, four protruding registration dowels, three spacers/stabilizers (with UHMW Slick Tape glides) arrayed around the pattern, and a couple handles.
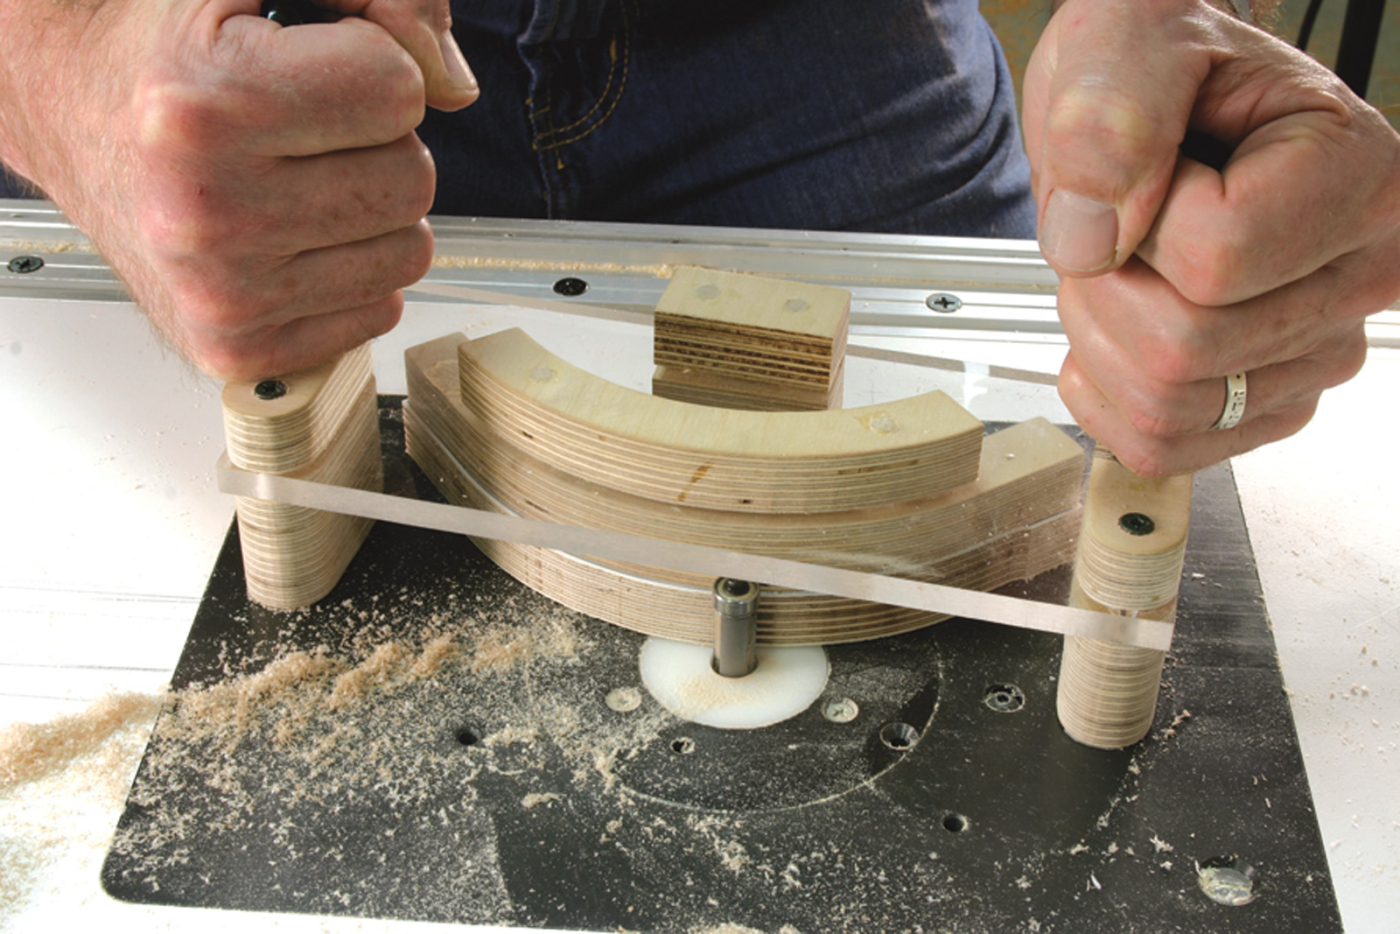
With a rough-cut corner segment resting on the router table, and registered to the perfected pattern just below the plastic guard, feed the segment into the cutting edges of the flush-trimming bit.
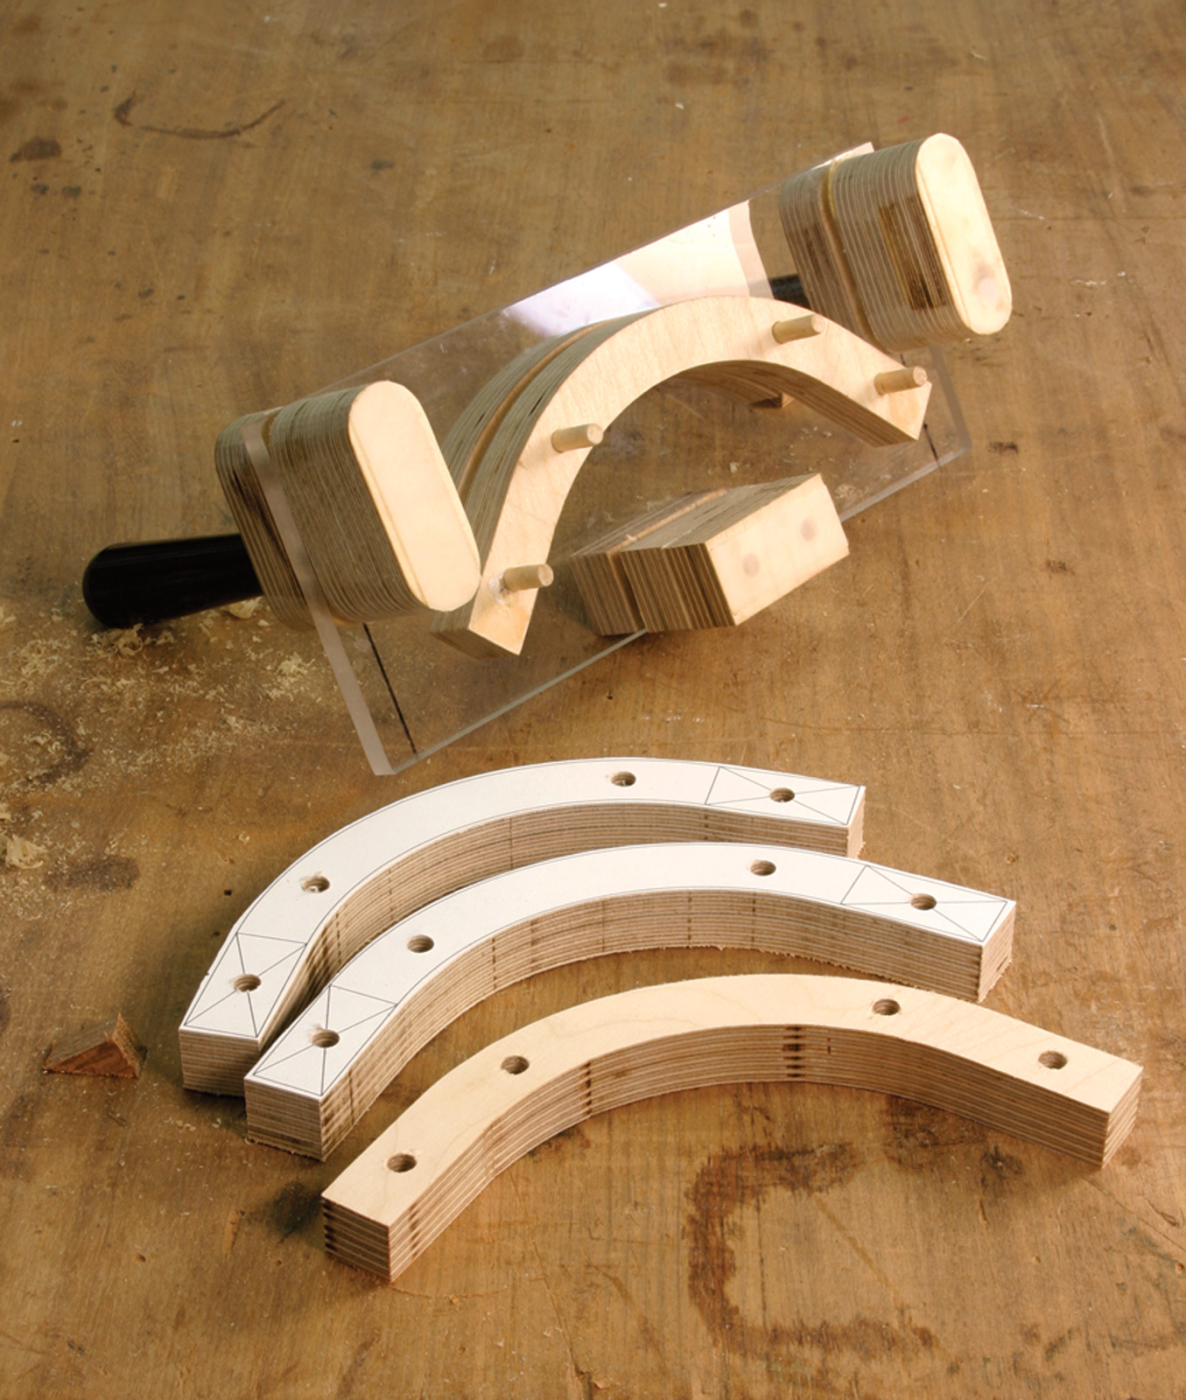
But before you can glue up your corners, 20 of the pieces need to be shorter than the others to form the fingers. You can trim them to size on the band saw, or you can set up a jig and use your table saw.
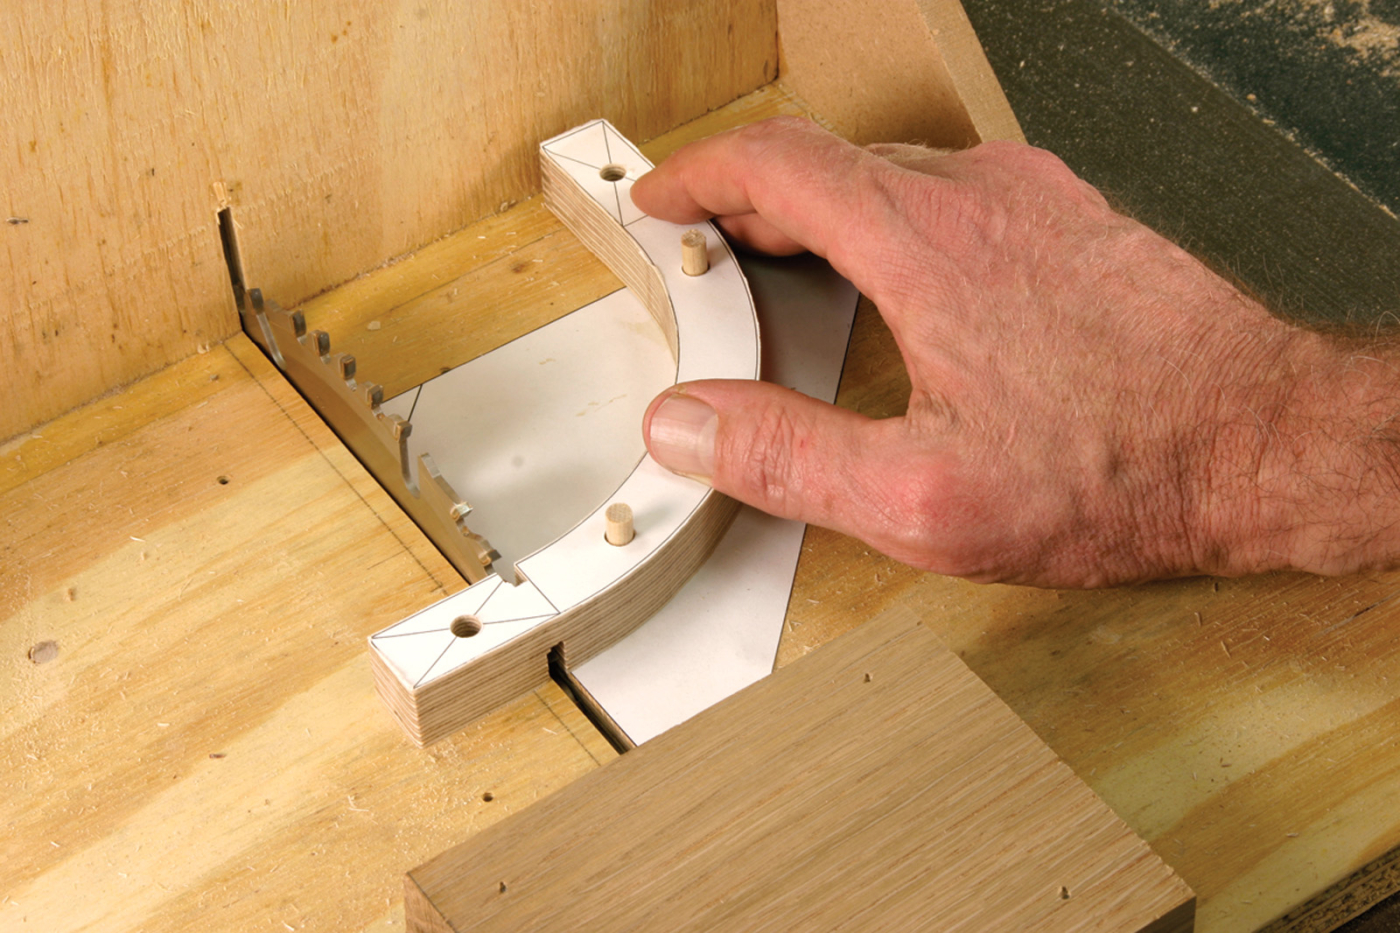
Alternately stack short and long corner segments over 7″ lengths of 1⁄4″-registration dowels for a perfectly aligned glue-up. Trim the dowels flush to the outside surfaces after the glue has dried.
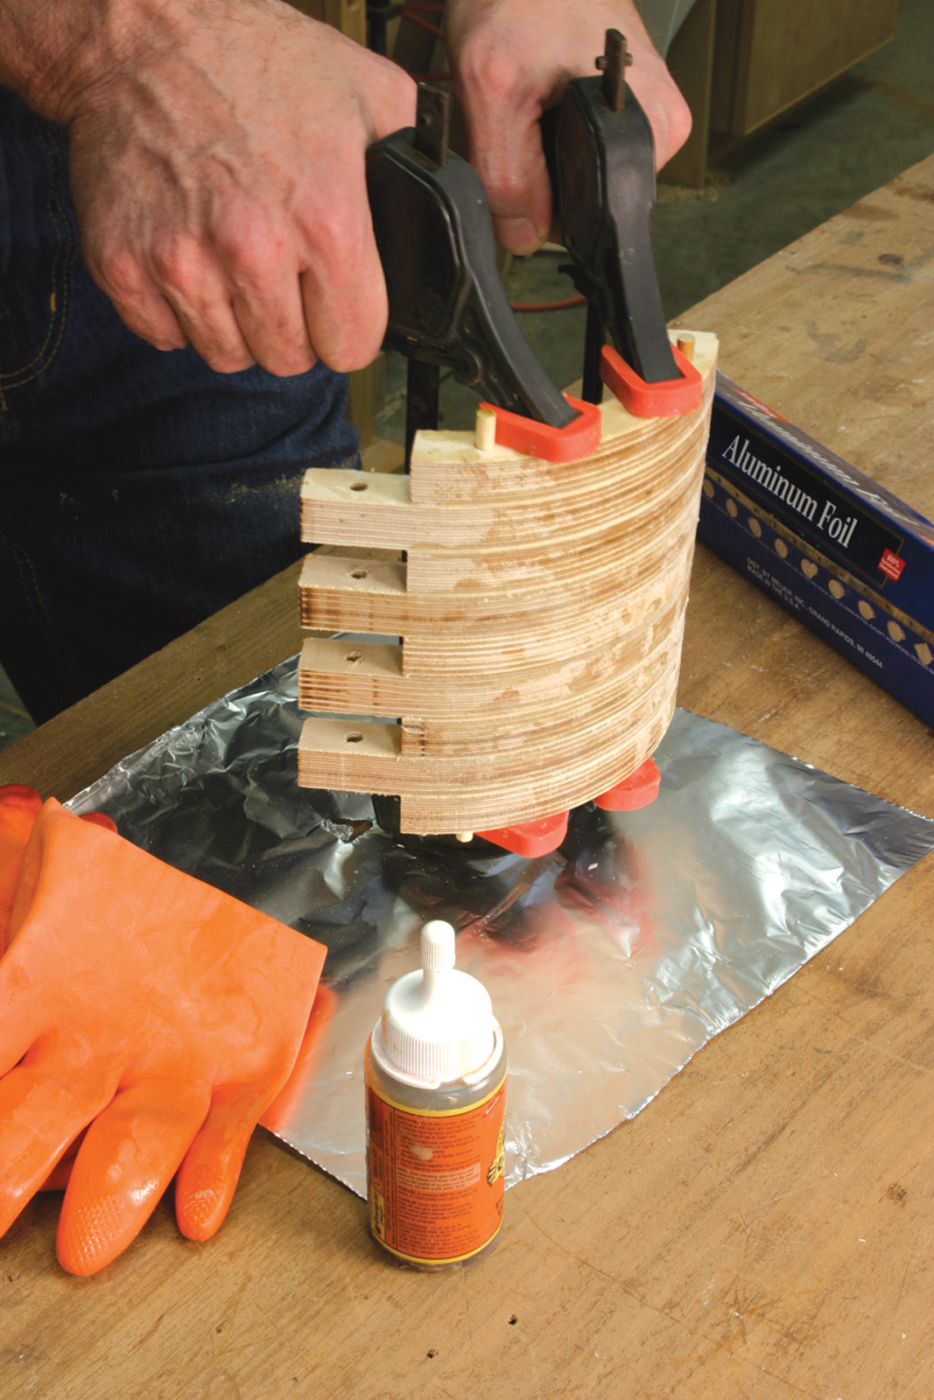
Corner Glue-up
My ingredients for this operation were: 1⁄4” registration dowels, a flux brush, cup of water, polyurethane glue, paper towels. And if you don’t already own gloves, get some. I went macho-gloveless for the first corner glue-up and ended up with Incredible Hulk hands. Nothing but time releases polyurethane glue from your skin. Before applying any glue, I placed the segments on a dampened paper towel, let them sit for a few minutes, and then flipped them. Baltic birch plywood is pretty inert stuff and the moisture absorbed from the paper towel helps to activate the glue.
Brush a liberal amount of glue on both sides of the five short and four long bends. Next stack them alternately on the dowels. When the sandwich is complete, apply a few clamps. Almost instantly, you’ll have a big foamy mess of glue squeeze-out. Don’t be tempted to tidy things up by wiping the foam with one of your paper towels. Doing so will lead to the sanding that you avoided by pattern routing. Be patient, let it dry, and then cleanly slice it away with a scraper.
My dado sled is nothing more than a scrap of plywood fastened to a couple wood runners. The fence is mounted square to the table and perpendicular to the blade. Here, I’m removing the finger-joint waste from a tabletop half.
Dado Sledding
I made a simple table saw sled for the dado cuts in the “legs” and table halves. Although it seems counterintuitive, I don’t recommend using a dado stack to make the notches. Because the thickness of plywood varies slightly within a single sheet, I found it best to trace the fingers of the bends on the straight sections and then nibble away the waste with a ripping blade. Start the cuts at the middle of the waste area and work outward, sneaking up to the pencil lines. This method of cutting saves you from fussing with shims and is more forgiving and far less aggressive than a dado stack.
Getting It All Together
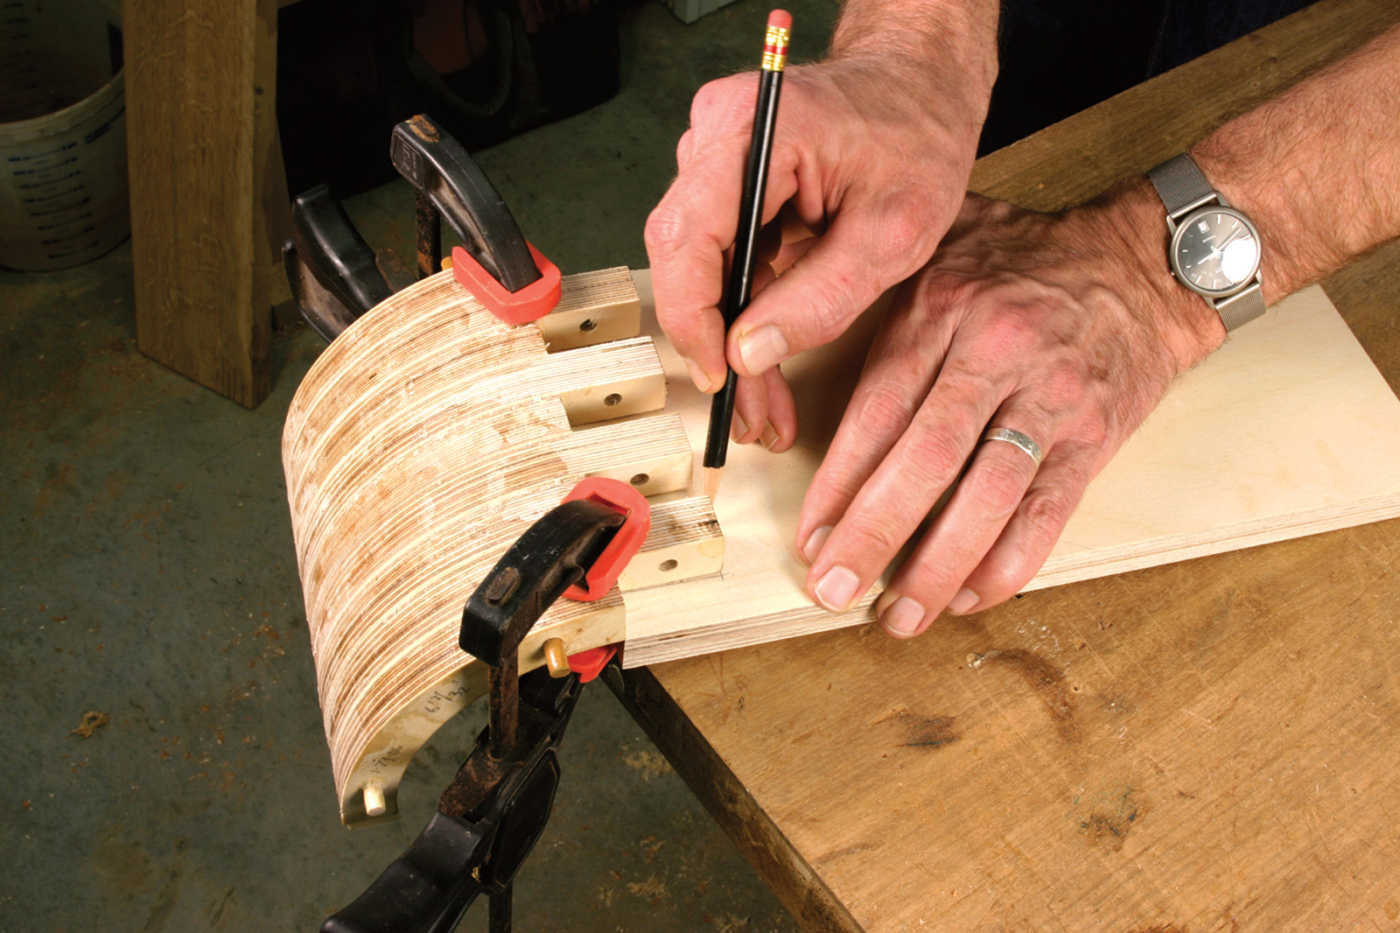
Trace the outline of the fingers of a glued-up corner to the legs, as well as the top and bottom halves, after clamping them in alignment on your workbench. The holes in the fingers are merely “leftovers” from the pattern- routing process.
I glued up the base in two vertical halves and then glued the halves together, aligning the top and bottom surfaces with biscuits. The only thing you really need to watch is the right-angle attachment of the bends to the flats. I accomplished this by first clamping a flat to my workbench and then pulling the fingers together with a pair of long bar clamps. I intentionally pushed the joint beyond 90° then pulled it back to square with a couple hand clamps. The rubber pads on the long clamps allowed this kind of micro-adjustment.
After starting to remove the straight extensions on 20 of the 36 corner segments on the band saw, I realized that by mounting a few more registration pins on the back of my dado sled I was able to make quick work of another repetitive task. I love it when I can get double duty out of a jig.
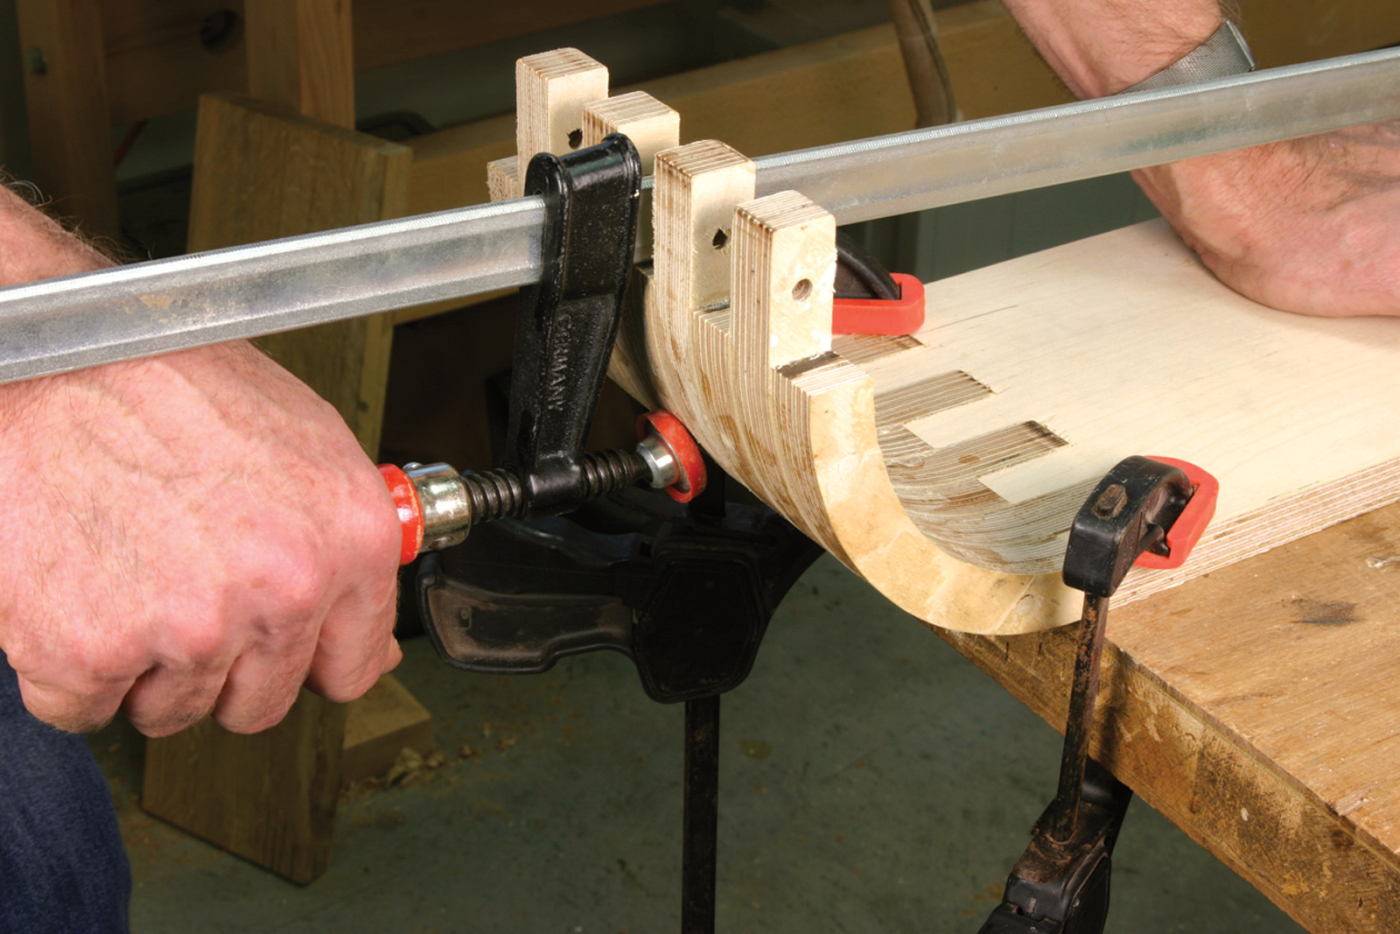
The secret to successfully joining corner pieces to flat pieces is keeping everything flush and square. Keep it flush with the little guys. Pull it together and up to square with the big guy.
Finish Line
I knew from day one that I wanted this to be a painted piece. Aalto was a fan of primary colors so I followed his lead with a cheerful cherry red. Your careful measuring and pattern routing in the early stages of the race will pay huge dividends when you near the finish line. A little wood filler, a little sanding, and you’re good to go. I usually don’t gush over a finishing product, but Krylon’s motto of “no drips, no runs, no errors” is no idle boast. It’s vital that the paint stays where it’s placed when applying the finish in three dimensions simultaneously.
Topping it Off
You can use any 19″-diameter disc of material for the top (solid wood, stone, metal) but it really deserves a circle of glass to display the undulations of the base. I ordered my 3⁄8“-thick top, with predrilled mounting holes, from a local glass fabricator. I separated the top from the base with black rubber bottle stoppers. When I can visualize a connection detail, but don’t know how to accomplish it, I always head for those mysterious, arcane parts drawers at the hardware store. I’d almost settled for doorstop bumper replacements (have you checked yours lately?) when I stumbled on two drawers of cork and rubber bottle stoppers in every conceivable size. Eureka! To pick up on the machine aesthetic of Gray’s side table, I through-bolted the glass to the base with stainless steel machine screws, finish washers, and cap nuts.
Can’t Help but Wonder
Some day, someone’s going to take a shot at the ribbon table in solid wood. My gut instinct tells me that this is impossible due to expansion/contraction considerations, but I haven’t taken the time to evaluate the force vectors. It might work or it might explode. Do I have a volunteer?
Inspiration
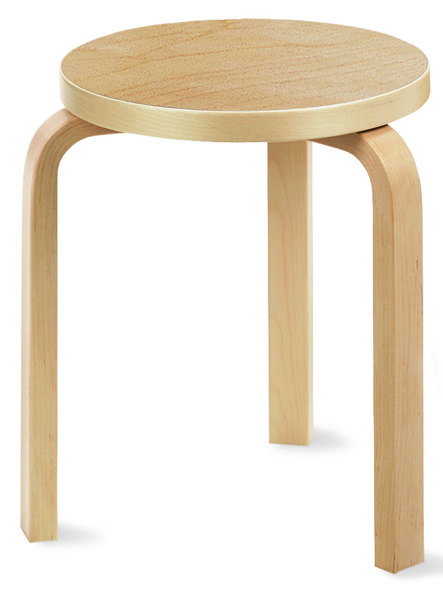
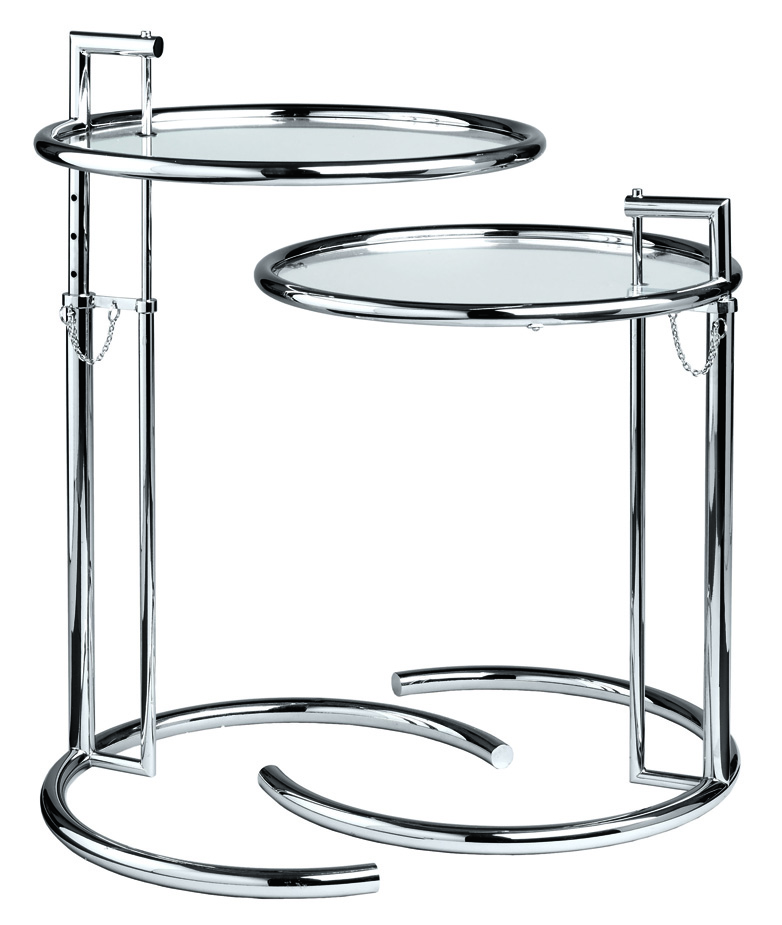
The Aalto Stacking Stool and Eileen Gray Table are available fromDesign Within Reach,online at www.dwr.com.
Variation

If you like the form but need a larger table, make two bases then top them with a long sheet of glass or other flat material.
Here are some supplies and tools we find essential in our everyday work around the shop. We may receive a commission from sales referred by our links; however, we have carefully selected these products for their usefulness and quality.