We may receive a commission when you use our affiliate links. However, this does not impact our recommendations.
Wood inlays are made by cutting a shaped pocket or void into a piece of wood, and then filling that pocket with another piece cut to the same shape. Although inlays can look impressive, they are not all that difficult to make. All you need to do is follow some simple techniques and you can create some amazing inlays.

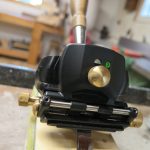
A brass inlay kit is a must-have accessory for inlay work.
You only need one power tool and few shop tools to make an inlay. A plunge router equipped with a brass inlay kit is used to make the cuts. The brass inlay kit includes a bushing that fits into the router’s base, and rides against the edge of the template during the cutting process. The kit also includes a bearing to position the router bit on the correct side of the cut line. You put the bearing on when cutting a pocket and remove it when cutting an inlay. You’ll need some double-sided duct tape and clamps to hold everything in place during the cutting process. And because you’re working with wood, you’ll need to do some sanding!
Fencing or templates are used to guide the router when building inlays. For simple geometric shapes like squares and rectangles, all you need is some sort of fence for the brass bearing to ride against. Because you’re using the brass inlay kit your fence can only be 1/4″ tall and the router base will need to ride on the top of it. If you’re making more elaborate or irregular shaped inlays, you’ll probably end up making your own templates out of 1/4″ material, or purchasing a template kit.
When you cut something on a table saw, the only thing that moves during the cutting process is the wood. Granted, the blade is spinning, but it isn’t moving! The same concept applies when building inlays. The only thing that moves during the cutting process is the router. If the wood or templates shift during the cutting process, the inlay or pocket can be ruined. To prevent that from happening, use double-sided duct tape to stick the inlay material to some sort of disposable backing material. Double-sided tape is effective in securing the template to the inlay material, too.

Double-sided tape is the perfect way to secure templates to workpieces.
Secure the material and template assembly to the work bench. Remember, nothing but the router moves! Set the depth of plunge the router bit will make into the material. If cutting a pocket, you don’t want to go all the way through the material. If cutting an inlay, set the plunge depth to cut all the way through the material and slightly into the backing material. Position the bearing next to the template wall, turn on the router, plunge the router bit into the material, and make your cuts in a clockwise fashion. If cutting an inlay, make sure the bearing is in constant contact with the wall during the cutting process. If cutting a pocket, remove all of the material inside the template shape.
Depending on the inlay, you may need to cut sharp corners. Because the router bit is positioned on the outside of the cut line when cutting out inlay pieces, you can make sharp corners. But because the router bit is positioned on the inside of the cut line when cutting voids, the cutting process leaves a small radius in the corners of pockets. So, unless you don’t mind slightly rounded corners, you will have to clean up the corners of pockets with a chisel.
Inlays can be easy, as long as you follow two basic rules of woodworking. Rule 1: Only one thing moves during the cutting process. Rule 2: Sharp tools cut best. Follow these basic guidelines and you’ll be creating amazing inlays in no time!
Learn more about wood inlays in Kurtis Leatham’s online course, Inlays Made Easy.
Here are some supplies and tools we find essential in our everyday work around the shop. We may receive a commission from sales referred by our links; however, we have carefully selected these products for their usefulness and quality.