We may receive a commission when you use our affiliate links. However, this does not impact our recommendations.

This easy-to-make project is sure to thrill the garden lovers in your life!
This sturdy little stand is perfect for your deck or patio. It’s got room for your favorite plants and it doesn’t take up a lot of space. When the weather gets cold, you can easily bring it, and a bit of summertime, indoors.
There’s no complicated joinery, just glue and screws. The legs simply chase each other around the base, like a pinwheel. The arms follow suit, but they’re offset, so your plants have plenty of room to grow.
Once you make templates for the legs and arms and the jig for routing the discs, you’ll have the stand together in no time. For tools, you’ll need a tablesaw, jigsaw, router and a drill, plus clamps and a file or rasp. If you use construction-grade lumber, you won’t need a planer or jointer. Rip the 1-1/2″ square column from a straight, clear 2×4 and use 1x stock for everything else. We went whole-hog, making ours out of mahogany. We spent about $100 for rough stock and milled it ourselves.

How to Build It
1. Mill all the parts to thickness. Cut the column (A), legs (B) and arms (E) to their finished dimensions.
2. Make templates for the leg and arm profiles (below).
 3. Rough out the legs and arms with a jigsaw or bandsaw, about 1/8″ oversize. Smooth the profiles with a rasp and sandpaper, a sanding drum mounted in your drill press, or an oscillating spindle sander.
4. Position each leg on the column and drill pilot holes for the screws (4a). Be sure to mark the legs so they’ll go back on the same column face during final assembly.
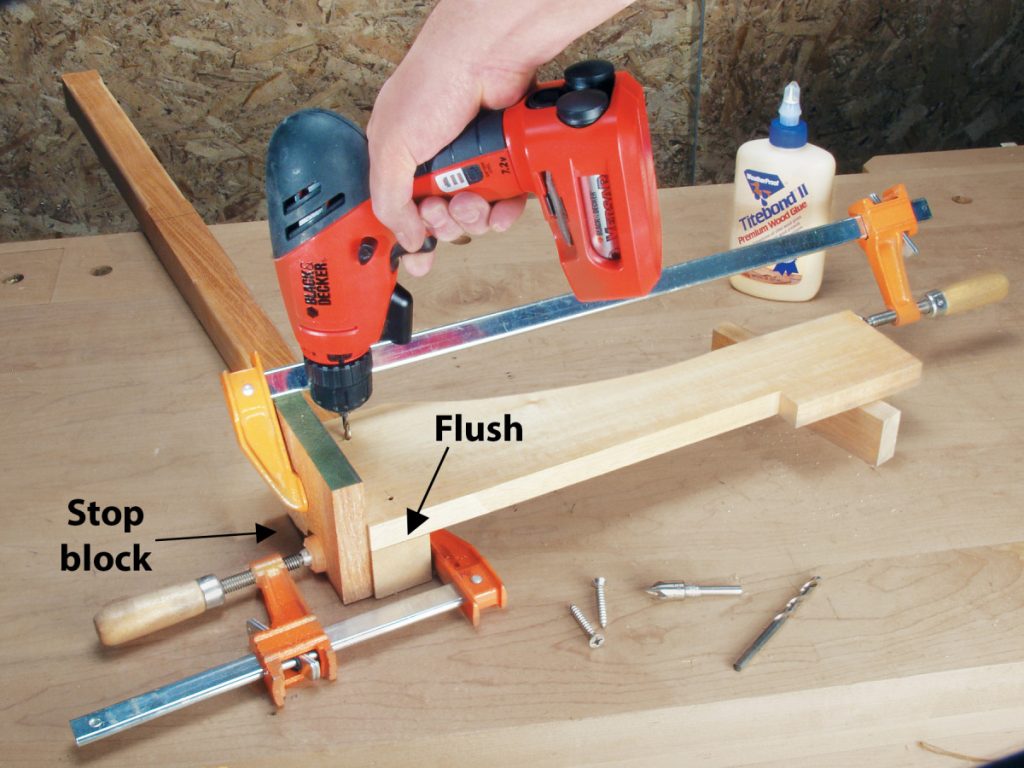
A stop block ensures perfect alignment when you mount the legs. First, clamp the stop block to the column. Then, clamp the leg to the stop block, making sure the bottoms of the leg and column are flush. After drilling pilot holes, countersink and drill out the leg holes so the screws will slip through and fit flush.
5. Round over the edges of the legs, except for portions that support the discs or go against the column. On the column, stop the roundovers 1″ away from the joints.
6. Fasten the legs to the column with weatherproof glue and stainless steel screws.
7. Attach the column support block (C).
8. Glue the triangular-shaped arm blocks (D), cut from your leftover column stock, to the column. If a stuck-on block keeps sliding down the column, pull it off, remove the excess glue and stick it back on. Before gluing on the second pair, plane the first pair flush.
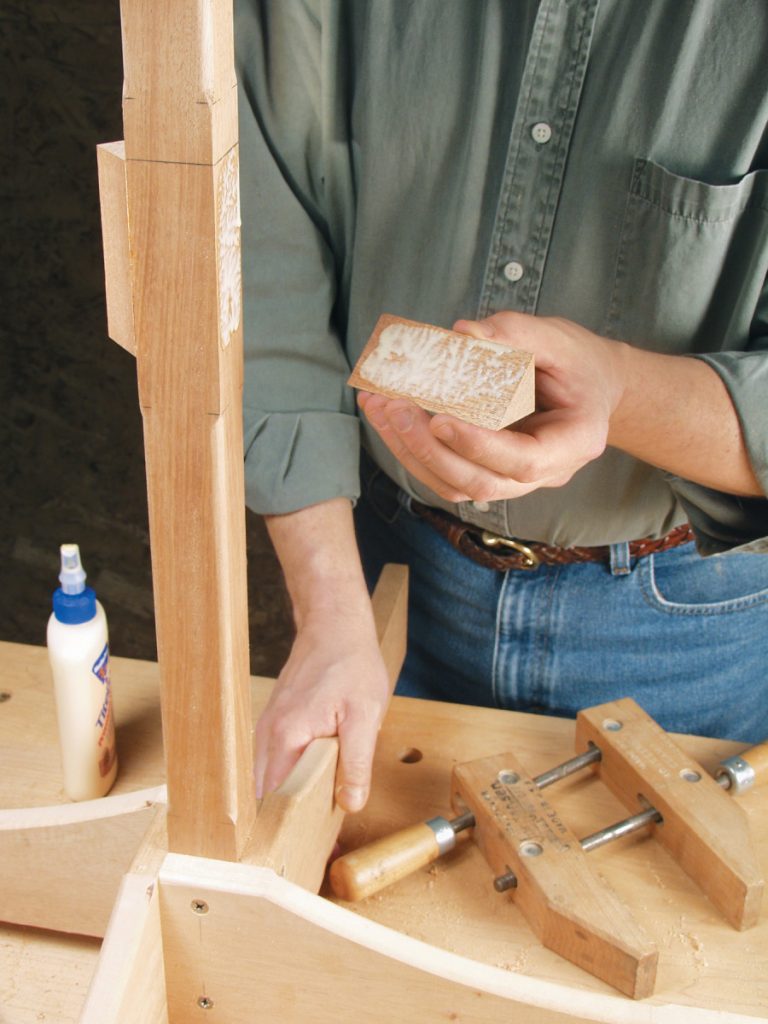
Glue the arm support blocks to the column, two at a time. Keep them properly aligned by going easy on the glue and using finger pressure to initially set the joint. Wait until the blocks are firmly attached before clamping. Once installed, these four triangular blocks create a mount for the arms that’s offset from the legs.
9. Attach the arms, following the same procedure you used for fastening the legs (Steps 4 through 6). Make sure the arms wrap around the column in the same direction as the legs, otherwise the discs won’t be properly staggered.
10. Make a jig to rout the discs, cut them to rough size and rout them. Then round over the edges.
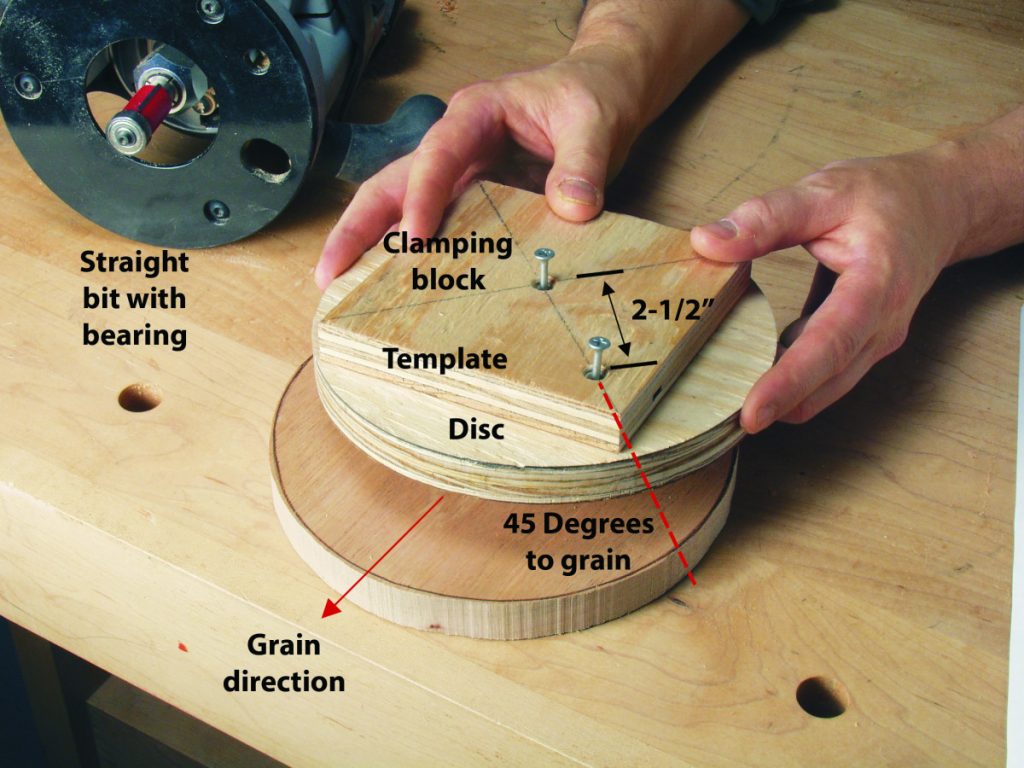
Rout perfect discs easily with a simply made two-piece jig. The block allows you to clamp the assembly to your workbench. The template lets you rout the round shape. Orient the screws at a 45° angle to the disc’s grain. Then the disc will be fully supported across the grain when it’s mounted.

To avoid tearing out the discs, you’ve got to make four passes, so you can always
rout “downhill,” following the grain. Make the counterclockwise passes (Steps 1 and 2) first. The two clockwise passes (Steps 3 and 4) require extra care, because you’re advancing the
router in the same direction as the spinning bit. Keep a firm grip, as the
router has a tendency to jump or skip ahead when the bit contacts the wood.
11. On all discs but one, drill out both holes left by the jig for the mounting screws. Countersink the holes on one side. Drill out only the center hole on the disc that’ll go on top of the column. Position the discs on the legs and arms, drill pilot holes, and fasten them.
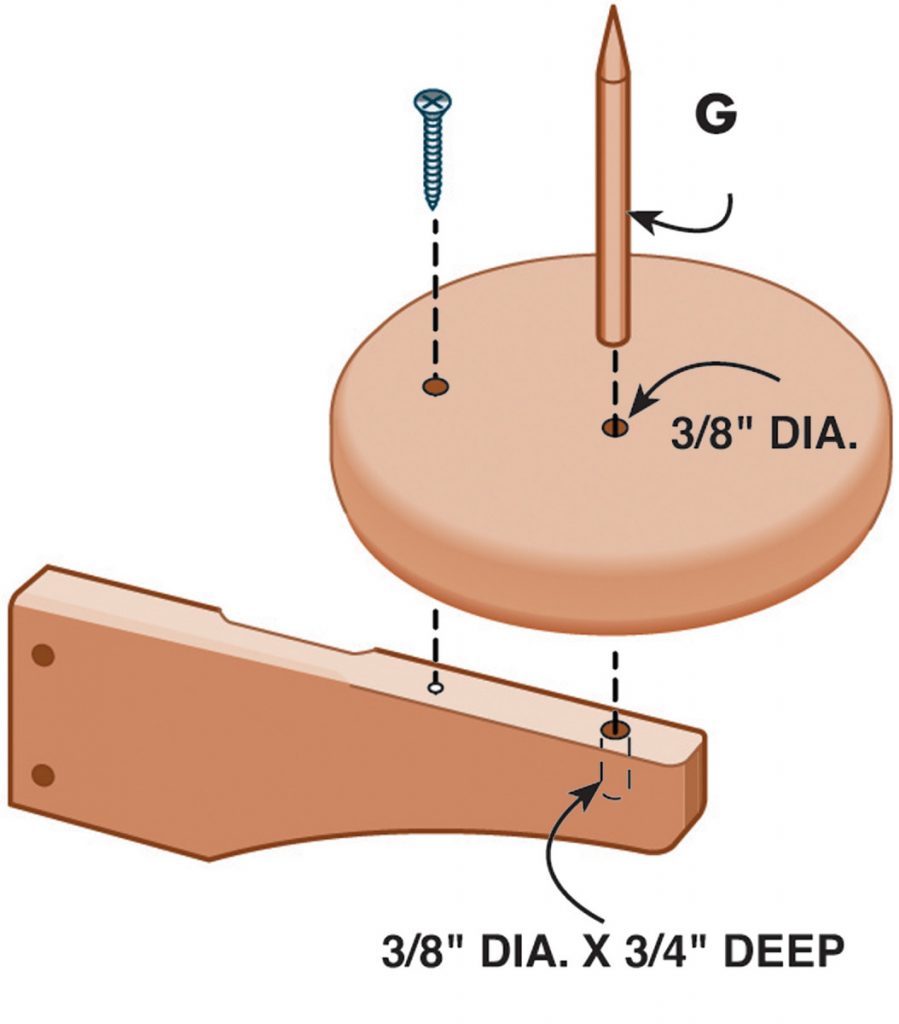
12. To keep your plants from getting blown off their discs by the wind, you may want to install optional anchor spikes (G) in the arms and legs. Drill out the discs’ center holes, as well as the corresponding screw holes in the legs and arms, with a 3/8″ bit. Then glue sharpened mahogany or white oak dowels into the arms and legs. Slip the discs over the dowels and fasten them with the remaining screws. Stake your plants on the dowels, using the drainage hole in the bottom of the pot. Provide air space between the pot and the disc by using a plastic “deck protector” (available at garden stores).
Optional pot spike
Shopping List
• 6 lin. ft. of rough-sawn, 2″ square leg stock 12 bd. ft. of 4/4 stock
• Optional construction-grade materials:
• 1- 2″ x 4″ x 6′ clear red cedar
• 1- 1″ x 12″ x 12′ clear red cedar
• 32 #12 x 1-1/4″ FH stainless steel screws
• 2 #12 x 2″ FH stainless steel screws
• Weatherproof glue
• 5 lin. ft. of 3/8″ white oak or mahogany
• dowel rod, for pot spikes (optional).

Here are some supplies and tools we find essential in our everyday work around the shop. We may receive a commission from sales referred by our links; however, we have carefully selected these products for their usefulness and quality.