


We may receive a commission when you use our affiliate links. However, this does not impact our recommendations.
 This traditional plane is a fun way to cut grooves, and can be made in half of a day.
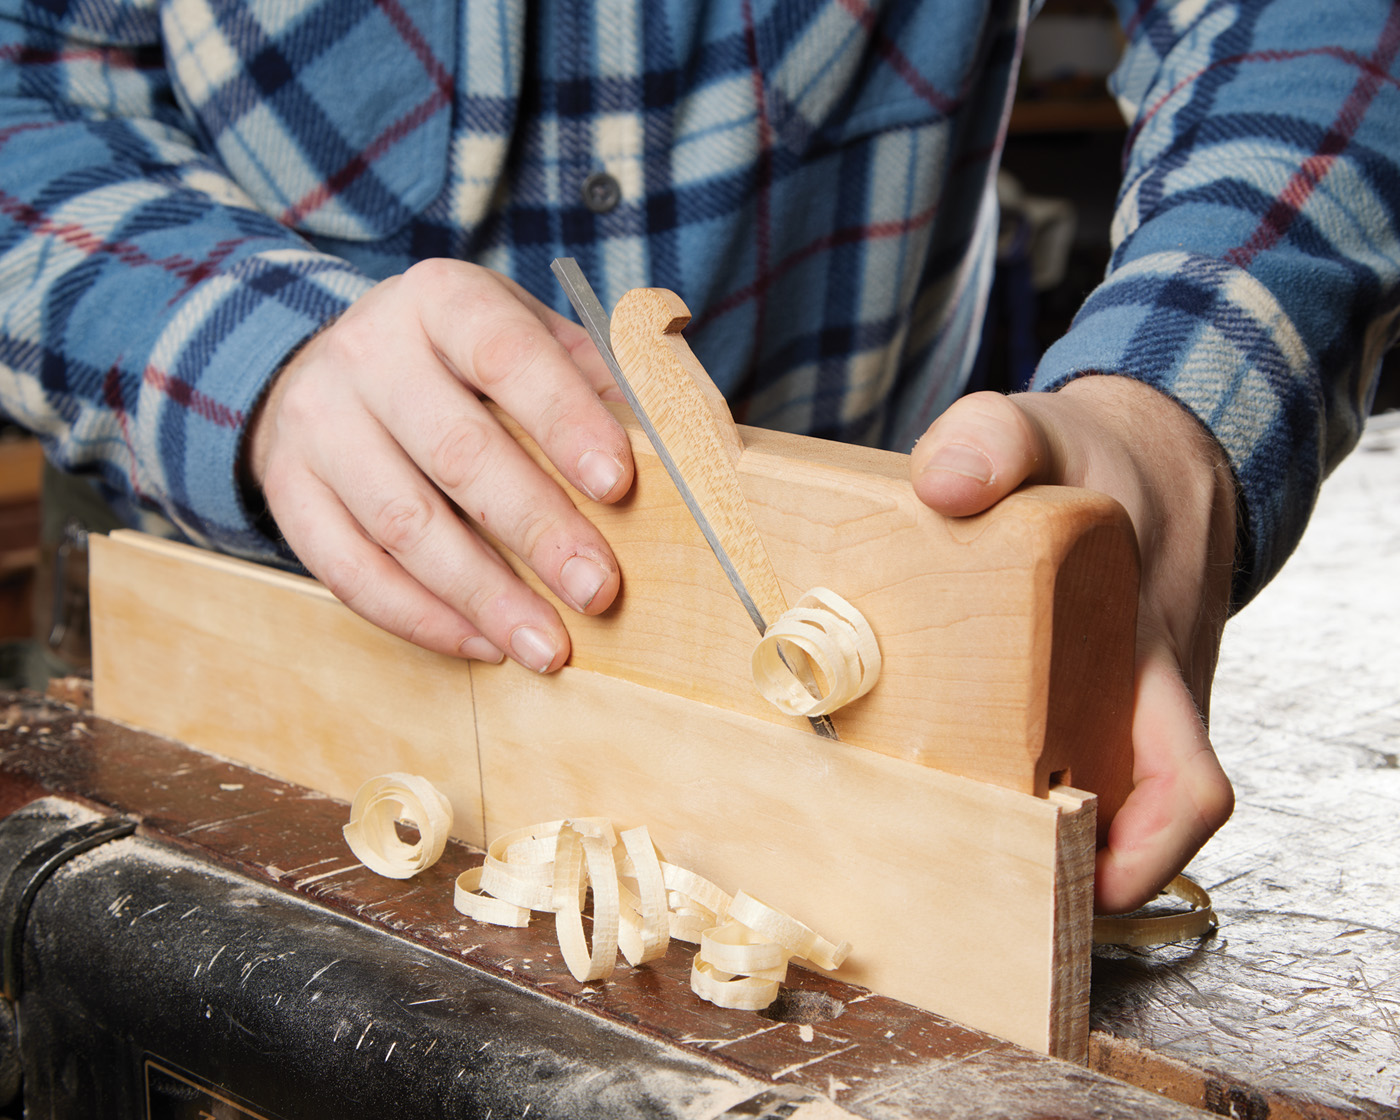
The grooving plane is a hand tool that is faster than a power tool that will do the same task. Not to mention, the curls are incredibly enjoyable. This project is designed so that a beginner can use hand tools to make a functional tool they can use for the rest of their life. It’s also a project that tends to scare people. Making a hand plane is supposed to be a very difficult task, but in this case, it’s surprisingly easy if you take it step by step.
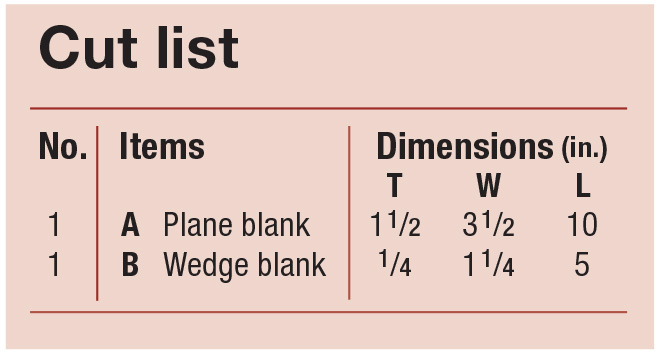
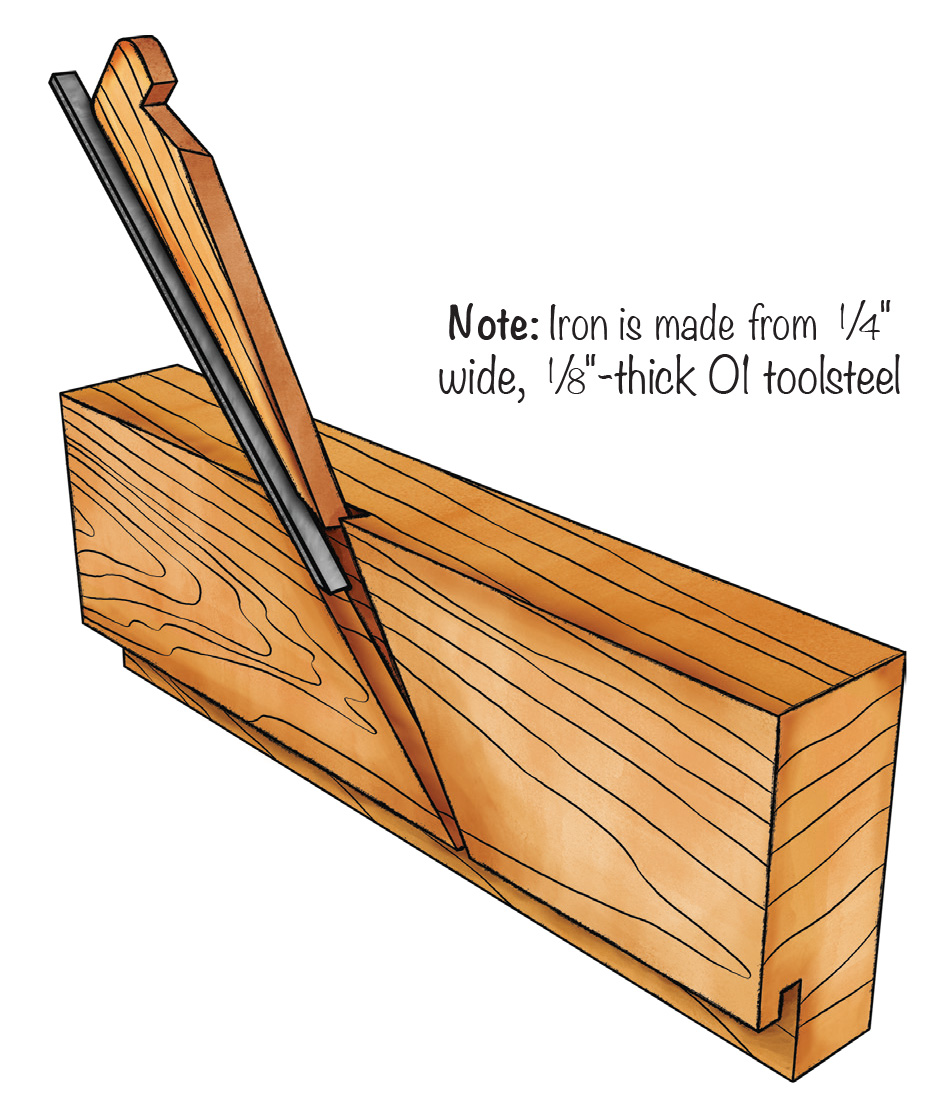
For this project, you will want to make the body out of a hard and durable wood, such as hard maple. The body is 10“ long and 3-1/2“ by 1-1/2“. This size was chosen so you can make a test project out of a scrap 2×4. This grooving plane is designed to cut a 1/4“ by 1/4 by 1/4 groove. This is the groove I cut more commonly than any other. If you would like a full kit with the body, wedge, and iron, they can be purchased at WoodByWright.com.
eLearning: Building a Traditional 18th-century Jointer Plane
In our store: Learn how to make a beautiful dovetailed chest to hold your new hand plane.
More Shop Projects: Build your very own Moxon vise.
Cutlist and Diagrams
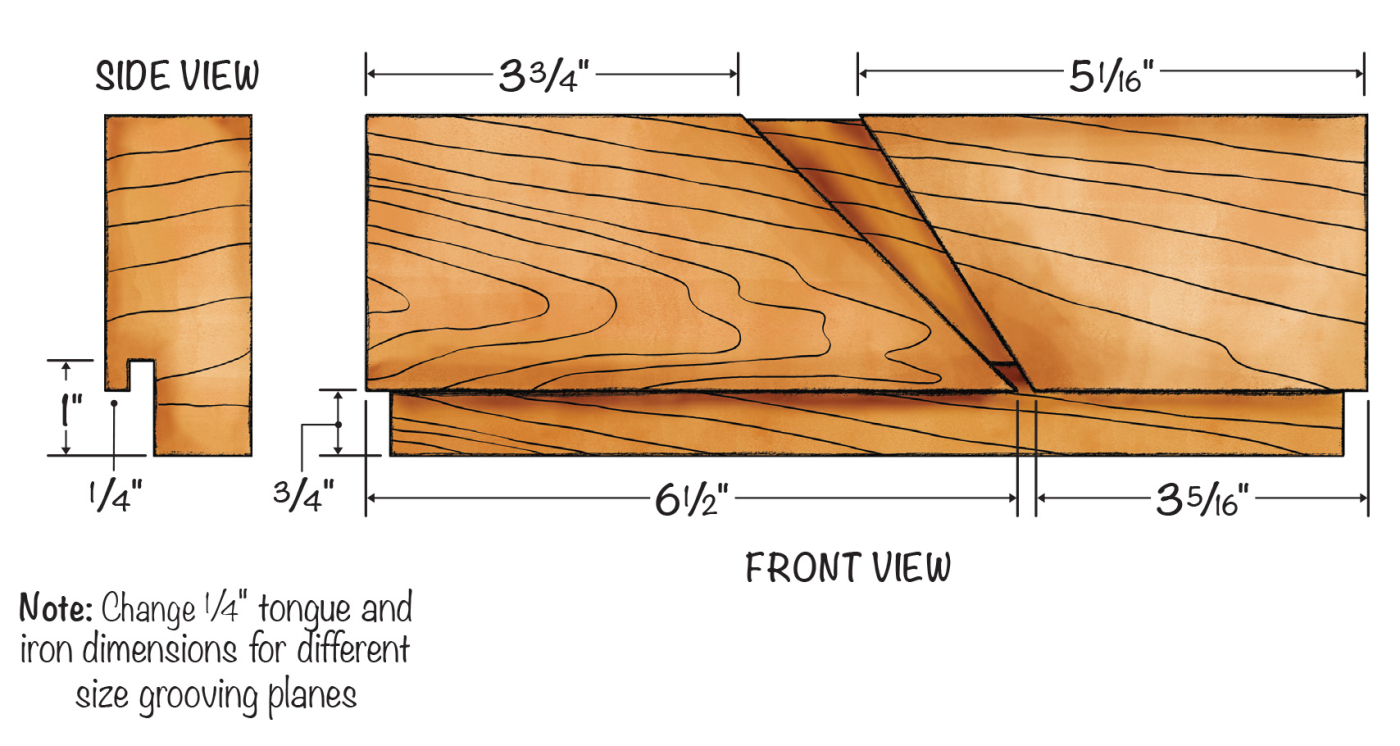
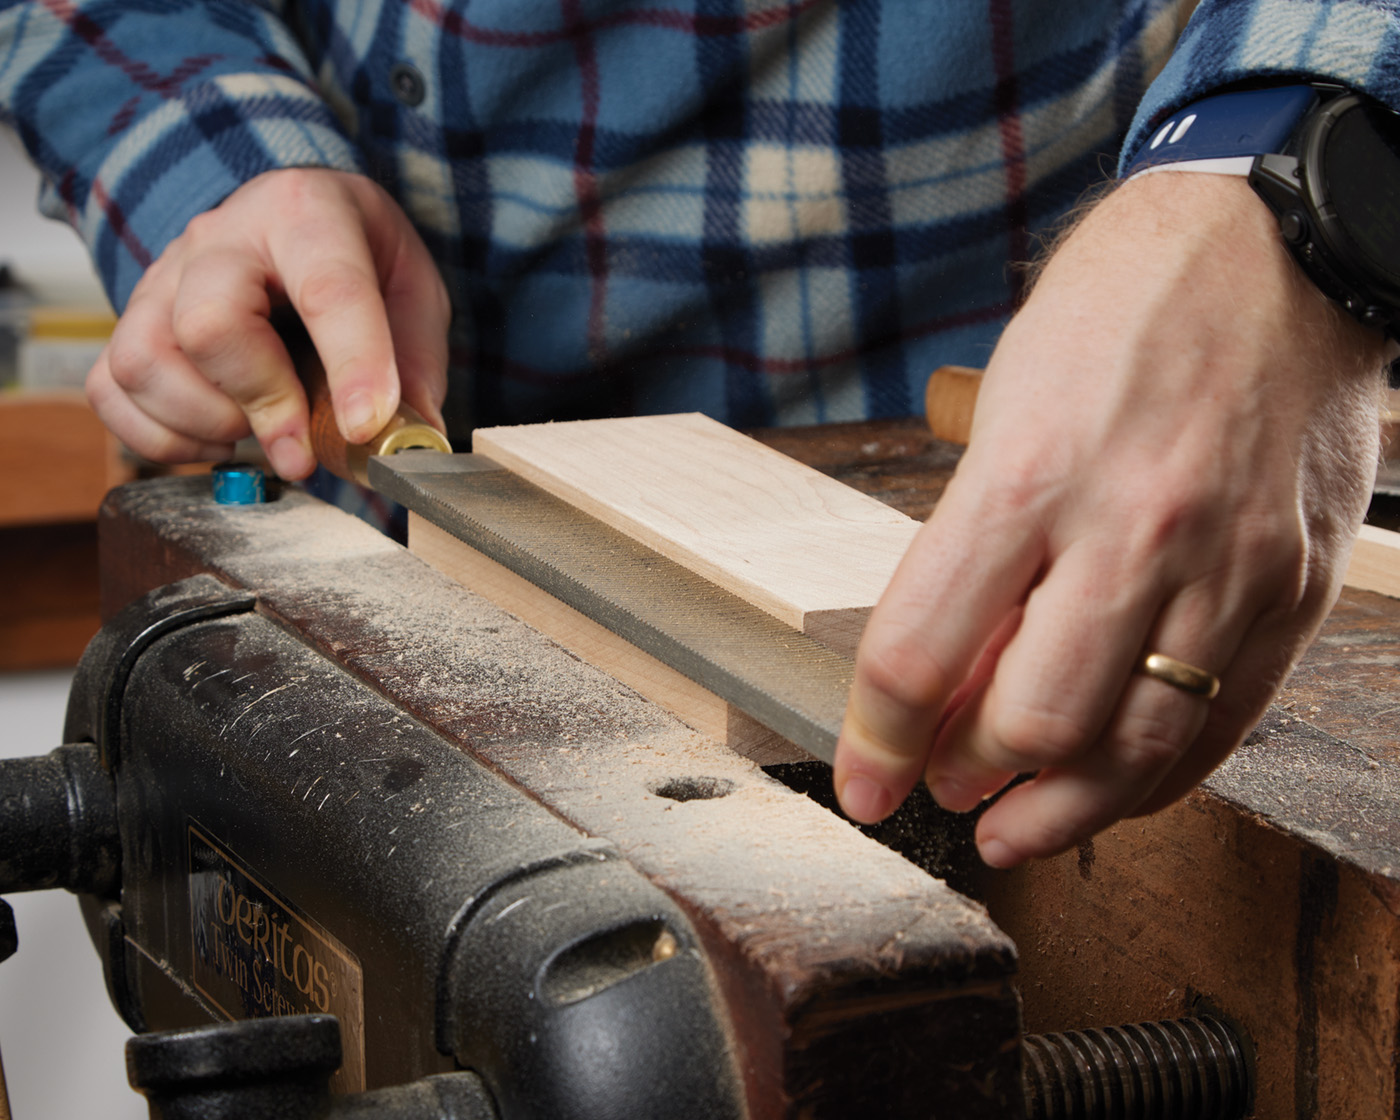
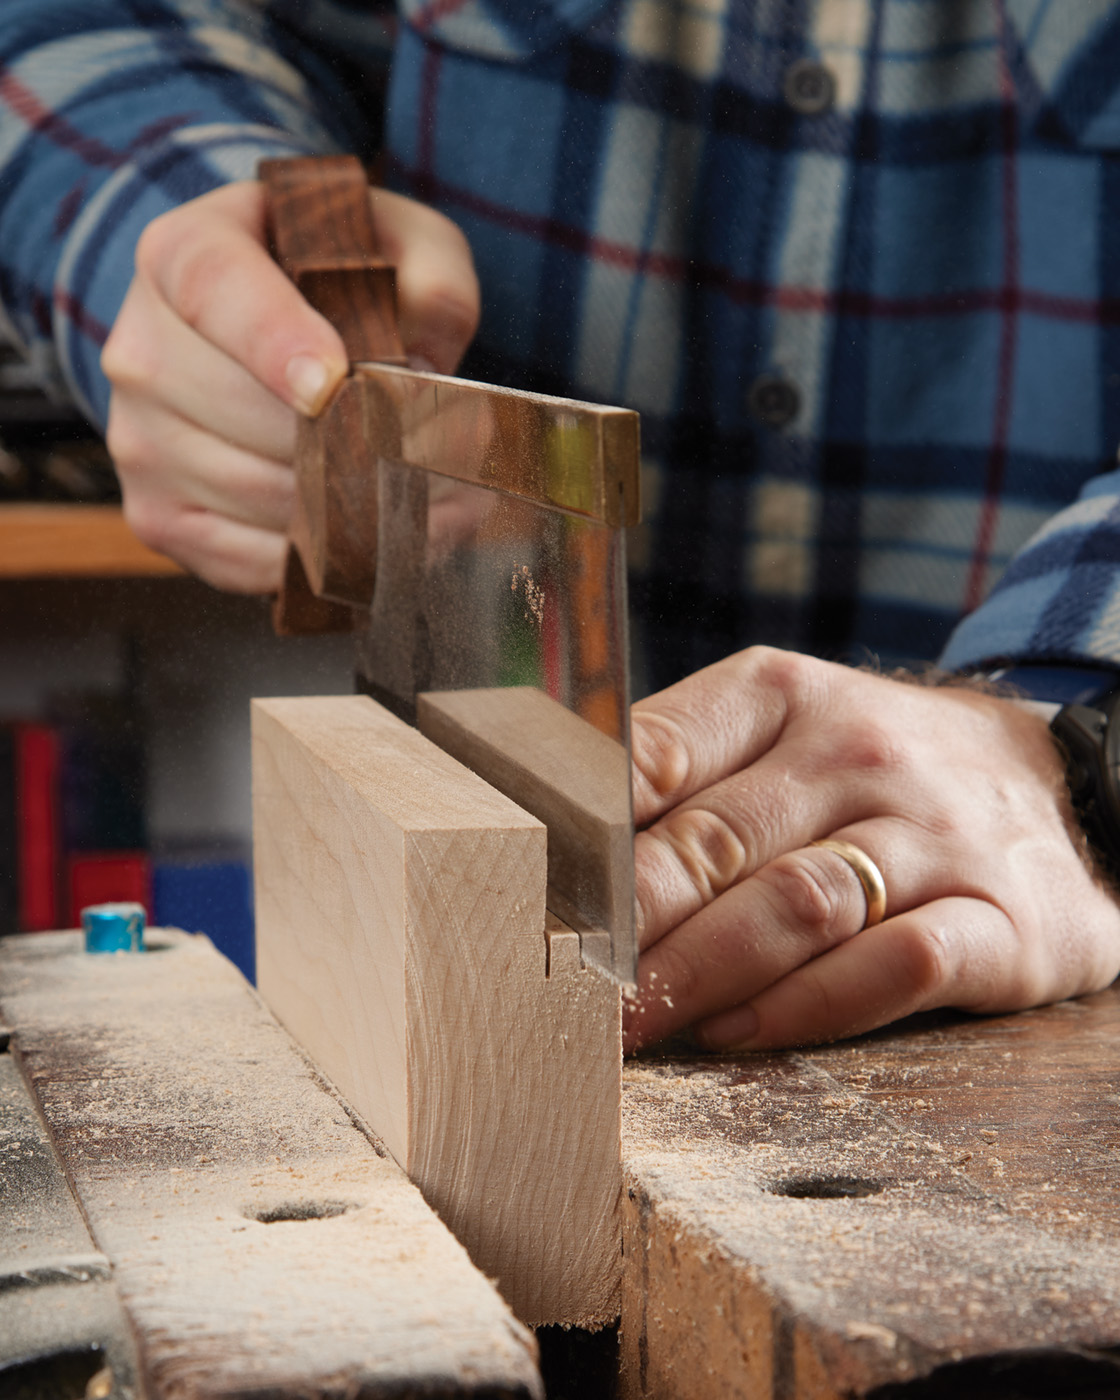
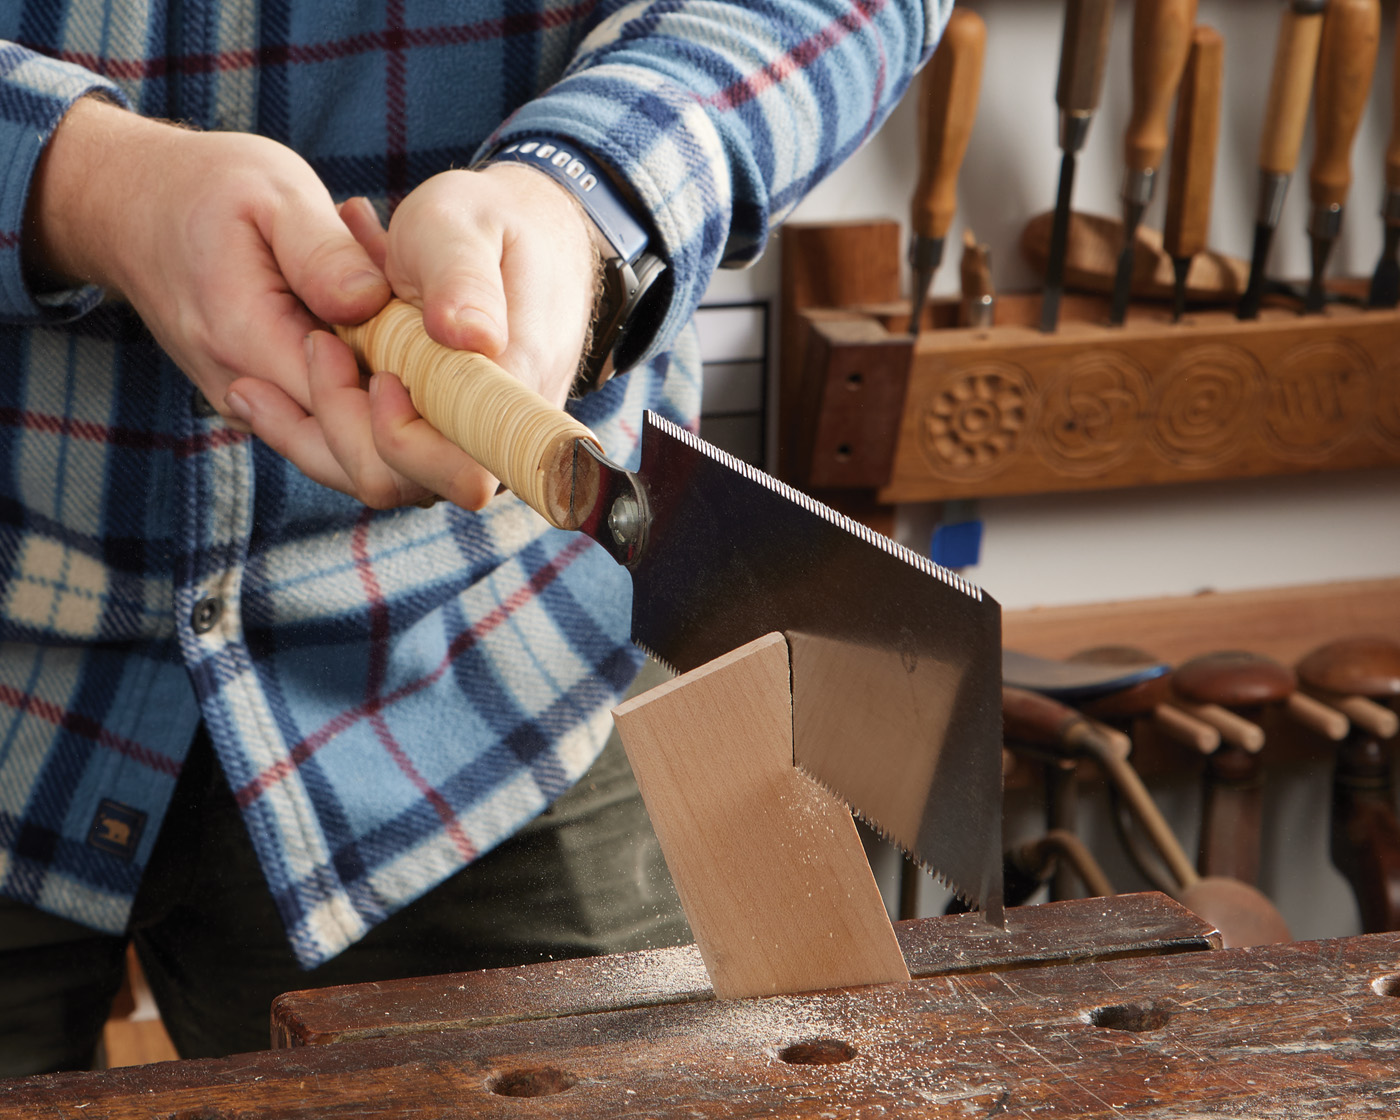
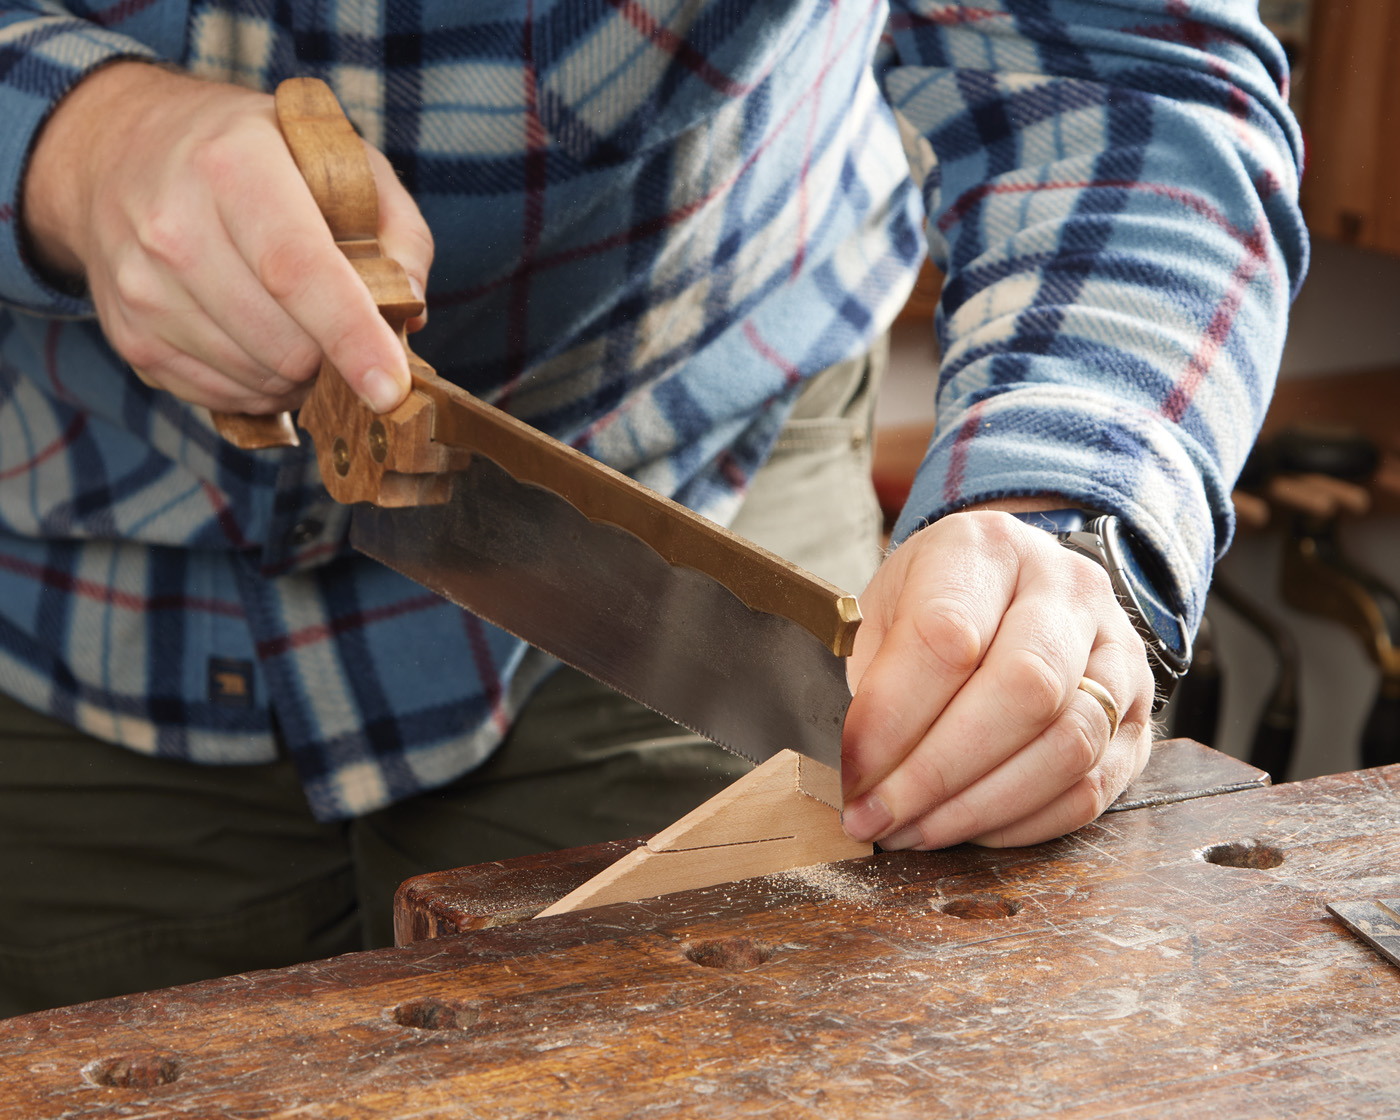
Cutting the Rabbet
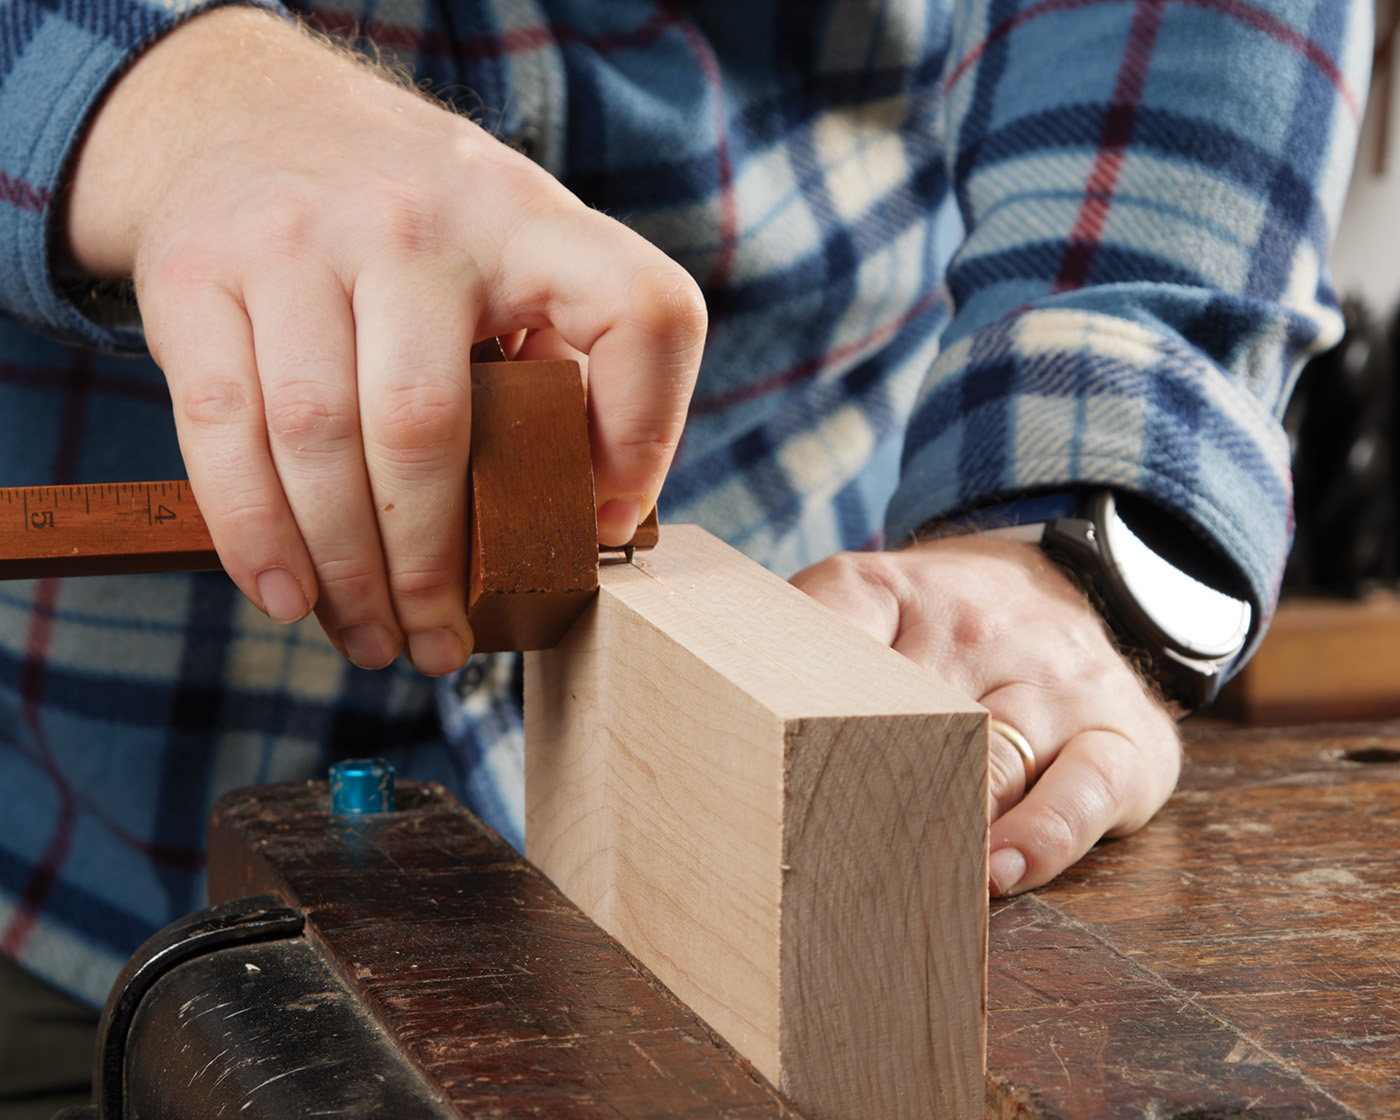
1 Lay out cuts for the rabbet. This one is a 1/2″ x 3/4″ rabbet.
We want to start by laying out the rabbet with a marking gauge. The rabbet needs to be 3/4“ deep across the face of the board and a 1/2“ deep across the edge of the board. You can use a rabbet plane to make this cut. But I usually choose to cut both sides with a tenon saw. If you start with a knife wall along the marking gauge line, it is a relatively simple cut to make. The knife wall will allow the saw to register in the line. If you make sure that the center of the saw extends out both ends of the cut, it will not clog up with dust inside. This is a step where you can take your time and enjoy the process. I find it quicker to make the cuts than setting up a rabbet plane to do it all at one time. Once both cuts have been made, I take this time to come in with a file or shoulder plane and true up the two surfaces to make sure that the inside is at 90° and nice and clean.
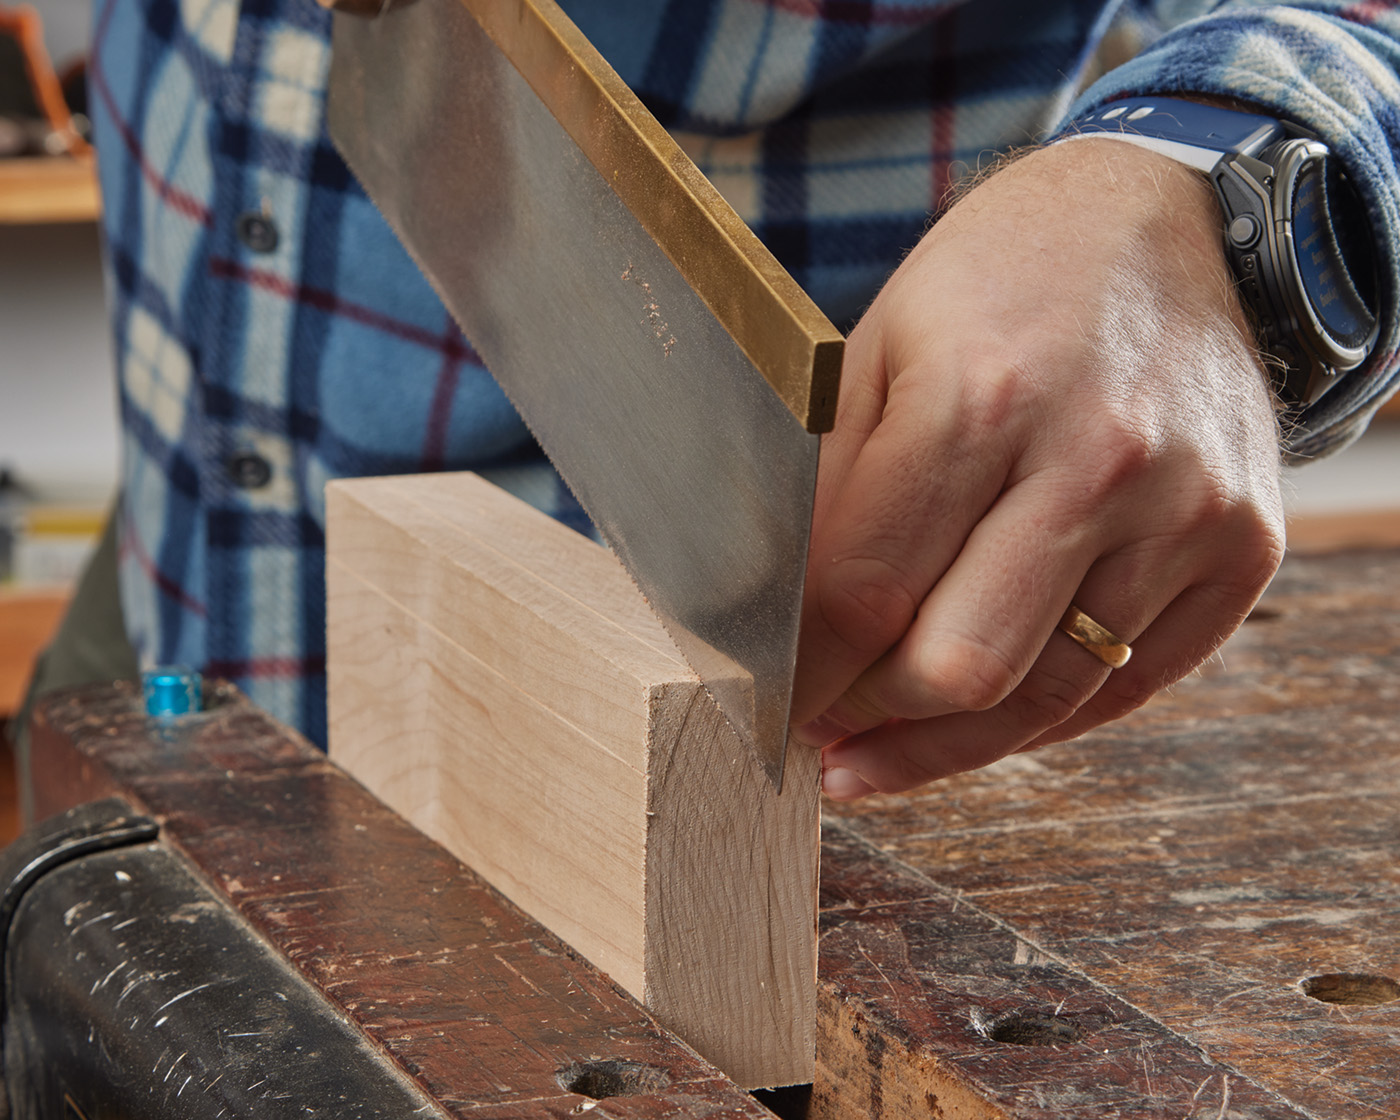
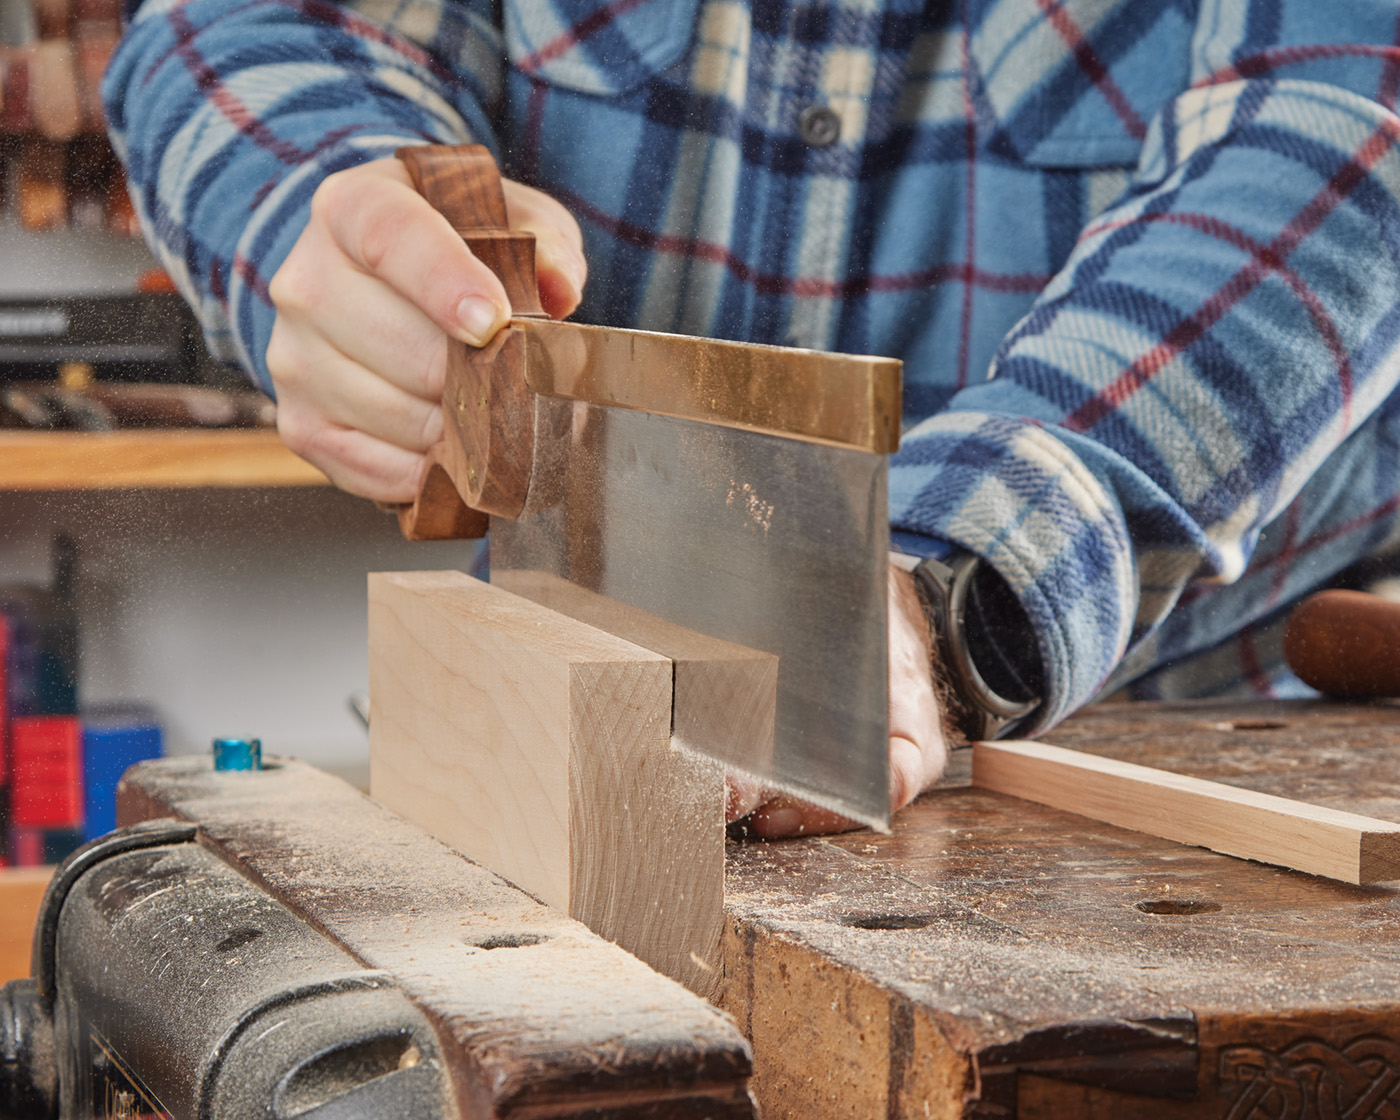
2 Cut down the cheek…
3 and shoulder of the rabbet.
4
5 Use a file or rabbet plane to clean up the saw marks.
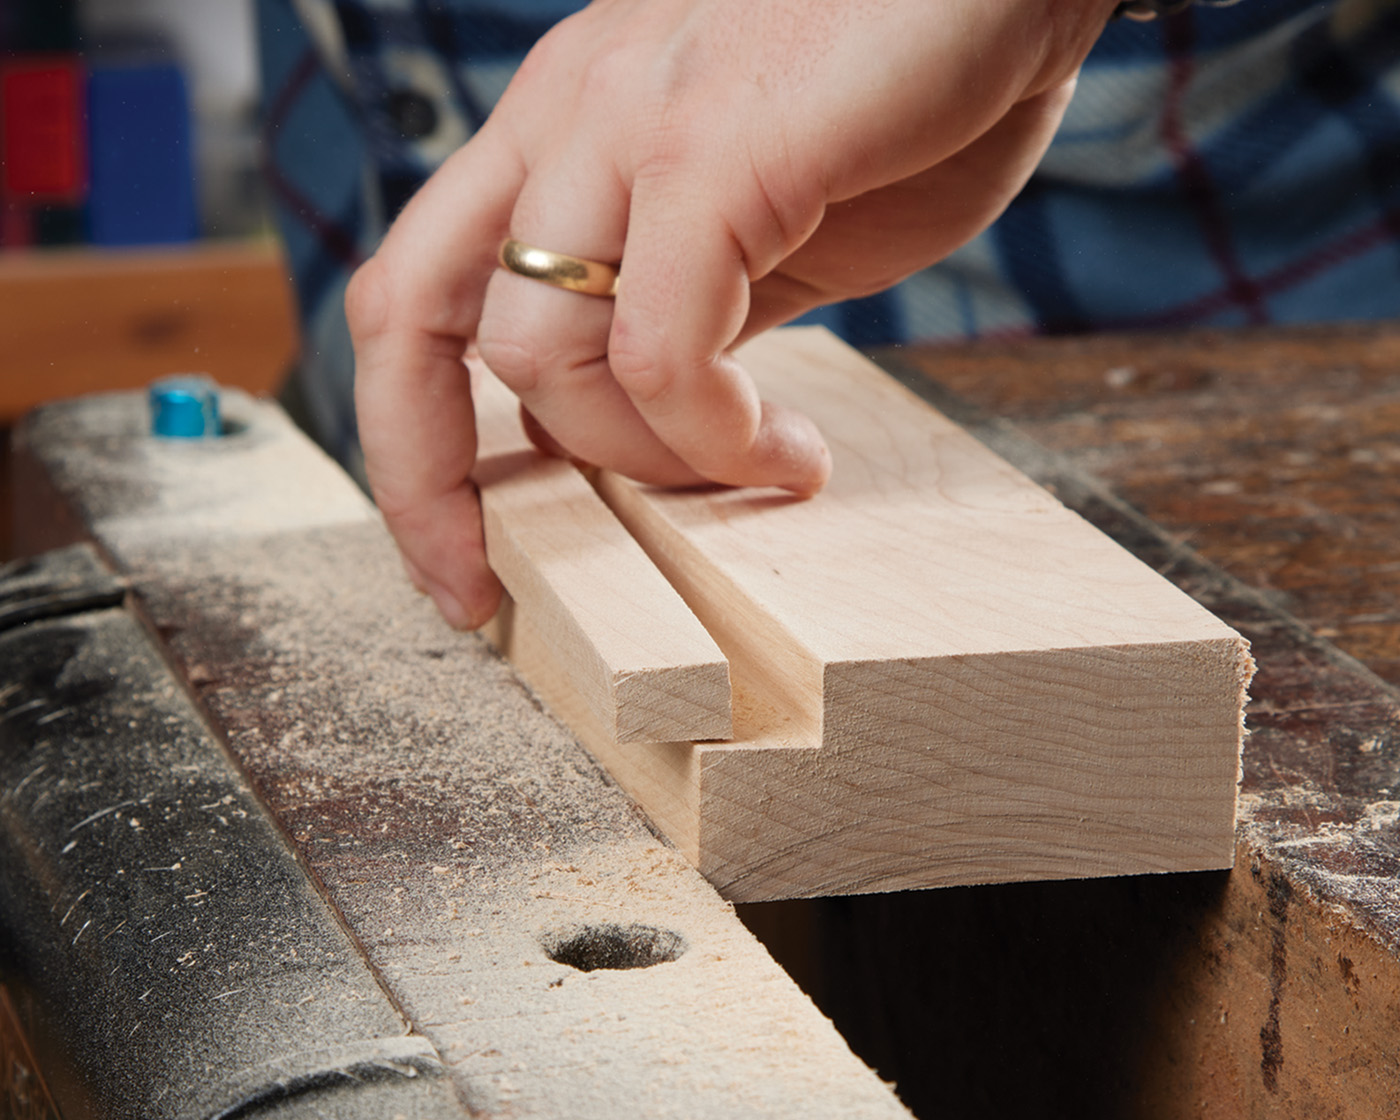
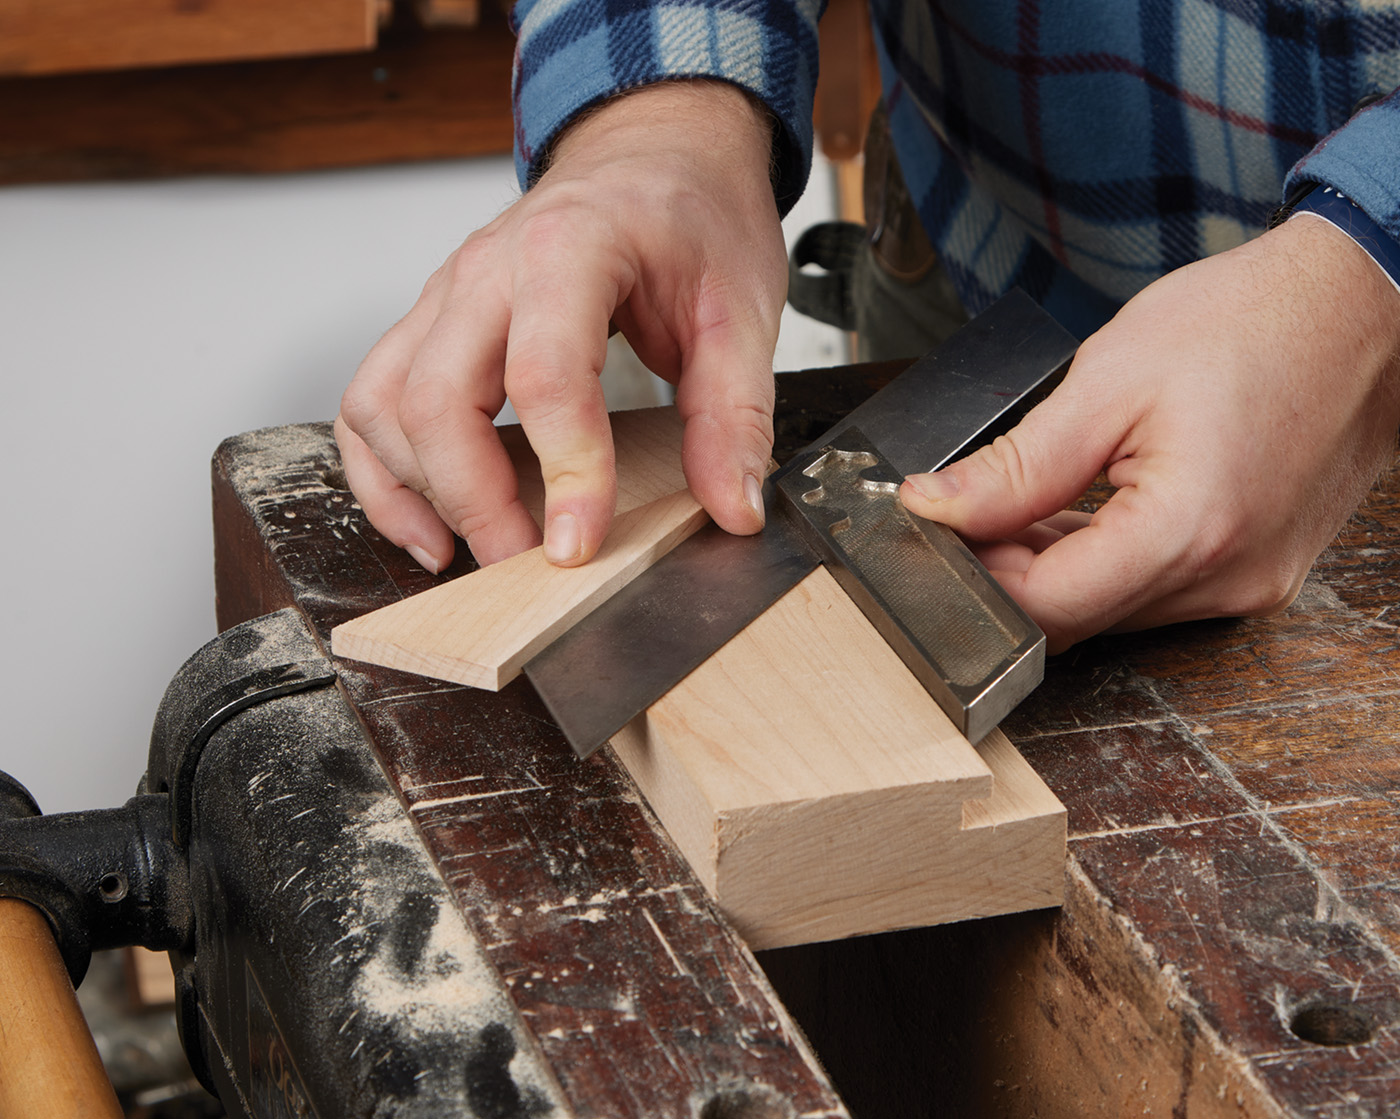
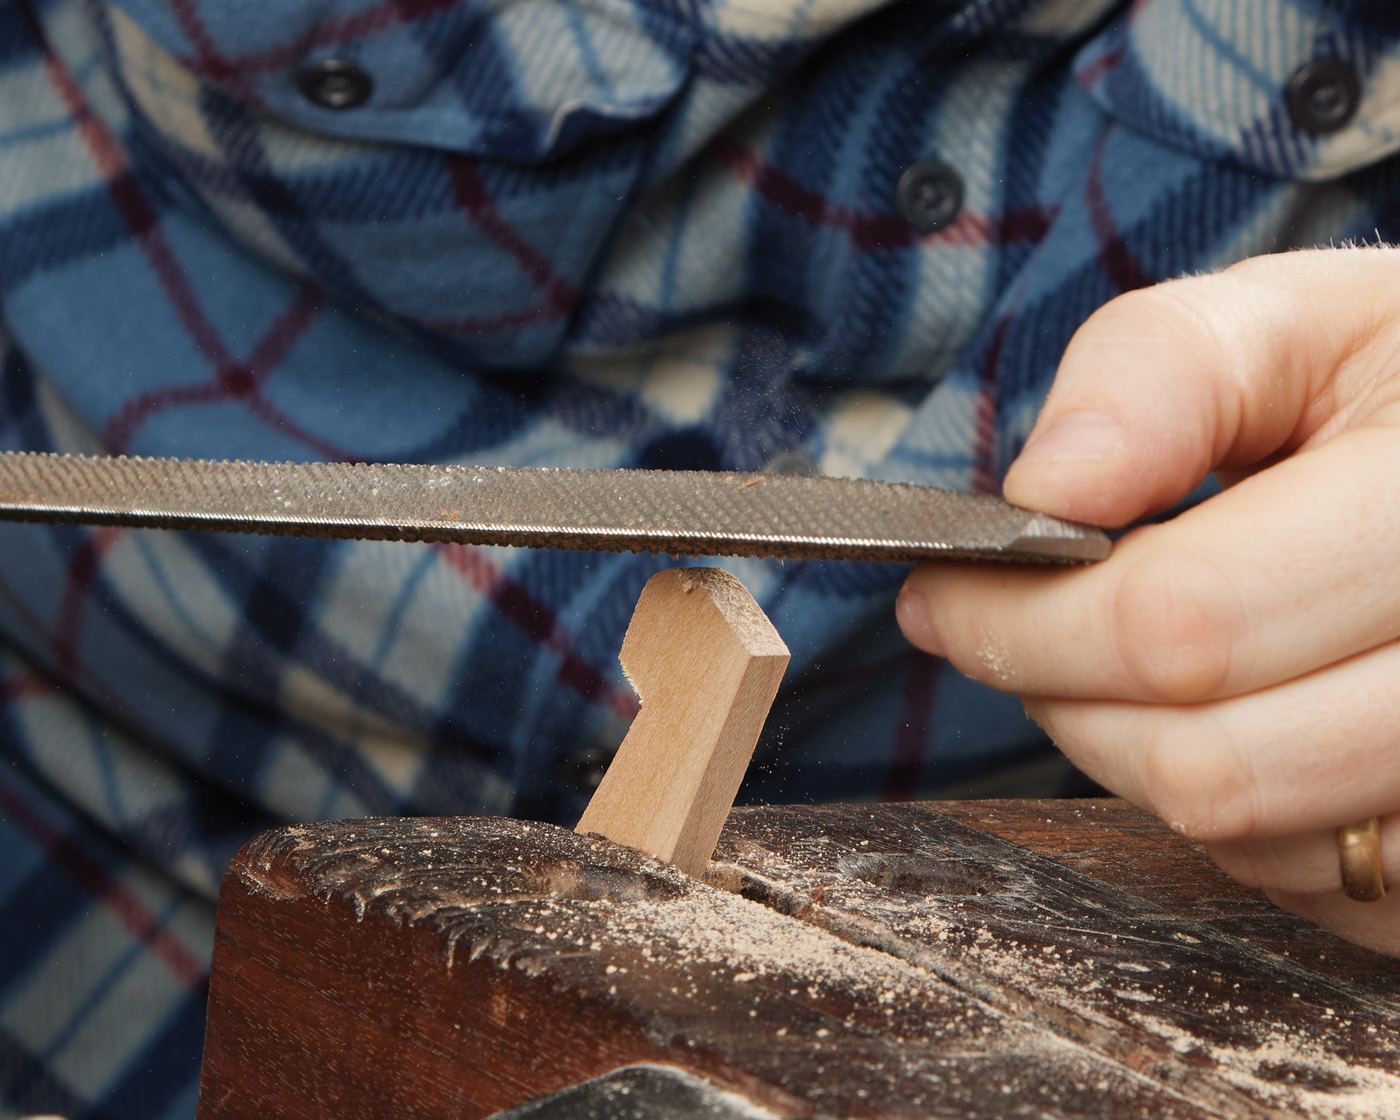
Cutting The Groove
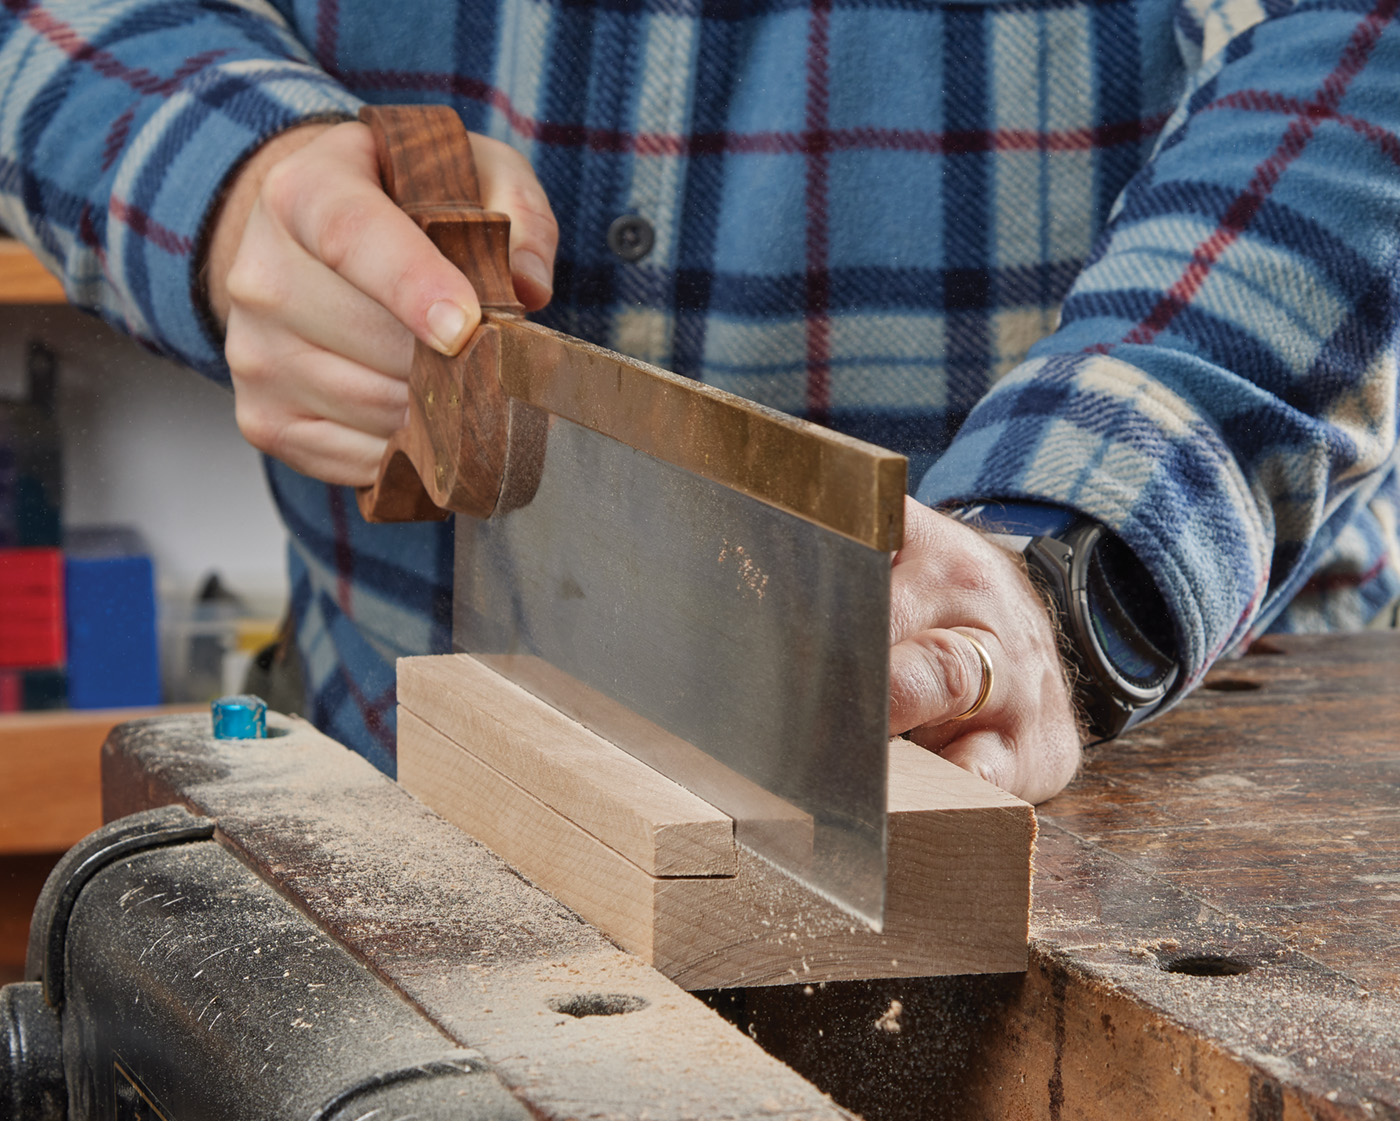
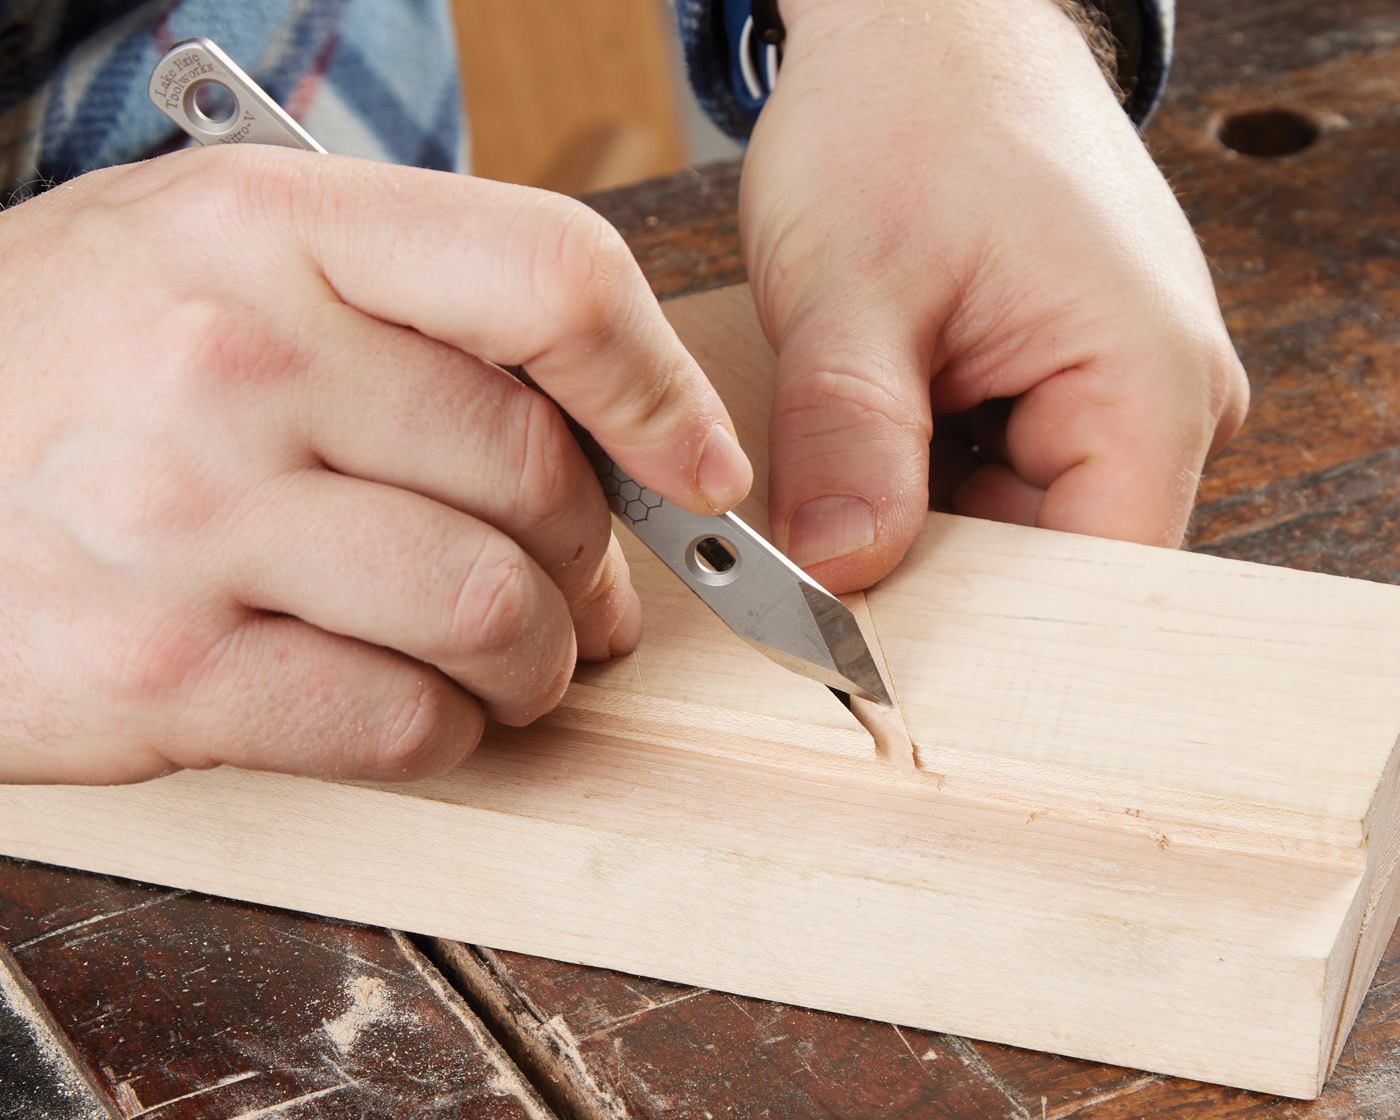
Now, we need to cut a groove at the bottom of the rabbet. This step would be very easy if we had a grooving plane set up to cut the groove already, but as we’re about to make a grooving plane, you probably don’t have one on hand yet. We’ll start by taking the same saw and continuing the cut down deeper up against the corner of the rabbet. We want to take the side we cut 3/4“ and continue it down 1/4“ more. We did not cut this down when we cut the rabbet because we wanted to clean up the rabbet before continuing the groove cut.
6 Cut down along the cheek of the rabbet, cutting about 1/4″ deeper than the rabbet is.
7 Lay out a line 1/4″ in from the shoulder of the rabbet.
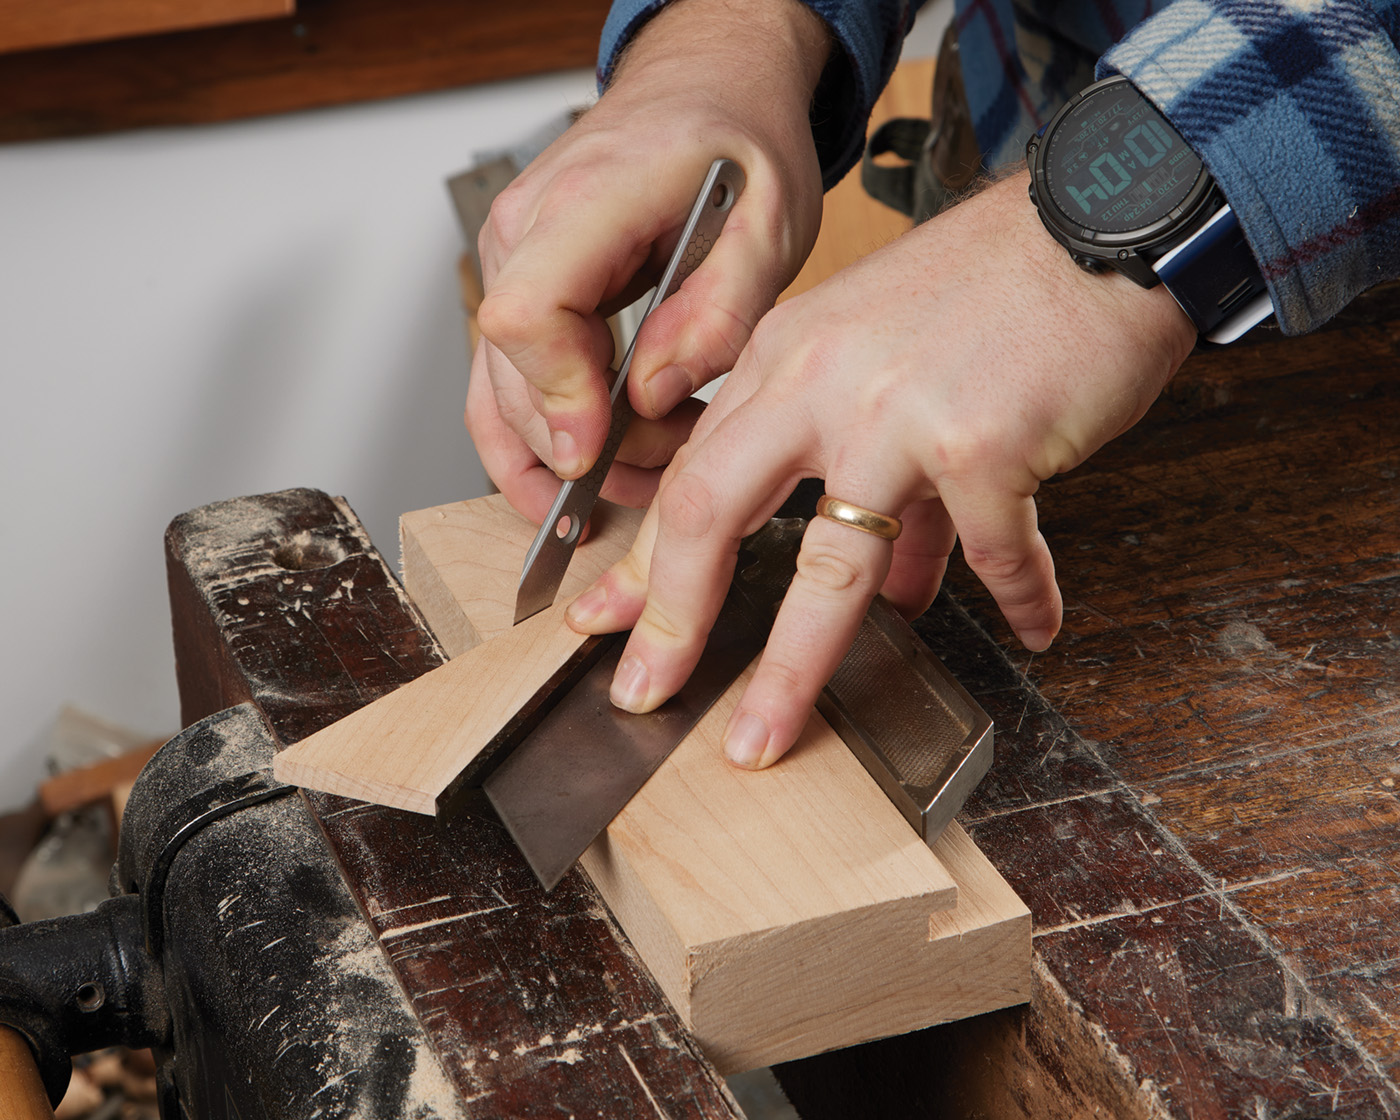
8 Cut down 1/4″ on that line, parallel to the cheek of the rabbet.
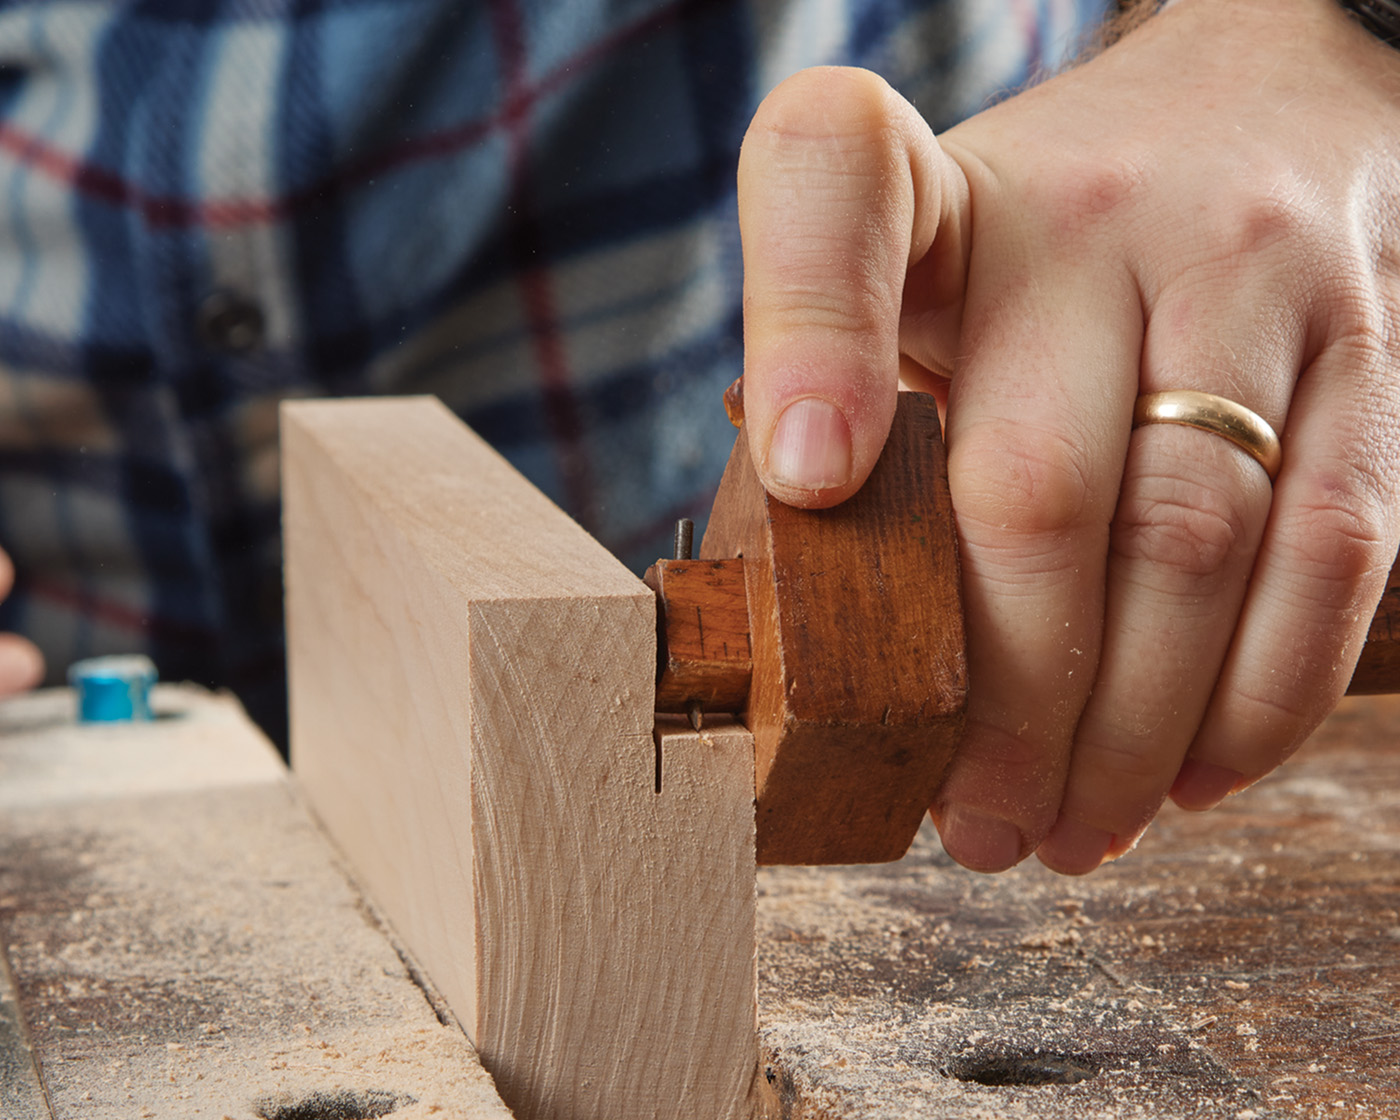
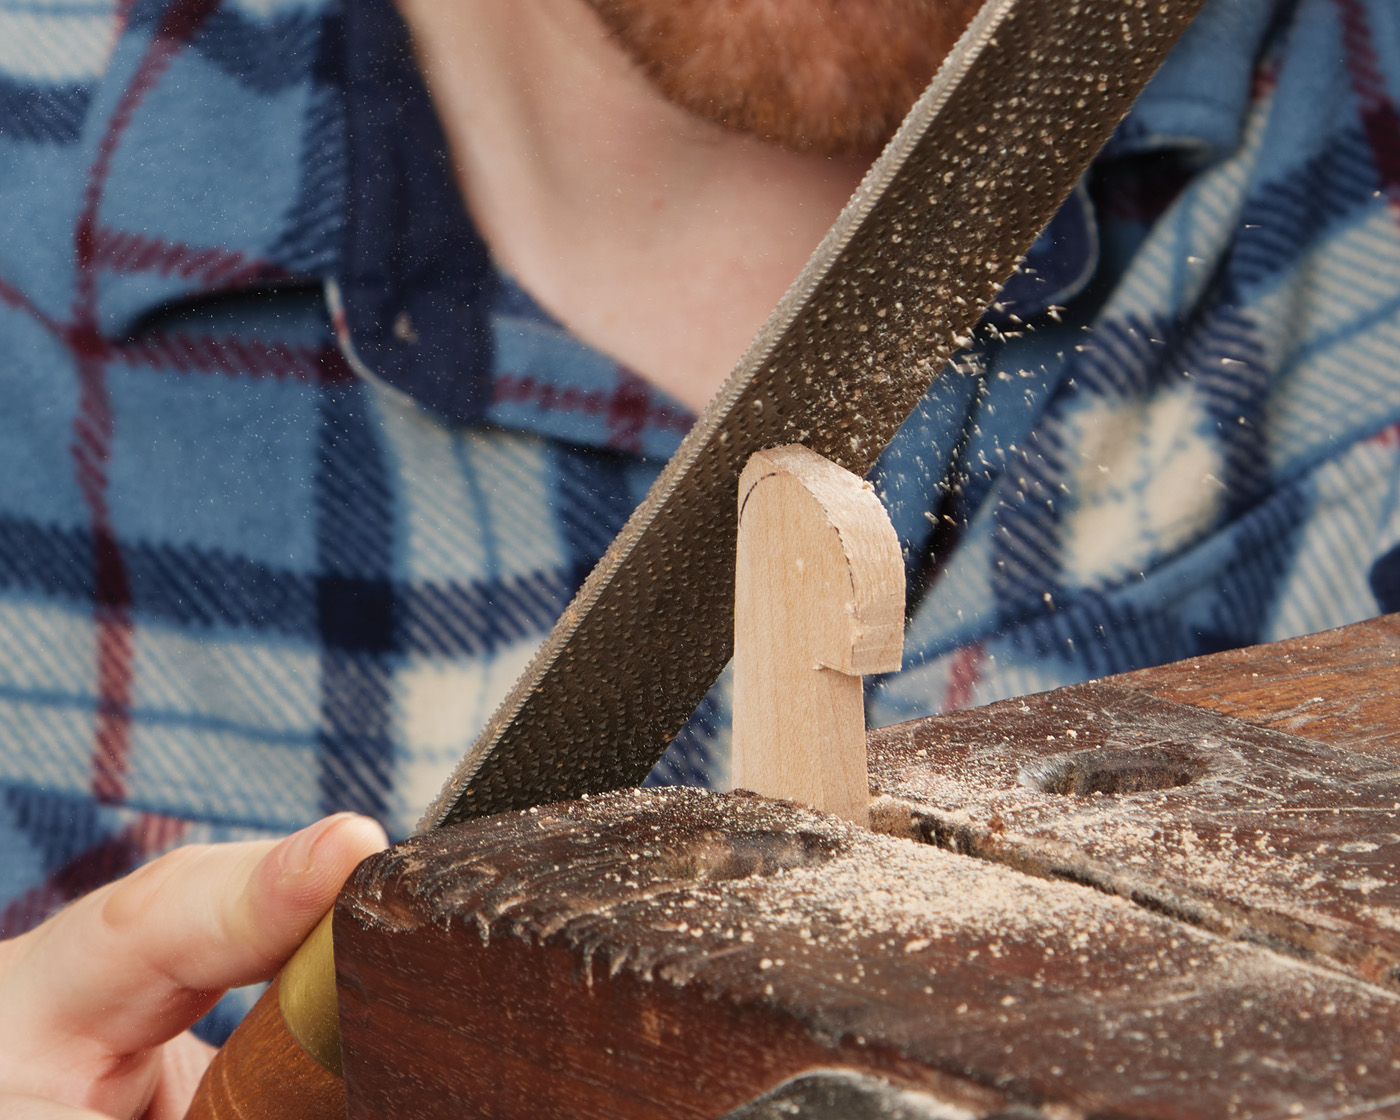
Next, we will set the marking gauge to 1/4“ and come in on the other face of the rabbet to mark out the other sidewall of the groove. Then, just as we did before, we can cut down a 1/4“ deep. With a 1/4“ or smaller chisel, we can remove the material in between the two saw cuts to create the groove. I usually find it easiest to remove the majority of the waste with a smaller 3/16“ or 1/8“ chisel and then come in with the 1/4“ chisel bevel down to remove the last bit and scratch the groove to be a hair wider than a 1/4“. We want this groove to be ever so slightly larger than a 1/4“ so that the material will be sliding through it when we cut a groove in the future. It will have a little bit of wiggle room and not bind up in the groove. Lastly, we can come in with a file or curved tooth float to smooth out the sidewalls and bottom of the groove.
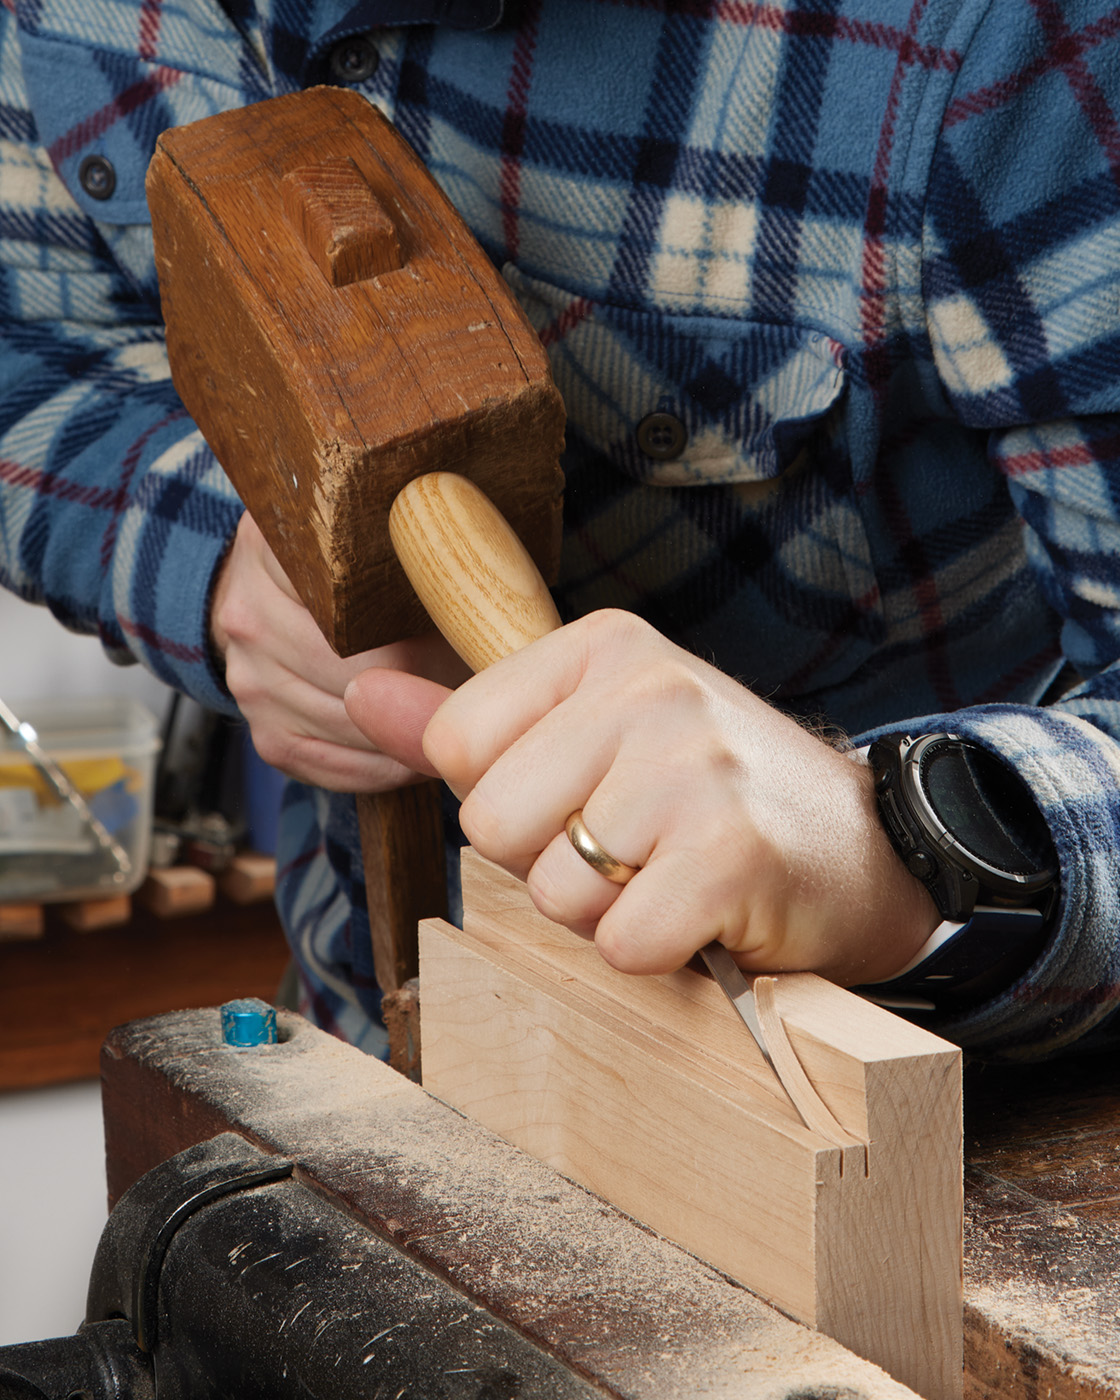
9 Use a small chisel to remove the waste between two saw cuts.
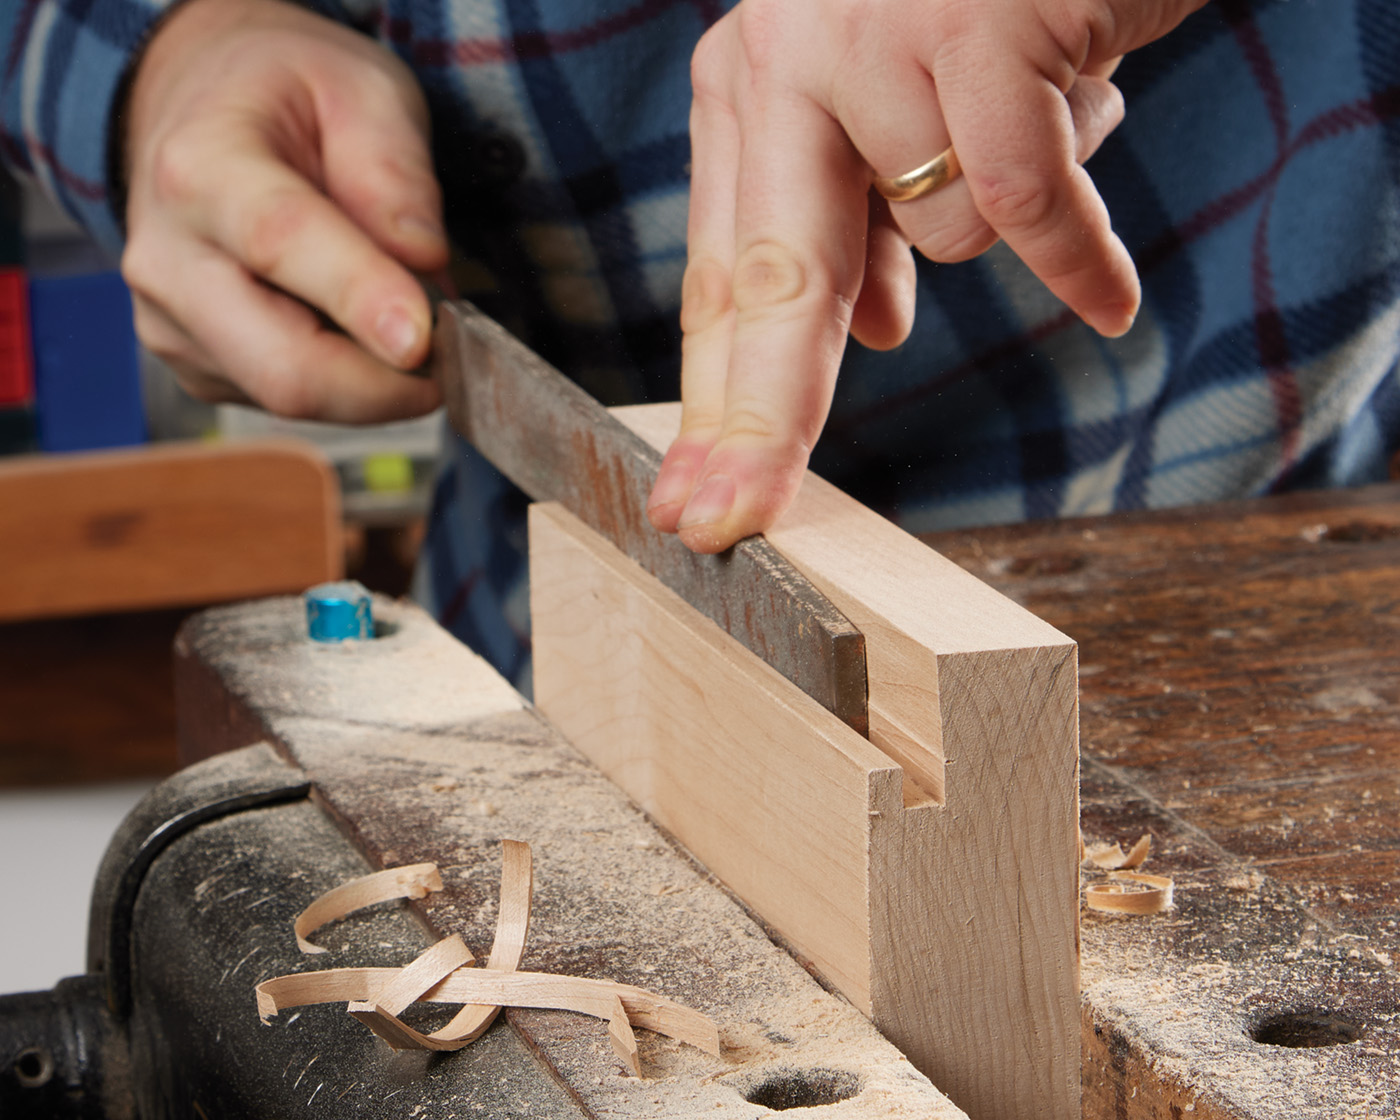
10 Use a file to clean out the groove and widen it by just a fraction.
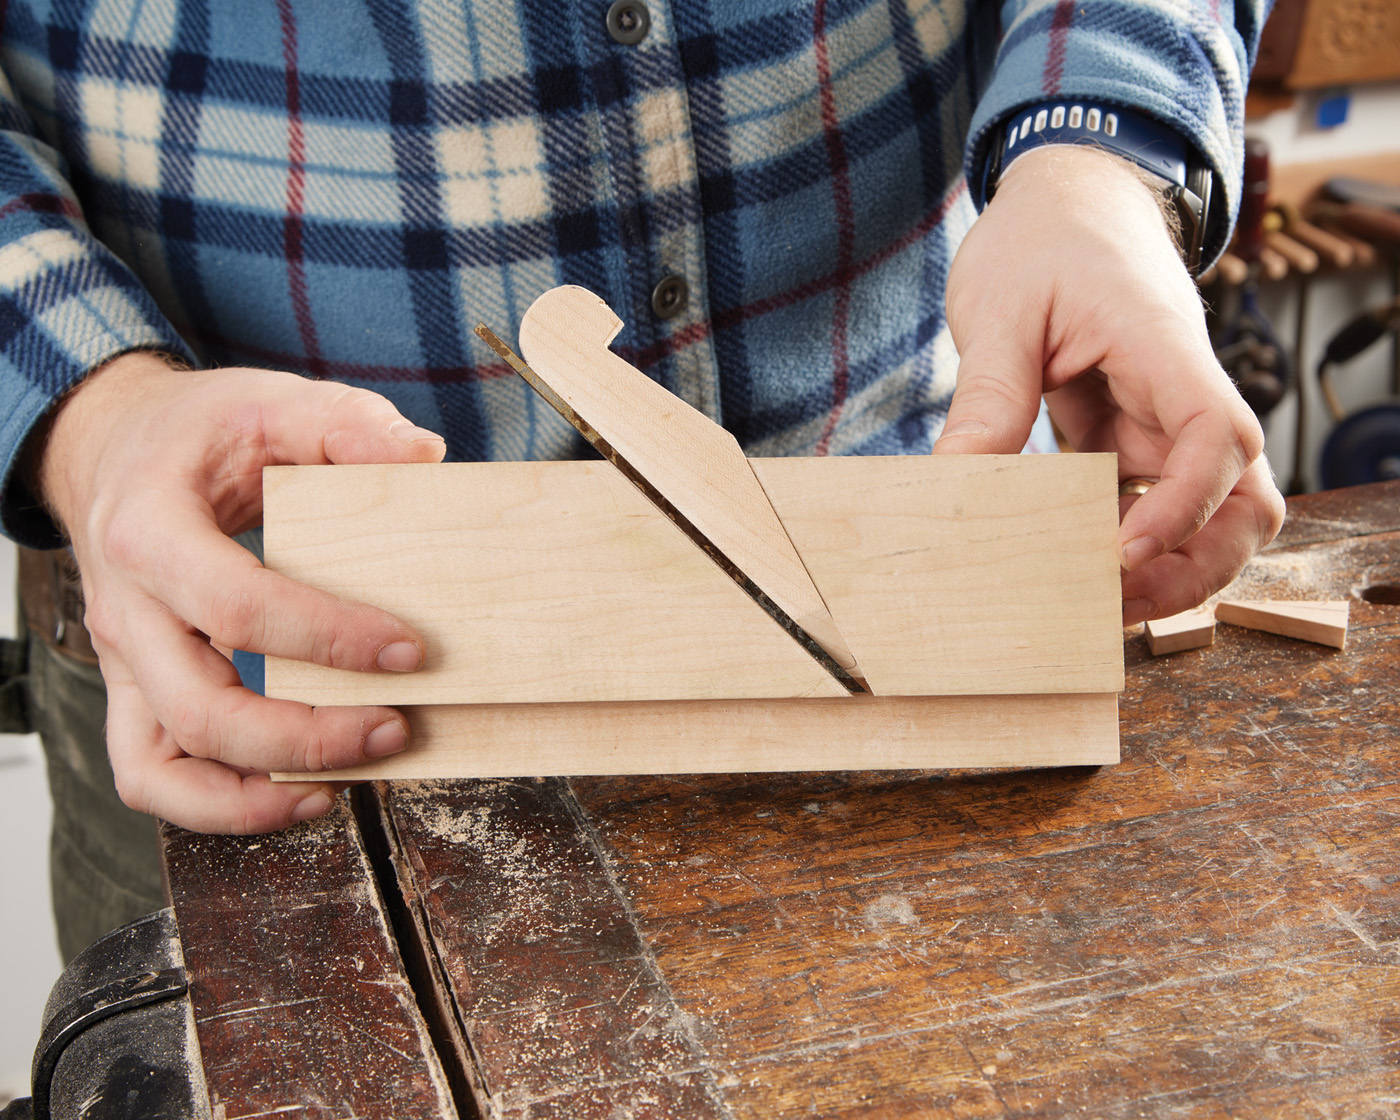
Making The Wedge
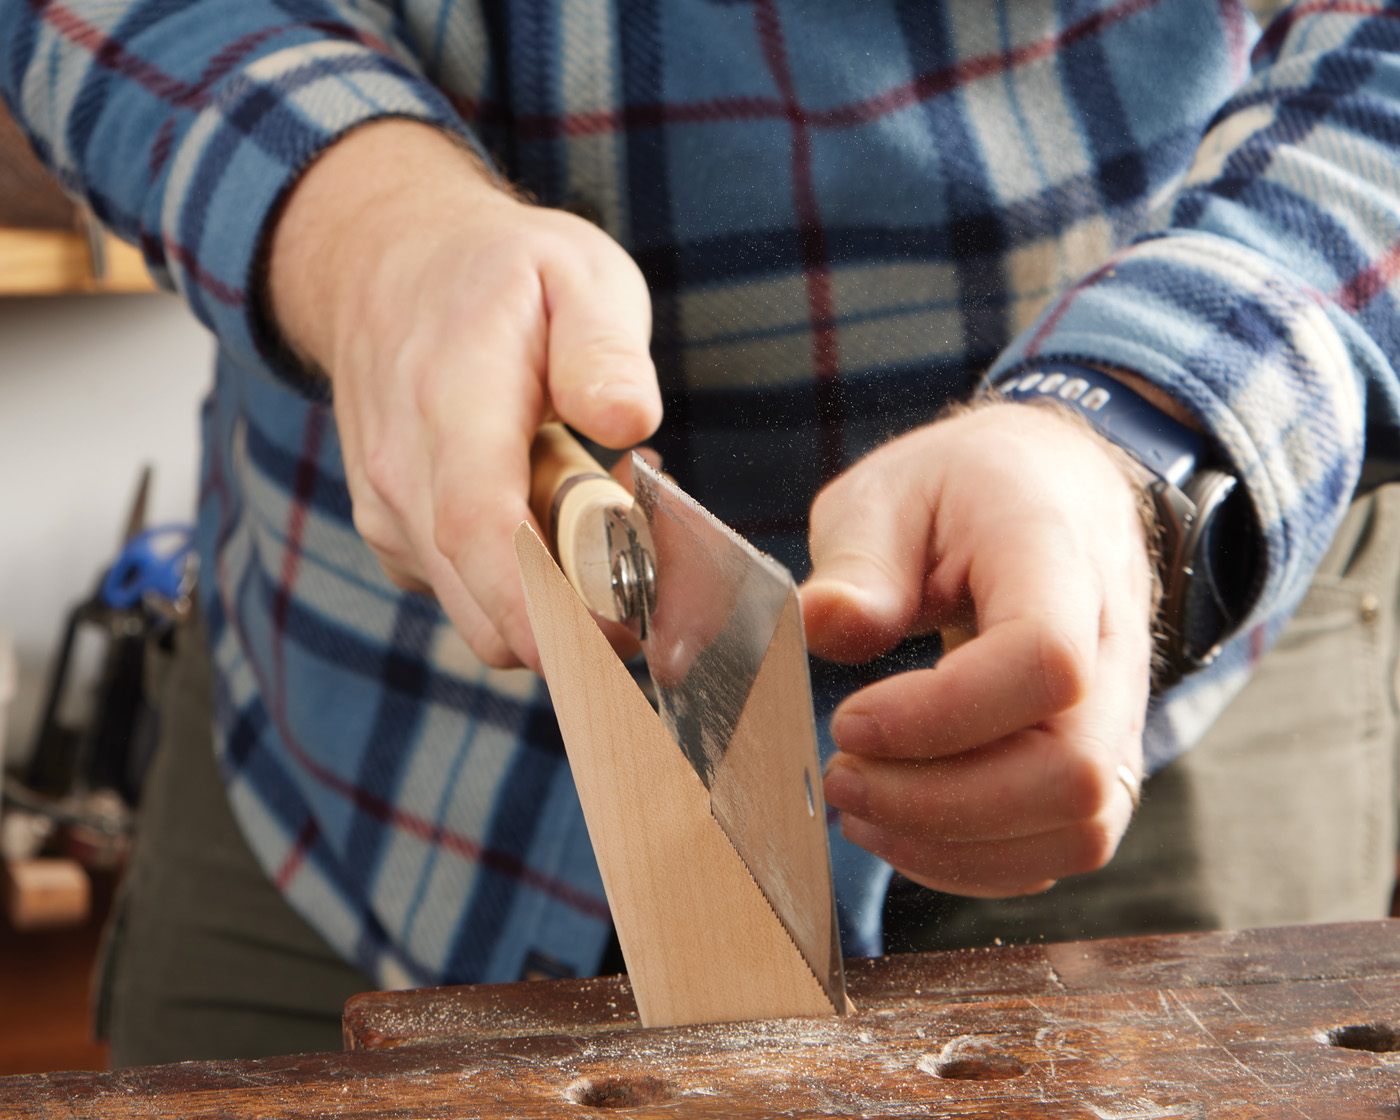
Before continuing with the body of the plane, we need to create a wedge. I start with a 1/4“ thick piece of maple 1-1/4“ wide by 5“ long. A line drawn from corner to corner will create the perfect angle for a wedge. With a saw, we can cut down along that line. Starting at one corner and going halfway through the board, turning it around, and doing the other half from the other end makes it very easy to work in a bench vise. Using a bench plane, we can then smooth up the surface of one of those two pieces to create a clean wedge. You may want to hold on to the other half. If you run into problems with the first wedge, you now have a pre-made wedge you can use to replace it.
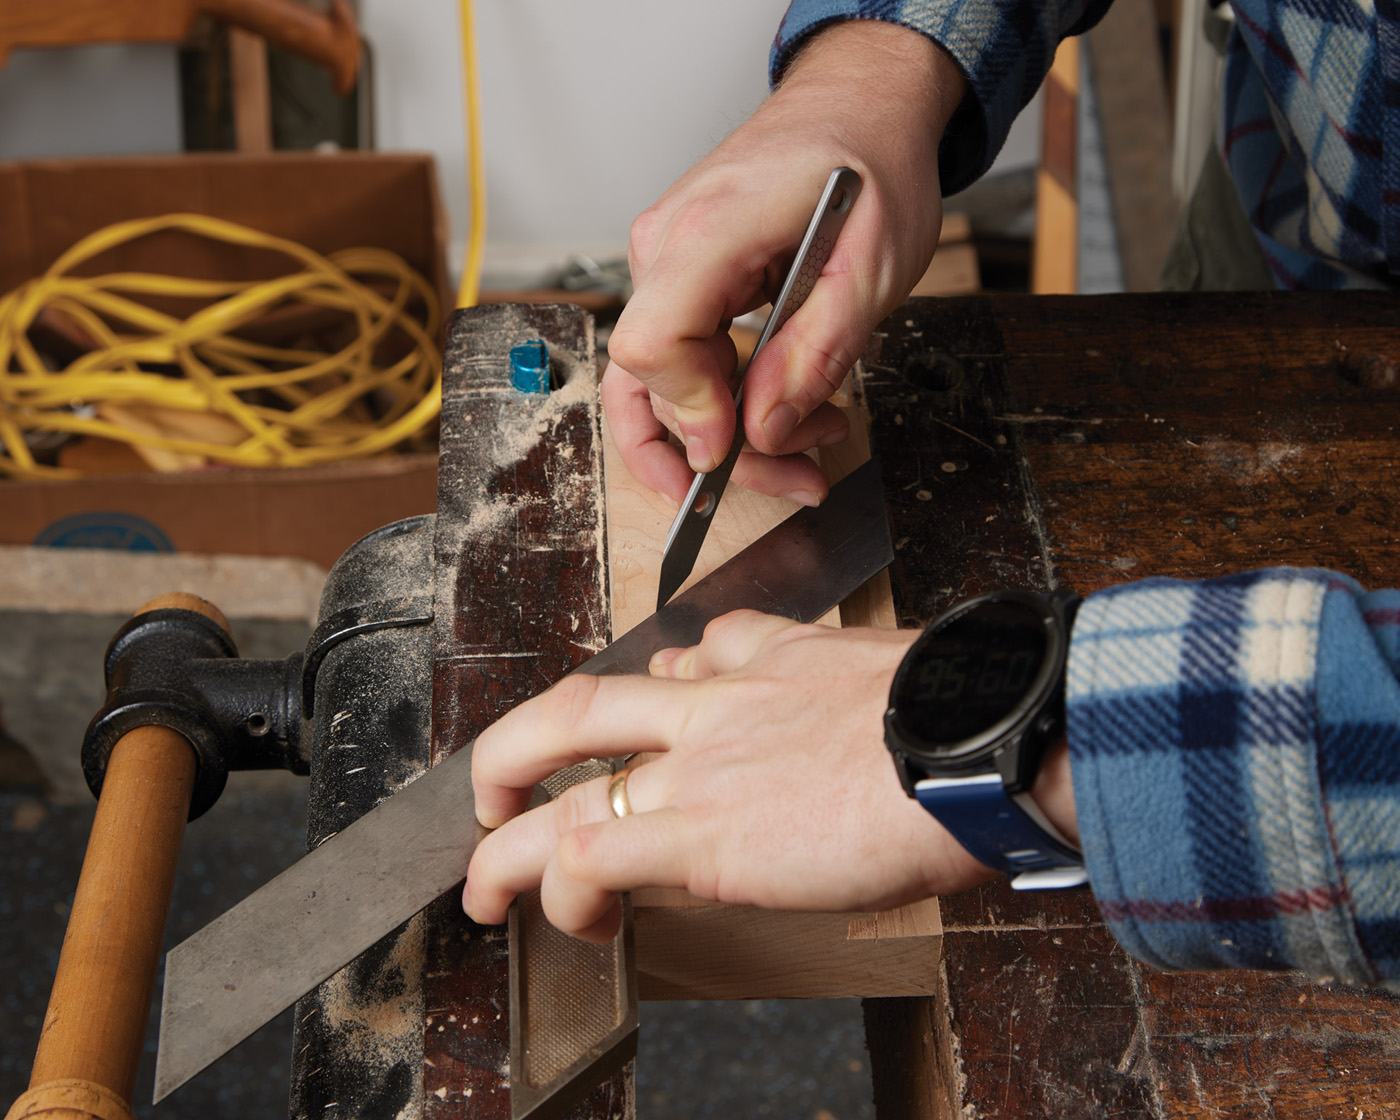
11 On 1/4″ stock, draw the diagonal for the wedge.
12 Cut along the diagonal to create the wedge.
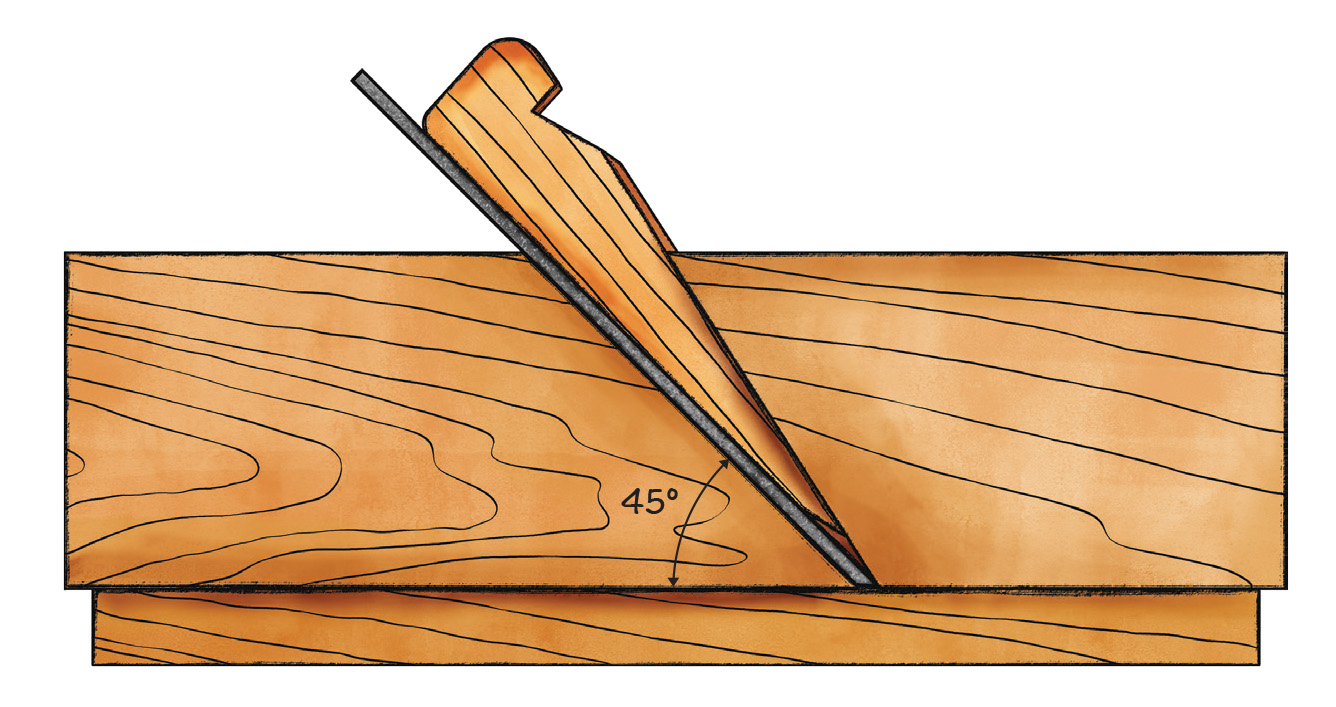
Cutting The Escapement
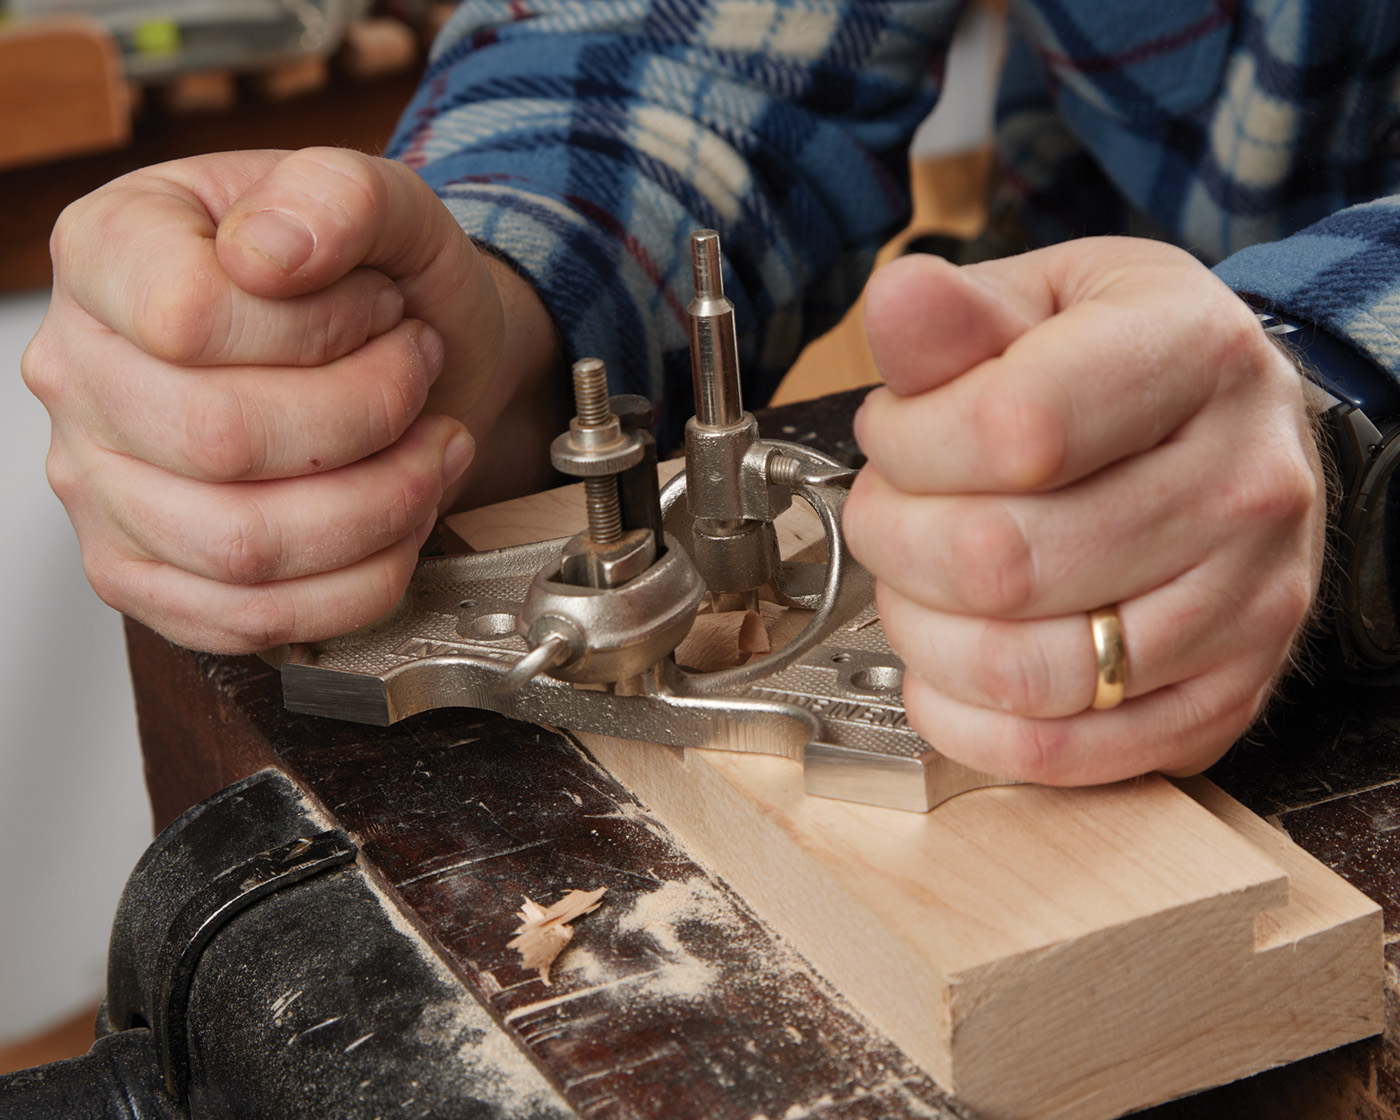
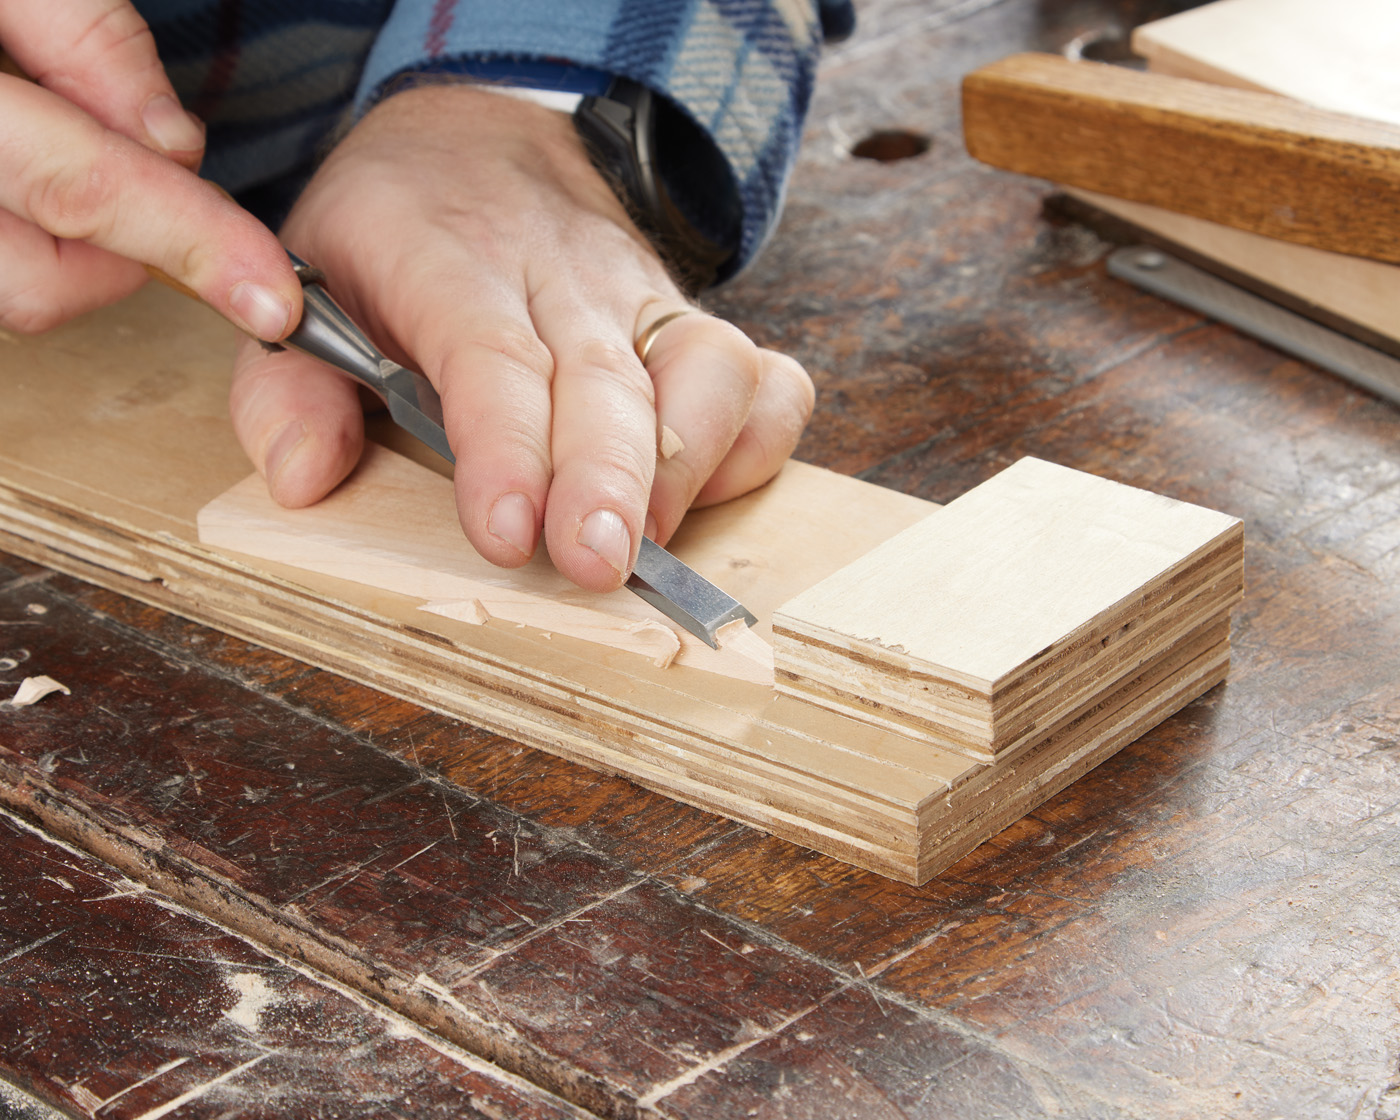
We can now return to the main body of the plane. We are going to cut the escapement into the face of the plane rather than taking the time to bore a hole down through the middle. It is much easier to just cut in from the side, because the rest of the plane is thick enough to resist the bending motion from the wedge. Leaving the side open is not a problem in this case.
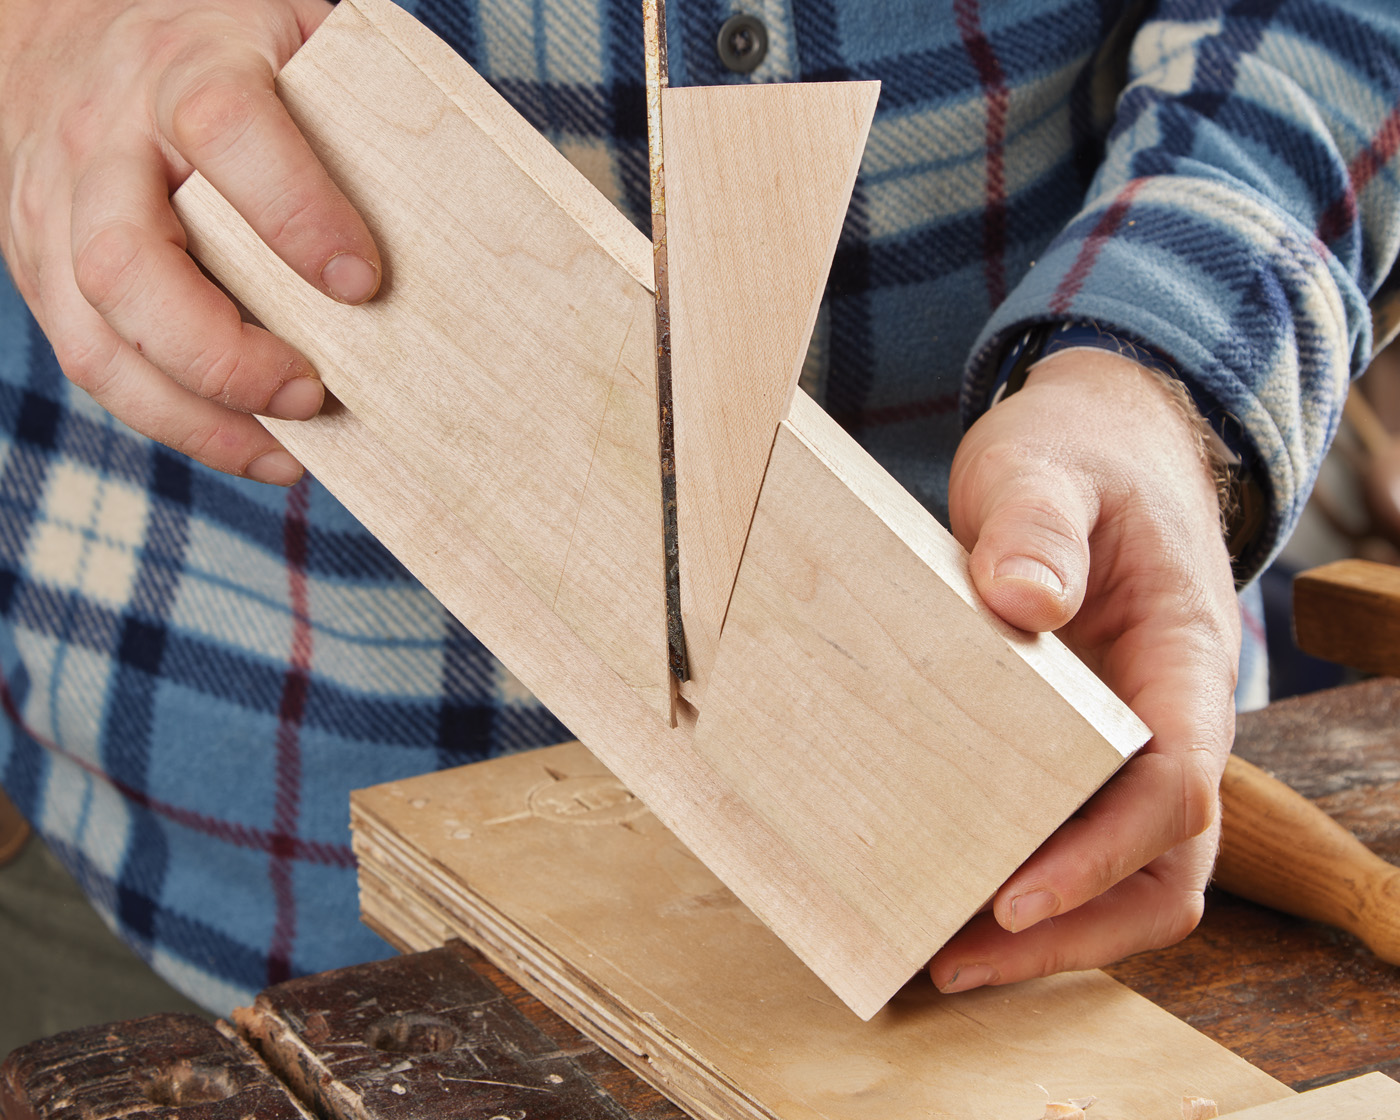
13 With the wedge, lay out the escapement on the side of the plane.
14 Cut down the bead line of the plane 1/4″ deep.
To lay out the escapement, we want the bed of the iron to be at 45°. I use a miter square to draw a line for the bed of the iron. The mouth of the plane is around 3/5 of the way forward. There’s no exact best place for the mouth to be on the plane. In this case, I usually tell people to place it where they think it looks good. With the miter square held in place, we can set the iron against it and then put the wedge against the iron. With the tip of the wedge right at the bottom of the mouth, we can now draw a line along the front edge of the wedge. Next, we need to cut these two lines down 1/4“. For the bed of the iron, I cut it vertically with the saw, but on the front face of the wedge, I lean the saw back toward the bed of the iron at about 5°. This angle will make the bottom of the escapement larger than the top. This will force the wedge deeper into the cut and keep it from falling out. We can remove the material in between these two lines with a chisel bevel up, staying away from our lines until we get very close, and then you can come in with a router plane and clean out the surface.
15 For the front of the wedge line, cut down at 5-10˚ angle at 1/4″.

16 Remove the waste with a chisel and router plane (below).
17
Fitting The Wedge
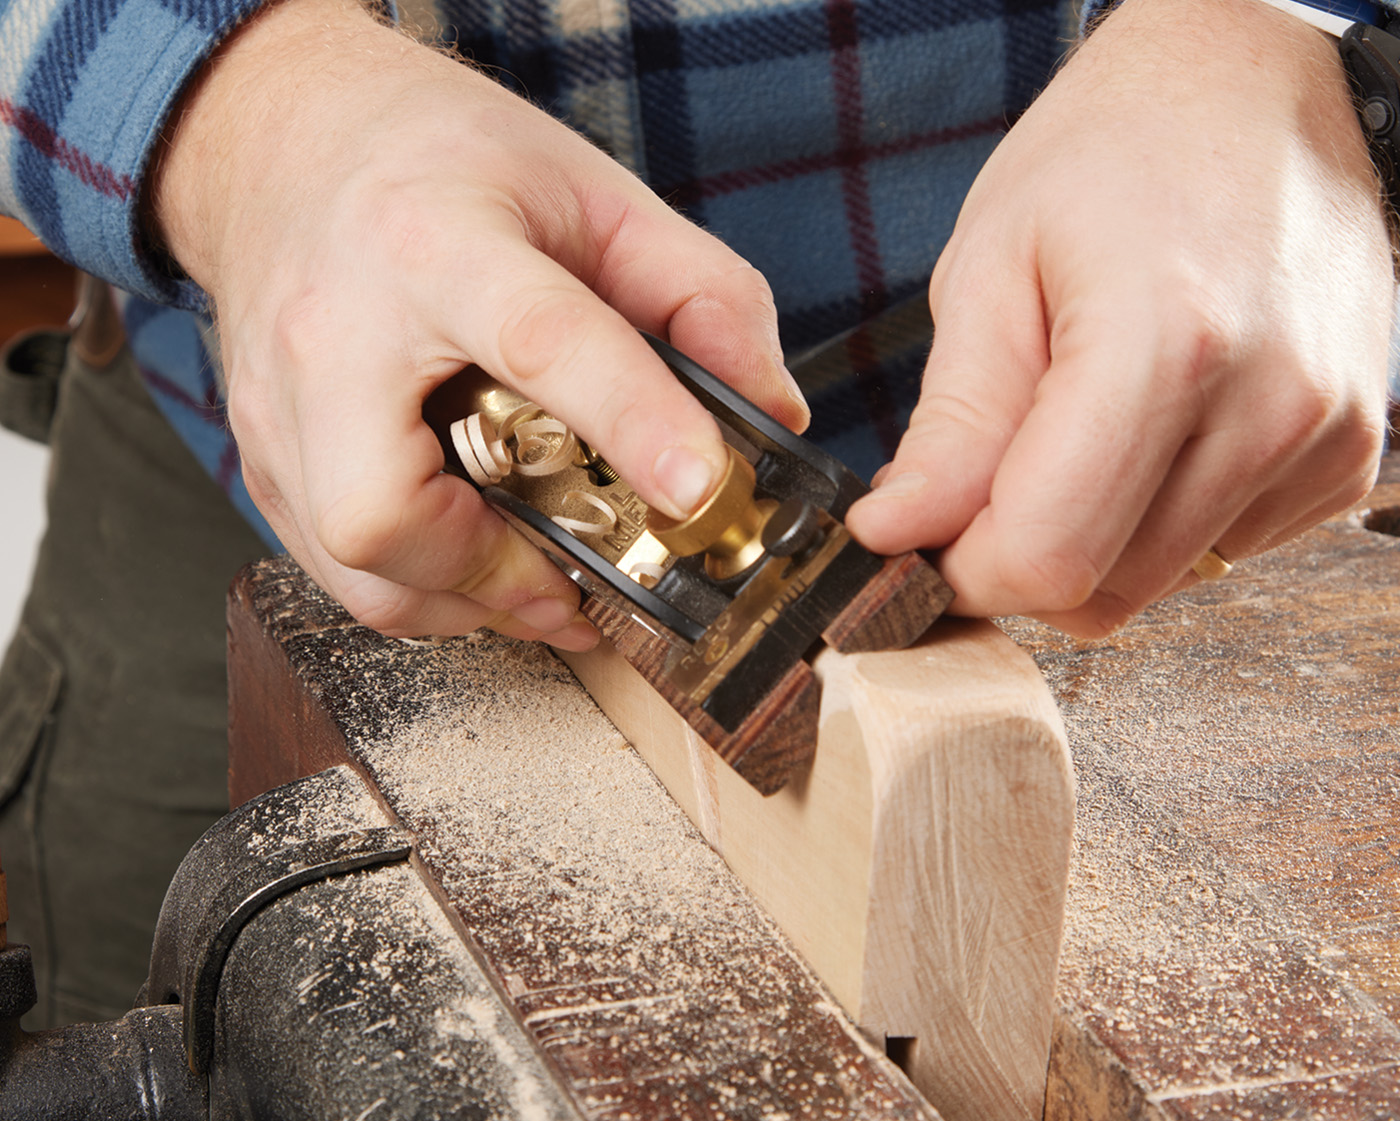
The wedge needs to be fitted to this new escapement. Because we cut the front of the escapement at a 5° angle, we now need to put that 5° angle into the face of the wedge. Usually, you want the grain to be parallel to the iron, so we will put this angle on the side of the wedge that has the grain running out of it. Generally, I just eyeball the angle with a hand plane. It doesn’t have to be dead exact, it just has to be close enough as the wedge and body will work into each other as they get used. When I think the wedge is at the right angle, I can put it into the escapement and give it a tap. If it’s very hard to pull out by hand, then it’s a good fit.
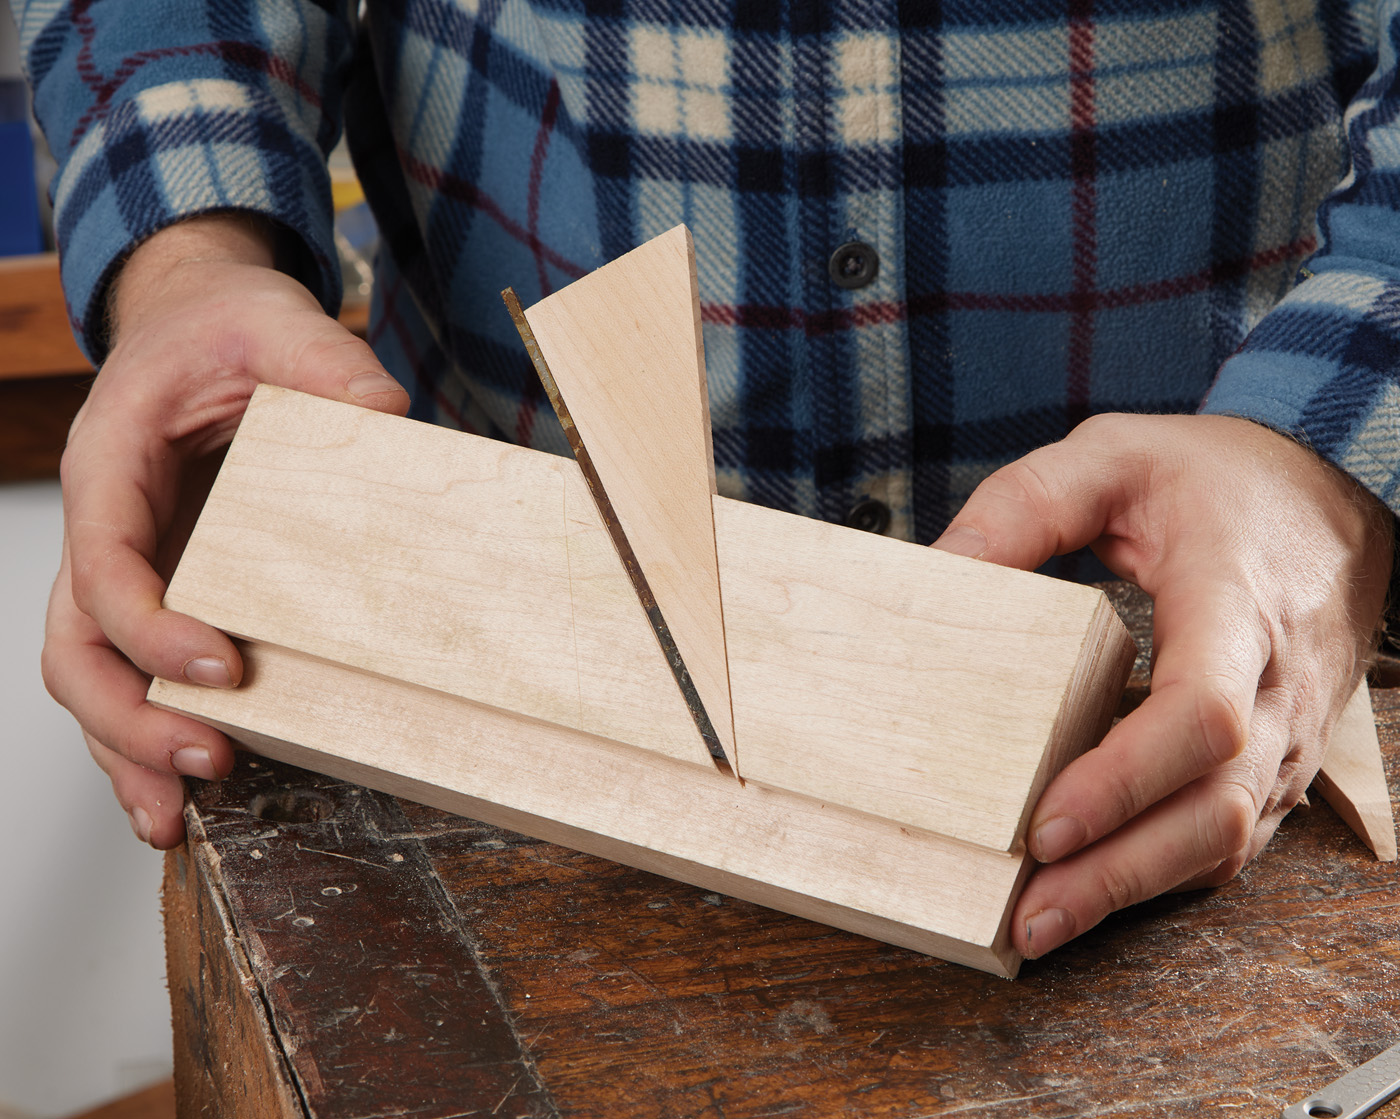
18. Adjust the escapement to fit the wedge and iron.
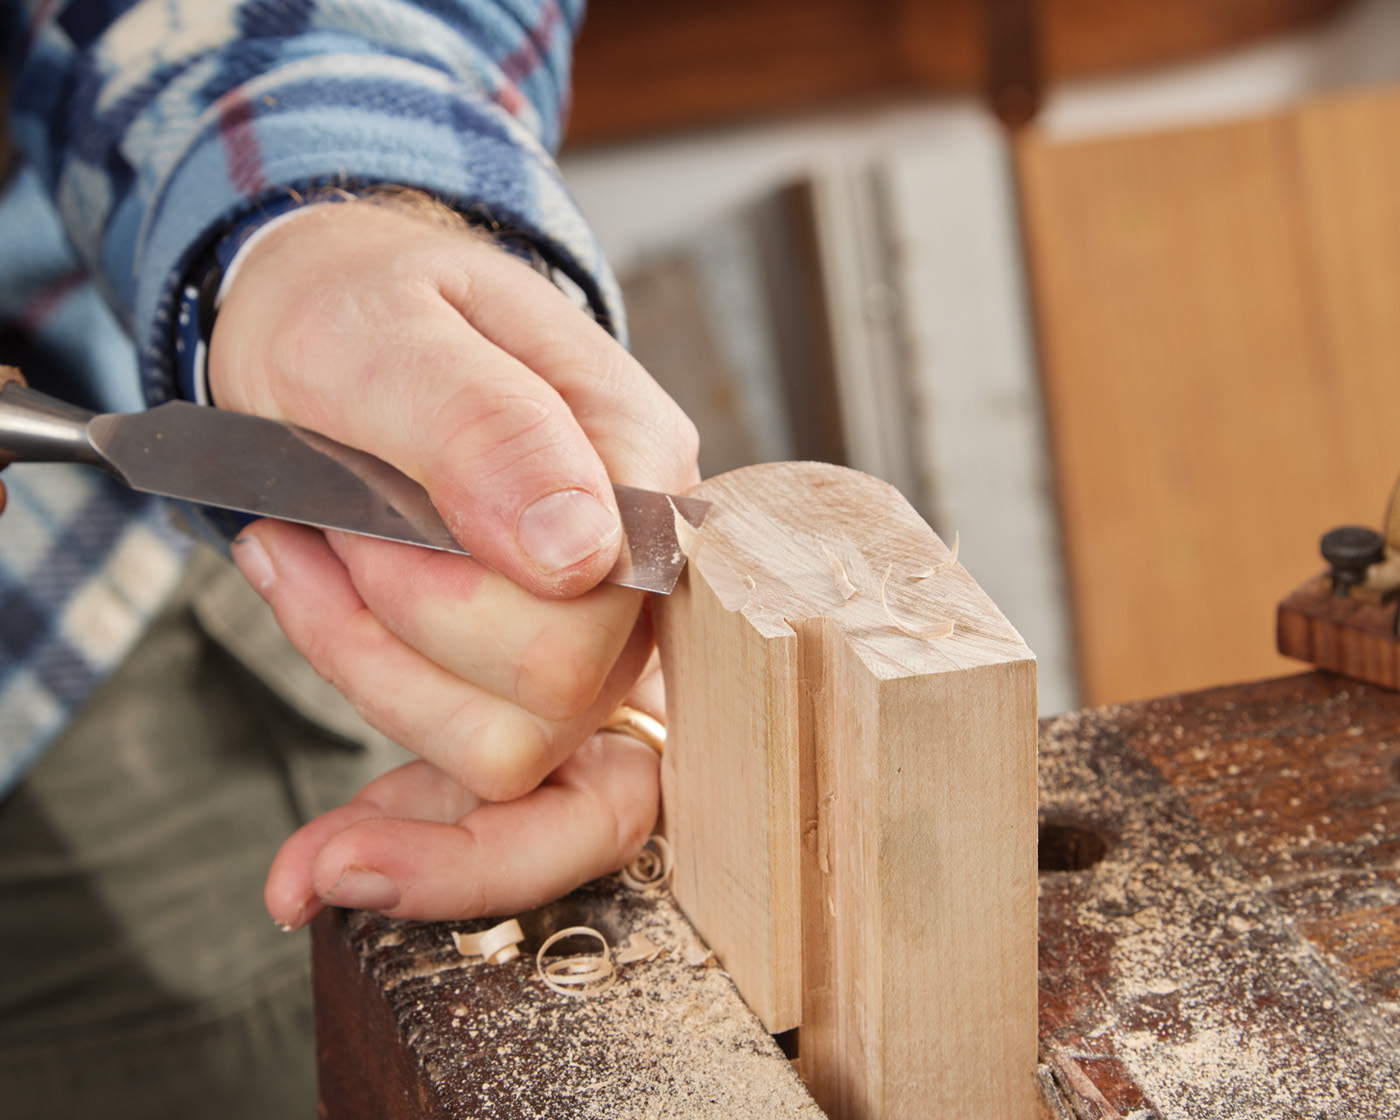
Make sure that it’s touching the iron and the front of the escapement all the way along. The plane is almost functional at this point. If we tried to take a curl, any cut from the iron would impact the wedge and jam up the plane. We need to cut the tip off of the wedge about 3/8“ up from the mouth. Now, we need to cut an angle onto the outside face of the wedge so that when the curls come up the iron, they are deflected out the side of the body by the wedge. A chisel on a bench hook takes care of this very quickly, and a file will give the last touches to the tip of the wedge to make sure it’s smooth and clean.
19 Cut off the tip of the wedge and taper to a point.

20 This will allow the shaving to come up and out of the plane during use, and not clog up the mouth. At least, that’s the goal.
21
22 From this point forward, all changes to the body of the plane are aesthetic or for comfort.
Making An Iron
For the iron, I use a piece of O1 tool steel 1/8“ by 1/4“ by 6“. It usually comes annealed and needs to be hardened. It is much easier to grind the angle in before hardening the steel. A bench grinder makes quick work of putting a 25 to 30° angle on the tip of the iron.
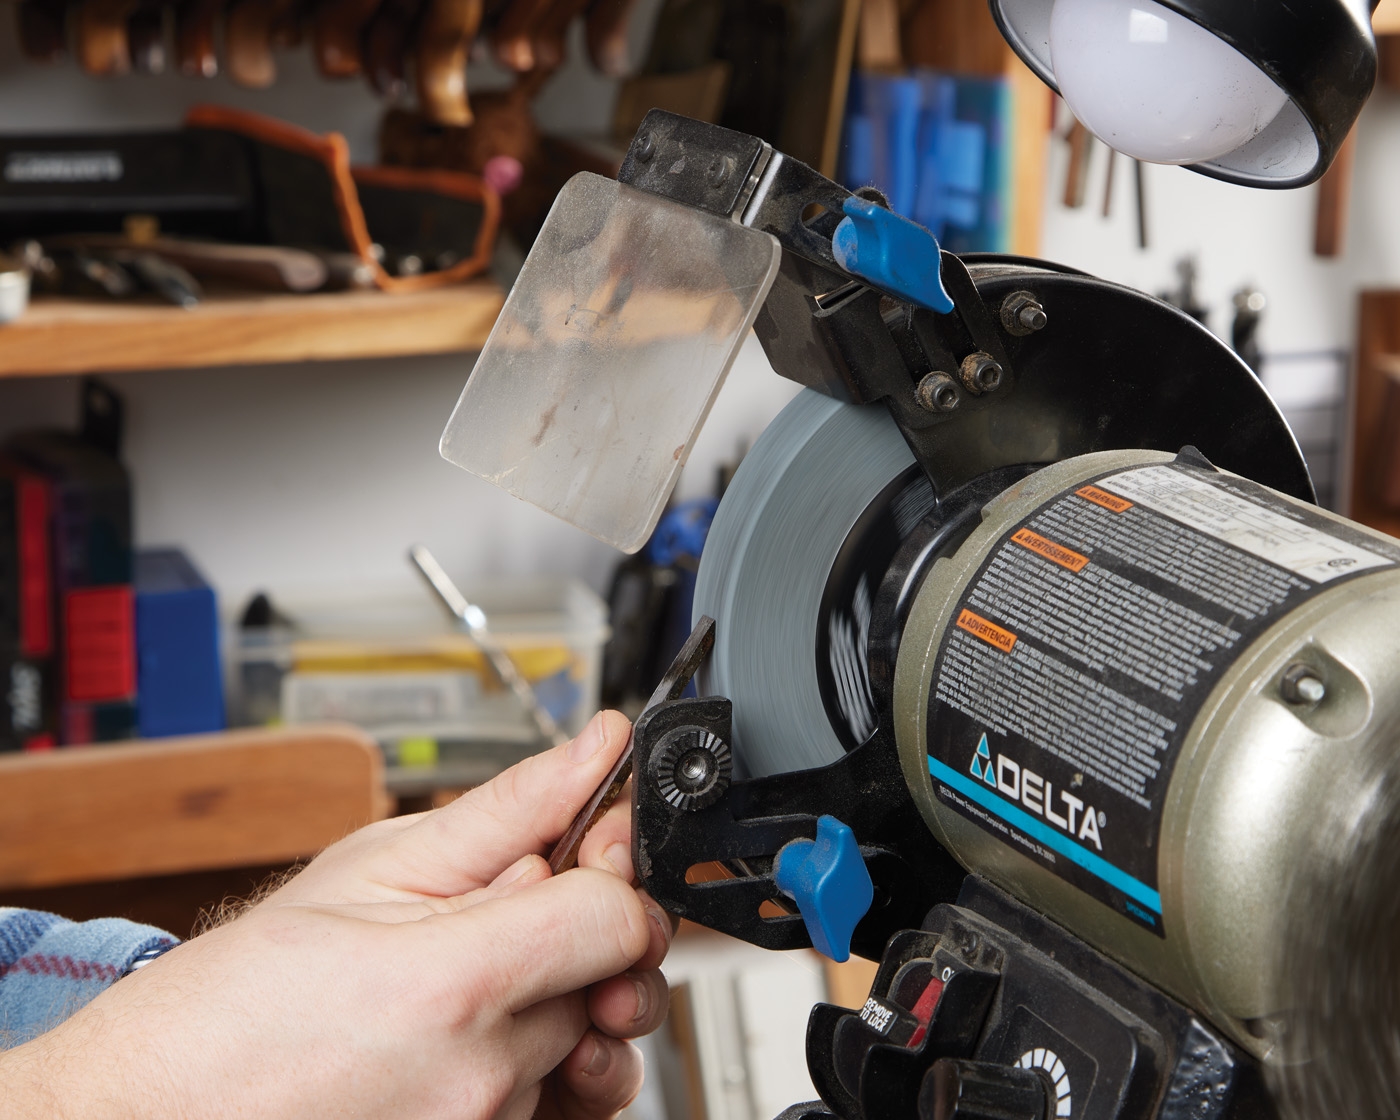
23 Shape the iron. I use a bench grinder to rough in the bevel angle.
To harden the iron, I use three propane torches and heat up the tip until a magnet won’t stick to it. I then quickly dunk it in used motor oil. Once it’s cooled down, I can put it in the kitchen oven at 400° for 2 hours, and then every hour, step it down 100° until it is fully cooled to room temperature. If this sounds too daunting, you can purchase the iron already hardened at my website. Lastly, the iron needs to be sharpened. This is done like any straight chisel or plane iron on your choice of sharpening stone.
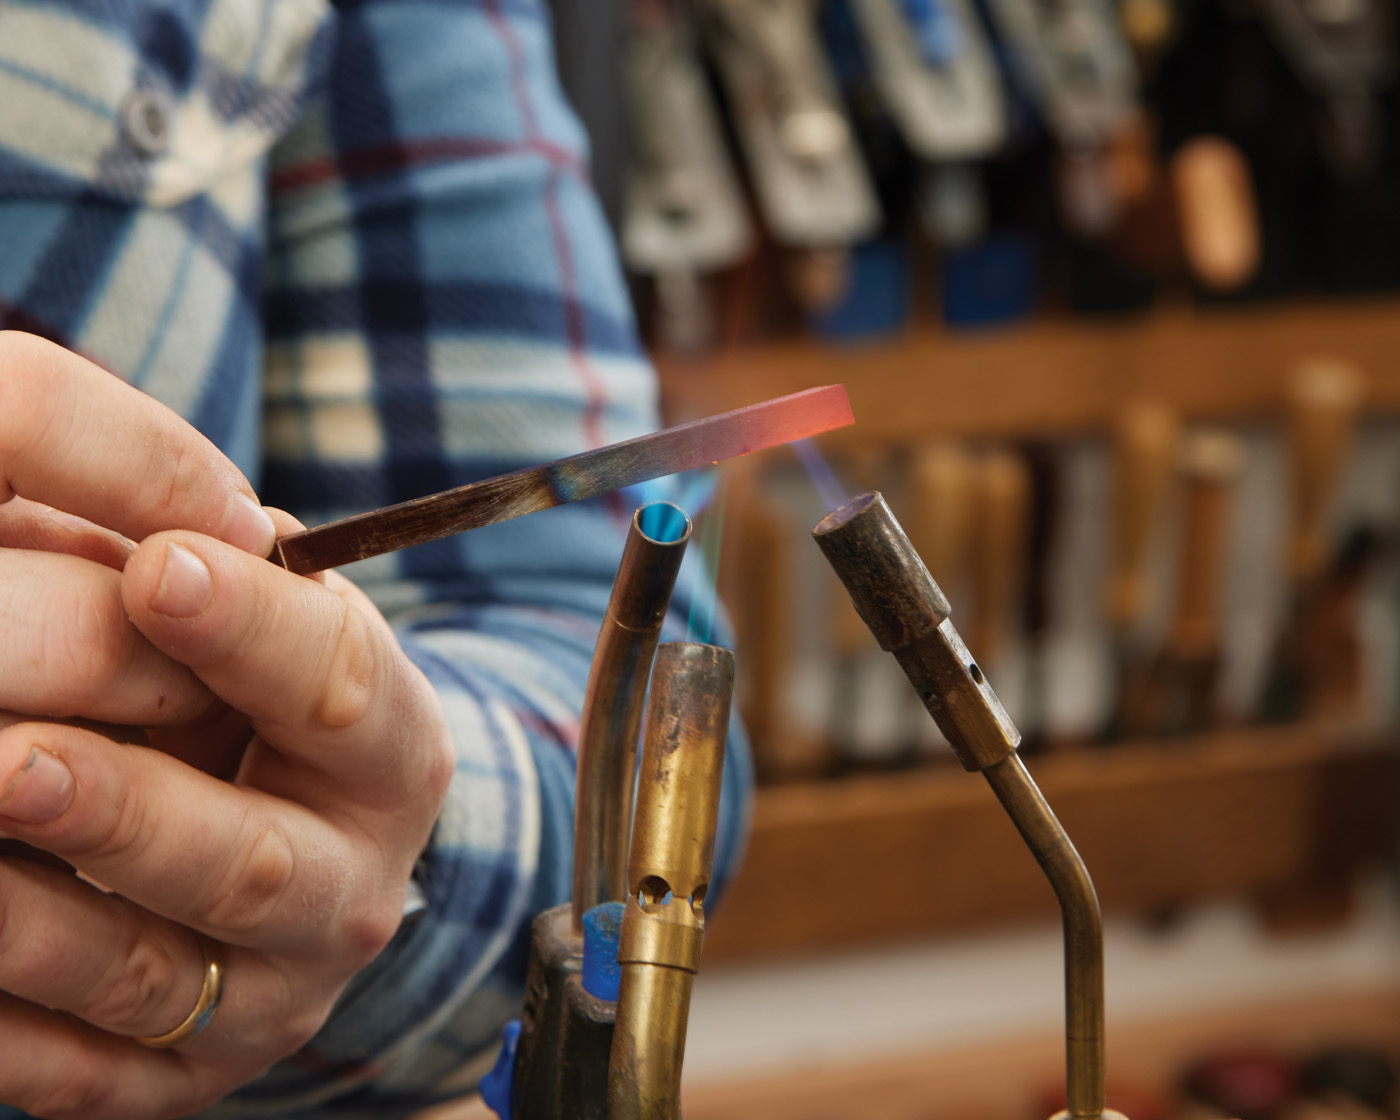
24 Harden the iron. Heat it to cherry red, then quench it in oil.
Final Details
At this point, the plane is functionally done. I will take it for a test drive and fine-tune the tip of the wedge to make sure that the curls aren’t jamming or catching on anything. I want to make sure that it will smoothly ride up the wedge and out the side. There’s often some small gap around the wedge or the mouth of the plane that will catch the wood curl and cause it to jam. Just look for the location where the curl is jamming and smooth that surface out. You will notice that, at this point, using it is very uncomfortable. The corners are all rough, and it has no style. I like to take a rasp and file and round over the top corners and spot where my thumb will grab the front. I will use the rasp and file and then feel the plane and see where I want to take off more material to make it comfortable. This is where your own personal style can come out.
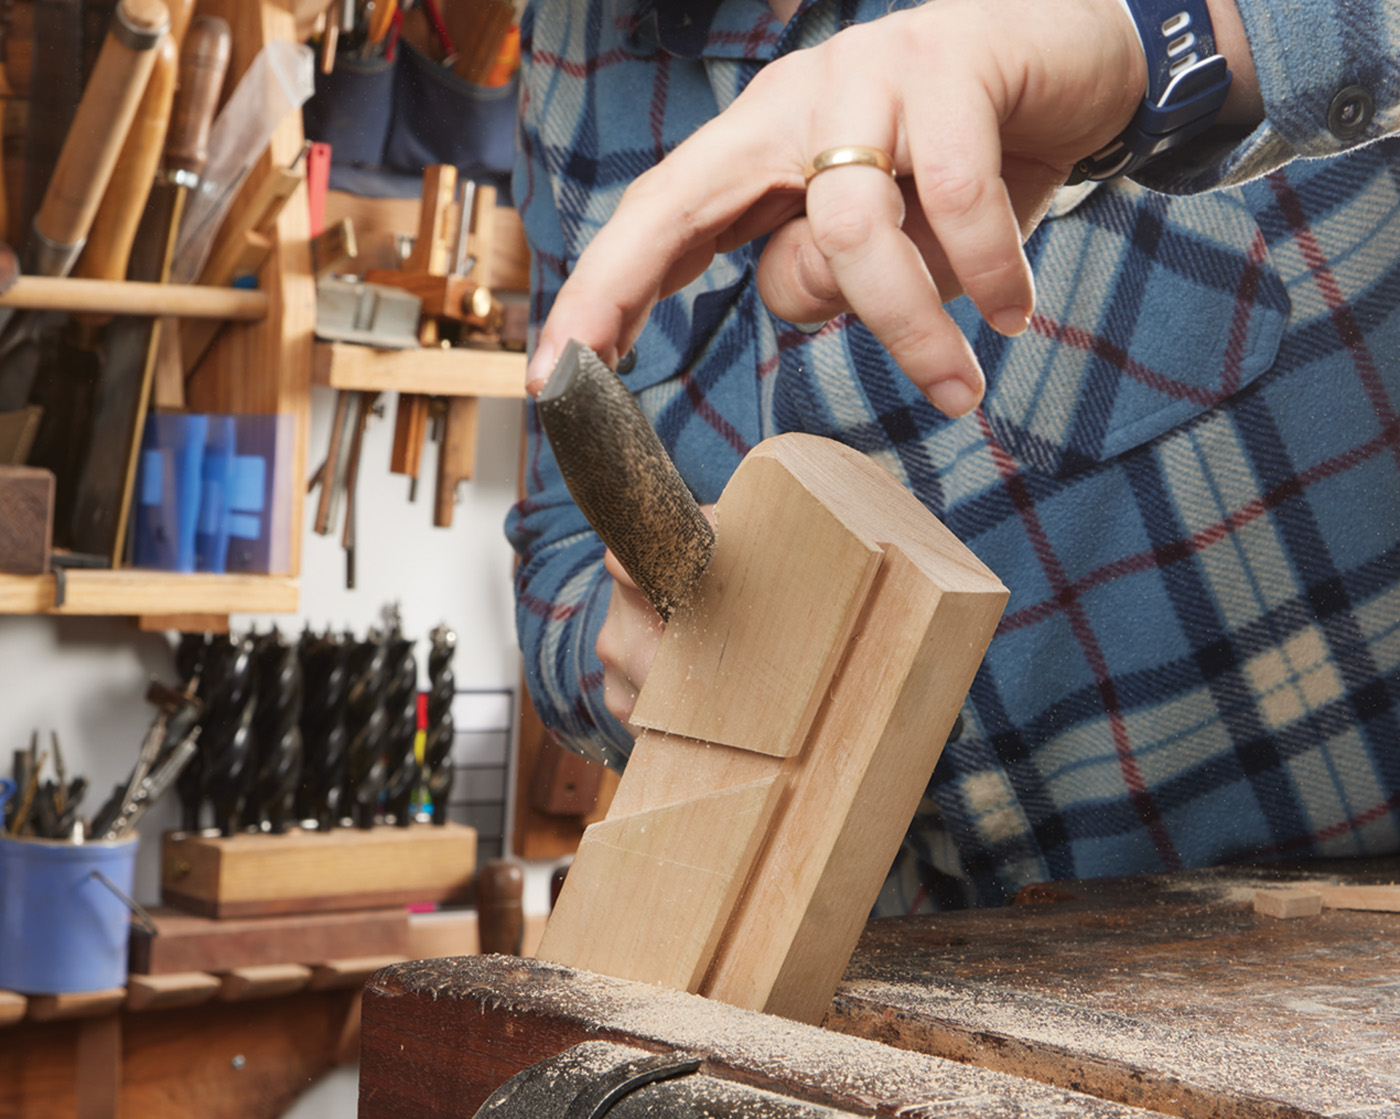
25 Chamfer the corners of the plane.
26 Remove any sharp edges.
27 Round over contact points to be comfortable in the hand.
Some people like to add chamfers and ogees, and others like to keep things as natural and smooth as possible. For the wedge, you will want to cut an ejection notch in case the wedge gets too tight, you can tap it out with a hammer.
28 Shape the wedge with a retraction hook.
29 Rough the hook in with
a handsaw.
30
31 File and rasp the top of the wedge into an appealing shape.
32
For a finish, I generally prefer boiled linseed oil and paste wax. I apply the boiled linseed oil and let the wood soak up as much as it wants, applying more if the wood soaks it up quickly. Then, after about 30 minutes, I’ll wipe off the excess and immediately apply a coat of paste wax. I’ll leave the paste wax rough on the surface for a few hours and then clean off the majority of the wax. The next day, I will come back and polish off all the extra wax on the surface. This is a very personal topic, though, and everyone will have something different that they like to finish their hand tools with.
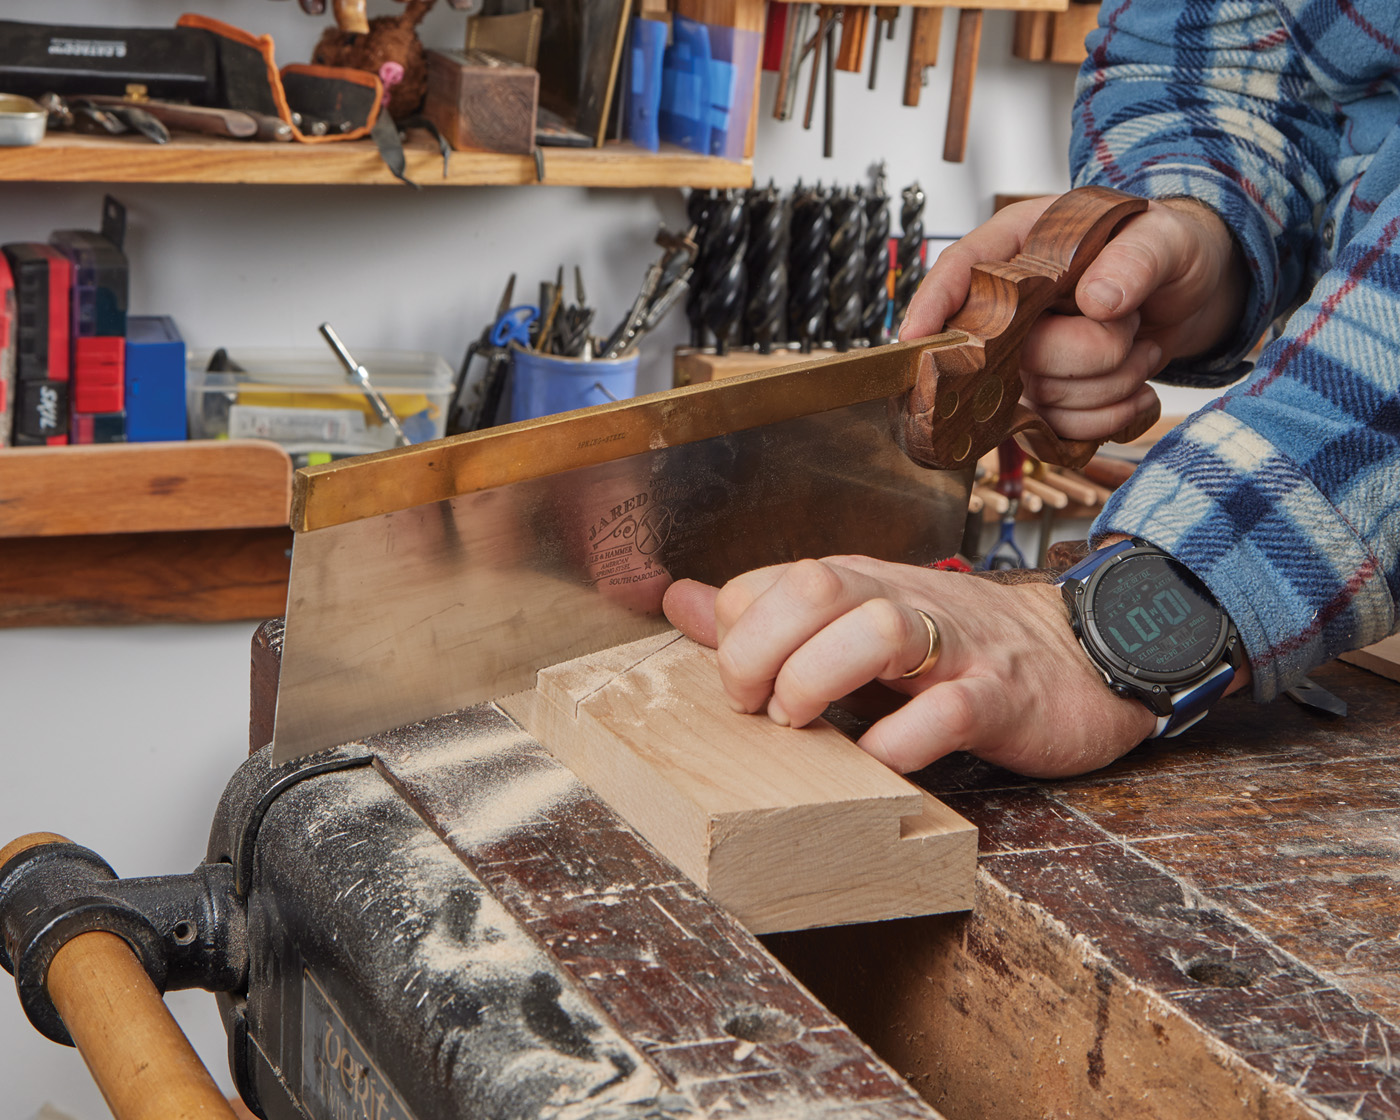
33 Check the fit of the wedge
and Iron.
34 Enjoy the beautiful curls. Test the plane and make sure it is taking shavings the way you want.
Final Thoughts
Making a grooving plane is one of my favorite classes to teach. The student looks at the project and thinks it’s too complicated and beyond them. However, in the end, everyone walks away with a functional tool. As long as you take the project one step at a time, most any beginner hand tool woodworker can make a beautiful tool to use for the rest of their life. Use this as an opportunity to stretch in a different direction and try something new. And now you can tell your friends that you make rather plain tools, but that’s okay because you know that they are groovy.


