


We may receive a commission when you use our affiliate links. However, this does not impact our recommendations.
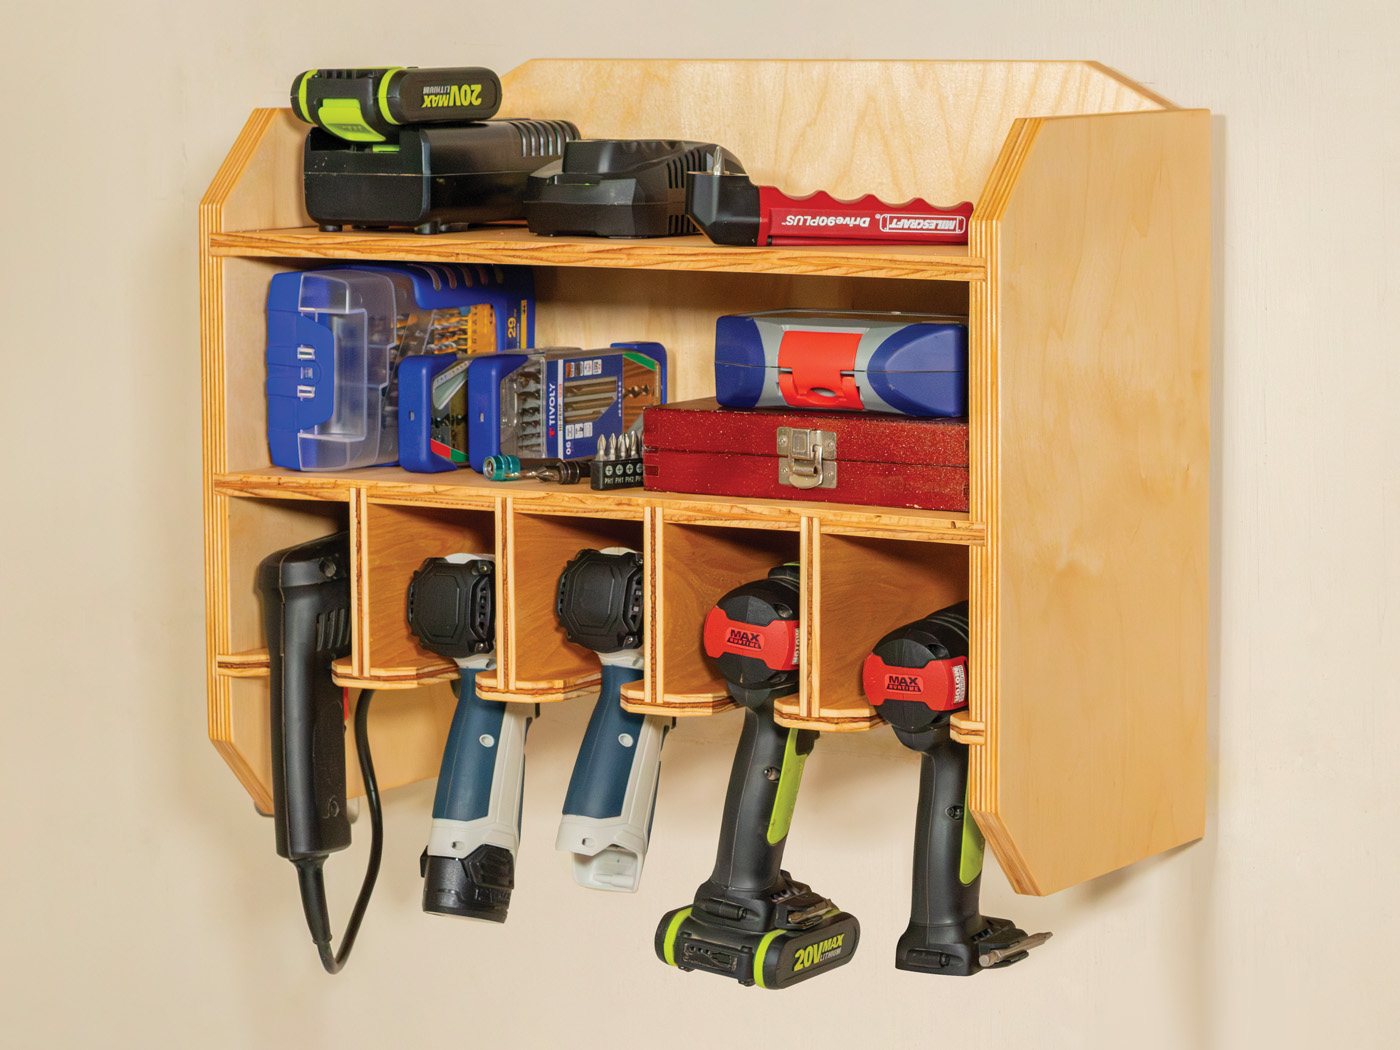 This simple storage solution stashes your drills and drivers, charges their batteries, and organizes your drill accessories.
When I first set up my shop, I built a few plywood cubbies to corral my cordless tools and accessories. They worked well enough at first, but over time, my drills and drivers turned into a tangled mess of bits, batteries, and other tools. I’d have to shuffle things around just to find the right bit or a charged pack. It wasn’t efficient, and it drove me nuts.
The more time I spent in the shop, the clearer it became that the issue wasn’t the tools themselves—it was the lack of a system designed around how I actually work. Cordless drills and drivers get used constantly, and any friction in accessing them adds up fast. I wanted a setup that kept everything visible, prevented tools from piling on top of each other, and made it just as easy to put things away as it was to grab them.
So I built a dedicated drill station. Each tool now hangs in its own compartment, ready to grab and go without fuss. The top shelf holds chargers, with a clean cord-management hole and a lower shelf keeps bits and accessories close at hand. Everthing’s organized, visible, and within reach.
Since this is a high-use shop shelf, I used leftover plywood I had around the shop. Its notched sides lighten the design, while the simple dado and rabbet joinery keep the structure solid without relying on hardware. It hangs on a French cleat, making it easy to take down or move as your shop evolves.
Additional Reading: Check out all of our shop project articles.
More Tool Storage: A Traditional Tool Chest in Two Days eLearning course
In Our Store: Tool Storage & Workbenches 6 Projects Download
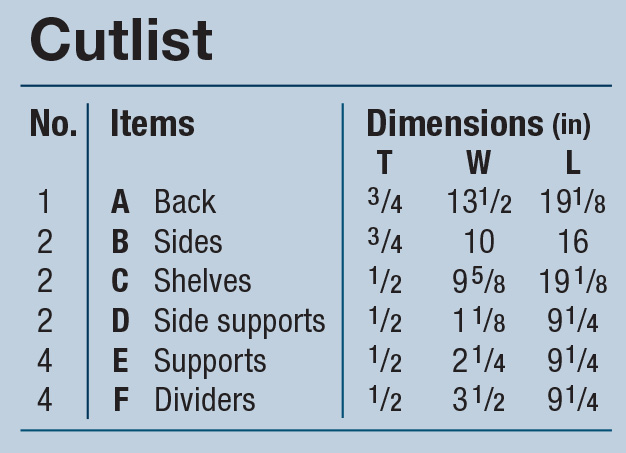
Cutlist and Diagrams
Designing Your Drill Station
Use the cut list above to build this station as shown or tweak it to fit your tools. Check your drill lengths and handle widths before cutting and adjust the compartments as needed. Make it wider, stack two rows, or add shelves for more accessories—whatever suits your shop. Designing is half the fun.
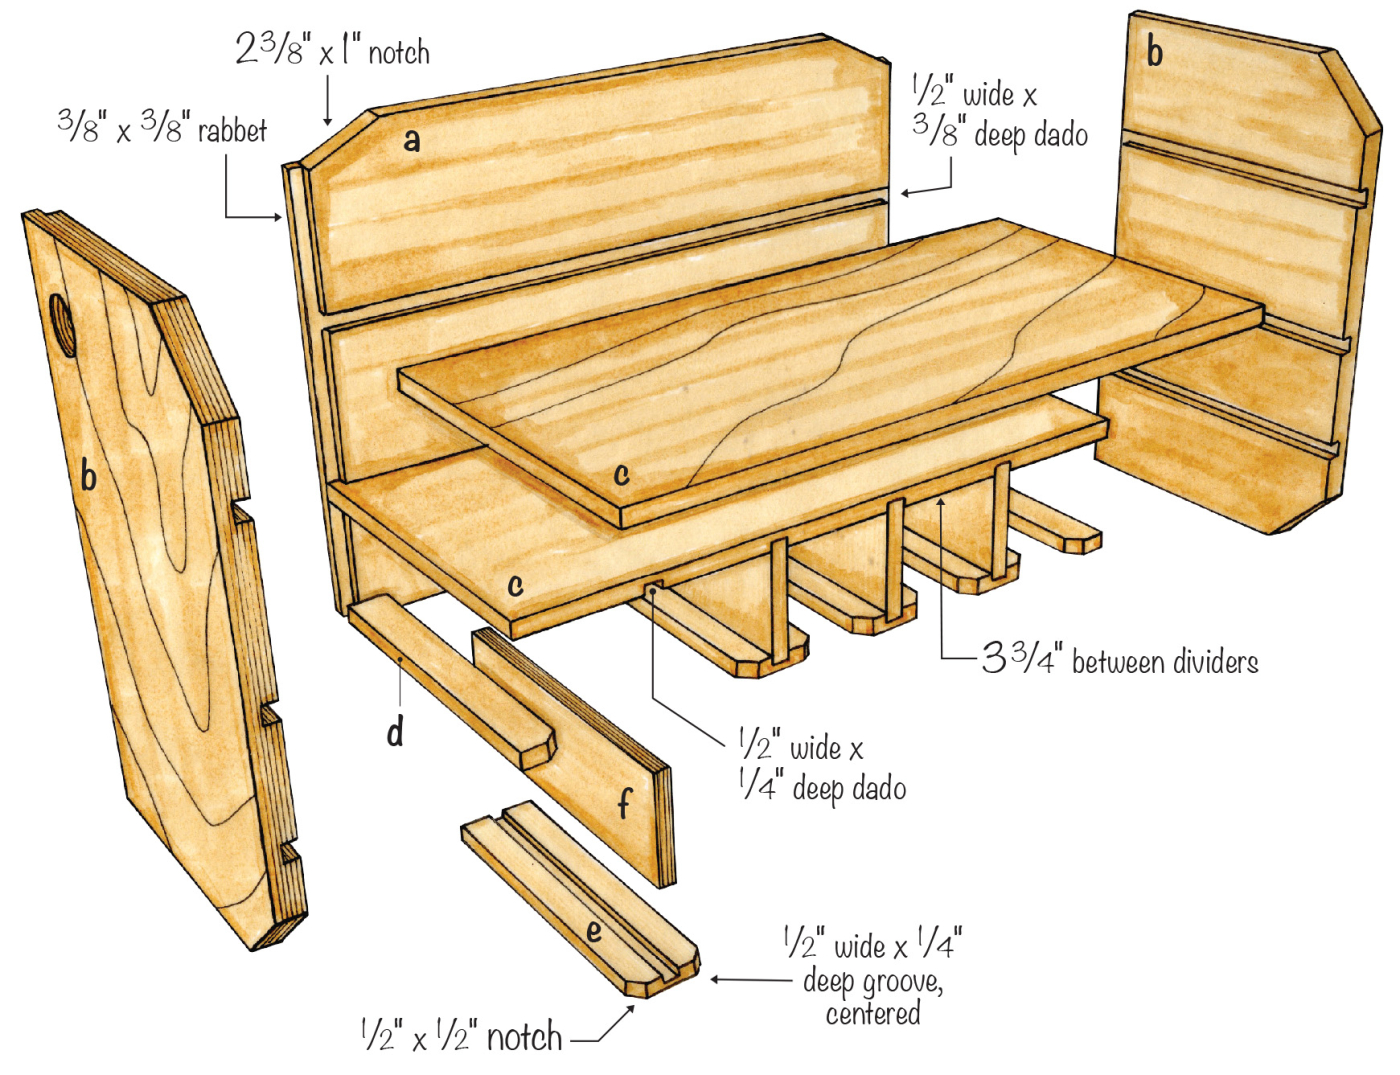
Rabbets, Dadoes, & Notches
Break down your sheet goods to rough size, referring to the cut list. Take the parts to the table saw to rip and crosscut them to the final dimensions. At the workbench, lay out the notches for the back’s two top corners on its rear face, one side’s two front corners, and one corner on one support.
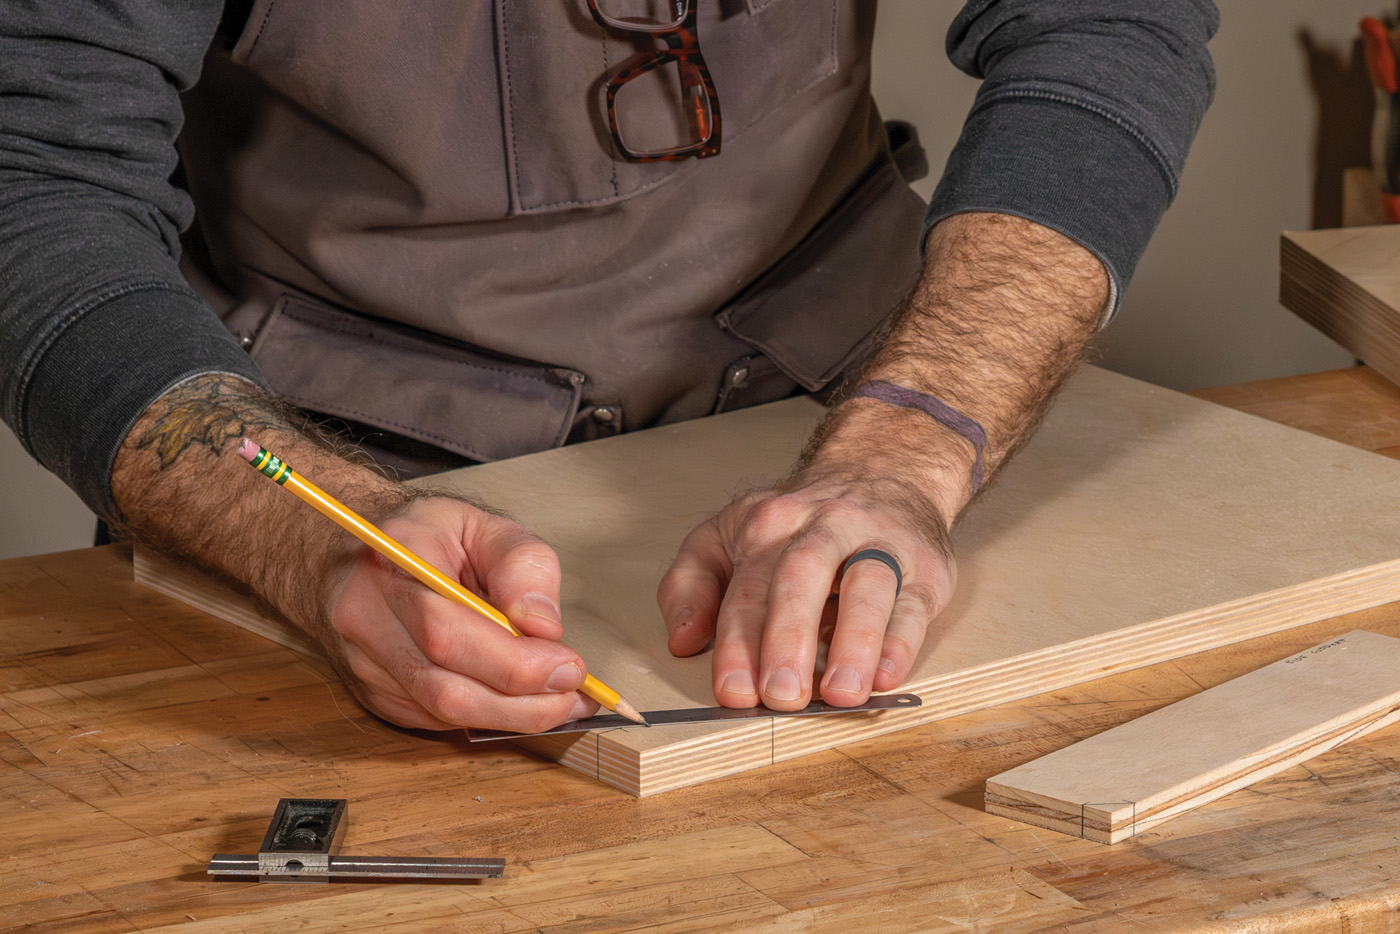
1 Mark the back. Use a rule and pencil on the back’s rear face to connect the end of one 3/8″ long line from the edge, 1″ down, to a mark 2-3/8″ in from the edge.
At the table saw, set your miter gauge to 45°. Rest the back edge of the marked support against the fence. Align the layout line with the table saw blade, ensuring the teeth are on the waste side of the line. Clamp a stop block to the fence and against the support’s rear end to lock in the setup. Make the cut and then flip the piece edge for edge to notch the opposite corner. Saw the notches in the remaining supports using the same setup and procedure. Make a slightly wider support to rip in half for the side supports, adjusting your miter gauge as needed to saw the notches.
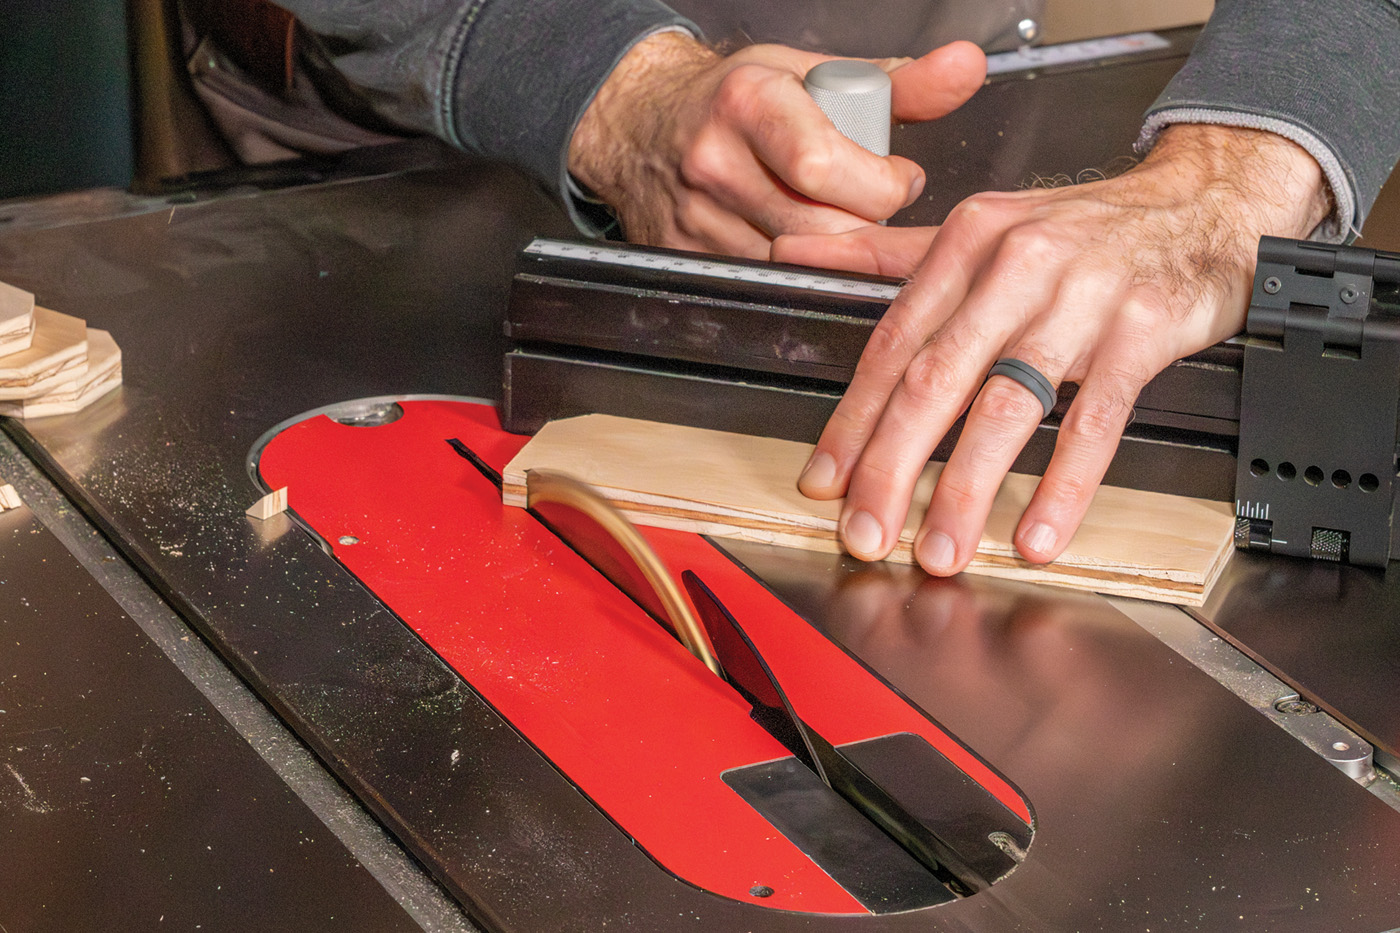
2 Notch the supports. After locking in the setup with your miter gauge and a stop, cut the corners of each support.
3 Rip the side supports. Saw the wider support in half to make the side supports that are glued into the bottom dadoes in the sides.
Install a dado stack in your table saw, setting the width to the exact thickness of your nominal 1/2“ plywood. Outfit your rip fence with a sacrificial fence and bury the blade so that the 3/8“ is exposed and the height is 3/8“. Make test cuts for a tight fit. Saw the through rabbets in the back and then the stopped rabbet in the sides. For the other side, adjust the fence to saw the stopped rabbet in the opposite edge.
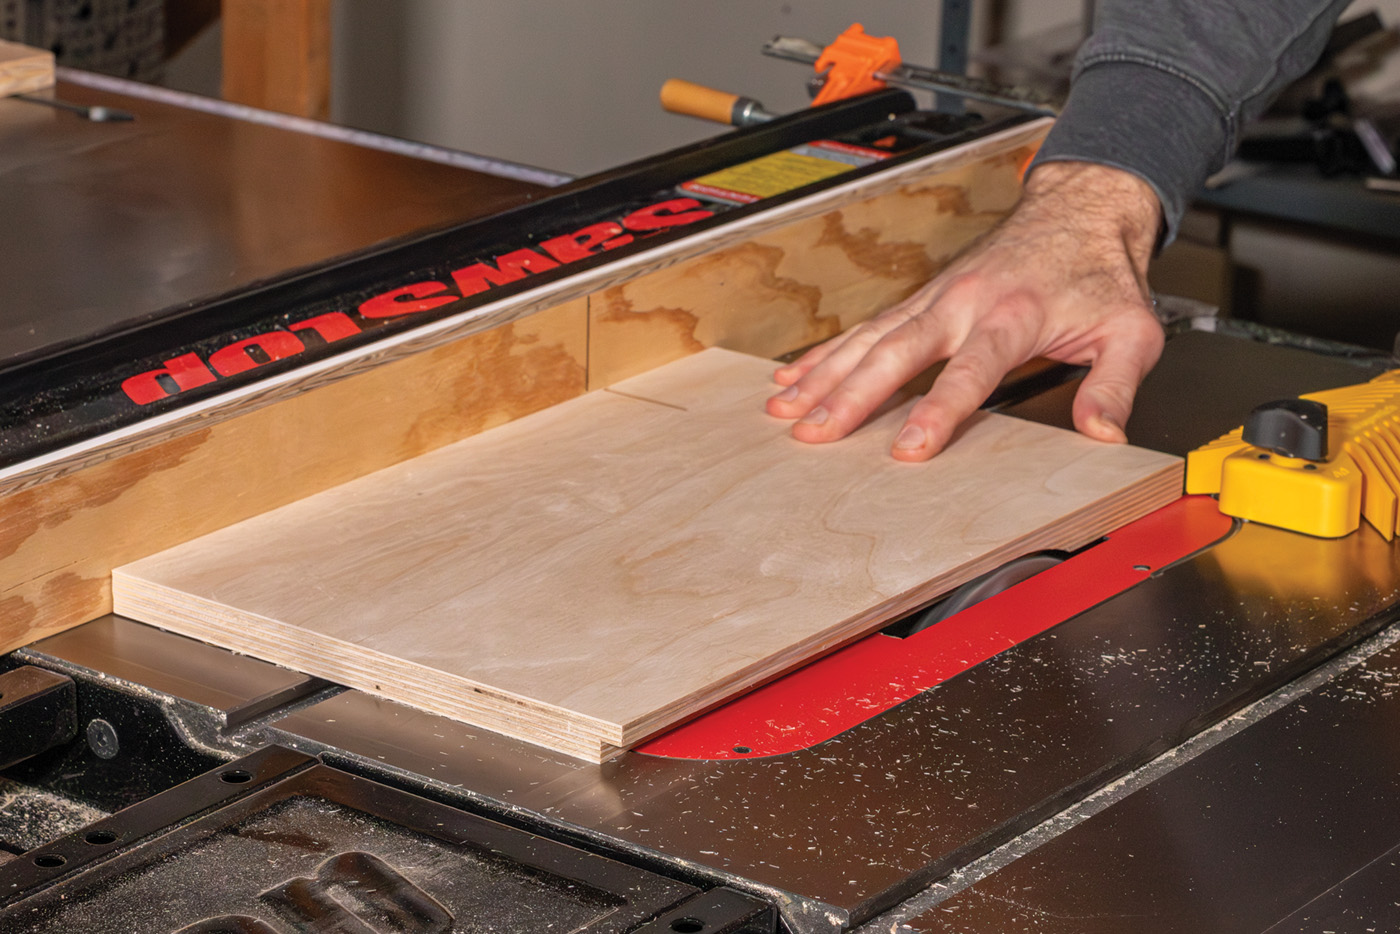
4 Saw stopped rabbets. Strike a line on your sacrificial fence at the infeed side of the blade. Transfer the dado location to the board’s outer face. Turn on the saw and feed the piece into the blade until the two lines intersect.
Next, remove the sacrificial rip fence and saw the dadoes in the back and sides. Your bottom dado will intersect with the stopped rabbet. Clean up as needed. Set the dado height to 1/4“ to saw the dadoes in the lower shelf and the grooves in the supports.
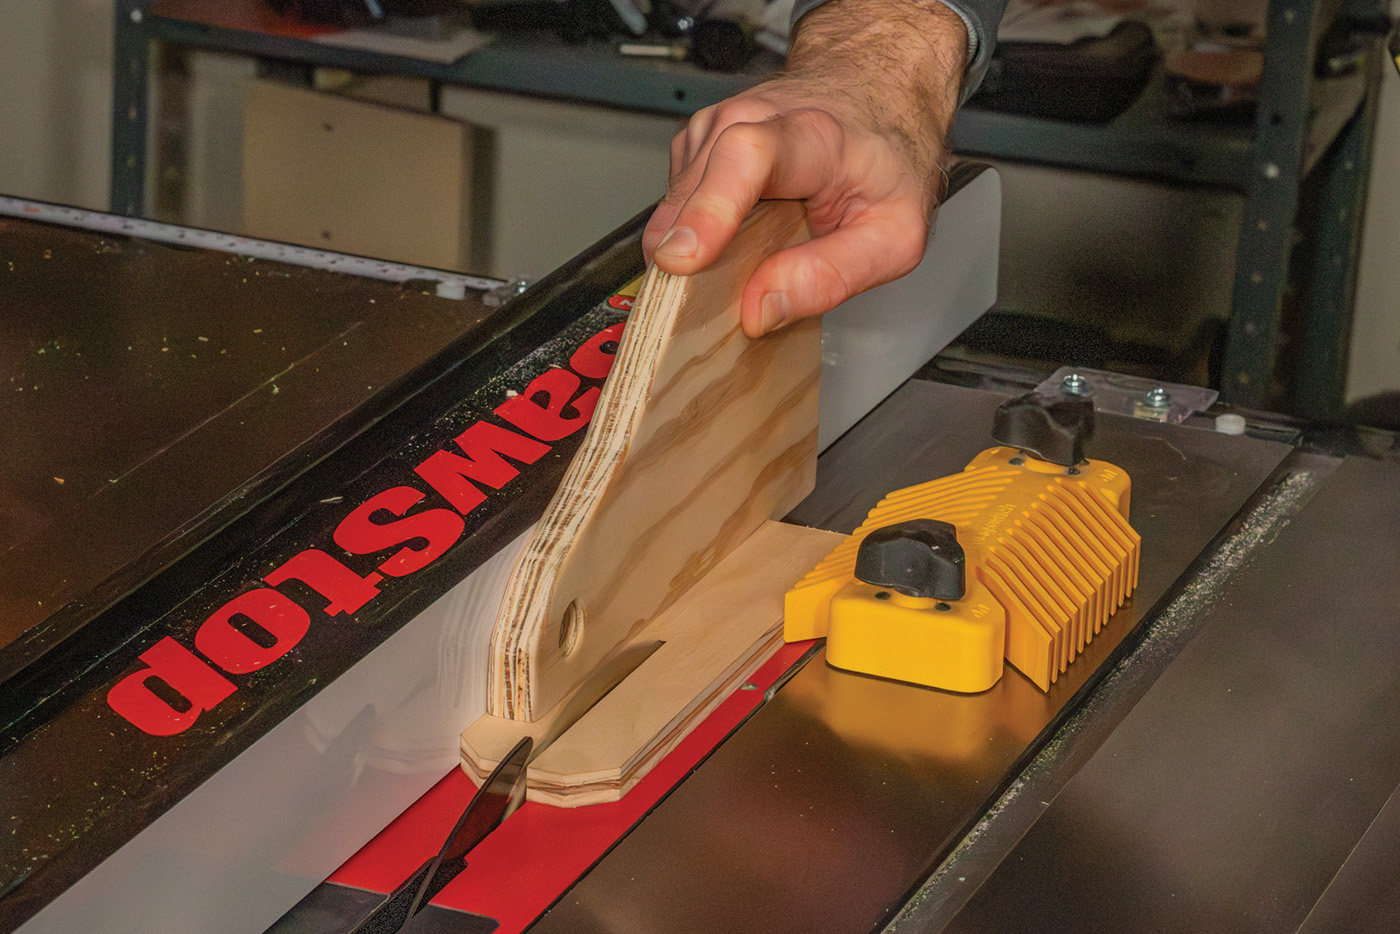
Bandsaw the back’s notches as shown in the drawing. Double-stick tape the two inside faces of the sides together, before bandsawing the corners. Mineral spirits will help release the adhesive when done making the cuts.
Assembly & Final Touches
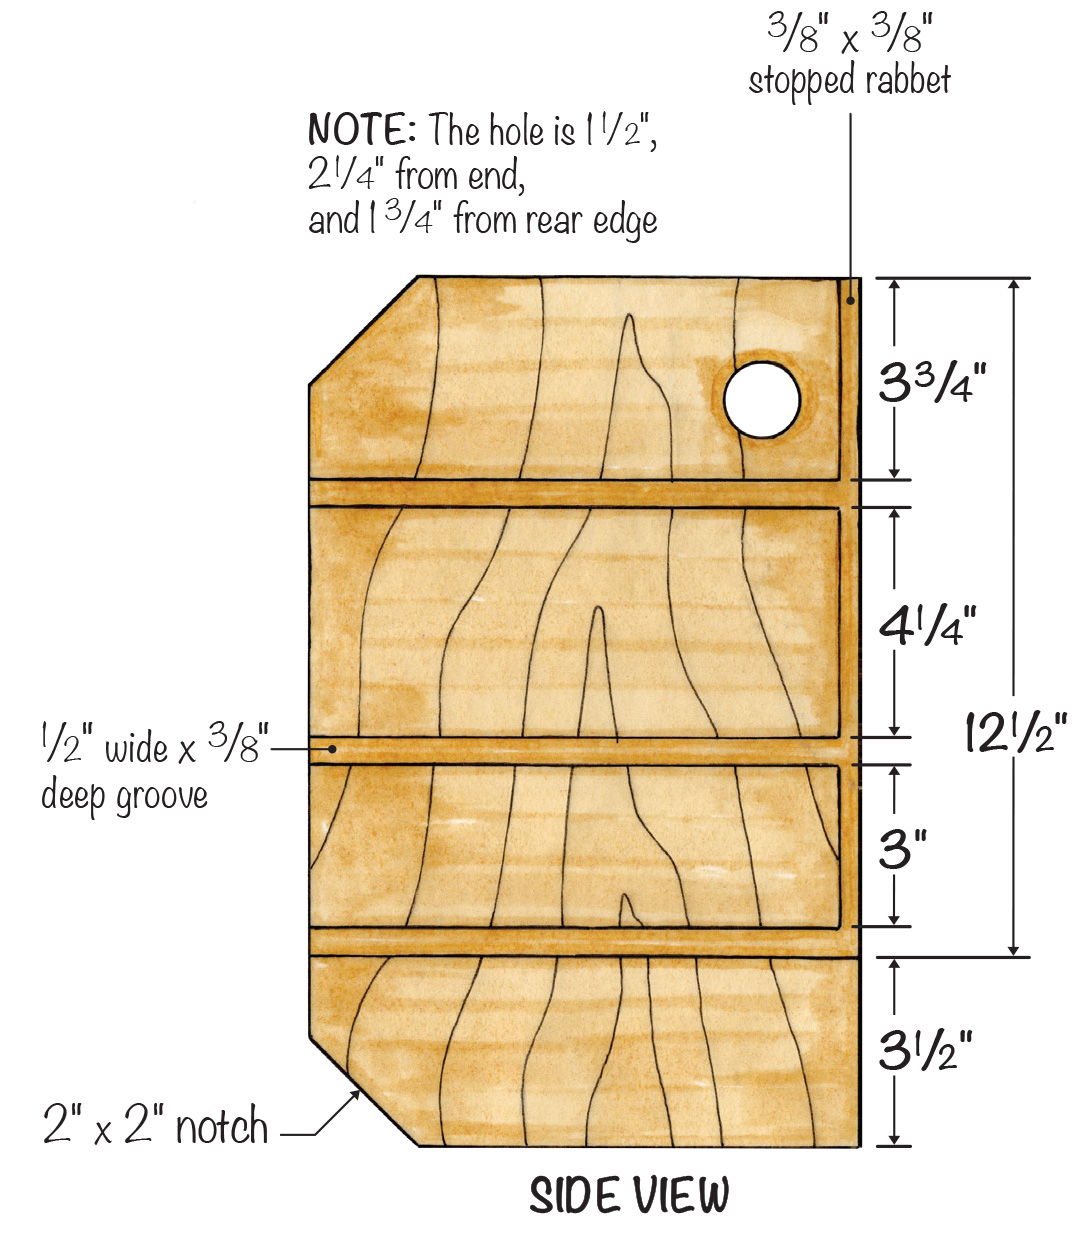
On the side piece that will be closest to an outlet, measure and mark the 1-1/2“-diameter hole for your battery charger’s cords. The hole’s center is 2-1/4“ from the top end and 1-3/4“ from the rear edge. Use an awl to mark the point. Chuck a 1-1/2“ Forstner bit in your drill press and set up a backer board to prevent tearout. Sand the parts and clean up any rough edges.
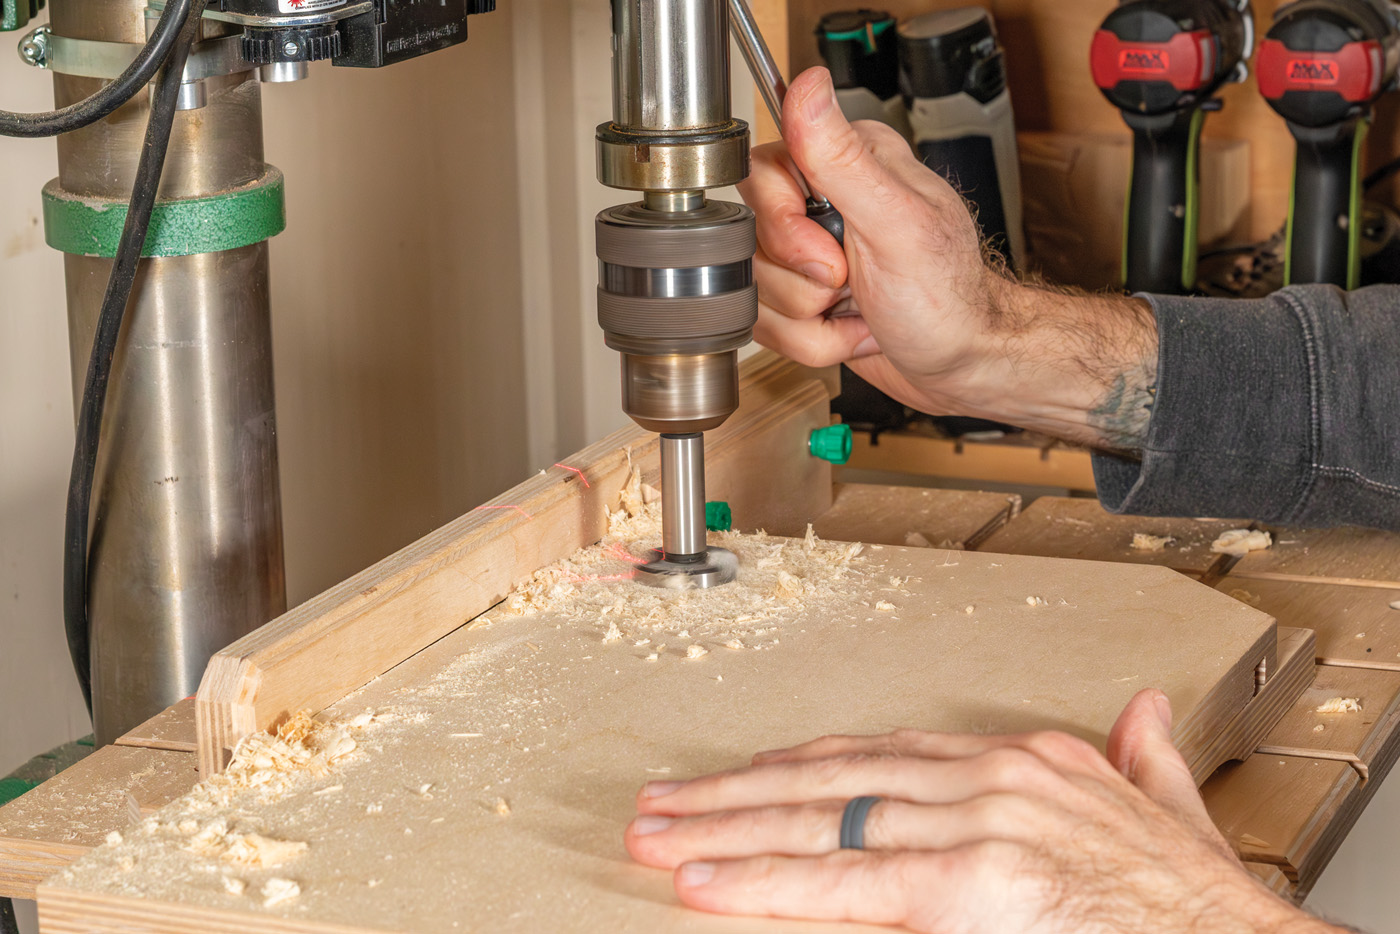
5 Drill the charger hole. With the bit installed and backerboard under the workpiece, drill the hole in the side.
Glue the sides to the back. To help seat the back into the stopped rabbets in the sides, glue the shelves in place. Use two clamps for each shelf. Glue each divider in its dado in the lower shelf and each support to its divider. Drive a few pins into the bottom face of the supports to clamp these pieces. Glue and clamp the side supports in their dadoes.
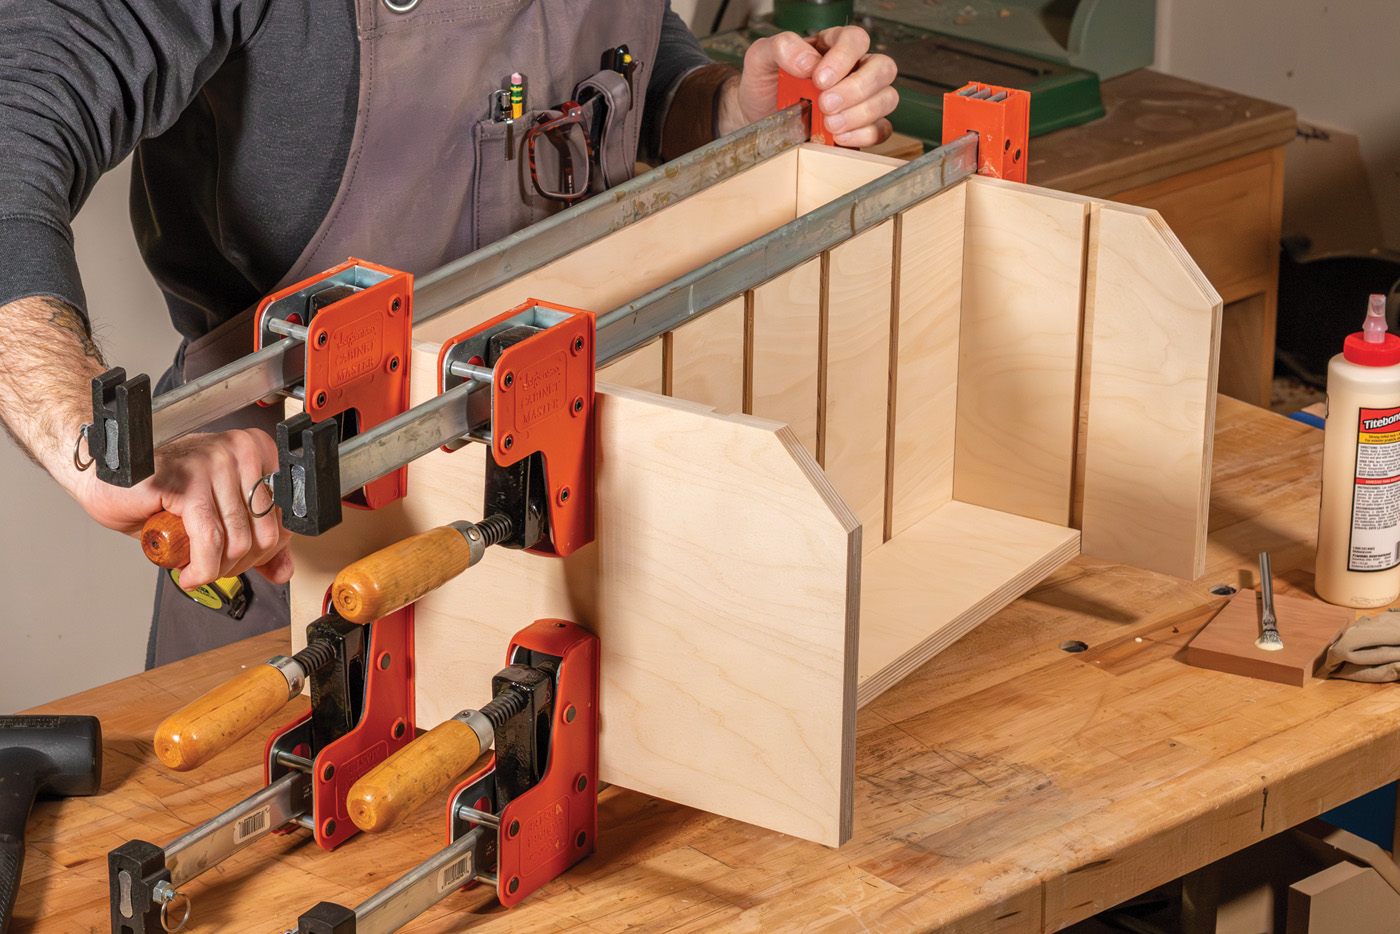
6 Assemble the case. Rest the back on a pair of clamps and drop in the sides. Slide in the shelves before adding another pair of clamps on top of the assembly.

7 Pin the dividers. While the case is assembled, install the dividers and supports. Pin the supports in lieu of clamping.
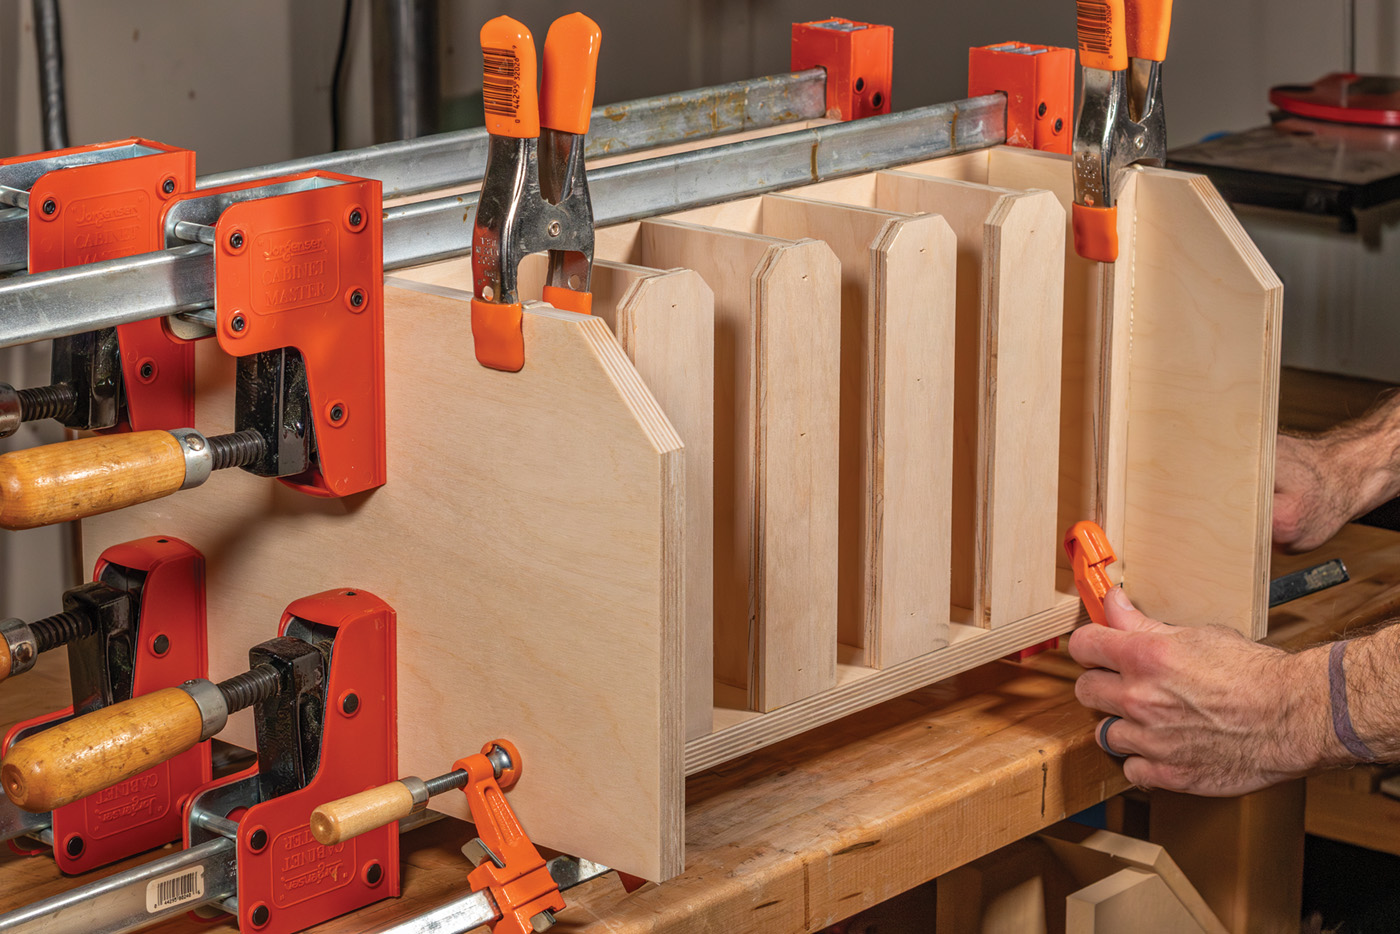
8 Clamp the side supports. After applying glue to their dadoes, insert the side supports and clamp them in place.
Before moving on to final sanding, take a moment to check the assembly for square and make any small adjustments while the glue is still workable. Confirm that the shelves and dividers are fully seated in their dadoes and that the supports are flush and aligned. This is also a good time to scrape away any excess glue squeeze-out, especially in corners and along joints where it will be difficult to remove once cured. Taking care of these details now will make the final cleanup faster and improve the overall fit and appearance of the unit.
Once the glue is dry, complete any final sanding and cleanup, then ease the sharp corners using a sanding block. Apply edge banding if you like, but I choose to leave the plys exposed.
I drove a couple of sets of screws to hold the chargers in place on the upper shelf. This allows me to grab a battery with one hand. Alternatively, drive screws into the sides of the assembly to hold chargers or hangers for accessories.
Install a french cleat on the back to hang the unit. Include a strip along the bottom of the back so it hangs flush on the wall.
There is no need to apply a finish, but for a little extra protection, I applied a few coats of poly before mounting the unit to the wall. When hung, slide your drills in place and organize your bits and chargers for easy access.


