


We may receive a commission when you use our affiliate links. However, this does not impact our recommendations.
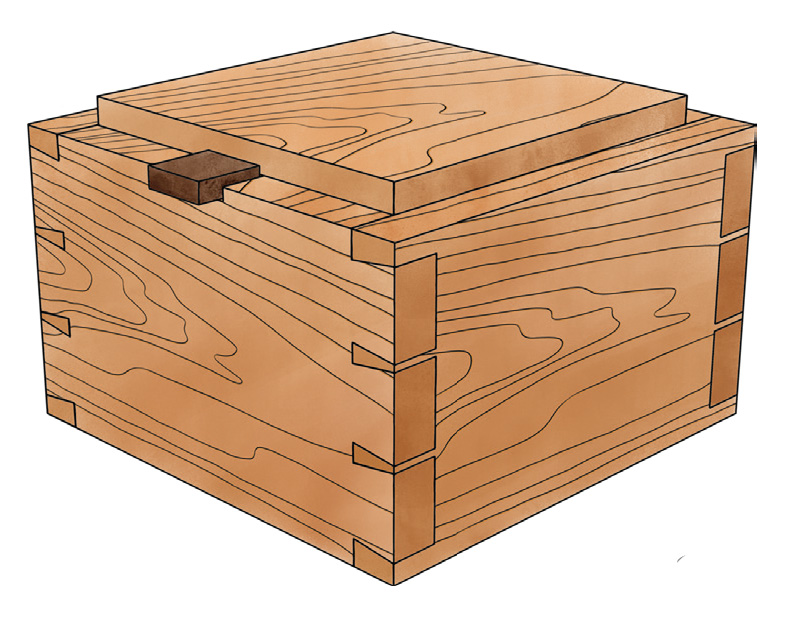
 This box is a great way to practice dovetails and some hand tool skills.
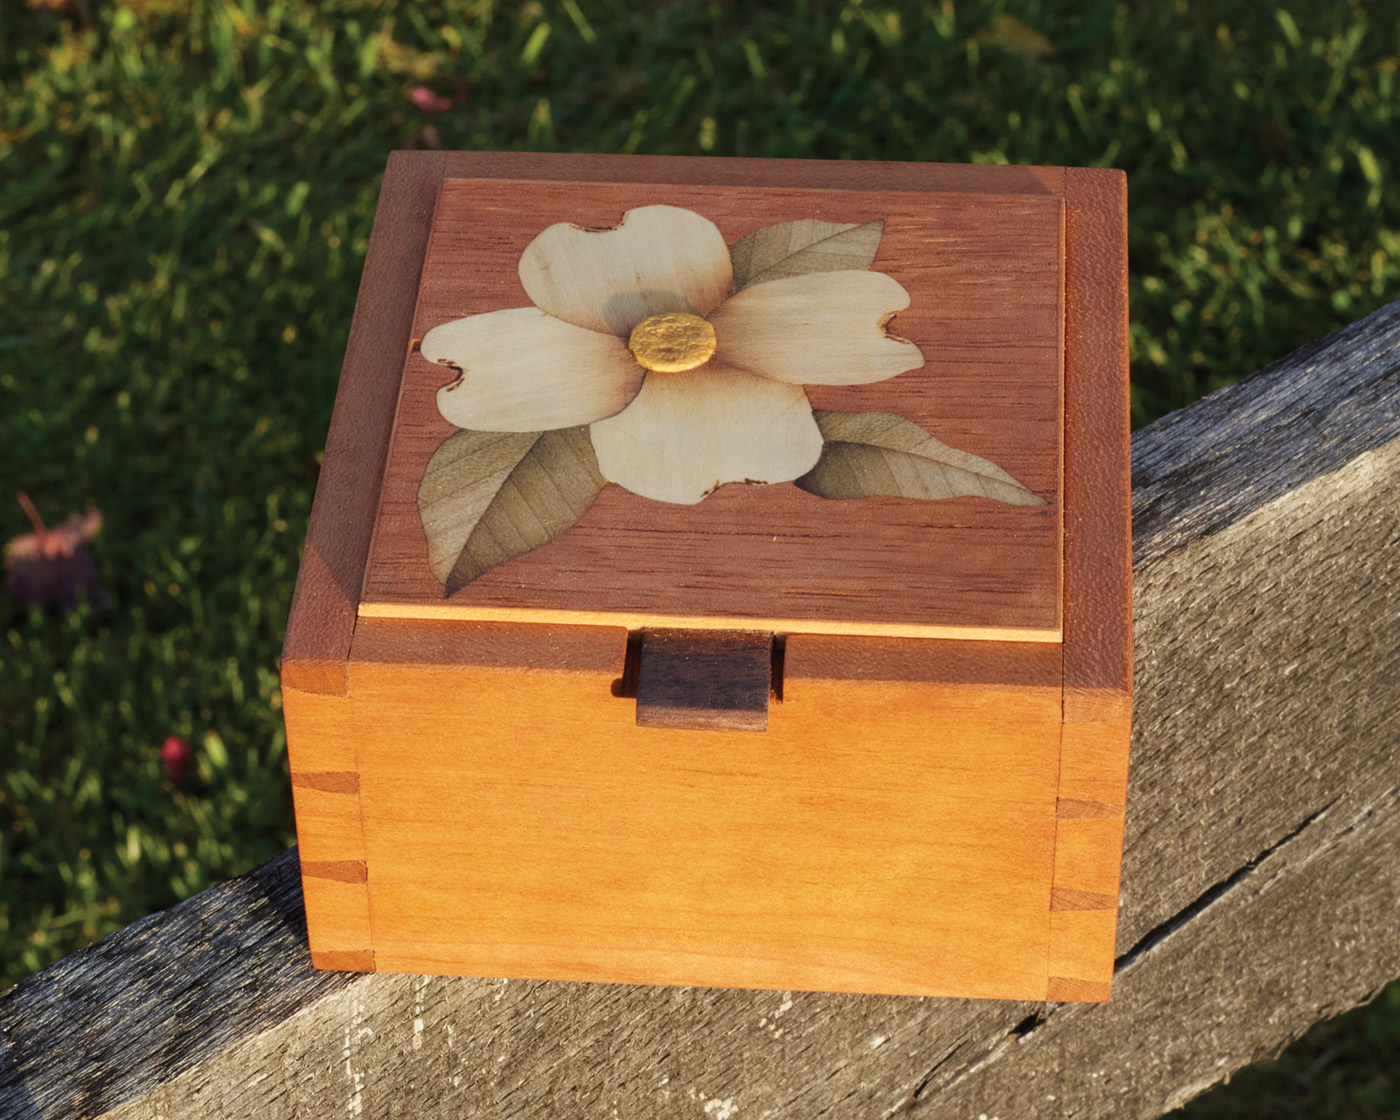
I love boxes. They’re quick to make. They’re useful. They make great gifts. And, you can do fun fancy stuff like add marquetry on top. I love boxes enough that I wrote an entire book on them (shameless plug for “Complete Starters Guide to Making Wooden Boxes”).
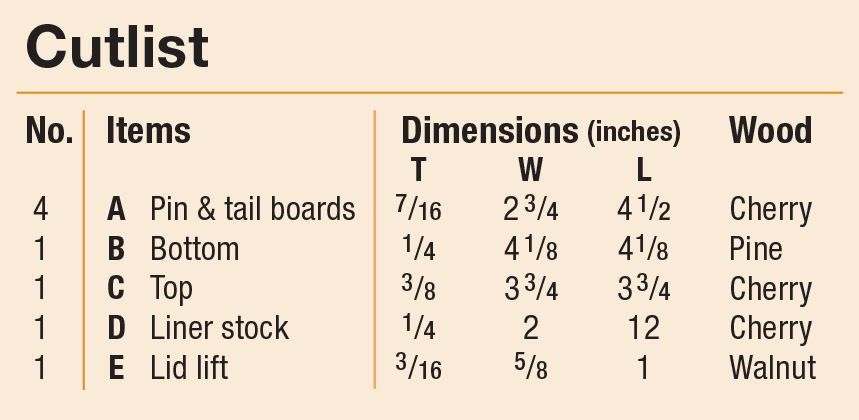
Cutlist and Diagrams
Building the Box
For this box, I start by milling all stock to the dimensions specified in the cutlist. Some of the dimensions are kept intentionally oversized because we’ll trim them to fit later. Because of that, make sure you start with the cutlist dimensions and not the final ones.
Decide which two pieces will be your tailboards and which will be your pinboards. Before getting started, I like to ensure that opposing sides of my boxes are exactly the same length. I’ll stack the tailboards (or pinboards) and feel with my fingers to see if they are the same length. If not, I’ll trim one at a shooting board until everything is good to go.

1 Match up the opposite pairs of parts—two pin boards and two tail boards. Use your fingers to decide if they’re equal length or not, and if they need trimmed, do so on a shooting board.
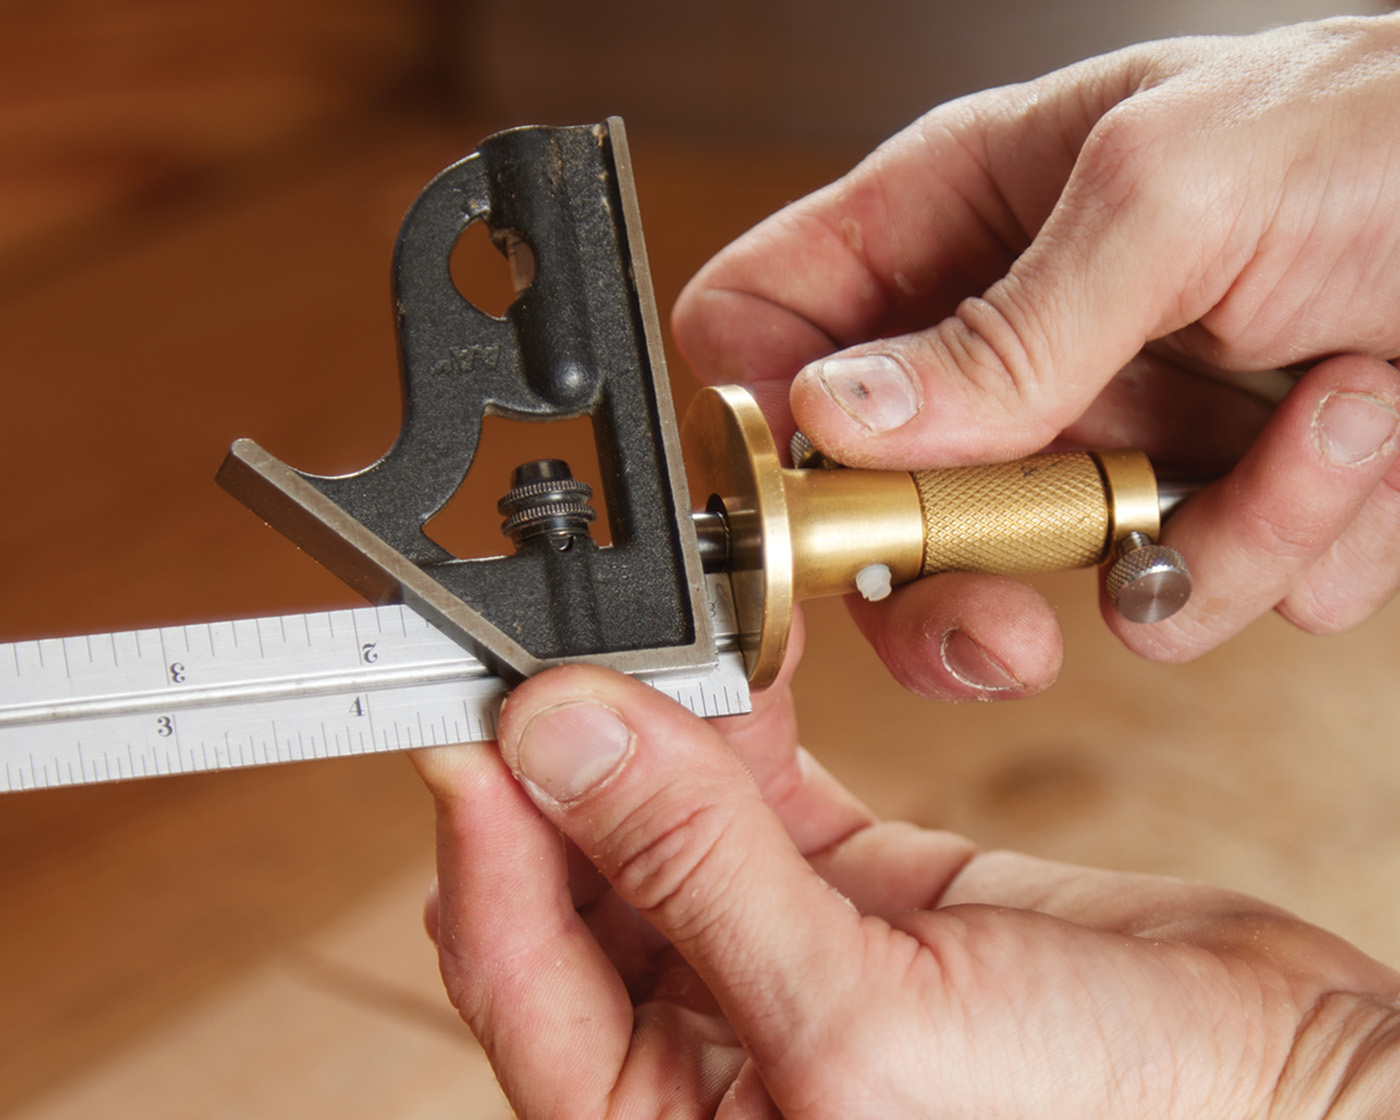
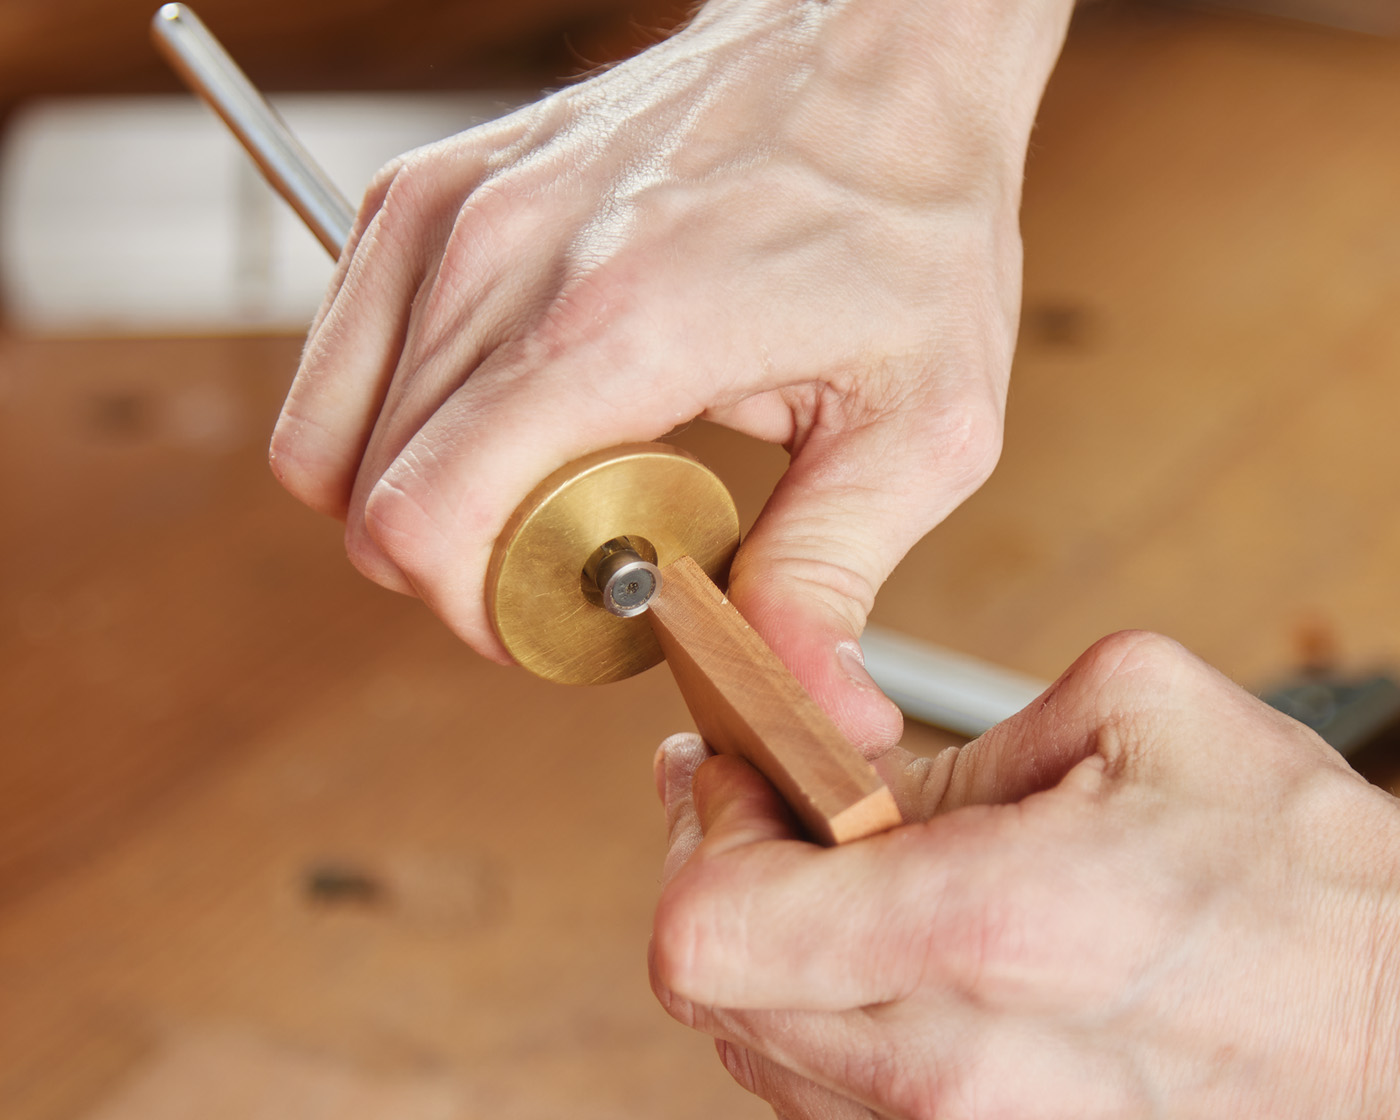
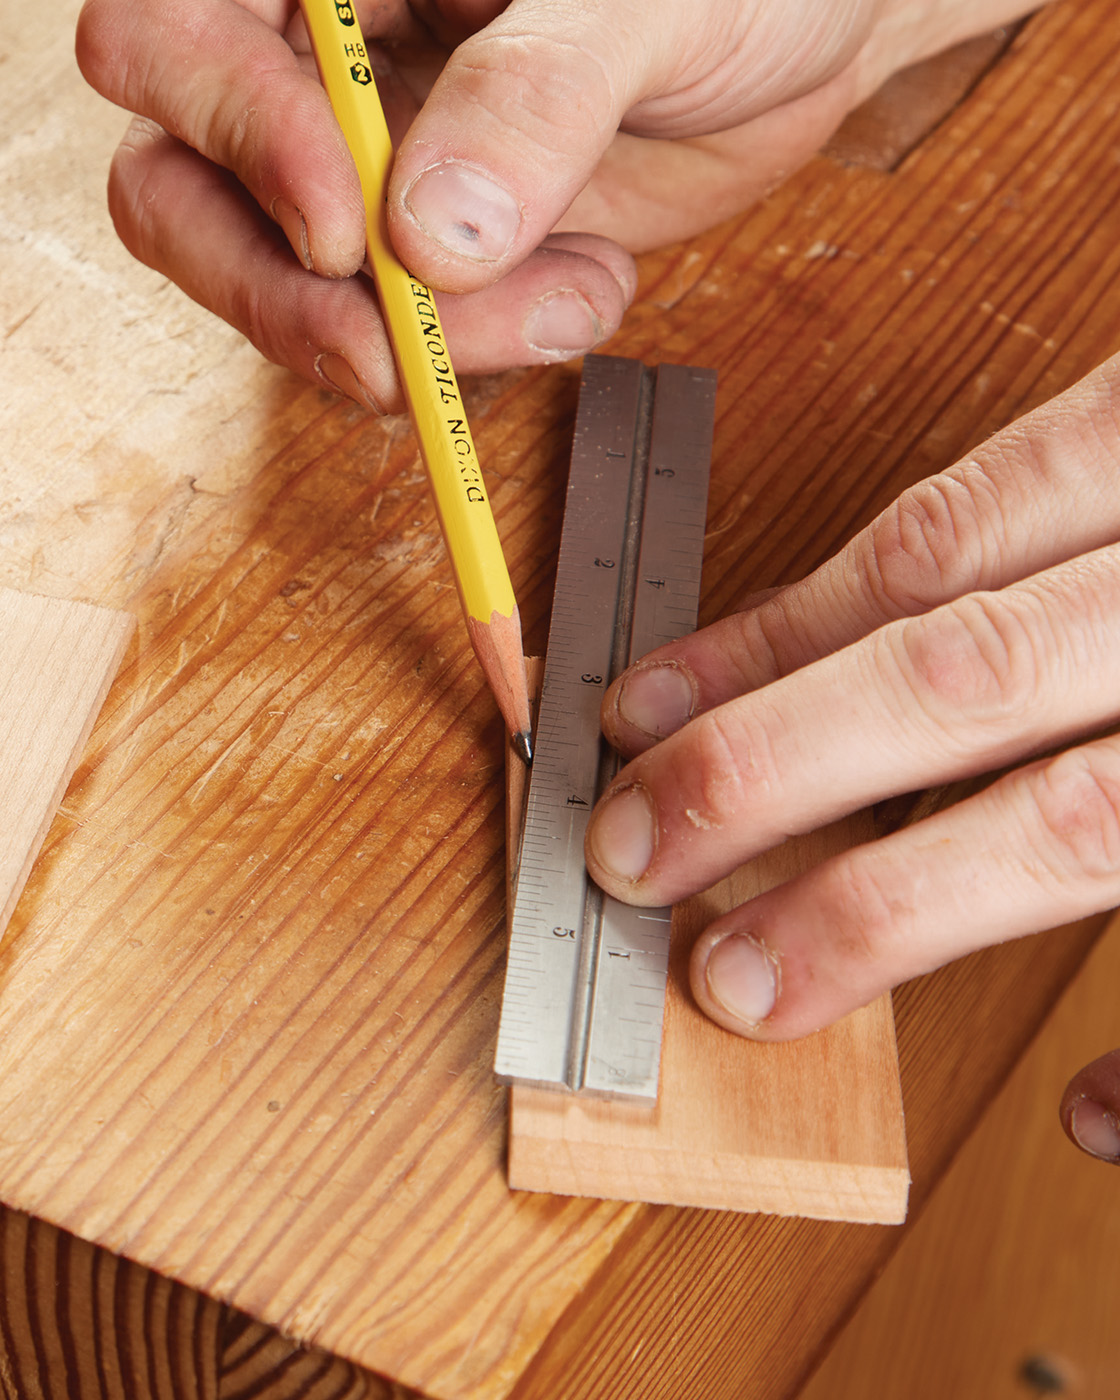
Gather your tailboards and set a marking gauge to project a bit more than the thickness of your stock (in this case, 1/2“). Scribe a line on the faces and edges of the tailboards and only on the face of the pinboards.
2 Scribe a base line around the ends of all four pieces of stock. This base line is set to the final thickness of each of your parts.
Clamp a tail board in your vise with the end facing up. Set a marking gauge to 3/16“ and strike a line across the ends of the board, pressing the head of the gauge against the edge of the board. Set a pair of dividers to open 13/16“ and place one point into one of the gauge marks you just made. Set the other point into the end of the board and make a mark. Rotate and “walk” the dividers along the edge of the board, making light marks with the points as you go. Repeat this process, starting from the gauge mark at the other edge of the board. When you are finished, you should end up with three equally spaced tails.
Video: Watch Megan Fitzpatrick lay out dovetails using the divider method.
3 Now lay out the dovetails. You can lay this out however you’d like. By eye works, but if you need dimensions, you can do that as well.
4 Here, I start by marking the half pin first with a marking gauge.

5 Then, I walk out the remaining measurements with the set of dividers.
To speed things up, I’ll use all the marks I made in the previous step as a template for the three remaining tailboard ends. Just clamp the boards together in your vise and use a combination square to accurately transfer your marks.

6 Use a square to strike the tail layout marks across the boards.
Set a bevel gauge to your desired angle or use a dovetail marker. For this box (and pretty much everything I make), I chose 7° because it’s a nice overall angle that provides adequate strength. Use the bevel gauge/marker to transfer pencil lines to the face of your tail board down to the marking gauge line.
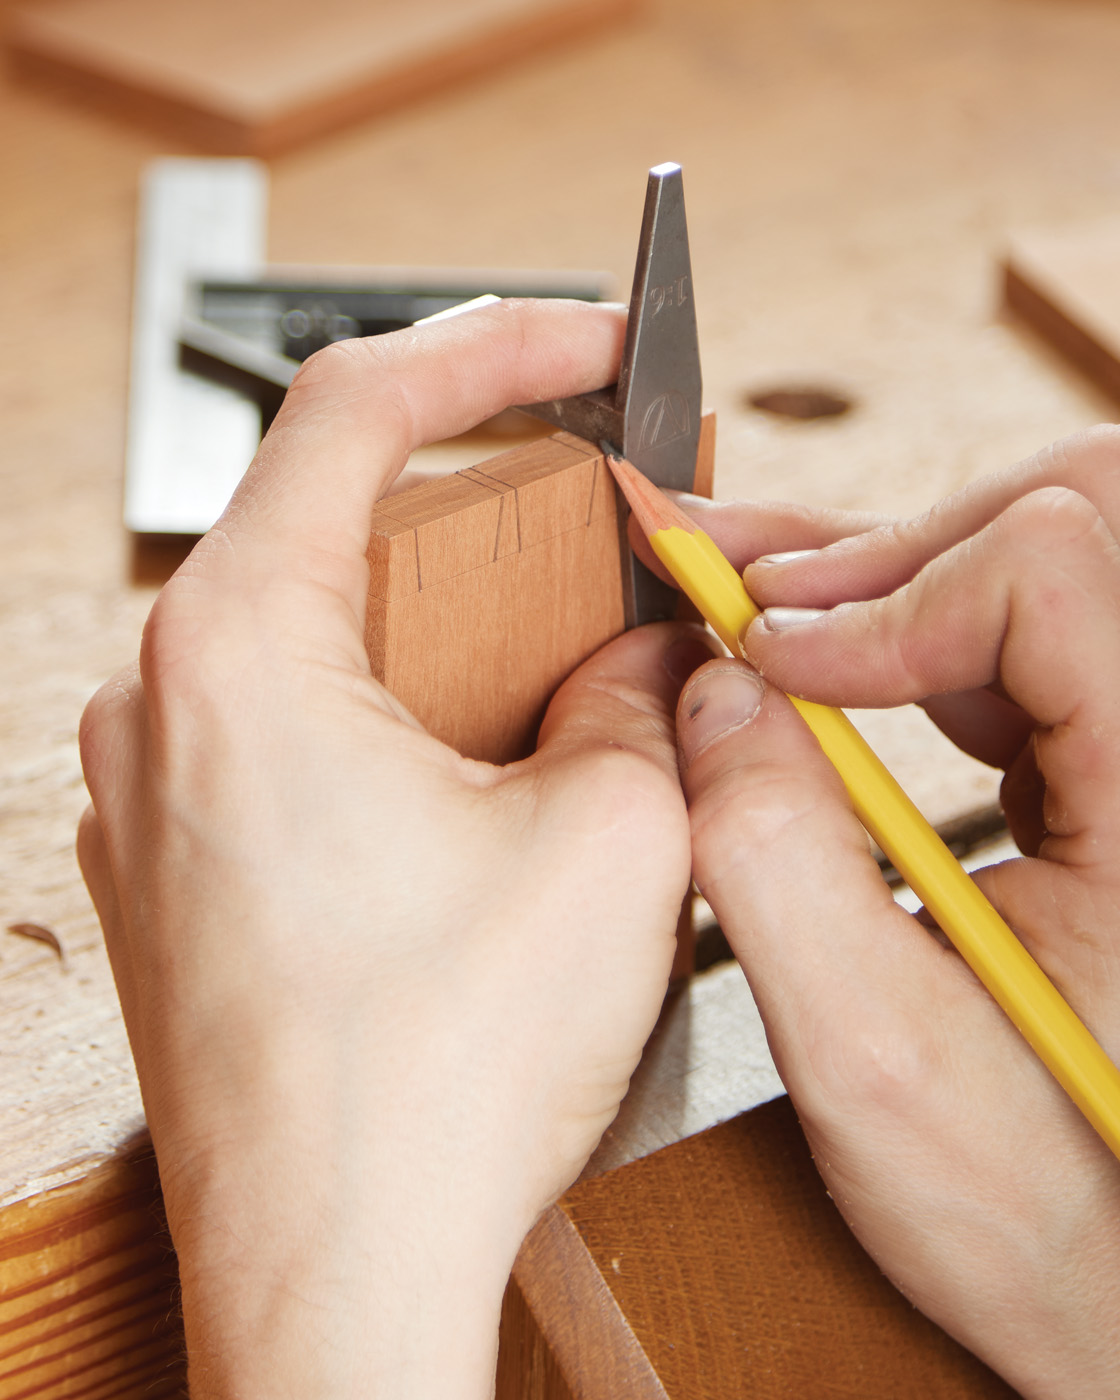
7 Use a dovetail marker to bring your top lines around the face of the board, clear to the base line.
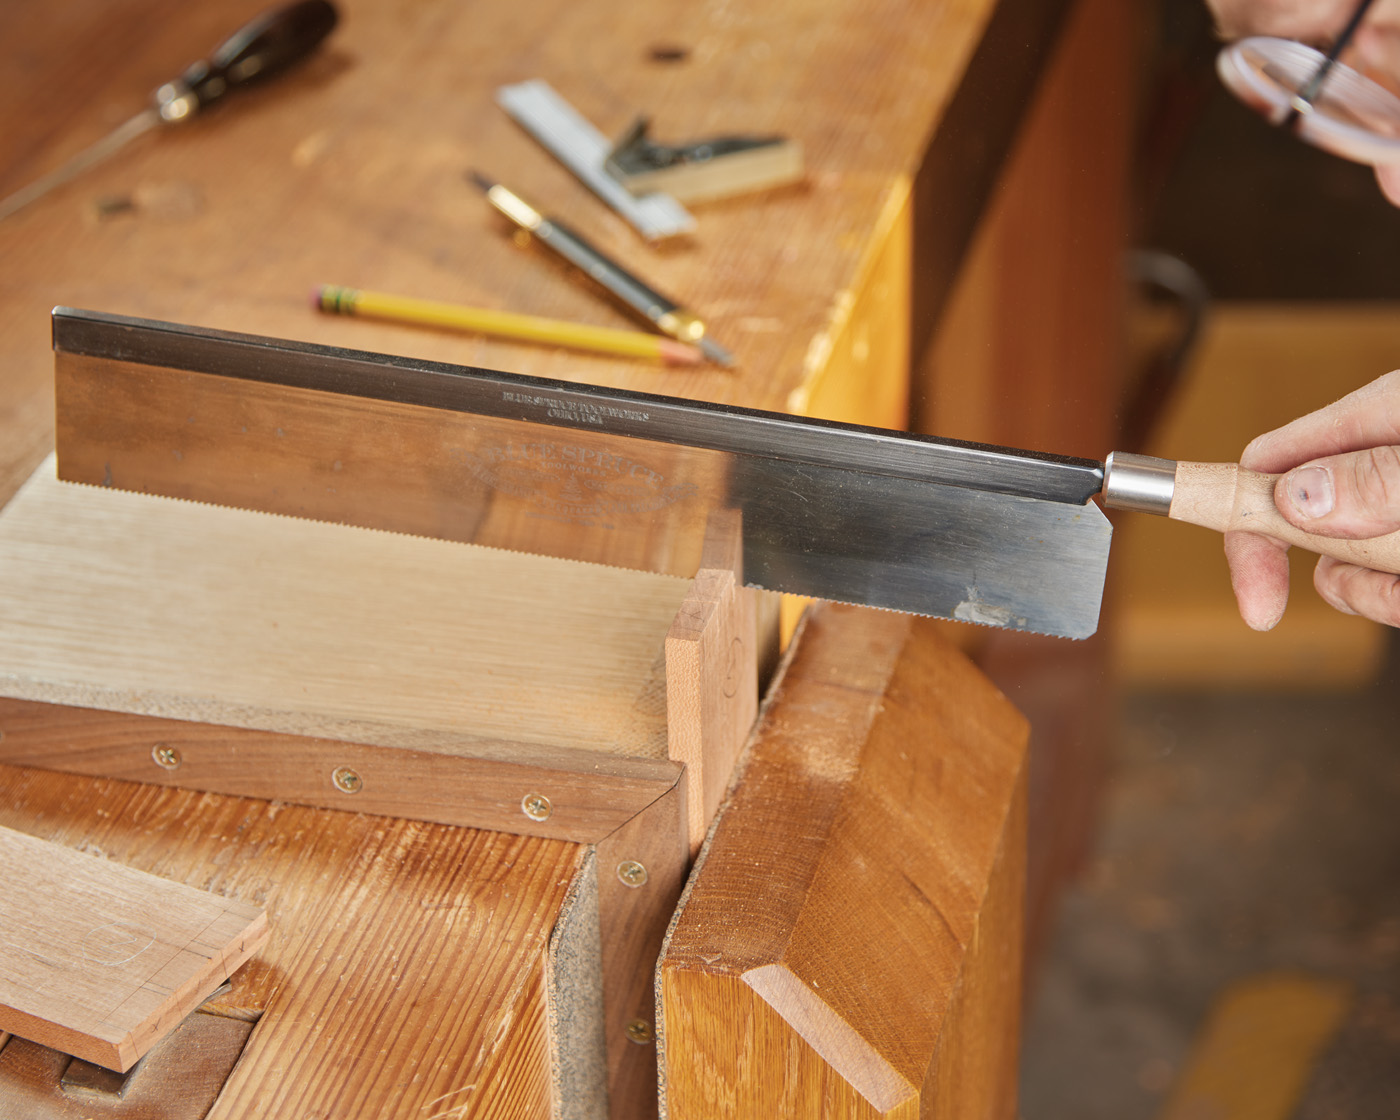
With the tailboard clamped in your vise, place your saw directly on one of your marks. Use the thumb and forefinger from your non-sawing hand as a fence to stabilize the saw on the mark and ensure that it is perfectly square across the board. Tilt the saw slightly to match the dovetail angle you drew on the face of the board. Once you feel comfortable that your saw is square across the board and tilted at approximately the correct angle, you are ready to cut.
Focus on holding the angle you set in the previous step while gently moving the saw forward and backward to establish a cut. Continue sawing, checking continually to make sure you aren’t going past your marking gauge lines (especially on the side of the board that isn’t facing you).
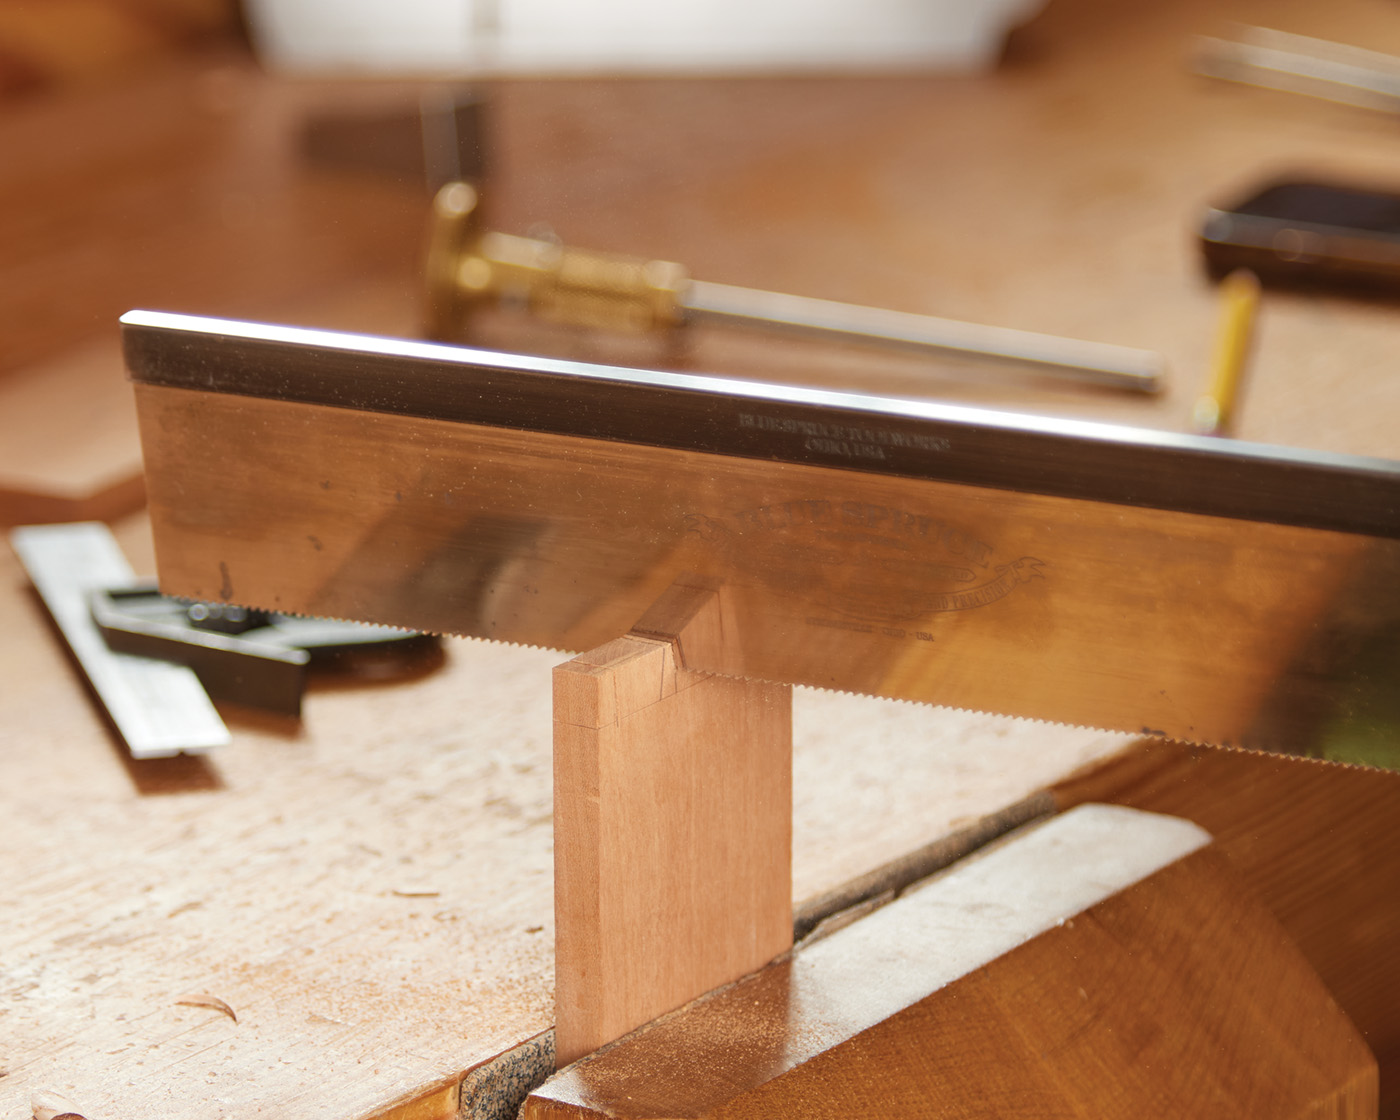
8 Cut the dovetails. Start with a backsaw to define the tails.
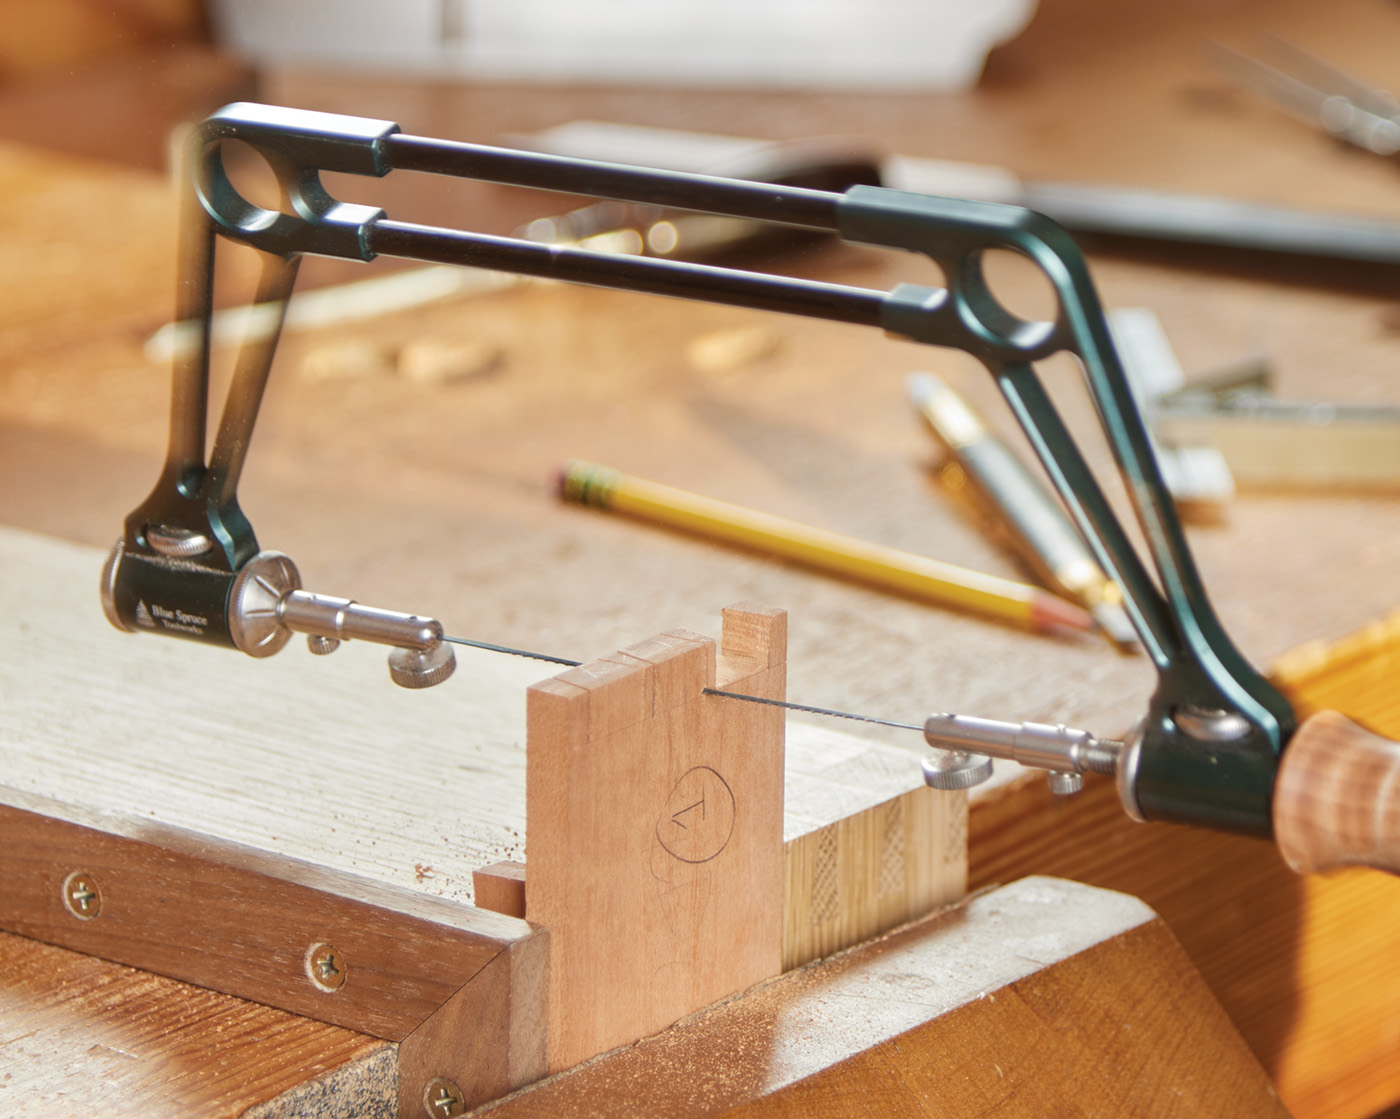
Once you have established all your tail lines, remove the waste between tails using a coping or fret saw. Reorient the tailboard in your vise so that the edge is facing up. Working from the waste side on the edge of the tail board, make a wedge shaped paring cut toward your marking gauge line. The result should be a small gullet in the waste side of the tail board that goes right up to the marking gauge line. Place your saw in the gullet and make sure that it is square. Cut until you meet the dovetail angled cut that you made earlier. If the waste doesn’t fall off easily, you may have to apply light pressure to snap it off. Any waste left behind can be cleaned up with a chisel.
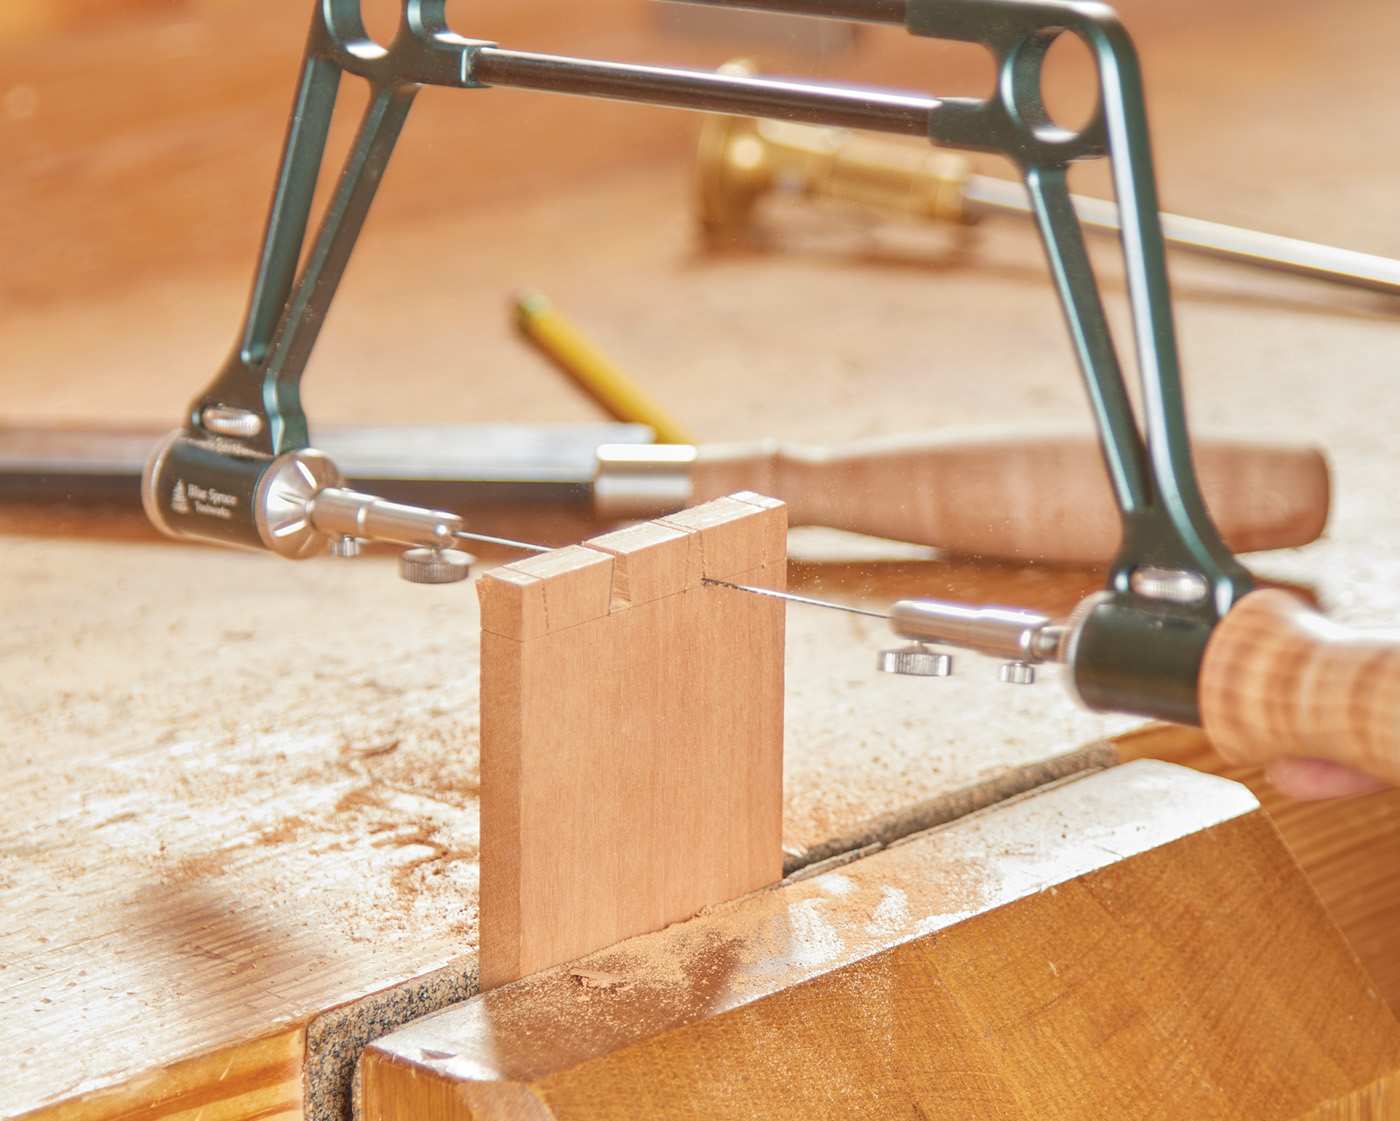
9 Then switch to a coping or fret saw to remove the waste.
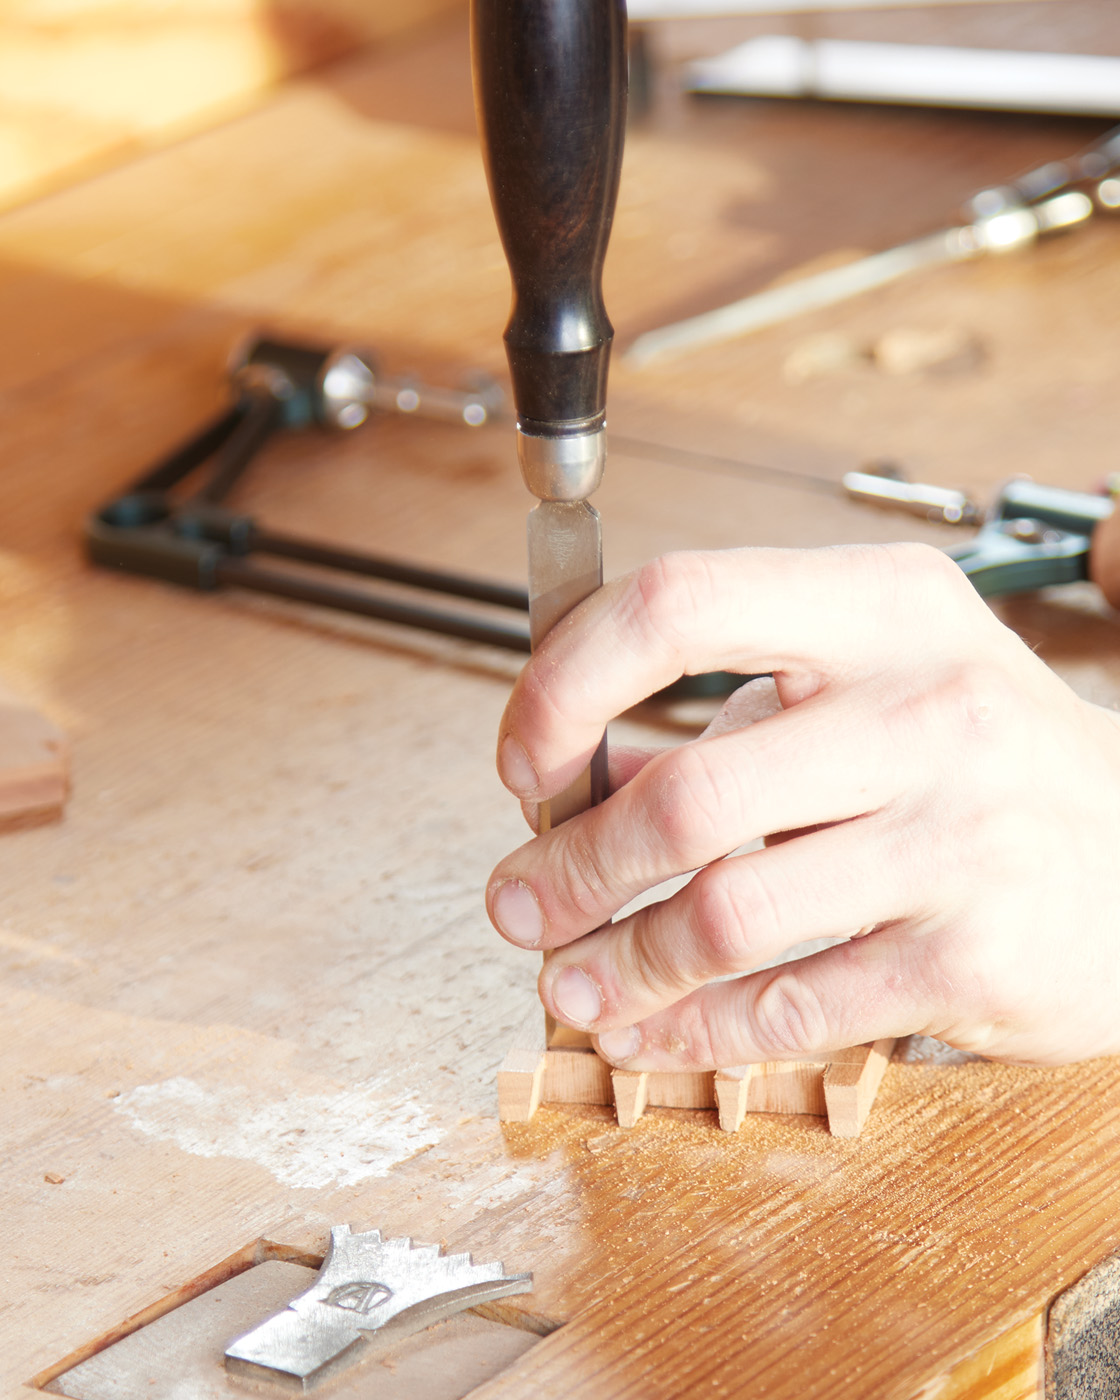
Remove the tail board from your vise and place it on your bench. Using the widest chisel possible, chop out the remaining waste between tails. Make sure you start far away from your baseline and only go about halfway through the board or you’ll risk blowout on the backside. As you chop, move your chisel closer to your marking gauge line until only a small amount of waste remains. Place your chisel directly in the marking gauge line and angle it so that it is slightly under 90°—this will ensure that no lingering waste material keeps your joint from coming together. Deliver your final mallet blows, still making sure to only go halfway through the board. Repeat this process on both sides of both tailboards, making sure you remove all the waste between tails.
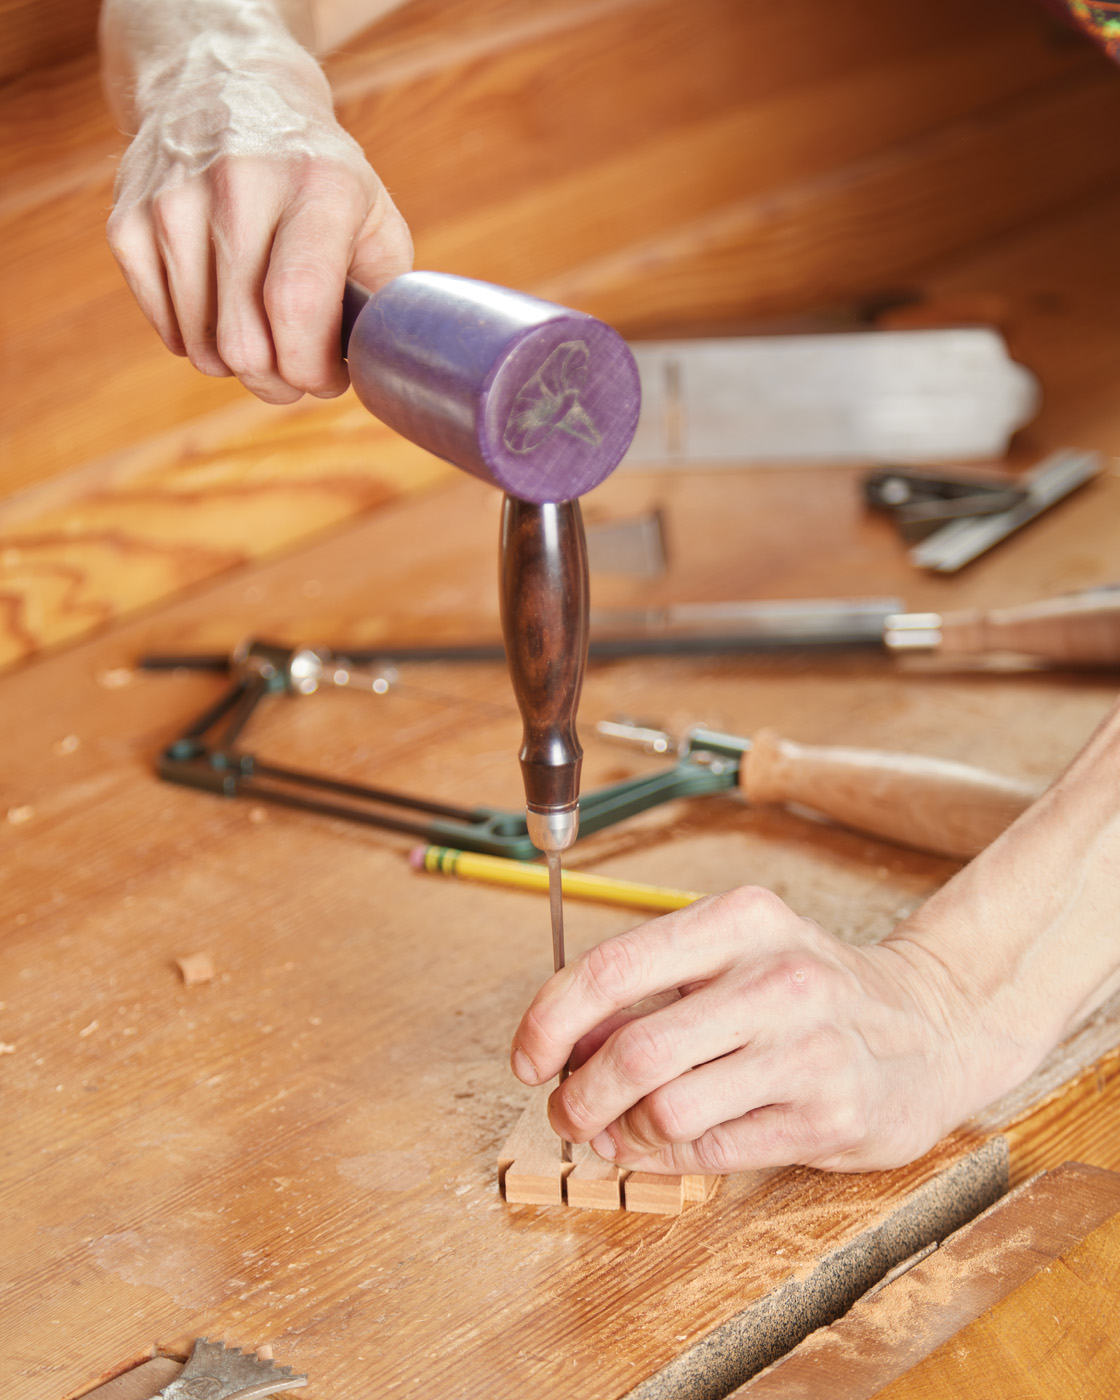
10 Carefully pare down the base line with a sharp chisel.
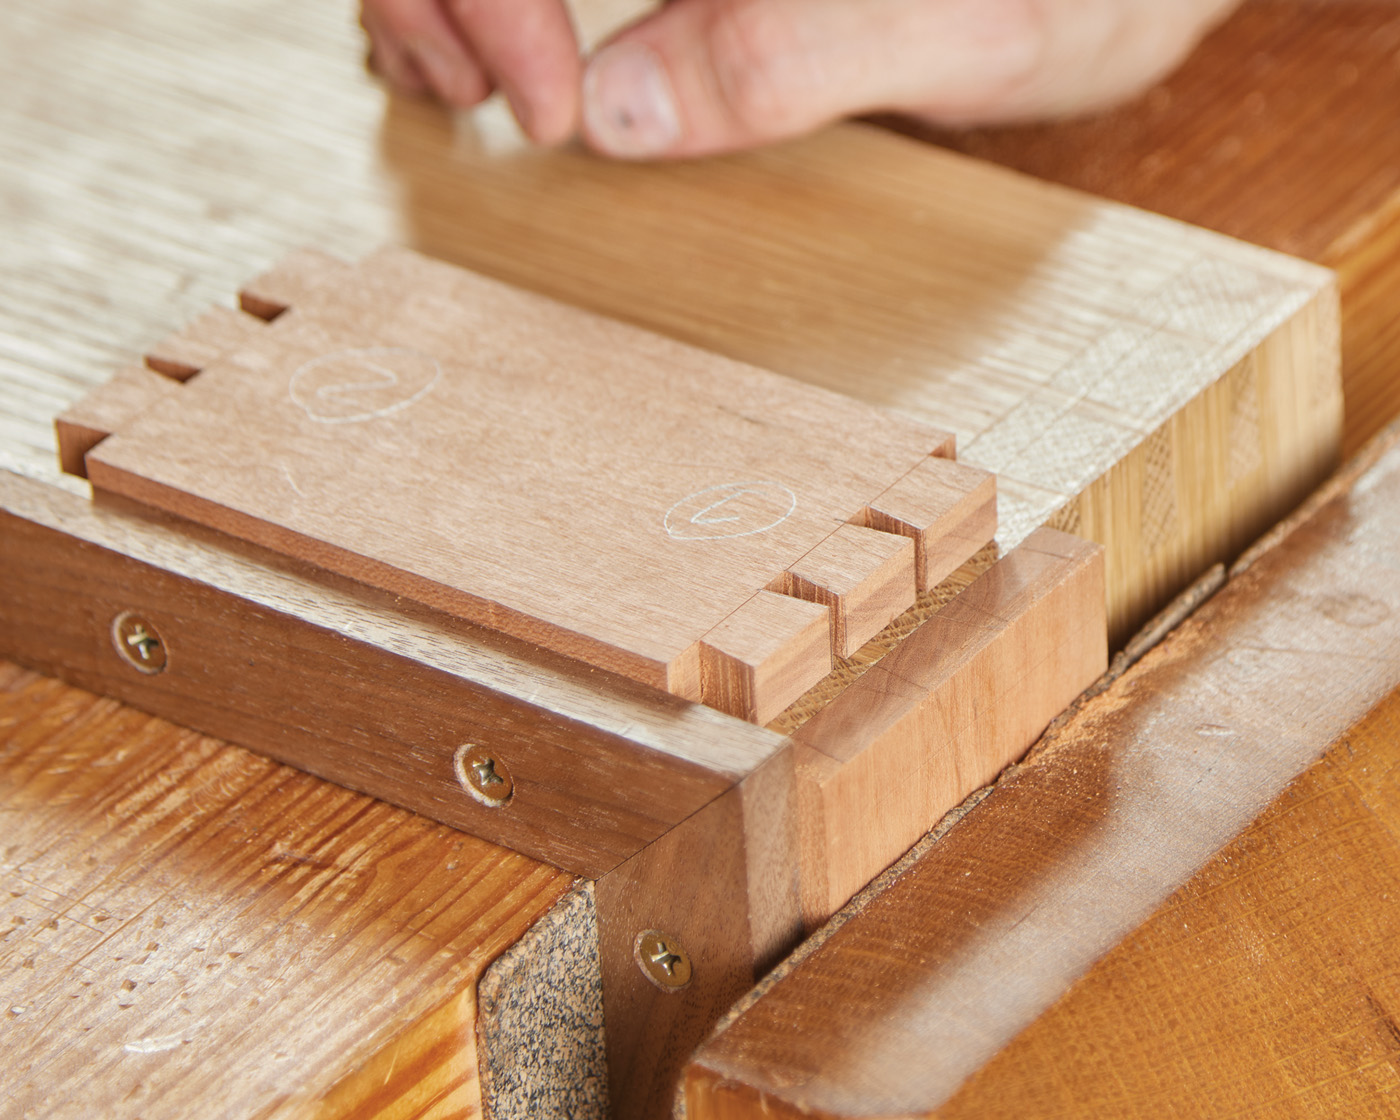
At this point, I like to line up my tail and pin boards in the way they will be assembled and mark them accordingly. Clamp a pin board in your vise and line up its corresponding tail board perpendicular over the end of the pin board. It can help to elevate your tail board with a handplane so that everything lays flat — here I am using an alignment jig. With one hand placing firm downward pressure on the tail board, use a marking knife to transfer the walls of your tails onto the endgrain of the pin board. It helps to place your knife right up against the wall of the tail to act as a fence while you make your marks. Mark both ends of both pin boards.
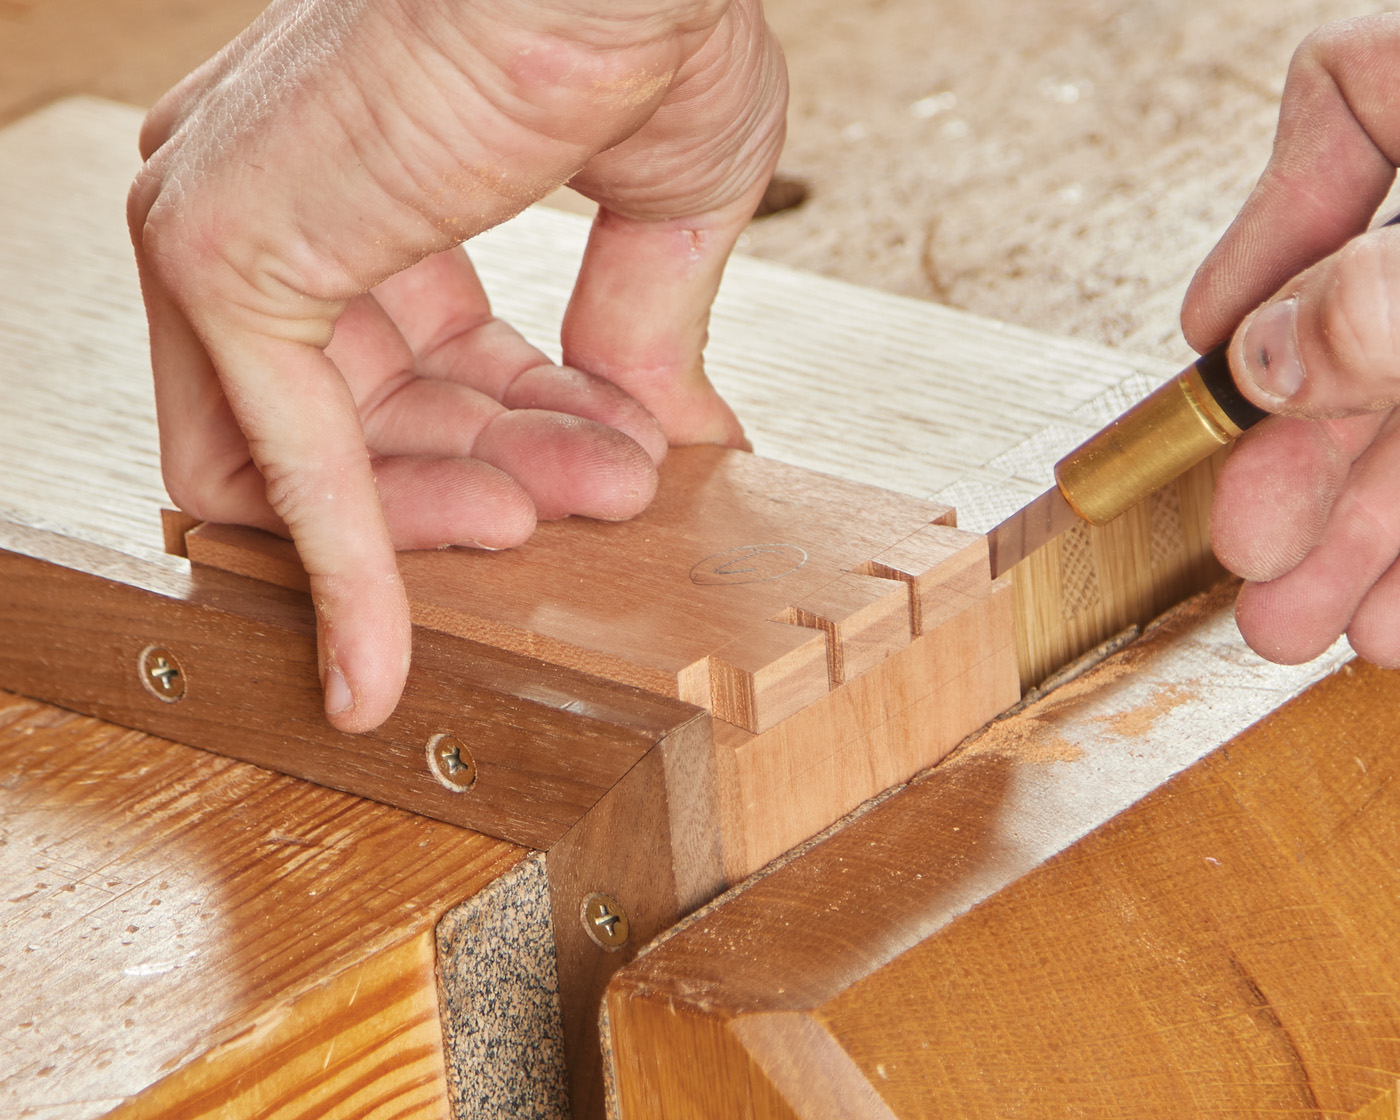
11 Use a tail board to layout and mark the pins.
12
When sawing the pin walls, you need to make sure you are sawing square to the edge of the board – i.e. there is no “tilt” to your saw like when you cut the tails. Also ensure your saw is on the waste side of the lines. Cut the pin walls, remove the waste, and chop to the base line just as you did on the tail board. Make sure you spend time ensuring that all lingering waste is removed.
13 Cut the pins. As before, use a back saw to cut the pins first.
14 Then cope away the waste.
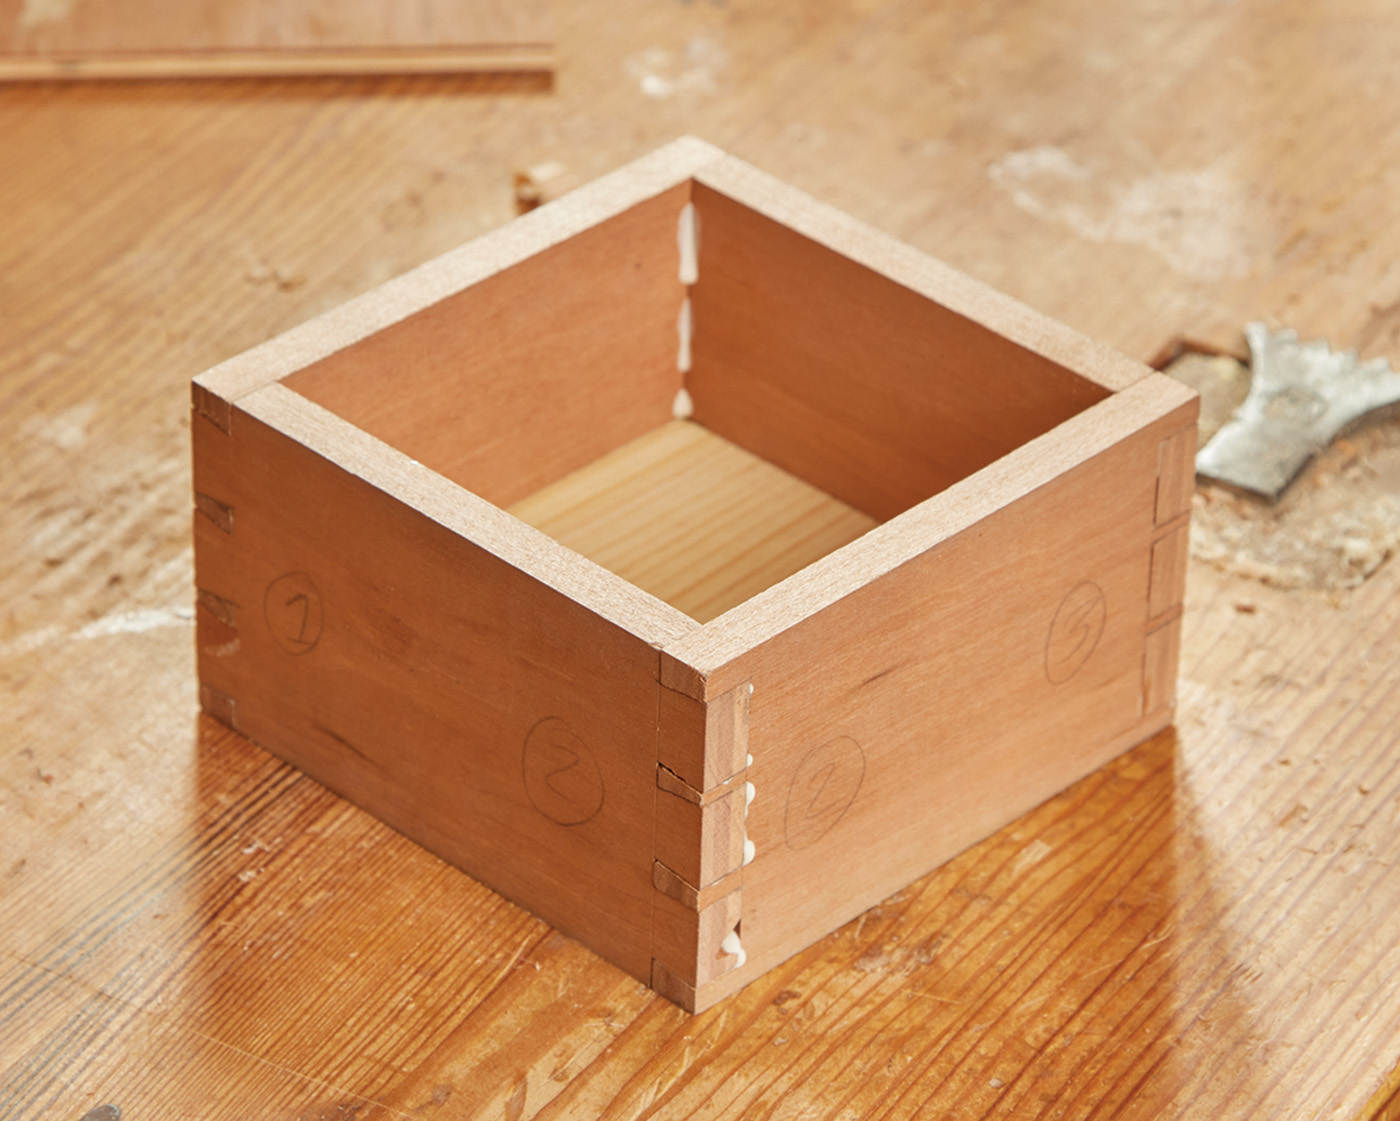
After all the waste from the pin board has been removed, clamp it in your vise. Rub a pencil on the inside walls of your tails and try to press the joint together by hand or with light mallet taps. Don’t try to force the joint together. If it’s too tight pull the tail board out once you feel resistance. The pencil markings from the tails will transfer to the walls of the pins where the joint is too tight. Using a chisel, pare lightly across the grain to remove these pencil markings from the pin walls. Re-pencil your tails and try to refit. Keep refitting and paring until your joint comes together with moderate pressure.
15 When chopping dovetails, I like to work from both faces, meeting in the middle of the workpiece.
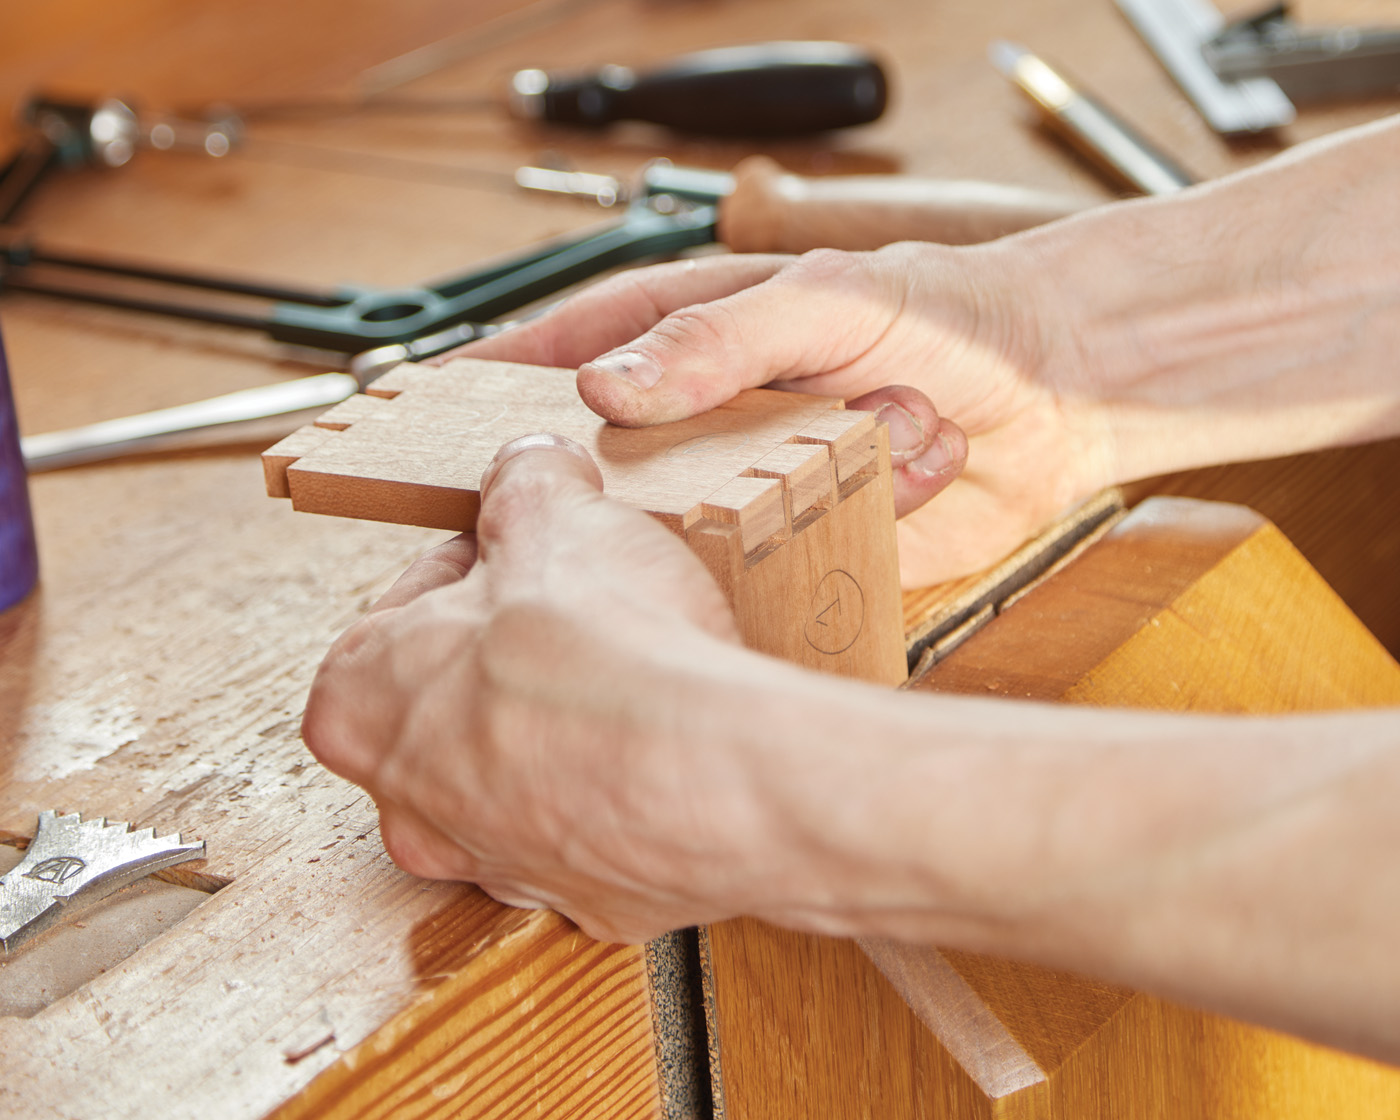
16 Test the fit of the tails and adjust as necessary.
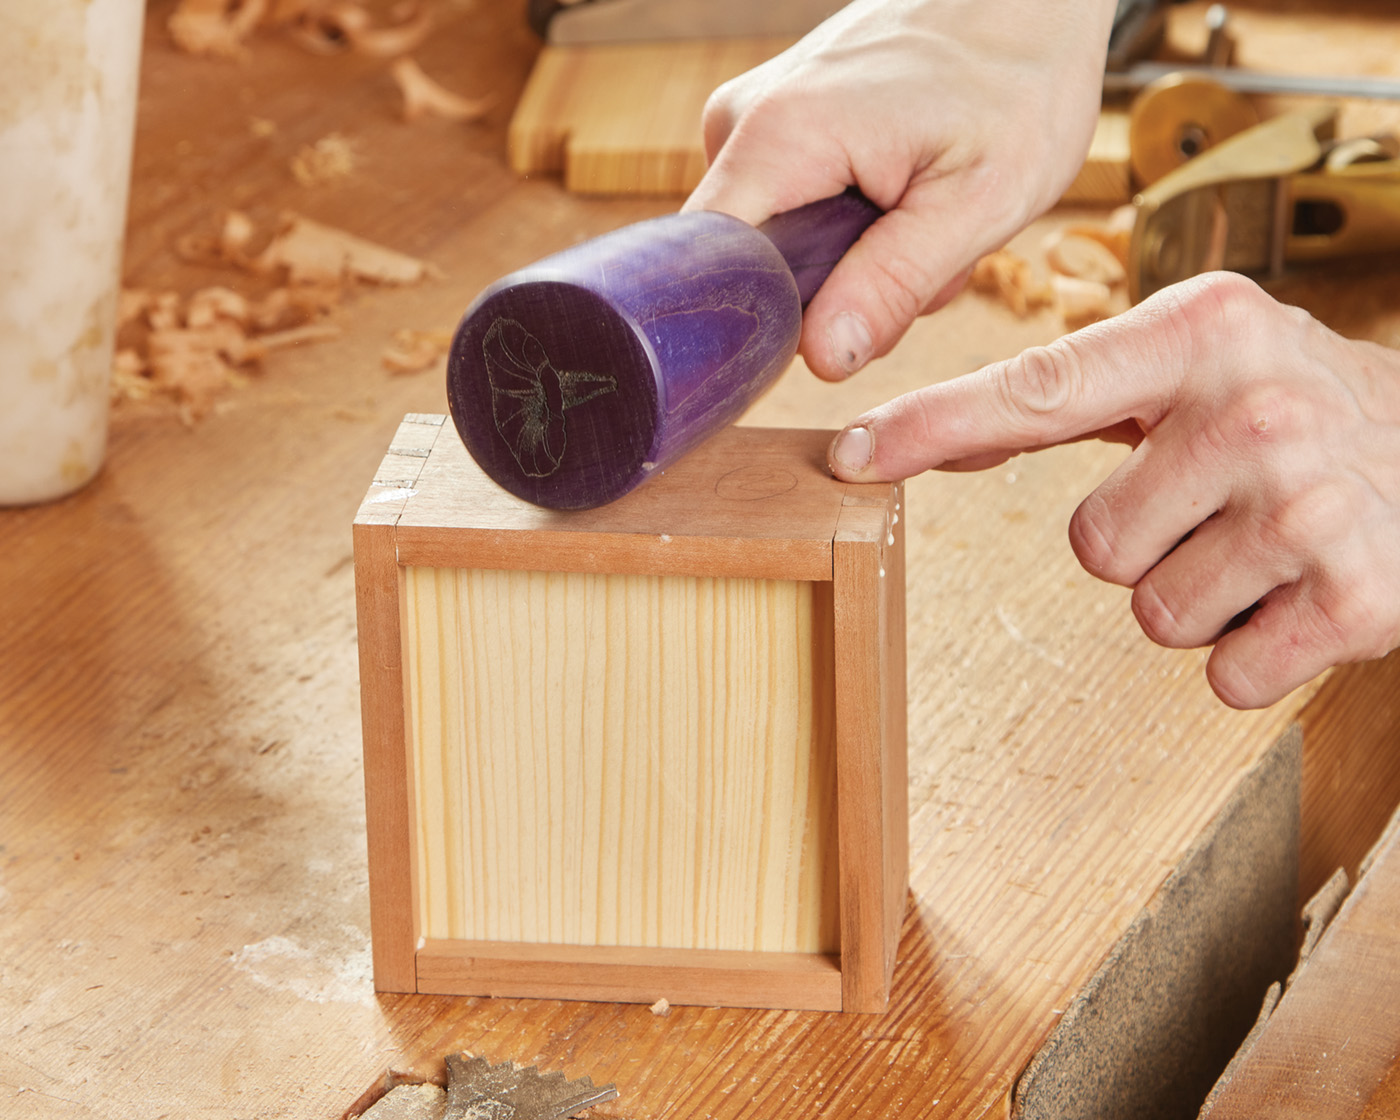
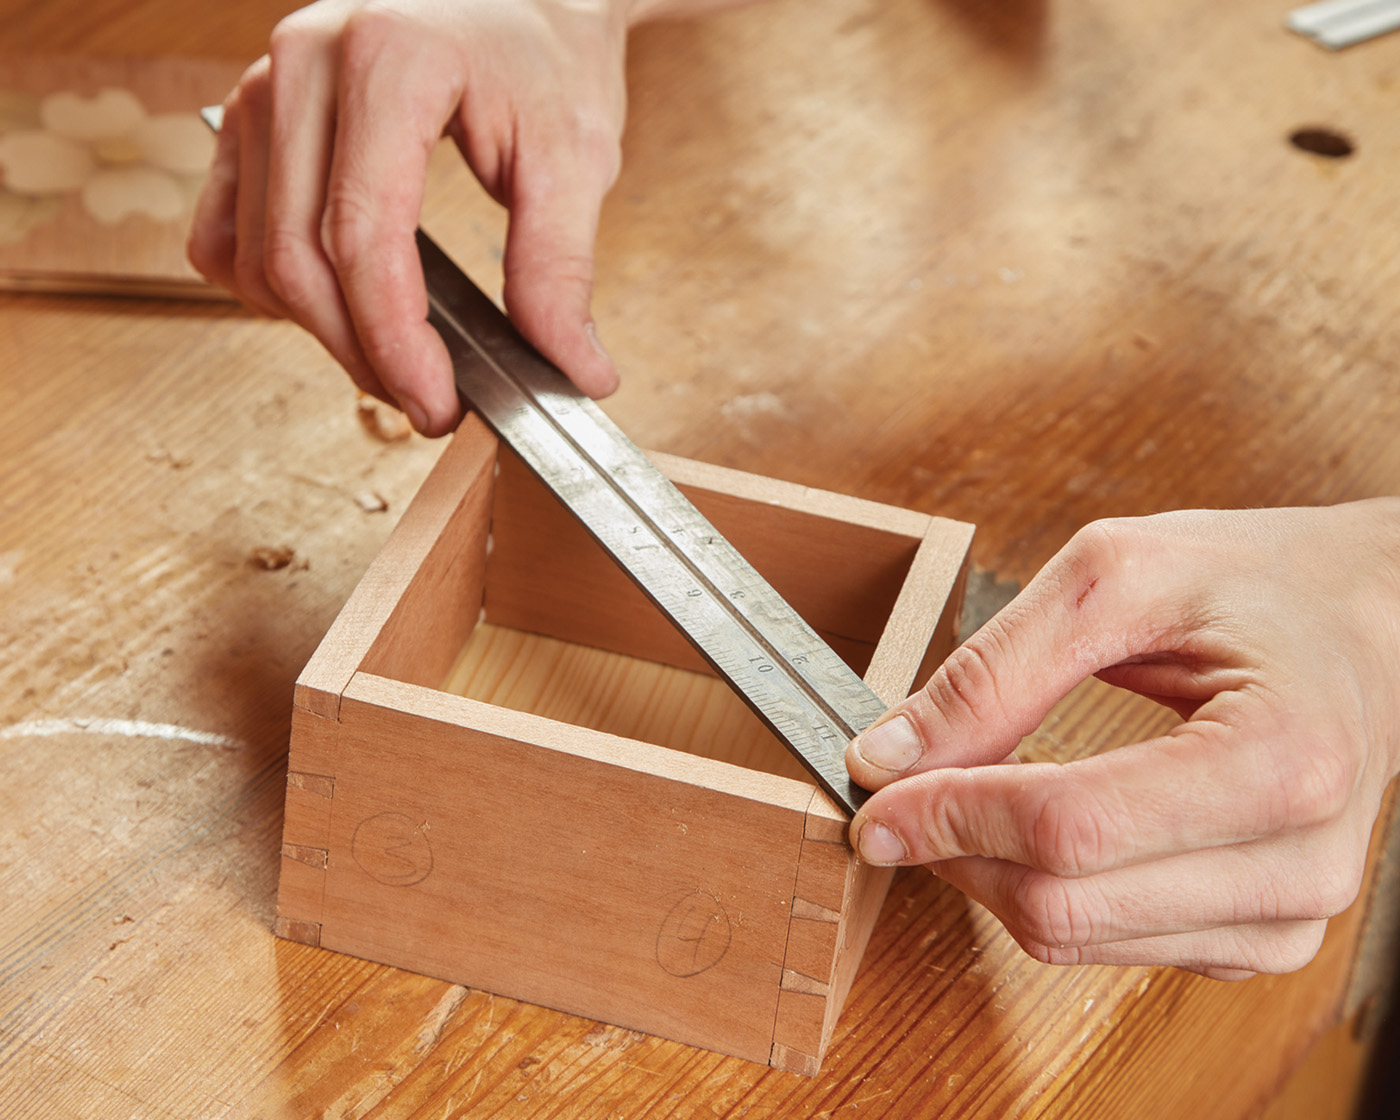
With the box assembled, check to see if there is any misalignment where the edges meet at the corners. If there is any misalignment, this will be transferred to the grooves we have to rout for the bottom. Level both the box top and bottom — grab a block plane and slowly plane around the box edge, making sure to keep the plane on at least two edges as you go. Once you get a full shaving all the way around the edge of the box, you’re good to go.

17 Plane the top edges of the box flush if there’s any discrepancy.
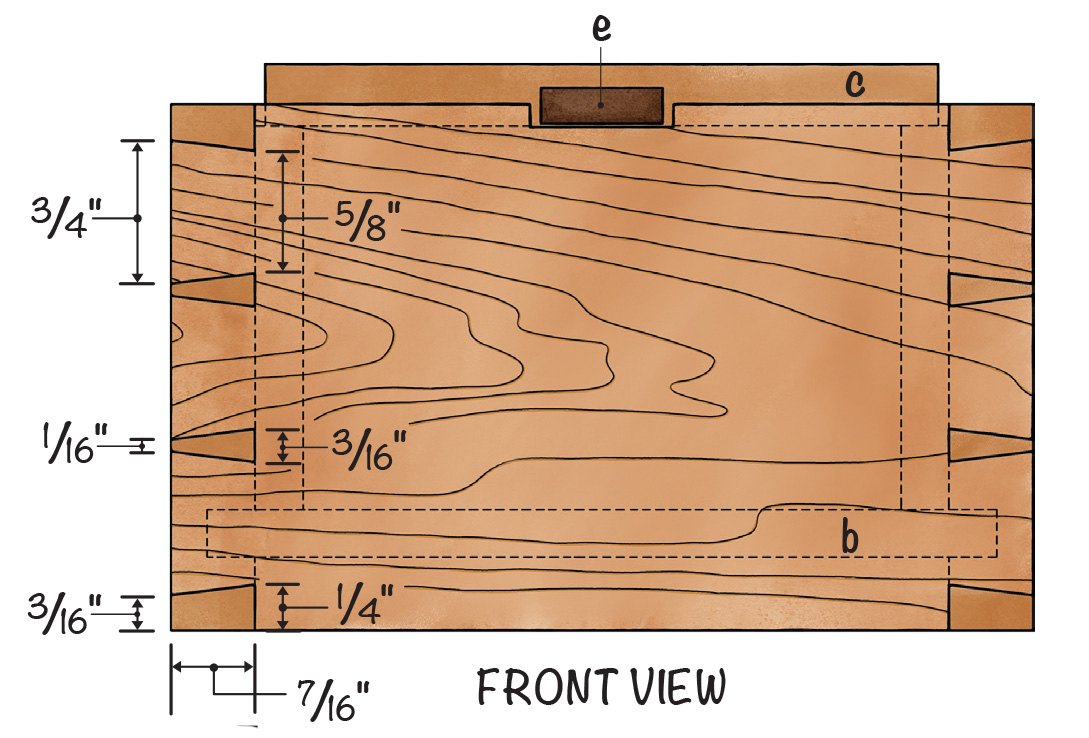
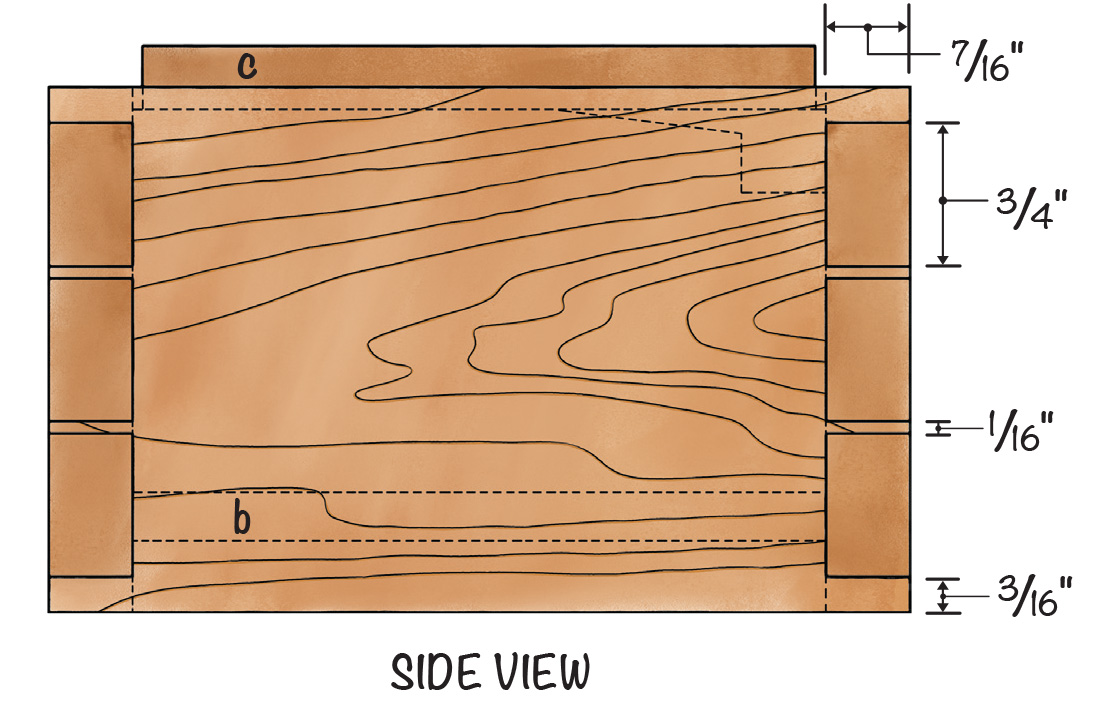
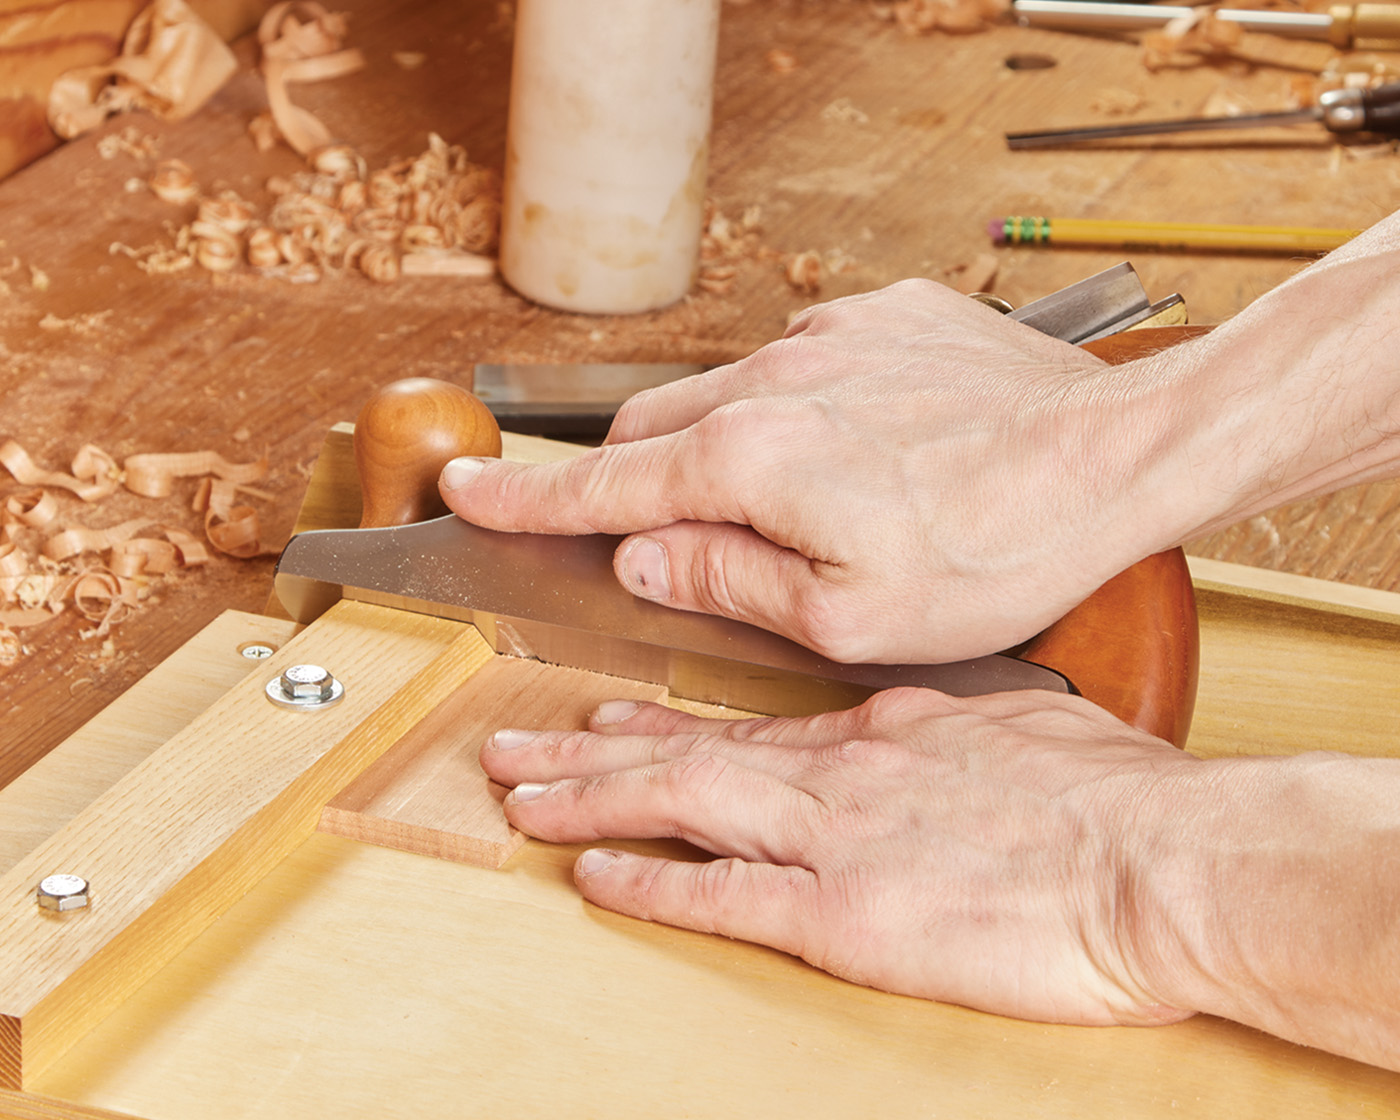
Chuck a 1/4“ uncut spiral or straight flute bit into your router at the router table. Set the fence so that the groove will be about 3/8“ from the bottom edge of the box and rout the grooves for the box bottom in light passes until they are 1/4“ deep. You can rout through grooves on the pin boards, but on the tail boards, you’ll have to do stopped grooves. Make appropriate marks or use stop blocks to make sure you stop your routing about 1/8“ from the end of the board.
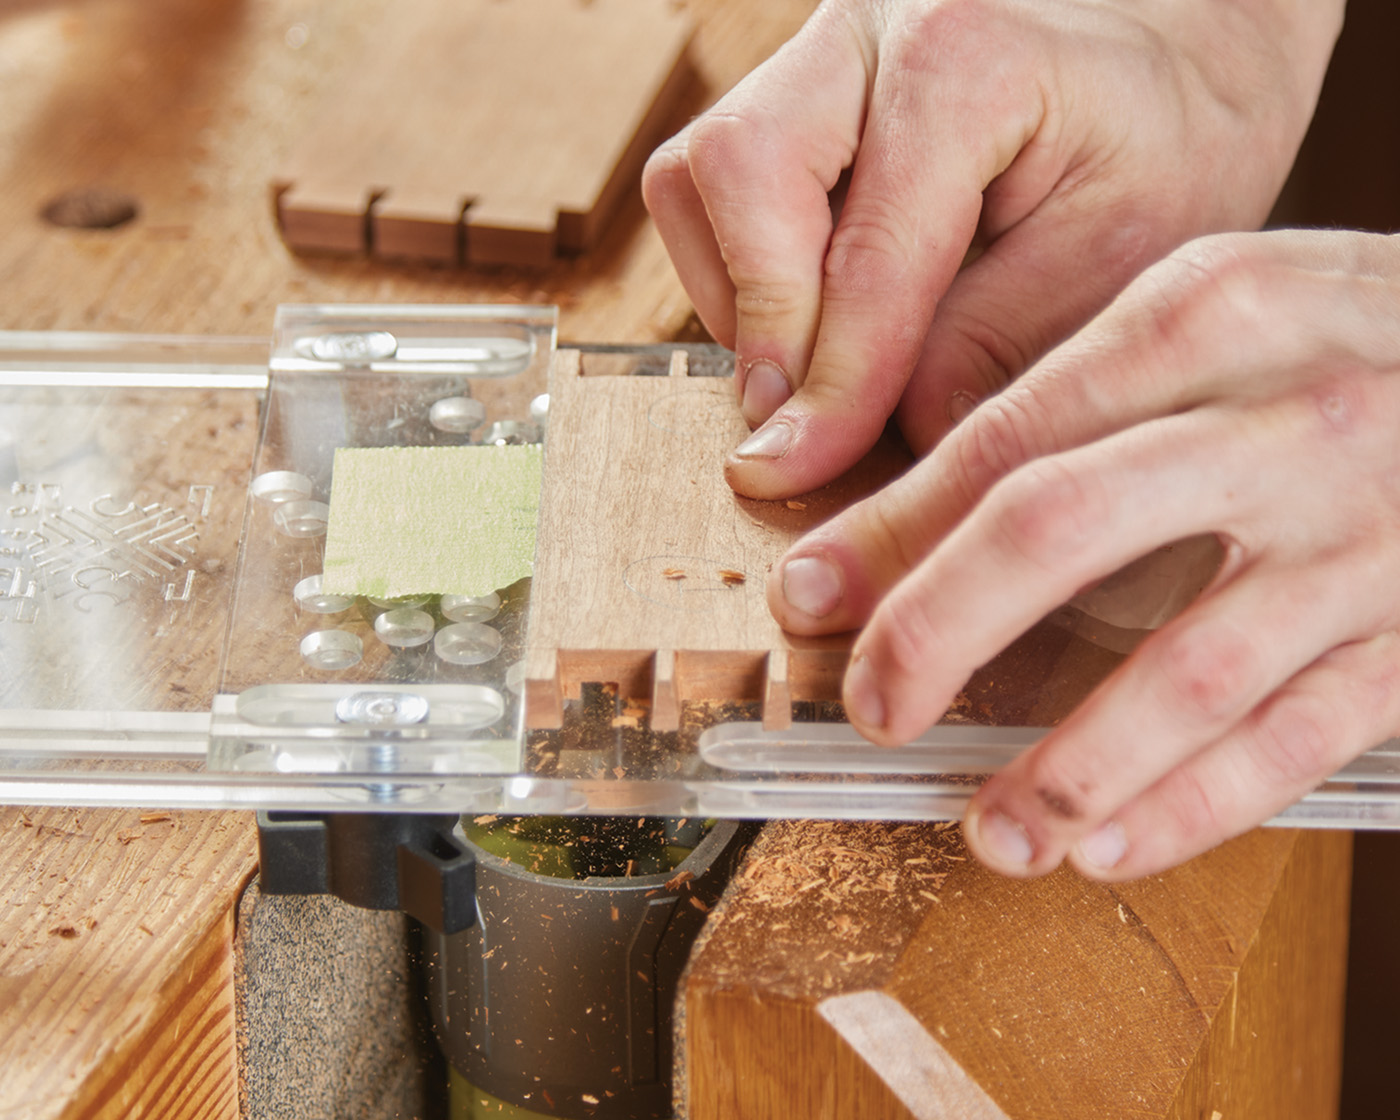
18 A router in the vise is an easy way to rout a groove for the bottom.
Gather the box bottom from the cutlist and do a dry fit — you really want to make sure the bottom is appropriately sized before any glue makes an appearance. If it isn’t, correct that at the shooting board. A dry fit is also a great time to make sure your joints are fully seating and there isn’t any missed waste keeping things from coming together. Note that in the cutlist, the width of the bottom is slightly undersized to allow for expansion and contraction. During the dry fit, ensure that this is still the case.
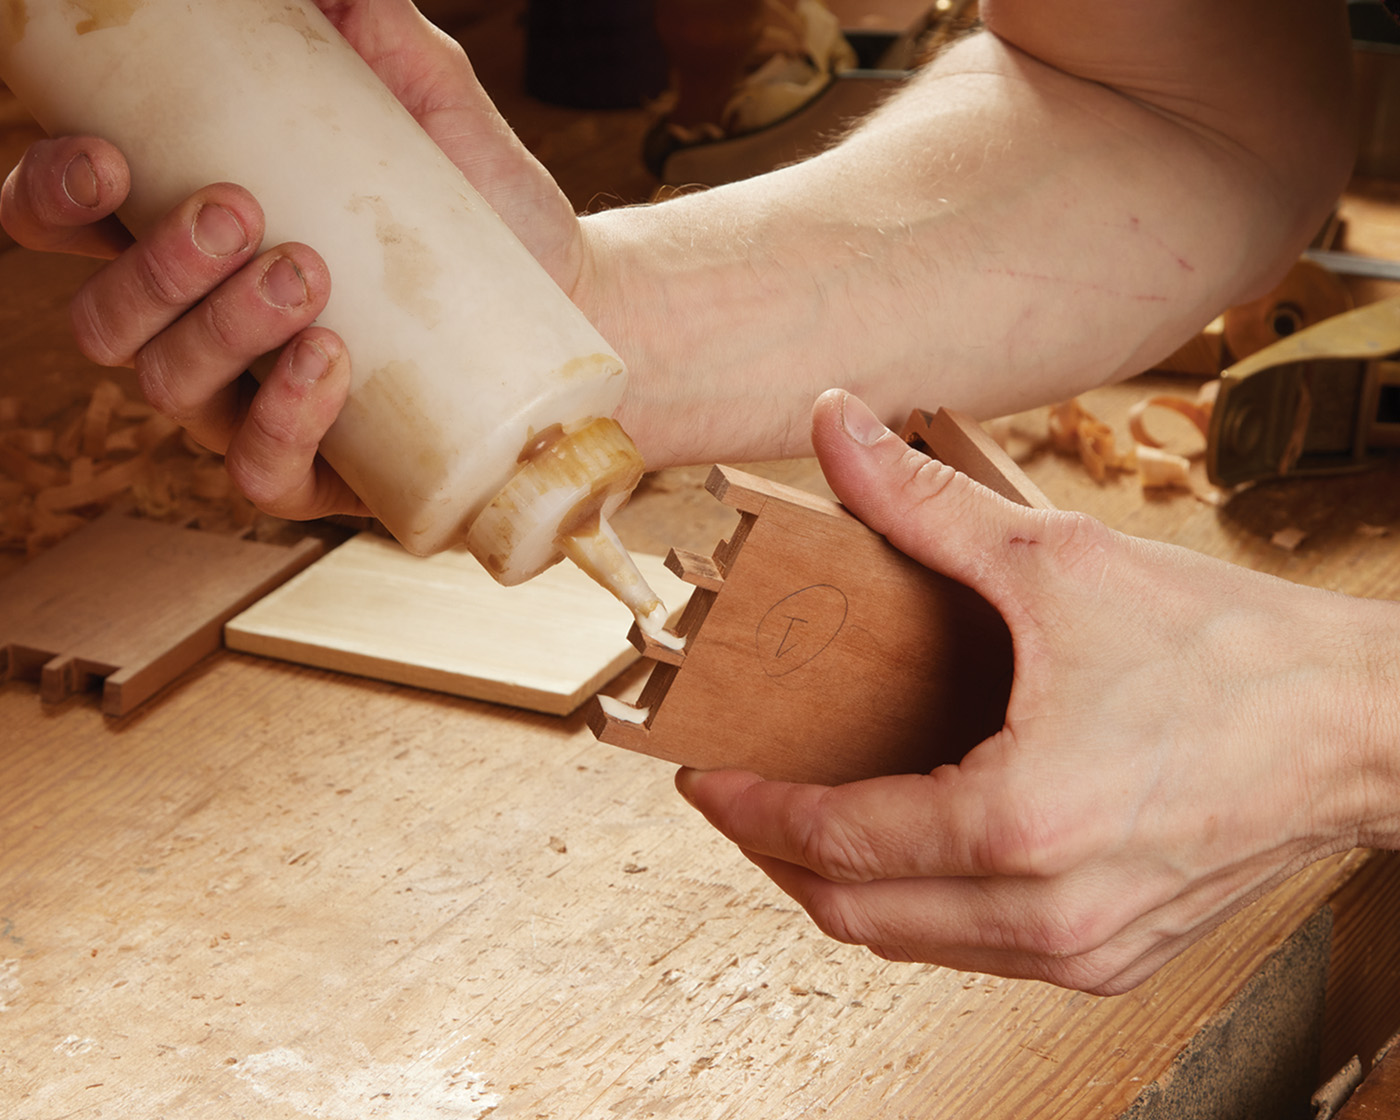
19 Glue the dovetails together and slip the bottom in place.
20
21
Spread glue on the pin walls of the same side of both pin boards and attach the corresponding tail board. With the pin boards facing up on your bench, spread wood glue in the center inch or so of the bottom grooves on both pin boards. Slide in the box bottom and center it along the width of the pin boards Spread glue on the remaining exposed pin walls and attach the other tail board. Apply clamps to the tails until the joint fully closes. Check for square by measuring corner-to-corner. If the distance between the corners isn’t the same, skew your clamps slightly and keep checking the corner-to-corner measurement – this can take a bit of trial and error.
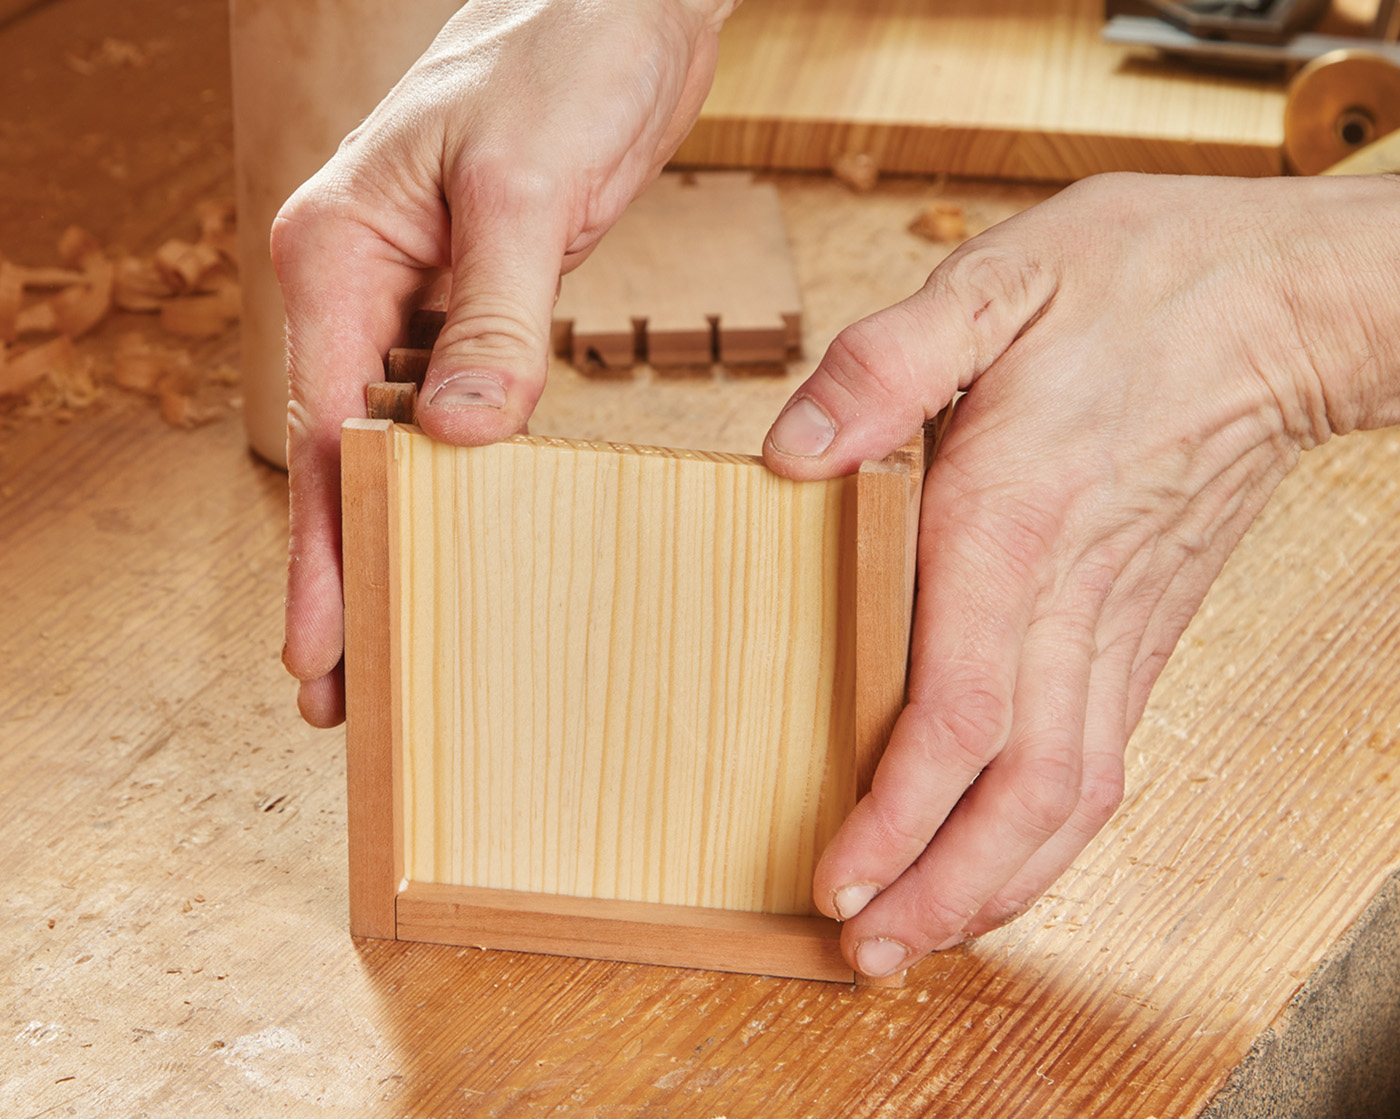
22 After you’ve assembled the box, scrape away any squeeze out and quickly check for square.
23 Apply a clamp to adjust the box if necessary.
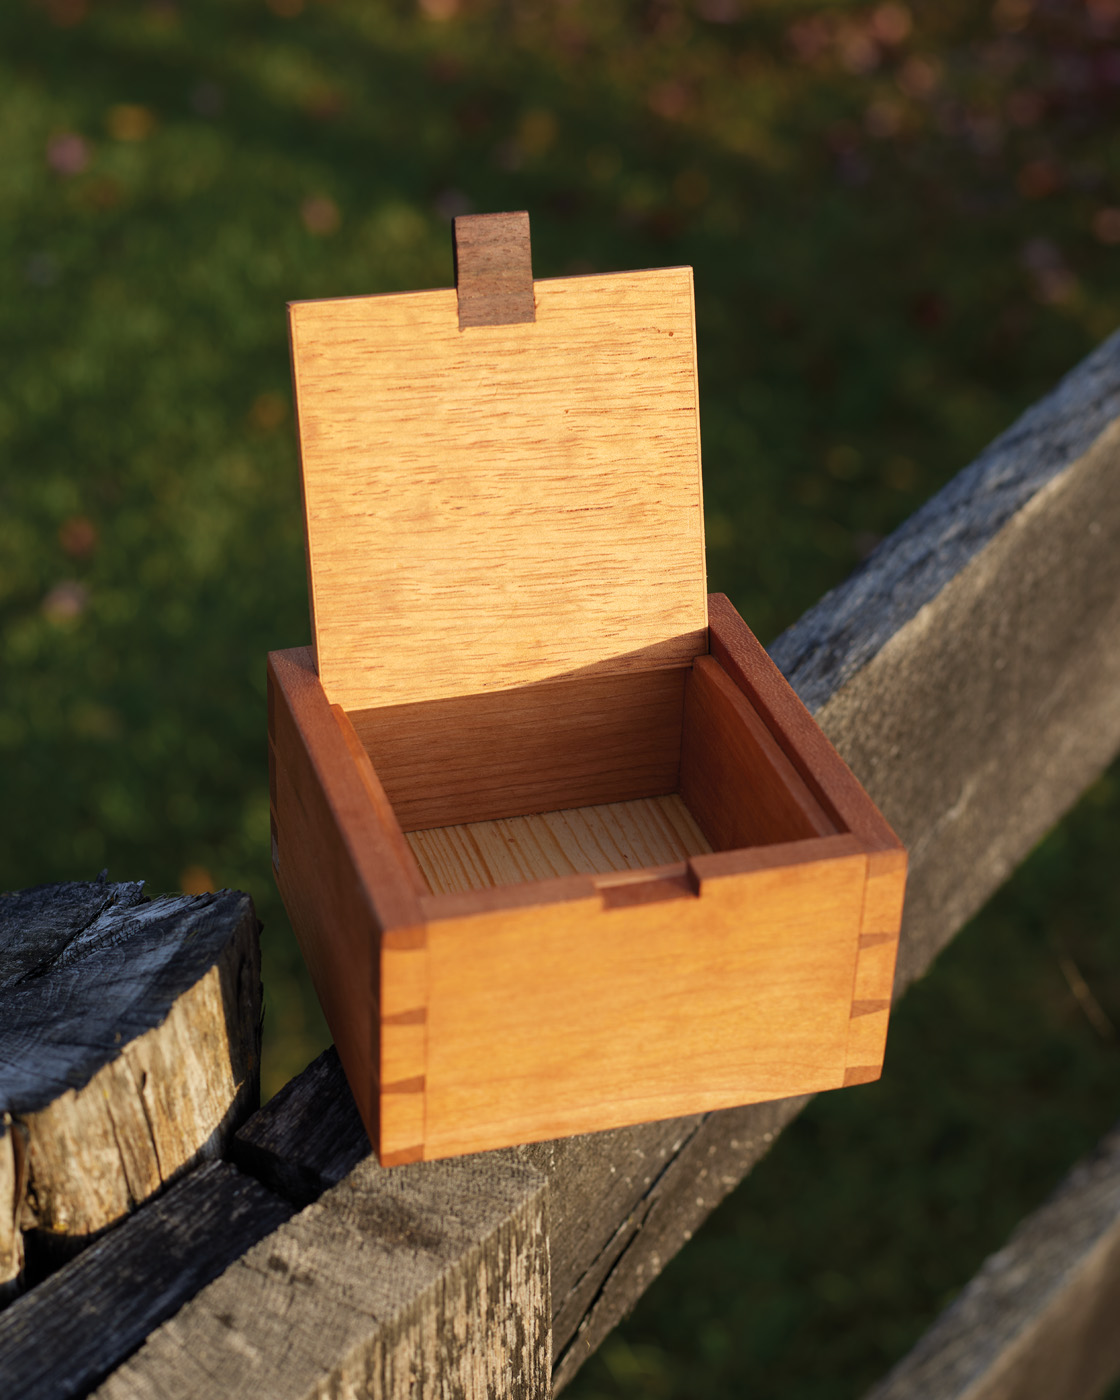
After the glue has dried, move on to fitting the inner liner. Start by measuring the length of the front of the box on the inside and rough cutting some liner stock to a bit over this length. Using a mitered shooting board, I’ll create miters on both ends of the board. If you kept the board oversized, it should not be able to slide into the box just yet. Trim the board until it just slides in the box along the front. Follow the same steps to fit the liner sides, with one modification.On those, miters are only needed on the ends that meet the front liner piece. The ends at the back can (and should) remain square.

24 Cut your liner material to rough length.
25 A miter shooting board allows you to dial in a precise 45° angle on the ends of the liner parts, and simply shoot them until they fit.

26
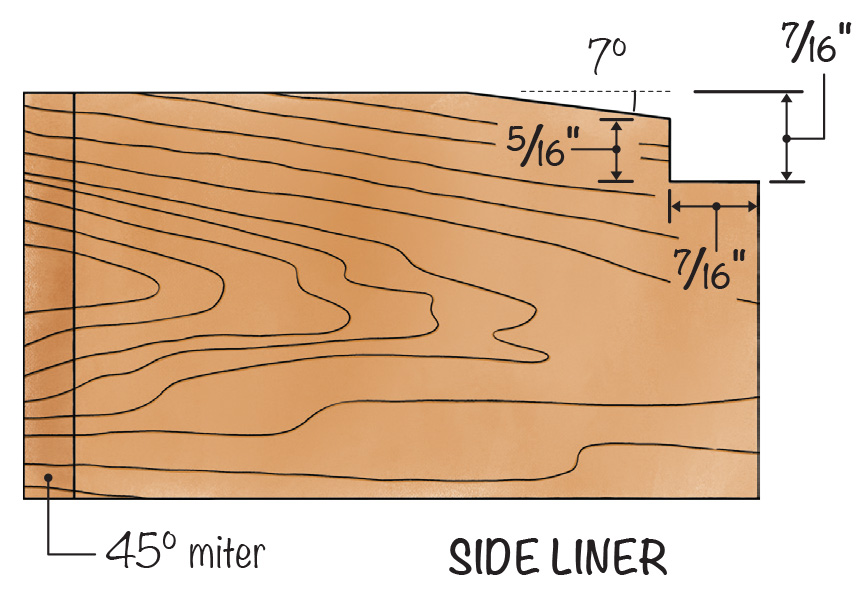
Using the provided drawings, mark the location of the slant and notch on the top and non-mitered side of both side liner boards. Remove the waste at the bandsaw.
27 The side liners get a taper and a notch. This allows the box lid to flip up and hold itself open in place. Lay this out before heading to the bandsaw.

28 Cut the notch out, staying close to your layout lines.

29 You can file and rasp as necessary to clean everything up.
Prepare your lid from the cutlist. The lid can be really anything — I used a marquetry panel I had lying around to make a nice plywood lid with edge banding — but solid wood would be fine as well (this isn’t a huge box). Check the action of the lid to ensure that it opens and stays open properly. If it doesn’t, you may have to make slight alterations to the angle or notch to get things right. A little trial and error is all it takes.
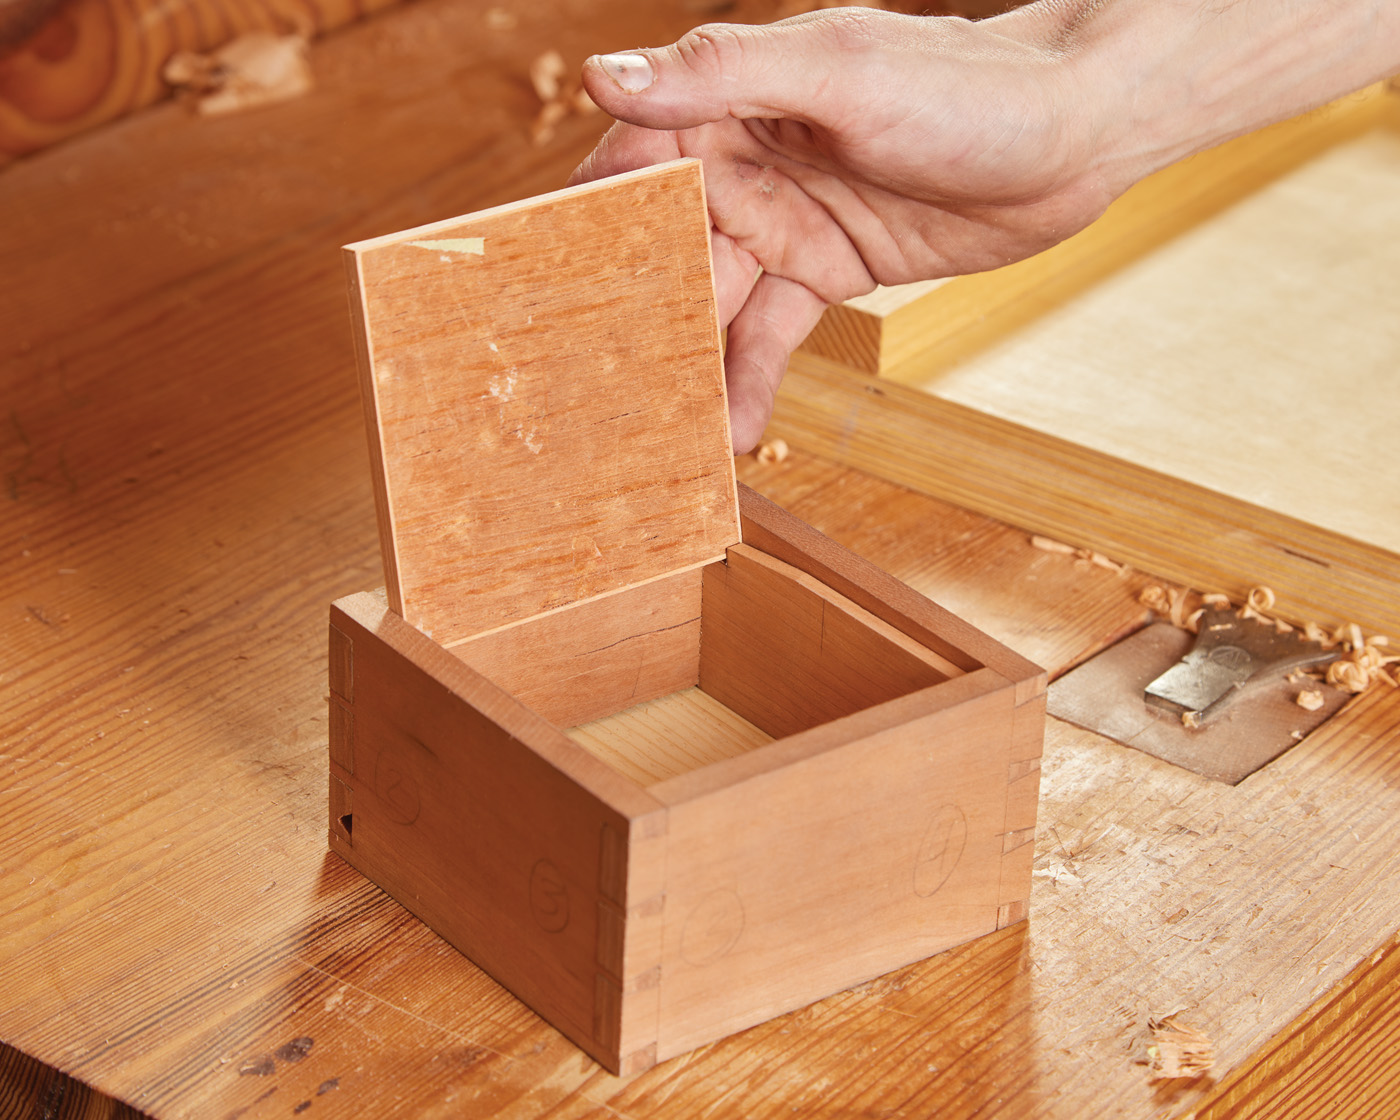
30 The lid tipped into place.
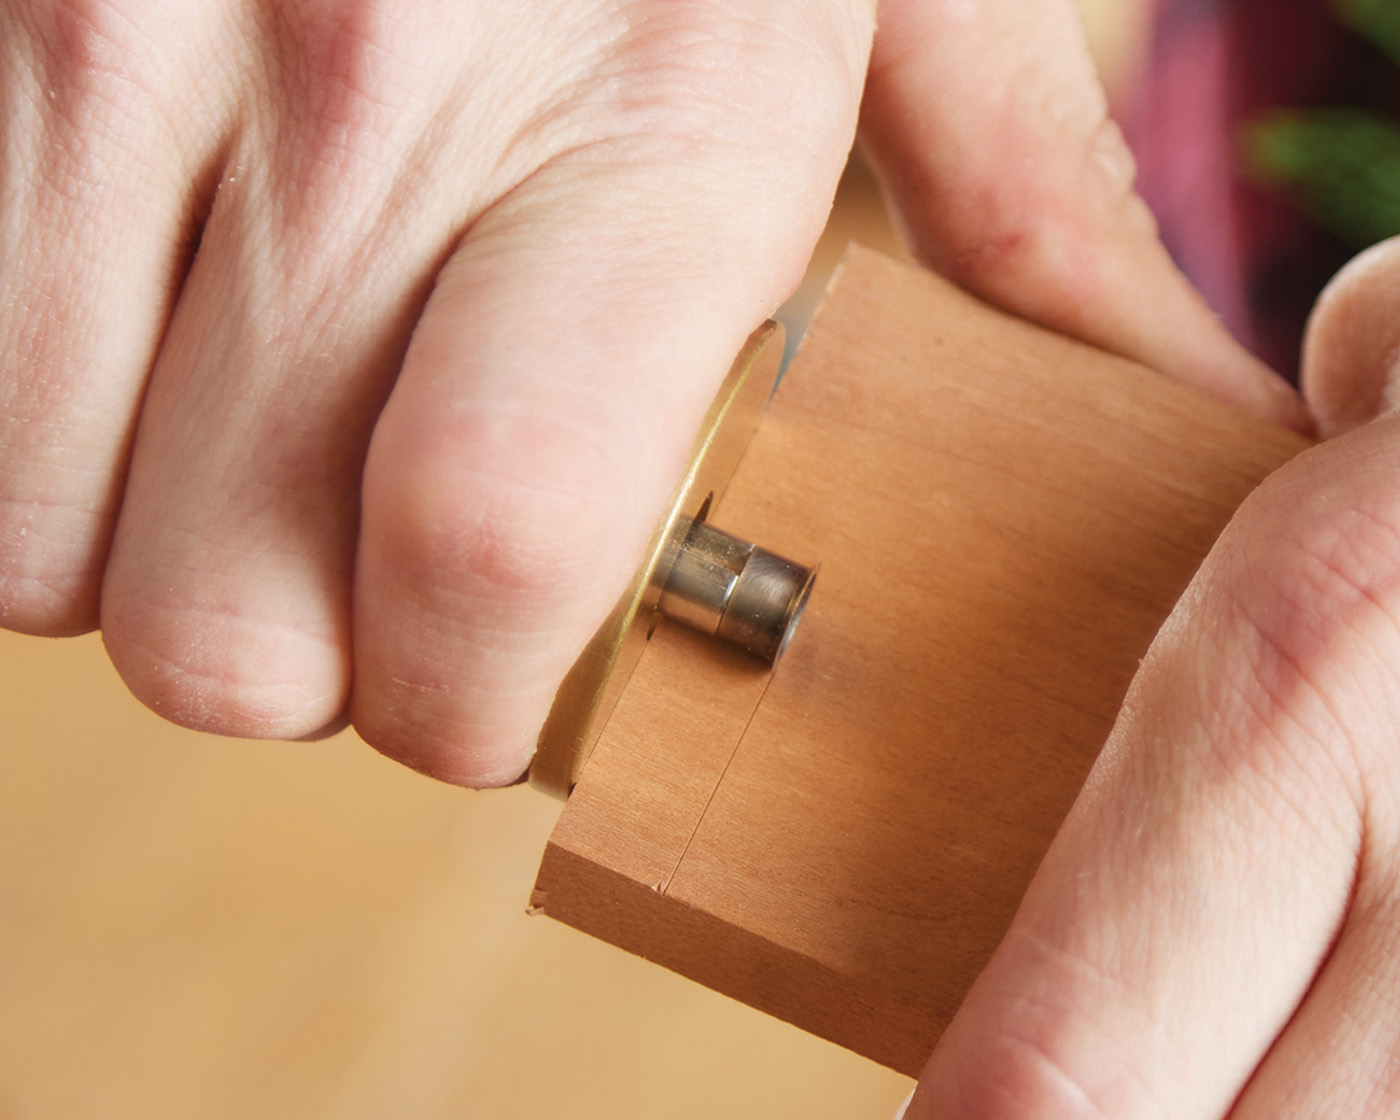
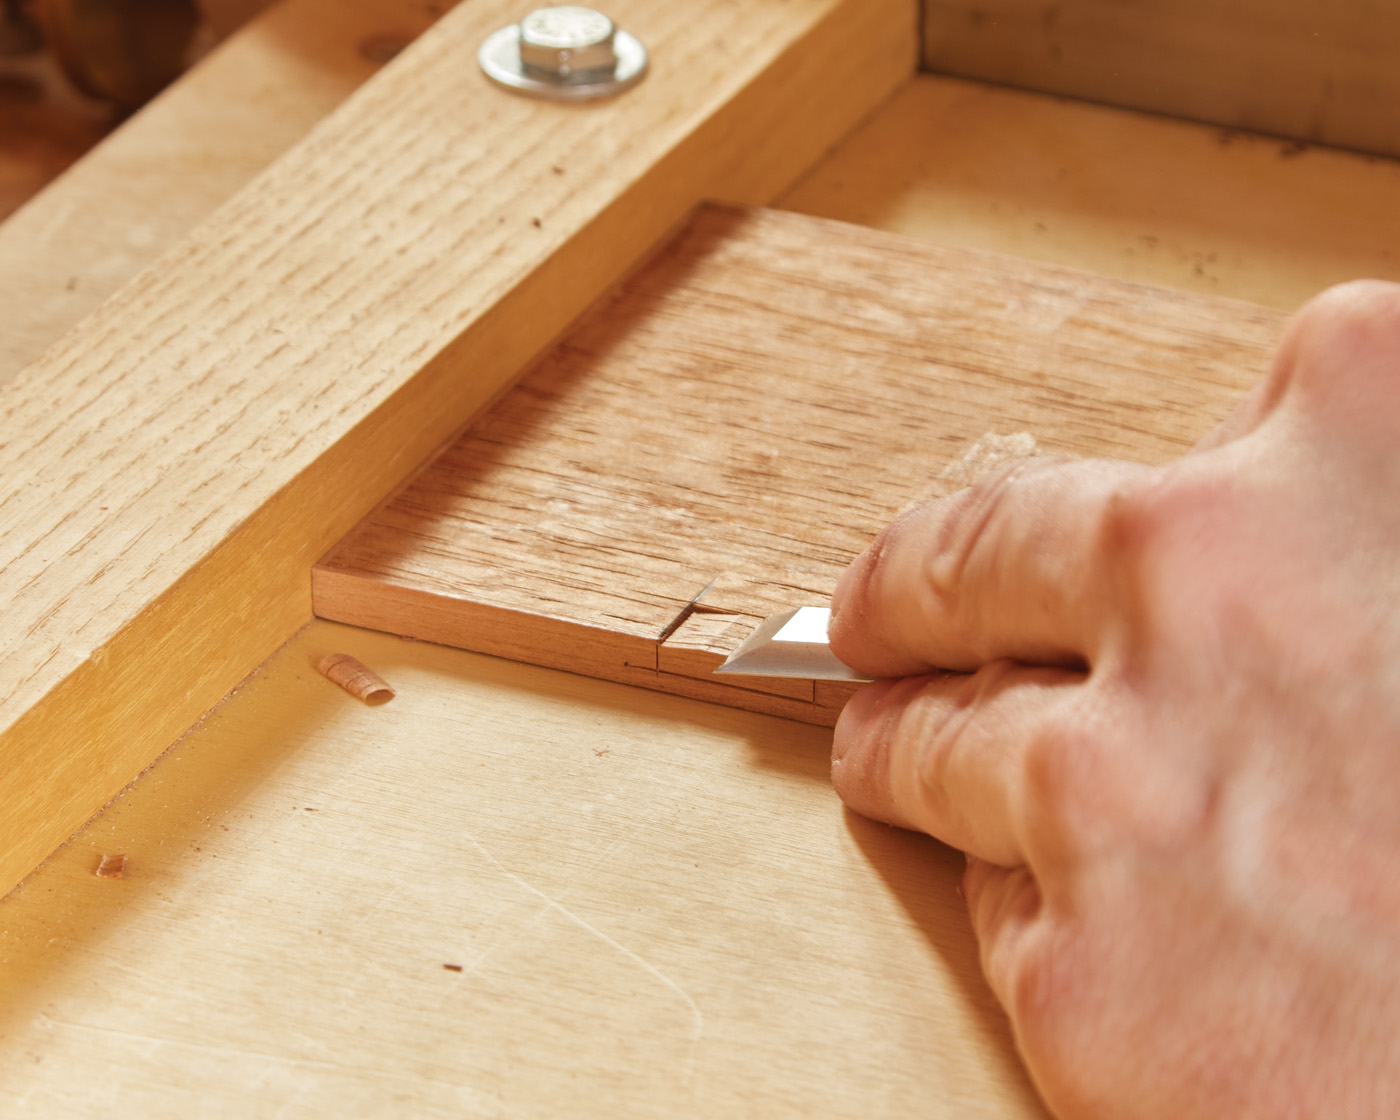
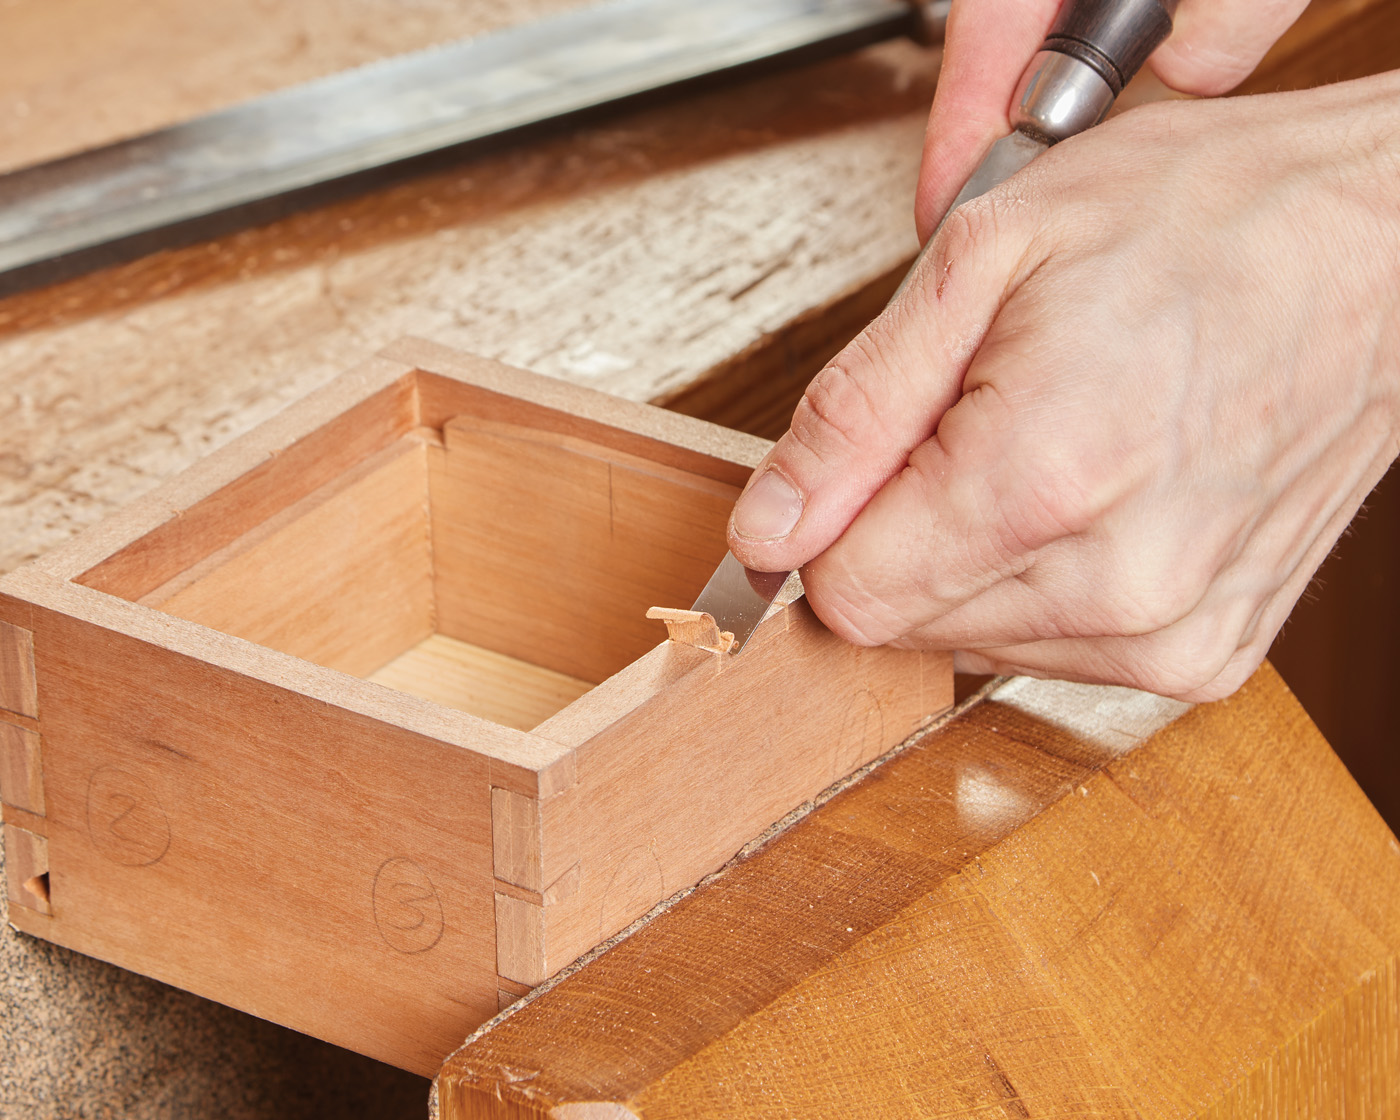
Your liner should be able to stay in place on the inside of the box with a friction fit, but if it doesn’t, now is a good time to glue it to the inside walls of the box. Mark the underside of the front edge of the lid according to the provided drawings. Remove the waste from this three-walled mortise with a chisel — it’s very quick and easy work as long as you made deep markings and sneak up to your final lines with small bites. Glue the lid lift from the cut list into this mortise and allow the glue to set.
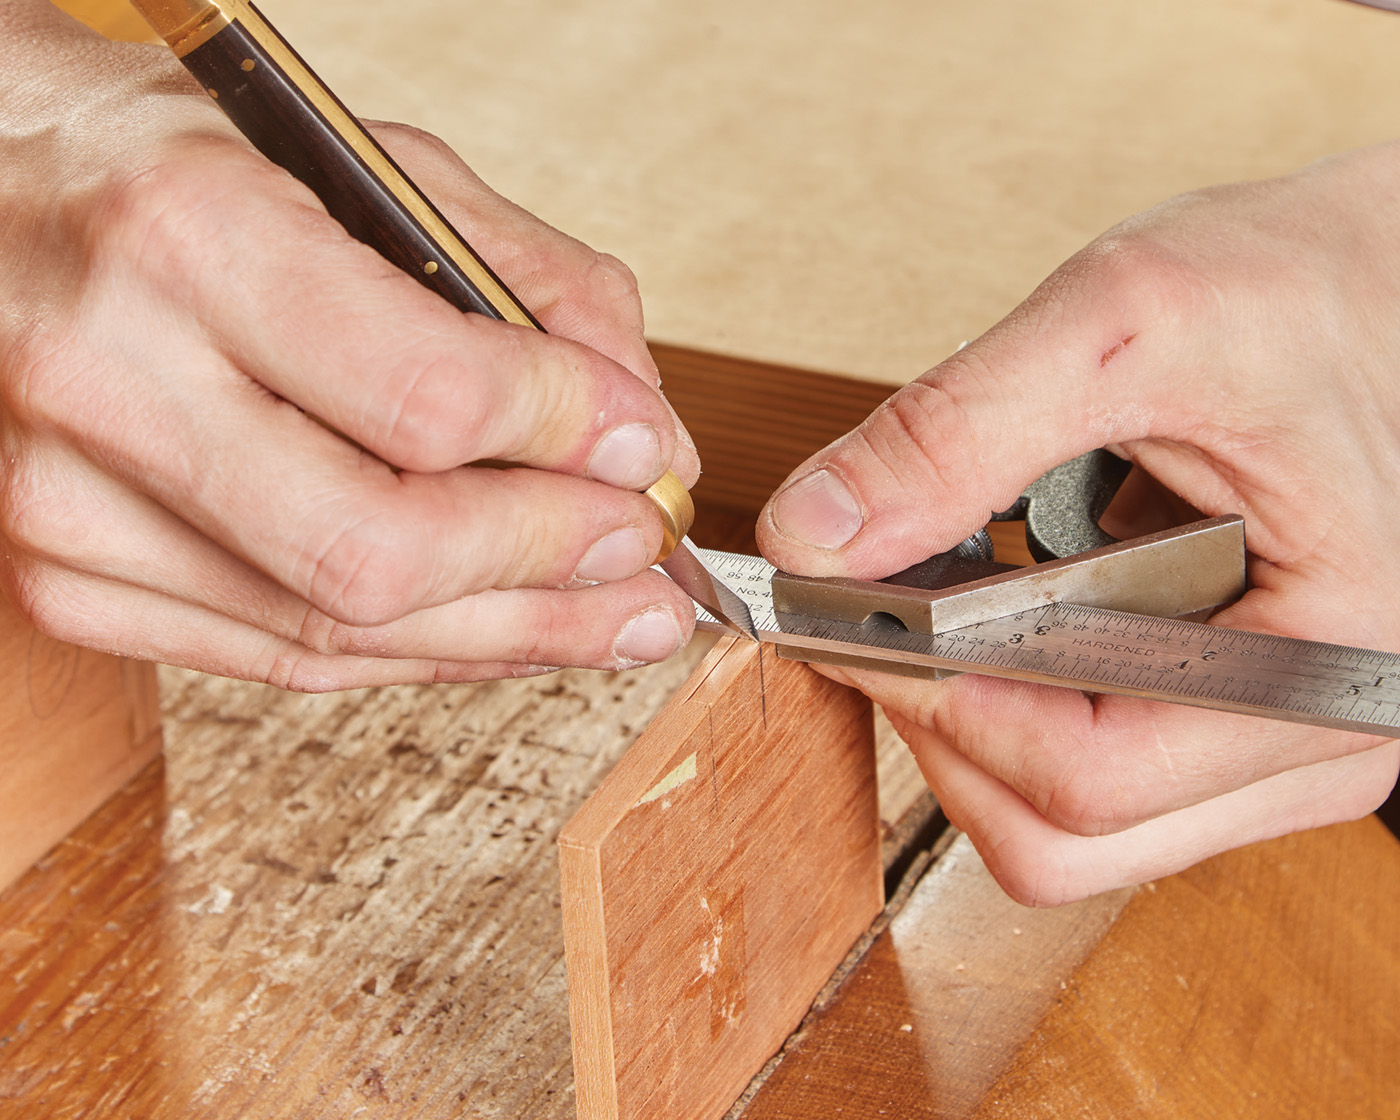
31 Mark a lift tab location.
32 Make a small mortise with a chisel. Chop the ends first, then flick away the waste.

33 Press the lift tab into place, then transfer the location to the box case by laying the lid in place.
Plane the lid lift flush with the bottom of the lid if necessary and put it in place in the box. Use a pencil to mark the location of the edges of the lid lift on the top edge of the box. Using a back saw, define the walls of the lid lift notch—you want to cut until your saw just meets the liner on the inside. Use a chisel to remove the waste between saw cuts until the notch is level with the liner. With the lid fitting, you can do a little shaping on the lift if you want, but when you’re happy with it, it’s time to apply a finish. For something like cherry, I love an oil finish. It brings out the deep rich tone of the wood.
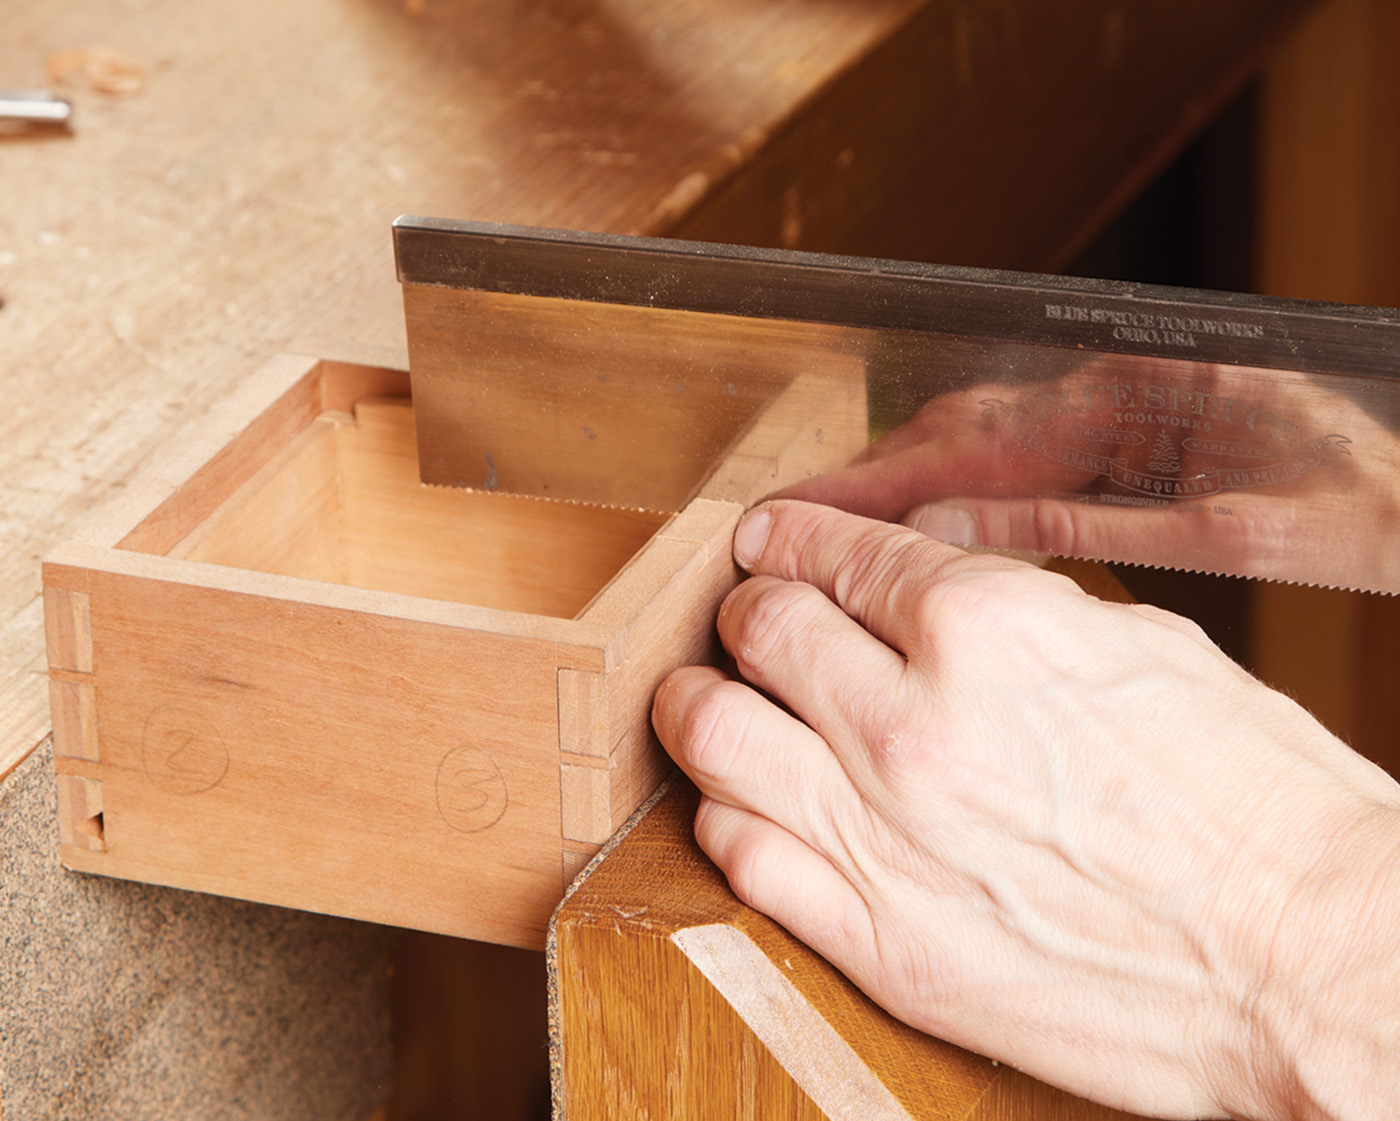
34 Define the lift tab notch with a back saw. Cut close to the lines, but leave room. This doesn’t need to be joinery tight here, just neat enough that the tab slides down in without binding.
35 Chisel down to the final depth.
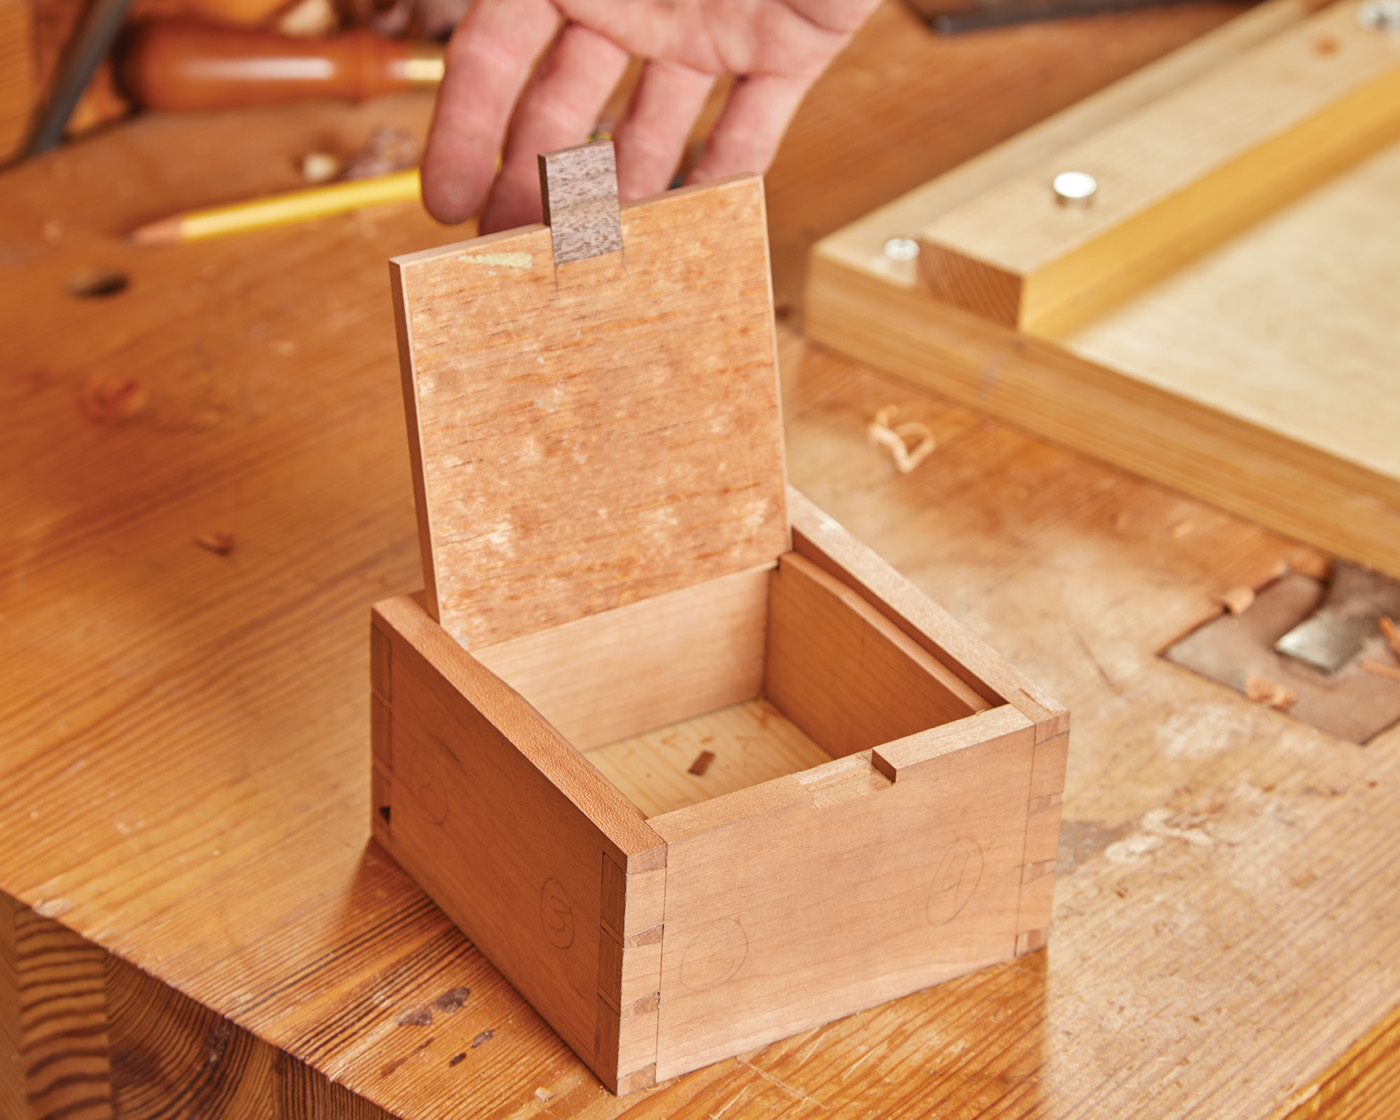
36 Test the fit and function of the lift tab. If you want, shape the tab a bit before you glue it in place.
As I mentioned, I love boxes. You can build them quickly, and it is a project that allows you to concentrate on improving your handtool skills. After you’ve made several boxes, you’ll see what I mean. Then, you can start treating boxes as a canvas for other adventures—something like adding a marquetry panel in the lid, or trying out that pyrography you’ve always wanted to mess with.


