


We may receive a commission when you use our affiliate links. However, this does not impact our recommendations.
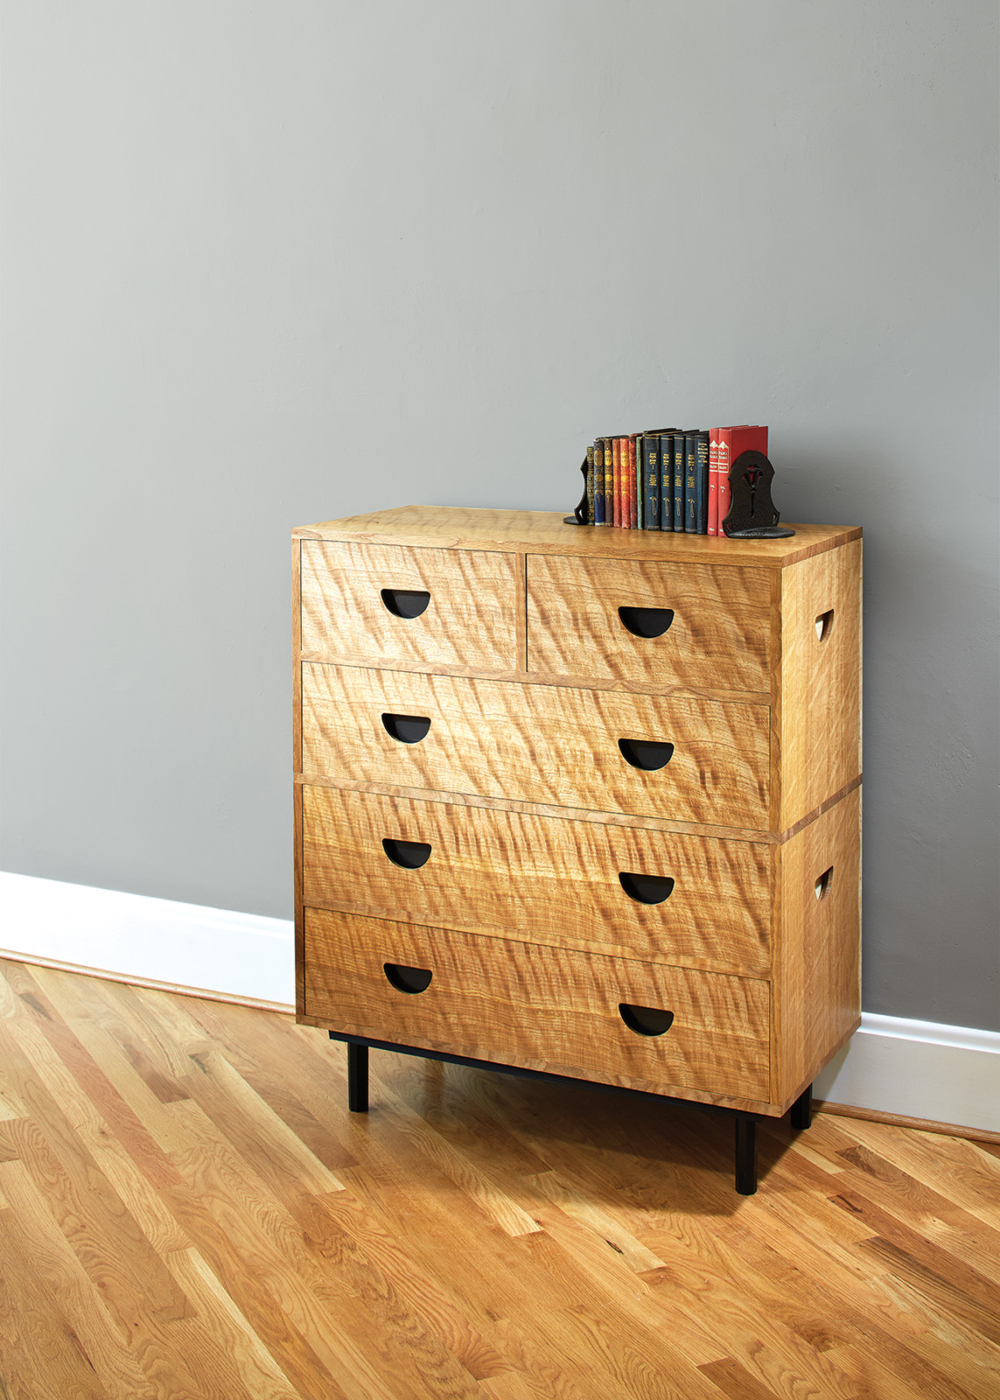
Built to move (and to last), this piece blends classic proportions and clean lines.
When the British Empire began taking over the world in the 18th century, one vexing problem at its tropical holdings was the monsoon season. When it hit, applied carvings and ornaments fell off the furniture, or the glue was consumed by insects.
Undeterred, the Empire developed a new kind of robust and unadorned furniture – what we now call campaign furniture – to hold the undergarments, brandy and books of the Empire’s subjects in all four corners of the globe.
What is most interesting about campaign furniture is how it inspired many early 20th-century makers to create Danish Modern and other contemporary styles that were extremely well made but unencumbered by ornament.
This chest of drawers explores that link between the 19th and 20th centuries by starting with pre-Industrial proportions for chests of drawers and stripping away everything that is not needed.
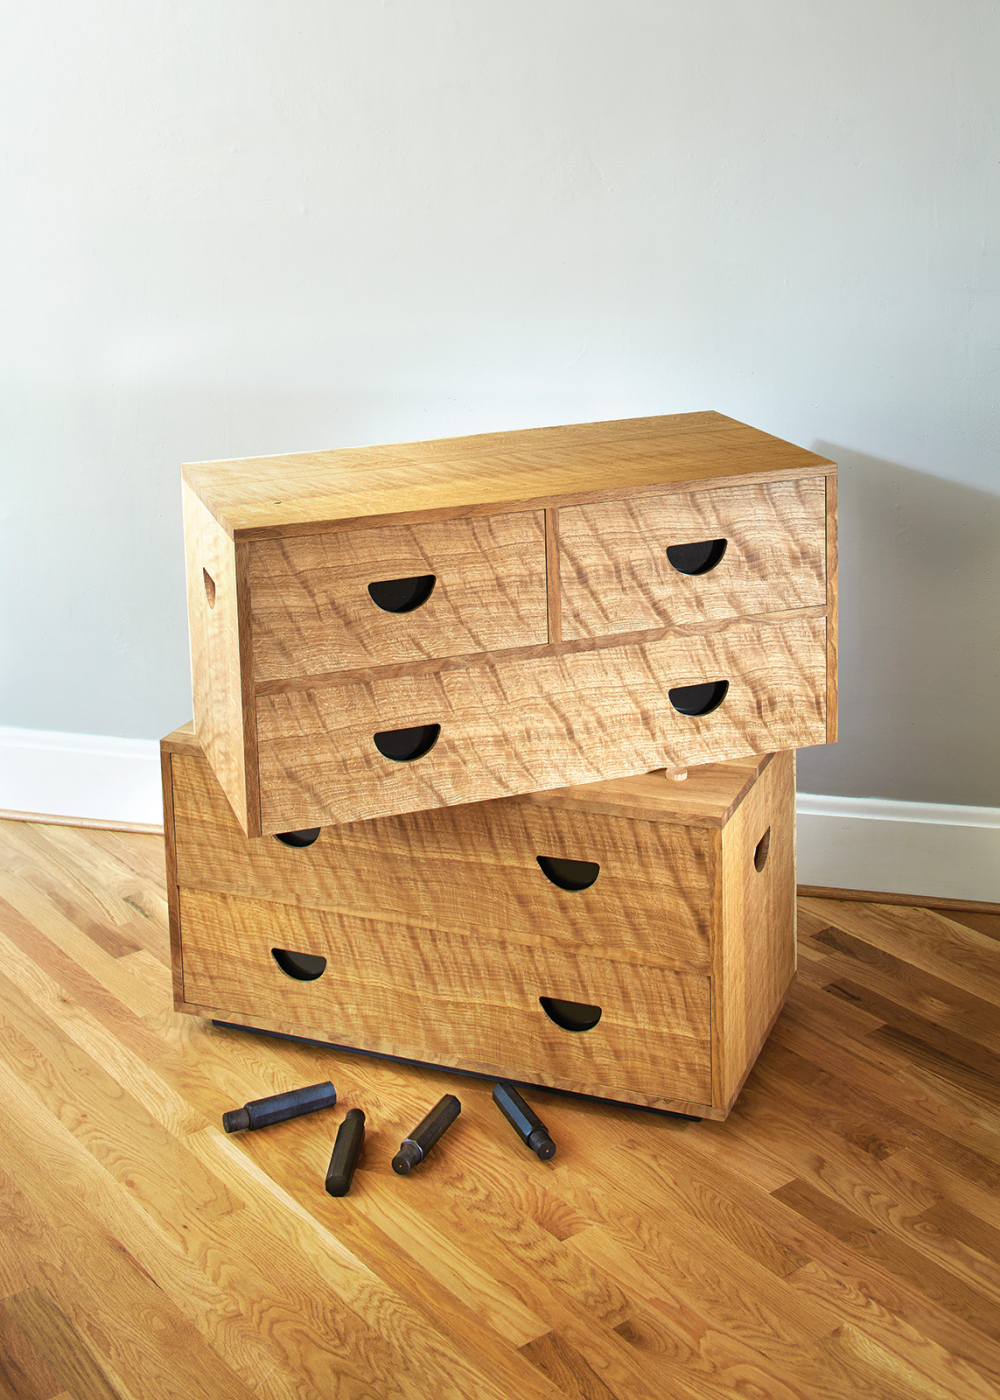
Like most campaign chests, all the pulls and lifts are flush to the carcase, though in this case they are cutouts backed with darkened brass. Also like campaign chests, the entire thing breaks apart to be moved easily to a new apartment (or tent in the desert). But unlike 19th-century campaign furniture, this chest embraces contemporary joinery to make the chest a cinch to build.
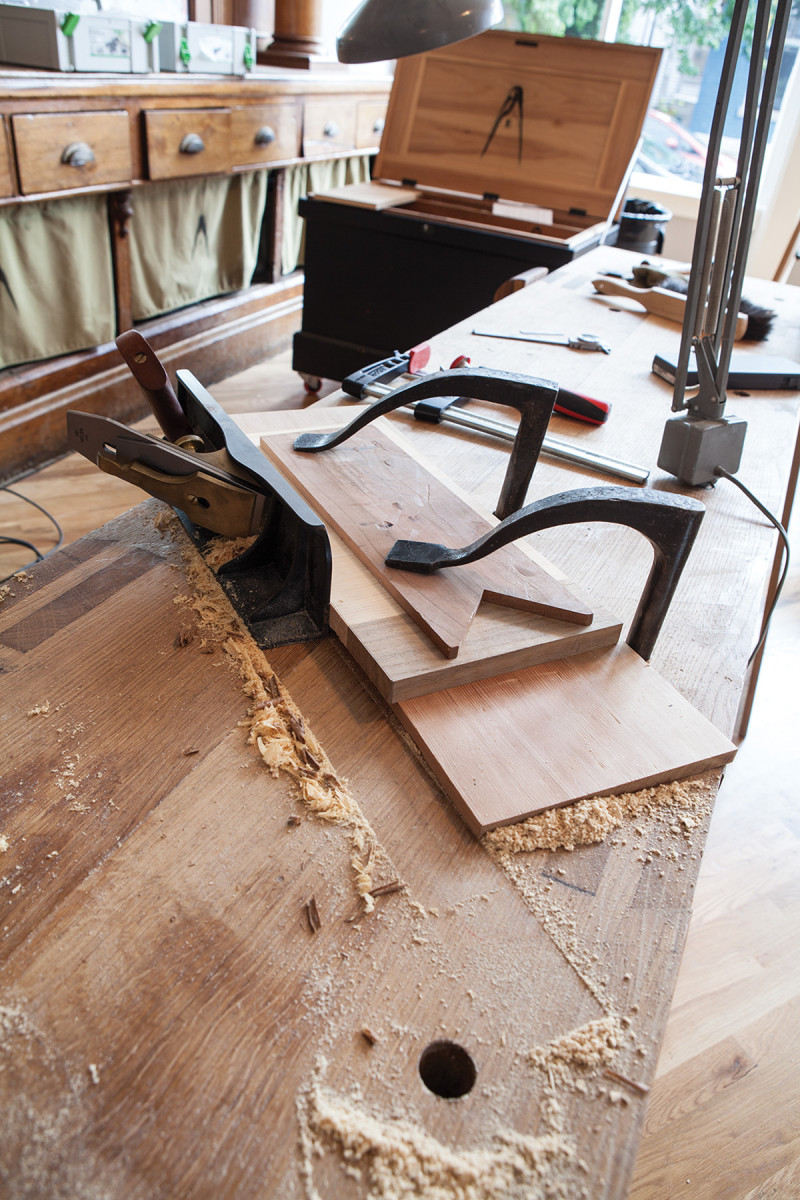
How it Goes Together
All the way through. The through-grooves in the ends of the carcase are easy to make with a router and a fence to guide the tool’s base.
The two carcases are joined with Festool Dominos, though almost any other carcase joint will do. I’ve built many traditional campaign chests with full-blind rabbeted dovetails. You might also consider biscuits or dowels.
The exterior panels are made of quartersawn white oak. The interior panels are pine or pine with a strip of white oak glued on the front edge. This construction saves on weight and expense. The backs of the carcases are captured in grooves in the tops, bottoms and end pieces. Once the two carcases are assembled, they stack on top of one another. To keep the top carcase from sliding around, it rests on dowels sticking up from the bottom carcase. Gravity does most of the work.
The plinth, or base, is simple. Two strips of wood are screwed to the underside of the lower carcase. The four legs – tapered octagons – are friction-fit into holes bored in the strips.
Like the case, the drawers are also built using Dominos, with the drawer bottoms captured in grooves. All in all, it’s a surprisingly quick project to build, especially if you own a Festool Domino. Begin by gluing up any panels you might need for the tops, bottoms, ends and dividers in the cases. Cut these casework pieces to finished size and prepare to cut the grooves for the backs.
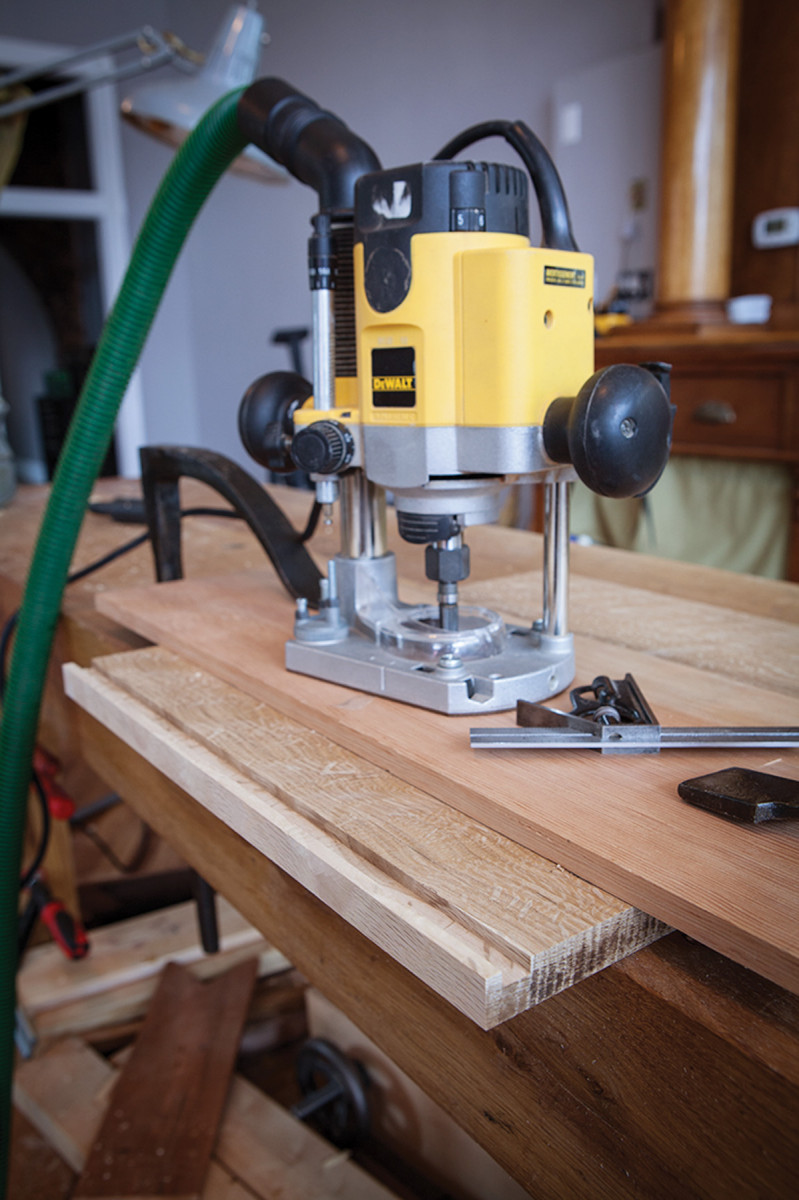
Stop here. When routing the grooves in the top and bottom pieces, you have to make sure the grooves do not go through the ends of the boards. I do this by eye because all this will be hidden in the glued-up carcase.
Grooves: Stopped & Through
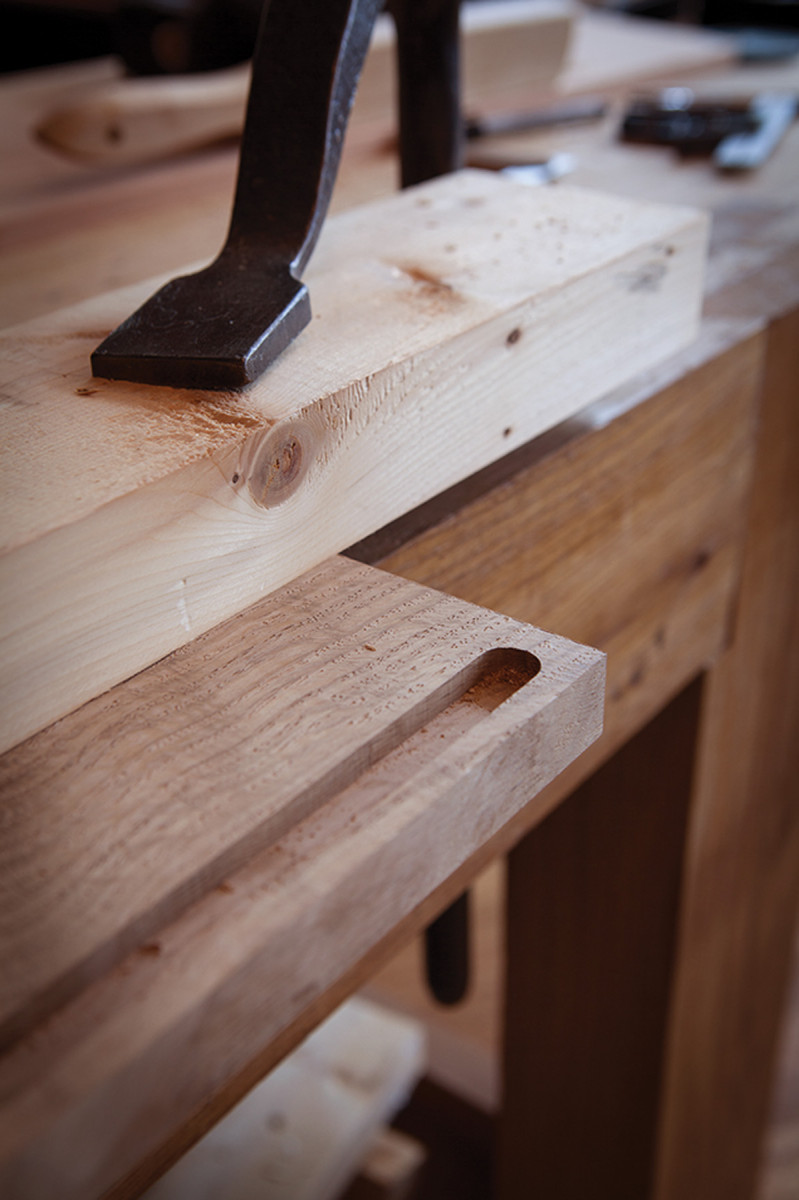
The grooves that hold the back are 1⁄2” wide and 1⁄4” deep. The grooves in the end pieces run through from end to end without stopping. The grooves in the top and bottom pieces, however, stop about 3⁄8” from the ends so the grooves don’t show when the case is assembled.
As you study the cutlist and drawings, you’ll see a subtle difference in the way the backs go into the grooves in the top carcase versus the bottom carcase. In the top carcase, the back can be slid into the carcase after it is glued up because the bottom of that carcase is a little narrower. On the other hand, the back for the bottom carcase is captured all around and must be inserted during assembly. The reason for this difference is cosmetic and prevents an odd notch from appearing at the back of the bottom carcase.

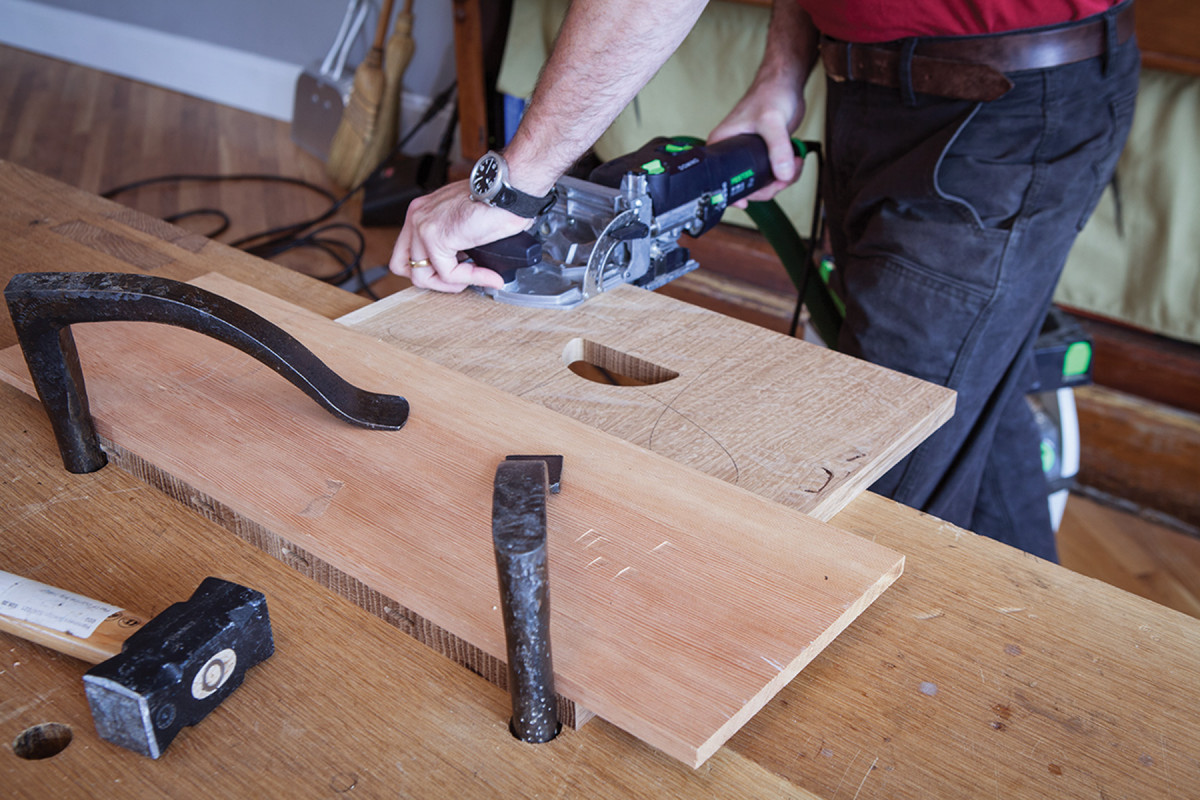
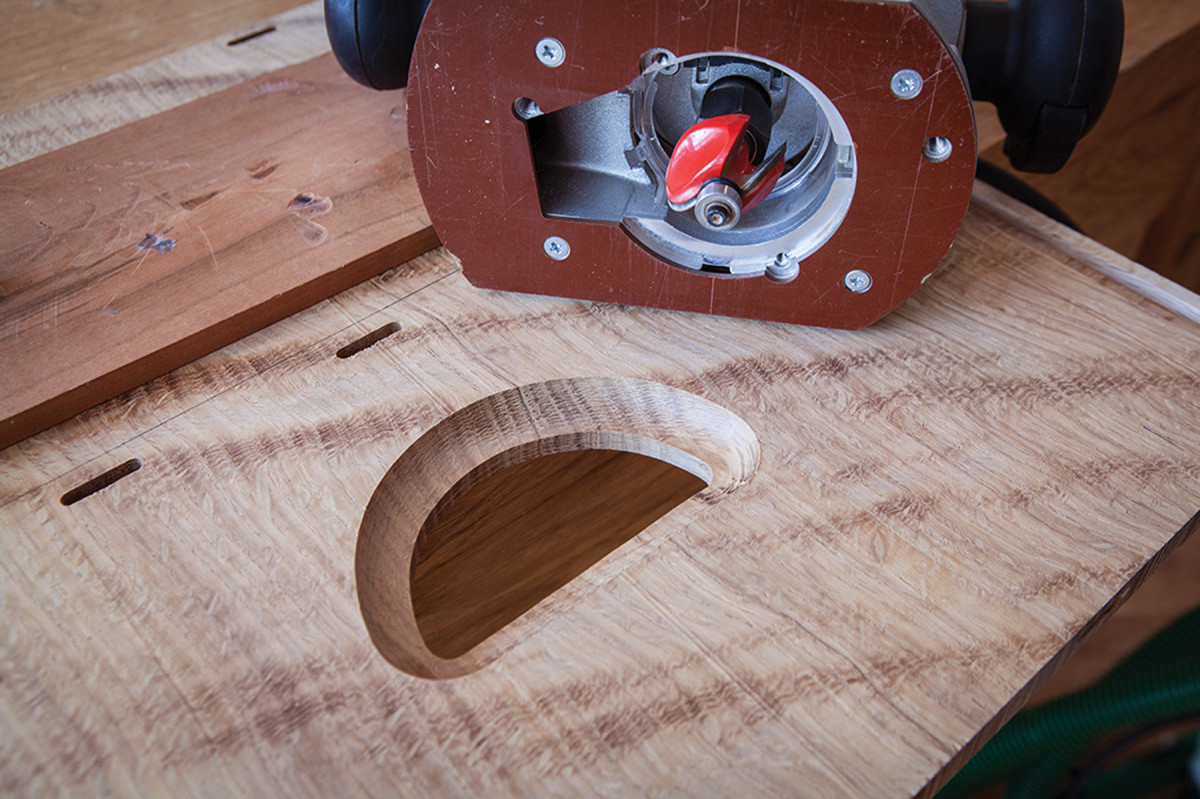
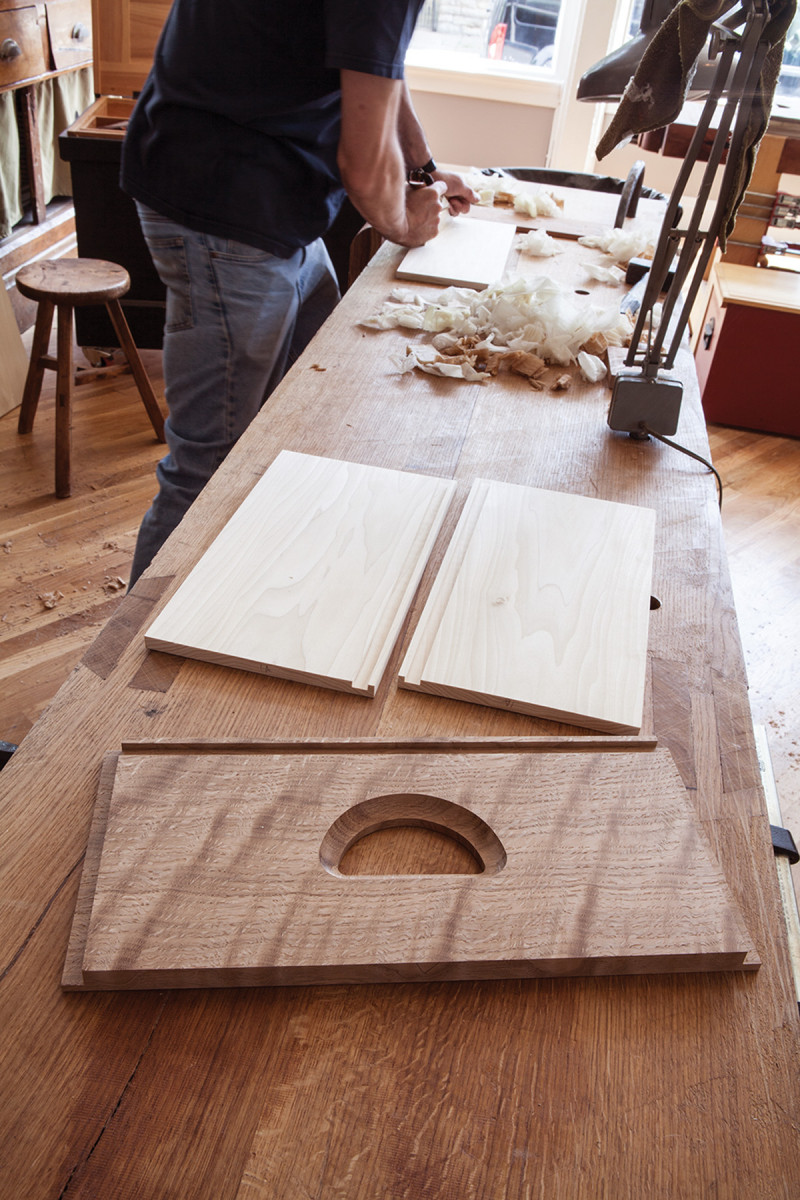
Mark & bore. Use your template to trace the half-moon shape on the work. Waste away as much waste as possible with a drill bit.
I usually cut grooves with a plow plane, but because these grooves are stopped, I turned to my plunge router. I chucked a 1⁄2” straight bit in the collet and clamped a fence to the work to guide the router’s base.
The through-grooves in the end pieces are simple to make. But you have to pay attention when cutting the stopped grooves in the top and bottom pieces. It’s easy to overshoot and groove the boards all the way through.
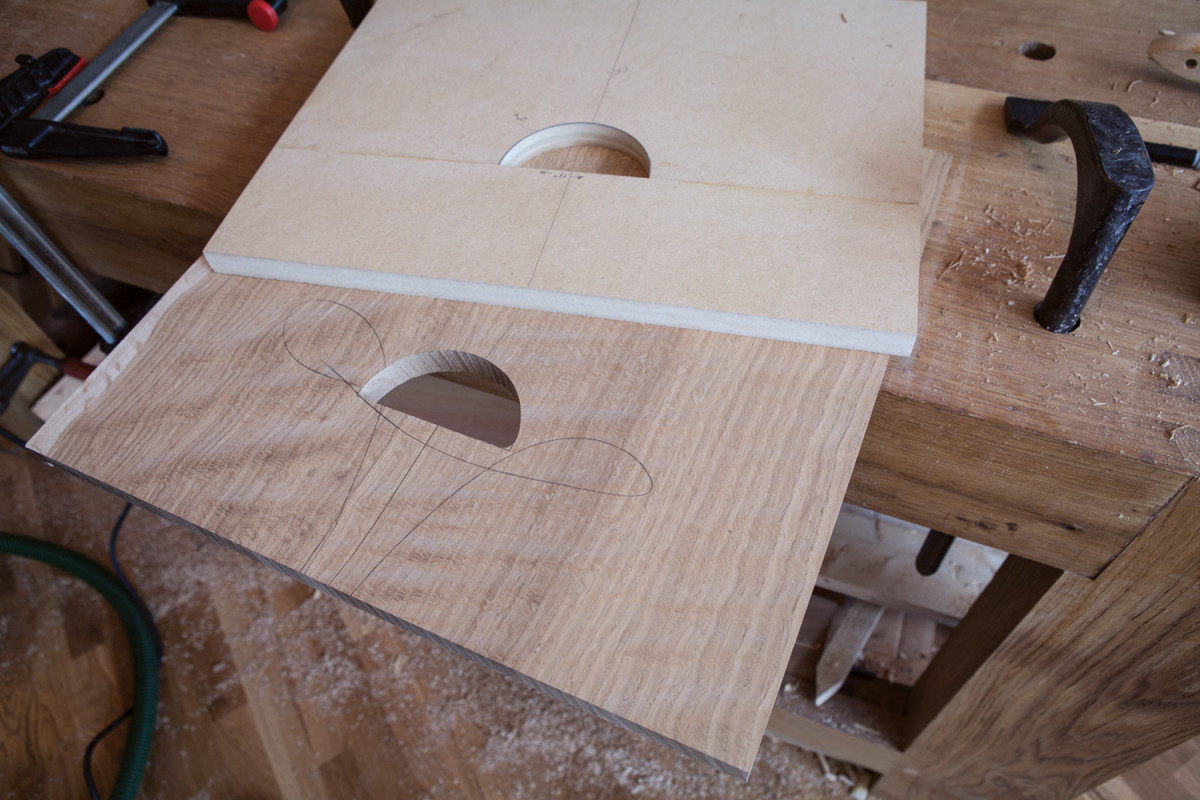
Then rout. Use the template to guide a router with a pattern-cutting bit to complete the shape.
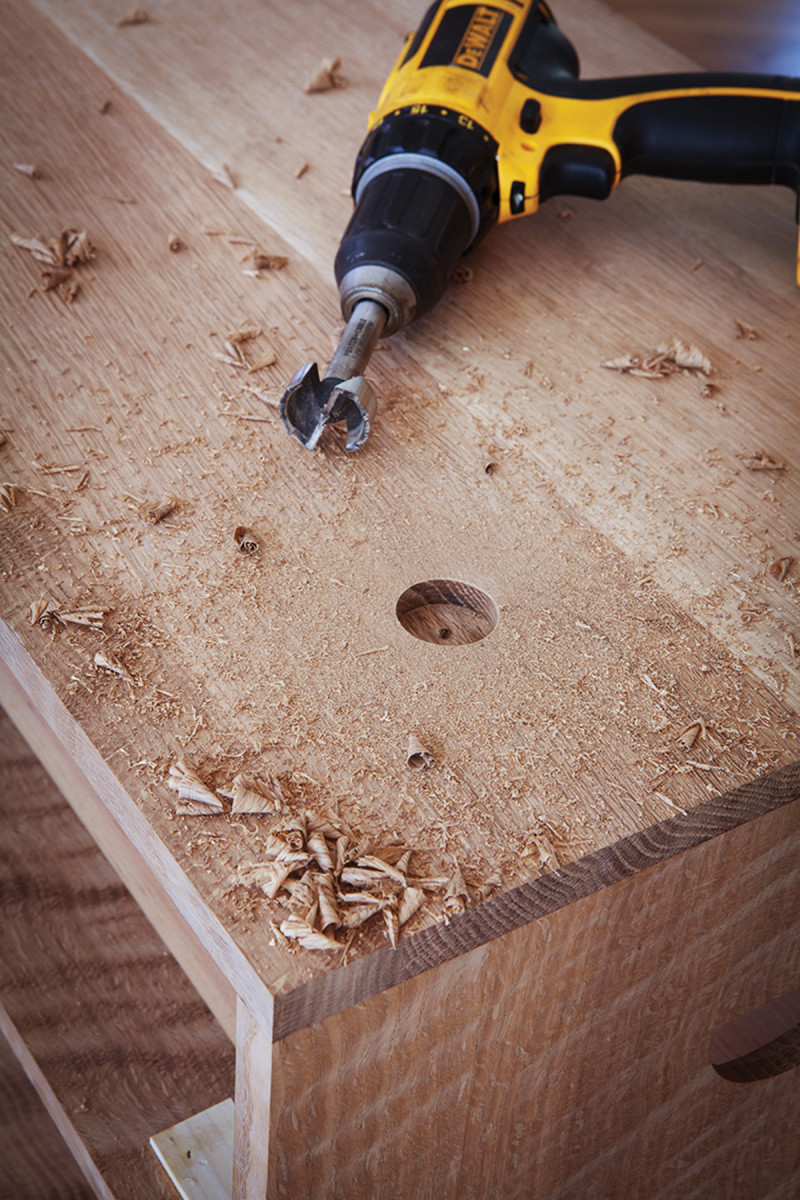
Before diving into the Domino joinery, it’s best to make the half-moon cutouts in the ends that serve as chest lifts. Because there are 12 of these cutouts, I made a template from MDF to both mark and rout the cutouts. The top of the cutout shape is a straight line 4″ long. The curve below is a 2″ radius.
Use the template to mark the four cutouts in the end pieces. Then remove as much waste as possible with a Forstner or other drill bit. Then clamp the template to your end piece and use a pattern-cutting bit in your router to finish the shape.
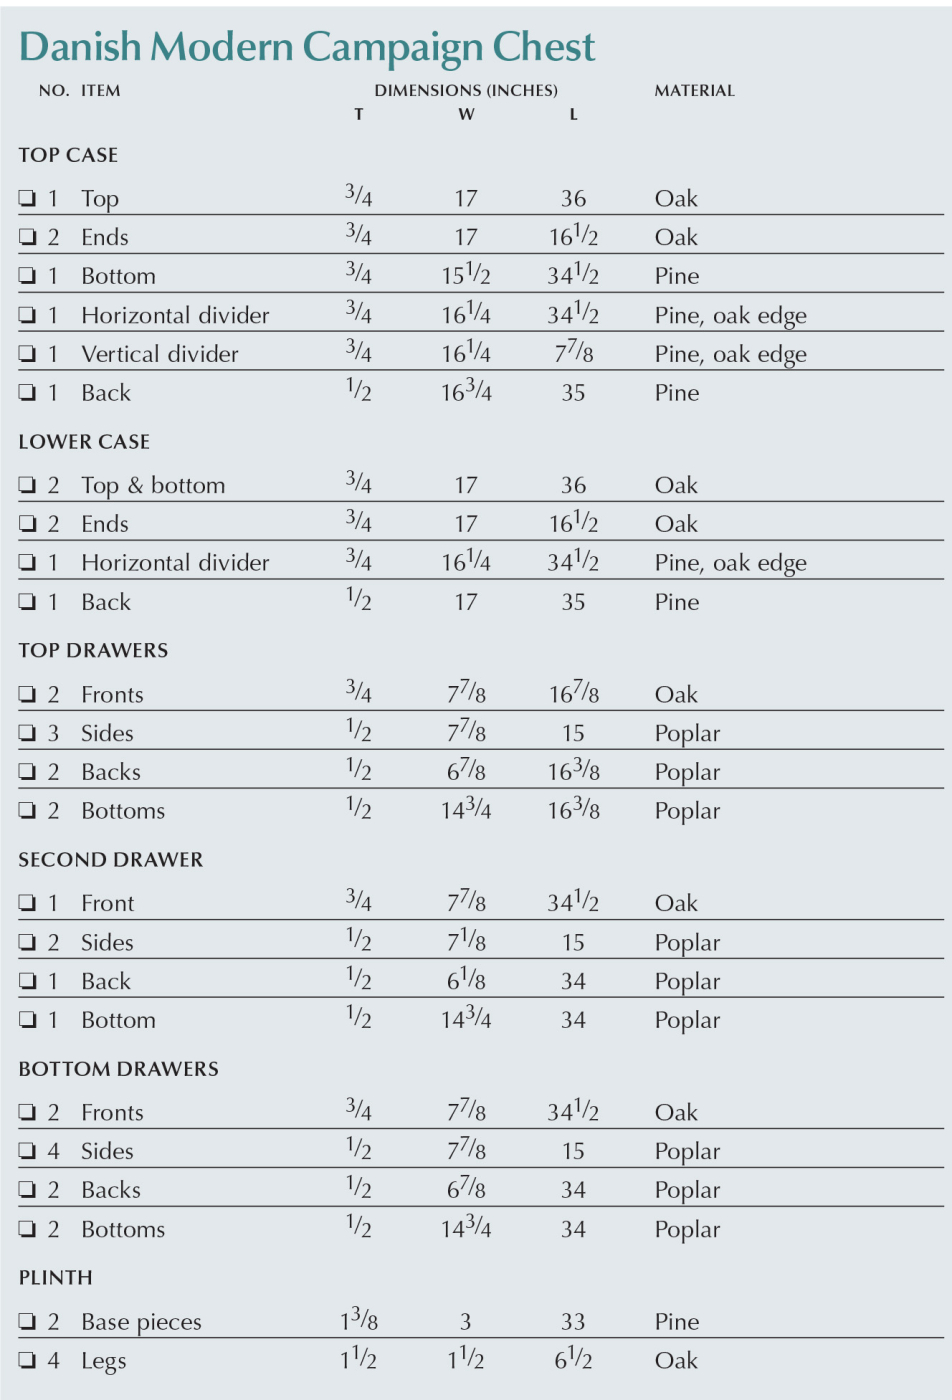
Danish Modern Campaign Chest Cut List
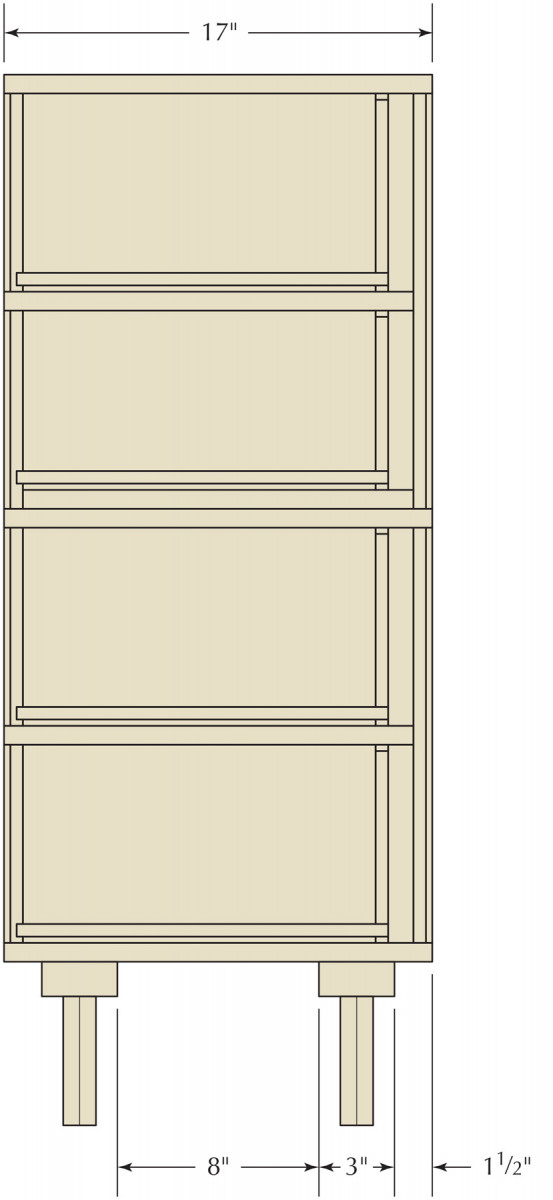
Profile Section
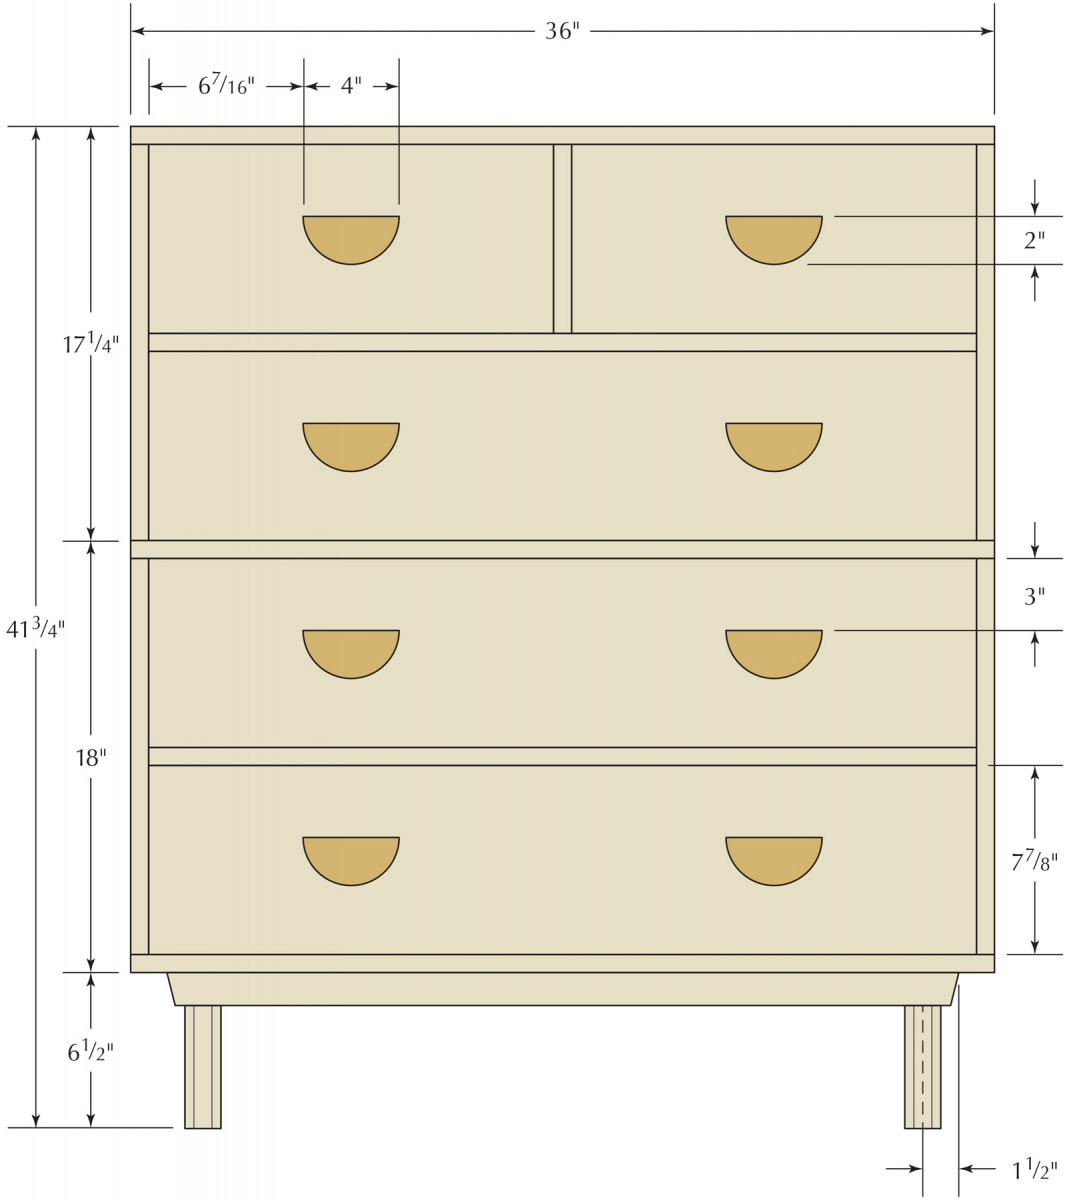
Elevation
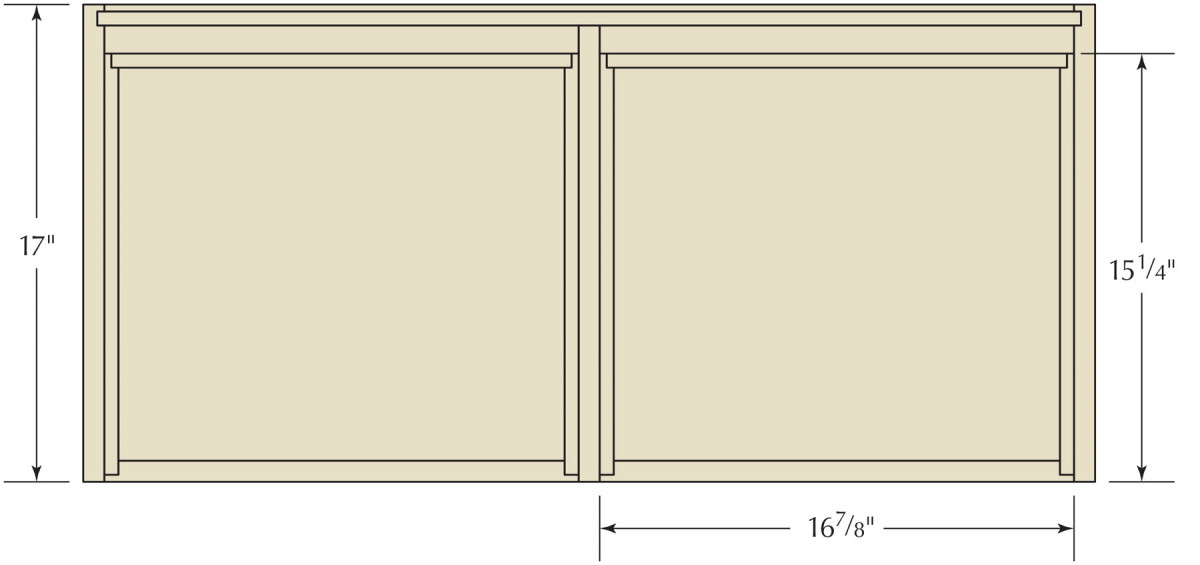
Plan Section
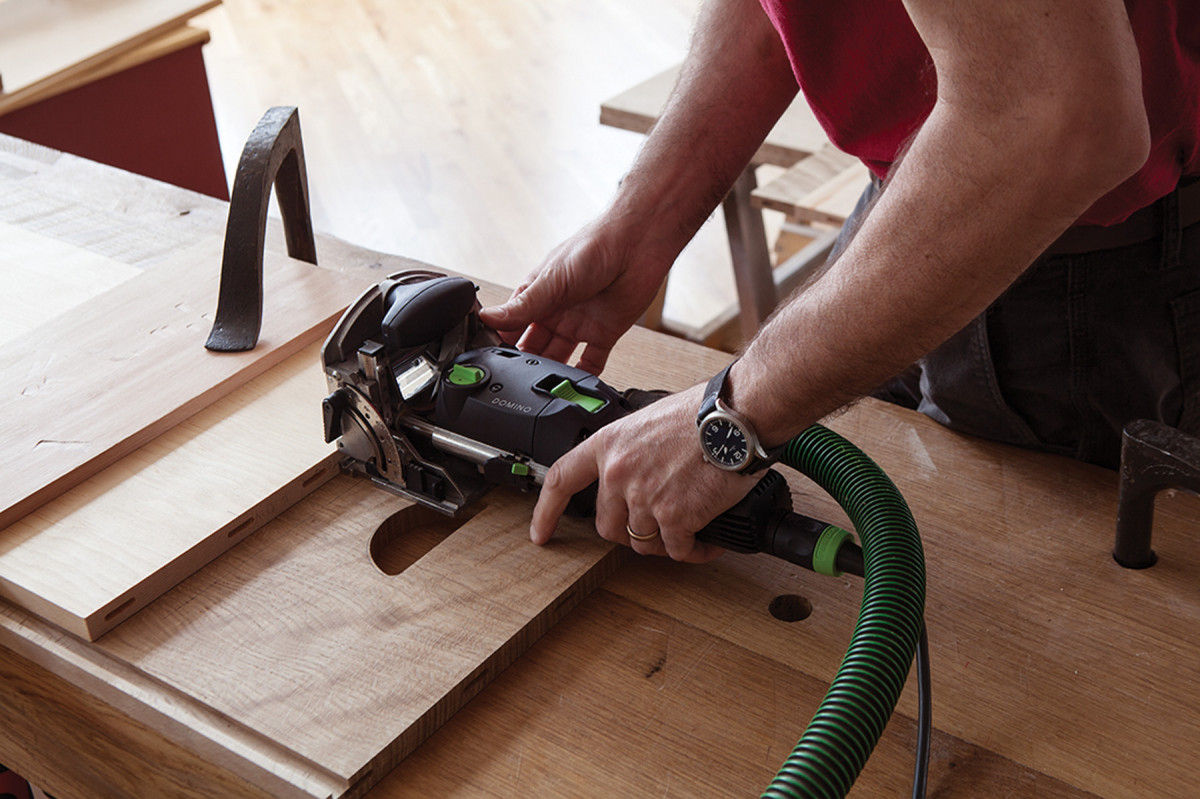
Domino Joinery
Into the end. Though this is a modern joint, traditional workholding is still my favorite way to keep the parts clamped to the bench.
Though I use traditional hand-cut joinery for most things, I cannot deny the Domino is a legitimate way to make excellent joints. I bought the machine for production work when it was first introduced and have been impressed with it. It is superior to a dowel or biscuit machine and produces a robust loose-tenon joint with ease.
For this piece, I used 5mm x 30mm Dominos to join the tops, bottoms, ends and the dividers between the drawers. I recommend at least five or six Dominos per joint.

Divider trick. Use the drawer dividers as a fence to guide the Domino when cutting the mortises in the end pieces.
Note the trickiness when it comes to attaching the bottom panel of the top carcase. It’s 3⁄4” narrower than both the top panel and horizontal drawer divider. And it is captured between the end pieces. This small complication allows the finished piece to have only one horizontal drawer divider showing between the top and bottom cases.
Then turn the machine 90° and use the same layout marks to make the mortises in the drawer divider.
The trickiest part of the joinery for the case is the vertical divider between the two top drawers. The first hurdle is getting the drawer divider the correct height. Here’s how: Once the horizontal divider is mortised, clamp up the carcase without glue. Place the over-tall vertical drawer divider up against the end piece and use it as a ruler to mark the finished height with a knife. Saw and shoot the divider to finished height.
The last major operation before gluing the carcase parts together is to relieve the interior of the half-moon handle cutouts. This relief, which is made with a cove bit in a router, gives a place for your fingers to go when lifting the carcase.
Assemble the Carcases
Saw & shoot. Use the ends of the case to mark the finished height of the vertical drawer divider.
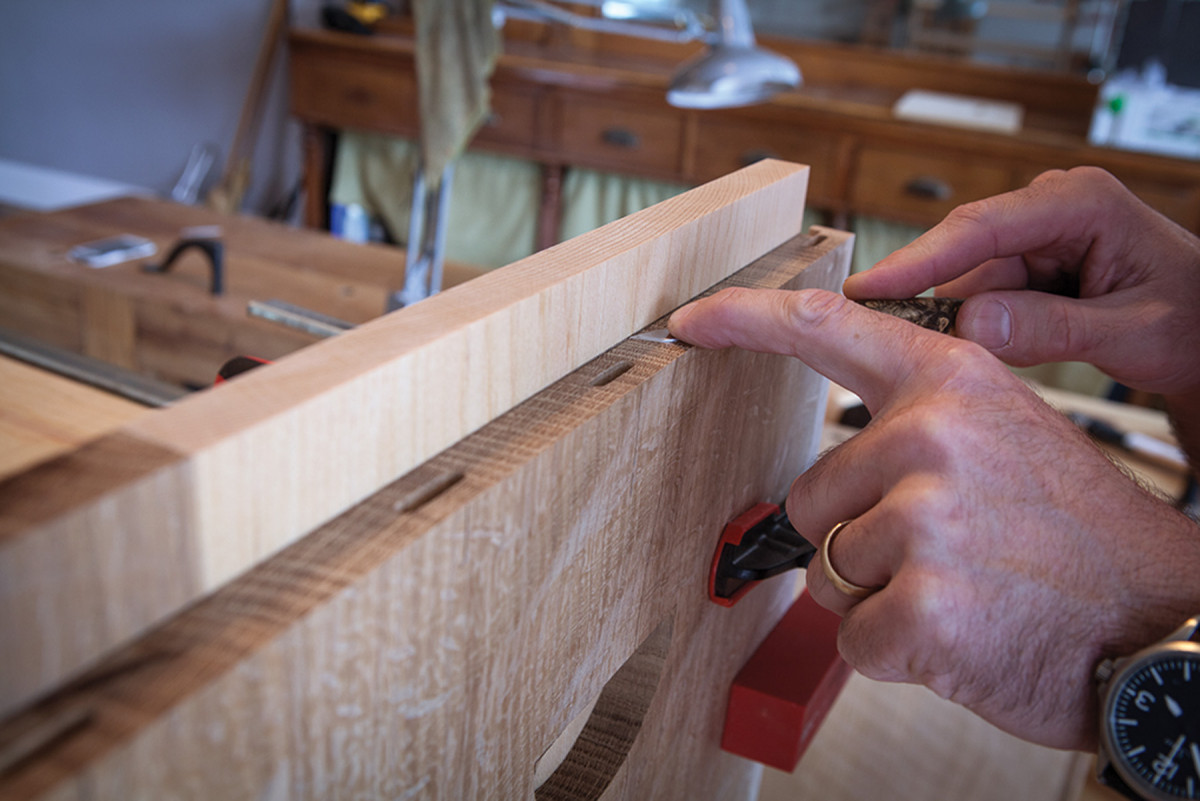
Before assembly, use a smoothing plane to remove all the ugly machine marks from the panels.
Then saw and shoot to the line (traditional habits die hard).
While I used modern joints on this piece, I opted for traditional glue. Liquid hide glue is an outstanding glue for Domino, biscuit or dowel joinery. Unlike yellow glue, hide glue doesn’t tend to swell and lock your joints – it’s much more of a lubricant. It also sets up slowly (which is great when you work by yourself) and it is reversible (which is great when you mess things up by yourself).
Get a grip. Use a cove bit set to make a 1⁄2″-deep cut to relieve the inside of the cutout.
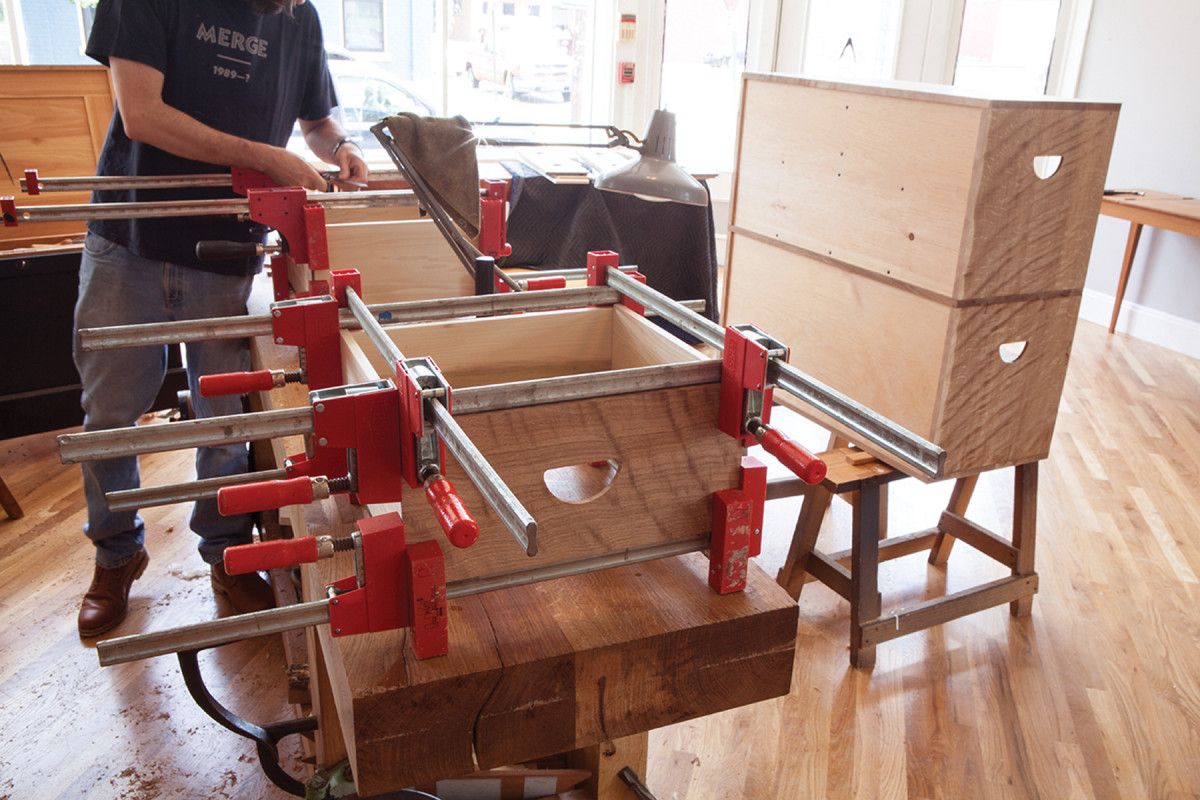
Assemble the carcases by working from the center out. Glue the horizontal dividers to the ends and clamp them together. Then add any other dividers, plus the top and bottom. After clamping everything together, check each carcase to ensure it is square.
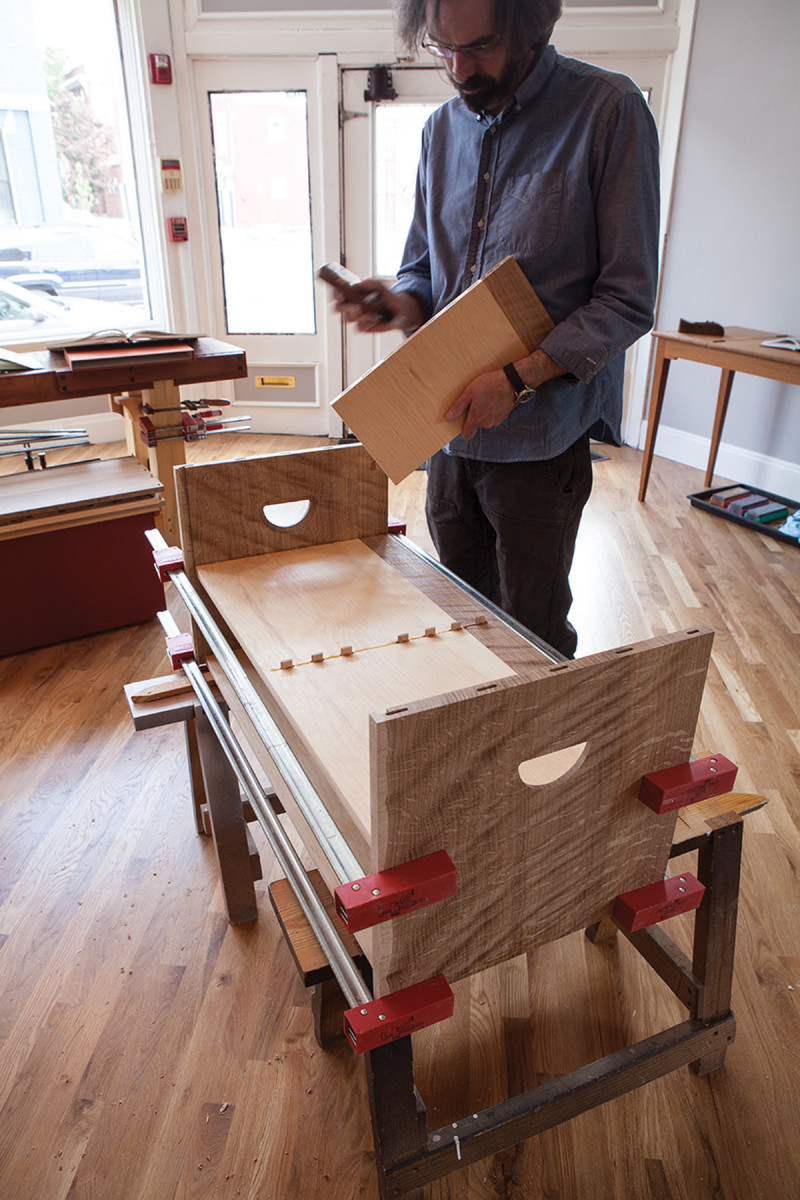
Take your time. Using liquid hide glue allows you to take up to 45 minutes to complete the assembly before the glue sets. This makes for easy one-person assembly jobs.
The only big difference between the assembly process for the top and bottom carcases is that the top carcase has a vertical drawer divider (the bottom carcase doesn’t). And with the bottom carcase, you’ll need to insert the cabinet back in place during assembly (as mentioned earlier). So don’t forget to do that.
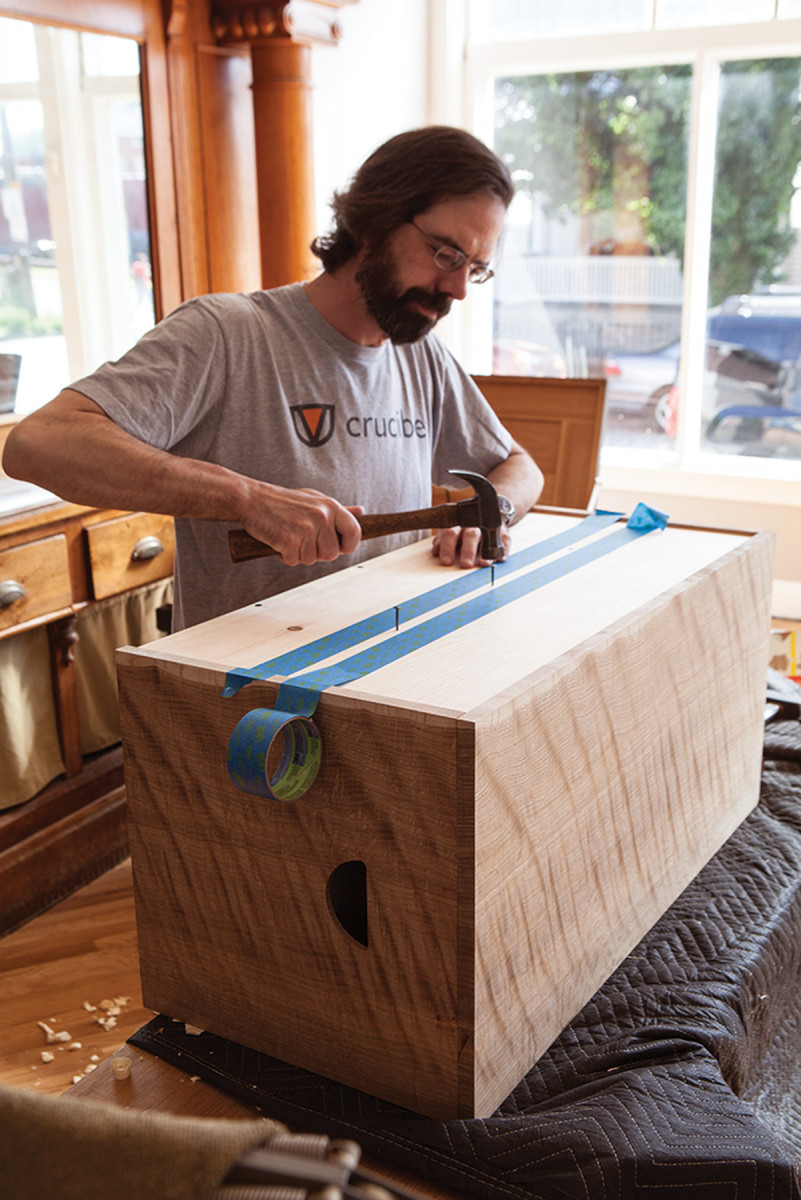
Tape guides the way. I use blue tape to temporarily mark out where my nails should go. Then I re-roll the tape back on the roll to use it again.
After the glue has cured, remove the clamps. Slide the 1⁄2“-thick back into the top case and nail the backs to the carcase members. I used 4d die-forged nails, which hold tenaciously but let the wood move without cracking.
Domino Drawers
I think it’s been about 15 years since I made a drawer without using dovetails. But after much thought, I concluded that a drawer made with Dominos could be incredibly strong. And I came up with an easy method that requires little layout or tricky cuts.
Drawer parts. Here you can see the rabbets and grooves that make up the drawers. I’m smooth-planing the drawer back before assembly.
Here’s an overview: It begins by making a simple rabbeted drawer and gluing it together. The drawer front has 1⁄2” x 1⁄2” rabbets at both ends. The 1⁄2“-thick drawer sides have 1⁄2” x 1⁄4” rabbets cut on their back ends. Then, to hold the 1⁄2“-thick bottom, make 1⁄2” x 1⁄4“-deep grooves in the drawer sides and drawer front.
Glue up the drawer. After the glue is dry, use the Domino to cut 5mm x 28mm-deep mortises through the drawer sides and into the drawer front and drawer back. Glue in 5mm x 30mm Dominos and cut them flush after the glue dries.This creates, for lack of a better word, a through-Domino joint, which works much like a “pin and crescent” joint – also called a Knapp joint.
First, glue alone. Assemble the drawers with glue and clamps – no nails, screws or Dominos. The glue alone will hold the parts together for the Domino joinery later.
First cut all your drawer parts to finished size and check them against your glued-up carcases to ensure they fit into their drawer openings. Make the cutouts for the drawer pulls and rout the coved relief on the inside – just like you did on the ends of the carcases. Then cut all the rabbets and grooves for all of the pieces. Then assemble the drawers with glue and clamps.
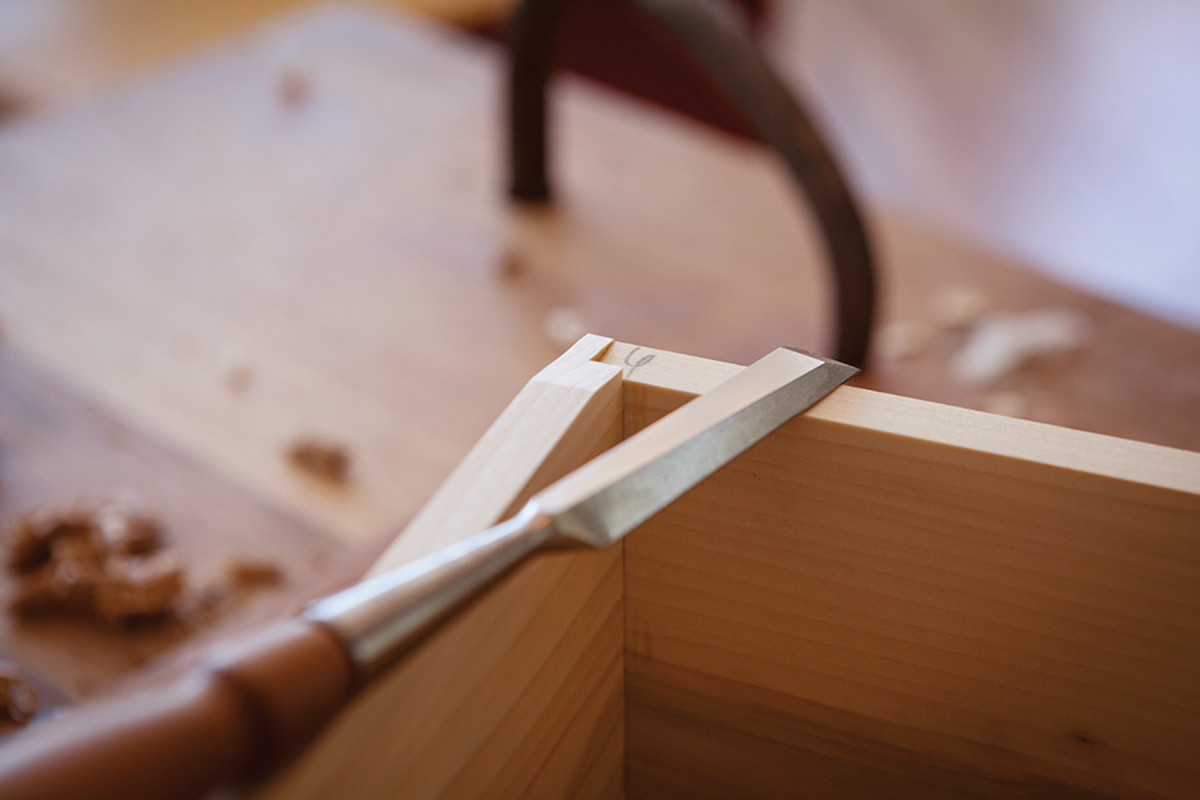
Drawer detail. Make this bevel with a chisel. The bevel (plus the fact that the drawer back is a bit narrower) makes for a drawer that’s easy to operate and insert into the carcase.
After the glue has cured, level the joints and bevel off the top rear corner of the drawer sides. This makes it easier to insert the drawer into the carcase. Note also that the drawer back isn’t as tall as the drawer sides. This detail makes the drawer easier to close.
Now fit the drawer bottoms into the drawers and secure them with a couple 4d nails through the bottom and into the drawer back.
Cut the Drawer Mortises
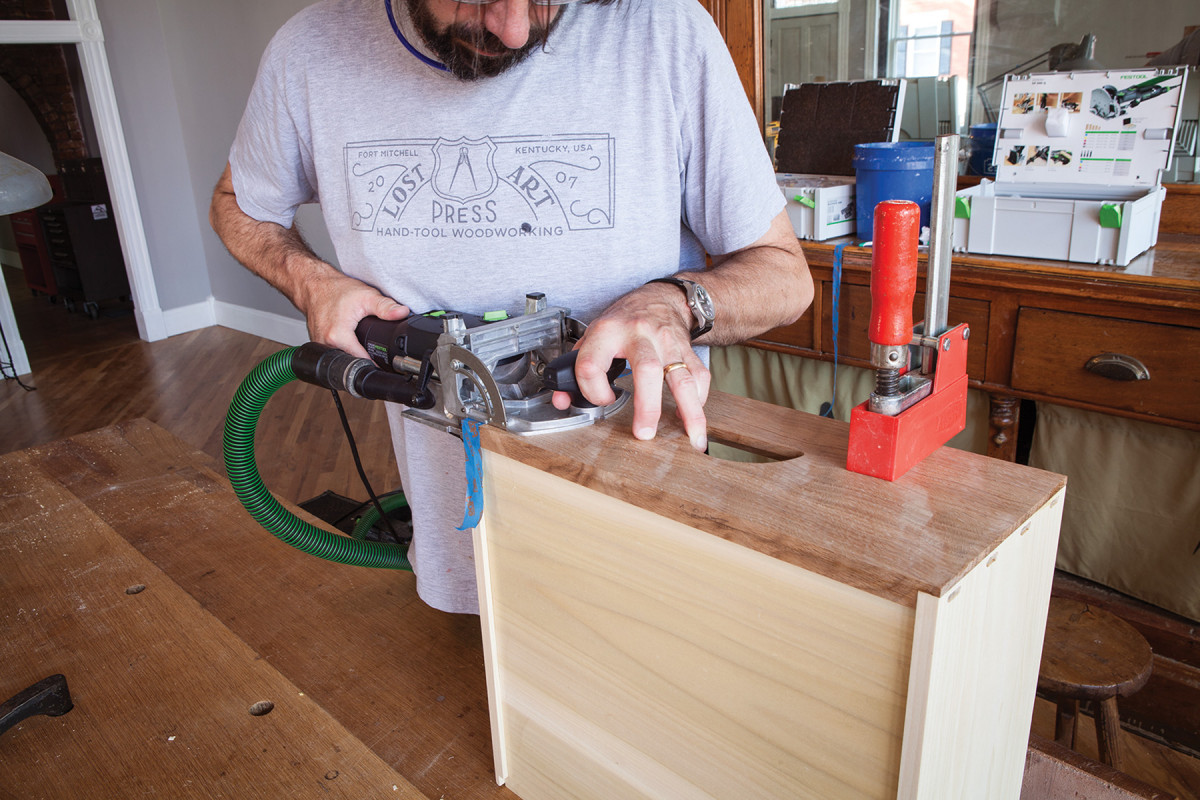
Plunge in. The Domino cuts a deep mortise through the drawer side and drawer front.
With the drawers assembled, you can cut the 5mm x 28mm mortises for the Dominos in the finished assemblies. I used four Dominos at each front corner of the drawers with three at each back corner.
Clamp the drawer to your bench with the drawer front facing up. Then lay out and cut the four mortises at each corner. If you own the Domino Support Bracket, which attaches to the underside of the machine, this is the time to use it. The bracket will reduce the chance of the machine tipping down, ruining the joint.
Drawer stops. My drawer stops are 3⁄16″-thick poplar, which was scrap from making the drawers. Tack the stops in place with 1⁄2″ brads.
Now paint glue on the Dominos and hammer them into the joints. Here I used yellow glue. Why? I was out of hide glue. When the glue dries, cut the Domino flush to the drawer side and plane things smooth.
Now the Details
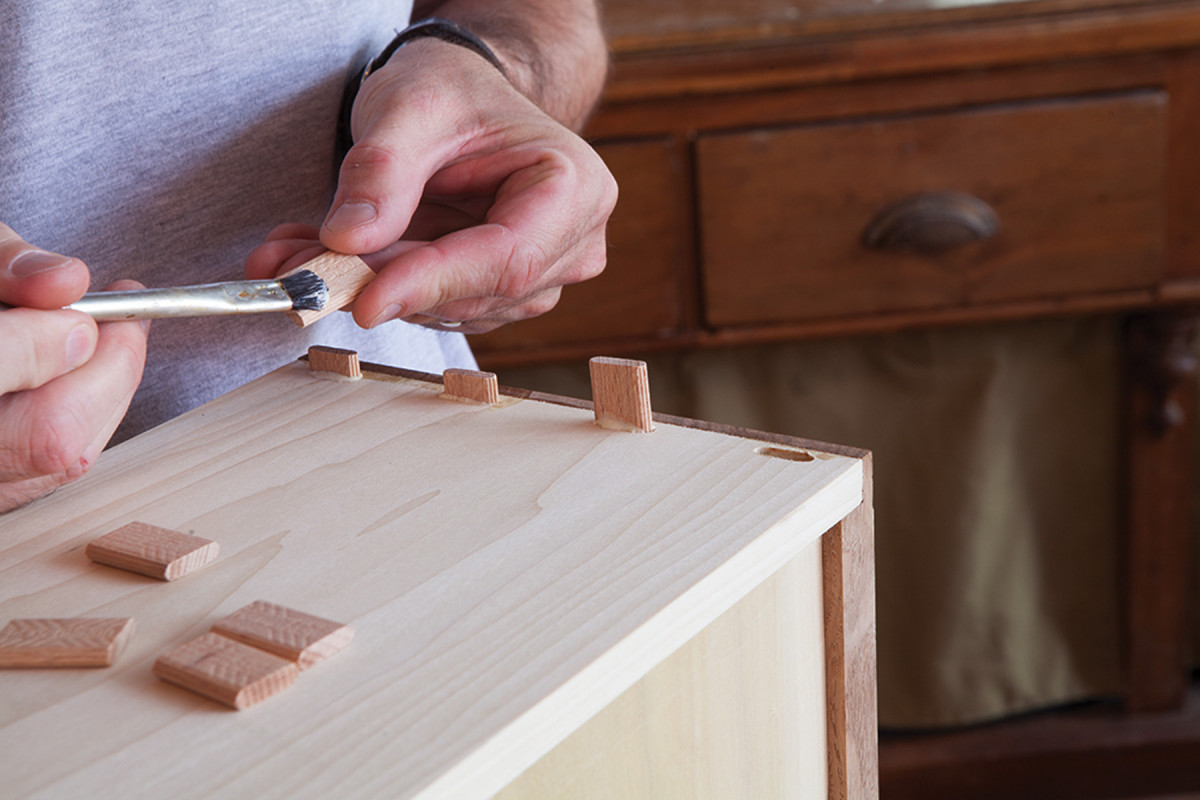
Paint the Domino. Use plenty of glue. I paint glue in the mortise and on the Domino. Glue is cheap; broken drawer joints are not.
Fit the drawers with a plane. Once they move smoothly, tack some drawer stops in the carcase to keep the drawers in place when closed. I opted to have my drawer fronts 1⁄16” recessed from the front edges of the carcase. This hides small errors and prevents you from having to flush up any irregularities over all the drawer fronts.
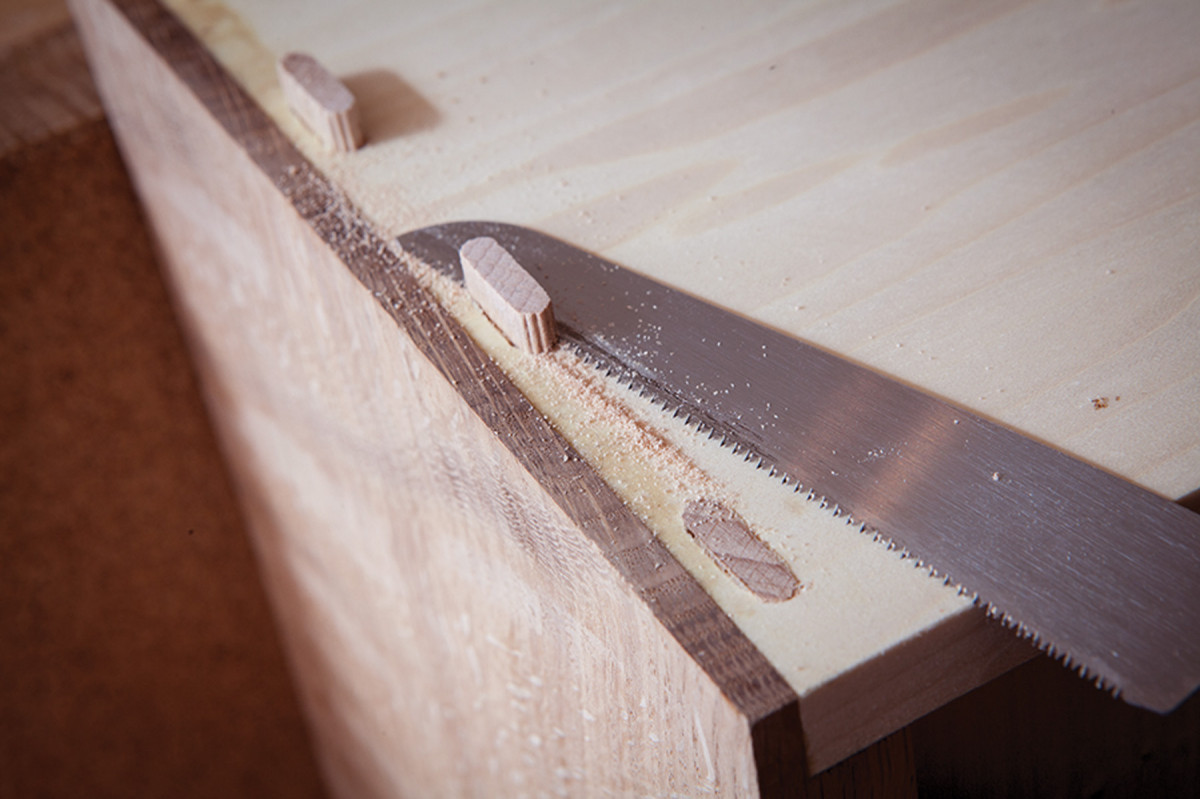
A flush finish. A flush-cut saw makes quick work of removing the extra 2mm protruding from the drawer sides. A plane finishes the job.
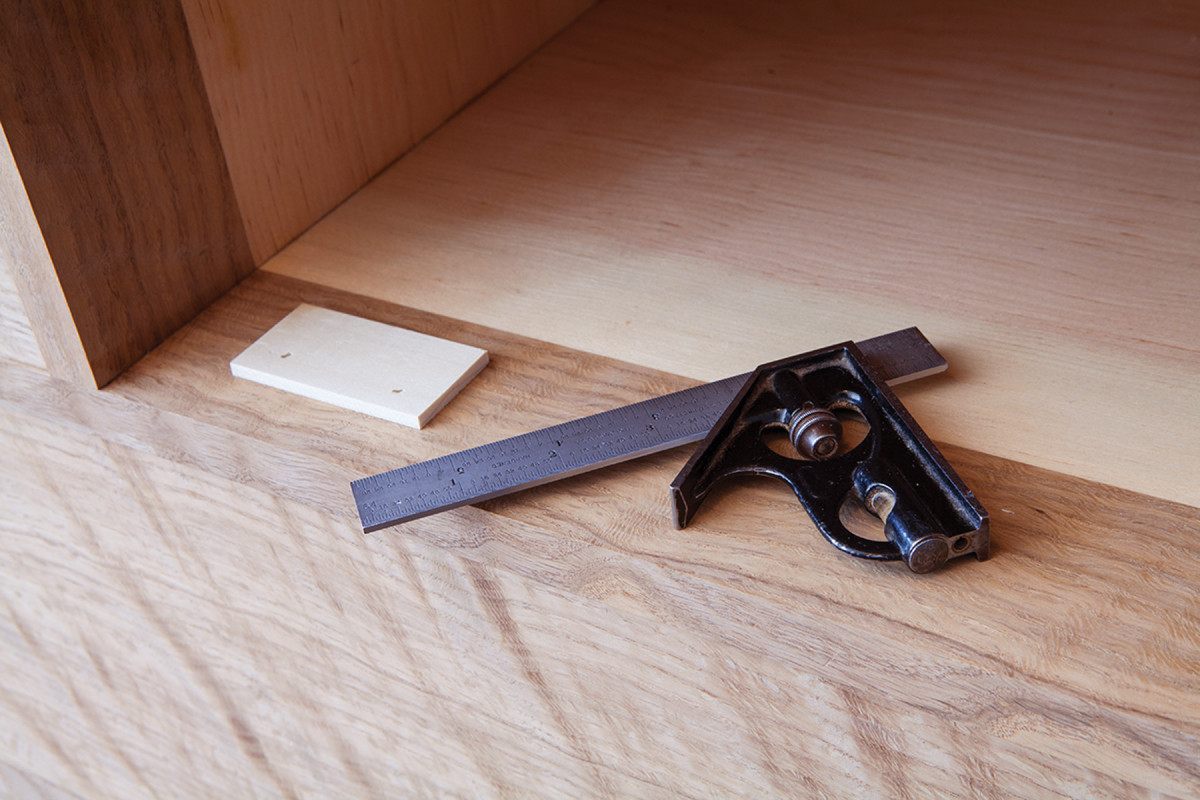
The next detail is connecting the top case to the bottom carcase. As mentioned before, this is done with two 1″-diameter dowels that stick up from the bottom carcase that nest into matching holes in the underside of the top carcase. Here’s how to make that happen with almost no measuring:
Clamp the top carcase to the bottom carcase so they fit as flush as possible. Now mark on the bottom of the top carcase where you want your dowels to go – about 2″ in from the ends and 3″ in from the front is fine. Drill a 1⁄16” hole through both carcases at each of these marks. Now unclamp the cases.
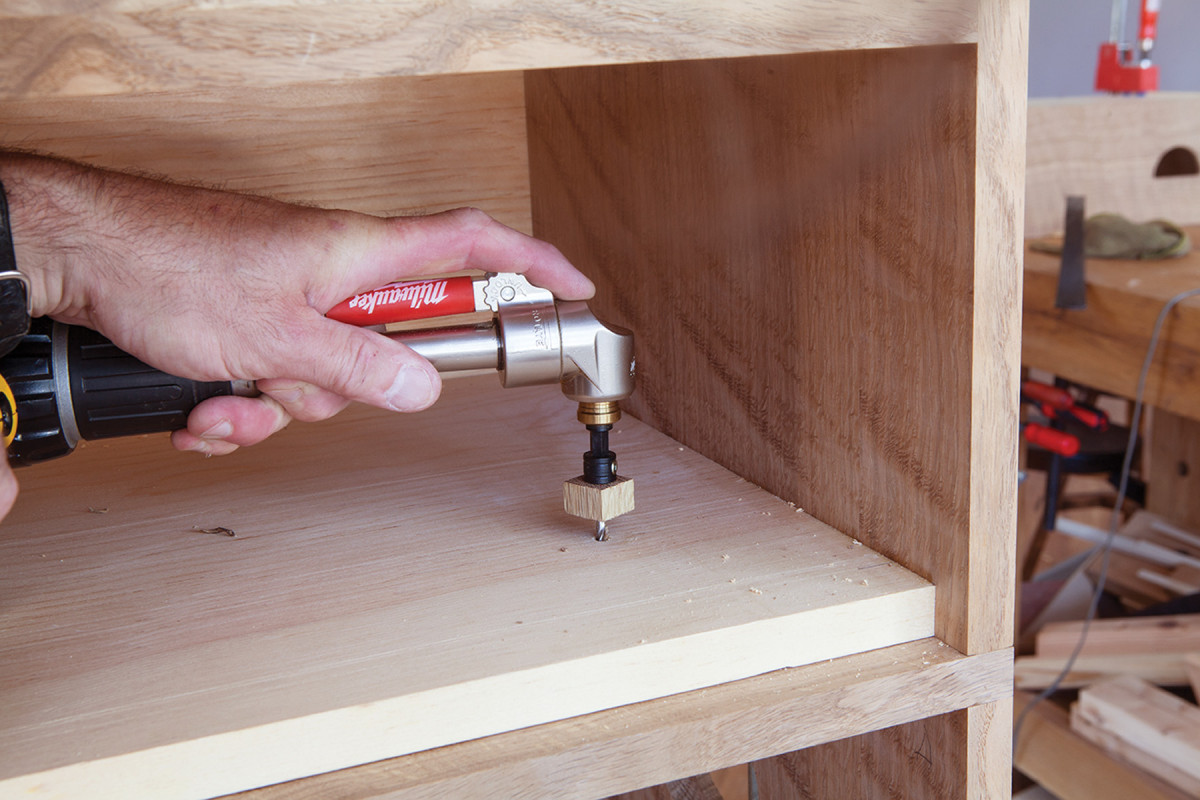
A hole to pilot you. A 1⁄16″ pilot drilled through both carcases makes it easy to drill the 1″-diameter holes for the dowels. (The little block of wood? It’s covering the flutes on a countersink bit – the only 1⁄16″ bit I have with a hex shaft to fit my right-angle drill.)
You can now use these 1⁄16” holes to guide the tip of your 1″-diameter Forstner bit. Drill 1⁄2“-deep holes in the underside of the top carcase and the top of the bottom carcase. Cut two bits of 1”-diameter oak dowel to about 7⁄8” long. Glue those into the holes in the bottom carcase. If you drilled the pilot holes plumb, then the top case should drop on the bottom case with a nice thunk.
If it doesn’t, rasp the dowels until things fit nicely.
Follow the pilot. Put the tip of your Forstner in the pilot hole and drill 1⁄2″ down. Keep the drill as plumb as possible.
The last detail before leaving the carcase is to add the brass backplates to the cutouts in the drawer fronts. I used 1⁄16“-thick brass and painted the front black. You can use wood, of course, but I wanted the fingers to find the cool and smooth brass inside the pulls.
I cut the brass to size with a hacksaw and filed the edges smooth – you don’t want lacy underwear to catch the corners. Then cut clearance holes and countersinks in the brass – all of this can be done with your woodworking tools set to slow speeds.
Screw the brass in place with #8 x 5⁄8” screws.
The Plinth
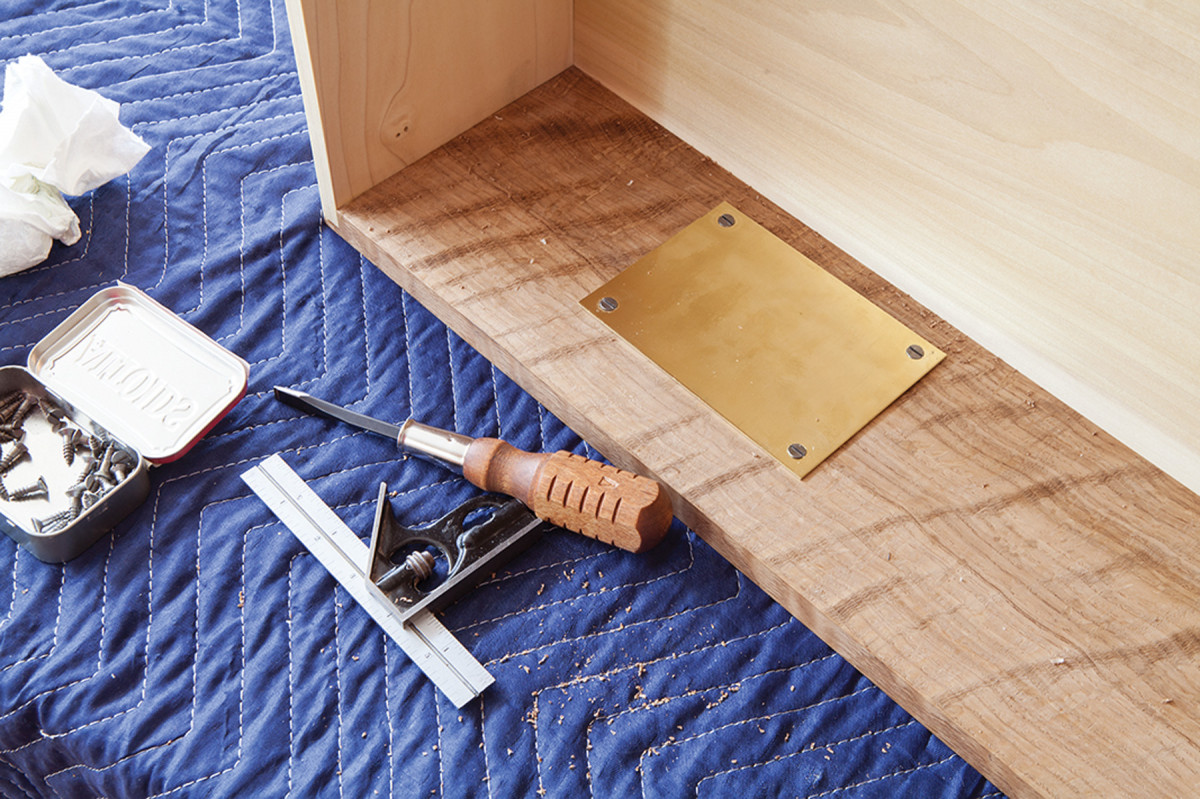
Brass backplate. I considered mortising these into the inside of the drawer front, but that wouldn’t have left enough space for your fingers to get into the coved area between the backplate and drawer front.
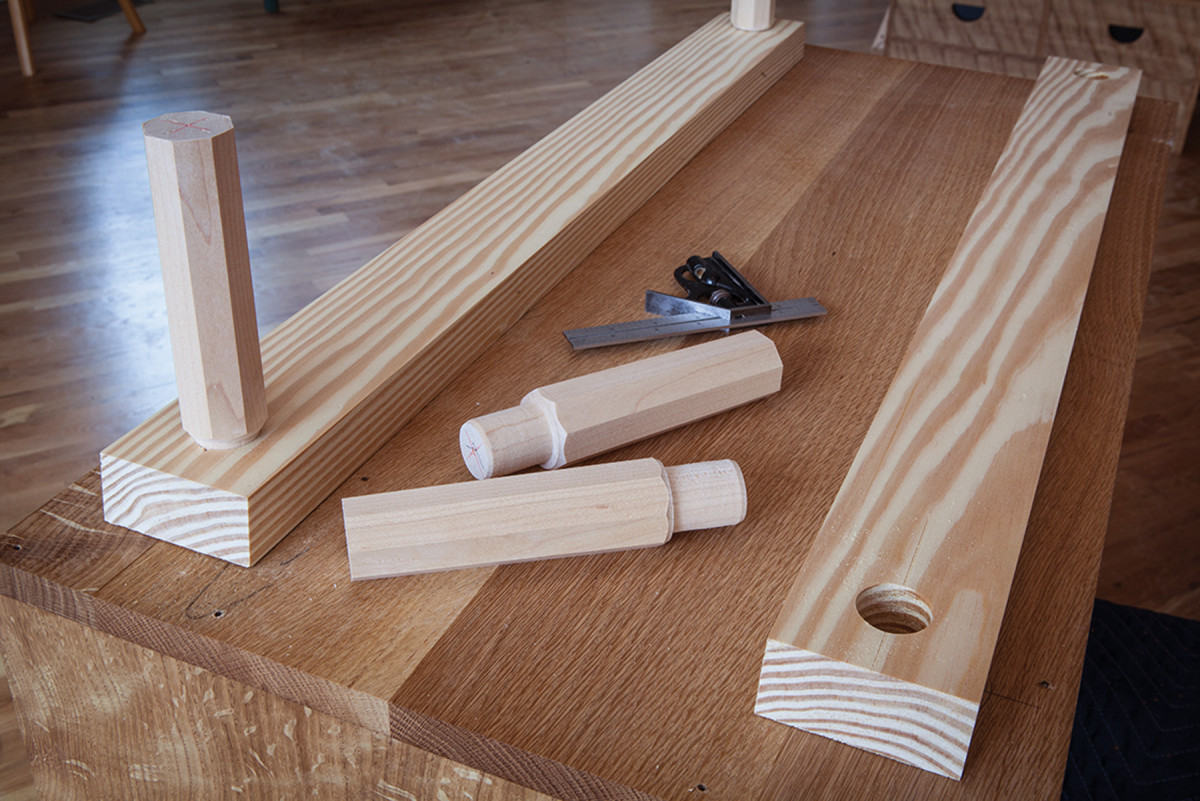
I experimented with several plinths before settling on this simple one. The second-place plinth used 5″ rubber casters that were affixed to 3⁄4” x 5″ x 5″ blocks on the underside of the carcase. It made the whole project easy to move.
The first-place plinth is also easy to make. It consists of two base pieces that are 13⁄8” x 3″ x 33″. I beveled the ends at 14° then bored 11⁄8“-diameter through-holes near the ends for the legs. Then I screwed the two base pieces to the bottom of the carcase.
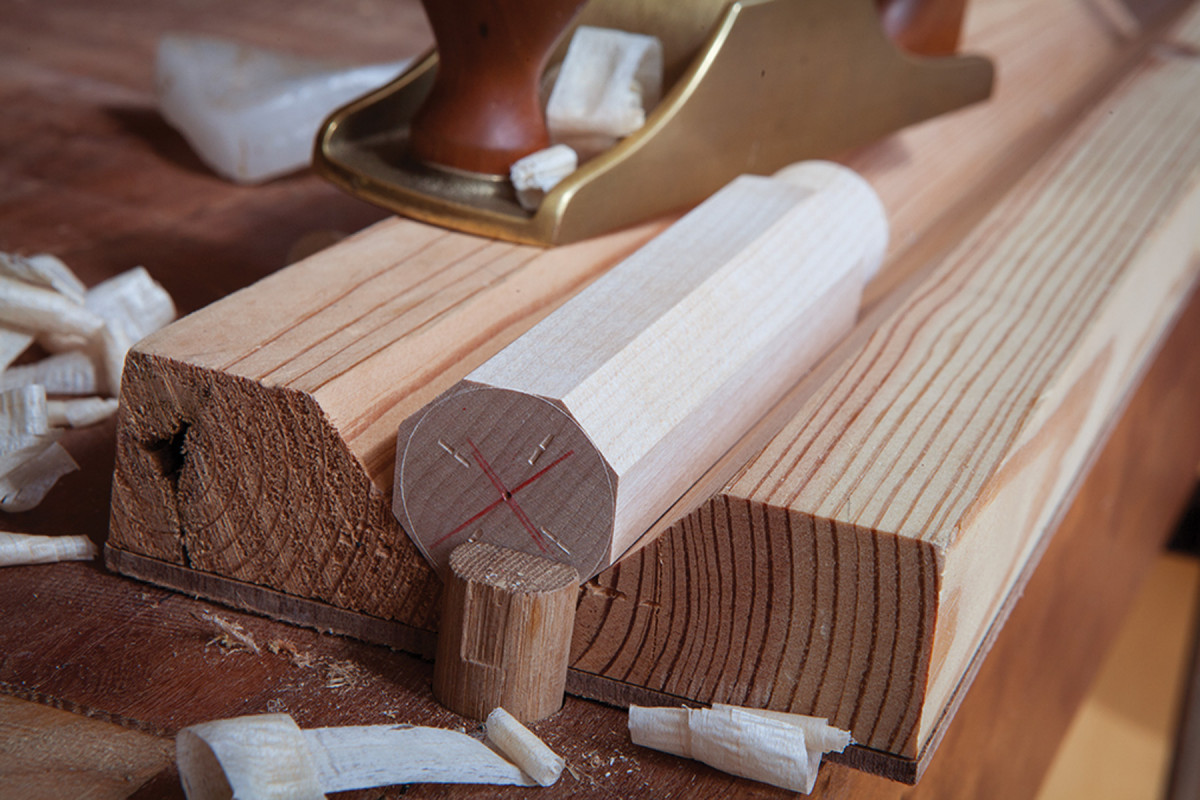
Plane to taper. Mark the final diameter on the underside of your legs using dividers. Plane down to that line.
The legs are 11⁄2” x 11⁄2” x 61⁄2” long octagons. I turned a tenon on the end of each leg to match its mortise, and I made the tenon a tight friction-fit. Then I planed the octagons so they tapered to 13⁄8” at the floor.
I wanted the legs to fit tightly so friction would keep the legs in place while the piece was being used. Yet you can remove the legs with a good tug to move the piece. If you want more holding power, consider embedding a rare-earth magnet in the top of each leg and at the bottom of each mortise.
Finishing
Tight fit. Screw the two base pieces of the plinth to the carcase from inside the case. Then fit each leg tightly into its mortise.
The finish is simple. I used a black aniline dye to color the plinth. Then I sprayed two coats of super-blond shellac on all the parts (sanding lightly between each) and added a coat of beeswax thinned with linseed oil.
The finished piece was intended to be a spec piece that I could sell to help pay my daughter’s college tuition. But my wife, Lucy, liked it so much that she claimed it for herself. She doesn’t much look like the British Empire’s Queen Victoria, but (like Victoria) she gets what she wants.
Editor’s note: This article originally appeared in the November 2016 issue of Popular Woodworking Magazine.
Blog: Read a seven-part series on how this piece was designed from scratch: Part One, Part Two, Part Three, Part Four, Part Five, Part Six, Part Seven.
Here are some supplies and tools we find essential in our everyday work around the shop. We may receive a commission from sales referred by our links; however, we have carefully selected these products for their usefulness and quality.


