We may receive a commission when you use our affiliate links. However, this does not impact our recommendations.
Splayed legs add stability indoors or out.
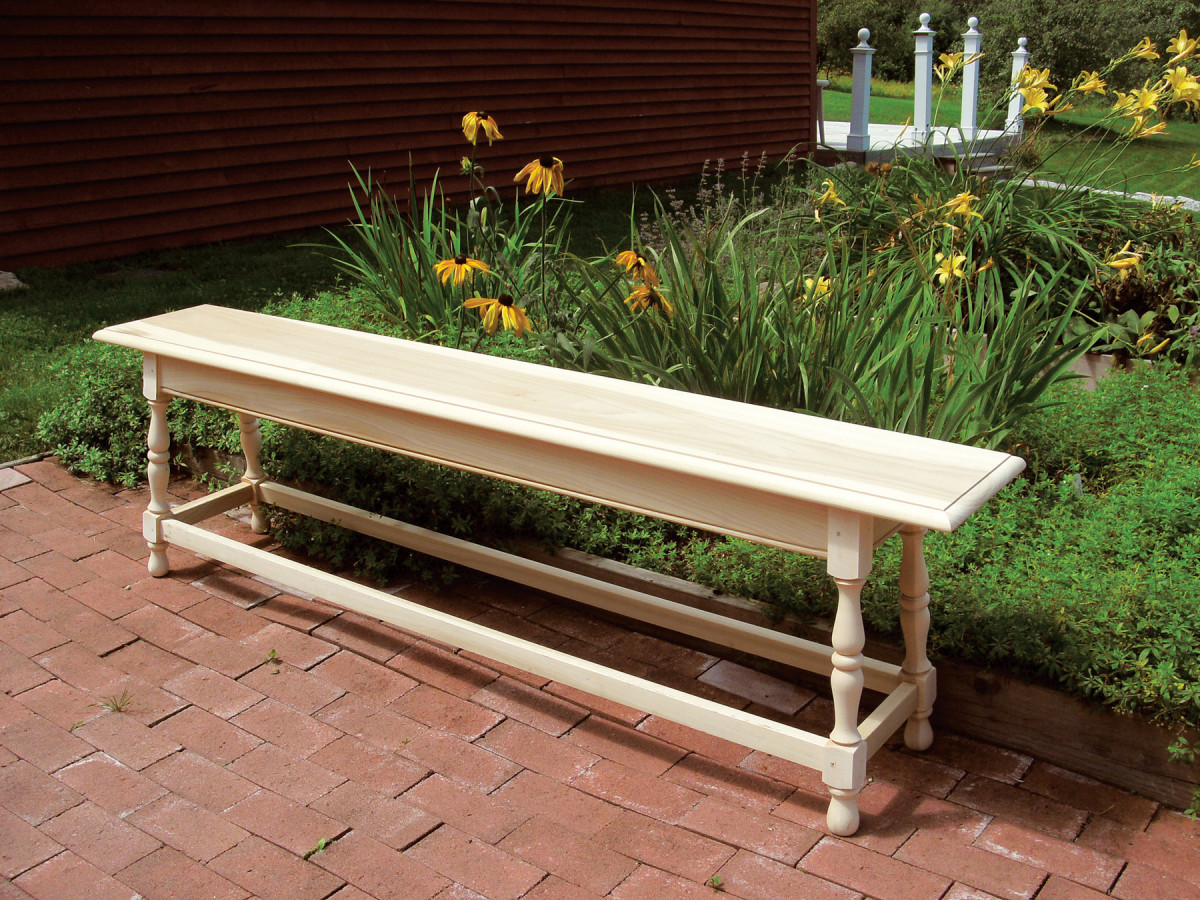
I demonstrate Windsor chair-making at the Common Ground Country Fair in Unity, Maine, an event that celebrates traditional crafts of all kinds. There’s never enough seating, so this year I resolved to build some benches to set up around my demonstration area. I wanted a simple design that would complement my Windsor chairs and stand up to hard use.
The bench shown here combines elements from several historical benches with a few of my own ideas. The legs splay, to increase stability, and the turnings consist of vases and rings, features commonly found in 17th and 18th century furniture. Historically, a clear pine seat would be typical. But I use poplar, because it costs less than pine these days, and wide boards without knots are readily available. Following tradition, I use 8/4 maple for the legs. Of course, you can change the length of the bench, or the width; just adjust the lengths of the aprons and stretchers to match your top.
Turn the legs
1. Mill four 1-7/8″ x 1-7/8″ x 21″ turning blanks for the legs (Part A Fig. A and Cutting List) and mark the centers on both ends.
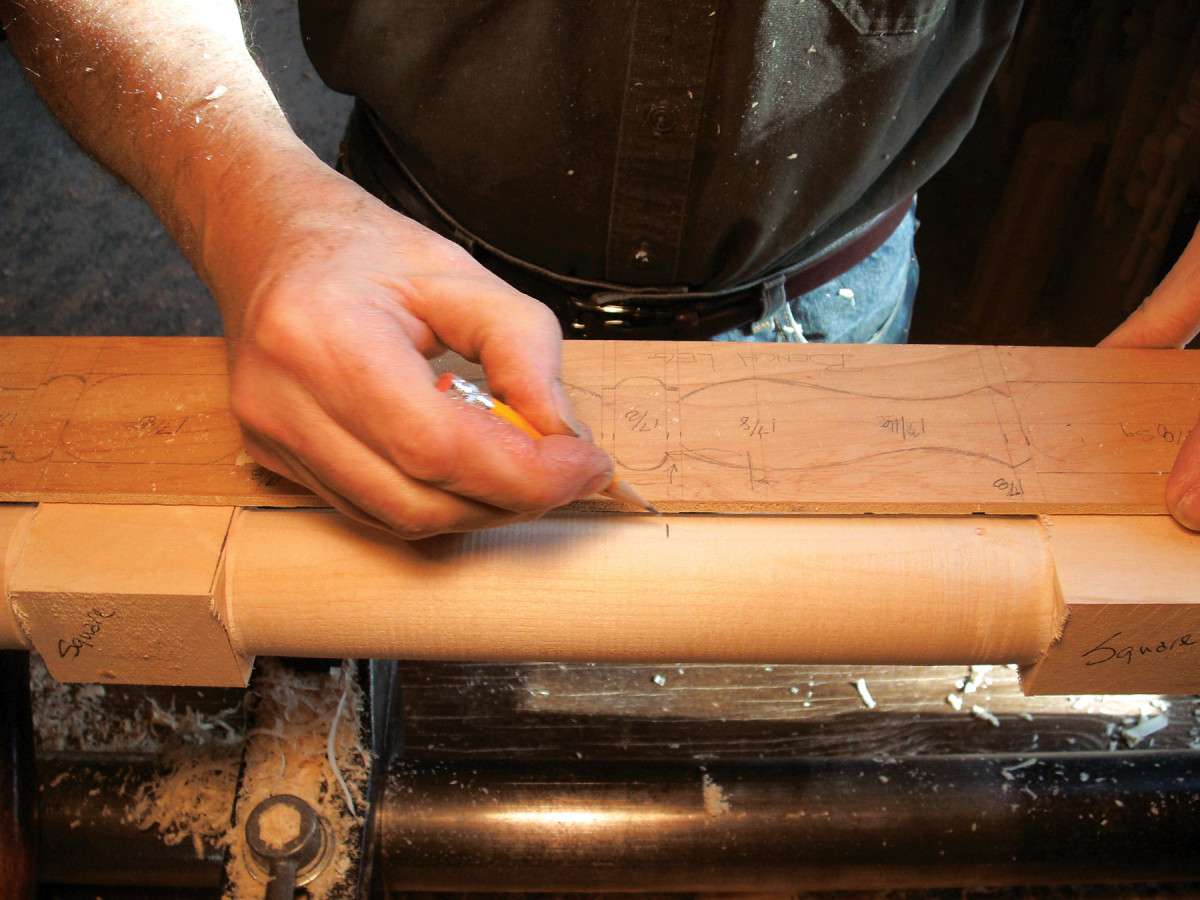
2. Make a template of the turned leg (Fig B), using a piece of 1/4″ plywood.
3. Position the bottom end of the template (the foot) flush with the end of one of the blanks, and mark the turning’s two square sections. Carry the lines around all four sides of the blank. Transfer these lines to the other three blanks.
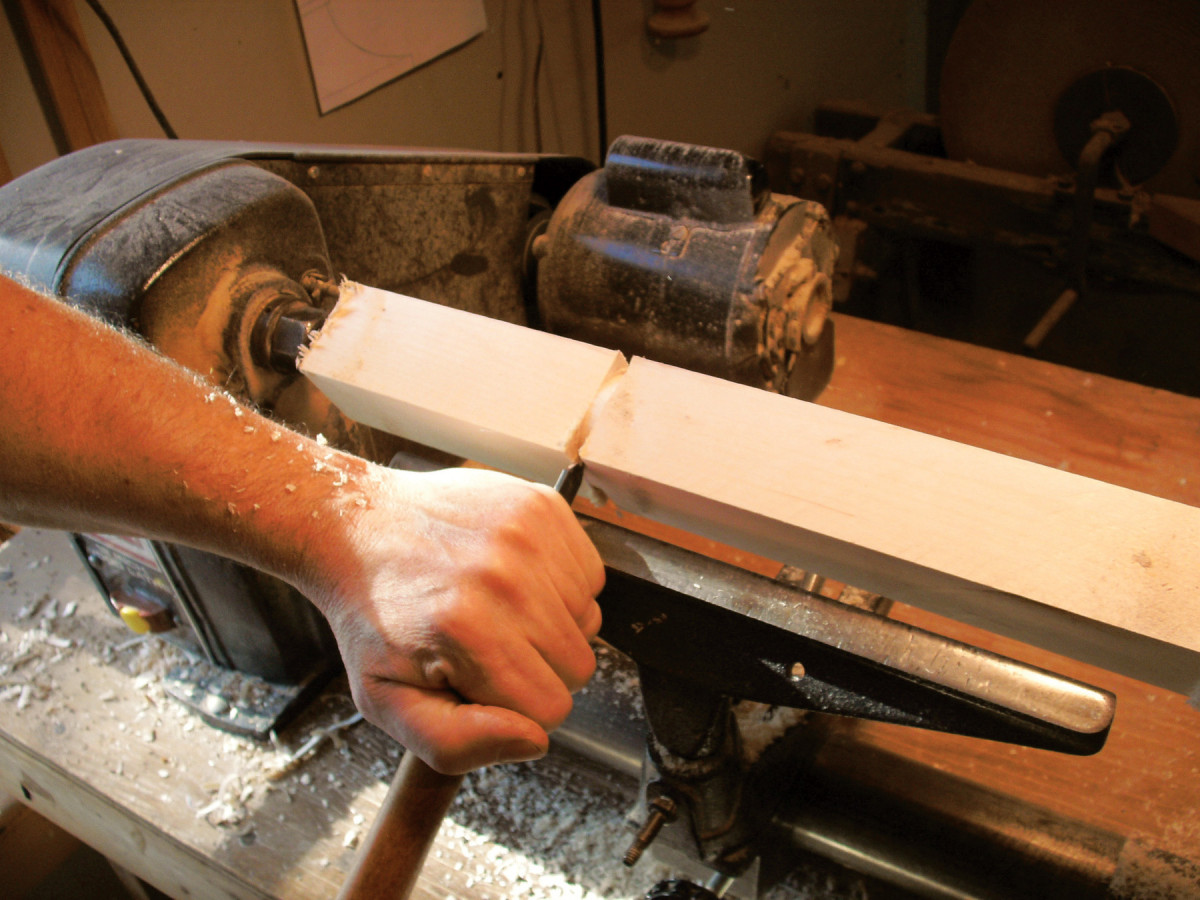
1. Start by turning the legs. Mount a blank on the lathe and cut in with a parting tool to establish the two square sections.
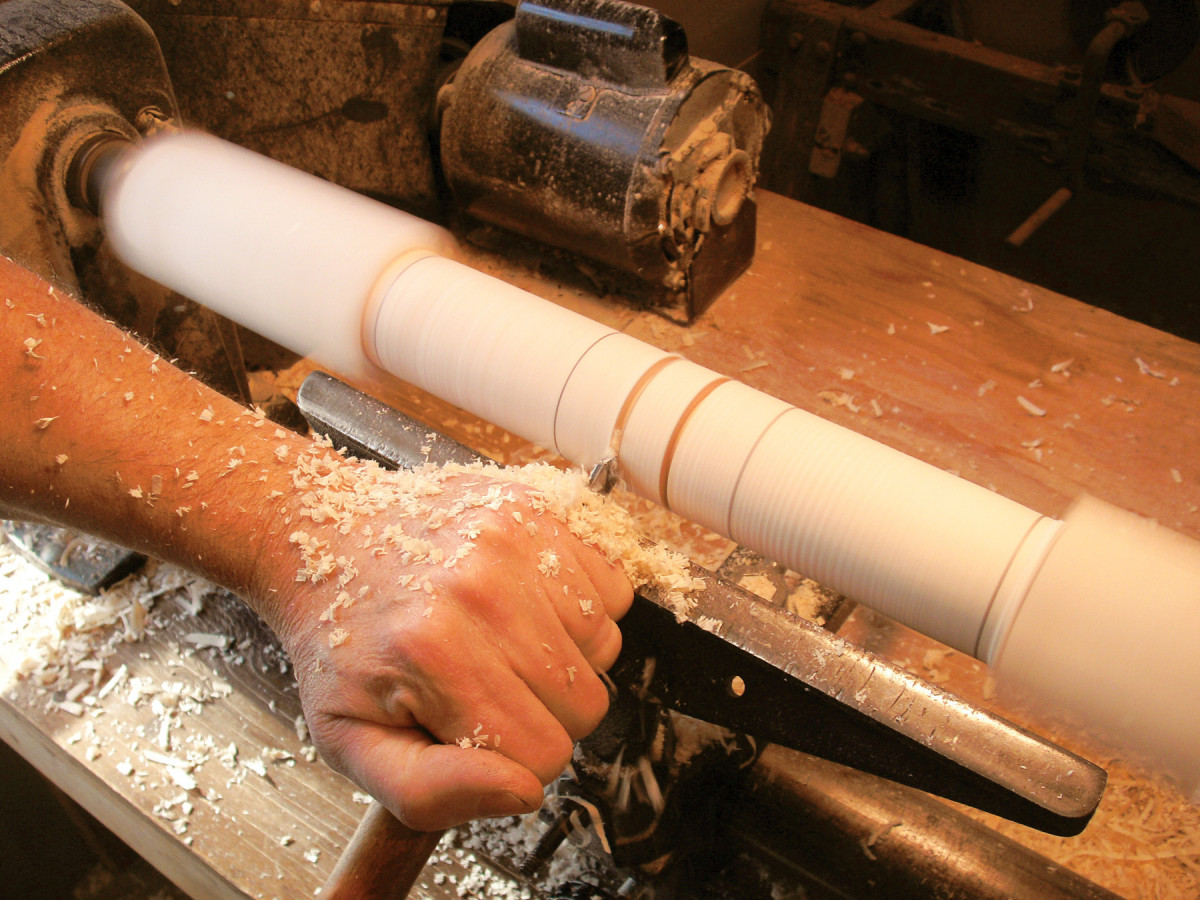
4. Mount a blank on the lathe and define the shoulders of the leg’s two square sections by cutting in with a parting tool on the waste side of each line (Photo 1). To avoid chipping the corners, start by making a shallow cut at the line. Carefully back out the tool and make a second adjacent cut to widen the groove. Then go back and deepen the first cut.
5. Switch to the spindle roughing gouge and turn the blank to a cylinder between the square sections and at the bottom. You may have to reduce the cylinder’s diameter slightly, if your blank isn’t perfectly centered—small variations between the finished legs won’t be noticeable after the bench is assembled.
2. Turn the center section to a cylinder. Then use a pattern to mark the transition points between the turned elements.
6. Using the template, mark the center cylinder’s major features (Photo 2). I mark both ends of the ring and the two large diameters of each vase.
3. Establish the center ring by cutting in with a parting tool.
7. Use a parting tool to define the ring’s two shoulders (Photo 3).
4. Rough out the ring and the vase shapes using a spindle/detail gouge. Shape the vases by eye, using the reference marks you’ve made. Switch to the skew chisel to finish the job. Use the same tools and techniques to turn the leg’s bottom section.
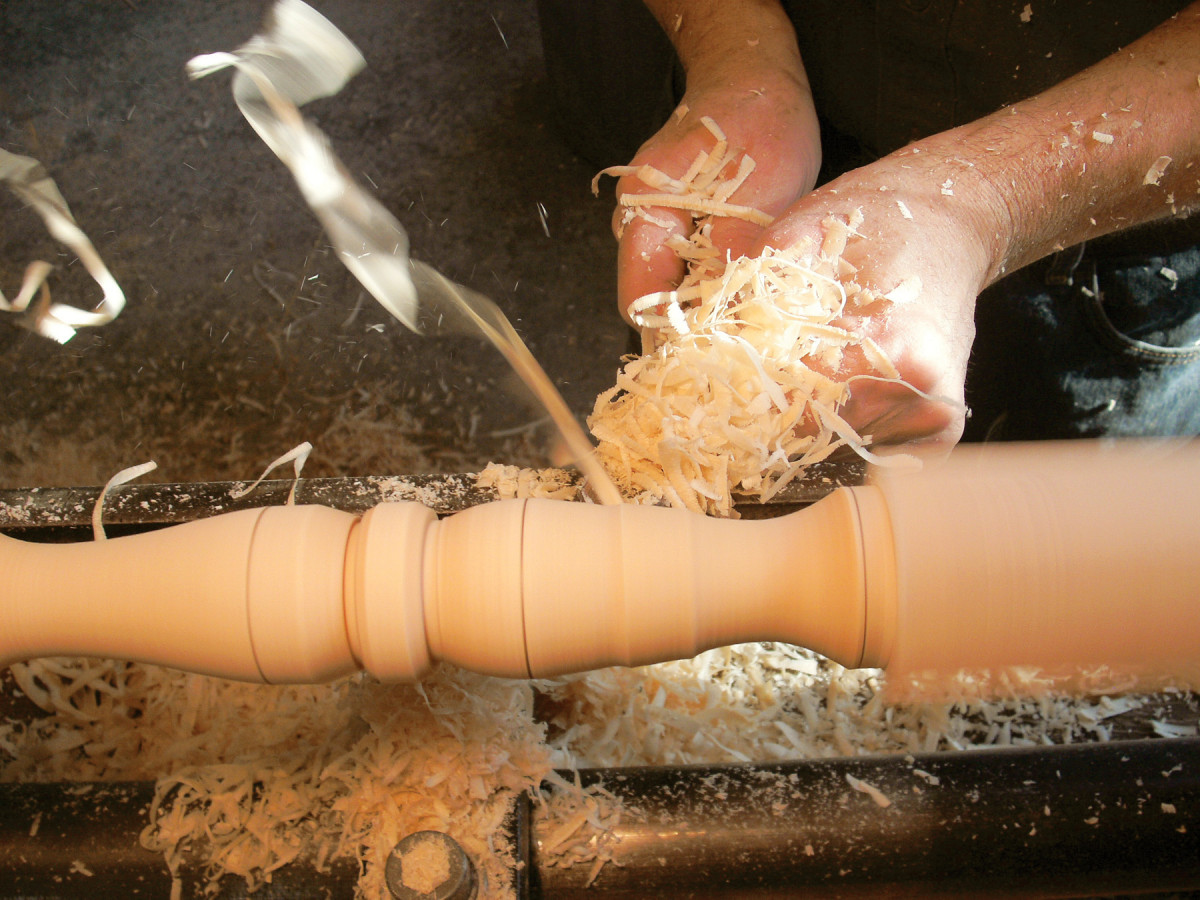
8. Switch to the spindle/detail gouge and cut away most of the waste at the base of each vase. Ease the outside edges of the ring to start forming its rounded profile. Then form the sweep of the upper portion of each vase (Photo 4).
9. Cut in with the parting tool to create the narrow fillets that flank the ring.
10. Use the skew to shape the ring and fair the curves on the vases.
11. Completing the bottom section of the leg is a breeze, because it includes the same elements that comprise its center section—a ring, a fillet and a vase-shaped foot.
5. Use the skew to shape the transition between the vases and the square sections. Then switch to the spindle/detail gouge to round the square shoulders.
12. Use the skew to cut in the transitions between the vases and the square sections (Photo 5). Then use the spindle/detail gouge to shape the rounded pommels on the ends of the leg’s square sections. Always work from the large diameter (the square section) to the small diameter (the turned section). Complete the job by making several light cuts, rather than a single aggressive cut. For each cut, start with the handle held low and the flute facing straight up, so the gouge’s bevel rubs on the area to be cut. Then, to make the cut, roll the gouge while lifting the handle and pushing in.
13. Finish-sand each leg while it’s still on the lathe.
Cut the mortises
14. Choose the best-looking adjacent faces on each leg. Then mark the other two adjacent faces for mortising.
15. Mark the apron’s bottom edge on the appropriate faces of each leg by drawing a registration line 3/4″ up from the start of the square section (Fig. B). On the lower square sections, mark the top of each stretcher.
16. Use the registration lines you’ve drawn to scribe the 1/2″ wide, centered mortises.
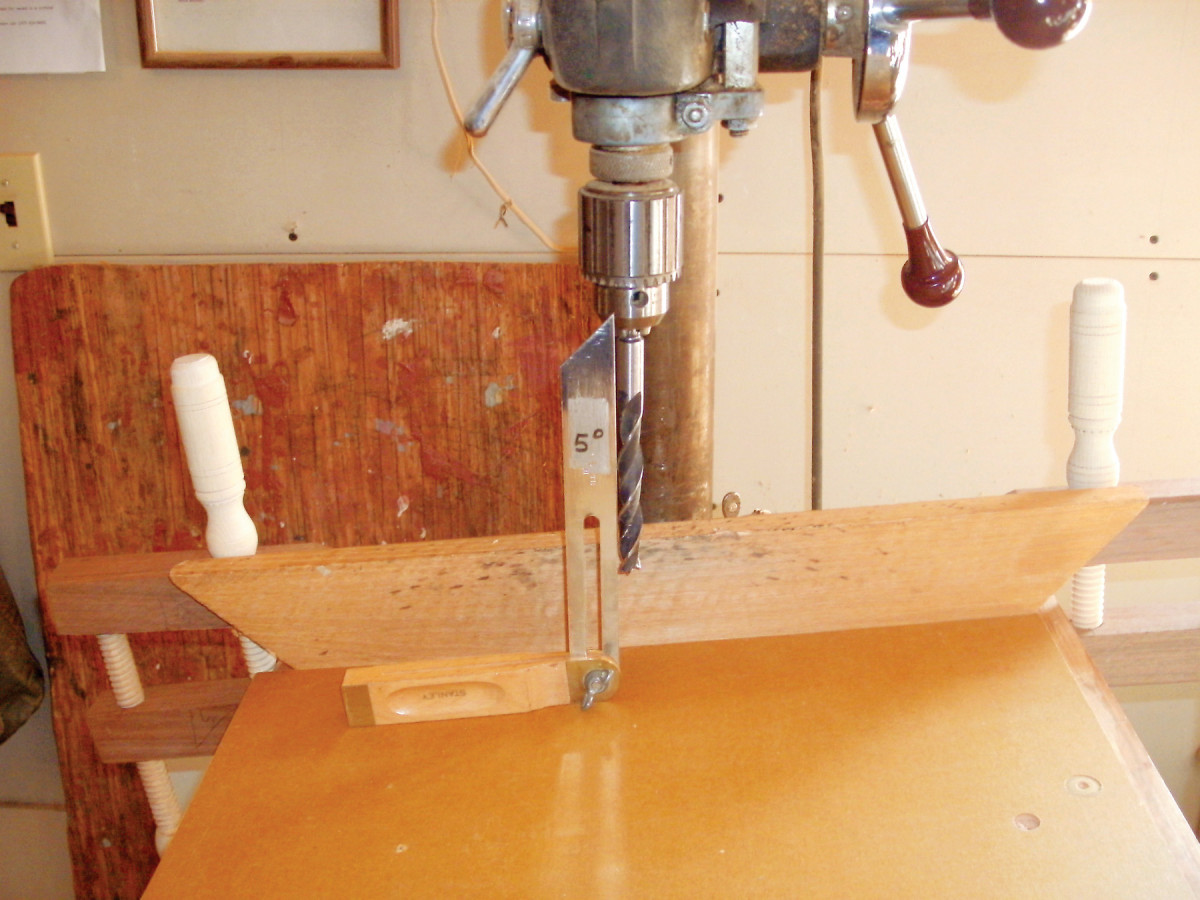
6. Tilt the drill press table 5˚ to rough out the mortises. To ensure that the mortises will slope in the correct direction, orient each leg with its bottom end on the low side of the table.
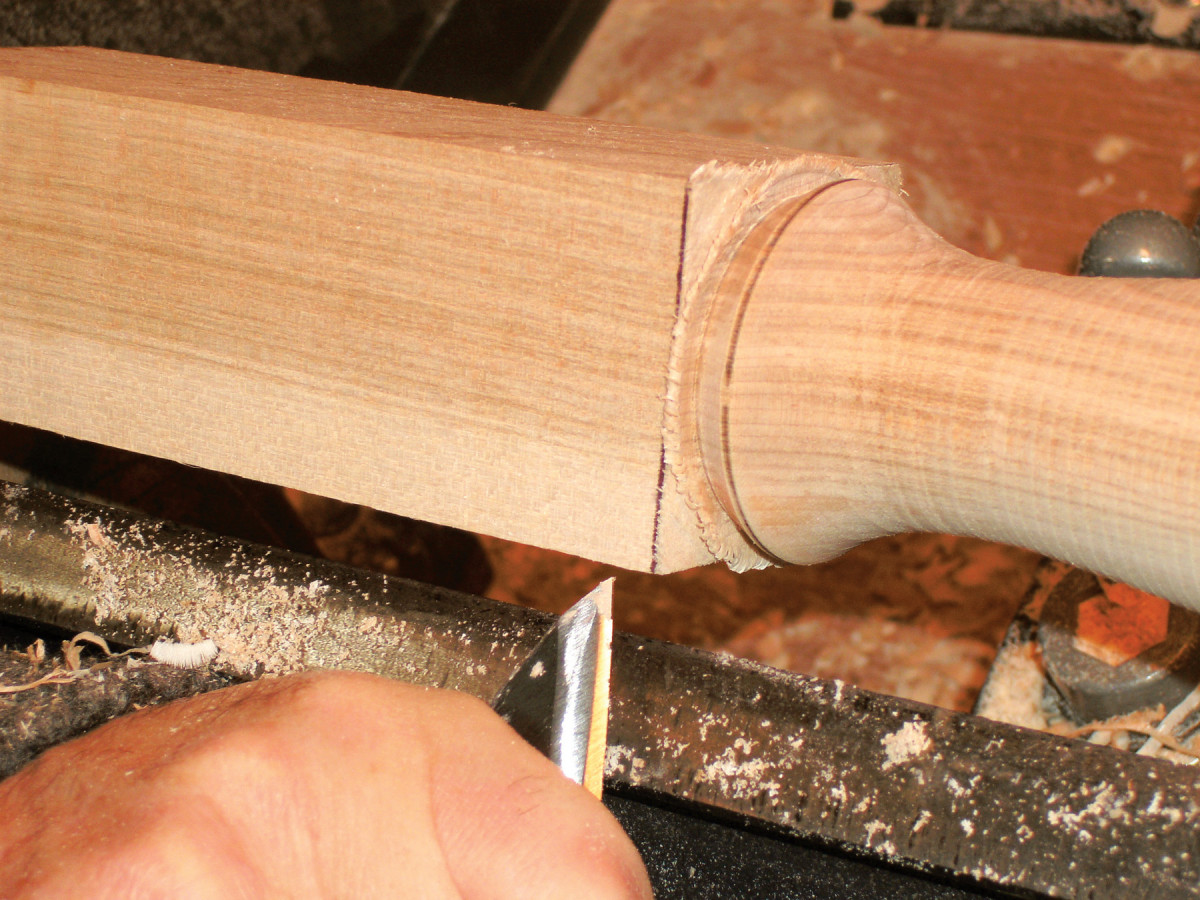
17. Rough out the mortises on the drill press. Set the adjustable table to a 5˚ angle and clamp on a temporary fence (Photo 6). To make sure each mortise slopes in the proper direction, always orient the leg on the table so it slopes downward from the top to the bottom. Set the fence to center a 1/2″ brad point or Forstner bit between the scribed lines that mark the sides of the mortise. Adjust the depth stop to drill about 1-1/16″ deep.

7. Create the mortises on the drill press. I drill slightly beyond the lines that indicate the ends of the tenons. Then I don’t have to round the tenon shoulders.
18. Rough out each mortise in two steps (Photo 7). First, drill a series of adjacent holes. Then go back and drill out the ridges that remain in between. (The mortises on each leg will meet in the middle.) Clean the mortise shoulders by hand, using the scribed lines and a chisel.
Mill the aprons and stretchers
19. Mill the 5/4 stock for the bench’s top (B), aprons (C and D) and stretchers (E and F) to 1″. Set aside a 13″ x 74″ piece for the top and cut blanks for the aprons and stretchers.
20. Rip a 5˚ bevel on the top edge of each apron board—because the legs splay 5˚, this cut will level the tops of the aprons with the legs. Return the blade to 90˚ and rip the aprons to final width (3-1/2″, measured on the outside face).
21. Use a chop saw set at a 95˚ miter to cut the aprons to length. Miter one end, then measure along the top edge to mark the other end for cutting, 7-3/4″ for the ends and 63-1/4″ for the sides. Make sure each pair of aprons is identical in length.
22. Cut a 95˚ angle on one end of each of the four stretcher pieces. Leave the other end long by an inch or two for the time being.
Cut the tenons
23. Cut and fit the tenons on both ends of the aprons and on the angled end of each stretcher. To assure tight-fitting joints, wait until later to scribe the uncut shoulder and tenon on the other end of each stretcher.
24. I use my tablesaw to cut the tenons on the skirts and stretchers. Because of their angled ends, the cheeks on one side of each tenon are cut with the gauge angled 5˚ from 90˚ in one direction and the cheeks on the other side are cut with the gauge angled 5˚ in the opposite direction. Set the rip fence 7/8″ away from the blade. Then use the workpiece to set the miter gauge. Simply rotate the head of the miter gauge until the angled edge of the workpiece rests flush against the rip fence.
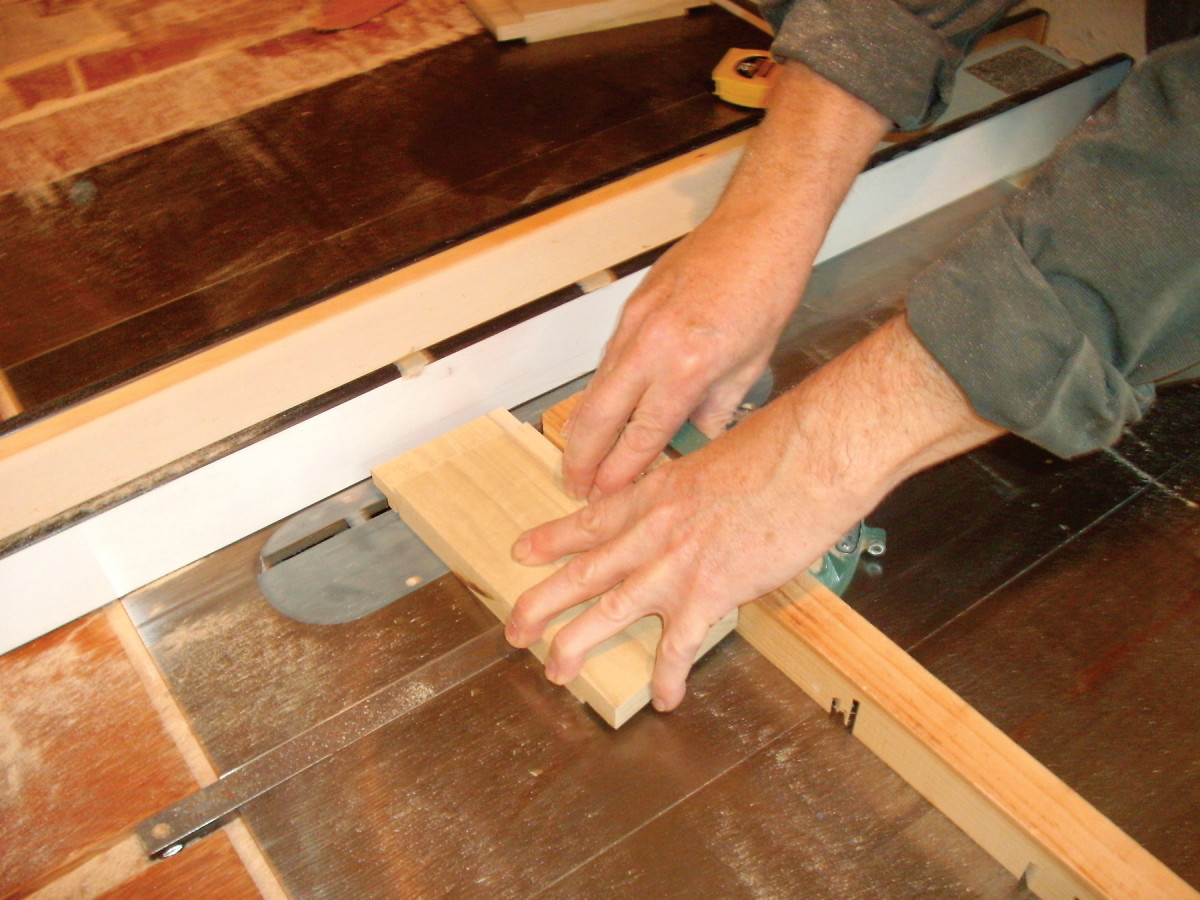
8. Use the rip fence and miter gauge to cut tenons on the aprons and stretchers. The ends of these pieces are cut at 95˚, so you have to angle the miter gauge similarly to cut the tenons.
25. Raise the blade to 1/4″ and make test cuts on scrap stock to dial in the correct tenon thickness (Photo 8). Make a series of crosscuts to remove the waste; on the last pass, the angled end butts against the rip fence. (If you have a dado set, you can cut each tenon cheek in two passes.) Flip the workpiece over, reset the miter gauge to make the angled end rest flush against the rip fence, and cut the other tenon cheek. Test the tenon’s fit in one of the mortises—the tenon should slide in without binding and fit without wiggling. Adjust the blade height and cut another test tenon, if necessary.
26. Cut all the tenon cheeks. You’ll need to attach a long fence to the miter gauge to support the long aprons and stretchers.
27. Use the bandsaw to cut the tenons’ top and bottom shoulders.
28. Miter the ends of the tenons, so they’ll fully seat when you assemble the joints. Tilt the blade to 45˚ and use the same two miter gauge setups that you used earlier. Make sure to orient each skirt correctly before cutting the miter.
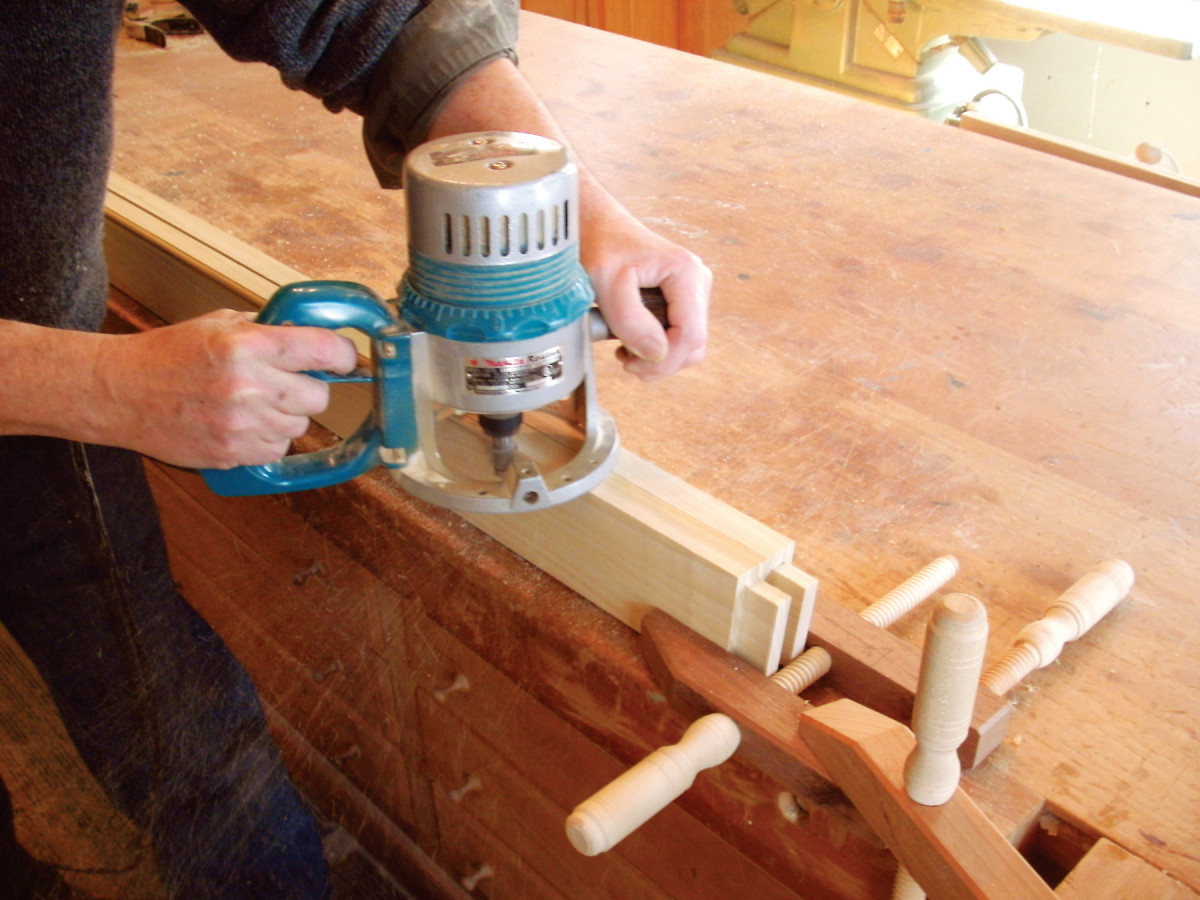
9. Rout a bead on the bottom edge of each apron. Gang the aprons together to provide additional support for the router.
29. Rout a bead on the bottom edge of each apron, using a 3/8″ beading bit (Photo 9).
Assemble the base
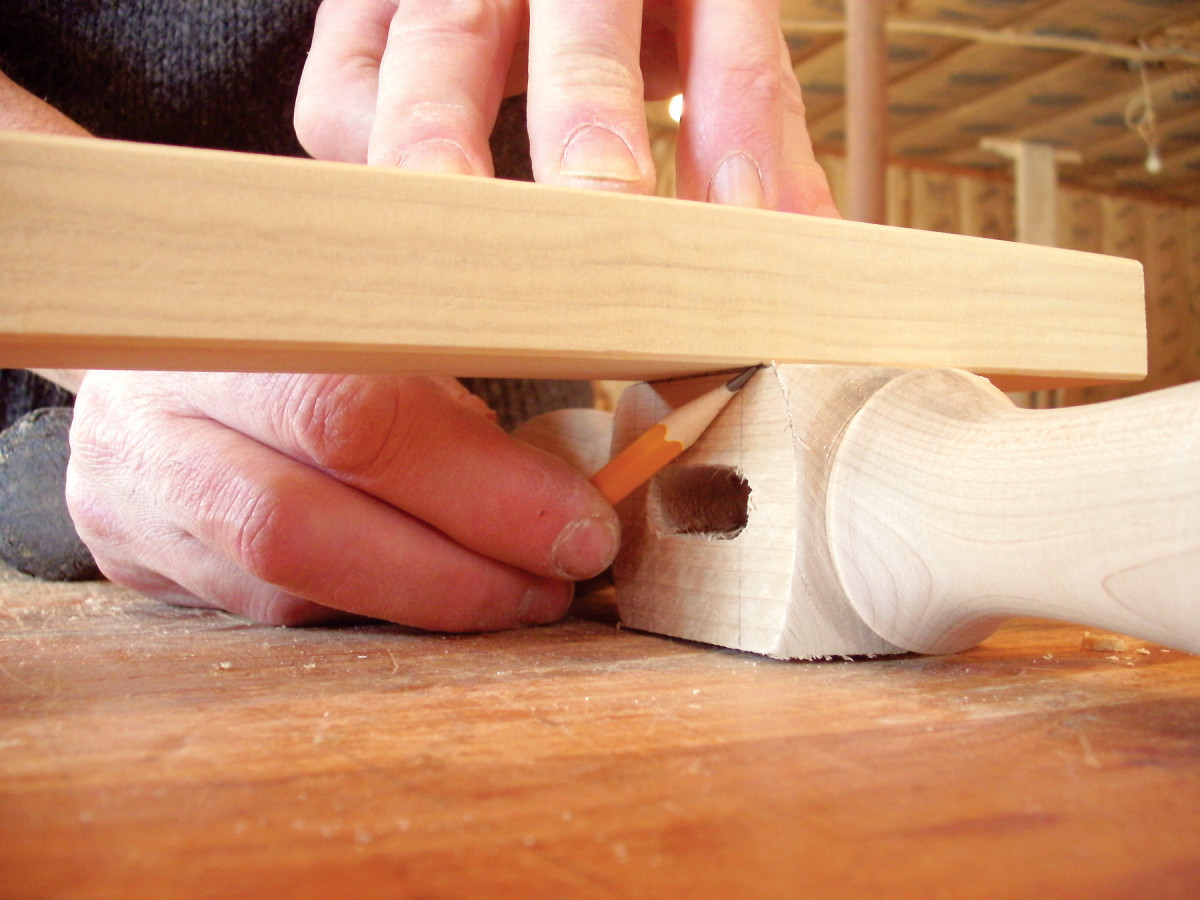
10. To ensure a tight fit, one end of each stretcher has been left unfinished. Clamp each apron between its pair of legs. Then position the stretcher and mark the angled tenon shoulder on the unfinished end.
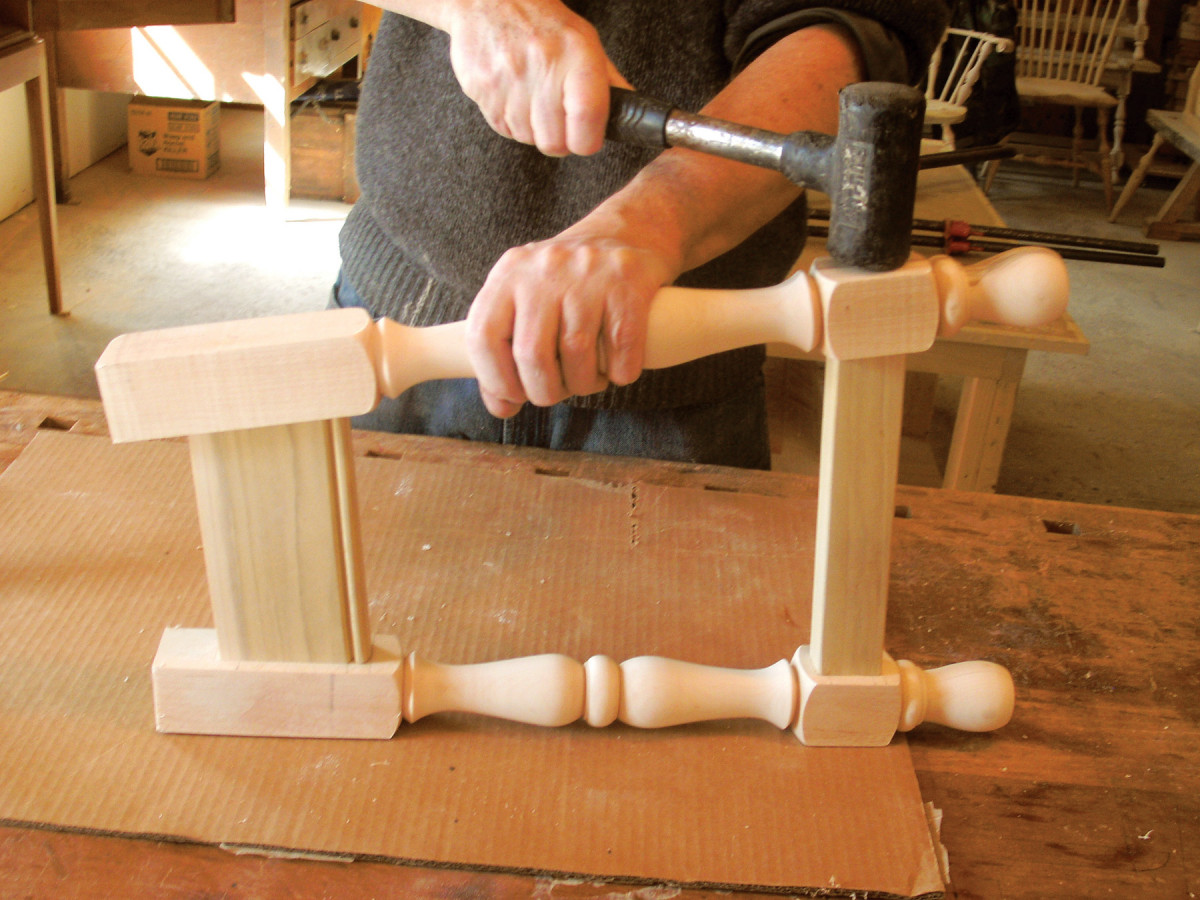
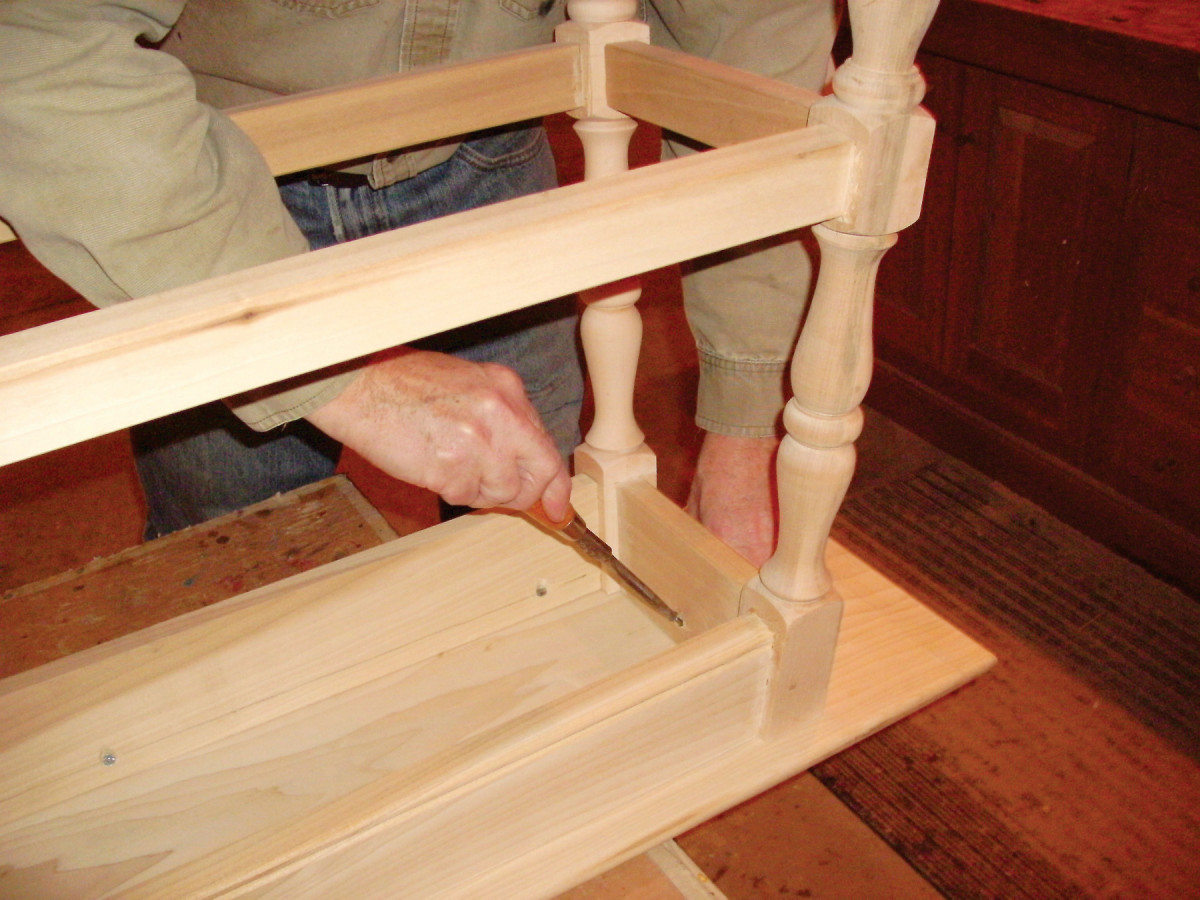
30. Clamp the appropriate apron between each matched pair of legs. The legs will be too long (they’ll be cut to fit after the base has been glued together), so use the registration lines drawn on the legs to locate the bottom edge of each apron. Next, place the appropriate stretcher in position, with its angled tenon shoulder butted against the inside face of one leg’s lower square section. Then scribe a line across the opposite end of the stretcher, where it crosses the inside face of the other square section (Photo 10). Add 1″ to this shoulder line to allow for the tenon. Cut each stretcher to final length. Then cut the remaining tenons.
11. Dry assemble both ends; if all the joints fit correctly, disassemble, apply glue, reassemble and clamp each end overnight.
31. Dry-fit each sub-assembly to make sure all the joints fit properly (Photo 11).
32. Glue together the two ends and allow them to dry overnight.
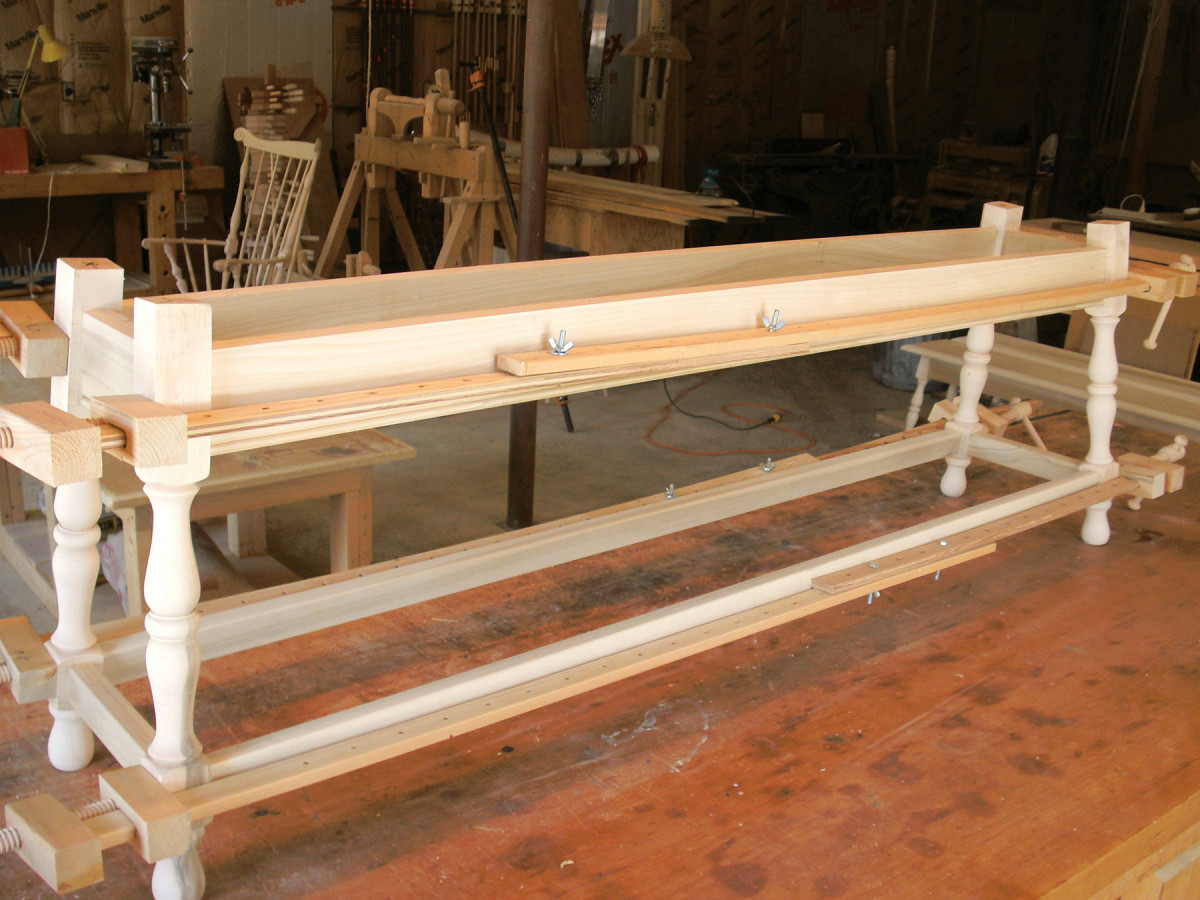
12. The next day, glue and clamp the long aprons and stretchers.
33. The next day, complete the base by gluing and clamping the long aprons and stretchers between the two ends (Photo 12).
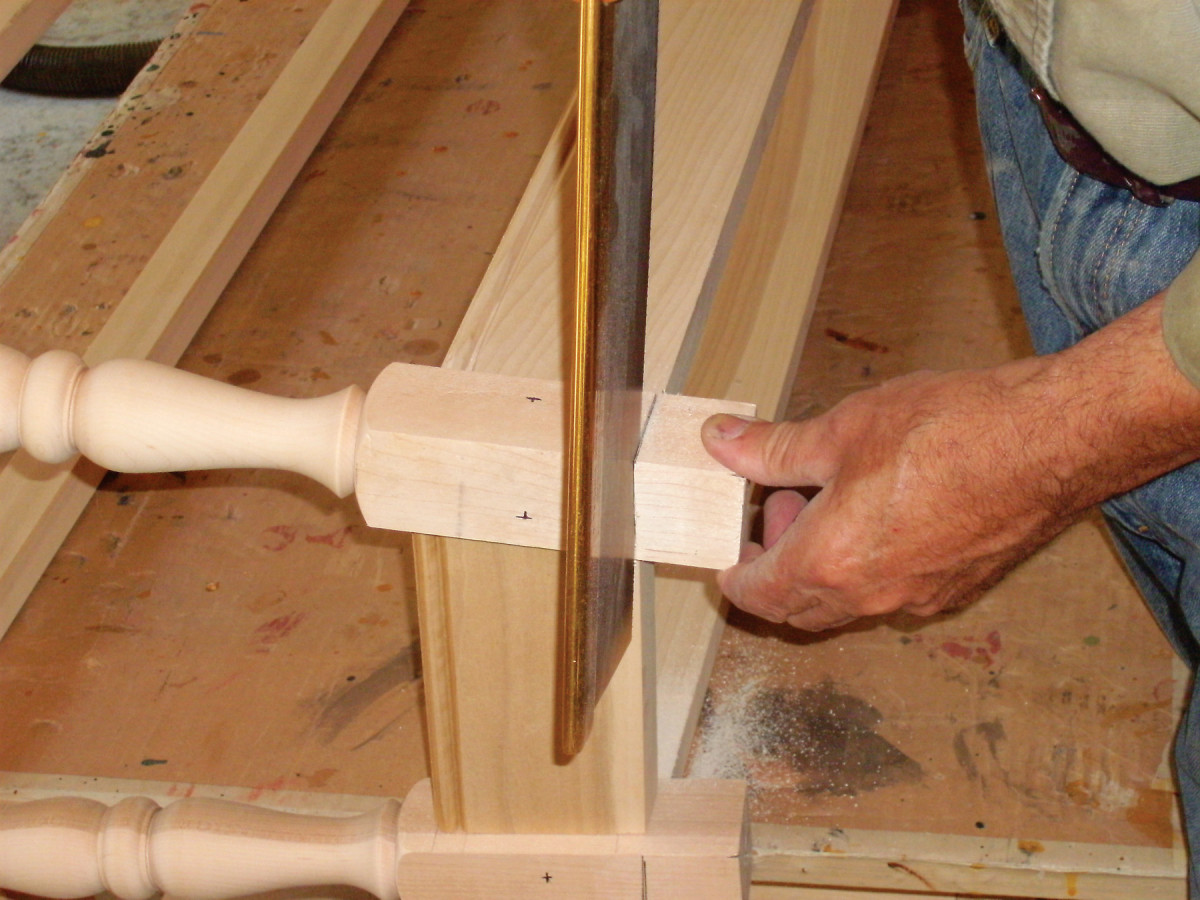
13. Cut the legs flush with the aprons. Then install the pins.
34. After the glue has dried, saw the ends of each leg flush (Photo 13). I use a block plane to clean up these cuts.
35. Pin the mortise and tenon joints. Today, these pins are mostly decorative. But before reliable wood glue was available, joints were secured mechanically with long tapered wooden pins driven through slightly offset holes that had been drilled through both the leg and tenon faces. These offset holes—and the joints—were pulled tight with an iron tool called a drawbore. Then the pins were driven in and cut flush.
Mark out the pin locations on each leg and drill 1/4″ dia. holes about 1-1/2″ deep, so that the pins will go through the tenon and into the body of the leg.
36. To make the pins (G), bandsaw a 1/4″ x 1/4″ length of scrap hardwood into 2″ lengths. Shave the end of each pin with a chisel to ease the corners. Apply a bit of glue in each hole and hammer the pins home. Trim the pins flush with a saw.
Make the top
37. Cut the 1″ thick top blank to final dimensions.
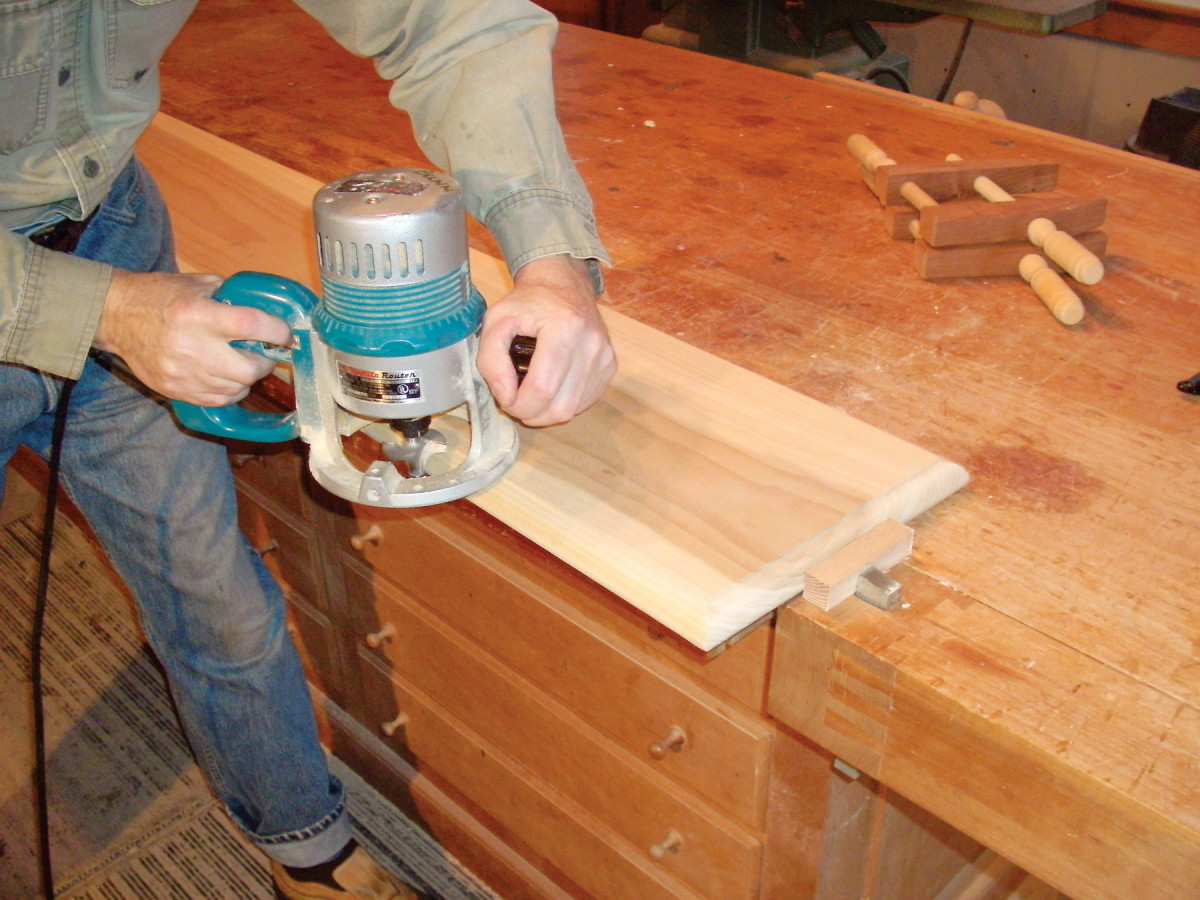
14. Rout the top edge to create a “thumbnail” profile. Shape the top edge with a 3/4” roundover bit, to create a fillet. Then flip the top over and use a 1/4” roundover bit to ease the bottom edge.
38. Use a pair of router bits to create a traditional “thumbnail” edge profile on the top. Install a 3/4″ roundover bit and set the depth to cut a strong 1/16″ step (or “fillet”) in the top’s edges (Photo 14).
39. To complete the profile, flip the top over and install a 1/4″ roundover bit to ease the bottom side of the edge. Blend the two router cuts by sanding.
15. Fasten the top with screws after drilling countersunk shank holes in the aprons.
40. Finish-sand the top and then attach the base with screws (Photo 15). First drill shank holes diagonally through the aprons from the top. Make sure the shank holes are large enough to allow for the top’s seasonal movement. Clamp the top in position and drill pilot holes through the shank holes, using a countersink bit. Then install the 1-1/2″ x #8 screws. For an even more authentic look, fasten the top with forged iron nails.
41. Stand the bench on a flat surface to level the feet. Scribe a line around each foot at the same distance from the flat surface (approximately 1/4″). Then cut each foot at the line.
42. All that’s left now is to paint the bench. I use milk paint, for authenticity, but today’s exterior enamel paints offer a durable alternative.
Colonial Bench Cut List
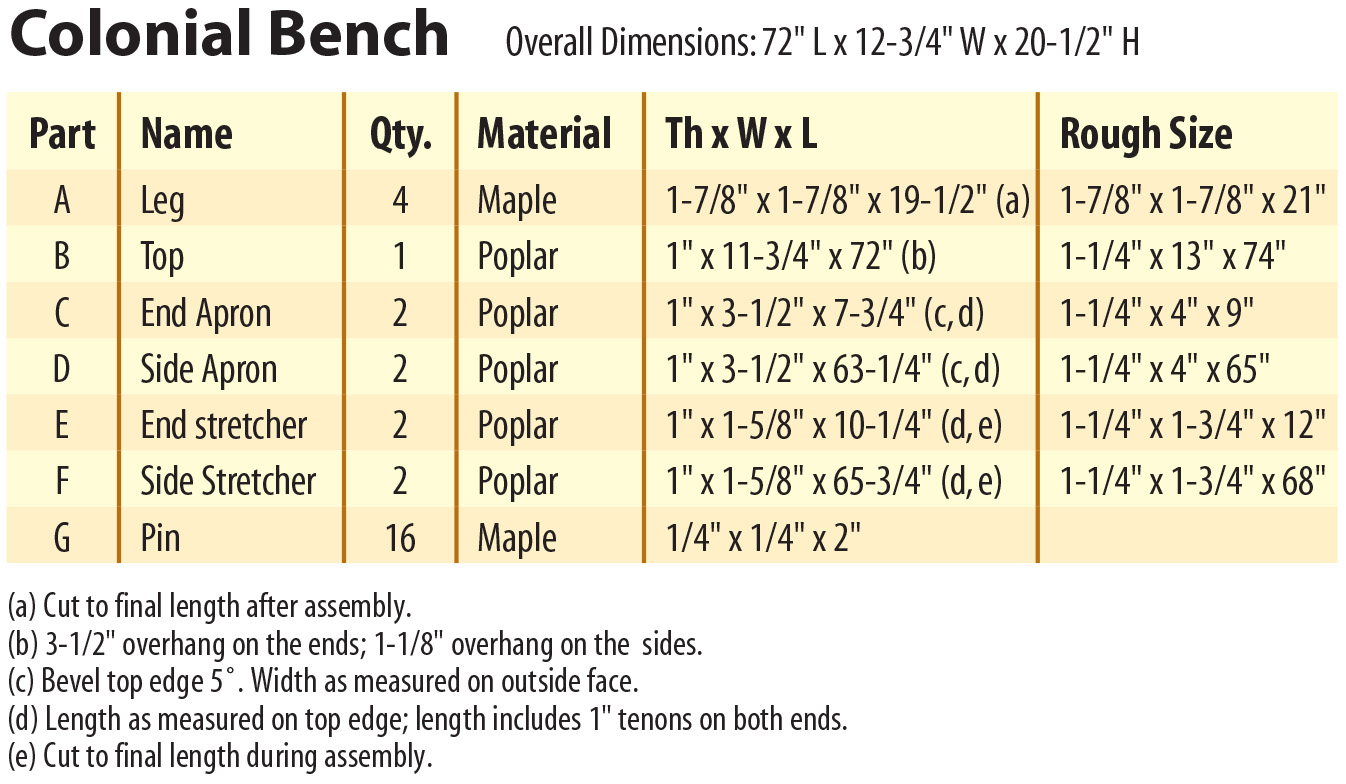
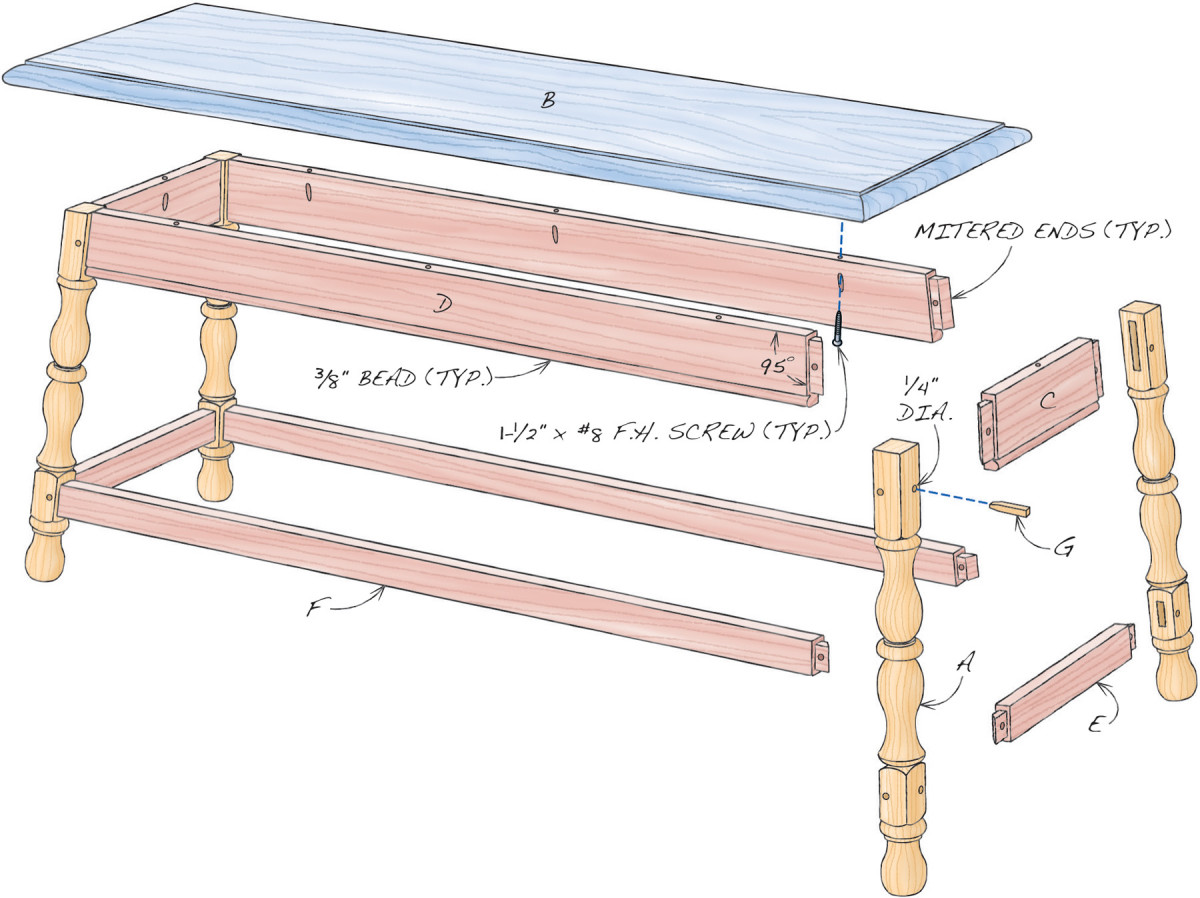
Fig. A) Exploded View
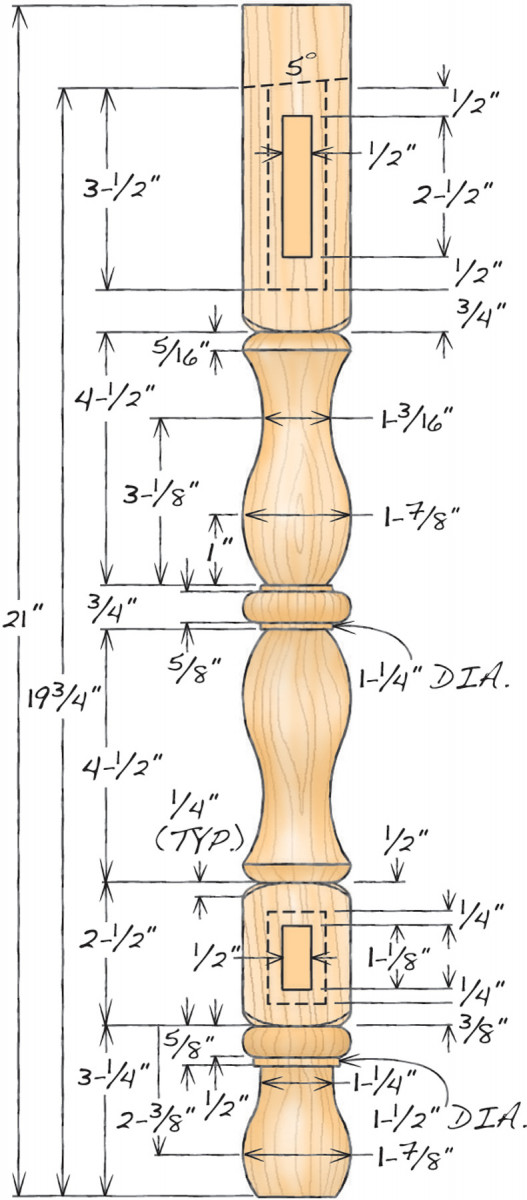
Fig. B) Leg Dimensions
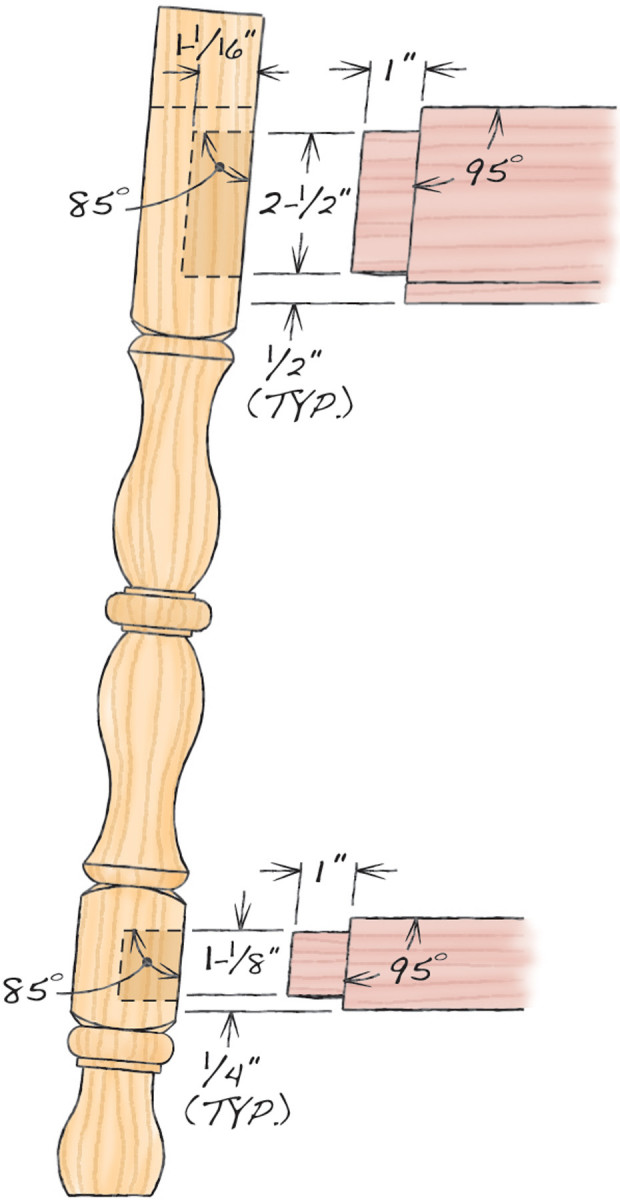
Fig. C) Joinery
Here are some supplies and tools we find essential in our everyday work around the shop. We may receive a commission from sales referred by our links; however, we have carefully selected these products for their usefulness and quality.