We may receive a commission when you use our affiliate links. However, this does not impact our recommendations.
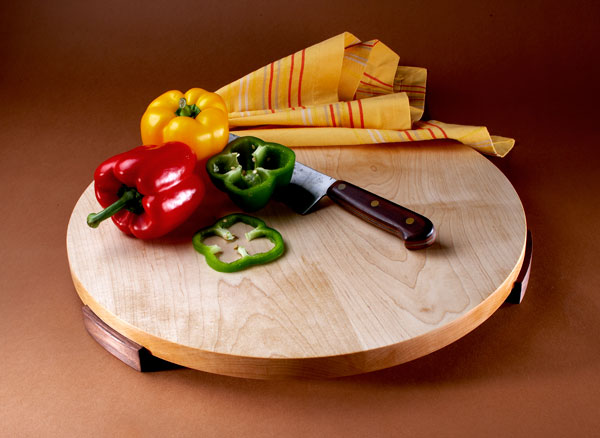
Solid maple makes an ideal surface for a cutting board, and feet in a wood of a contrasting color help it sit solidly, and make it easy to lift. A canola-oil finish contributes to an elegant look and is easy to maintain.
by Robert W. Lang
A well-equipped kitchen deserves to have a nice maple cutting board, especially if the kitchen is in a woodworking household. The cutting board may be an animal-shaped survivor from 8th grade shop class, or a more sophisticated design. For many woodworkers it is an introduction to working with shapes that aren’t straight.
Maple has been used as a food preparation surface for hundreds of years and there are good reasons to follow tradition. While getting a perfectly smooth, tear-out free surface may be vexing, the finished product is both practical and attractive, despite unsuccessful attempts in recent years to label it as unsanitary.

After the maple circle is trimmed, the bit is adjusted so that it is flush with the outer edge of the large circle.
This design began as a way to practice making circles. The three feet raise the cutting board above the counter, allowing it to be easily picked up and put down. The size and contrasting color of the feet add some visual interest, and if you have an adjustable trammel jig, like the one shown on page 24, it’s easy to add them, bringing a simple project to a slightly higher level.
The cutting board shown here is about 18″ in diameter. The basic design can be scaled down if you prefer. To obtain a piece wide enough, I glued together two pieces a little larger than 9″-wide. A simple butt joint is more than strong enough in this application. I selected the pieces, and when I had them arranged the way I wanted them, I marked the faces with a carpenter’s triangle.
If you plan on surfacing the finished board with a handplane, arrange the boards so that the grain on the edges runs the same way. Maple is notorious for tearing out, and if one piece runs downhill while the other runs uphill, you may find it impossible to get a good surface after gluing.

This setting is used to rout a 1⁄4″-deep rabbet in the blanks for the feet.
I ran the edges to be glued over the jointer just before assembly, with the face of one board against the fence and the face of the other away from the fence. This cancels out any minute deviation of the jointer’s fence from square. Even if the angles are slightly off from 90˚, they will be complementary, ensuring a flat surface.
Straight matching edges and a level surface to lay the pieces on when gluing are important when gluing solid wood edge-to-edge. I ripped a few strips of scrap to a consistent width and placed them across my bench to support the pieces. After lining the triangle sides back up, I rotated one board up on edge and applied a bead of glue to one edge only.
Because this will be used in the kitchen and washed frequently, I used a waterproof polyurethane glue (Gorilla Glue). This glue tends to foam after assembly, so after laying on a bead from the glue bottle, I spread the bead with a palette knife to cover the edge with a thin, consistent film. I wiped the other, unglued edge with a damp rag because this glue cures only in the presence of moisture.
There are some other glues that also could be used; the key element is water resistance combined with some flexibility in the cured glue line. A waterproof PVA (such as Titebond III) would likely work as well as polyurethane. I have had epoxies fail after three or four years in cutting boards. I think this is due to the epoxy drying to a hard, brittle line. Wooden cutting boards are the objects of some inevitable abuse; soaked and dried repeatably as they are used, cleaned then put away.
Clamping Considerations
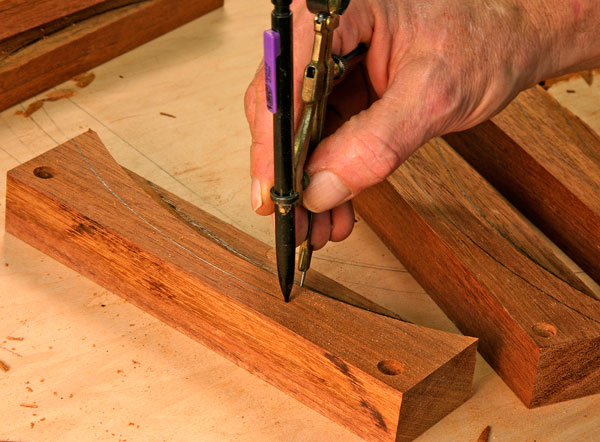
A compass is used to scribe an offset line from the edge of the rabbet. The feet are then band sawn to shape.
Despite the tendency of some of us to use as many clamps as is possible to fit for an “optimal” glue joint, practical experience demonstrates that two or three clamps across the joint will produce a good joint. The goal is a glue line that is barely visible, and this can be achieved with firm even pressure. I scraped off any wet glue that squeezed out to observe the glue line. This also allows the glue to cure in less time and with a better bond than letting it dry on the surface.
After letting the glue cure for 24 hours, I cut the circle on the band saw and trimmed it with the router and trammel jig as described on page 24. The particular piece of maple I used tore out a few times when trimming the edge. I think it would have preferred to serve humanity by staying in the woods and being tapped for syrup rather than being cut into lumber. For this project, it didn’t make a difference that the circle was a fraction smaller than originally planned.
Best Foot Forward
After I had a good clean edge on the entire maple circle, I reset the trammel jig so that the outside edge of the cutter was lined up with the outer edge of the maple. This set the distance for the rabbets in the top of the feet. I screwed a scrap of the same material used for the feet (walnut) to my bench to serve as a center point.

Cooking oil makes a good finish for a cutting board. It’s cheap, easy to apply and can be renewed on a regular basis.
I drew the outline of the board on the bench so that I could screw down the blanks for the feet securely, while avoiding the path of the router bit. I set the depth of cut to 1⁄4″ and routed an arc in the blank. I used a compass to scribe the inner and outer profiles of the foot on the top surface. At the band saw, I cut to the pencil lines, and cleaned up the saw marks.
I came close to a perfect surface with my smoothing plane and card scraper, but there were a couple torn spots that resisted my efforts. Following the dictum of, “If at first you don’t succeed, try something else,” I resorted to a random-orbit sander, and Abranet abrasives. Abranet is a new product from Mirka, with a mesh instead of a paper backing. It works very well, and stepping through the grits of #150, #240 and #320 left a very nice surface.
I use a 30˚-60˚ drafting triangle to lay out the locations of the feet, one on the center line and the other two 120˚ apart. I again used Gorilla glue to attach the feet to the board, with a pair of small spring clamps to hold them in place. I left the clamps on overnight, and after rounding all the corners slightly with a piece of Abranet, the cutting board was ready for finishing.
For the finish, I saturated the wood with canola oil from the grocery store, let it sit for about 15 minutes then wiped it dry. Two coats a day apart are the initial finish, and I’ll apply another coat of oil every month or so as the board is used. When it starts to look a bit dry, it’s time to refresh the finish. To keep the board from warping, I will make sure to wash both flat surfaces with soap and water every time I use the board.
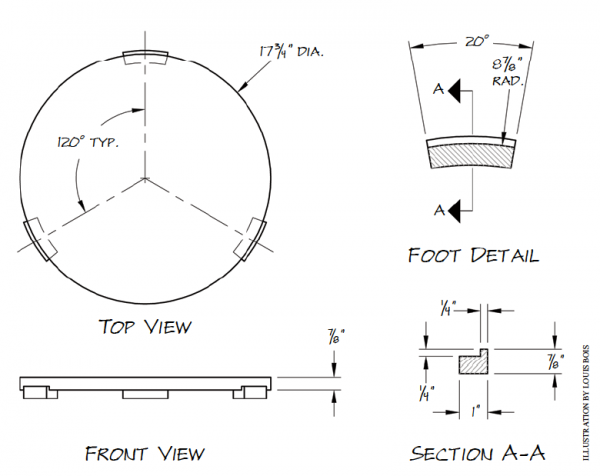
Click on the illustration to make it larger.
This article is from the Spring 2008 issue of Woodworking Magazine. The issue is available in our store as a digital download, or buy all 16 issues on one CD (or via download).
Here are some supplies and tools we find essential in our everyday work around the shop. We may receive a commission from sales referred by our links; however, we have carefully selected these products for their usefulness and quality.