We may receive a commission when you use our affiliate links. However, this does not impact our recommendations.

Perfect
Edge Joints
A 6-step
tune-up
sets your
jointer
straight.
By Dave Munkittrick
Jointers are simple machines with
few moving parts, but the two
beds, the fence and the cutterhead
all have to be in alignment
for a jointer to function properly. Few
things are more frustrating or more
common than problems with jointers.
This is especially true when you’re
trying to get straight, square edges
on your boards. I’ve come up with a
six-step tune-up that should set your
jointer straight. It’s easy to do and will
only take an hour or two, depending
on how many problems you unearth.
Jointers are supposed to cut straight,
square edges, but all too often, they
leave a sniped or a bowed edge (see
“Common Problems,” page 2). Snipe
results whenever the top of the outfeed
table dips below the knife’s top cutting
arc. A bow cut results whenever the
outfeed table rises above the cutting
arc. A cutterhead that’s not parallel
to the outfeed table, or tables that are
not parallel to each other, will make it
impossible to get the table height set
just right for all fence settings.
Common Problems
Our tune-up will help you identify and
correct four common jointer problems:
| 
Problem #1:
A table surface that’s
not flat. 
Problem #2:
Tables that are not
parallel to each other
across their widths. 
Problem #3:
Tables that are not
parallel to each other
along their lengths. 
Problem #4:
A cutterhead that’s
not set parallel to
the tables. | | Click any image to view a larger version. 
Common jointer
problems result
in a sniped or
bowed edge.
Adjusting the outfeed
table height usually
cures the problem.
However, if both tables
and the cutterhead are not in
perfect alignment, the problem
will return when you move the
fence. This tune-up procedure takes
care of all the possible misalignments
that can cause jointer problems. |
The Right Stuff
You will need a few tools to perform this tune-up: A good
straightedge, a set of feeler gauges and machinist’s metal
shims are must-haves for this job. For some steps, a dial indicator
is easier to use than a straightedge.
The straightedge, shims and feeler gauge run about $105
total. The optional dial indicator with a magnetic base
and extension arms adds another $40 and is well worth
the cost. All these tools can also be used to set and
tune-up other shop equipment and to check your own
work for flatness (see Sources, below).

A precision straightedge is essential.
You can perform all the tune-up steps using
this 50" precision straightedge that costs $79. Unlike
inexpensive straightedges, this one has a precisionground
edge with a tolerance of .003" along its entire
length. Such a good straightedge is not cheap, but it’s a
good investment for your shop.

A dial indicator with magnetic base and
arm can’t be beat for tool setups. A number
of these six tune-up procedures are
best done using a dial indicator. Like the
straightedge, this tool is also useful for
other machine setups.

A feeler gauge set is used in tandem
with a straightedge to measure
very small gaps. If the straightedge
reveals a gap, you can measure that
gap by finding the feeler gauge that
fits under the straightedge.

Metal shims align jointer parts. Variety
packs are convenient and easy to use. A
strip of aluminum cut from a soda can is
a quick substitute for a .005" shim.
That coupled with some
.001" shim stock should cover
all your tune-up needs.
Shims can be stacked to create
any desired thickness.
Fine Tuning Your Jointer Step 1: Check For Flat Tables and Fence Check each table and the fence for flatness (Photo 1).
The accuracy of later measurements depends on flat tables.
Measure for dips or a droop using the straightedge held parallel
to the table bed. Then, hold the straightedge diagonally
across the table to check for twist. The good news is that finding
twist or dips in the table is highly unlikely. The bad news
is that if you do find things out of whack, you can’t do much
about it. In extreme cases, a messed-up fence or table may be
reground at a machine shop. You’ll have to weigh the cost in
time and money against simply buying a new jointer. If your
jointer is under warranty, talk to the manufacturer. Step 2: Align Tables It’s not unusual for the two tables to be out of parallel
across their widths (Photo 2). It’s easiest to check the tables
for parallelism with a dial indicator (Photo 3). You can also
do the check with a straightedge. Hold the straightedge
down on the middle of the infeed table so it extends over
the outfeed table. Set the infeed table to the exact same
height as the outfeed table. Slide the straightedge over to
the fence side of the table and use feeler gauges to check
for gaps. Repeat with the straightedge on the user side of
the table. Align your tables by shimming the outfeed table.
Loosen the outfeed table’s gib nuts and lift the table so
you can insert metal shims on the side of the table that’s
low (Photo 4). Shim the outfeed table only because it is
moved very little and the shims are less likely to shift during
table adjustments. Recheck the tables and make any necessary shim adjustments
until the tables measure in exact alignment. Step 3: Fix Sagging Tables Tables can also be out of alignment along their lengths
(Photo 5). Use the straightedge to see whether the table
end dips below the infeed table (Photo 6). Correct a dip by
adding shims to the top or bottom of both gib ways on the
outfeed table (Photo 7). Retighten the gib nuts and check
the tables again. Make any necessary adjustments until the
tables lie in the exact same plane. Step 4: Level the Cutterhead
with the Tables Now that the tables are parallel to each other along their
lengths and widths, it’s time to make sure the cutterhead
is parallel to the tables. If the cutterhead is not level with
the tables, your cut will be heavier on one side of the table
than on the other. Jackscrew cutterheads allow you to set
the knives to compensate for this; spring-loaded knives or a
segmented carbide insert cutterhead do not. The fix for this
problem is so simple that I recommend leveling your cutterhead
no matter what type of knife holder you have. Use a dial indicator or straightedge to check cutterhead
alignment (Photo 8). If the cutterhead is off, measure the
exact amount on the low side. This equals the size of shim
you’ll need to raise the cutterhead (Photos 9 and 10). Step 5: Set Proper Knife Height To minimize kickback hazards, jointer knives should not
project more than .020" from the cutterhead. (Owners of
spring-loaded cutterheads have a knife-setting gauge that
automatically sets the proper knife projection.) A potential
hazard exists with knives set parallel to the outfeed table: It’s
easy to unintentionally set the knives so they project too far. A dial indicator is the best instrument for checking knife
projection (Photo 11), but you can make do with a straightedge
and feeler gauge. Step 6: Set Proper
Outfeed Table Height Your knives should be set so that the very top of the cutting
arc, also referred to as top dead center, is the same
height as your outfeed table. We used the straightedge to
accomplish this task (Photo 12), but a dial indicator is another
option. To do this, set the dial indicator on the outfeed
table and zero it. Then set the plunger over the cutterhead
with the body of the indicator on the outfeed table. Rock the
cutterhead back and forth; the indicator should hit zero as
its highest mark. Check this at several points along the width
of the table. Repeat for all three sets of knives.
straightedge
no gaps
outfeed
table
knife at top
dead center Edge-joint a couple of boards to test your jointer (Photos
13 and 14). In practice, it often takes a little tweaking of the
outfeed table height to get it just right. Often the table ends
up set .001 or .002" below the cutterhead. Now your jointer is
ready to go and should create perfect edge joints every time. | | 
1. To start your tune-up, check each table for flatness. Lay
the straightedge on a table and use the feeler gauge to
check for gaps. A gap of .003" or less is acceptable. 
2. Infeed
and
outfeed
tables that are not in the same
plane across their widths need
to be made coplanar. (With any
luck, your tables aren’t this bad.) 
3. Check the tables for parallelism across their widths.
Bridge the dial indicator from the center of the infeed
table to the center of the outfeed table and zero it. Slide the
indicator across the width of the table to measure any difference
in height. 
4. Bring the tables into alignment by inserting metal shims
on the low side of the outfeed table. Choose a shim
thickness equal to the amount your table was off. Loosen
the gib nuts and lift the table while you insert the shim or
shims. Then retighten the gib nuts. 
5. Tables can be
out of parallel
along
their
lengths.
Typically,
the tables
sag on
the ends.
This is especially true on
older jointers that have
worn gib ways. 
6. Check for table sag by holding a straightedge
tight against the infeed table. Set the infeed table
height so the straightedge just contacts the outfeed
table. Then use a feeler gauge to determine the
amount of dip or rise in your outfeed table. 
7. Correct a sagging table by shimming the bottom
end of the two dovetailed gib ways on the outfeed
table. A table that dips toward the cutterhead would be
shimmed at the top end of the gib ways. |
| 
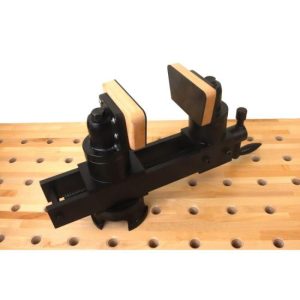
8. Check that the cutterhead is parallel with the tables. Rotate
the cutterhead so the knives are below the table. Clamp a
guide board parallel to the cutterhead. Set the dial indicator
against the guide board so the plunger contacts the cutterhead.
Zero your dial indicator; then slide it back and forth. 
9. I removed the cutterhead here to illustrate how it is
mounted. Two threaded rods attached to pillow blocks
run through holes in the base and are held in place by a
nut and a washer. Place shims between the pillow block
and the jointer bed casting. 
10. The cutterhead is easy to shim. Remove the drive belt
and loosen the bolts that hold the cutterhead in place. Lift
the low end of the cutterhead and insert shims under the pillow
block. Then retighten the bolts. 
11. Proper knife projection increases jointer safety by limiting
the cut’s aggressiveness. Use a dial indicator set to zero
on the cutterhead. With your hand on the pulley, rotate the cutterhead
backward. As the knife rides under the dial indicator, it
should read no more than .020". | | 
12. To set the outfeed table height, place a straightedge
on the outfeed table so it projects over the cutterhead.
Rotate the cutterhead backward and raise or lower the table
until the knife barely kisses the straightedge when it’s at top
dead center. 
13. Fine-tune the outfeed table height by edge-jointing
a couple of boards that are narrower than the fence
height and no longer than the infeed table. 
14. Put the newly jointed edges together and hold the joint
up to a light source. No light leaks indicate a jointer
that’s perfectly tuned. If you are getting a snipe at the end of
your cut, raise the outfeed table a bit. If the jointer puts a concave
edge on your board, lower the table. Repeat the process
with the fence set at the far edges of the table. The results
should be the same, and that should put a smile on your face. |
Source Note: Product availability and prices are subject to change. Lee Valley Tools, leevalley.com, 800-871-8158, 50"
aluminum straightedge, #05N63.05; Dial indicator and magnetic base
and arm, 88N31.20; Feeler gauges, #86K99.01; Brass
sampler, 6-1/2" x 6", .001 to .010 thickness, #27K07.50. This story originally appeared in American Woodworker August 2006, issue #123.
Purchase this back issue. | | |