We may receive a commission when you use our affiliate links. However, this does not impact our recommendations.
Routed joints reinforced with floating tenons make a sturdy, seamless case.
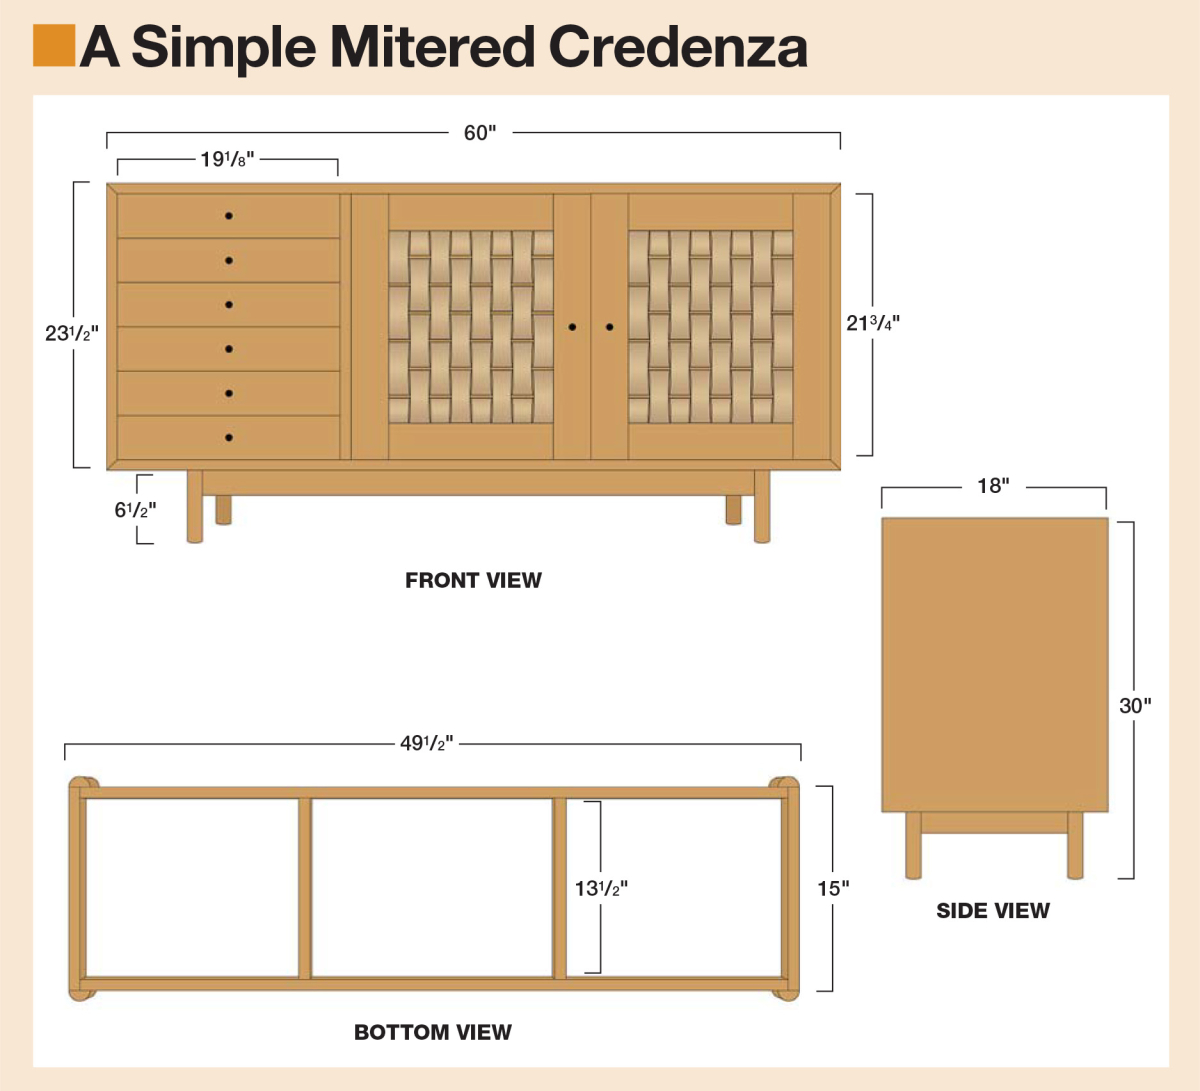
Project#1903 • Skill Level: Advanced • Time: 4 Days • Cost: $400
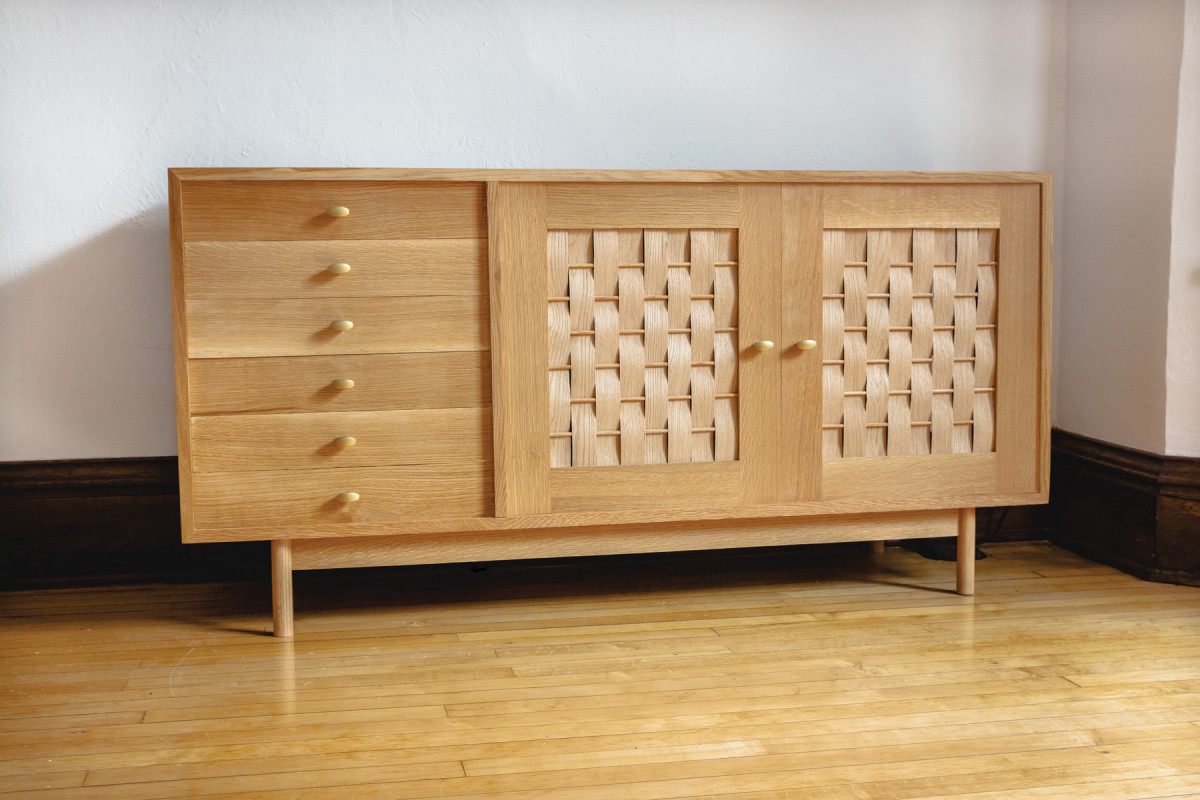
This credenza was built for my dining room to house overflow dishes, table linens and the rest of our fancy accouterments that only come out during holidays. It’s built almost entirely out of quartersawn white oak, with the exception of the maple drawer sides and red oak legs. With a large cabinet on one side and a half-dozen drawers on the other, there’s room for just about everything.
The drawers are made with a lock miter router bit. It’s one of my favorite ways to batch out drawers that look good and are strong enough for everyday use. The doors are a frame-and-panel construction, with a panel made from “woven” veneer and dowels. This gives the doors some interesting texture and a mid-century vibe.
Finally, the base is made from the offcuts paired with oak dowels for the legs. The credenza is finished with a few coats of tinted Danish oil and buffed with wax for a satiny finish that’ll hold up to regular use in our dining room.
Cutlist

 Start with the Miters
1-2. Miter the ends of each panel with a 45° miter bit. Line up the edge of each panel with a straightedge under it.
First things first: mill your lumber, joint your edges and glue up your panels. I used my track saw for a lot of this work—it’s my go-to for making precise cuts on big pieces of lumber. I used it to cut all of my panels to length and as a stand-in for a jointer.
Cut in multiple passes, leaving just a hair for the final pass.
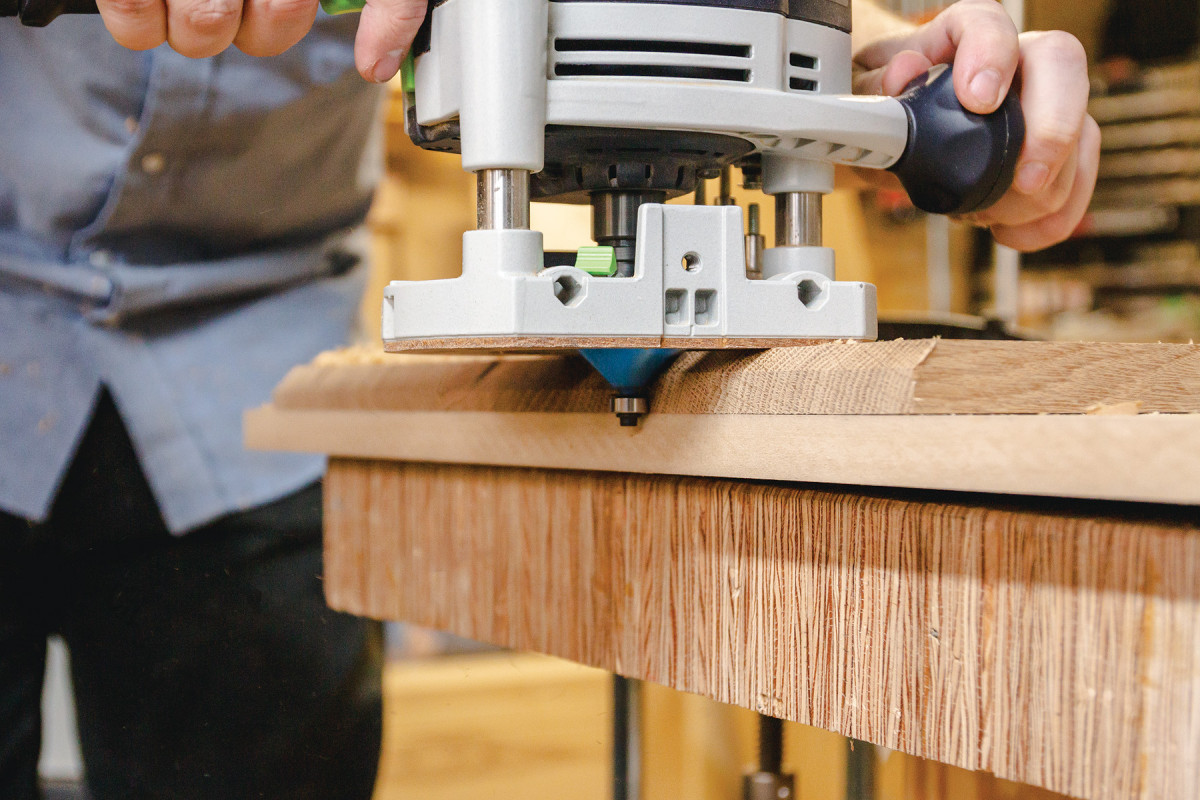
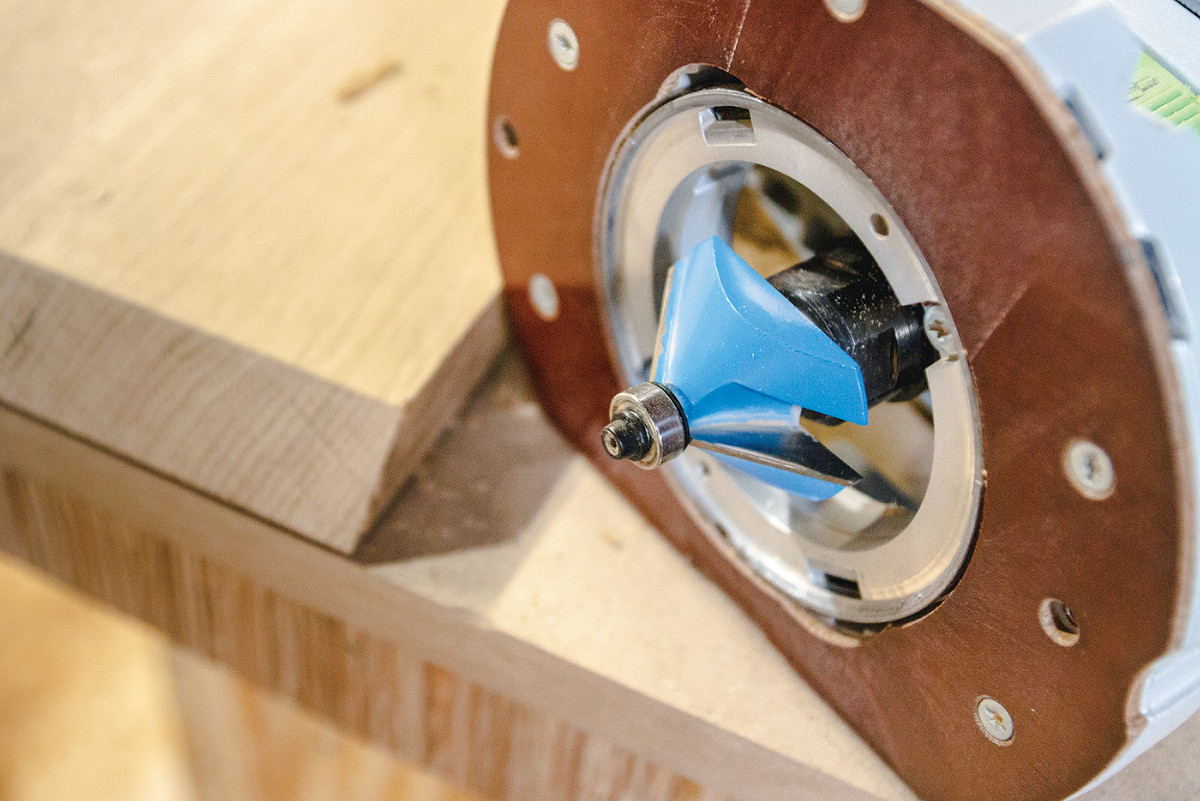
Once your case panels are cut to size, it’s time to make your miters. The miters are made with a 45° router bit. The panels are 7/8” thick, so you’ll need to make sure you have a large enough bit miter bit to cut these miters. Many miter bits top out at 5/8” material thickness, but there are a handful of bits made for thicker material–up to 1 1/4” thick. That’s the one you want for this project.
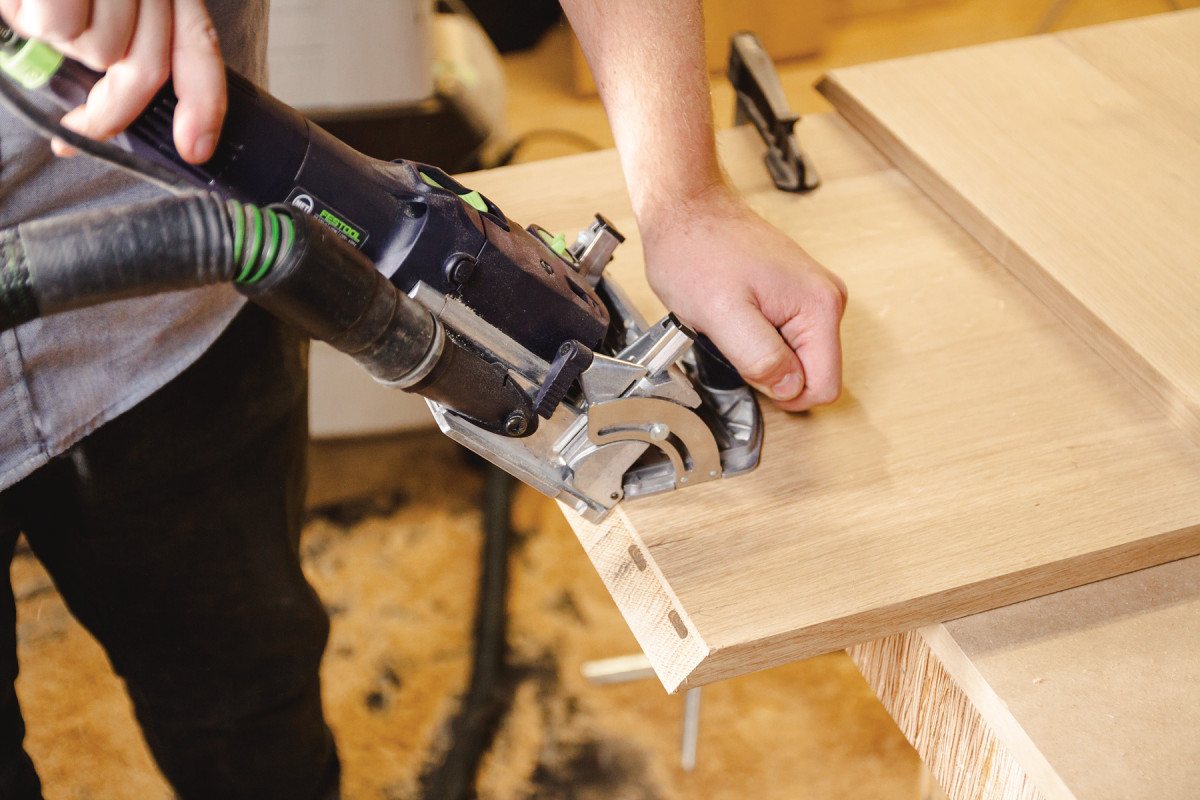
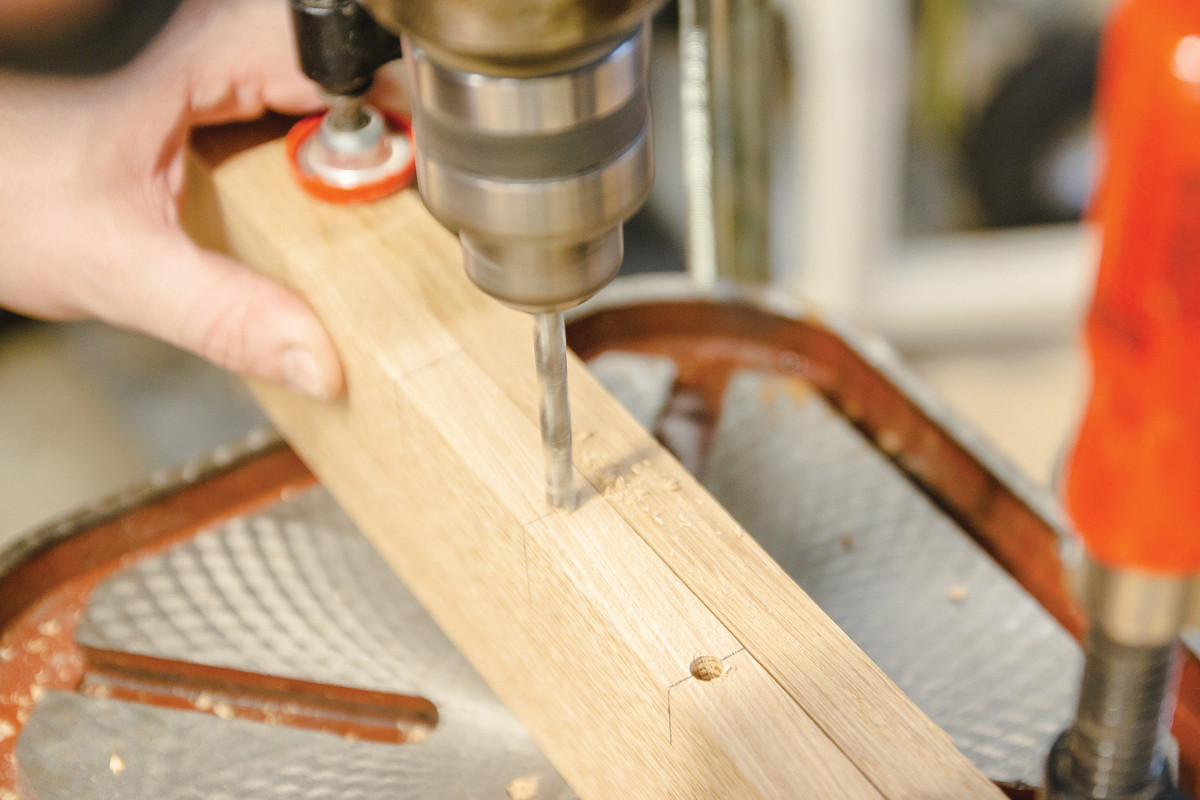
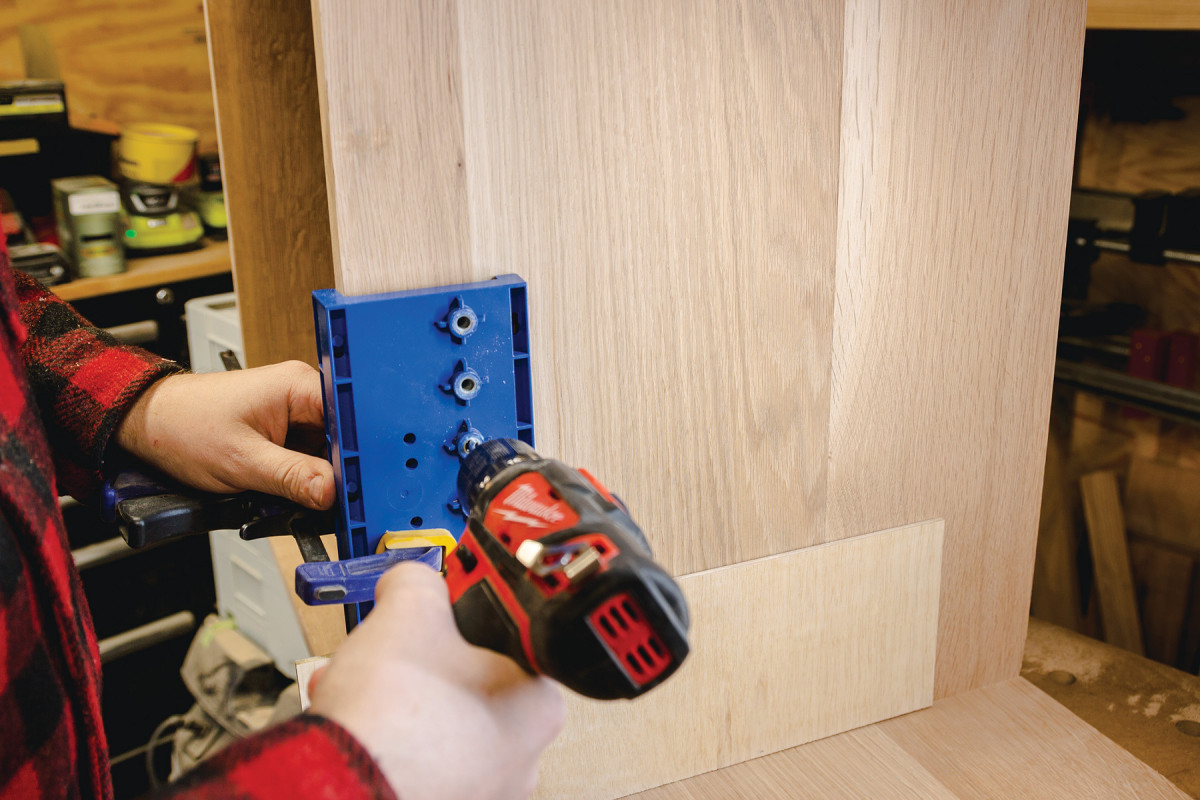
3. Reinforce the miters. I laid out the 8 mortises 1/4″ from the inside edge of the miter. The fence on the Domino is set to 45°.
The key to these miters is a straight reference edge for the router bit; I used a scrap of MDF. Cut the miter in multiple passes, I leave about 1/32” for my last pass to make sure I can remove any burning from the bit.
With the miters cut, I begin the floating tenon joinery. I use 5mm dominos in each joint to help align the miters and give strength to the corners. I cut a few test joints to dial in the precise position of the mortise–about 1/4” from the inside edge of the miter, with the domino joiner at 45°. Each miter received 8 dominos.
Tip: Track Saw Edge Jointing
 I first discovered this trick when I was gluing up a bunch of 8/4 ash to build a tabletop. Each board weighed about 75 pounds and was difficult to square up on my short-table 6” jointer. But then it hit me: I could use my track saw to put a precise, 90° edge on my boards. Once I had a good edge on one side, I could run the boards through the table saw to square them up. With a glue line rip blade, the joints off the saw were ready to glue up without any additional prep.
Add Stopped Dadoes
4-5. Make a router dado jig from MDF and plywood. A cutoff from the divider panel will give perfect spacing between the fences.
Then it’s on to a pair of stopped dadoes for the cabinet divider. I use a stopped dado to give the appearance of a simple butt joint from the front, while retaining the strength and alignment that dados provide. I made a quick dado jig from MDF and plywood.
 First, I built two fences from MDF. I used two layers of 3/4” MDF for each fence because my top-bearing router bit is a big one (13/4“) and I only needed a 1/4” deep dado. Square up one fence to the plywood rails, then sandwich an offcut from the divider with the other fence and screw it in place, keeping everything square.
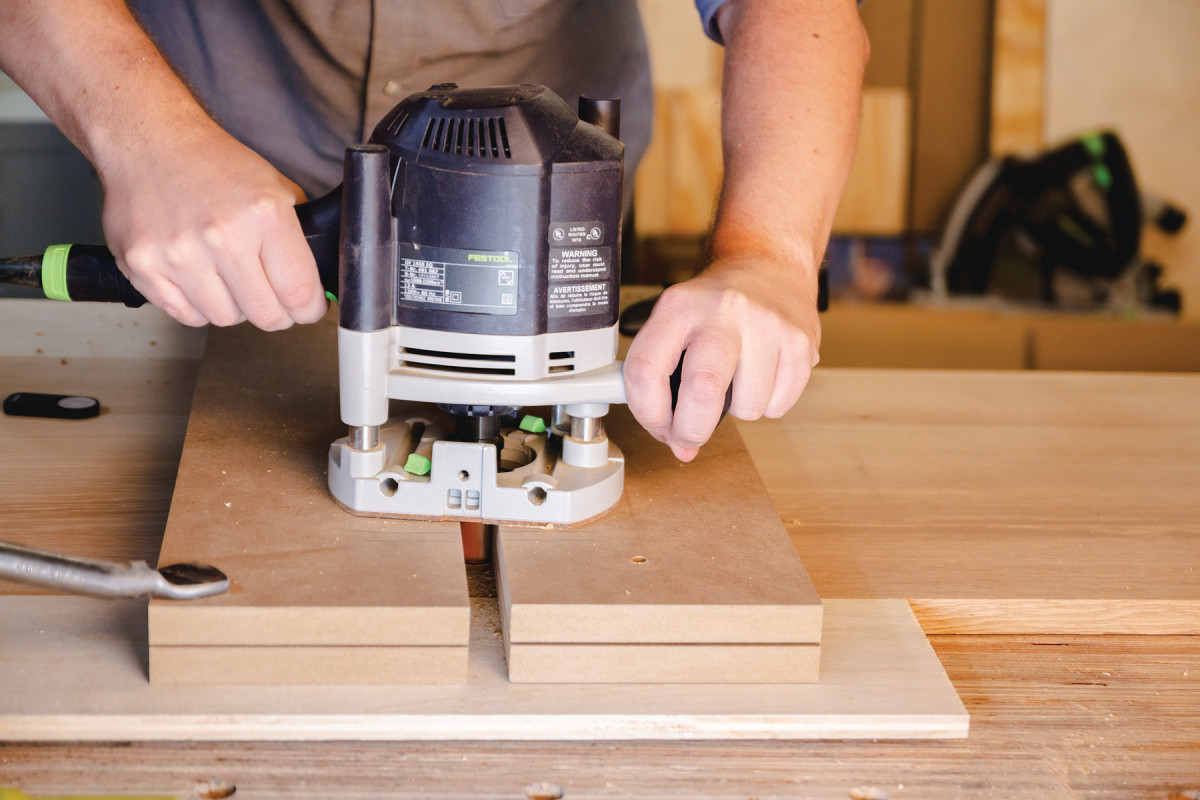
6. Cut the stopped dado for the divider in two passes with a top-guided flat bottom bit that is slightly smaller than your dado.
To use the jig, align it with your dado layout marks, then use a top-bearing router bit to cut your dado. I used a bit just a tad narrower than my dado, and made two passes to 1/4” deep with my plunge router. I also marked a stopping point on the top of my jig, knowing I’d come back and square up the dado. After the first dado is cut in my top panel, I mark the matching dado on the bottom of the carcase. Once both dados are cut, square up the stopped end with a bench chisel.
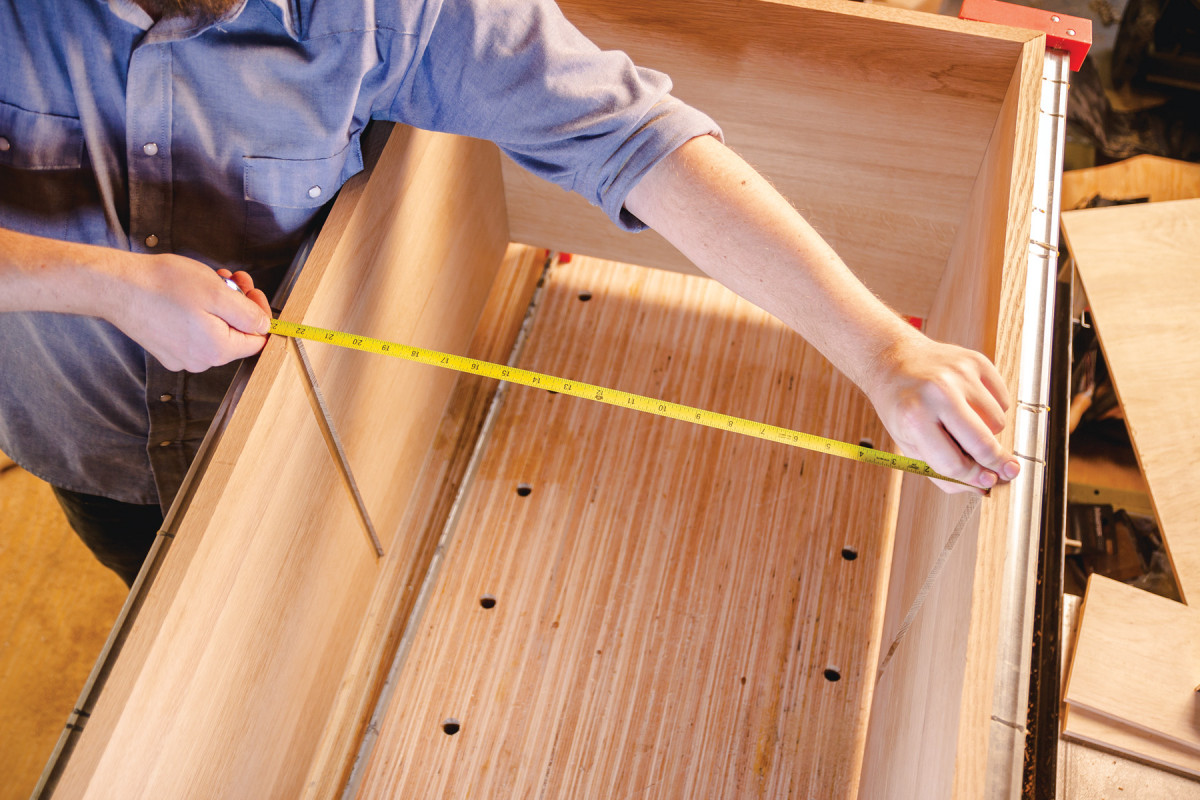
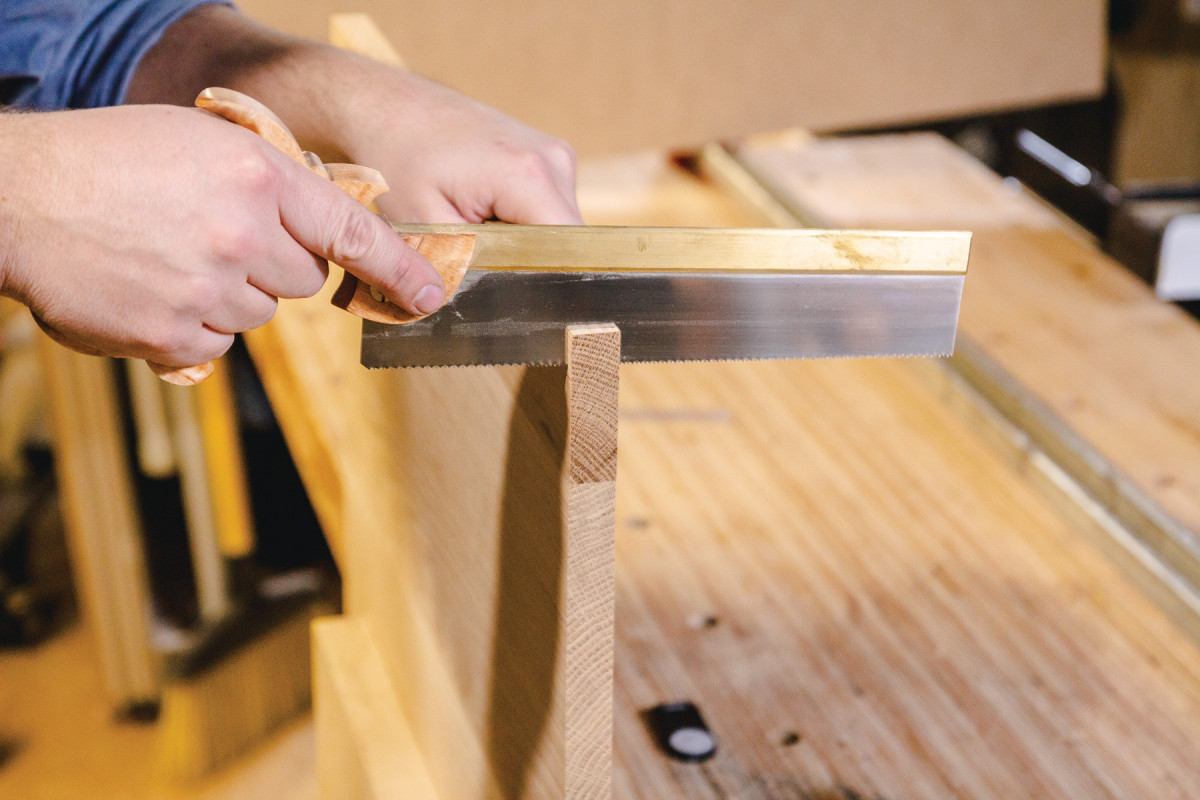
7. Dry assemble the case and measure one last time for your divider panel.
At this point, dry assemble the case. With everything clamped together, measure for the height of the divider panel and cut it to length. Then layout and cut the notches in the front of the panel so it fits into the stopped dado. It goes pretty quickly with a handsaw. Refine the fit with a sharp chisel.
Glue Up the Carcase
8. After the divider is trimmed to length, cut notches to fit the stopped dado.
Carefully disassemble the dry fit case, make note of panel orientation and then get everything in place for the glue up. I used Titebond III for the glue up because it has a longer open time than Titebond I (which is my go-to in the shop). Before I began, I made sure I had all of the clamps I needed in place and ready to go, with a few extra just in case.
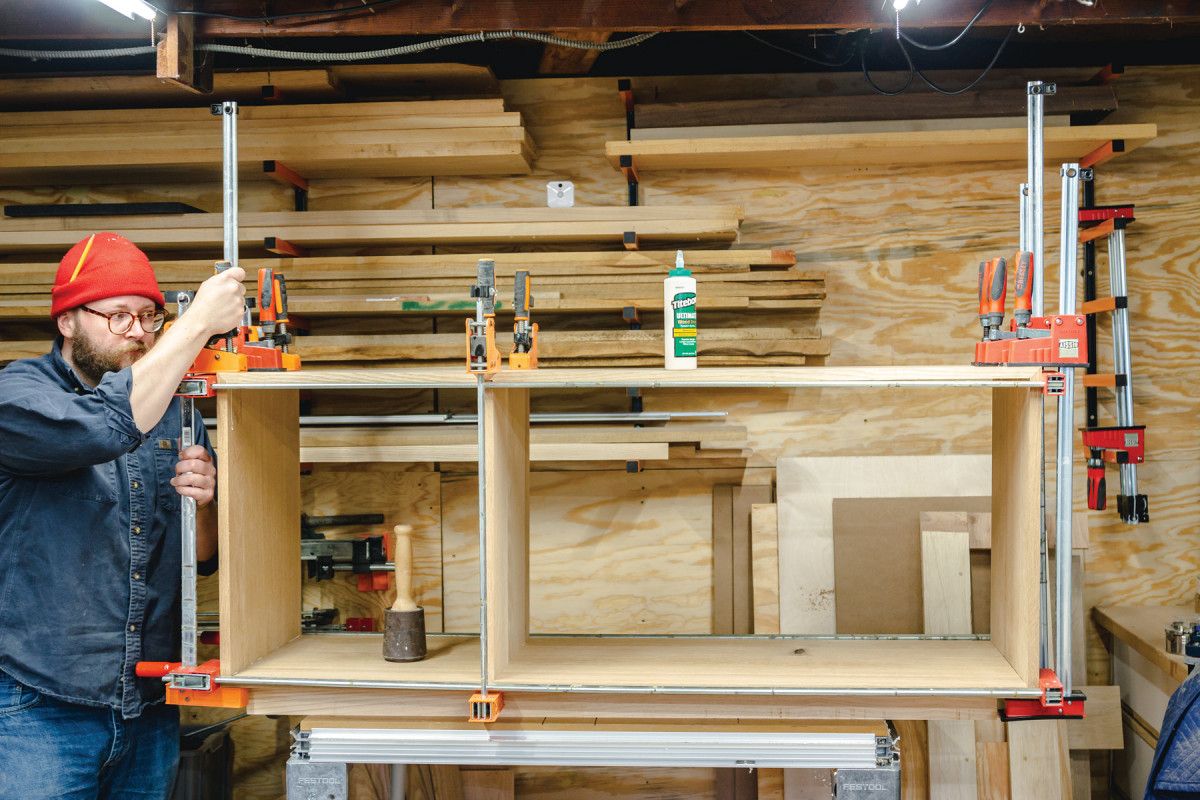
9. The most hair-raising part of the build: the glue-up. I used Titebond III for the longer open time and moved quickly. Having a friend provide backup (and emotional support) is also a good idea. Clamp the carcase, measure for square and let the glue cure.
With four mitered joints, I started with the two bottom corners of the carcase. I spread a healthy amount of glue on the dominos and mitered edges, got the pieces in place and brought them almost all the way home with a rubber mallet. Then, I added some glue to the bottom dado and fitted the divider in place. Then it was time for the top. The process was pretty much the same here. I aligned all of the dominos with their mating mortises, added some glue to the top dado, then brought everything home.
Finally, I used parallel jaw bar clamps to clamp everything together. Do a final measurement of diagonals to make sure the case is square, and then let the glue cure.
Make the Doors
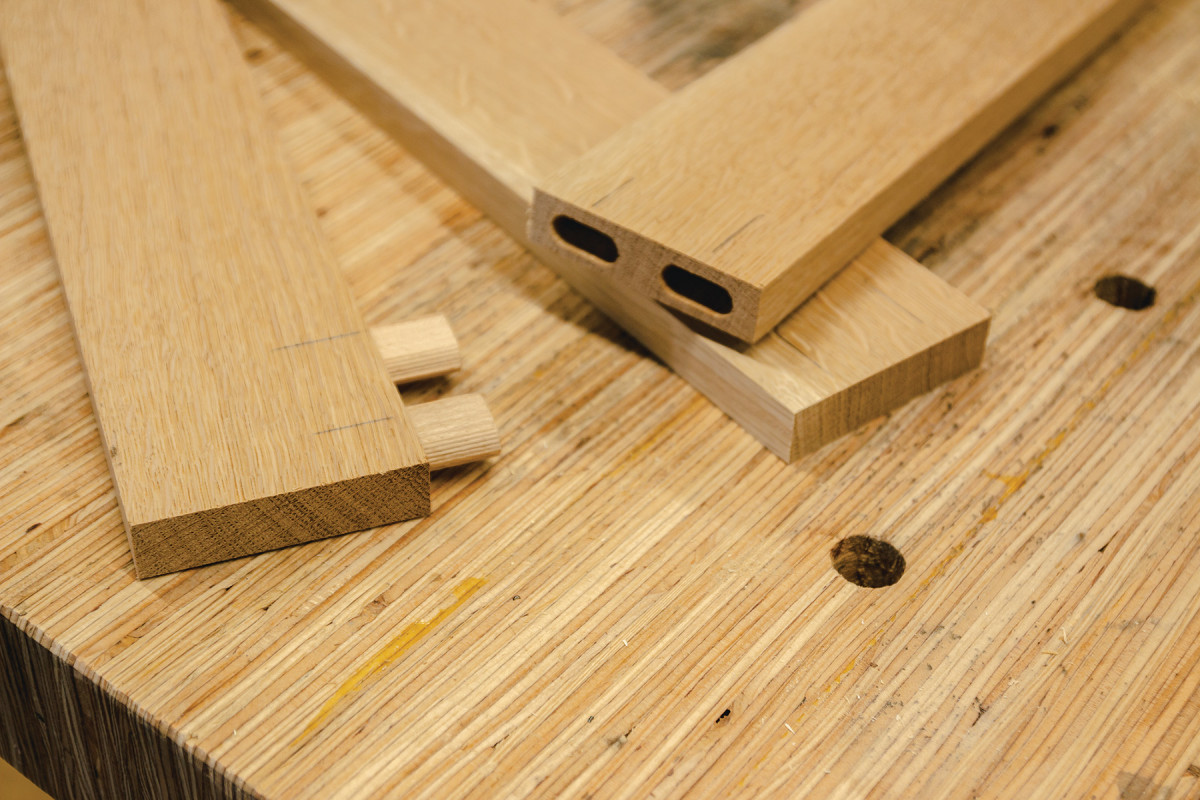
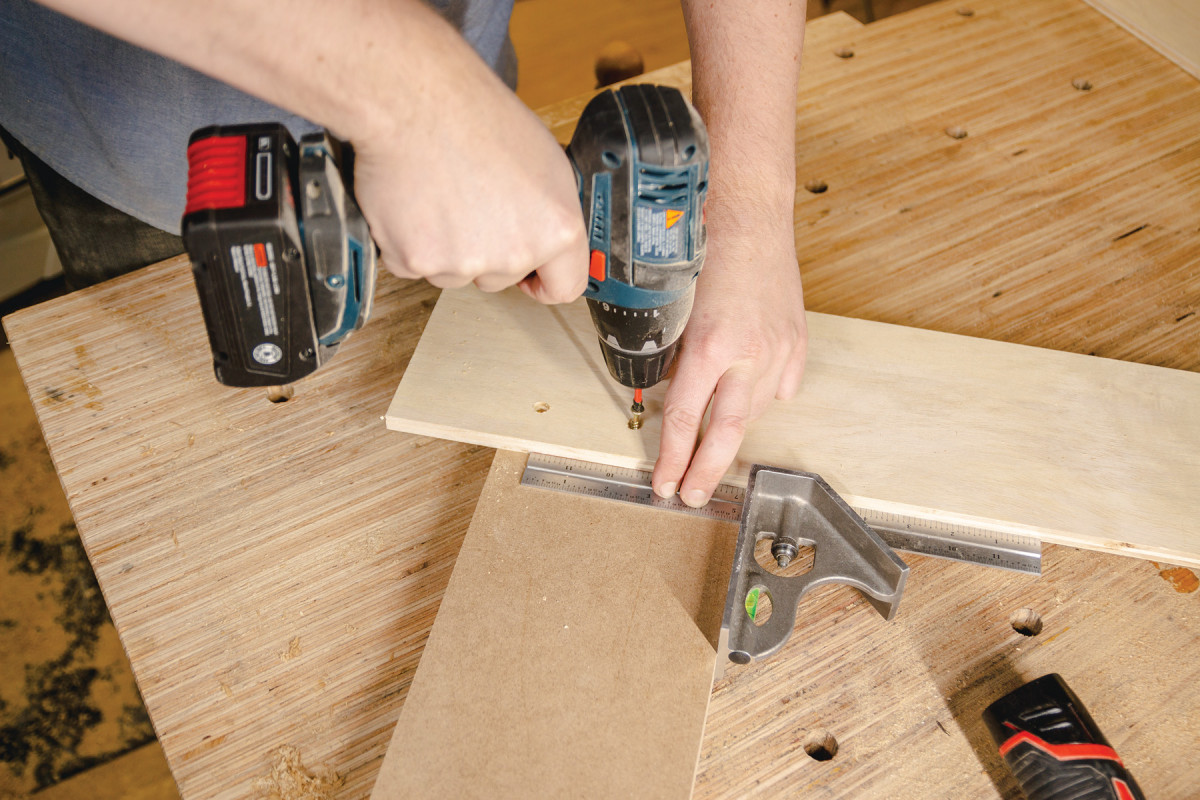
10. Measure your cabinet opening, calculate your door size and cut rails and stiles to length. The rails and stiles are 3” wide. I used 10mm dominos to join the rails and stiles.
The frames are joined with floating tenons and the panels are made of dowels and “woven” veneer.
11. Cut a kerf on the inside edge of each stile. This is where the veneer will slide into during the weaving process.
First, I cut my rails and stiles to width and length. Then I used the domino to cut two 10mm mortises in each joint. You’ll need to drill holes for the 1/4” dowel rod in the stiles that the veneer will weave through at this point. Finally, I cut thin grooves in each of the rails for the veneer. With all of that done, it’s time to assemble the doors.
12. Drill holes for the 1/4″ dowels. I used a drill press with the fence set so the 1/4″ hole is exactly in the center of the board, and drilled 6 evenly spaced holes within the frame opening. Assemble the doors. The dowels are just friction fit, and the tenons are glued in place.
I cut my dowels to length and insert one end into a stile. The dowels just friction fit in their holes. I add glue in the domino mortises and spread it evenly on the dominos and edge grain. Then I add the rails and repeat the process on the other stile. Once the glue has cured, I cleanup the squeeze out and get the door ready for finishing.
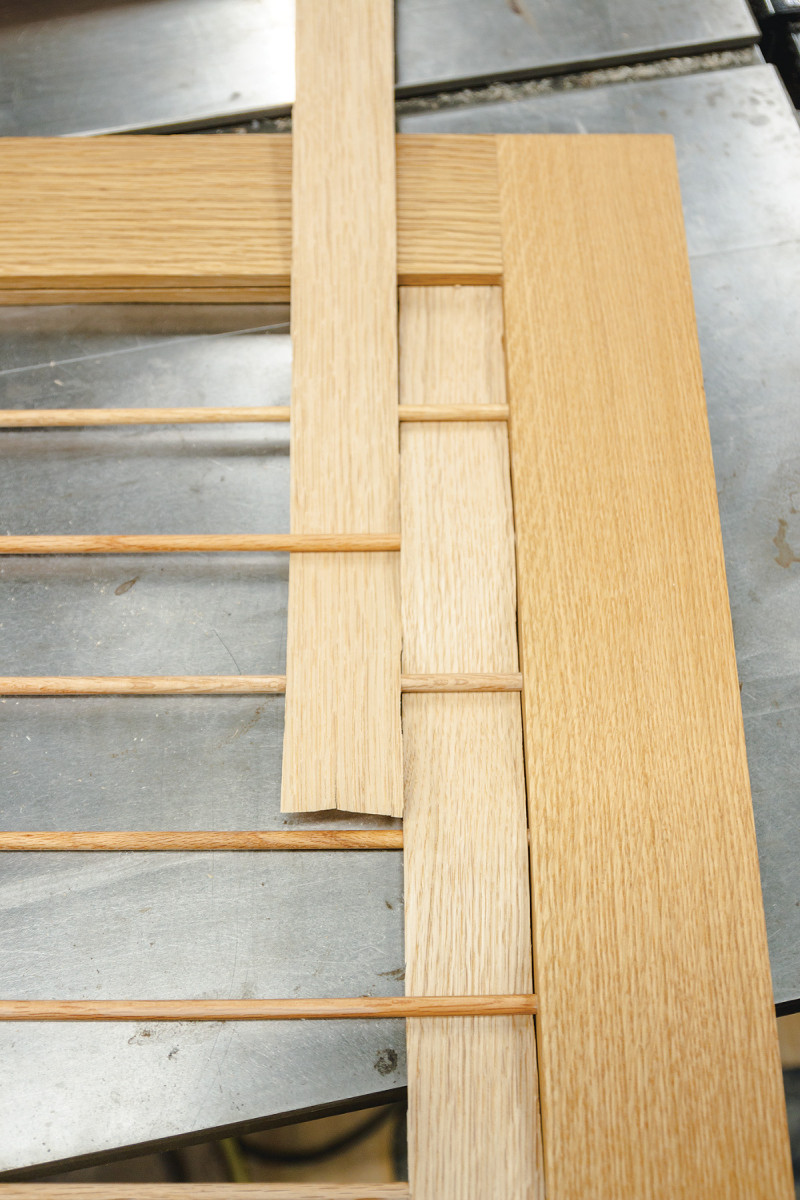
13. After the frames are assembled and finished, you can weave the veneer through. Cut your veneer to 15/8” wide and about 1” longer than the frame opening. Then just go over and under the dowels, and tuck the veneer into the kerfs in the rails. It takes some patience and you may crack a few pieces of veneer, so cut extra strips.
It’s easier to finish the door before you weave the veneer. I used fruitwood-tinted Danish oil to contrast with the natural white oak veneer. With the doors finished, it’s time
to weave. First, I cut my veneer to longer than I needed but to the precise width. I did a little experimenting and found that I liked seven 15/8” wide strips of veneer in each door. Weaving it is a simple process. Put one end in a groove then go over the first dowel, under the next, until you reach the other end. Then, trim your veneer to length and squeeze it into the other groove. Alternate the next strip, and so on, to create the woven pattern. The strip is just held in space by the tension in the veneer.
Make and Install the Drawers
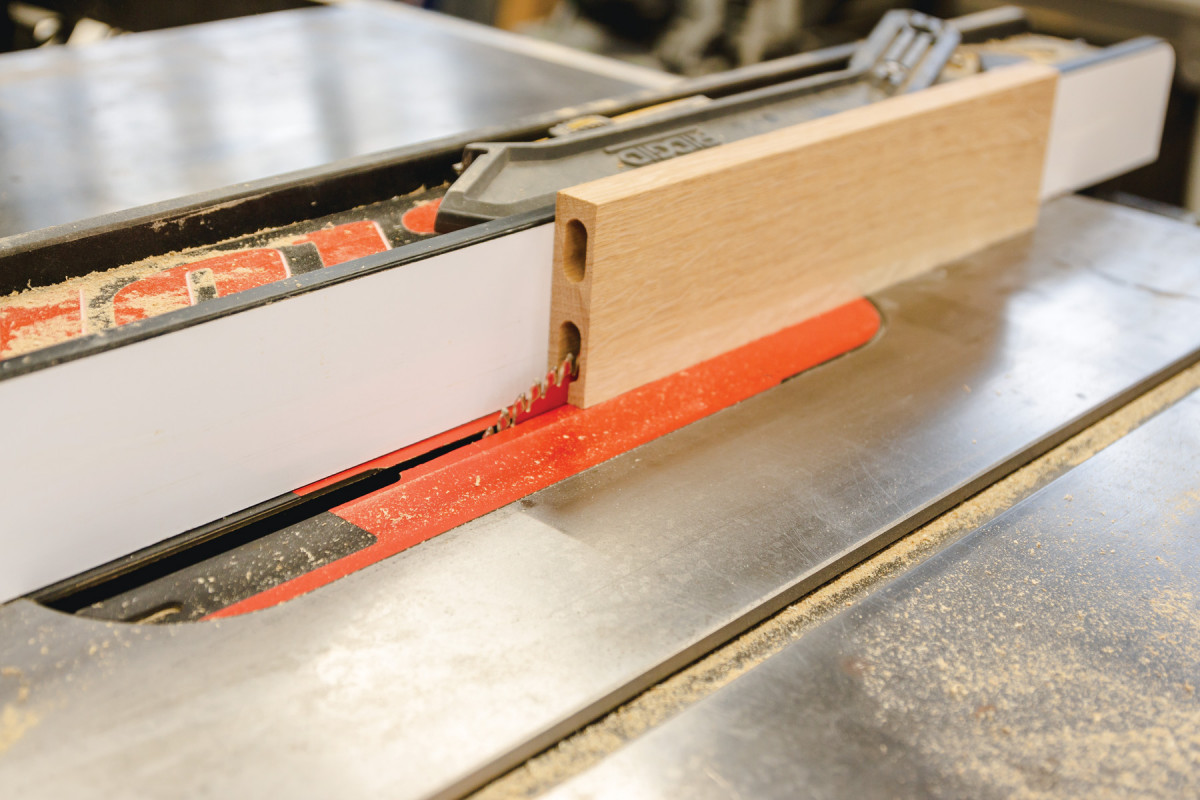
14. Make drawer boxes with a lock miter bit (see Lock Miter Drawers, page 52). Rout 1/2″ stopped grooves in each side of the drawer, 1/4″ deep, then square the ends 1″ from the front of the drawer with a chisel.
I wanted mitered edges on my drawers, but they needed to have a good mechanical joint to stand up to being opened and closed. Enter the lock miter router bit. I used 5/8” stock for my drawer front, sides and back, with a 1/4” plywood bottom. You can see how to make the drawers in the article on page 52. Make sure your drawer front and back pieces are exactly the same width as your cabinet opening and all of your sides are the same depth. For this cabinet, that means fronts and backs are 191/8” wide, and the sides are 17″ deep. Once you’ve made your drawer boxes and the glue has cured, you can move on to getting them ready to install.
15. Mill the UHMW runner stock to slightly less than drawer-groove size, and then install runners in the cabinet. Careful layout and plywood spacers keep things aligned.
The drawers have grooves in each side that ride on runners. I cut the stopped grooves in the drawer sides on the router table. I centered the groove in the drawer side and made a reference mark on my router tabletop to know when the end of the stopped groove was approaching. I used a 3/4” flat bottom router bit to cut a 1/4” deep groove in each drawer side. With a bit this size in maple, I made the cut in two passes, taking off about 1/8” at a time.
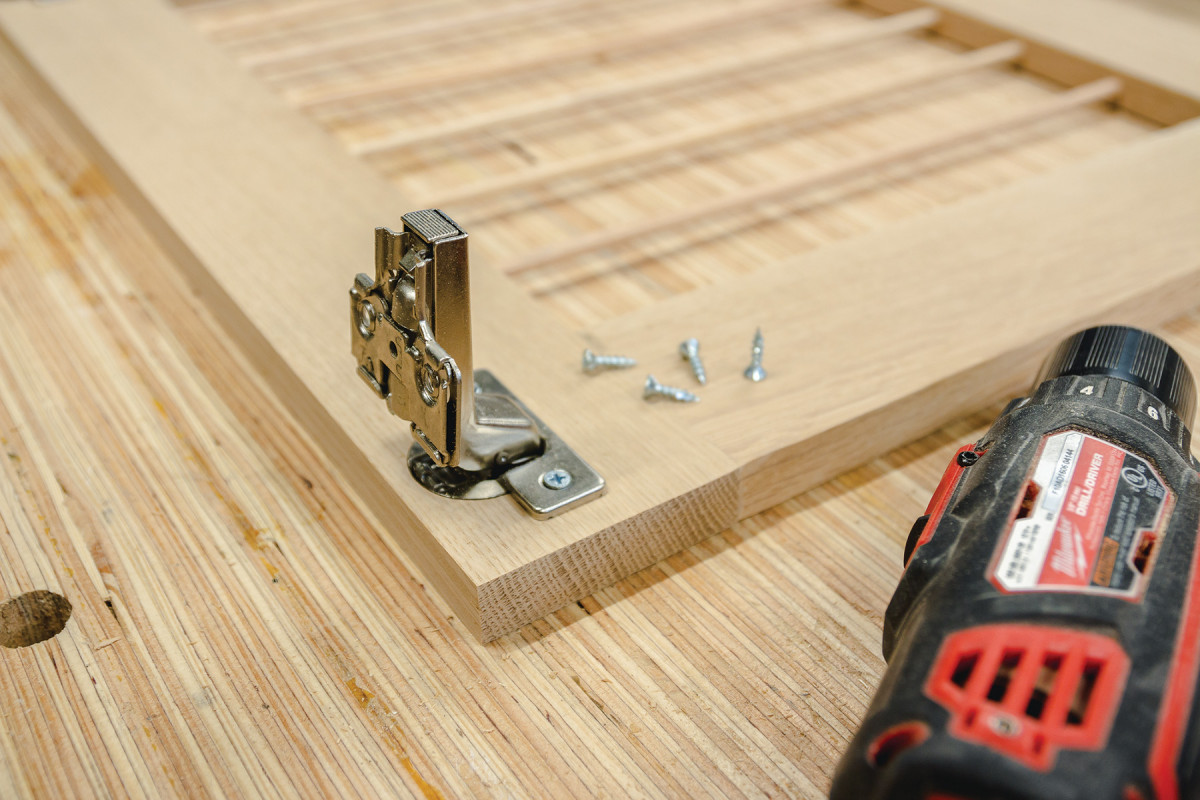
16. Keep in mind the 1/2″ recess when you’re installing the hinges in the cabinet. The easiest way I found was to measure in from the front edge (keeping in mind the recess), then hold the door in place while you drive a couple screws in. European hinges have a little adjust built into them, so as long as it’s close, you can dial in a precise door fit.
Then I went ahead and milled and cut the drawer runners to size. The runners are made from UHMW (ultra-high molecular weight) plastic. It’s a uniform material that mills easily on woodworking equipment and gives the drawer sides a slick surface to ride on. My material was 3/4” thick, but I needed to plane it just a touch to get it to fit in my drawer grooves. Then, I cut runners off at the bandsaw, each 1/4” thick.
17. I drill shelf pins with a shelf pin jig. There’s only one shelf, and I know it’ll usually be in the middle of the cabinet, so I drilled five holes for each pin starting roughly in the middle of the cabinet. A plywood spacer keeps the jig registered.
With the runners cut to size, I laid out and installed them in the cabinet opening. The drawers are inset in the cabinet about 1/2“, so take that into account along with the stopped grooves in the drawer sides. The easiest way I found to do this was to stack the drawers, then measure where the grooves in the drawer end up. Then, I used a series of templates made from leftover 1/4” plywood to mount the runners.
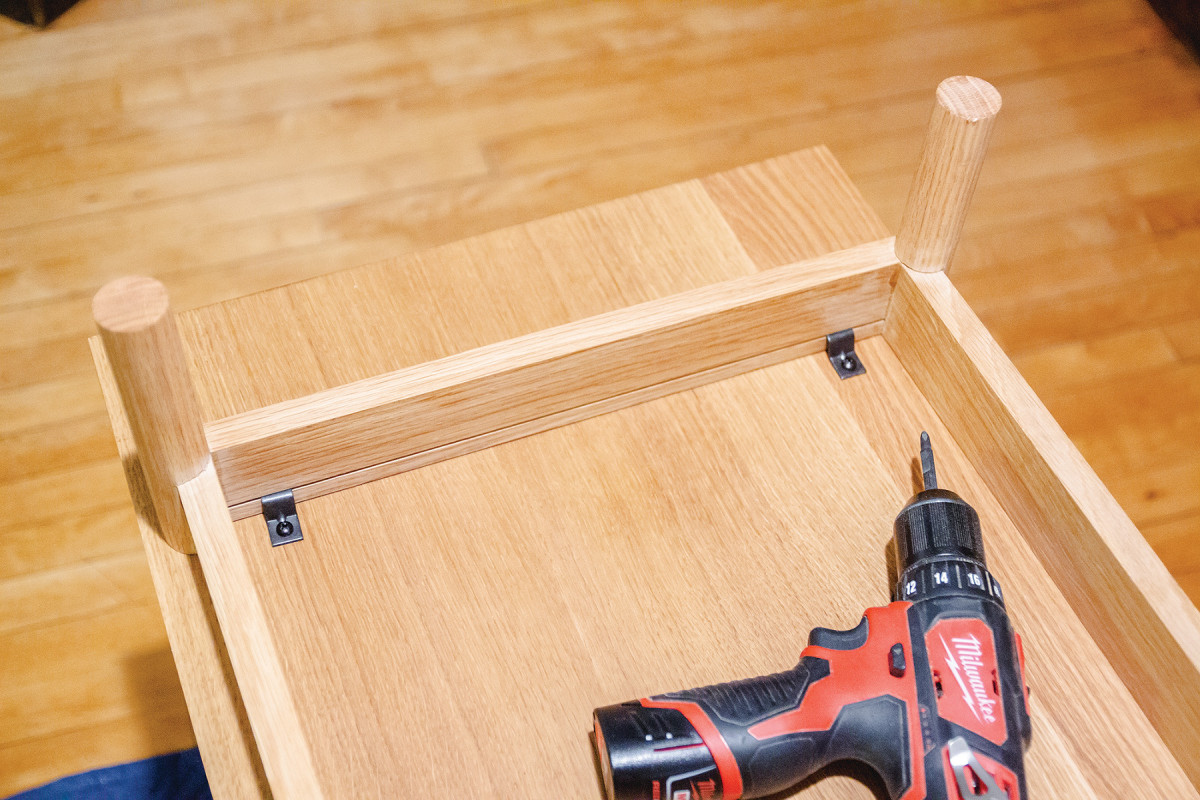
18. Attach the base to carcase with Z clips. Two in each small piece will keep things in place but still allow wood to move with the seasons.
Finally, fine-tune the fit of the drawers. You may need to shave a bit off the sides or tops. I used my No. 4 plane for this task, numbering the drawers once I got the fit I wanted.
Install the Doors
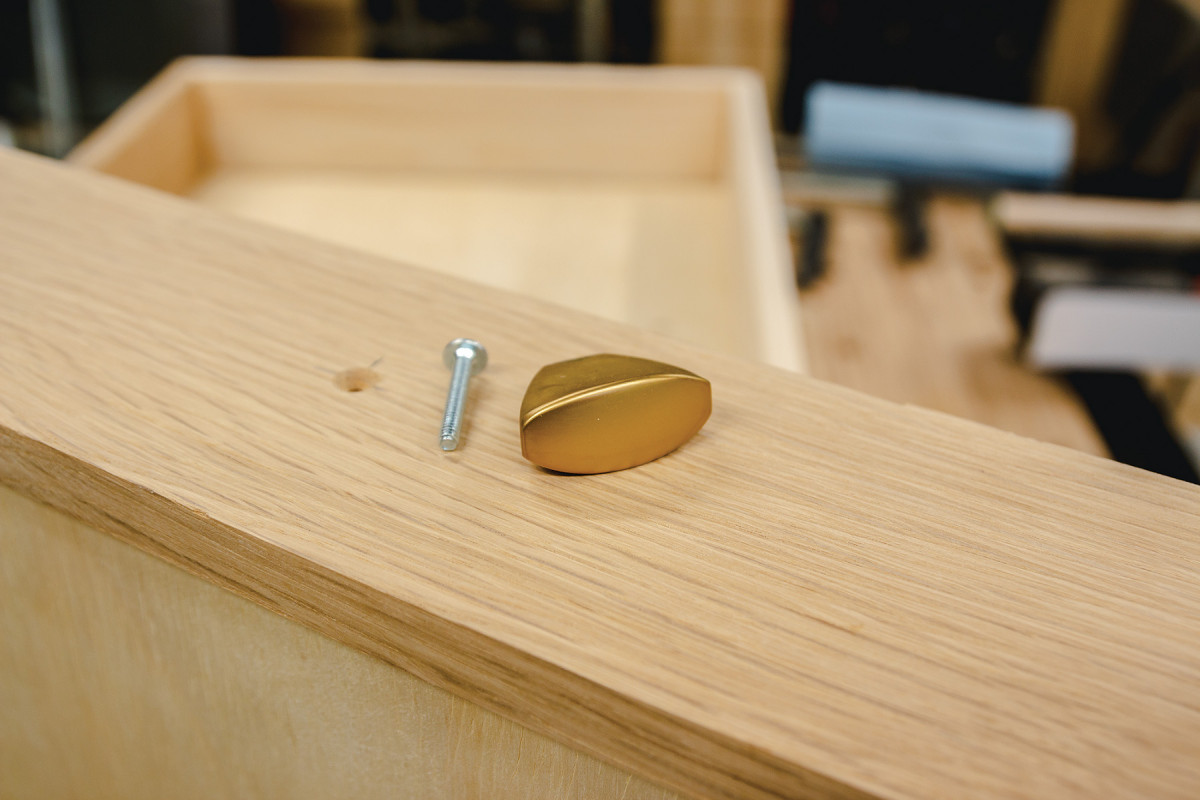
19. Install the door and drawer pulls. I found these small brass pulls at my local home center.
I used European-style 32mm hinges for the door because they stay out of the way and they allow you to dial in the fit. I used Kreg’s European hinge jig to drill the hinge cups in the doors. It’s easy and foolproof, especially when your door is fully assembled and ready to install. I also used a shelf pin jig to add an adjustable shelf to the cabinet.
Add the Base and Back
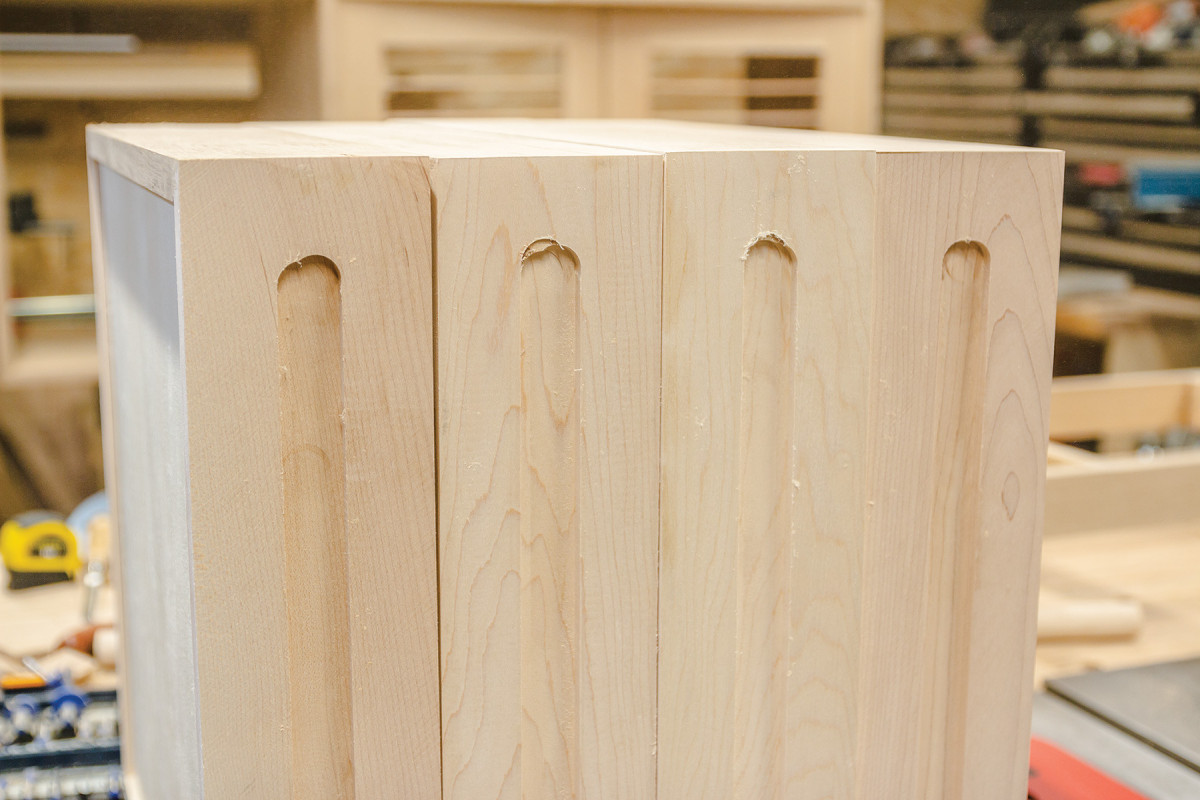
The base is really just a big rectangle with a couple reinforcements. The trick to making it look seamless, though, is cutting the half-lap in the legs. This is a little tricky, but it goes quickly with a band saw. I secure the leg in a handscrew clamp, with my layout lines square to the blade. Then just two cuts and they’re ready to attach.
The main structure of the base is joined with dominos but before you glue up, cut grooves in the short pieces for Z-clips to attach the base to the carcase. Then, glue on the legs. I also drove a couple pin nails through each to keep them in place until I could get clamps on.
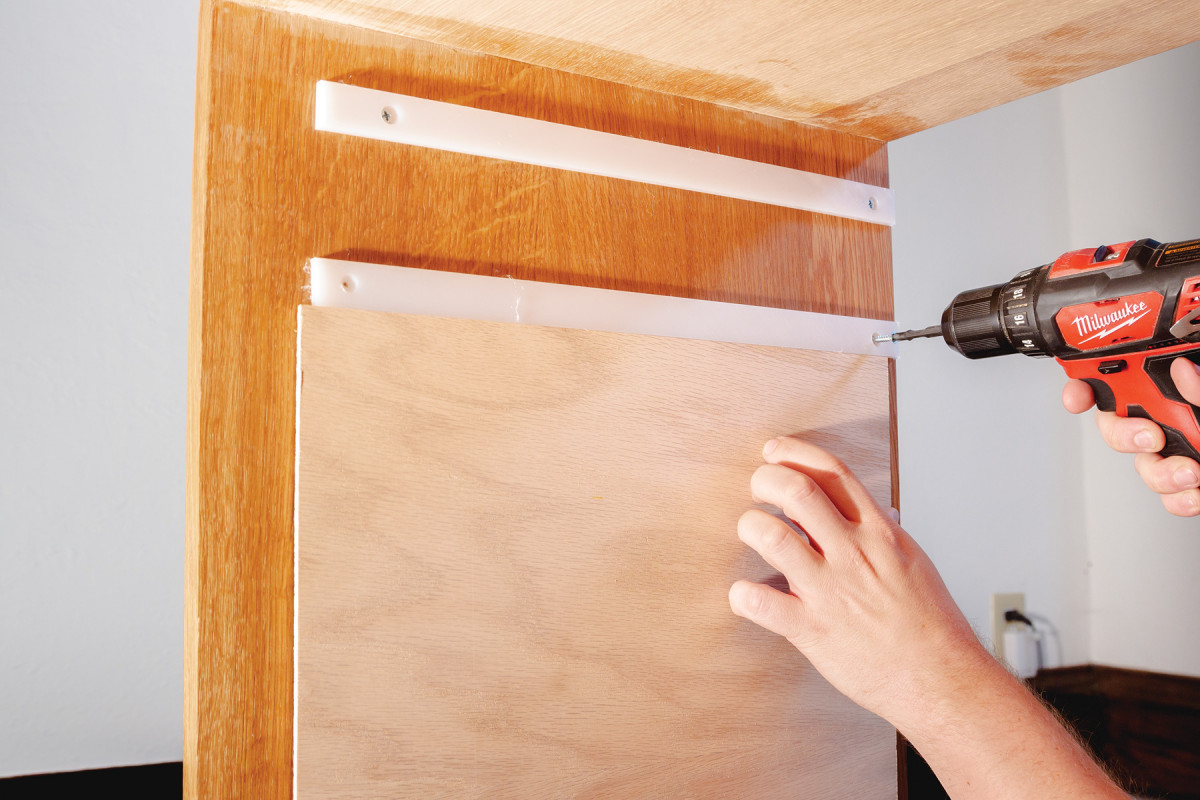
Finally, use a rabbeting bit to rout out a recess for the plywood back. You’ll need to use a chisel to square up the corners.
Sand and Finish
It’s easiest to finish the base and carcase separately. Sand the whole thing to #180 grit, then wipe on a few coats of your favorite finish (I used Fruitwood-tinted Danish oil). Do the same with the drawers. (The doors are finished prior to weaving—you can leave the weaving until the last step if you’d like.) Then reassemble everything, nail on the back, and put it in place. All that’s left is to load it up and start living. PW
Andrew Zoellner is the editor of Popular Woodworking. He wants you to keep making awesome things out of wood.
Here are some supplies and tools we find essential in our everyday work around the shop. We may receive a commission from sales referred by our links; however, we have carefully selected these products for their usefulness and quality.