We may receive a commission when you use our affiliate links. However, this does not impact our recommendations.
Stickley-Style Plate Rack
Beautify your bungalow with an American classic.
By Garrett Glaser
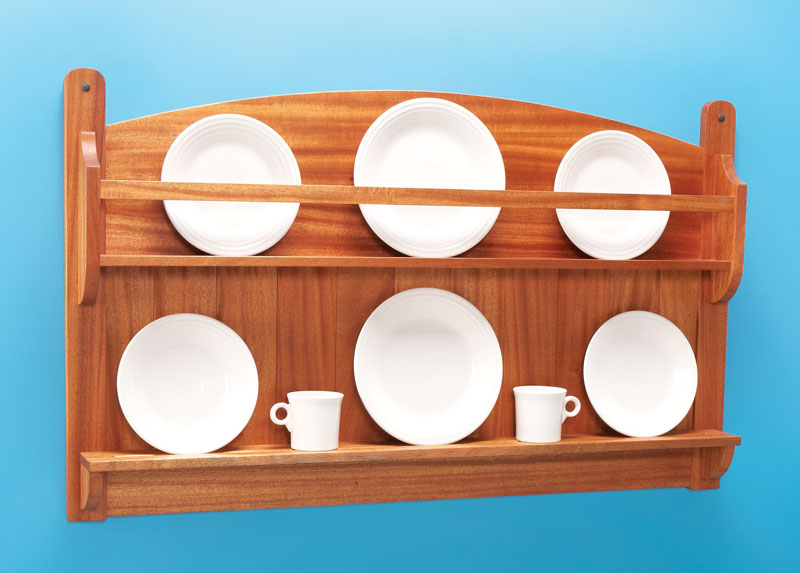
Whether it displays everyday china or an heirloom collection, this handsome plate rack does the job with Arts and Craft s style. Like original pieces of that era, this rack features mortise and tenon construction, stepped joints and other subtle design elements that create visual interest and are hallmarks of good craftsmanship.
Building this piece will test your skills—a notion that fits perfectly with basic principles of the Arts and Craft s movement: to make your best effort and do your best work. Gustav Stickley himself marked his furniture (and his warranty) with the phrase “Alsikkan,” which translates to “As best I can.”
Although the Stickley name usually evokes images of deeply fumed quartersawn oak, this homage is craft ed from mahogany, another wood favored by Stickley and his contemporaries. Mahogany’s rich tone and attractive figure make this rack worthy of display—with or without plates!
Make the end posts
Mill and cut the end posts to final dimension (A, Fig. A and Cutting List, below). Then carefully locate, mark and cut the three mortises on each post (Fig. B). If you don’t have a mortiser or a mortising attachment for your drill press, install a Forstner bit and rough out each mortise by cutting overlapping, stopped holes along its centerline. Then clean up the shoulders and square the ends with chisels (Photo 1). African mahogany is a very soft , almost spongy wood, so using a sharp chisel is a must.
Next, cut a 3/8″ wide x 9/16″ deep rabbet on the back inside edge of each post, using a router with a rabbeting bit (Photo 2).
Pro Tip: When you rout stopped rabbets, use the base of the router to mark both end points on the face of the workpiece, so you can easily see where to start and stop.
Locate the hanging hole on each post and mark the curves on its top end. Drill the hole and use a bandsaw or jigsaw to shape the end. Then smooth the curves, using a disc sander or a belt sander clamped to a workbench.
Assemble the frame
Mill the top and bottom rails (B, C) to final dimensions. African mahogany boards over 12″ wide are fairly common, but you can also glue up narrower boards to make the top rail. Establish the tenons on the ends of both rails (Photo 3). Then lay out and cut the arc on the top rail.
Mark the top rail’s centerpoint and the beginning of the arc at the tenon shoulder on each end (3″ down from the top). Th en use a shop-made bow to draw the arc (Photo 4).
To make the bow, rip a 1/8″ x 3/4″ x 48″ strip from a piece of straight-grained hardwood. Th en cut 1/16″ wide x 1/2″ long notches in both ends of this piece. Next, cut a length of kite string or nylon mason’s line somewhat longer than the bow. Tie a knot at one end and a series of evenly spaced knots at the other end. Then install the string, using the knots to bend the bow.
Find (or tie) a knot that creates a bow that matches the three marks you’ve laid out on the rail. Th en position the bow on the rail and draw the arc. This bow probably won’t create a geometrically perfect arc, so the best procedure is to position it, draw the arc from one end to the center and then flip the bow end-for-end to finish drawing the arc.
Cut the arc using a bandsaw or jigsaw. Th en use a disc sander or a sanding block to fair the curve.
Complete the tenons on the top and bottom rails by using a pull saw to cut their shoulders. Use a coping saw and a chisel to remove the waste between the two tenons on each end of the top rail.
Pro Tip: To keep a frame with one or more wide rails from splitting due to seasonal movement, cut two tenons on the ends of the rails rather than one long tenon. Cut the bottom tenons to fit their mortises full-width, but cut the top tenons narrower, so they’re free to move up and down inside their mortises as the wood expands and contracts.
Assemble the rails and end posts without glue to testfit the joints. Then glue up the frame (Photo 5). Yellow wood glue has enough elasticity to allow the top rail’s seasonal movement.
Add the shelves and brackets
Mill and shape the upper and lower brackets (D, E; Fig. C). Cut the mortises in the upper brackets using the same method as for the end posts.
Next, mill the upper and lower shelves (F, G) and the plate rail (H) to final dimensions. Th en cut the tenons on the upper shelf and plate rail to snugly fit the mortises in the upper brackets. (Note: At this point, the shelf will protrude beyond the bracket’s back edge.)
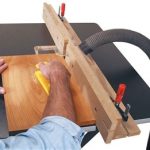
Cut a 3/16″ wide x 7/16″ deep rabbet in the back edge of each shelf (Fig. C). Make sure to rabbet the top edge of the upper shelf and the bottom edge of the lower shelf. Th en notch each shelf so it fits flush against the end posts when its rabbet is registered against the rail (Photo 6).
Plunge-rout 1/4″ deep plate grooves in both shelves using a 1/2″ core box bit (Photo 7). As before, use the router’s base to mark the start and stop points.
Finish-sand the frame, shelves, brackets and plate rail. Then glue and clamp each shelf with its rabbet registered against the edge of the appropriate rail on the assembled frame. Next, install the plate rail as you slide the upper brackets onto the shelf ’s tenons (Photo 8). Clamp the brackets to the shelf and to the frame. Make sure the assembly is square and the brackets and end posts are parallel. Th en drill countersunk pilot holes through the back of the end posts and fasten the brackets with screws.
Glue the lower brackets to the end posts and lower shelf. To avoid cross-grain gluing (and allow seasonal movement), orient the grain on these brackets vertically.
Examine the assembled rack and finish-sand as necessary. Th en apply your favorite finish. I wiped on three coats of gel urethane.
Install the back slats
Mill long blanks for the back slats (J), preferably by resawing thick stock rather than planing away more than half of a board. Rip the blanks to width and then use a sanding block to lightly chamfer the edges. Next, install a thin kerf blade and cut 3/32″ wide x 3/8″ deep slots for splines on both edges of each blank (Photo 9). It isn’t necessary to perfectly center the slots; just keep the same face of the blank against the fence to cut both slots.
Install a zero-clearance insert in your tablesaw, set the fence and use a sacrificial push block to rip the splines (K) from a board milled to 9/16″ thickness. Cut the slats and splines to length. Finish-sand the slats, apply the finish and let it dry. Then install one spline in the same edge of each slat. Don’t use glue.
Lay the rack front-face down on your bench to install the slats, which rest on the rabbeted edges of the upper and lower shelves (Photo 10). Press the slats together, so the splines don’t show. Secure the slats by fastening retainers (L, M) to the shelves and end posts, using 23-gauge pin nails.
Cutting List

Fig. A: Exploded
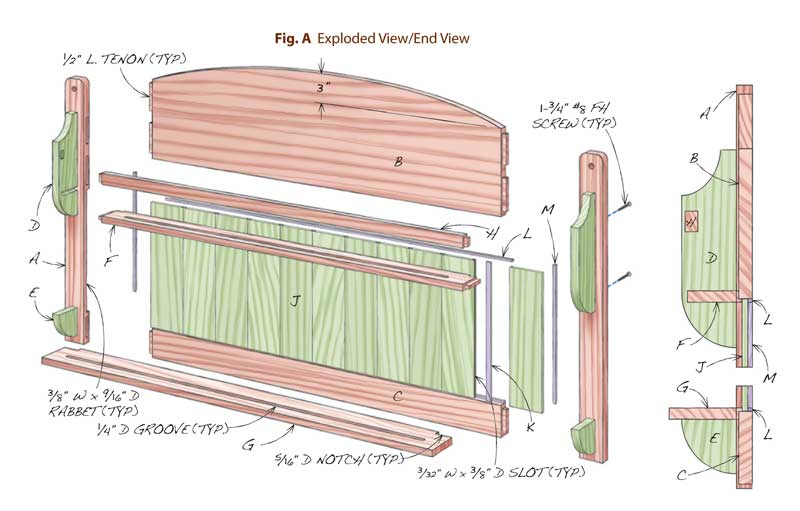
Fig. B: Post and Rail Joinery

Fig. C: Shelf Details

Fig. D: Upper Bracket

Click any image to view a larger version.
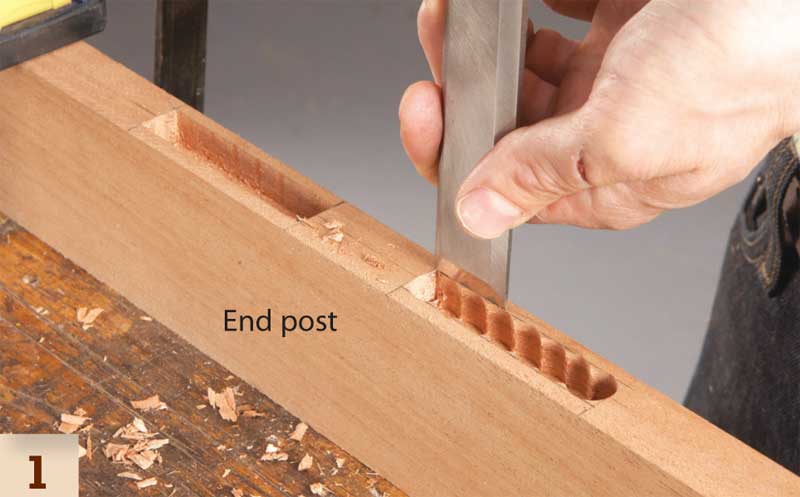
1. Cut mortises in the end posts for the rails. Drill overlapping holes and then square the cheeks and shoulders by hand.

2. Rout a stopped rabbet on the inside edge of each end post to house the back slats.

3. Rabbet both faces on the ends of each rail to establish the tenons. On the top rail (shown here), wait to cut the tenon shoulders until after you cut the arc ( see Photo 4).

4. Pro Tip: Use an adjustable bow to lay out large arcs. To make the bow, stretch a string with evenly spaced knots between slots cut in the ends of a thin hardwood stick. Then use the knots to adjust the bow’s arc.

5. Pro Tip: Measure diagonally in both directions to make sure a frame is square. If the measurements are identical, you’re good to go.

6. Notch each shelf to fit the opening in the frame, using a miter gauge with a fence and a stop block. Only the upper shelf has tenons.
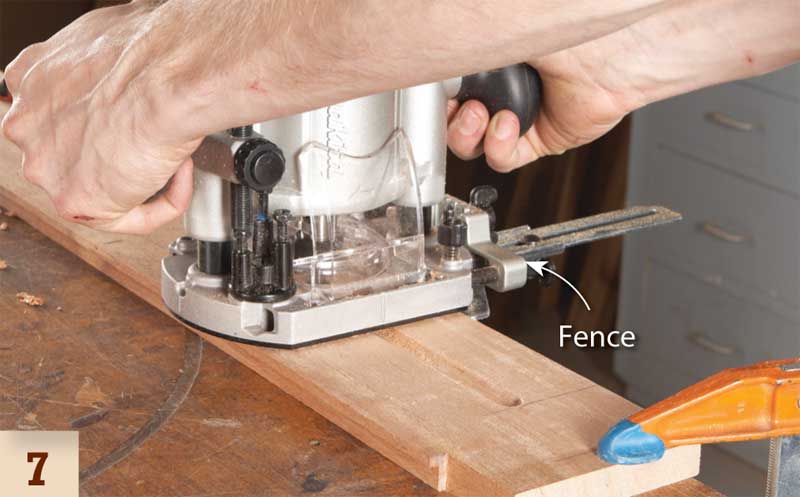
7. Rout plate grooves in each shelf using a plunge router with a fence and a core box bit.
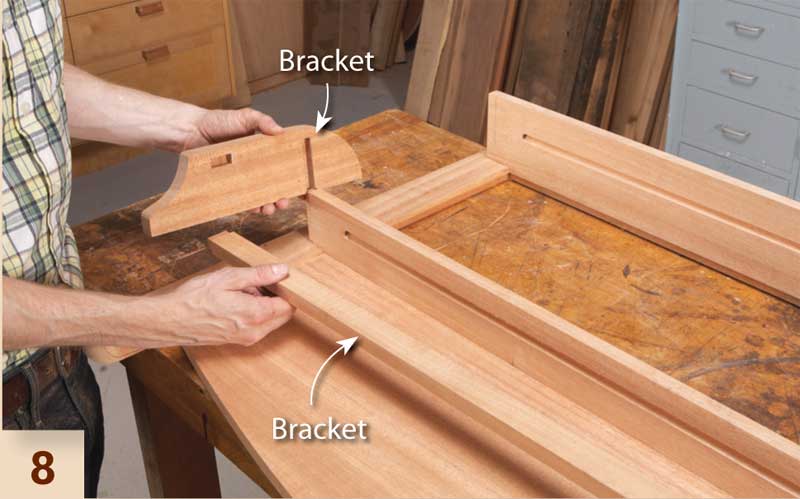
8. Install the brackets and plate rail after gluing on the shelves. Gluing these mortise and tenon joints is optional, because both brackets will be securely fastened to the frame with screws.

9. Cut narrow kerfs for splines in the edges of the back slats. Use a featherboard to keep the slat pressed against the fence so the slots are consistently located.
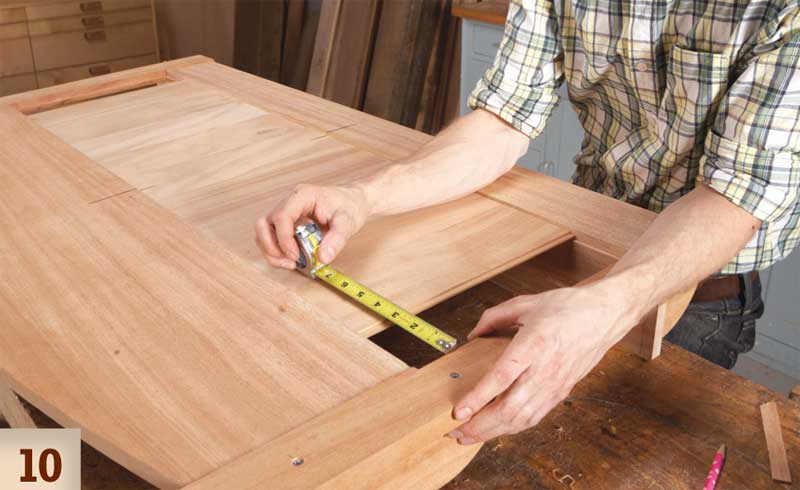
10. Install the slats working from the center to the ends. Allow for seasonal movement when you cut the end slats to fit. Install retainer strips to hold the slats in place.
This story originally appeared in American Woodworker October/November, issue #168.
Here are some supplies and tools we find essential in our everyday work around the shop. We may receive a commission from sales referred by our links; however, we have carefully selected these products for their usefulness and quality.