We may receive a commission when you use our affiliate links. However, this does not impact our recommendations.
One afternoon – start to finish – is all it takes, even for a new woodworker. This may be the easiest (and coolest) table you’ll ever build.
If mid-20th century modern furniture design were as popular as the Arts & Crafts style is today, then thousands of these tables would be turning up for sale at craft shows any day now. Why? Anybody can build this table. And the more tables you build at once, the less time each one will take.
In spite of its simplicity and minimal materials, the table is very sturdy, owing to the geometry of the dowel placement. Isamu Noguchi (1904 – 1988), a sculptor and designer recently honored with the issue of U.S. Postal Service commemorative stamps, designed the table in the 1950s using a cast-iron base and chrome-plated steel rods. Wooden dowels, even 5⁄16“-diameter ones as used in our model, provide ample strength.
Many different materials can be used to make the table. In addition to the wood or steel dowel options, the base can be solid wood or plywood. The top can be solid wood, plywood covered with plastic laminate or even glass with a ring of plywood to capture the top of the dowels and support the glass. Marble, granite or slate are still other possibilities.
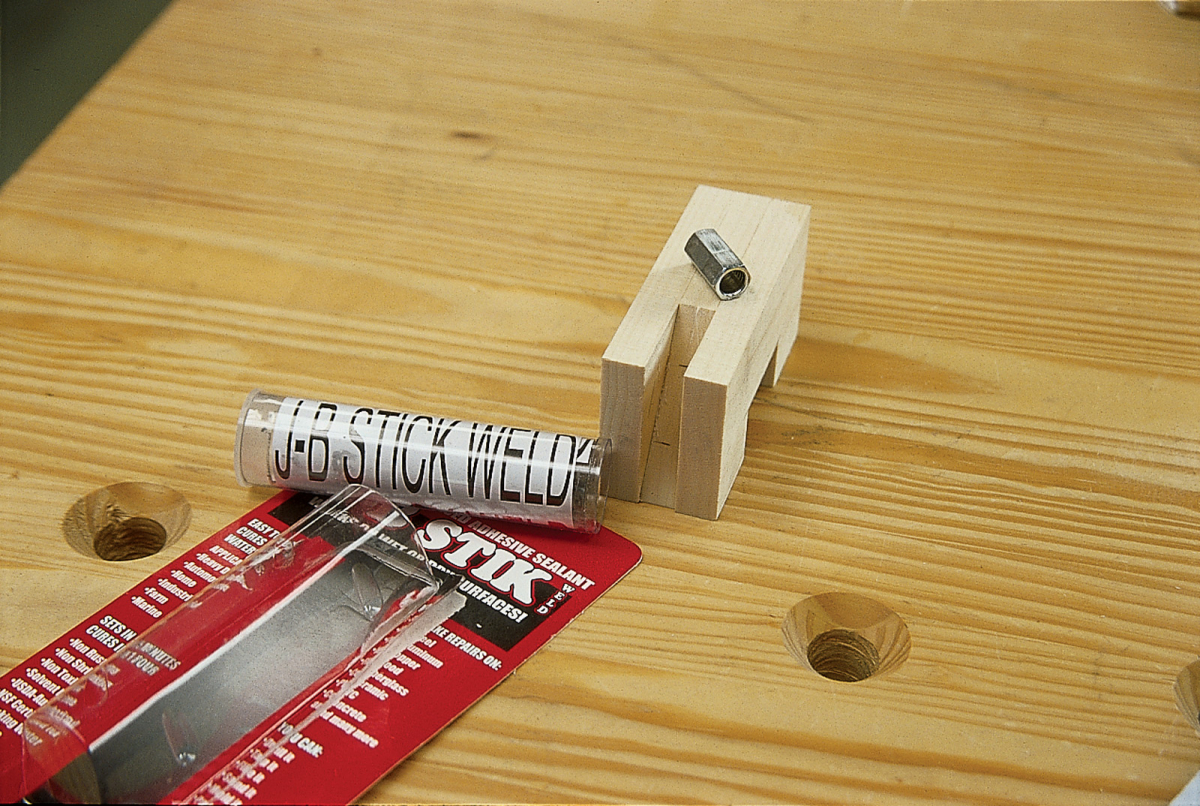
The drilling jig is made from four pieces of wood, with the center piece cut at the proper angle before gluing the blocks in place. The metal drill bit bushing is then glued in place using epoxy.
The Secret to its Simplicity
When you’ve settled on the materials, the first order of business (and the genius that makes the table so easy to build) is making one simple jig. This is what will guide your drill bit when boring the holes for the dowels.
You’ll need something to use as a guide for the drill bit, which we’ll call the drill bit bushing. Aluminum or copper tubing can be used for 1⁄4” or 3⁄8” dowels, but for 5⁄16” dowels (which we used for the table shown on page 47), you should buy a 1″ long x 5⁄16” threaded rod connector and drill out the threads. Just make sure the inside dimension of whatever you choose to guide your drill matches your dowels’ diameter.
 To build the jig, first rip and crosscut a 2″-wide x 61⁄2“-long board. The thickness of the board should be the same as the outside dimension of the drill bit bushing. On this board, cut a 56° angle across its width at one end (use a miter saw or a miter gauge with a 34° setting).
Next, cut two 2″-wide x 61⁄2“-long pieces of scrap wood (the thickness isn’t critical). These will be glued to the angled piece to create a space to capture the drill bit bushing. Glue the drill bit bushing to the angled section of the jig using epoxy.
After the glue has cured, cut a notch in the bottom of this assembly and attach the long, transverse “wing” board. This board provides you with a place to attach the clamps that will hold the jig in place while you drill your holes for the dowels. Simply secure the wing to the jig using four countersunk drywall screws.
A finish nail serves as the pivot point for the circle-cutting jig. For outside cuts, measure from the inside edge of the router bit; use the outside edge of the bit for measuring inside cuts. Mark the radius distance on the jig, then drill a small hole for the nail.
Cutting Circles
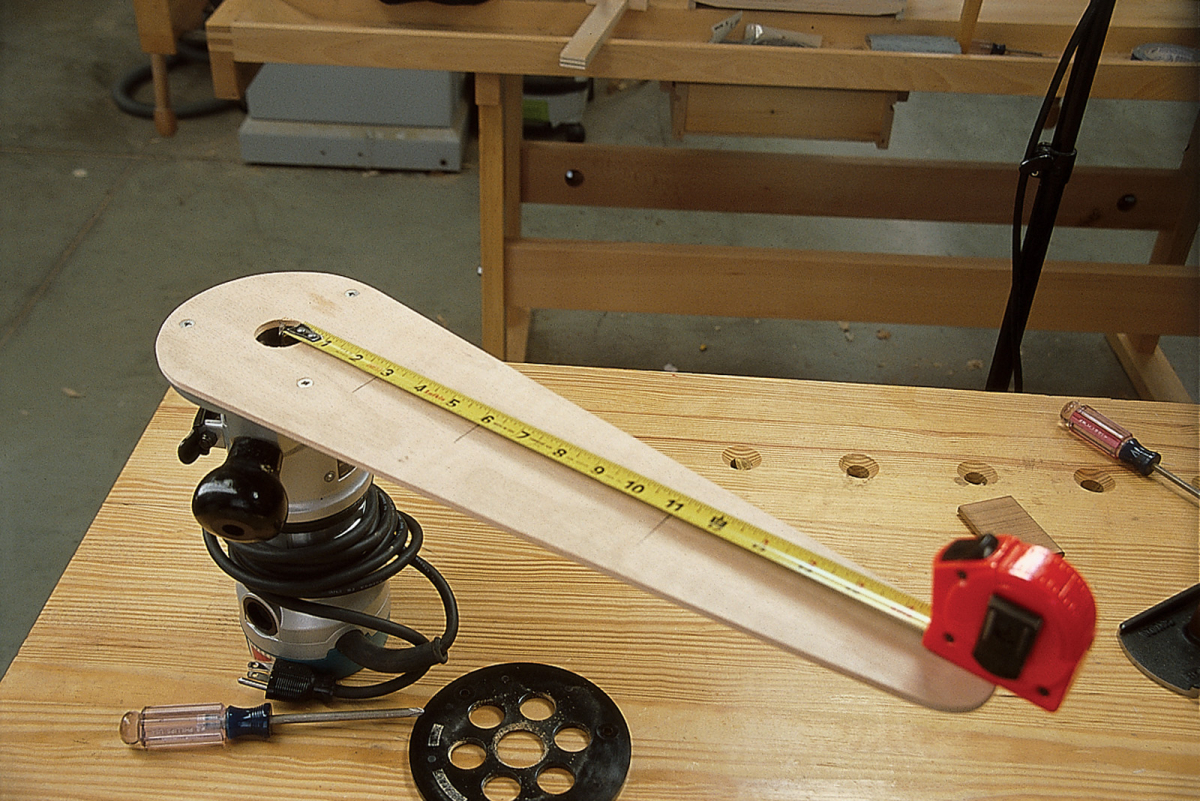
With the jig built, you can cut the top and base to shape. You can use a band saw or jigsaw for this, but a perfectly round shape is best achieved by using a router with a circle-cutting jig. Although you can purchase this jig, a simple shop-made version will handle this project easily.
Simply mount a piece of 1⁄4“-thick plywood that’s about 24” long to the base of your router. Drill a hole so a straight bit can pass through the jig. For the three radius sizes required for this project (the top, and the outside and inside circles of the base) drill a small hole for a finish nail that will be the pivot point of the jig.
Where you drill these pivot holes depends in part on whether you are cutting the outside edge of the top or base or the inside edge of the hole in the base. To cut the outside edge of the top and base, you don’t want to include the diameter of the straight bit in your measurement; for the inside hole, you do.
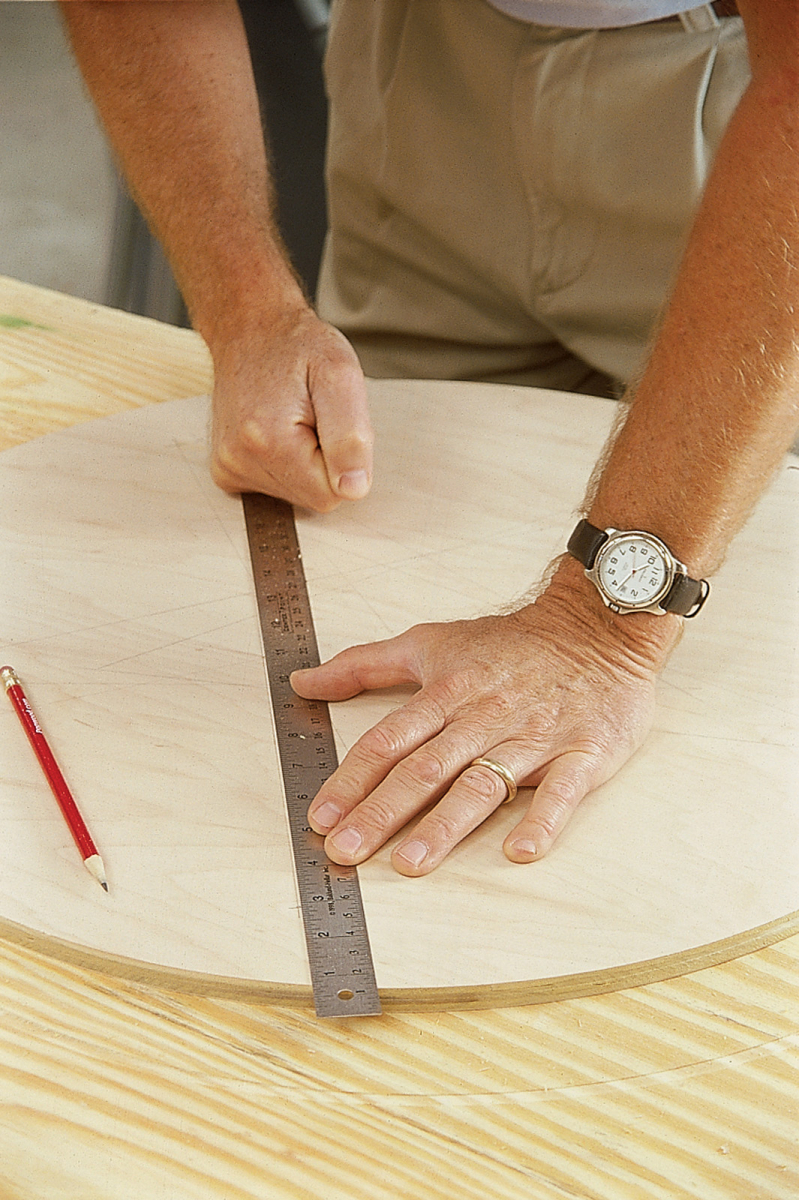
Next, prepare the two square blanks for the top and base from 1⁄2“-thick material of your choice. Each blank should be at least 1⁄8” bigger than the finished size. On the underside of each plywood blank (the side that won’t show) find the center by drawing two lines from corner to corner of each square. The center is where those lines intersect. Mark that spot with an awl for the finish nail that is the pivot point of your circle-cutting jig.
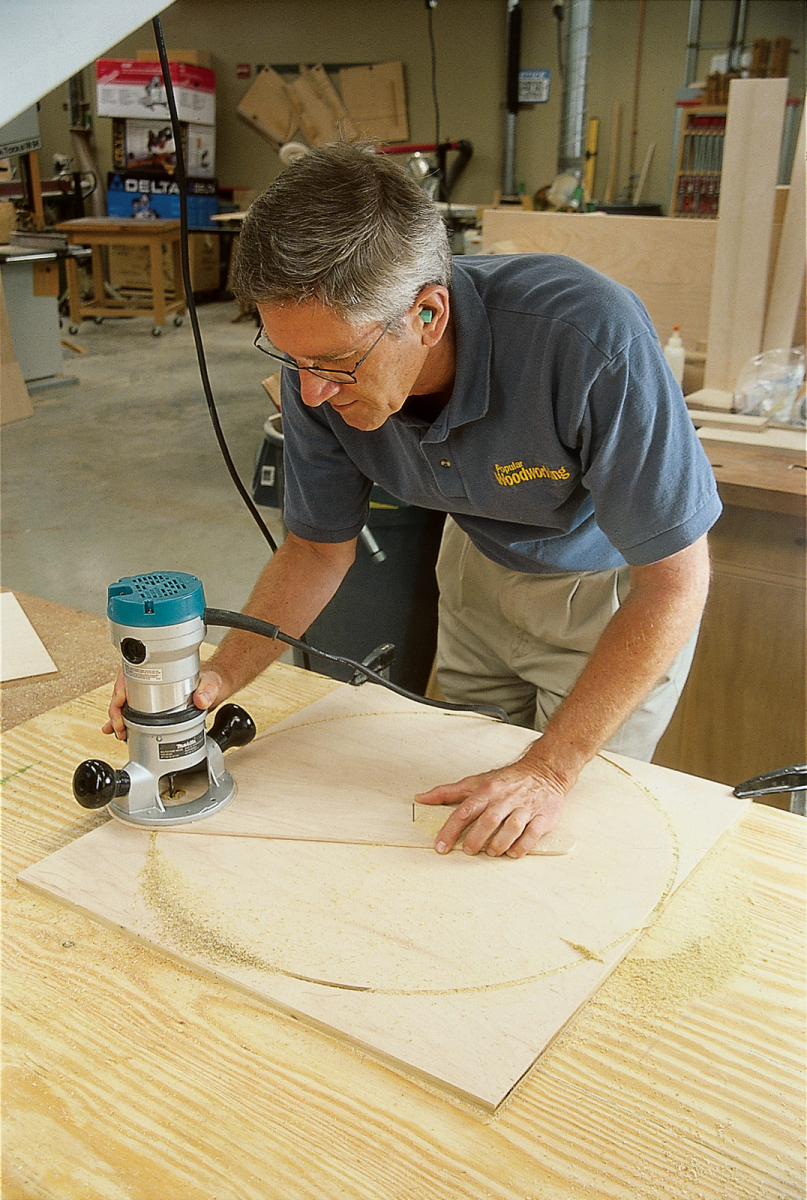
Mark the center of the circle with an awl. Then use the point of the nail in the jig to drop in the hole. Give the nail a couple of taps with a hammer to secure it. Cut the circle by moving the router counterclockwise. Make the cut in several passes, lowering the bit about 1⁄8″ after each pass.
Insert the finish nail in the appropriate hole in the jig and hammer it in the center of the blank. When cutting the circles in the base, you can drive the nail clear through because – if your design calls for it – the center piece is later cut away and discarded. Cut the outside circle first. (The inside circle is cut after you drill your holes for the dowels.) Do the same thing for the top, except this time don’t drive the nail all the way through.
When cutting all the circles, you should make the cut in three passes, so set the depth of your router bit’s cut accordingly. Be sure to clamp each blank to your benchtop. You’ll likely want to protect your work surface from the last router bit pass by putting some scrap below the work.
Also, keep in mind that when you later cut the inside circle of the base, the outer ring should be clamped down so it isn’t damaged by the router bit at the moment it’s cut free of the outer ring.
Cut the top and the outside base circles. As mentioned earlier, before cutting the inside base circle, you’ll need to drill the dowel holes first because you’ll need to use the waste material of the inside circle to align the jig.
Drilling Holes
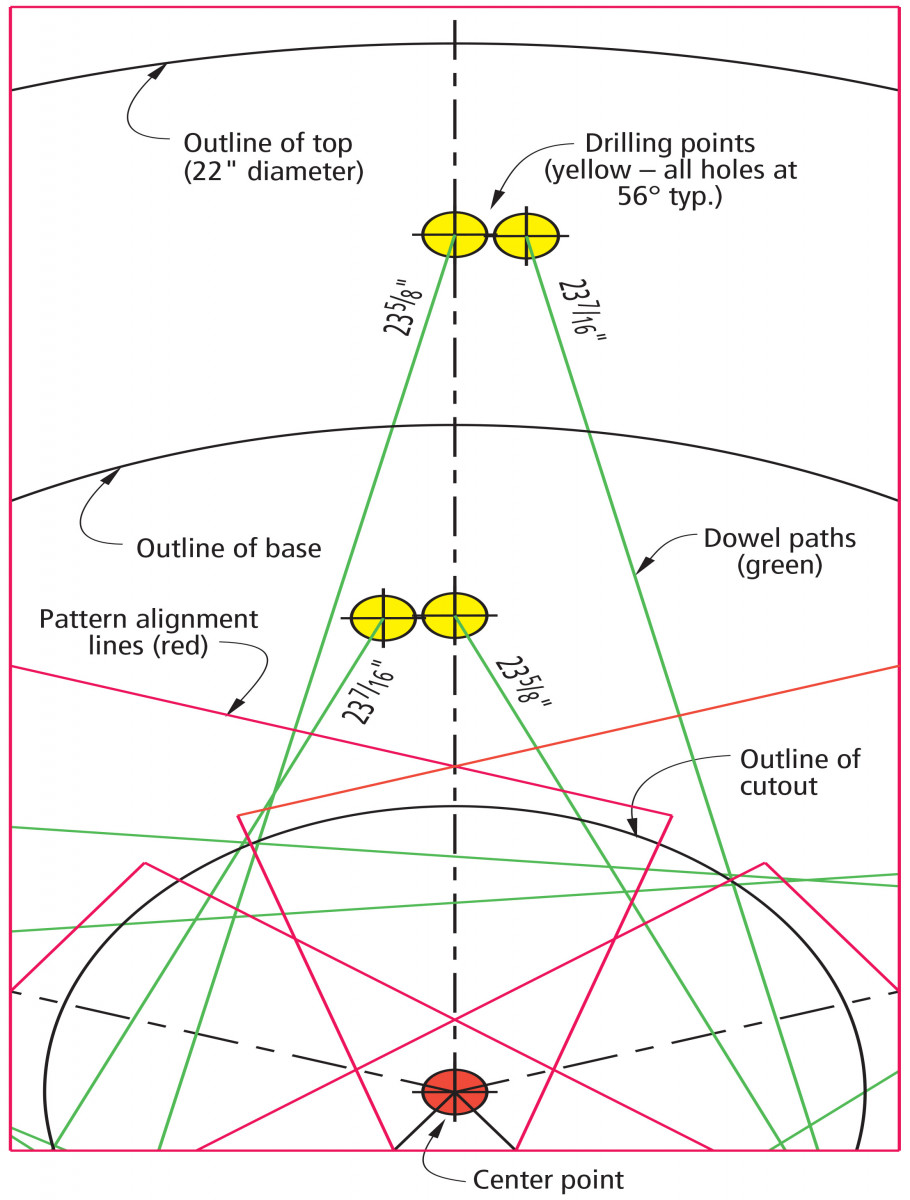
Pattern

Prepare to drill the holes for the dowels using the jig you made and the hole-drilling pattern above (top). To use the pattern provided here, you’ll need to enlarge it to fit legal-size paper. Then make five copies, trim to the pattern border and match them up so that corresponding, overlapping lines are in place, as shown directly above Tape the five pages together, then carefully tape them to the top side of the base.
Next, study the pattern and sort out the various circles. The very outside circle is the outside diameter of the top. The next circle in is the outside diameter of the base. It contains the five pairs of small circles that are the drilling locations for the holes in the base where the dowels will be glued. Note: Each drilling location has a straight line that connects it to the location in the top for gluing the other end of the dowel.
Before clamping the jig in place and drilling your holes, you must mark the centerline of the guide bushing on the back of the jig.
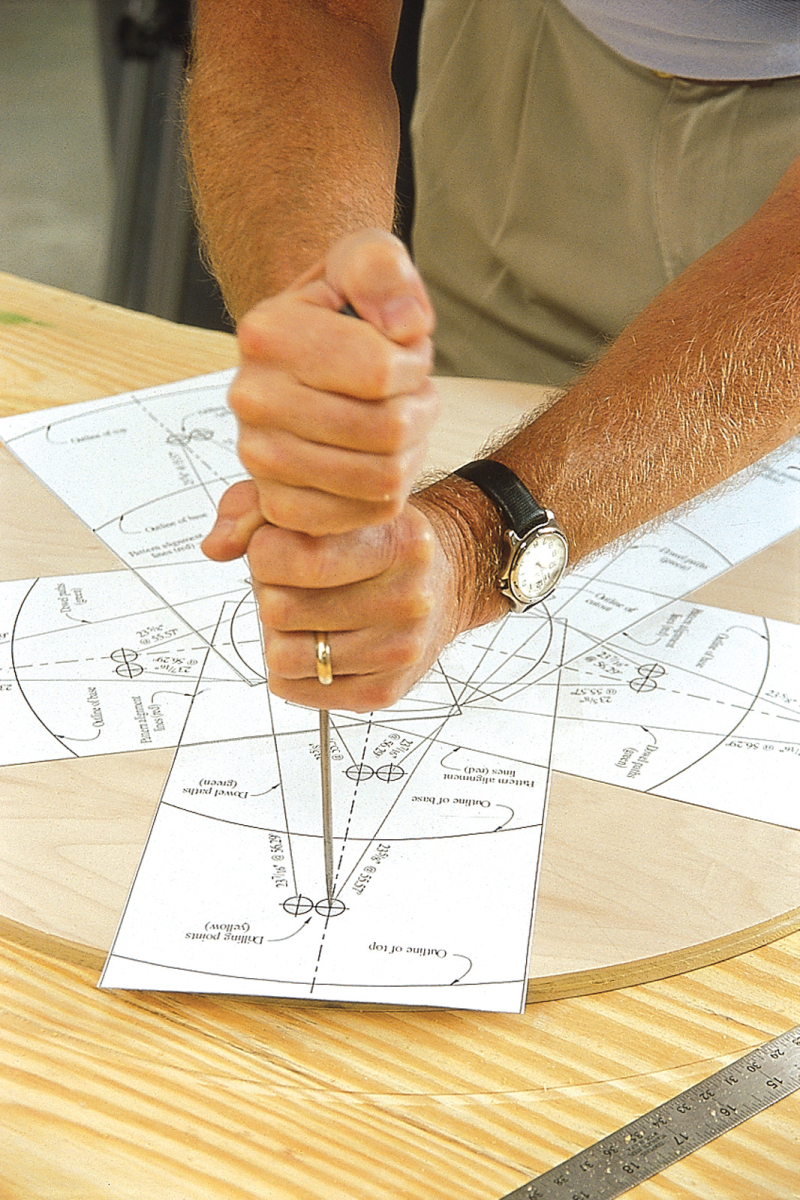
Tape the five-piece pattern together and lightly secure it to the underside of the top. Use an awl to mark the hole’s drilling center for the dowels. Make two more marks, one to represent the hole center for the base and another along the line indicating the dowel path. Mark the center about 8″ back from the dowel center for the top.
Transfer the drilling locations from the paper template to the work. Use an awl or other pointed implement to softly mark each hole’s center. Then follow the straight “dowel” line mentioned earlier about 8″ back and softly mark another point. Designate pairs of dimples that go together When all these are made for the base, remove the template, keeping it intact, then connect the paired dimples with a pencil line. (Or, you can make two copies of the pattern, attach one to the top and one to the base, and drill right through each pattern.)
Tape the five-piece pattern together and lightly secure it to the underside of the top. Use an awl to mark the hole’s drilling center for the dowels. Make two more marks, one to represent the hole center for the base and another along the line indicating the dowel path. Mark the center about 8″ back from the dowel center for the top.
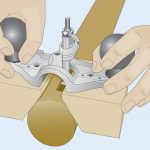
To clamp the jig to the work, you’ll need to elevate it. Use short lengths of 2x4s. Now you can position the jig as shown below.
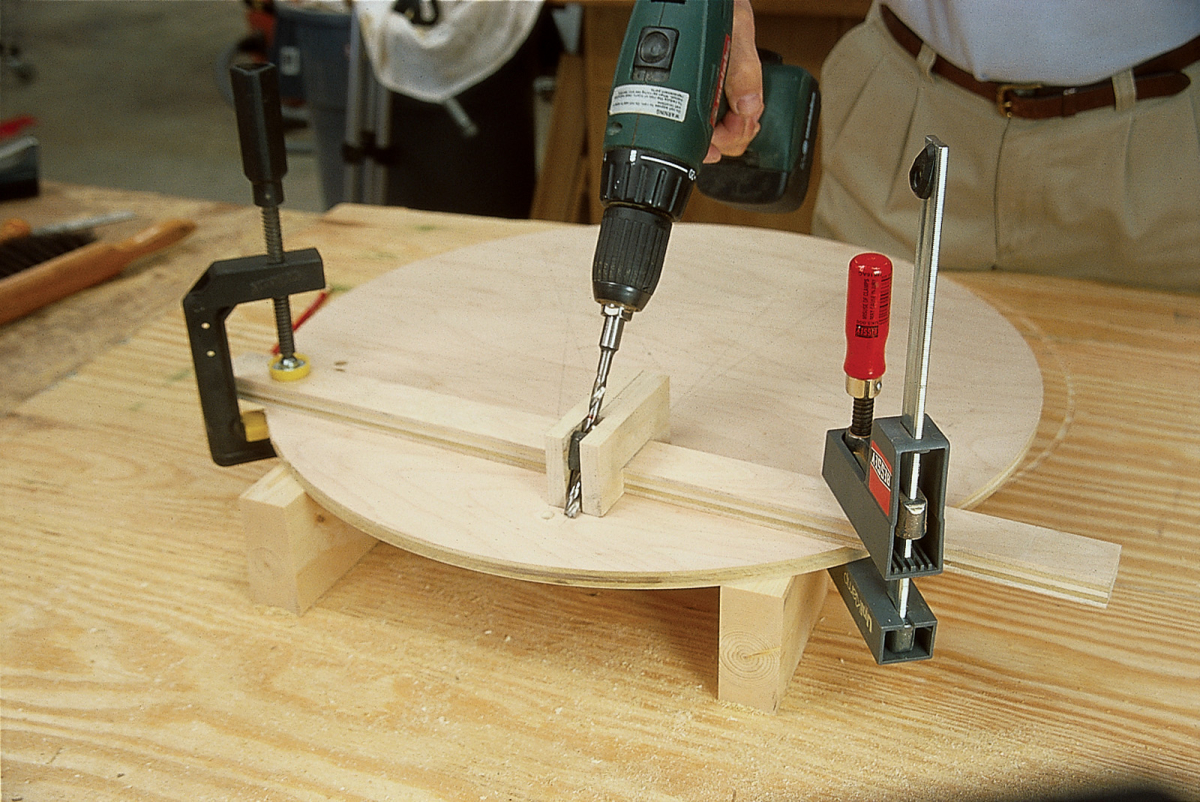
With the drilling jig clamped in place, drill a 1⁄4″-deep hole for the dowel. You should mark your drill bit with a pen or piece of tape to tell you how deep to drill. Obviously, you don’t want to drill through your top.
Use the drill bit bushing as a sighting device so you can see the center of your marked hole. Align the pencil mark on the back bottom edge of the jig with the straight line for that hole location. Verify the position by sliding your brad-point drill bit through the bushing. If the point hits the dimple, it’s perfect.
Clamp the jig to the work and drill a 1⁄4“-deep hole. Because you’re drilling at an angle, one side of the hole will be longer than 1⁄4“. To establish a consistent hole depth, mark on your drill bit where you should stop drilling when the mark reaches the top of the bushing. Repeat the process for each hole center on the base and the top. Once you drill all the holes in the base, place the template on the underside of the top piece and follow the same steps to drill the mating holes. To make assembly easier, redrill the holes in the top using a bit that’s 1⁄64” larger than 5⁄16“. It’s not necessary to use the jig – just chase the existing holes with the larger bit.
Now that the drilling is complete, you can go back and rout out the inner circle of the base.
Before assembly, you may want to apply edge veneer tape to the exposed plywood edges. Use pressure-sensitive adhesive-backed veneer tape because of the size of the inside circle of the base.
Assembling the Storm
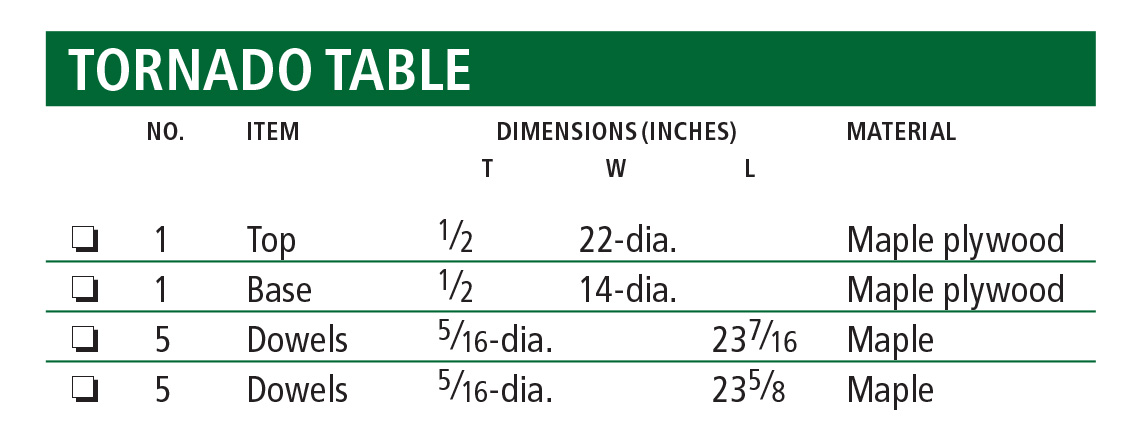
It’s time to cut your dowels to length – five at 23 5⁄8” and five at 23 7⁄16” to create a 20″-high table when assembled. Designate length by color-coding the ends.
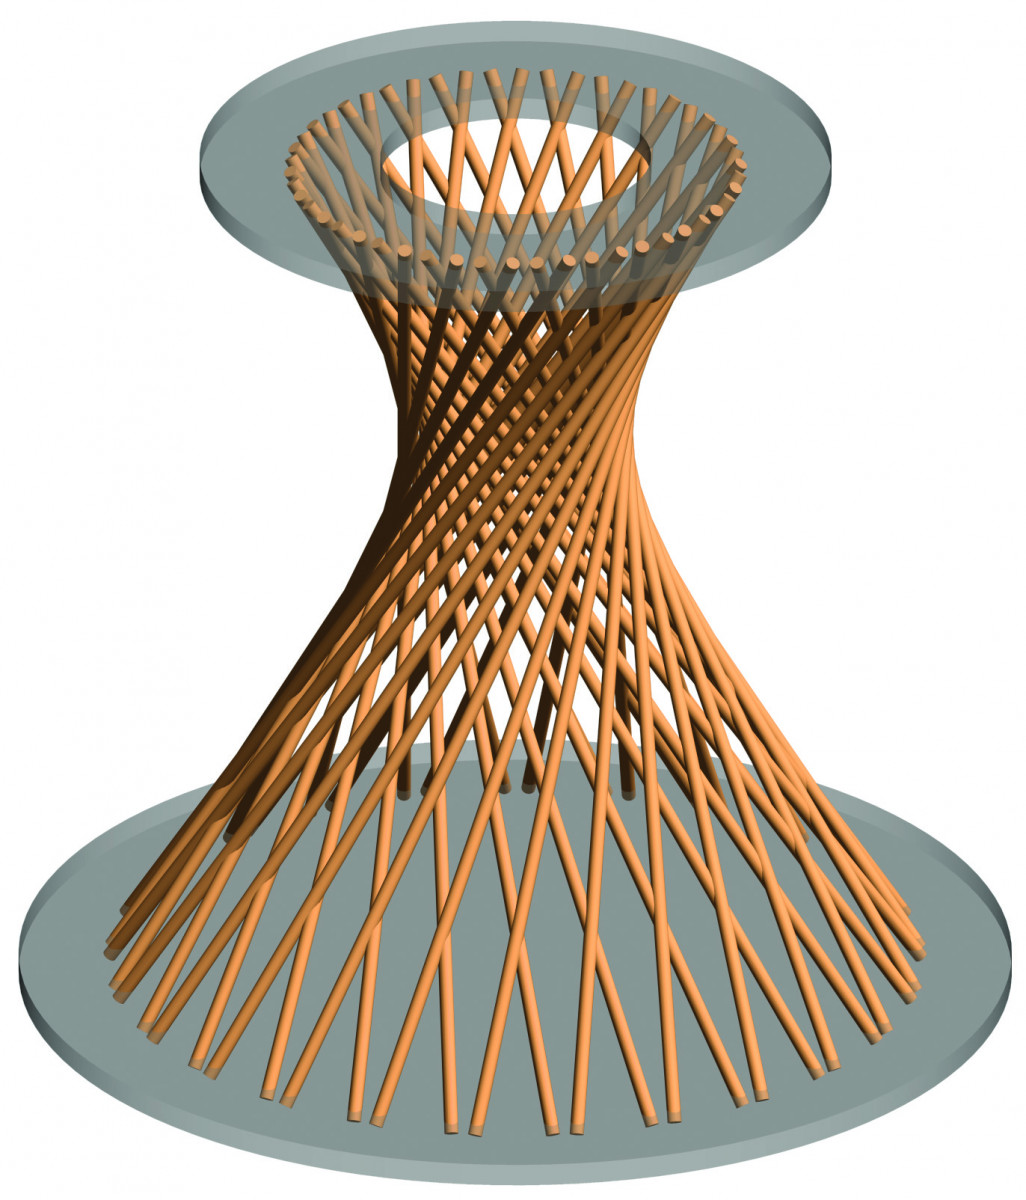
Next, dry-fit the base, dowels and top. First insert the dowels in the base. Each pair will make a “V” shape. Insert the slightly longer dowels first in the left hole of each pair. Next, place the shorter dowels in the right hole making sure these dowels overlap outside all of the previously placed dowels. Study the 3-D illustration at right to get a clearer picture.
When you’re satisfied with the assembly, take the table apart. Sand it and get ready to finish the base, dowels and underside of the top. If you want, finish the good side of the top, too. Just be careful not to damage it during final assembly.
Before applying any finish, plug the dowel holes and tape off the ends of the dowels. This will ensure that you’re gluing wood to wood, not finished wood to finished wood. To finish the dowels, consider screwing cup hooks in one end so you can apply the finish and then hang them to dry.
For final assembly, place the top upside down and glue all the dowels in the top first. Then apply glue to the holes in the base and carefully slip the dowels in their respective holes. Be sure all the dowels are seated home. Measure the distance between the base and top to make sure they’re parallel. This will ensure a table with a top that’s parallel to the floor. While the glue is drying, place a weight on top of the base.
The Tornado Table described here is basic and representative of the original Noguchi table. As you can see from the gallery of tables our entire staff made, the variations of tornado tables are limited only by your imagination and materials.
Easy to Build and Easy to Personalize
To show you how simple the Tornado Table is to build, we had each member of the Popular Woodworking staff design and construct their own interpretation. Here’s a quick look at what each person created.
• Steve Shanesy, editor and publisher
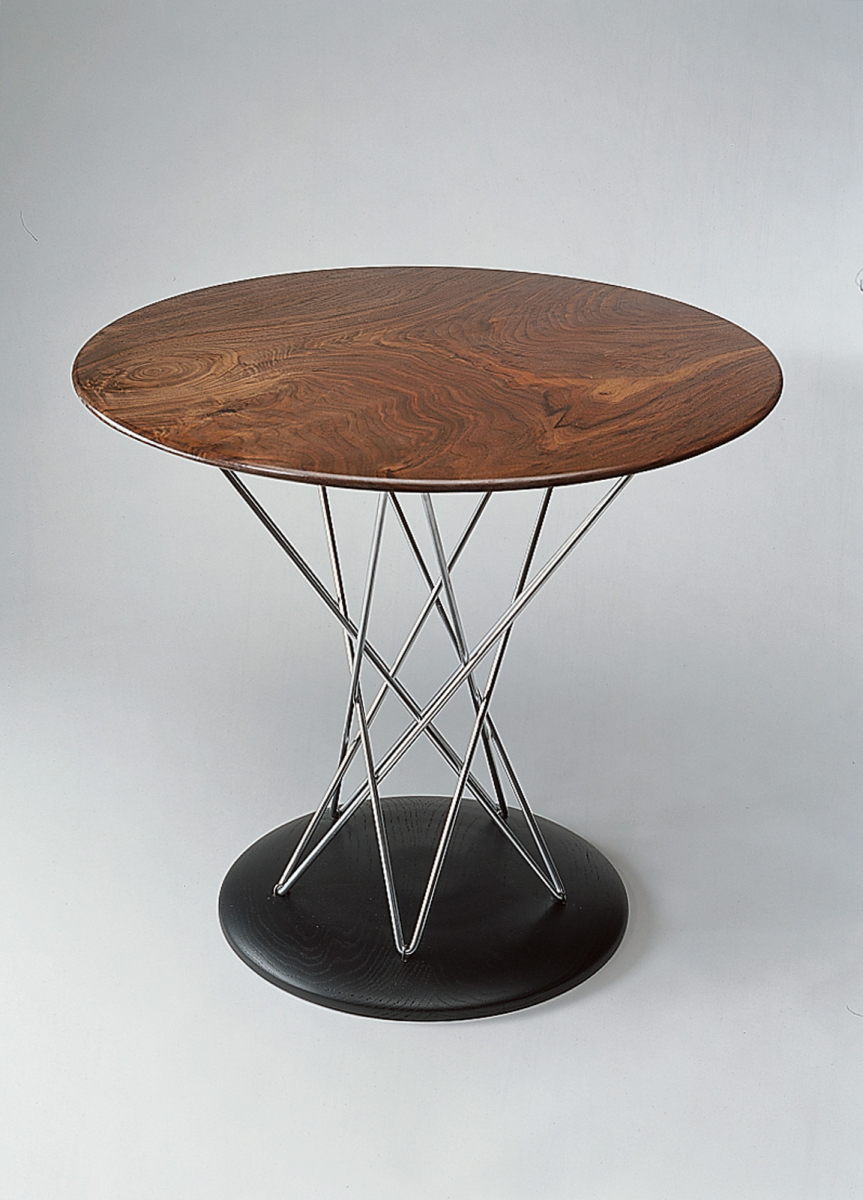
Materials: Walnut top, white oak base, steel supports
The idea behind it: I wanted to get closer to the look and materials of the original Noguchi design. The base is turned, giving it a slight domed shape, and the 1⁄4” steel round stock is bent at the base and secured with clinch nails. The walnut top is a single board (believe it or not) and features a so-called “pencil edge” detail often seen on Knoll furniture pieces of the era.
• Linda Watts, art director
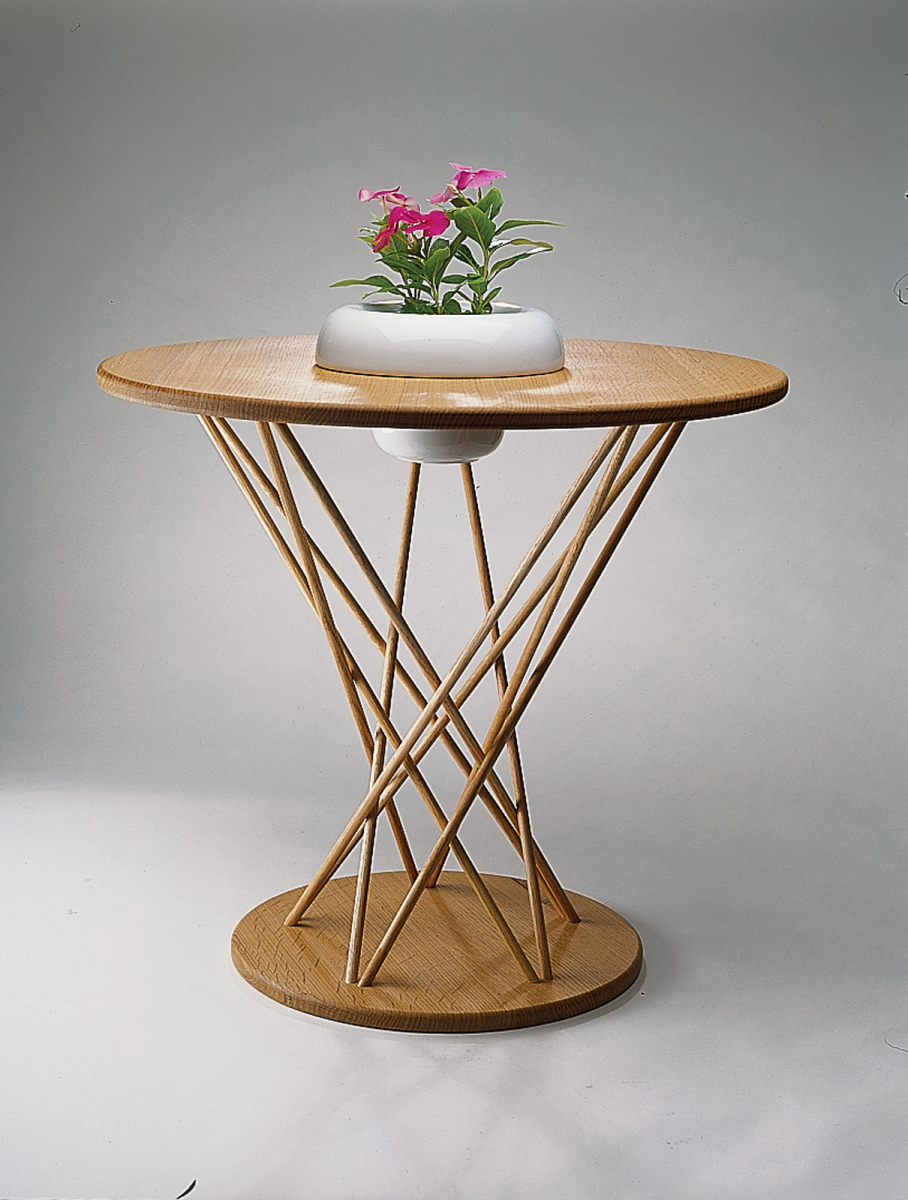
Materials: White oak
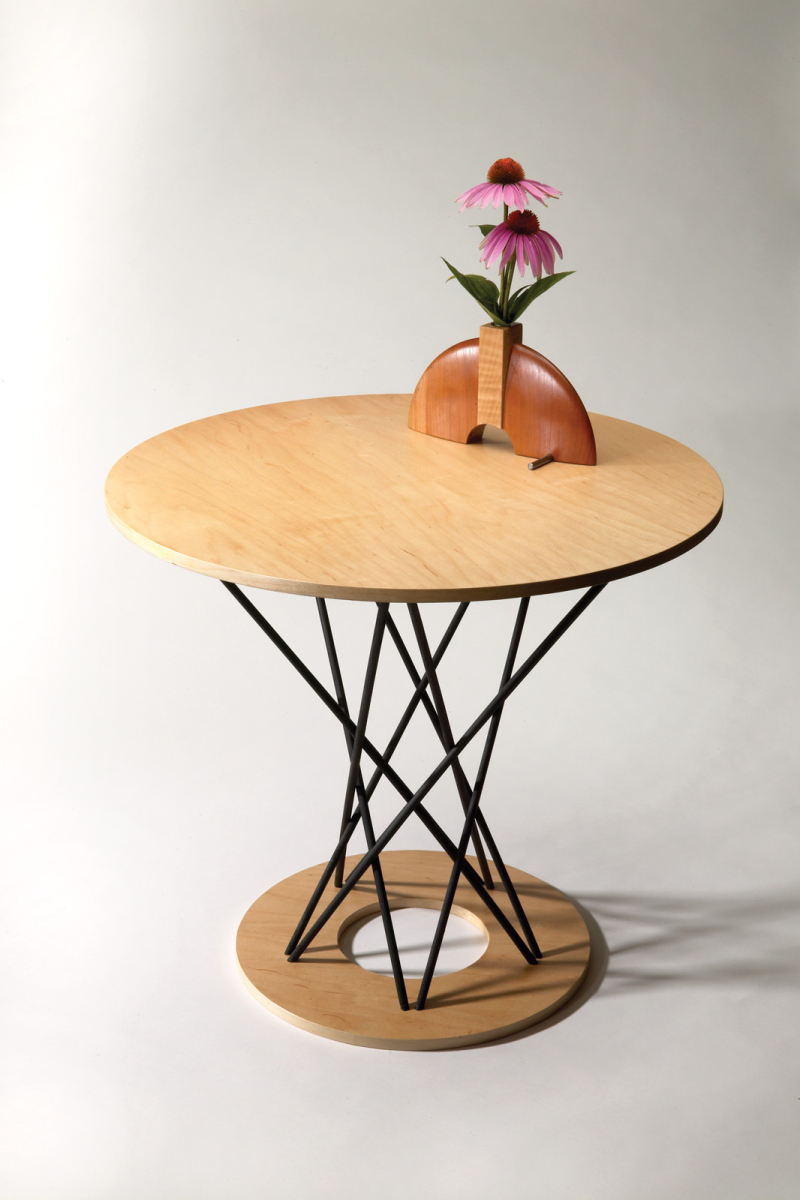
The idea behind it: I delight in sitting on my front porch on a warm afternoon, so my goal was a practical one. I wanted a side table that could withstand the weather and hold a good book, a glass of iced tea and a planter of flowers. I cut a hole in the top to inset the lipped planter for stability and finished the table with a light coat of boiled linseed oil.
• Christopher Schwarz, executive editor

Materials: Cherry base and dowels, sugar pine top
The idea behind it: I was going for a high-tech, high-texture look, so all the surfaces are finished with hand tools. The rippled surface of the top was created with a scrub plane. The chamfers on the base and underside of the top were made with a drawknife, block plane and scrapers. And the circle in the base was shaped with a small gouge.
• David Thiel, senior editor

Materials: Poplar top and base, hardwood dowels
The idea behind it: Black lacquer has always held a magical appeal for me. With such a simple table, a gloss black finish seemed an obvious way to dress it up. I left the dowels natural as a counter-balance to the stark reality of the top and base. The edge of the top was radiused above and a heavy chamfer applied below to slim the appearance.
• Kara Gebhart, managing editor
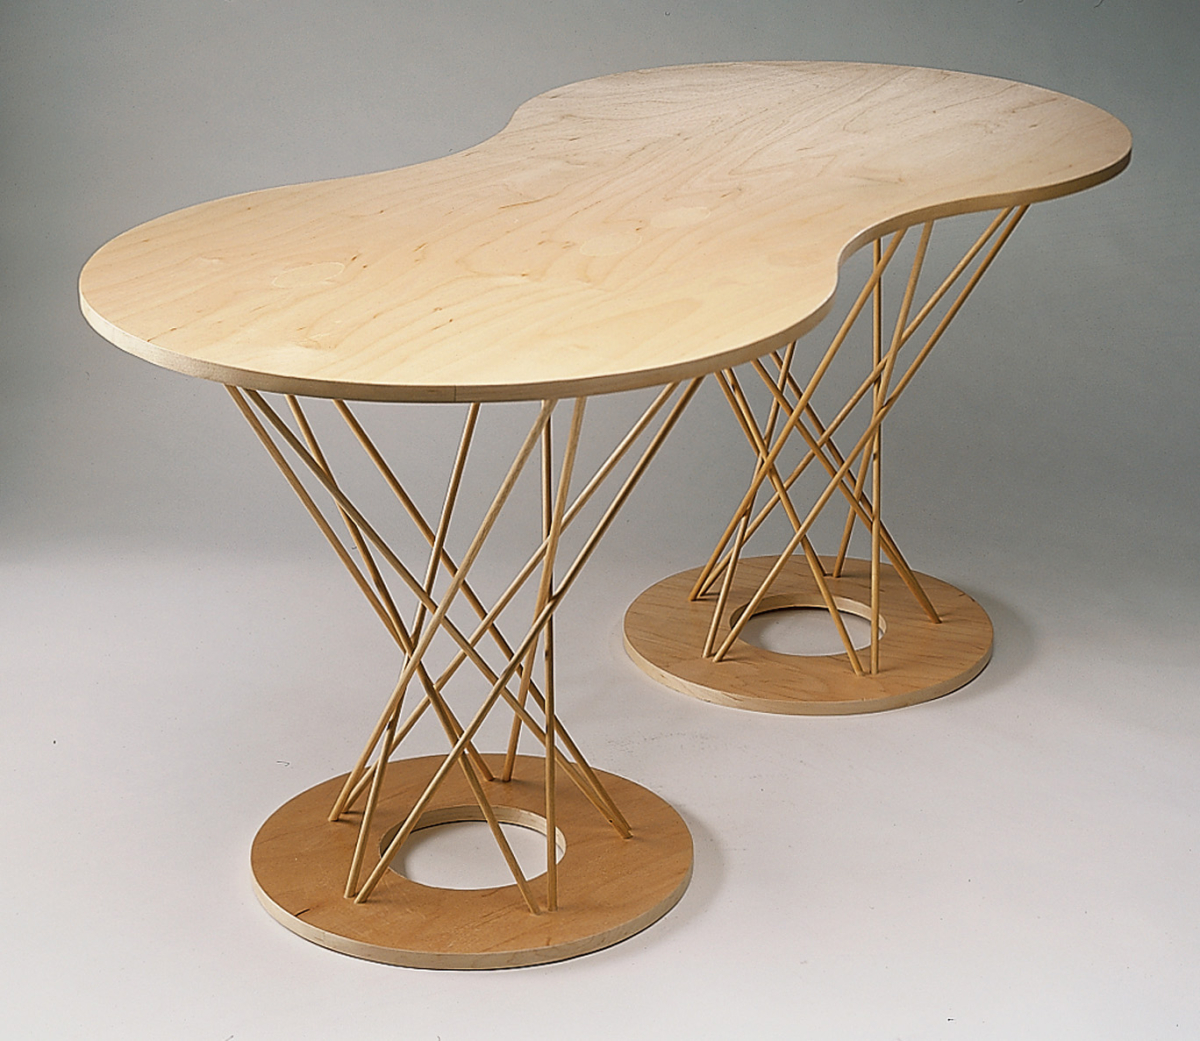
Materials:
Maple plywood top and bases,hardwood dowels
The idea behind it: I wanted a top with a more fluid shape, but then there was a stability issue. So John suggested creating a two-base tornado “storm.” The amoeba-shaped top (cut out on the band saw) is two 22″-diameter circles connected with curves. The overall height is 17″ and I chose 1⁄4” dowels. The drilling angles remained the same. I finished it with spray lacquer.
• Michael Rabkin, associate editor
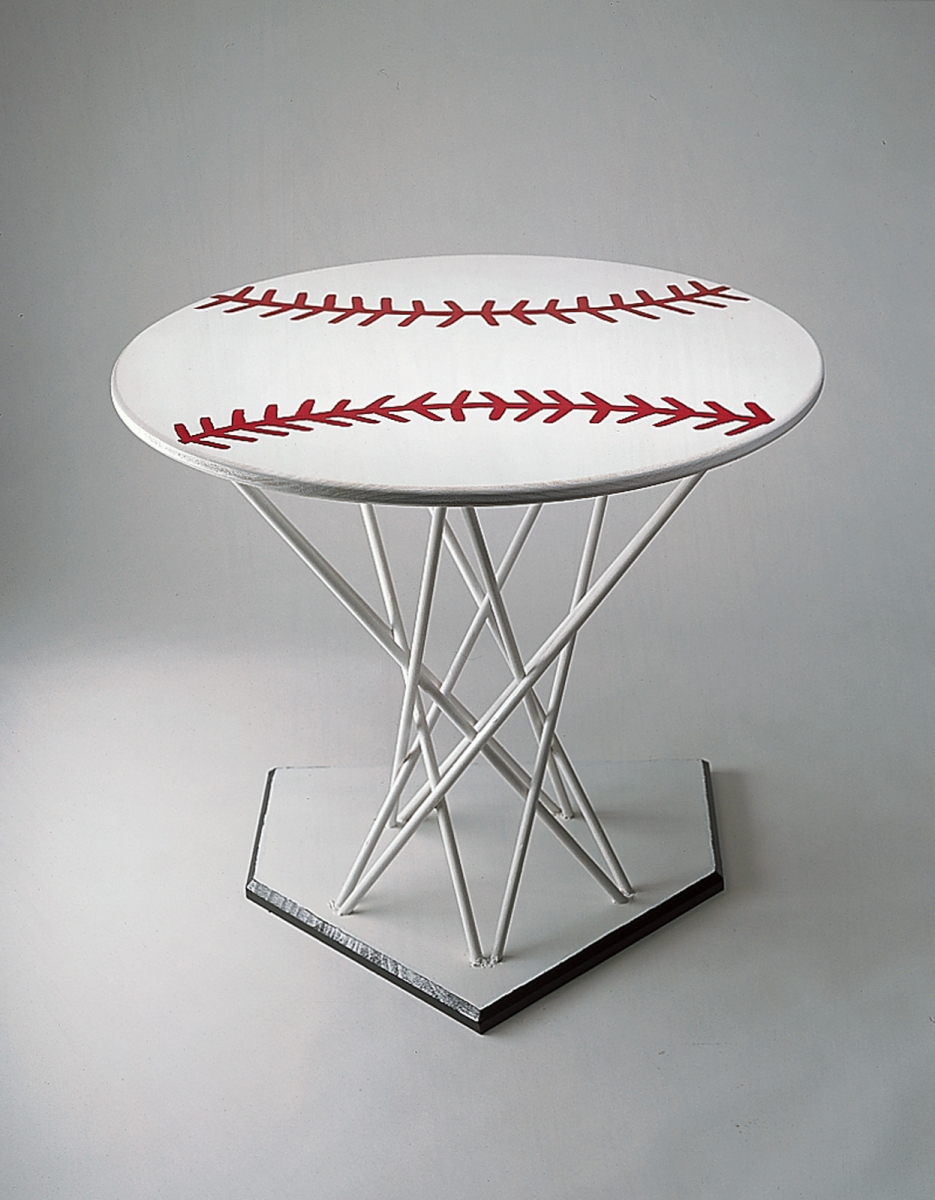
Materials: Poplar top and base, hardwood dowels
The idea behind it: Baseball has always been a big part of my life – Mom was a huge Yankee fan and Dad was my Little League coach who took my best friend and me to our first of many major league games. I changed the circular base to a home plate and painted the entire table white. Then my friend Amy (a great artist) painted the red stitching on the top so it looks like the ball I caught while walking with Dad in the left-field bleachers during batting practice in Pittsburgh this year.
The Hyperboloid: A Shape For Atomic-Age Furniture
As a child of the 1950s, I used to classify myself as a Baby Boomer. After researching Isamu Noguchi’s Tornado Table, I’ve decided to switch titles to “Offspring of the Atomic Age.” (The fact that my father worked for the Atomic Energy Commission doesn’t hurt, either.)
If commercial nuclear power has a birthday, it would be Dec. 8, 1953. That was the day President Eisenhower gave his “Atoms for Peace” speech. As a result, the first wholly commercial power plant was ordered in 1955 and built in 1959 by Commonwealth Edison in Morris, Ill. Coincidentally, Noguchi presented his design for the rocking stool (yes, the table started as a rocker) to furniture manufacturer Knoll Associates in 1955. When inverted and with a few dowels added, the Tornado Table takes on the shape of a nuclear power facility’s cooling tower. How much more “atomic” can you get? Despite its current negative connotations, the shape of the cooling tower was the icon for a bright new tomorrow in the mid-1950s.
As a pure geometric form, the shape of the Tornado Table (and the illustration above) is what is known as a one-sheeted hyperboloid. For more information on all the cool math, check out http://mathworld.wolfram.com/Hyperboloid.html. Apparently, hyperboloids came in one- and two-sheet varieties.
But what about three sheets? Yet another Internet search gave me the answer. The phrase “three sheets to the wind” dates to 1821. The “sheet” is a reference to a rope on a sailboat. To have a sheet loose in the wind is bad seamanship; to have three loose means you are not capable of controlling the boat i.e., wasted. And you thought you’d only be learning about woodworking. — JH
Tornado Table Cut List

Editor’s note: This article originally appeared in the October 2004 issue of Popular Woodworking.
Here are some supplies and tools we find essential in our everyday work around the shop. We may receive a commission from sales referred by our links; however, we have carefully selected these products for their usefulness and quality.