We may receive a commission when you use our affiliate links. However, this does not impact our recommendations.
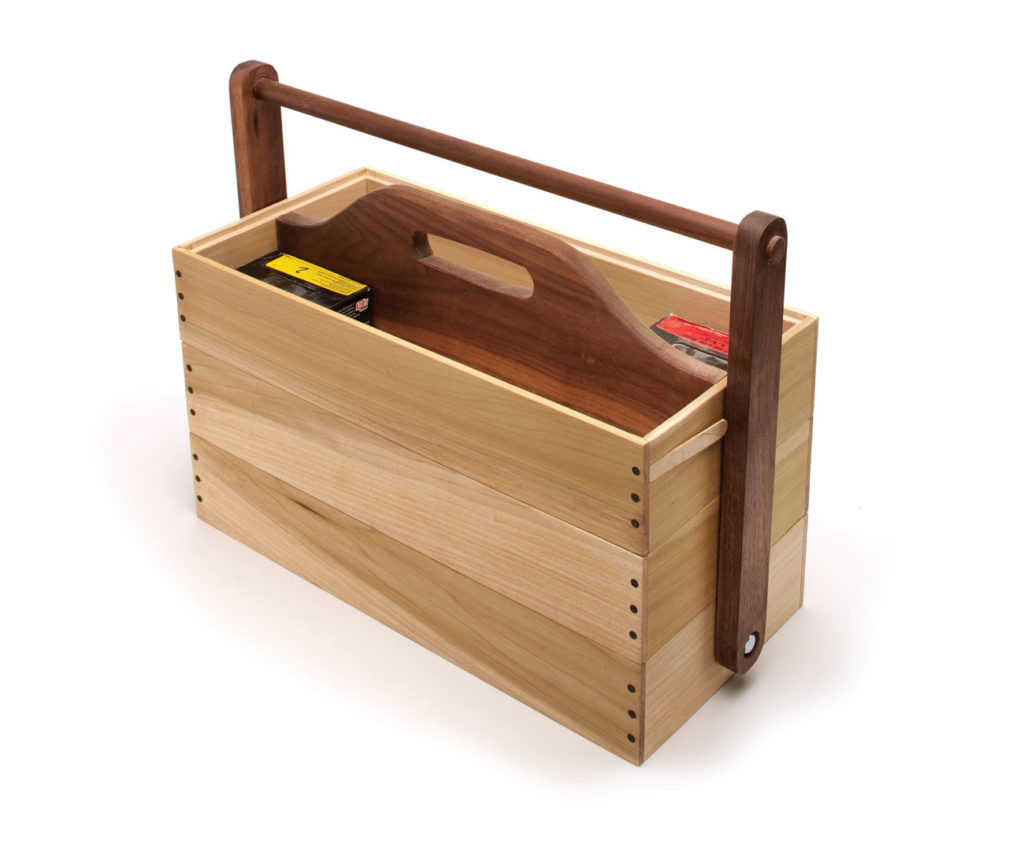
A simple-to-build tote, perfect for tool and supplies transport.
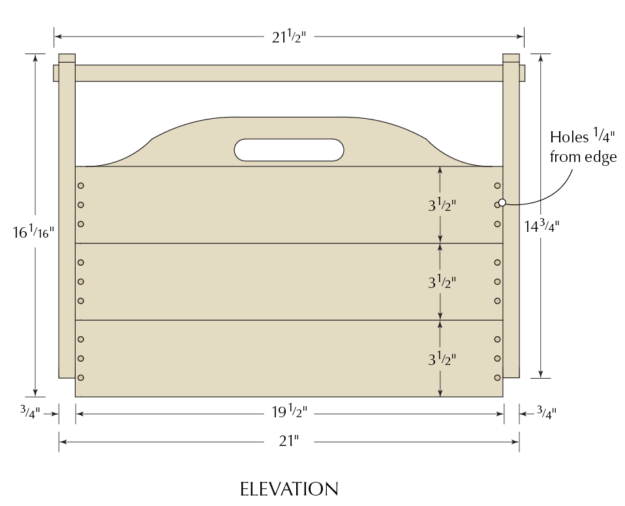
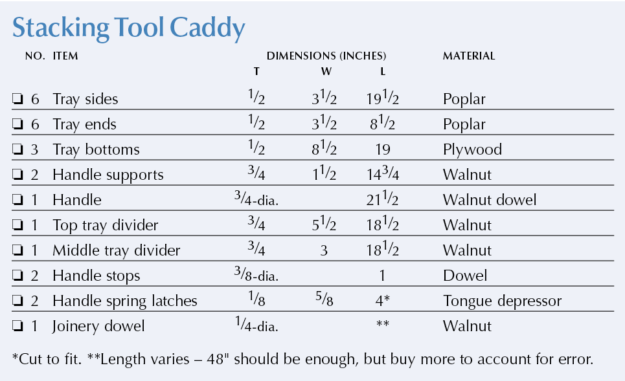
I designed this stacking tool caddy to hold small parts and a few tools. It’s comprised of three tool trays that stack and interlock together to form a single unit that can be carried wherever needed. Best of all, it stores my screws, nails and small tools so they’re all right at hand. It’s also handy for transporting other items: sewing supplies, fishing tackle, and whatever else you can think up.
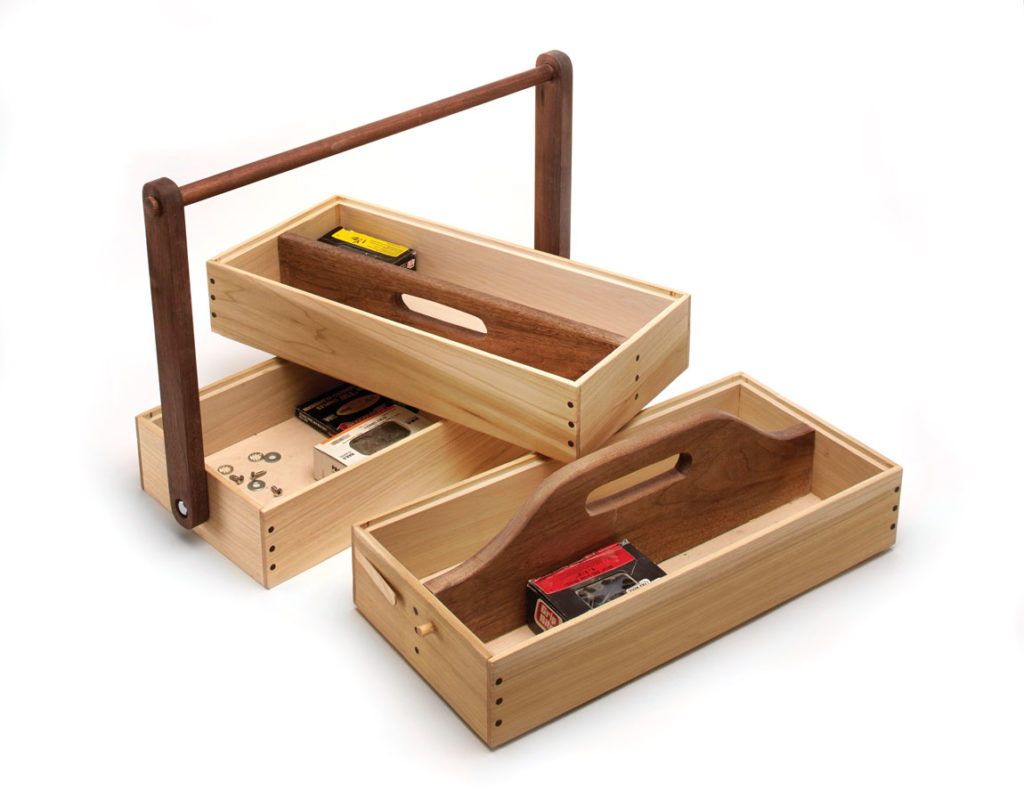
The trays are joined with half-laps secured by dowels. The dowels not only add strength but also add a nice decorative detail to the project. To lock the trays together, the main handle pivots, allowing access to the individual trays. A tongue depressor acts as a simple spring latch.
Trays First
The sides for each tray are 1⁄2” x 3-1⁄2” poplar (dimensional 1⁄2“x4 lumber from the big box store). To begin the construction, cut the side and end pieces. It’s vital they are the same length – if they aren’t, the trays won’t be square and won’t stack and interlock correctly. A stop-block can aid in making the repeat cuts accurately. Cut the short tray sides, then reset the stop-block to cut the long tray sides – you should have six of each.
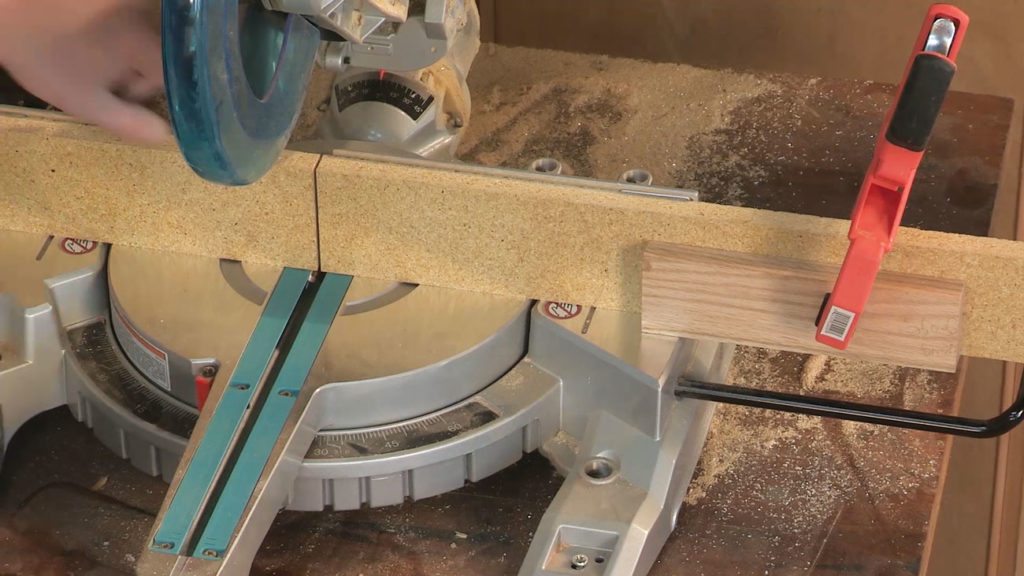
Matching lengths. For clean cuts and a good registration surface, attach an auxiliary fence to the stock fence of the miter saw. Also, ensure consistent lengths by using a stop-block. With the saw off, measure from the blade to the block, and clamp it in place. Start by cutting the end of the board square, then put that end against the stop and make your cuts.
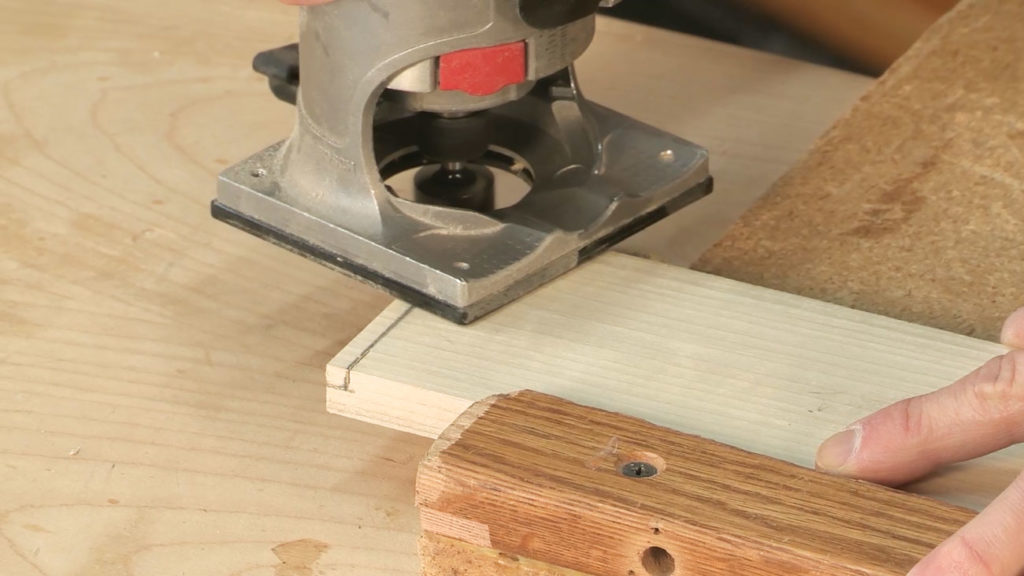
Next, rout a 1⁄4” x 1⁄4” rabbet on each end of each of the tray pieces for the half-lap joinery. Watch out – the router bit has a tendency to fracture and tear out the fibers as you exit the cut, leaving a jagged corner. An easy way to eliminate the blowout is to first make a small cut with a handsaw to define the exit point of the bit.
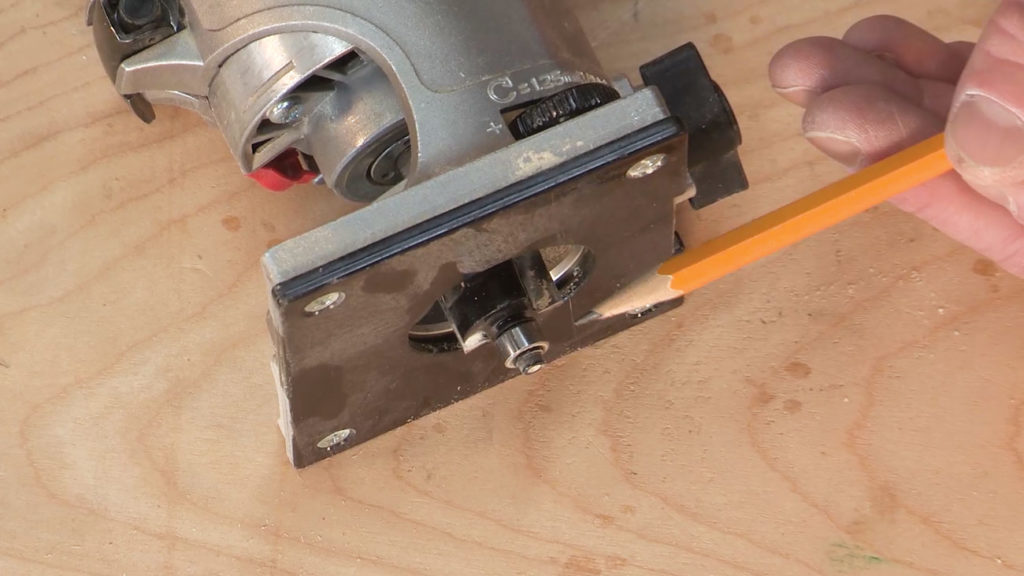
Router setup. Use a 1⁄4″ rabbet bit for the joinery. The bit will automatically make a 1⁄4″ cut in width because of the bearing size, but the bit still has to be set so it’s cutting 1⁄4″ down from the base plate.
Rabbet. Rout the rabbets on the ends of every tray part. I use a bench hook to hold the work in place and off of the bench.
Next, glue up the trays. It can be tricky to hold the tray together and glue each side at the same time. To make it less of a juggling act, use some painter’s tape to temporarily hold the joint together while you apply glue to the other corners.
Before the glue dries, place the tray in clamps snugly, but not fully tightened, so you can check for square. Measure diagonally from corner to corner one way, then the other – the measurements should be the same. If they’re off, that means the tray is slightly racked and has to be adjusted. Once you’ve got it where you want it, slowly and evenly tighten the clamps. Check for square one more time before allowing the glue to set up.
With the glue dry, make sure the top and bottom edges are all flat and flush. If necessary, use a block plane to true them up. Then cut a 1⁄4” rabbet on the top and bottom edges – you can use the same router setup as you did for the joinery.

Rout again. Cut a 1⁄4″ x 1⁄4″ rabbet on the inside of the top and bottom of the trays, after the glue dries. The router bit and setting are the same as for the joints. When routing on the inside of a piece, make sure to move the router clockwise – you should always move the router so the rotation of its bit is against the direction you’re moving.
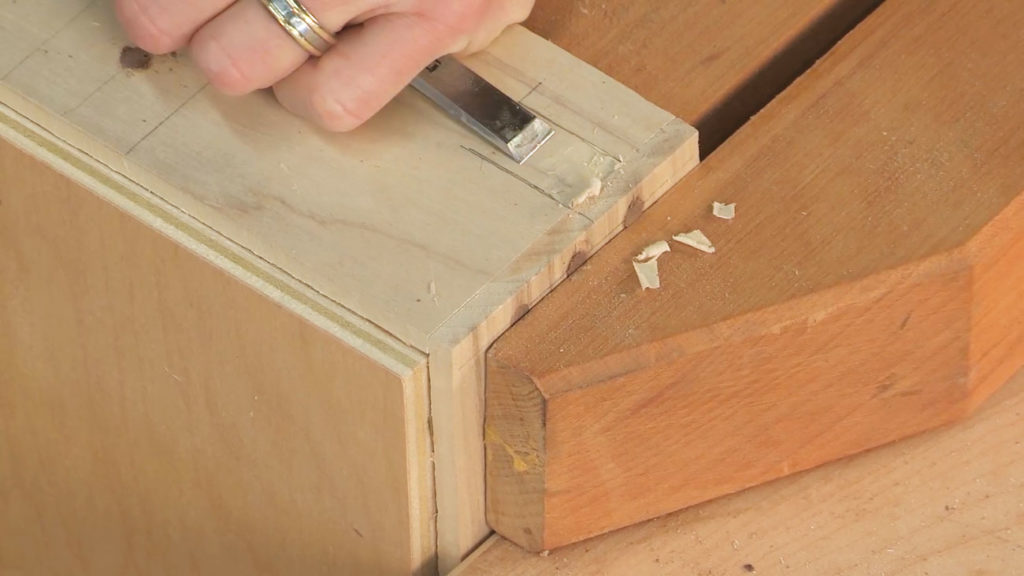
The corners of the rabbets will be round. Use a chisel to square these so that the bottoms’ corners will seat fully and so the trays nest together in a stack.
Next, cut the 1⁄2” plywood bottoms to length and width. Because the rabbets are only 1⁄4” deep, the plywood sits below the sides by 1⁄4” – this lets the bottom register into the top of the tray below. However, the lowest tray’s bottom should not project – it should be flush with the side pieces. Use the router with the same bit and depth setting to cut a 1⁄4” rabbet on all four edges of the bottom for the bottom tray. The rabbets on the tray bottom and tray sides will nest together, allowing the bottom to sit flush with the sides. Make sure when routing the outside of the workpiece that you’re moving clockwise around the work. Now glue in the plywood bottoms.
Next, reinforce the joinery with some 1⁄4” dowels by drilling three holes in from the sides through each joint. Refer to the drawings for layout – they are 1⁄4” from the ends, and should be evenly spaced. The end grain will want to blow out during this operation – there are a few ways to prevent that from happening. First, place some tape over the corner to reinforce the fibers while drilling. Also, carefully measure and draw the lines where the dowels should be placed to avoid getting too close to the sides of the boards. Lastly, make sure the drill is up to full speed before pushing down into the wood, or it will tend to tear at the fibers instead of cutting them cleanly.
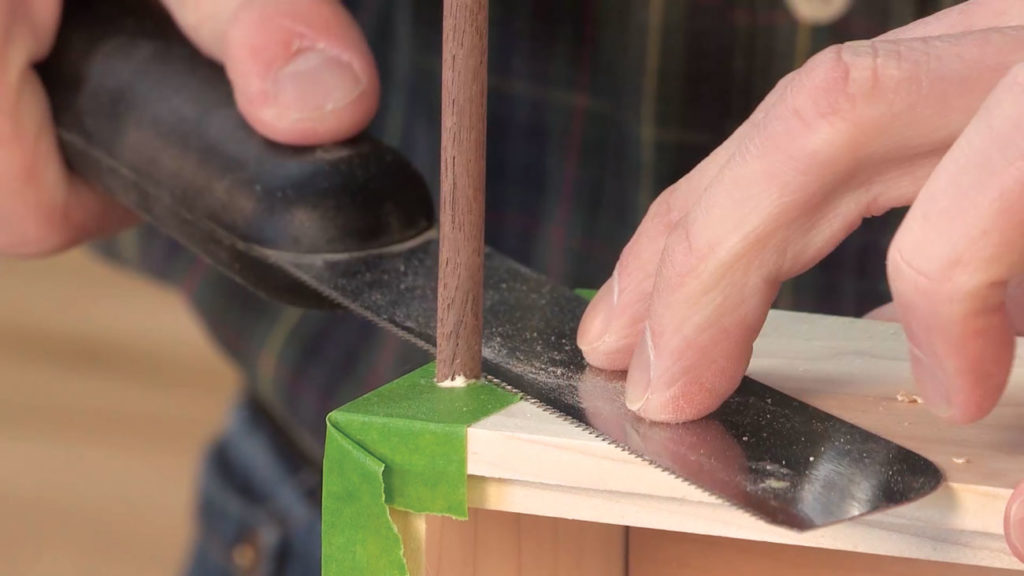
Dowels. Keeping the dowel long assures you’ll bottom out on each hole. After applying glue and tapping it home, cut off the excess with a flush-cut saw.
After drilling all the holes, glue in the dowels. To make sure you have the right length of dowel for each hole, keep the dowel long and glue it in one hole at a time. Put glue in the hole and on the end of the dowel rod, then tap the dowel until it’s seated. With a flush-cut saw, flush the dowel to the tray surface. Repeat the process for all the tray sides.
Get a Handle on It
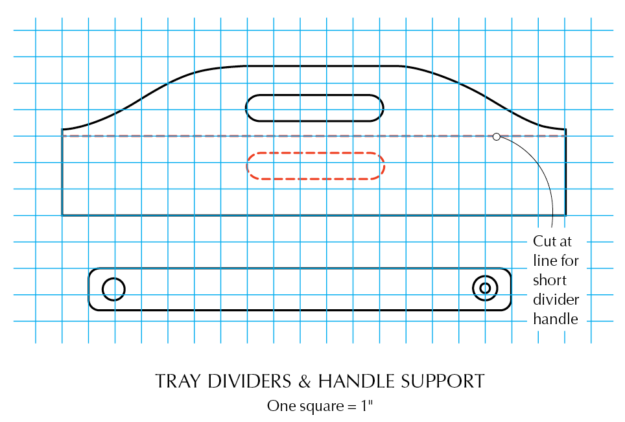
The top divider has a tall handle, and the middle divider has a low handle that sits below its walls. From the drawing below, make full-sized templates for the two dividers and trace them onto the wood. Use a jigsaw or other appropriate saw (such as a bowsaw or band saw) to rough out the shape.
Start the finger holds by drilling the outermost holes, then drill several holes in a line between them. Place a sacrificial piece of wood underneath to prevent drilling into your benchtop. Also, clamp the workpiece to the scrap when drilling – this will prevent blowout on the other side of the workpiece as the drill bit exits the wood.
Chisel to your layout lines, removing the waste left from drilling. Chop about halfway into the work, then flip the board over and finish the work. This will give you better results because by working from both sides the back side won’t blow out. File and sand to make the divider’s curves and finger holds smooth and comfortable to the touch.
To mount the dividers in the tray, find the centers of the tray sides and, with the divider clamped in place, drill 1⁄4” holes from the outside of the tray into the divider. Use 1⁄4” dowel and glue to secure the divider. Both dividers are affixed in the same way.
Before you make the larger exterior handle, make the spring latches and handle stops. The spring latches are made from tongue depressors, which flex to secure the handle vertically. The stops are pieces of dowel that prevent the handle from rotating too far.
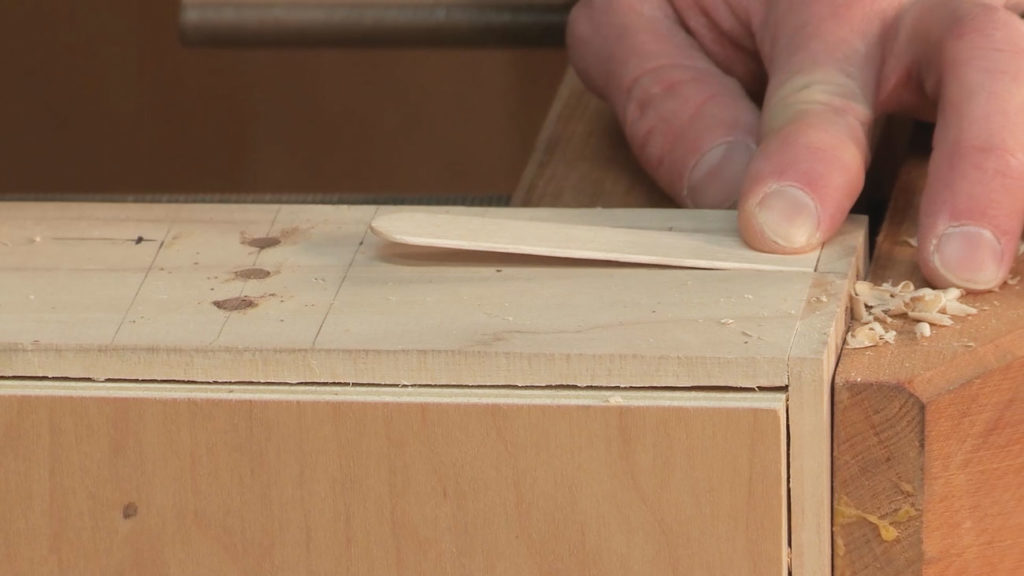
Spring latches. The mortises that hold the spring latches are pared with a chisel held at an angle to form a ramp, which causes them to stand proud. A tongue depressor is just the right size and thickness, but any thin piece of wood will work.
From the plans, lay out the lines for the spring latches on the top tray’s sides and use a knife to score deep lines to define each latch’s mortise.
With a chisel, pare away the wood between the knife cuts at a gradual slope, so that the mortise angles upward. Make sure to test each latch as you chisel its slot – it should be proud enough to hold the handle back but easy enough to press down far enough to allow the handle to pass over. Use glue and small brads to secure the spring latches in place.
The handle stops are 3⁄8” dowels drilled and glued in place. They should be installed so that the handle stops vertically, after passing over the latches.
Now, while the glue for the spring latches and stops is drying, make the main handle. This handle is mounted to the lowest tray by a nut and bolt through the arm and into the tray. The two arms of the handles on either side are connected by a 3⁄4” dowel above the stacking trays.
Cut the arms to length and drill a 7⁄8“ hole part of the way through the bottom of each arm. This will allow the bolt heads to sit below the surface. On the same centers, drill through the arms with a 3⁄8” bit, and drill a corresponding 3⁄8” hole into the sides on the lowest tray.
Then drill a 3⁄4” hole all the way through the top of each arm, through which the 3⁄4” dowel will pass to connect the two arms together. Round over and smooth the corners of the arms with a file or sandpaper.
Place a 1-1⁄2“-long x 1⁄4“-20 bolt and washer through the handle arm on each side. Sandwich another washer between the arms and the sides of the tray, then a washer and nut on the inside of the tray. The nuts might have a tendency to come loose during use, so use Loctite on the bolts before threading the nuts on.
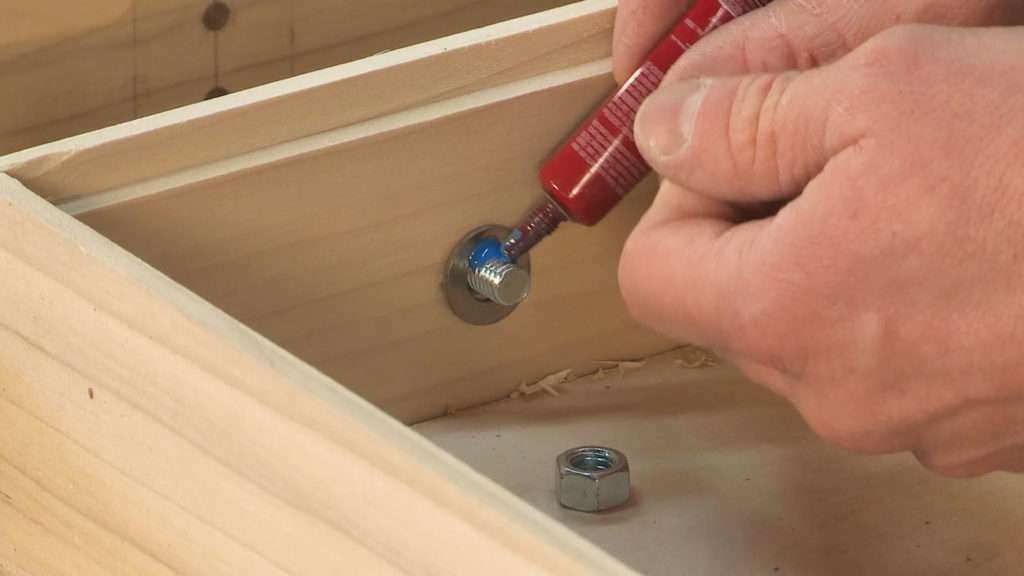
Hardware. Attach the handle with the 11⁄2″-long x 1⁄4″-20 bolts. I’m using Loctite to keep the nuts from loosening – once dry, it acts as a mild glue, but can be reversed with some persuasion.
With the bolts tightened and in place, assemble the stacking trays and move the main handle into place. Glue in the 3⁄4” dowel for the main handle. Leave it a little long at this point.
With the dowel in place, but before the glue dries, make the final adjustments on the handle. The arms should be locked in place by the spring latches but still able to pass over them when they’re depressed. Adjust the clearance by moving the arms closer or spreading them apart from one another. Once the clearance is correct, let the glue dry, then cut the ends of the dowel flush to the arms. A nail can be driven through the arm into the dowel to further reinforce the joint between the two.
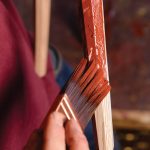
Lastly, sand and finish the parts. I used a simple oil/varnish blend – it applies easily with a rag and gives a soft lustre and a protective finish that isn’t too thick. The thin film prevents the finish from chipping or sticking when the trays are stacked together. 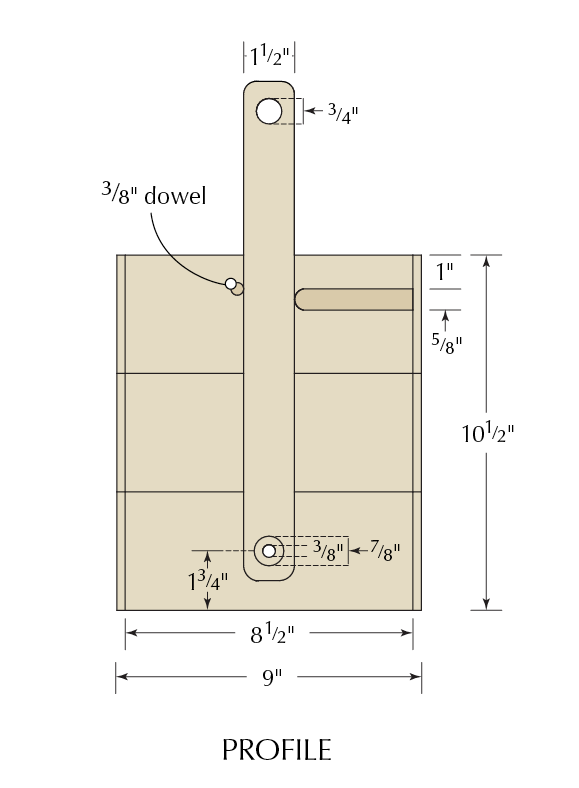

Here are some supplies and tools we find essential in our everyday work around the shop. We may receive a commission from sales referred by our links; however, we have carefully selected these products for their usefulness and quality.