We may receive a commission when you use our affiliate links. However, this does not impact our recommendations.
We may receive a commission when you use our affiliate links. However, this does not impact our recommendations.
Designing the process can be as challenging as designing the object.
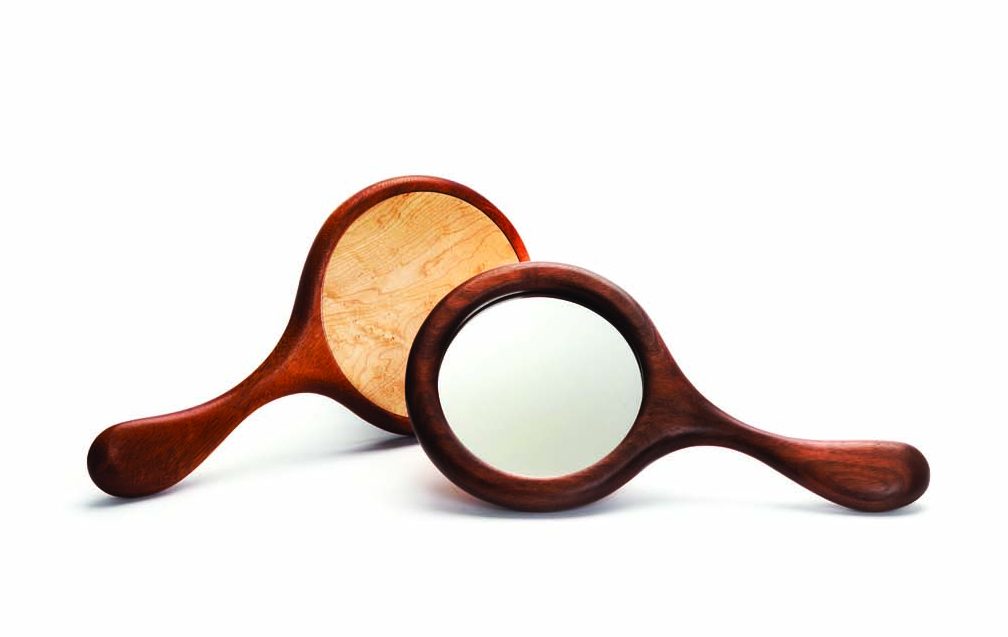
The way something looks is only the first half of a design problem. How to make it and how to make it efficiently are often greater challenges. If you want to make more than one of something, the problem grows exponentially. I designed these hand mirrors as a production item about 30 years ago. They are an example of making good choices from available options for quality and efficiency.
My goal was to appeal to the senses, both visual and tactile. Starting with nice wood helps on both counts. To get the handle right I made a few prototypes. I had to remember that not everybody has hands as big as mine. With the form established, I needed to duplicate the overall shape, with room to adapt each piece to the board it was cut from.
Most of the mirror is shaped by machine, but the handles are carved by hand. After a few runs of making these from a plywood pattern, I began to wish I could see through the pattern to better match the grain to the shape, and to more efficiently nest a batch of mirrors on a single board.
A trip to the local plastic fabricator’s shop netted some 3⁄8“-thick Lexan. I traced the pattern on the sticky paper that covers the plastic, then cut the shape on the band saw. I smoothed out the saw marks on my disc and drum sanders, drilled a 3⁄16“-diameter hole in the center, then removed the protective paper.
Feathering the Nest
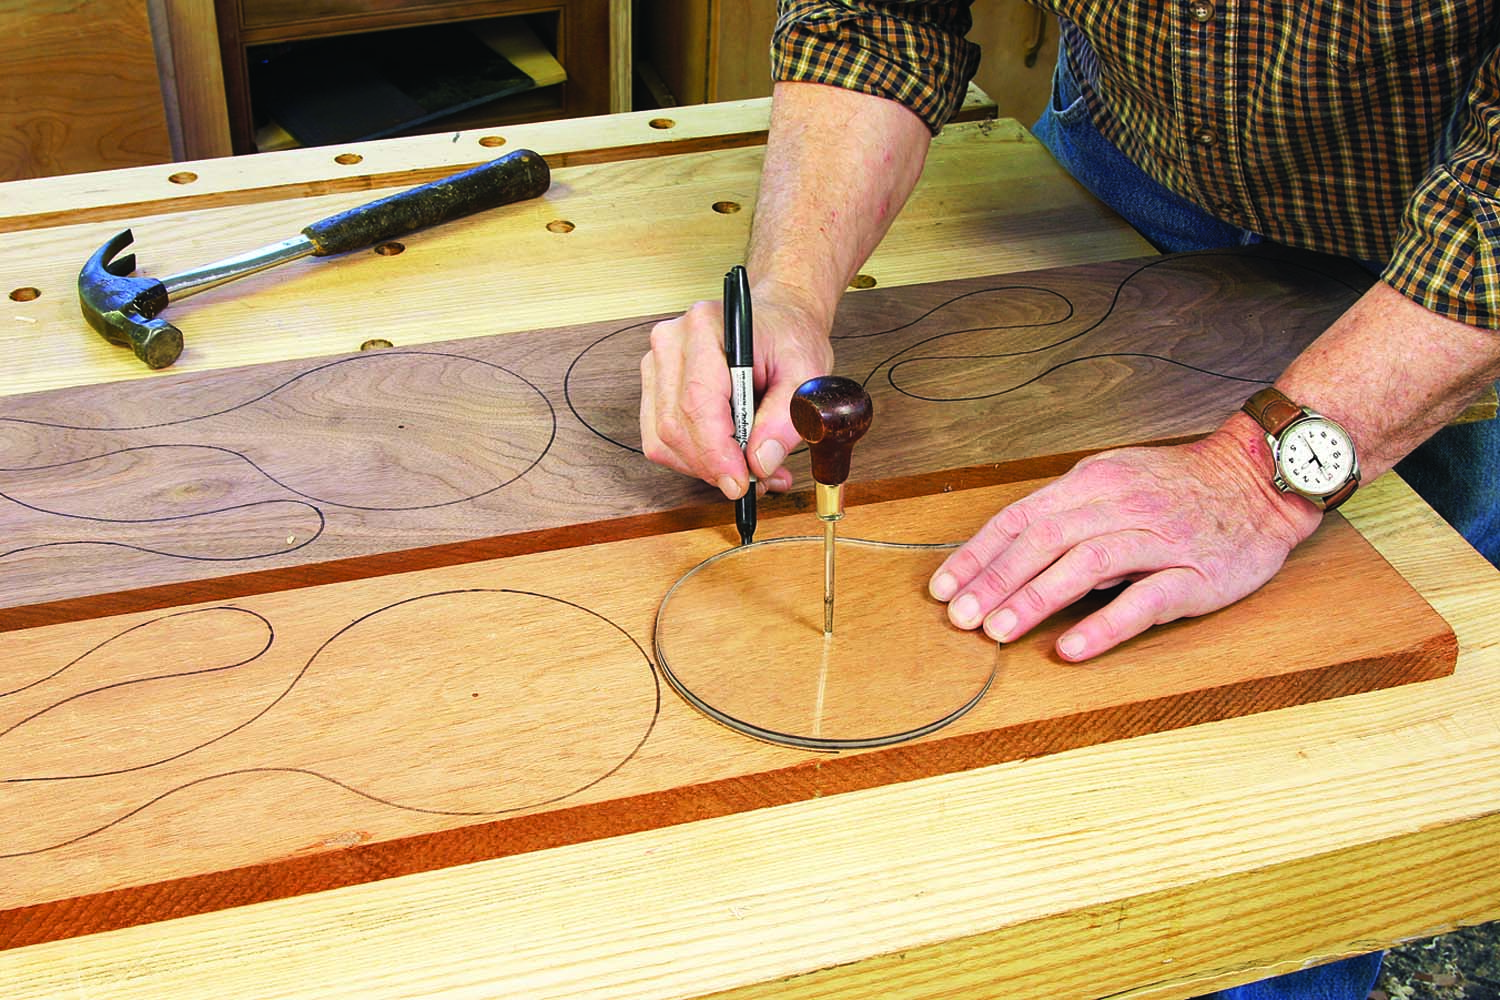
Crystal clear. A transparent pattern, made from 3⁄8″-thick Lexan, makes it easy to adjust the position of the wood grain to the shape of the mirror.
It takes a piece of nice hardwood at least 6 1⁄2” wide and 13 1⁄4” long to make one mirror. By reversing the pattern and arranging it handle to head, I can come close to doubling the yield when making several at a time. I put the pointy end of an awl in the hole in the pattern and tap the other end with a hammer.
That holds the pattern in place as I trace around it with a felt-tip marker. I can also rotate the pattern around the awl to adjust the way the grain of the wood follows the shape of the handle. At this point, it’s tempting to head to the band saw to cut the blanks to shape, but it’s better to put that off.
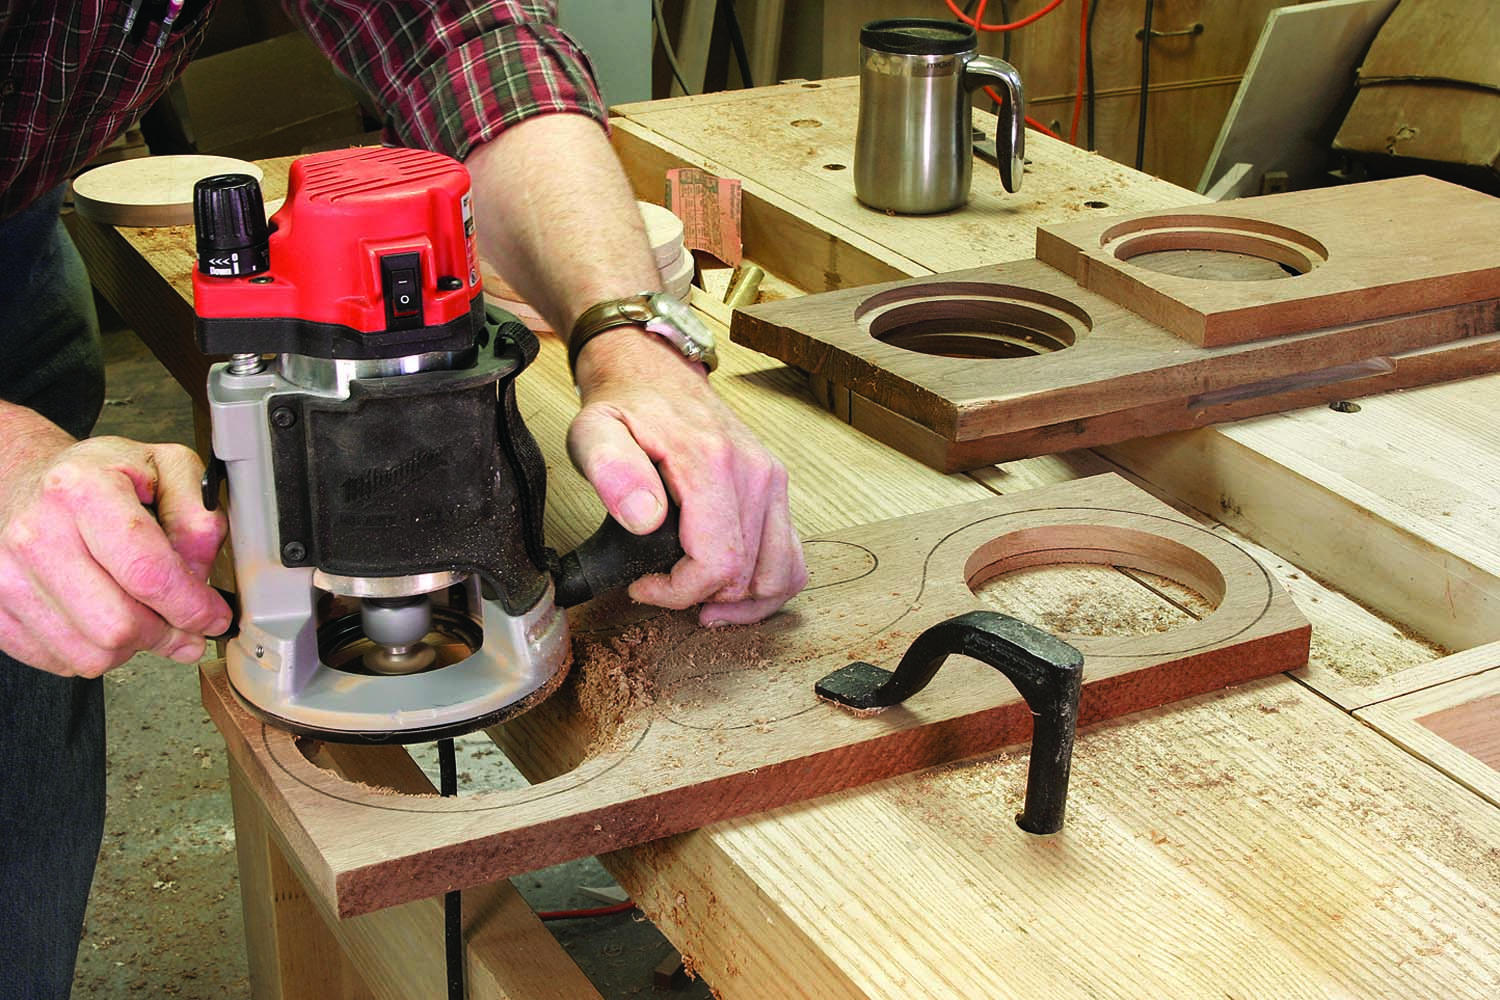
The mark left by the awl is the centerpoint of the circular cut out. I intended to make a router jig for the 5″-diameter holes, but that was too small to use a trammel on the router base to make the hole. I bought a fly cutter to make the pattern and a light came on while I was making the cut to make the pattern.
The fly cutter in the drill press is quicker and quieter than the router, even though it is a little on the scary side. I decided to use it to cut the holes, and here are a few tips to make it work well and safely. First and foremost is to clamp the work down to the drill press table. Second is to use the slowest possible speed on the drill press.
Inattention to either of these details can cause the drill press to perform an imitation of a crashing helicopter. It also helps to touch up the tip of the cutter with a file and sharpening stones. Repeat the sharpening if the cutter begins to burn or stall.
Stepped Rabbets
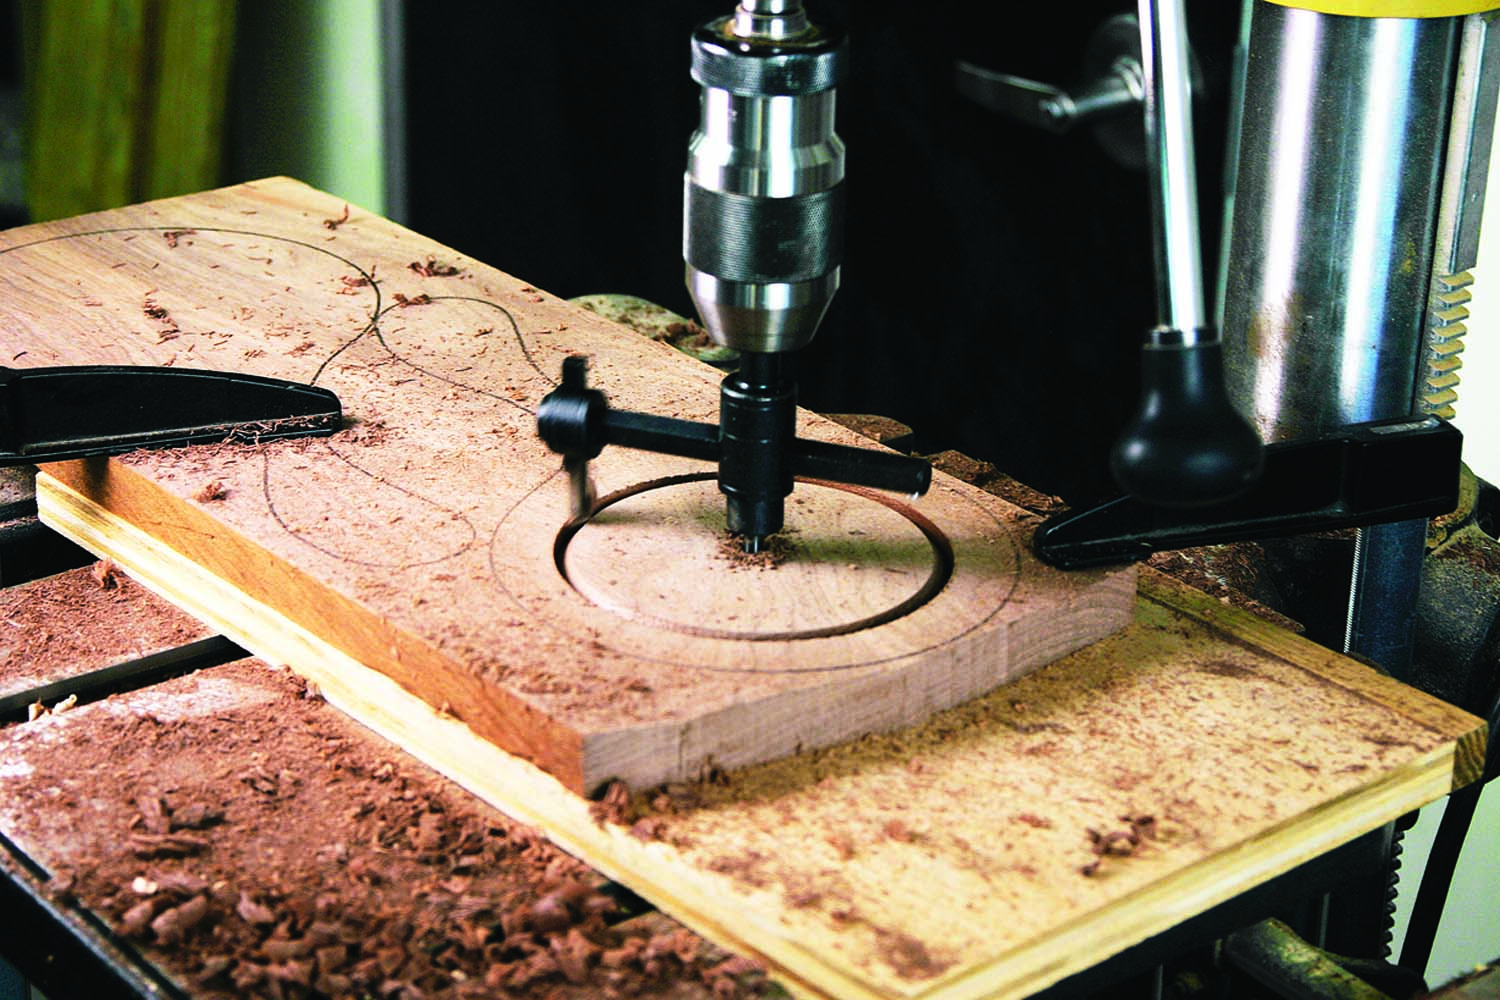
Fly safely. A fly cutter works well for making large holes, but watch your hands. Clamp the work to the table securely and use the slowest possible speed.
At this point, the front and back of the mirrors are the same. The difference in the finished product is that the back has a pair of offset rabbets. The first is 3⁄8” wide by the thickness of the back insert. The second one is 1⁄4” wide and 1⁄8” deeper. The mirror fits in the deeper rabbet and is held in place by the insert.
Right-handed people generally prefer to hold a hand mirror in their left hand; so that from the front, the curve of the handle points to the right. I mark which side will be the back, then cut the rabbets with a bearing-guided bit in a router. I set the depth to the material that will become the backs, nominally 5⁄16“. Milling the rabbets before cutting the outside shapes gives the router a solid base to sit on, and plenty of room to clamp the work down.
I make a test cut on the edge of the board, then place a piece of the back material in the rabbet to make sure that the top surfaces are flush. When the first rabbets are done, change the setup to cut the second ones. Most rabbet bits can take different size bearings to cut different widths. Make sure that the second rabbet is deep enough to hold the mirror.
At some point after the rabbets are cut, schedule a break and head to your local glass shop. Take one of the blanks with you to be sure that the mirrors will fit. Glass people have trouble sometimes with esoteric technical terms like “perfect circle” and “5 1⁄2” diameter.”
Round & Round
The puzzle of how best to make the inserts perfectly round and exactly the right size took a while to solve. Woodworking books and magazines are full of nifty ways to make circles, but most of them didn’t work well enough for me. Here are a few of the methods I tried, and the reasons I didn’t like them.
A jig for the band saw is hard to get started, leaves a rough edge and takes too long to dial in to the right size. A jig on the router table can leave a clean edge, but the small size puts hands too close to cutters, and there is a danger of tearing out a chunk of wood at some point on the curve. Turning the discs on the lathe makes for a smooth edge and you can sneak up on the exact size, but it takes too long in a production run to take the discs off and on the lathe to check the fit.
One of the surprises to me in making these mirrors was that there would always be some variation in the size and/or the shape of the holes. I wanted the thin discs to pop into the back without showing a gap, but they can’t be too big and forced in without the risk of breaking the surrounding wood. I needed a magic device that would give me a perfect circle, and do it quickly. And I needed to get the wood on and off so that I could fit individual discs to individual holes, altering the shape slightly if I needed to.
I came up with a gizmo that works with a 12″ disc sander. It’s a piece of 1⁄2“-thick plywood with a 1⁄2“-diameter dowel that sticks up 1⁄8” inch. A shallow hole is drilled with a Forstner bit in the back of each disc-to-be, so it can spin on the dowel. My moment of good thinking in this was to make the plywood plate pivot on a screw that connects the plate to a piece of wood that fits snugly in the miter gauge slot of the sander’s table.
That allows the jig to pivot toward the disc, letting me reduce the diameter in controlled steps. It also allows me to clamp a stop on the table to limit the travel of the plate. I mark the discs with a compass on both faces of the material, taking care to align the centerpoints.
Orderly steps. Mill the rabbets before cutting the blanks to shape. That leaves material to support the router, and to clamp the work to the bench.
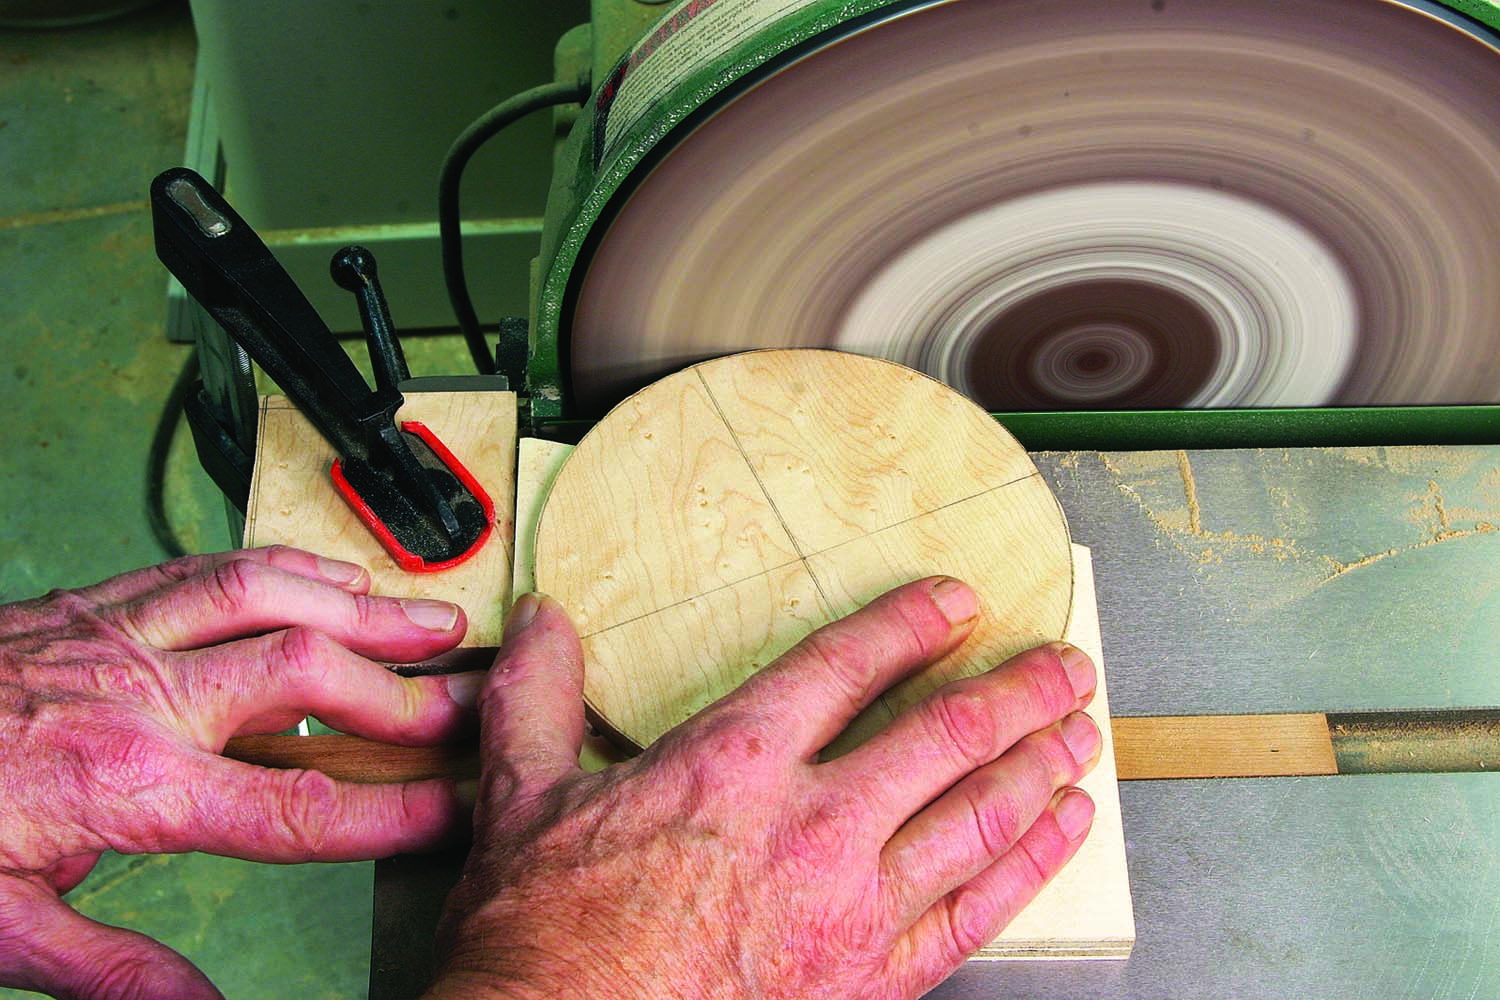
The compass point on the back side becomes the center for drilling the shallow hole, and the outline on the other side lets me know how close I am as I sand. I rough cut the discs on the band saw, staying as close as I can to the lines while moving at a productive pace. Then it’s a stop at the drill press to make the holes before taking the stack to the sander.
At the sander, the early going can be aggressive, but I lighten up as the disc nears the pencil line. I make a test fit to see how much more material needs to be removed. I check the fit all the way around, because the shape of the hole may not be perfectly round due to some movement in the wood.
This happens across the grain, so wood has to be sanded from either both sides, or the top and bottom. As long as there is no obvious gap, no one will know it isn’t a perfect circle. When I have a back fit to a blank, I leave it in place as much as possible during the remaining steps. This makes it easy to keep track of what goes where, and it keeps the holes from distorting if the wood decides to move.
Get a Handle on it
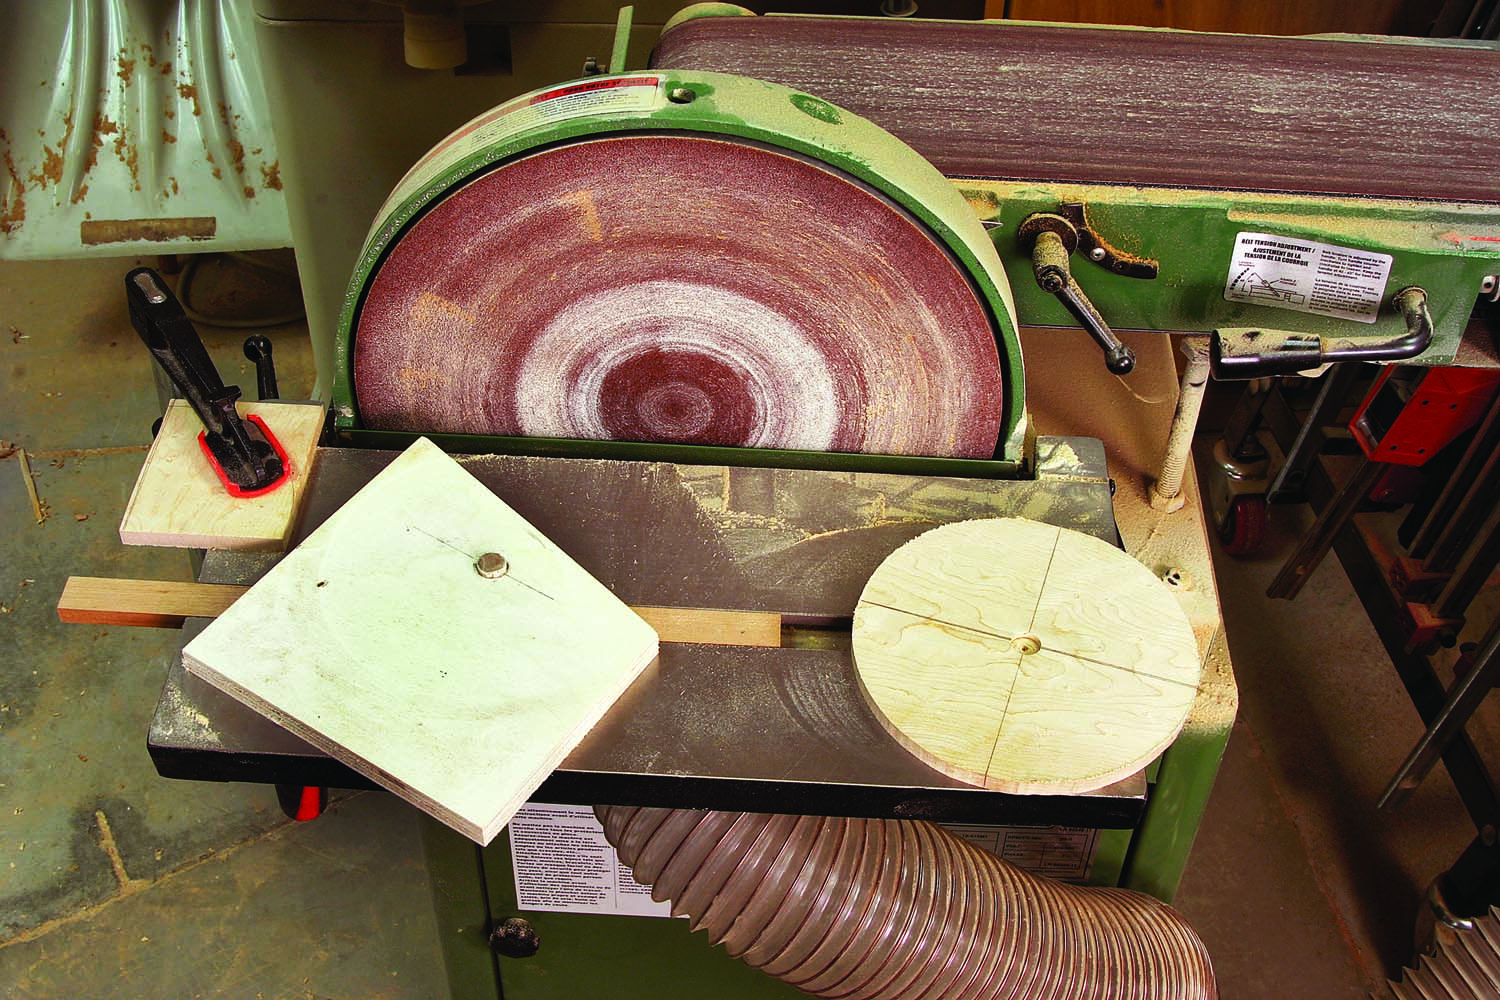
Swing it. The base of this jig pivots, allowing for adjustments to the diameter while in use. The short dowel registers in the hole centered in the back piece.
The overall length of the mirror leaves just enough room to cut all the way around on a 14″ band saw. I make an initial rough cut to separate the blanks, then cut to the line. Then saw marks are removed with the disc and spindle sanders. It’s important to make a smooth transition where the curve changes direction at the bottom of the radius.
Stop on a dime. A block of wood clamped to the table limits the size of the disc. Slide the jig away from the stop to take a deeper cut.
After sanding, I go around the outer edge on both sides with a 3⁄8“-radius roundover bit at the router table. I mill the blanks as thick as possible from 4/4 stock, and make sure it is at least 13⁄16” thick. That leaves a flat area for the bearing of the router bit to ride against when routing the second side. I switch to a 1⁄4“-radius bit to round over the inner circle on the face side.
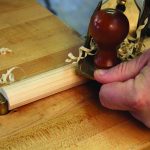
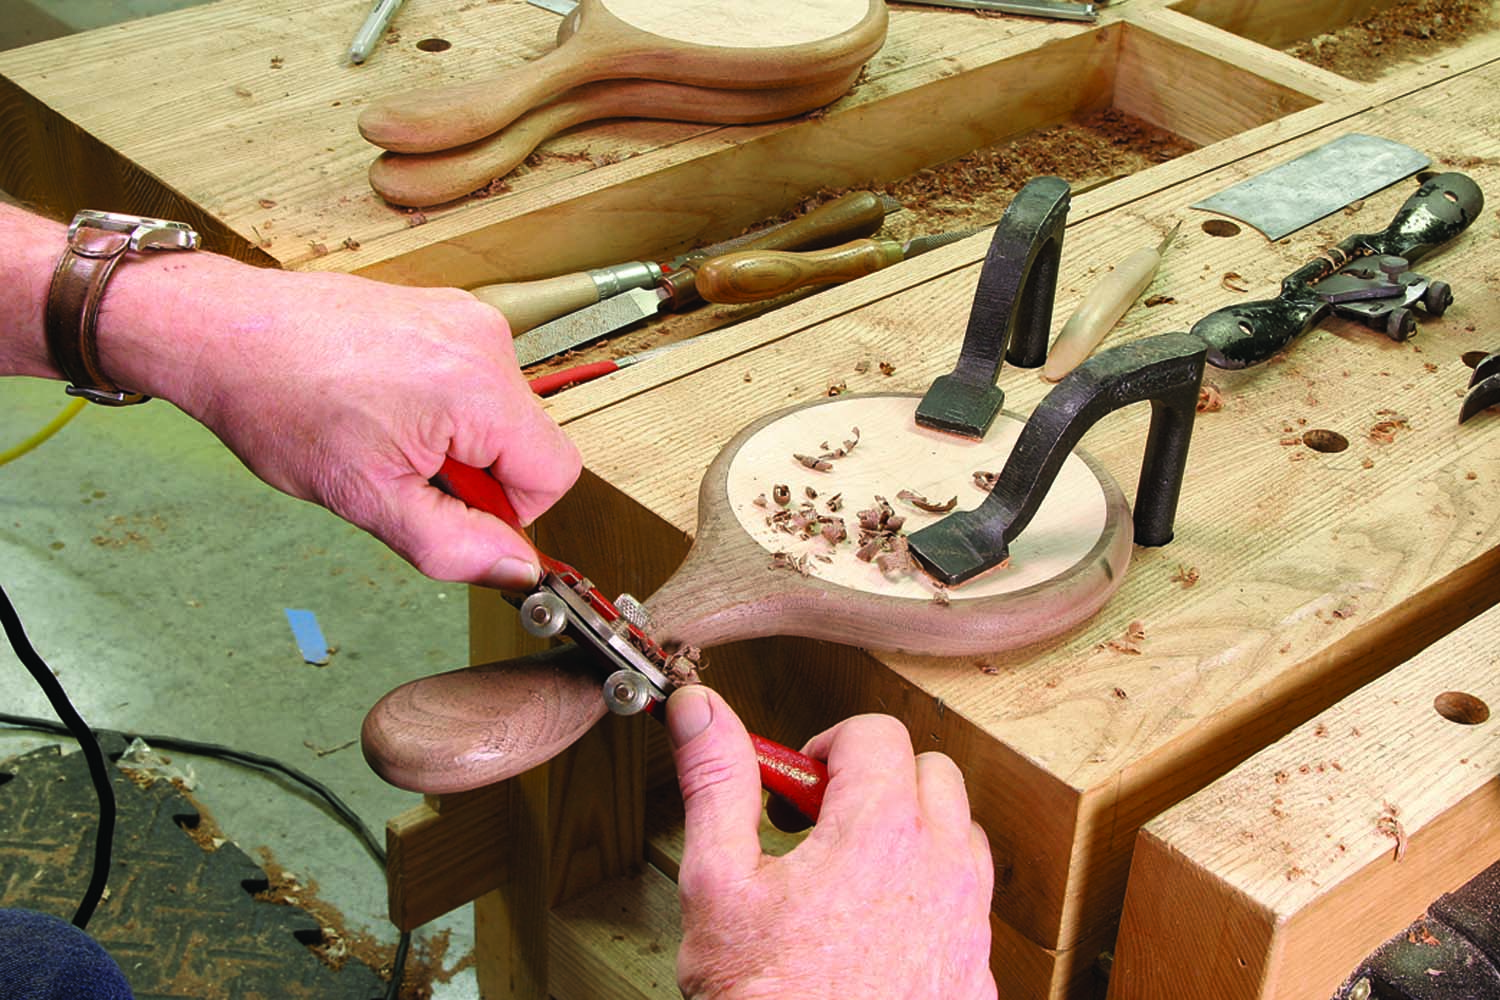
Shaping the handles by hand is the step that makes these mirrors special, and for me it’s the most enjoyable part of the process. The router removes much of the waste, and I use a spokeshave to increase the radius of the curves at the end of the handle, reduce the thickness directly below the mirror and blend the transitions between the machine-shaped and hand-shaped surfaces.
I use the spokeshave as a roughing tool, and skew the blade so that it takes a deep cut on one side and a more refined cut on the other. By shifting the tool laterally I control how much material is removed without changing tools or adjusting the tool. I work with the grain of the wood as I shape the handle. When it feels good and looks good, it’s time to move on.
Shaping by Hand
Rough shave. Hand work changes the curves from dull to varied, to improve the looks and the fit in the hand.
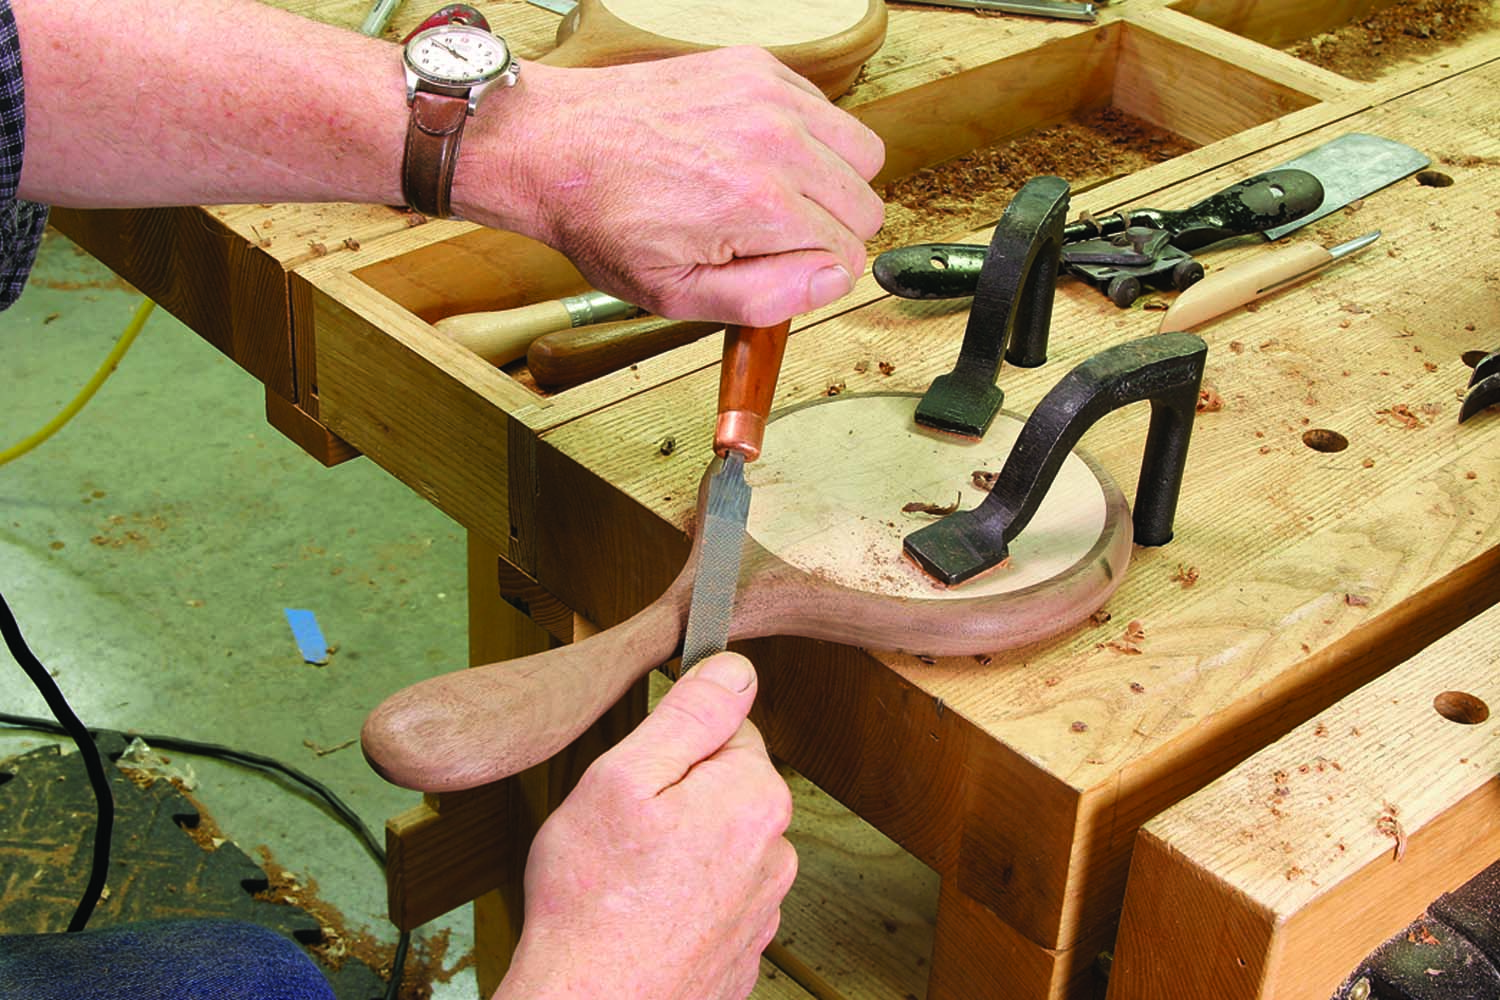
Rough to ready. A series of rasps removes the facets left by the spokeshave, eases the transitions between the curves and refines the shape.
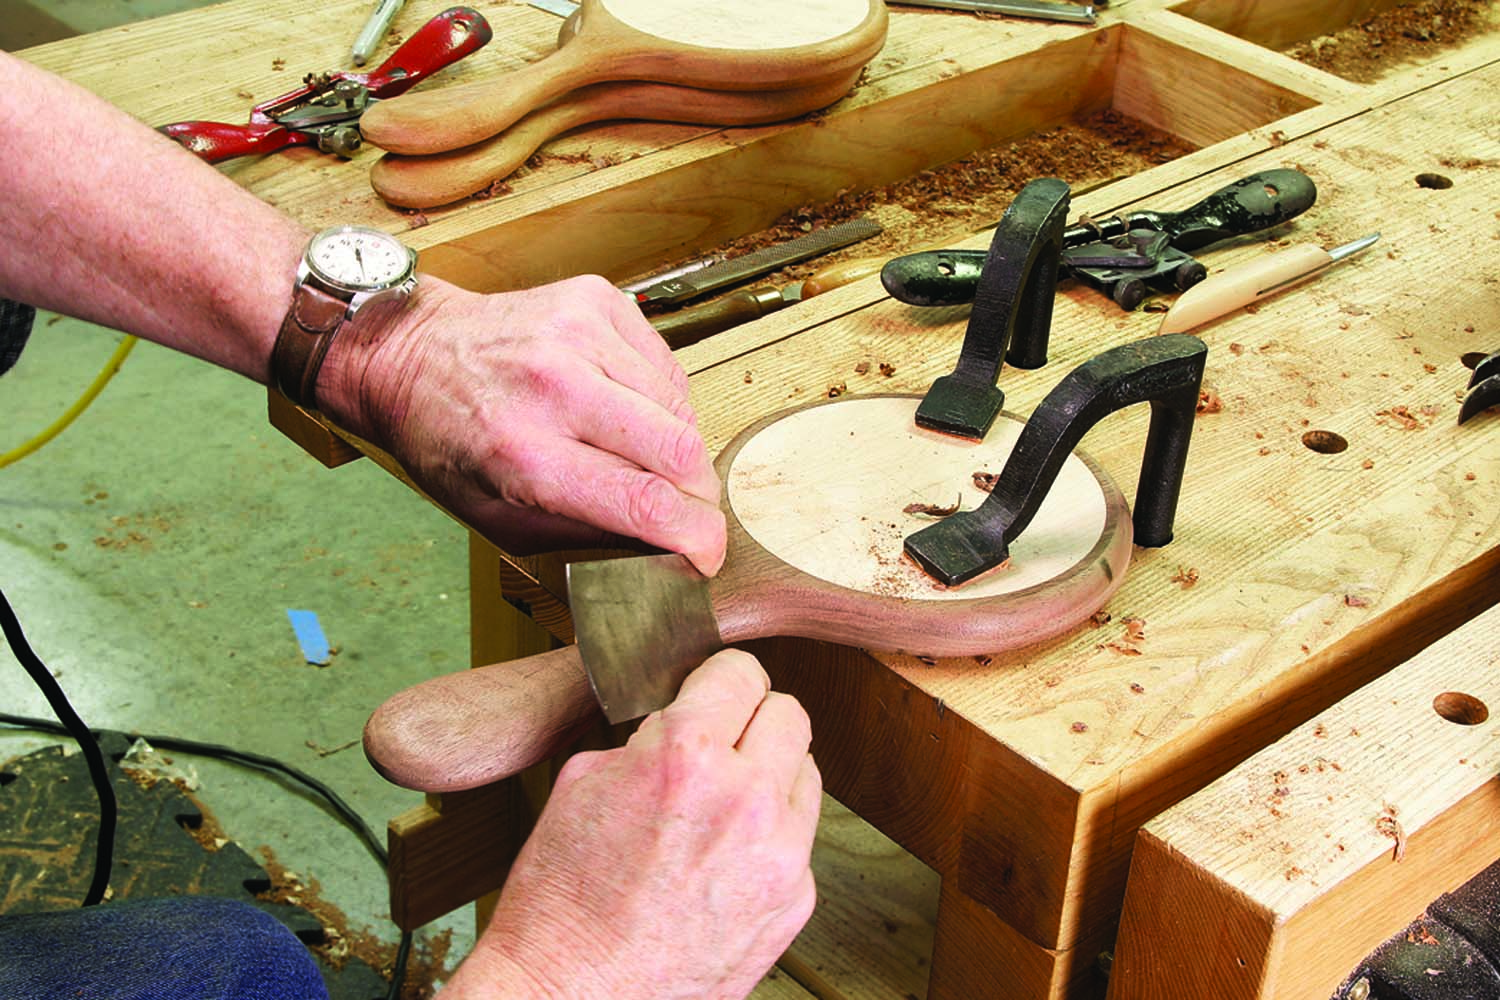
Like magic. A card scraper is ideal for following the rasp. It slices off the ridges left by the teeth of the rasp, leaving a smooth surface.
Avoiding the Fuss
There are many options to take a piece of wood from shaped-but-rough to ready-to-finish. This is a simple project, but some surfaces are flat, some have been rounded with a router, and some have been cut with a spokeshave. When the finish goes on, all of these surfaces need to be consistently smooth, and without a discernible transition from one shaping method to another.
My next move is to work on the transitions, and remove the facets left by the spokeshave. A rasp is ideal for this, even though the overall surface quality may look worse for a while. A coarse rasp with a round profile on one side will easily follow the curves, knocking off the high points. A finer rasp comes next, and its job is to remove the marks left in the wake of the coarse rasp.
A third rasp, with an even finer grain follows, to take out the marks left by its predecessor. The key to efficiency is knowing when to stop, when one tool has refined a surface as well as it can. If you start with too fine a tool (or too-fine sandpaper), you spend more time than you need to. The same thing happens if you keep going with a coarse tool, expecting it to leave a nicer surface than it can.
I follow the last rasp with a card scraper. Even the best rasp leaves behind a scratchy surface. The beauty of the scraper is that it only needs to knock off the high points the rasp left behind. It may seem like an unneeded complication to use these different tools, but each step is efficient and doesn’t take long.
Some sanding is inevitable, but my goal is to make it as painless as possible. Refining the surfaces beforehand allows me to start with a relatively fine grit. For these mirrors, I start with a #120-grit piece of Abranet, backed up with a flexible pad. The pad makes it easy for the sandpaper to conform to the curves.
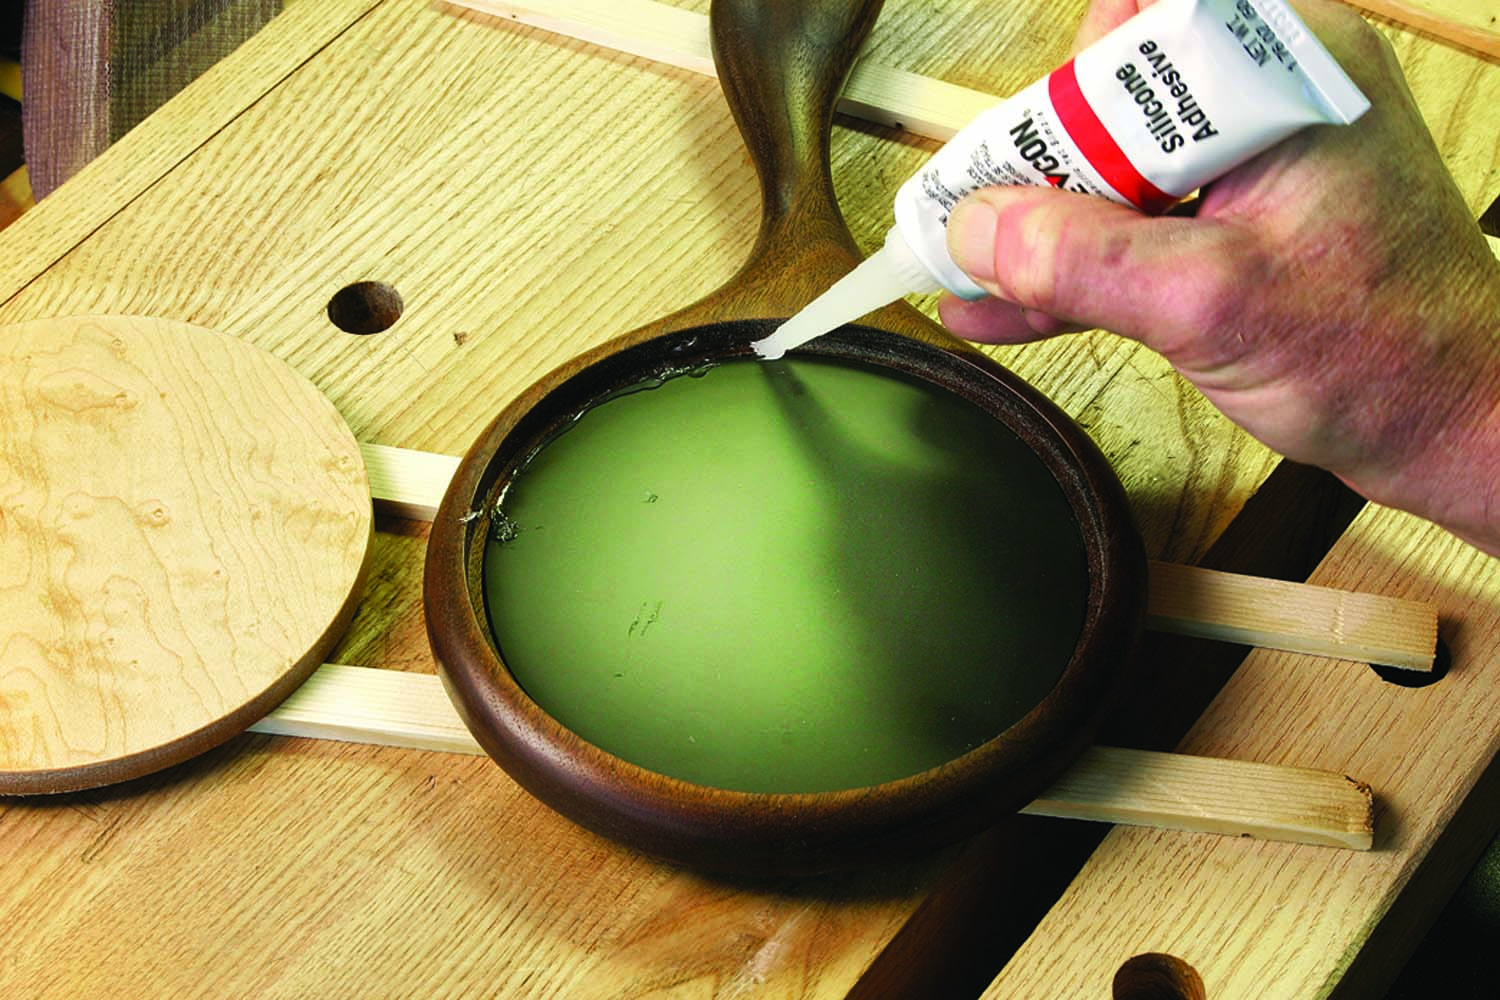
Stick with it. A thin bead of silicone adhesive holds both the mirror and the back in place. Keep the bead small to avoid squeeze-out.
The first round of sanding is always the slowest, and if I come across an area that won’t smooth quickly, I back up a step – to the scraper, a coarser grit of sandpaper or to the finest rasp. I repeat the sanding with a series of finer grits, working up to #240 or #280. As with the rasps, each step takes less time than the one before it.
I like the look and feel of an oil finish on small projects such as this, but oil can take weeks to achieve a decent build. I shortcut the process by applying one coat of Danish oil, rubbed in with a non-woven abrasive pad and then wiped dry. I let that sit overnight, then spray three or four coats of satin lacquer.
I allow the lacquer to dry thoroughly, then assemble the mirrors. I put the wood face down, then drop the round mirror into the recess. A narrow bead of silicone adhesive is applied to the outer edge of the mirror, then the back is put in position. Use a couple spring clamps to hold the back in place until the adhesive dries. PWM
VIDEO: Watch a video of the circle-sanding jig in action.
FULL-SIZE PATTERN: Download the full-size PDF pattern of this project: Mirror_Pattern
Here are some supplies and tools we find essential in our everyday work around the shop. We may receive a commission from sales referred by our links; however, we have carefully selected these products for their usefulness and quality.