We may receive a commission when you use our affiliate links. However, this does not impact our recommendations.

With all the talk at our “Woodworking in America” conference about how to properly sharpen plane blades, I didn’t see or hear one presenter mention a power sharpening system. I know there are many woodworkers that sharpen with electric-powered sharpeners.
As you may know , I was asked numerous times at the conference , I use a WorkSharp 3000 to sharpen my chisels and plane blades. I find that tool the best way for me to put a fine edge on my hand tools. Yes, I do have a few hand tools.
On a 3000 (click here to see a video) the chisel and plane iron port sharpens tools up to 2″ wide, so the machine is limited to work on narrow blades only. And with the only available bevel angles at 20Ã?°, 25Ã?°, 30Ã?° or 35Ã?° you were limited there as well. Not to mention it was only possible to add a 5Ã?º micro-bevel if desired. So from what seemed like day one of the introduction of WorkSharp WS3000, there was talk about an attachment to sharpen wider plane irons. That attachment came is now available.

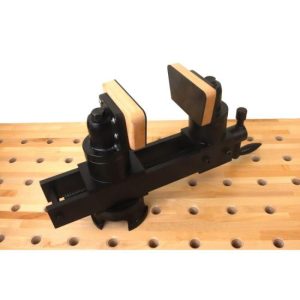
The accessory uses a platform that’s bolted to the tool in place of the original top tool rest. There are leveling screws to bring the table into perfect position with the glass sanding discs , use a good straightedge to adjust the table. If the table isn’t level and in line with the discs, you may notice a slight skew as you sharpen your blades.
With the setup ready, you need to position your plane iron into a supplied honing guide.
One thing I picked up at the conference is to adjust the blade to an identical position each time you return to sharpen that blade. If you do that, you’ll spend less time sharpening and you’ll extend the life of your irons. WorkSharp’s Alignment Fixture , also included with the attachment , helps you do just that.
Simply set the alignment pin into the fixture at your desired setting (arrow facing away), slide your iron , bevel up , into the guide as it’s held to the fixture and the blade nuzzles up to the pin, then tighten the honing guide, capturing the blade.

One catch in using this accessory is to match the bevel angle scale on the alignment fixture to the appropriate position on the honing guide. There’s a white scale with angles that match those at the port, or an amber scale that has multiple settings from 25Ã?º to 60Ã?º. (I’m not fond of the stick-on labels used designate white or amber positioning. I’m fearful those labels might vanish leaving one to wonder which position is which.)
Once the blade is set into the guide, you’re ready to sharpen. Flip the honing guide so your bevel angle is down and the wheel of the guide is running on the plate. Introduce the iron to the sanding disc and you’re off to a keen edge.
Of course, you’ll need to work through the grits to gain a sharp edge, and if you use a micro-bevel you’ll need to adjust the blade in the guide a second time. This time adjust the alignment pin with a simple turn. By placing the pin in the same hole setting, but turning the arrow to point toward the guide and blade, you’re adding a 1Ã?º micro-bevel. That also shortens your time spent sharpening when you touch up the edge.
I plan to continue to sharpen with a WorkSharp 3000 in the future. Now I can work on my plane irons as well.
At the conference many different methods for sharpening were discussed. What method do you use? Water stones? Oil stones? Sandpaper by hand or a tool such as a WorkSharp? Let us know by answering our survey.