We may receive a commission when you use our affiliate links. However, this does not impact our recommendations.
Recreate this classic design and push your skills to the next level.
Project #2004 • Skill Level: Advanced • Time: 3 days • Cost: $400
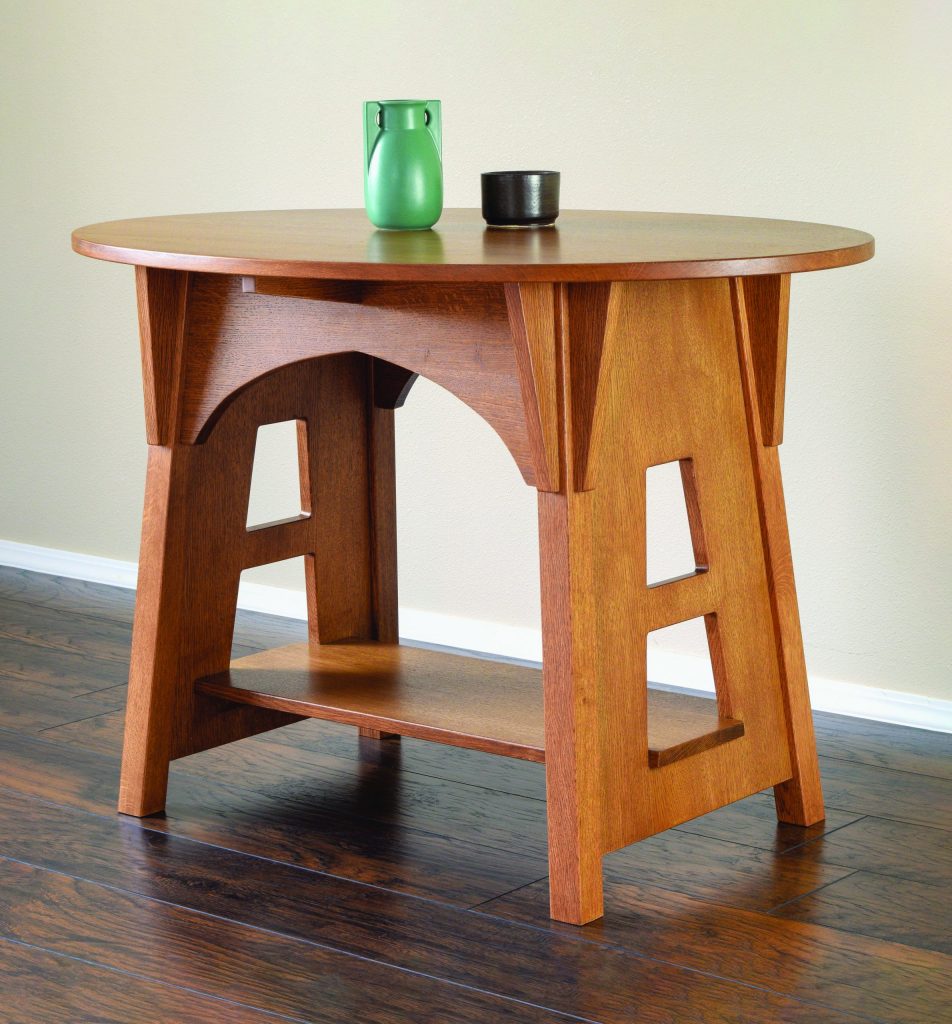
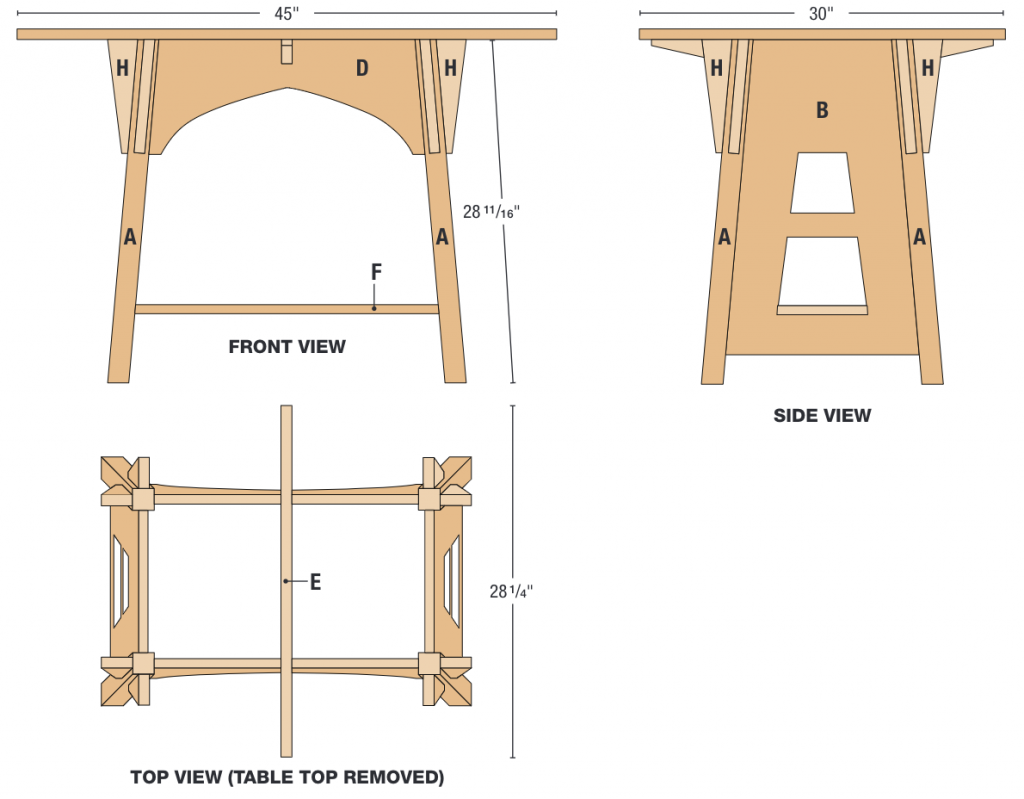
Of all the surviving Charles Limbert designs, there are three that stand out above the rest in my mind. One is the #355 Cottage Bookcase, and the second is the #153 Turtle Top desk. The third is the #146 Single Oval Library Table. I’ve been fascinated with these pieces for years and inspired by the interesting use of shapes and angles in Limbert designs. With most Arts & Crafts style furniture, there is a deceiving level of complexity hidden in the design. With Limbert’s #146, the complexity is plastered all over the face of it. You don’t have to ponder long to see the compound angles, trapezoids, and elliptical forms in this interesting table.
The Single Oval table is a medium sized display table and would make an excellent perch for vases and collectibles. While most furniture from this era looks fantastic with heavy fleck Quartersawn oak lumber, I found myself reaching for rift sawn stock to build this one. There are so many dominant profile lines and shapes, that too much figure might actually distract from the piece. Likewise, sapwood and flatsawn grain draws the eye away from the intended focal theme of this piece: its interesting shapes and angles.
Compound Angle Legs
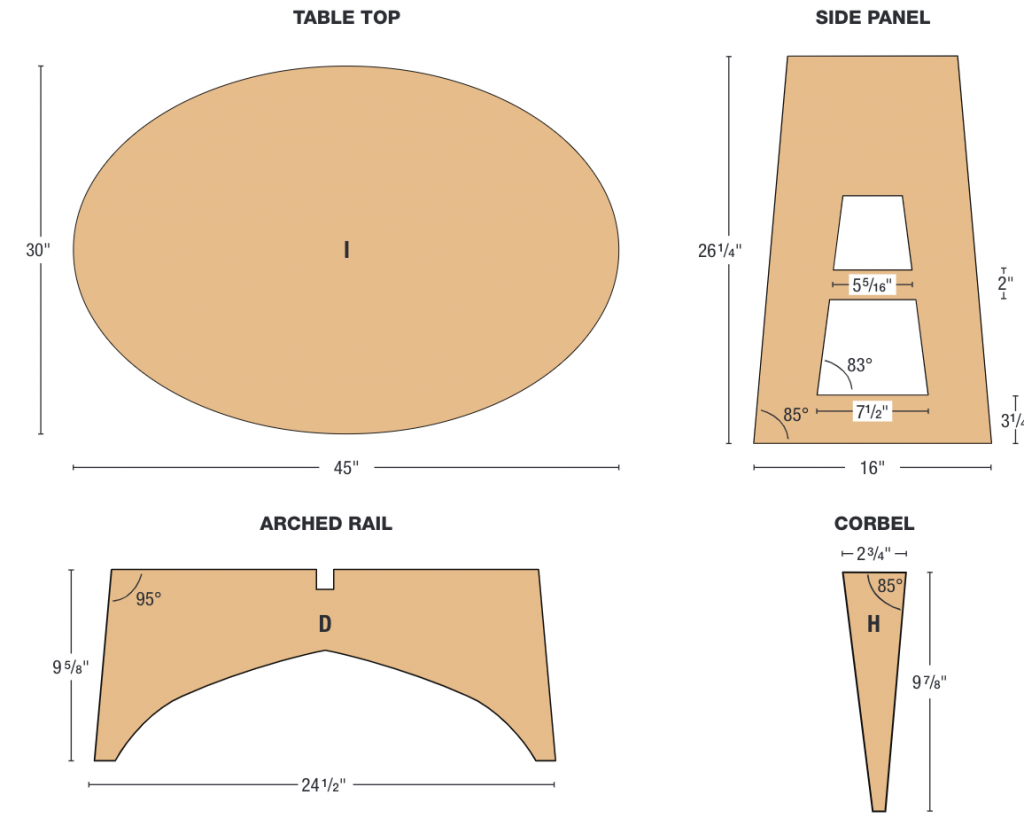
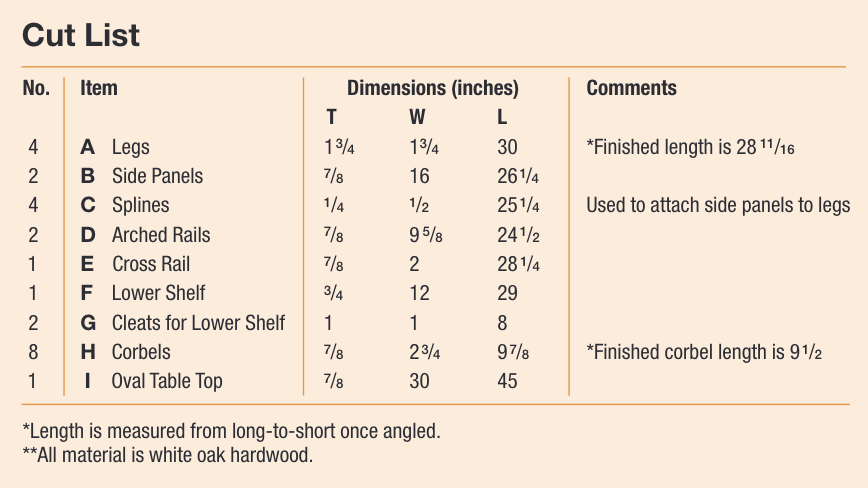
Find a plank of 8/4 rift sawn oak and make the four legs. They finish out at 13/4″ square, and about 30″ long. The legs are mitered and beveled, forming a compound angle. My father and I have another name for compound cut: we usually call them “About a quarter inch short.”
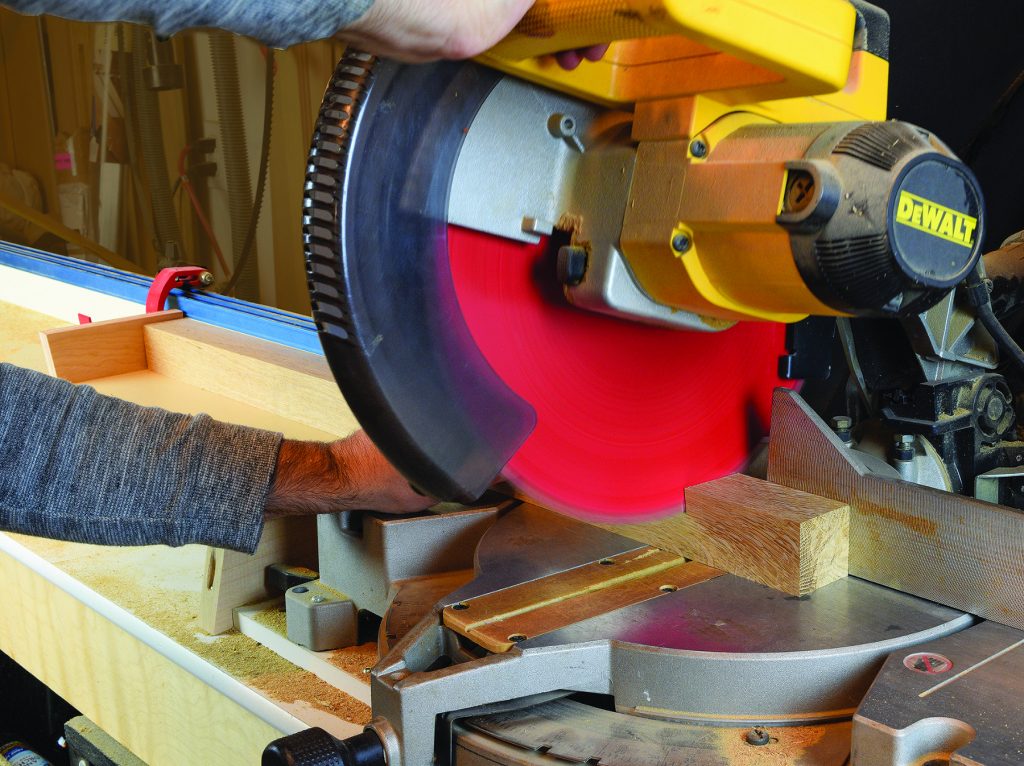
Compound angles can be tricky, so whether you use a miter saw or a table saw, come up with a consistent way to cut them to length. I chose a miter saw, and set the miter angle to 5°, and the bevel angle to 5°. Start by cutting one end of the leg at this compound angle, and slide the leg down the table, being sure to keep it in the same orientation. Then use a stop block to trim the legs to identical length.
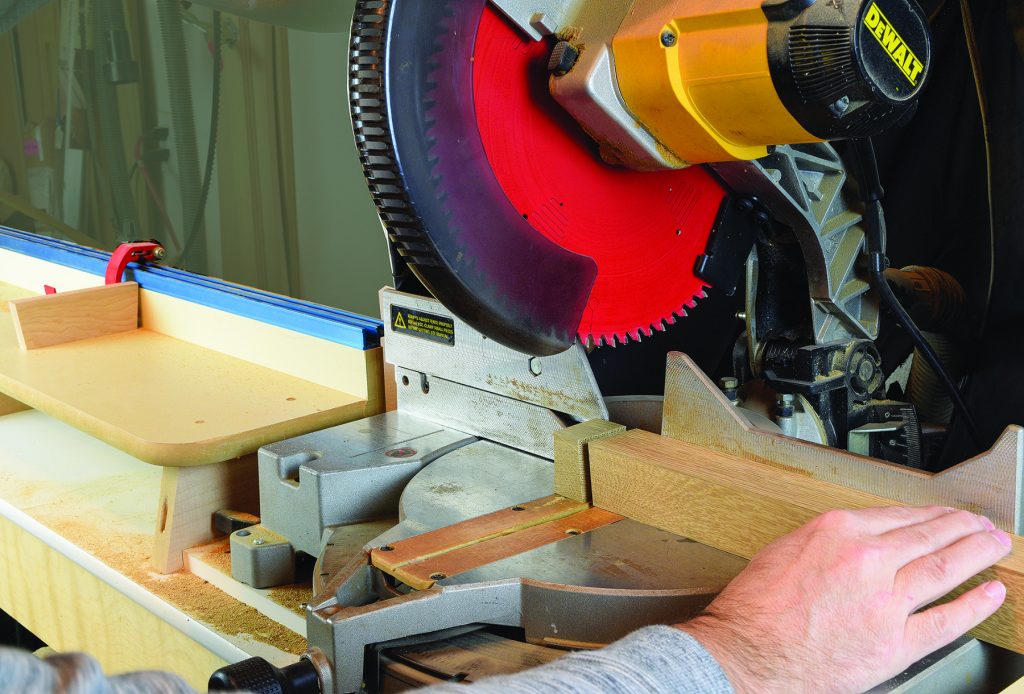
Cut, Slide, Cut. Set both the bevel and miter angles to 5° and trim one end of the leg
Slide the leg to the left until it contacts the stop block and trim the leg to final length.
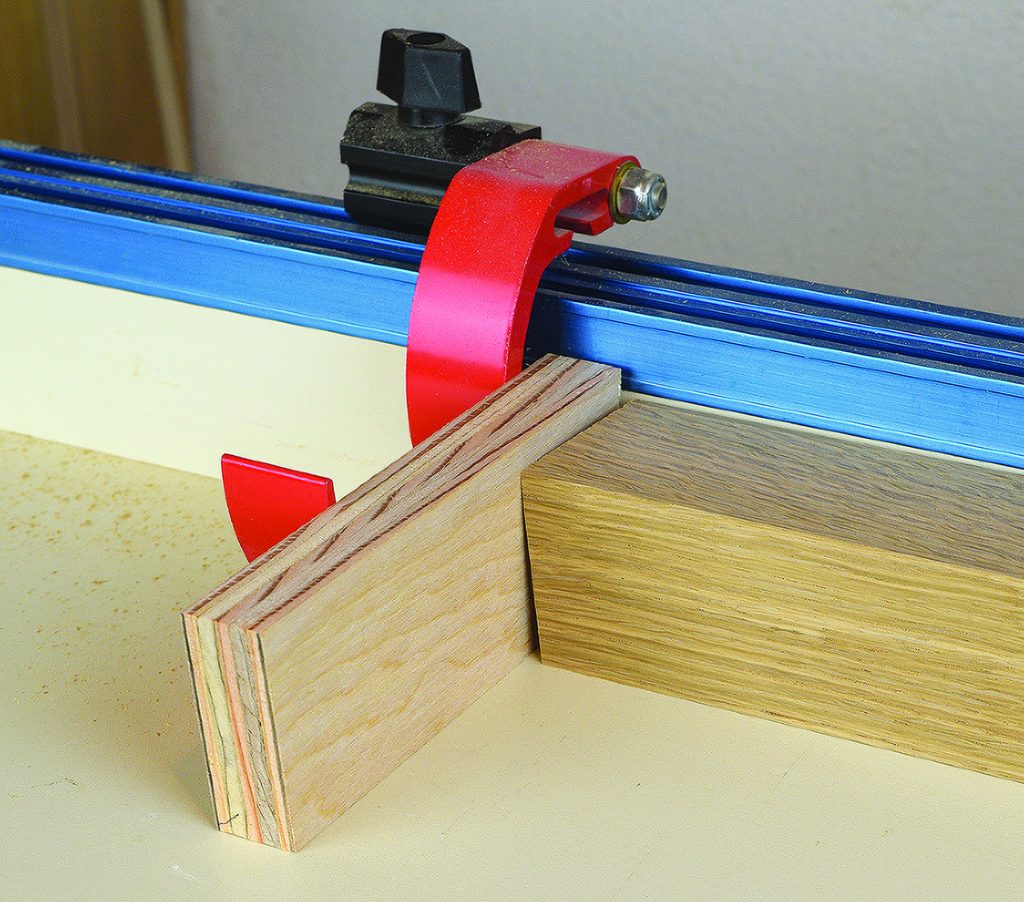
Use a scrap block to make sure the point of the compound angle makes contact with the stop block.
Upper Leg Joinery
The upper third of each leg is where most of the joinery takes place. The arched rails join the legs with mortise and tenons, and the corbels feature stub tenons that sit in shallow grooves. Mark the extent of the 1/2″ wide x 81/2″ long mortise on the leg and mill it 3/4″ deep. Since the tenon will be divided, I left the center 11/2″ of the mortise a little shallow.
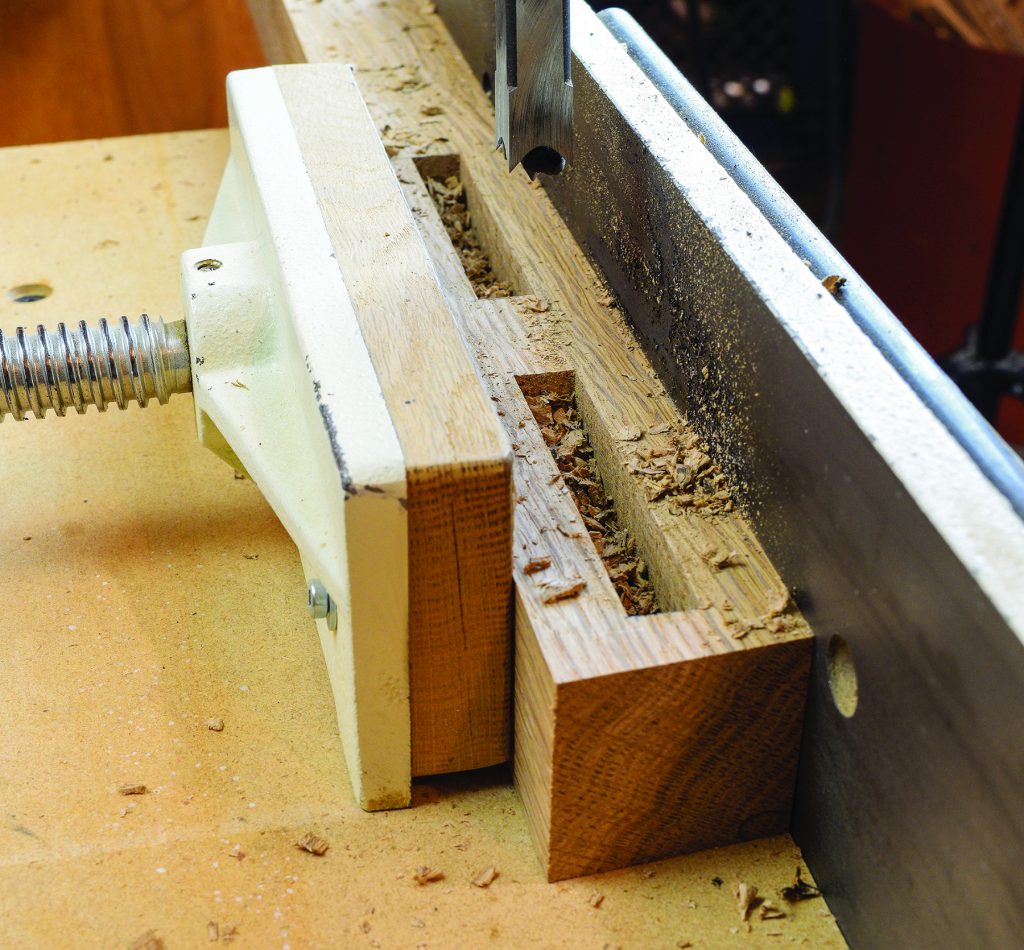
Each leg gets two mortises, cut 3/4″ deep. The remaining material is cut last to a depth of 1/4
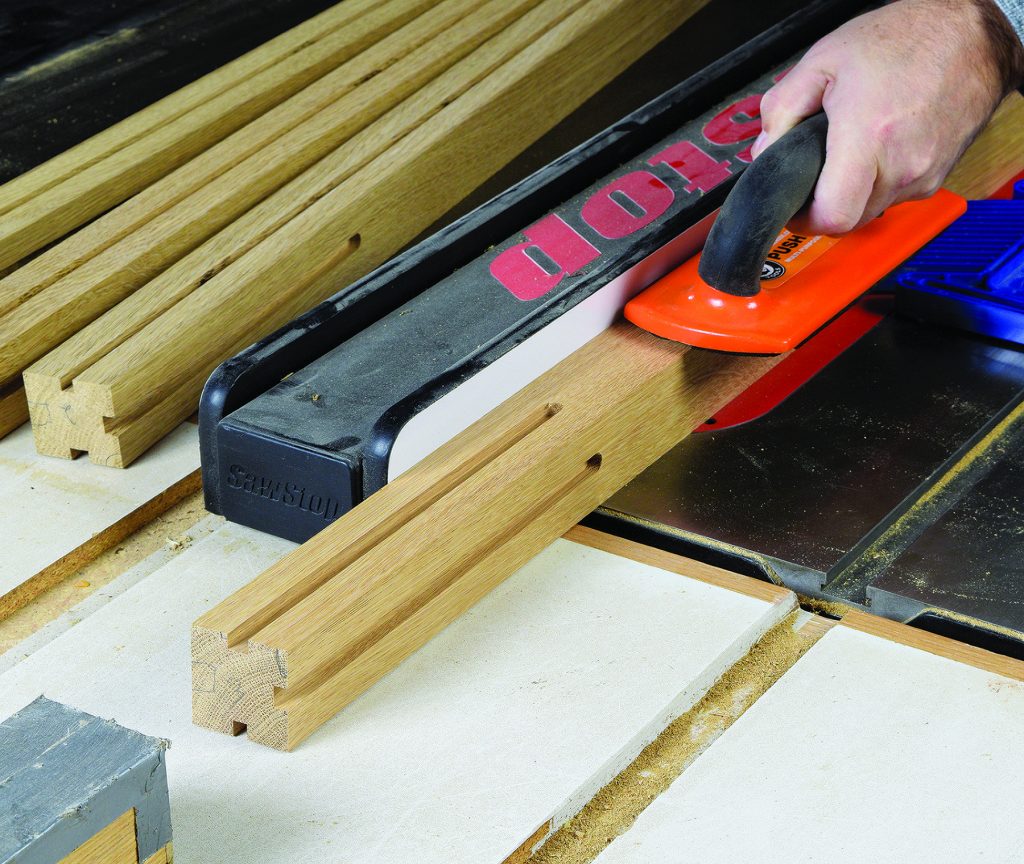
For cutting the grooves, I stumbled onto an interesting problem. Since the top of the legs are cut at a compound angle, my regular stop block wouldn’t work. Instead, I came up with a single-point block for the router table that registers only the center of the leg. This allowed me to mill grooves on adjacent sides of the leg to the exact same length. Use a scrap offcut from the legs to make the single-point stop. Drill a hole centered in the top of the offcut and tap in a short length of 1/4″ dowel. Set the stop block to allow a 9″ long groove and clamp it to the router table fence. Chuck a 3/8″ diameter straight bit into the router, with bit height set to 1/4″. Set the fence for a centered cut and mill two grooves in each leg.
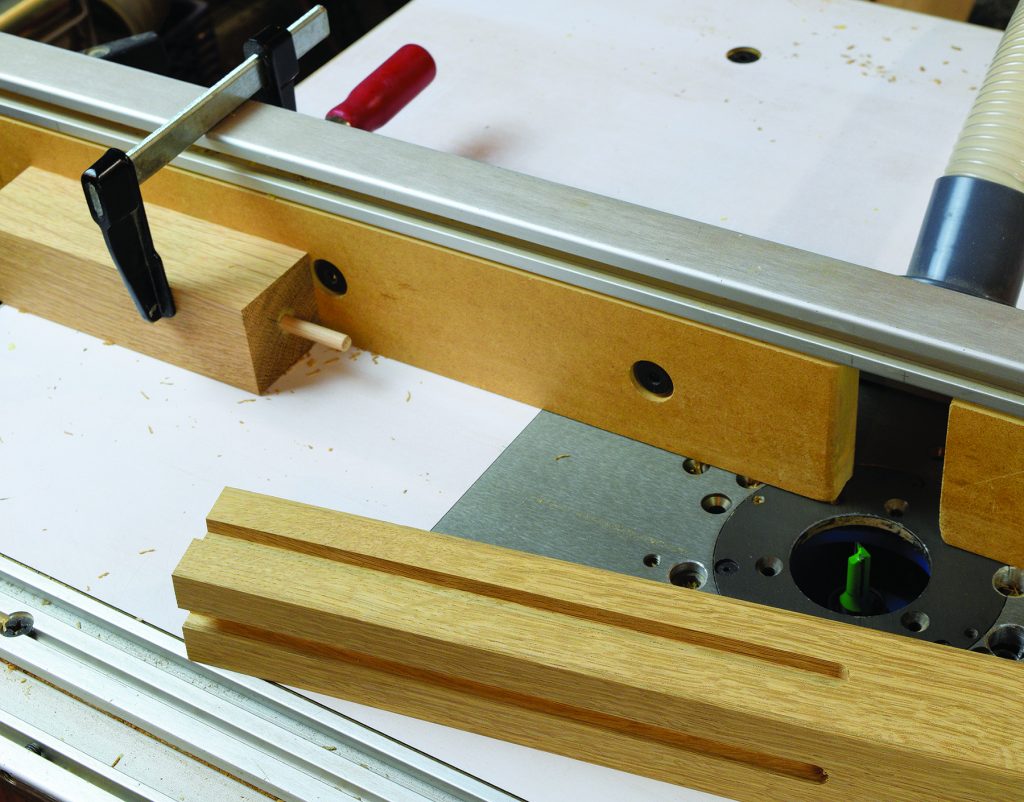
A single-point stop block, made from a leg offcut and dowel, helps make the two shallow grooves the same length.
Trapezoid Templates
Glue up the panels required for the table including the top, side panels, arched rails, and lower shelf. Once the panels come out of clamps, cut the side panels to a rough size of 261/4″ long and 16″ wide. Next, set out to make a template for the trapezoid cutouts that decorate each side panel.
Start by drawing the trapezoid shapes on one side panel. Rip 4″ wide strips of plywood and lay them on your pencil. Measure between the strips and cut short cross-pieces to fit. Assemble this somewhat crude five-piece template with pocket hole screws.

Cut strips of scrap plywood and set them on your layout lines. Angle the ends of the short cross pieces approximately 7°. Using pocket hole screws, attach the strips to form a quick frame

Now clamp the frame to a piece of 1/2″ MDF to make a permanent one-piece template. Use your router like a jigsaw to rough out the shapes with a 1/4″ spiral bit and 3/8″ guide busing
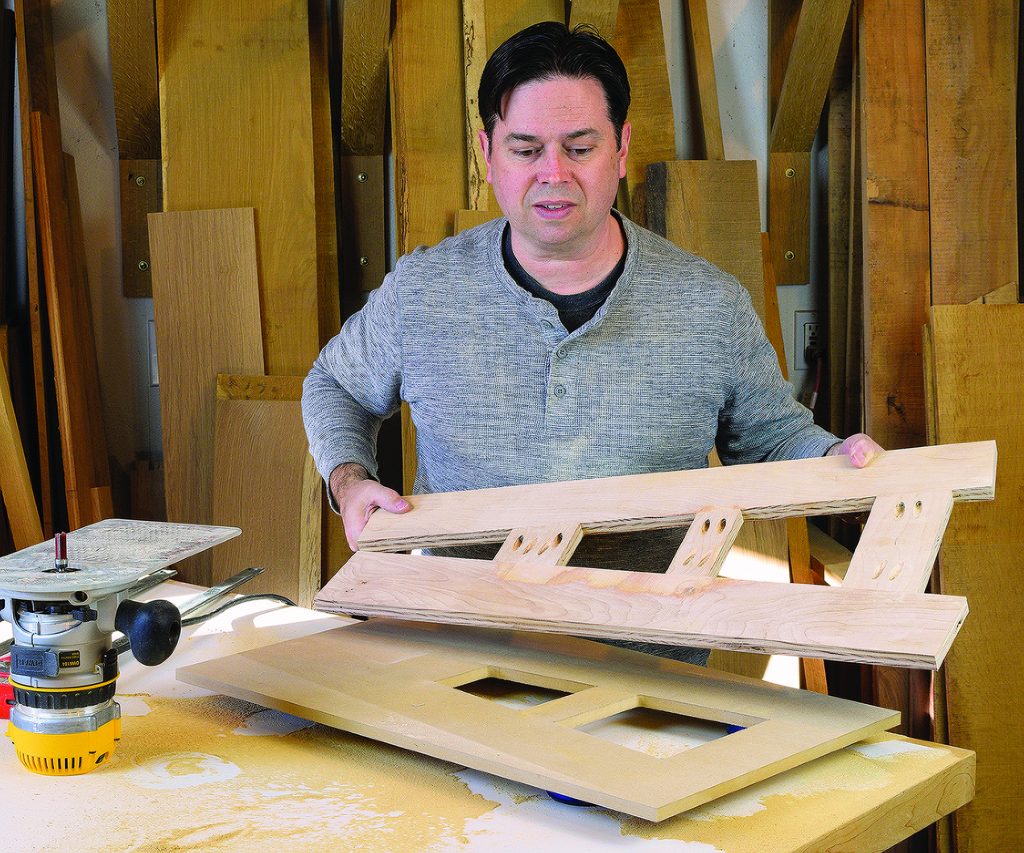
Finish shaping the template with a 1/2″ diameter top-bearing pattern routing bit, before removing the frame
Now—you could use this alone as a routing template, or you can use it to pattern rout a one-piece template of 1/2″ MDF. Either way, you’ll need to remove most of the waste from the trapezoidal cutouts. I have a 1/4″ spiral bit in my shop that I’ve dedicated to just such a task. Paired with a 3/8″ guide bushing, it’s the perfect bit to remove the bulk of the waste.
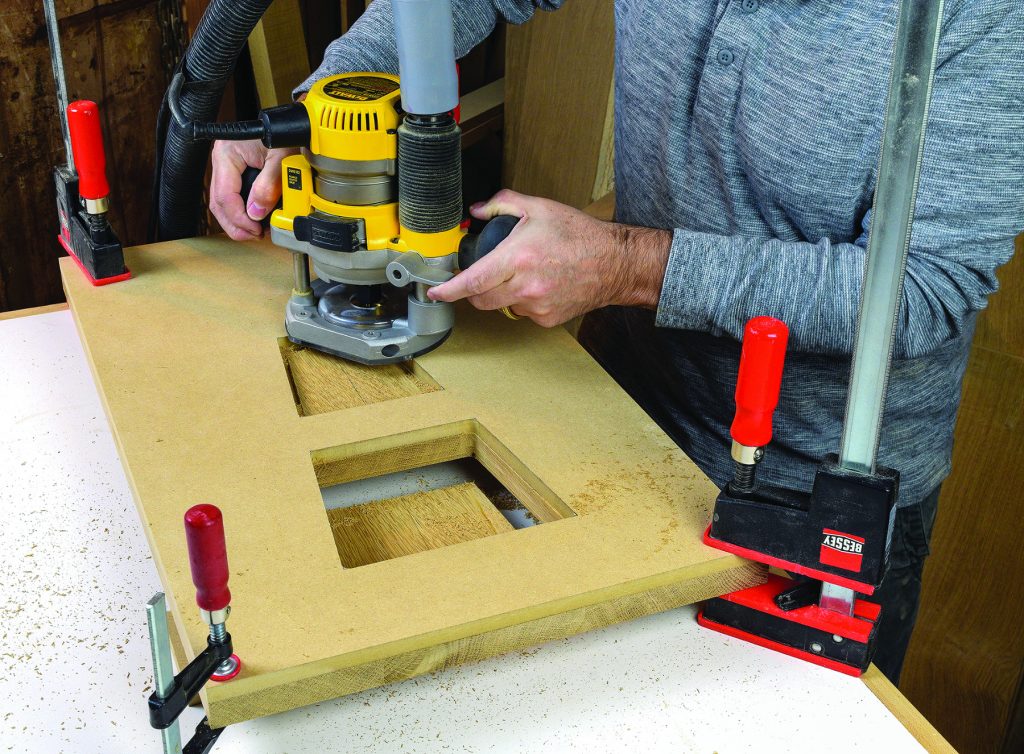
Rough out the shapes with a router equipped with a 3/8″ guide busing and 1/4″ spiral bit
So long as you take your time, and cut in multiple passes, it works quite well. I find it quicker and more accurate than a jigsaw, and now you’re one step away from nice finished cutouts. Switch to a bearing-guided flush trimming bit, and remove the sliver of waste in a single clockwise pass.
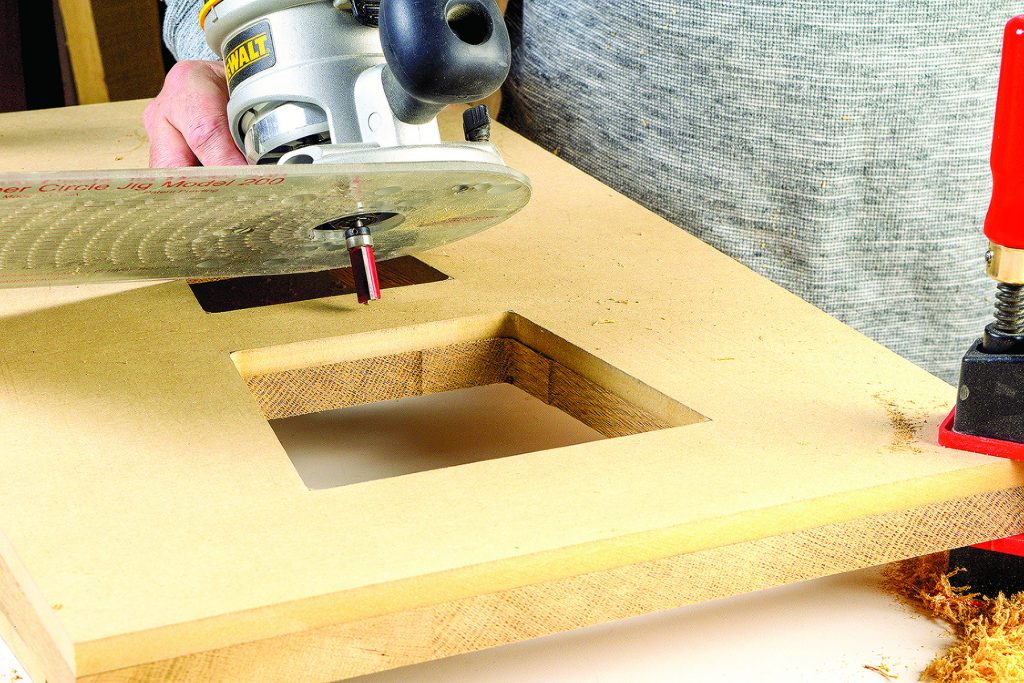
Flush trim the minimal waste that remains
Taper and Spline
The legs are glued to the side panels with splines. But first, the side panels must be tapered at a 5° angle, which lets the legs lean in towards each other. Taper the panels to your layout line with a tapering jig at the tablesaw. Now mill centered grooves in the side panels to accept the spline. The groove should stop about an inch from the bottom of the panel. This 1/4″ deep groove is easily formed at the tablesaw with a 1/4″ wide dado stack. Then reset the rip fence and make a centered groove in the legs as well. This groove should stop 33/8″ from the bottom of the leg.
A tapering jig makes quick work of the angled side panel cuts. The jig is guided by a wooden runner underneath

With a 1/4″ wide dado stack, form stopped grooves in the side panels. A stop block clamped to the outfeed table limits the length of the cut.
With the 1/4″ dado stack still installed on the saw, set the rip fence for a centered cut on the legs. Adjust the stop block and complete a stopped groove in each leg.
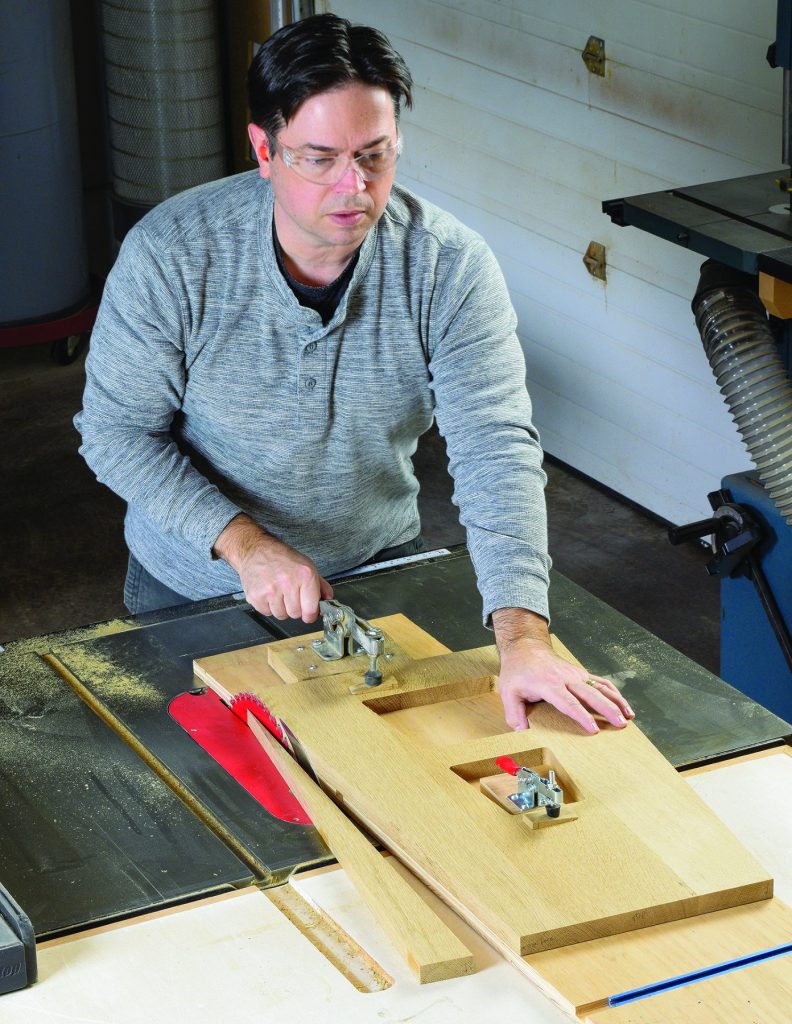
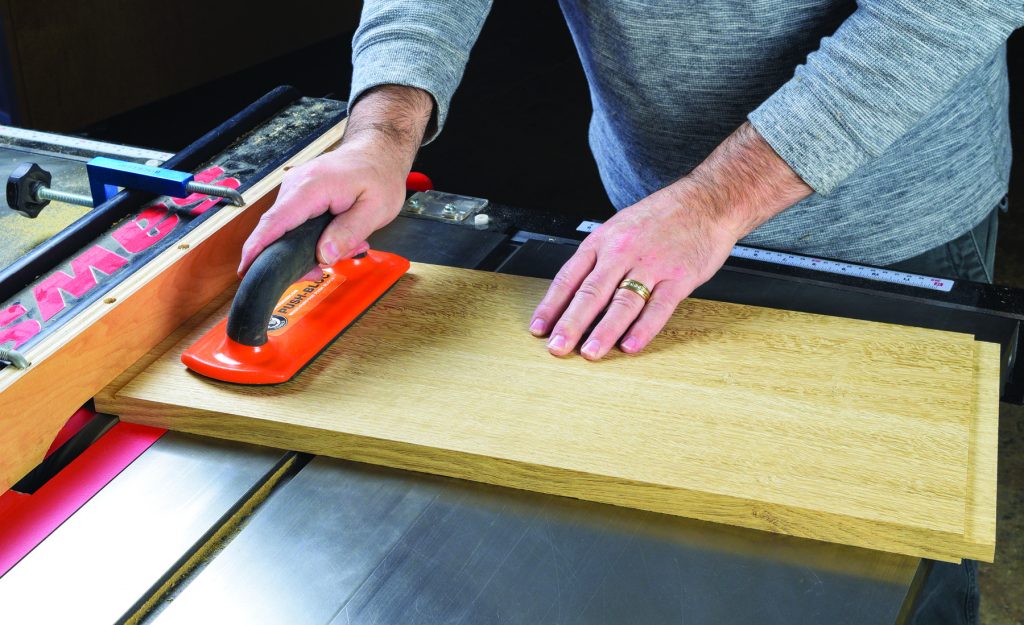
Now angle the tablesaw blade to 5°, and make a bevel cut across the top of each side panel. Once that’s taken care of, you’re ready for the leg subassembly. Mill up some spline stock to fit the grooves and glue each panel to a pair of legs. Use the tapered offcuts as cauls to keep the clamps square. Focus on aligning their top edges as you clamp the parts together.
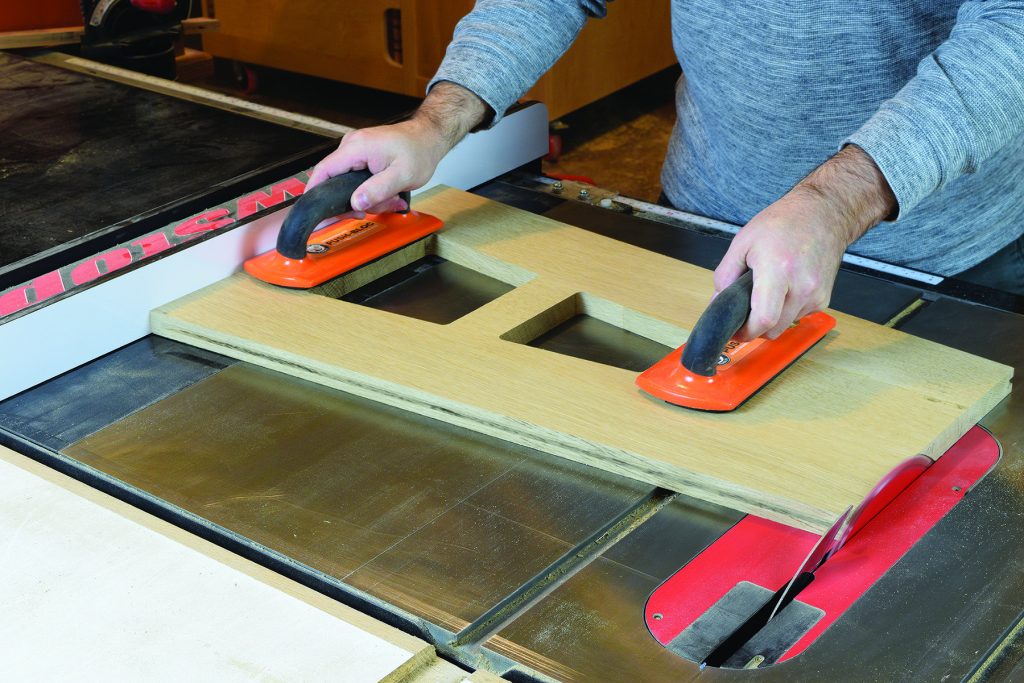
Tilt a combination blade to 5° and bevel the top of the panel. With left tilting saw, orient the “show face” of the workpiece down toward the tablesaw. Use large push pads and firm pressure to complete this light skimming cut. A riving knife is another good safety measure for this operation.
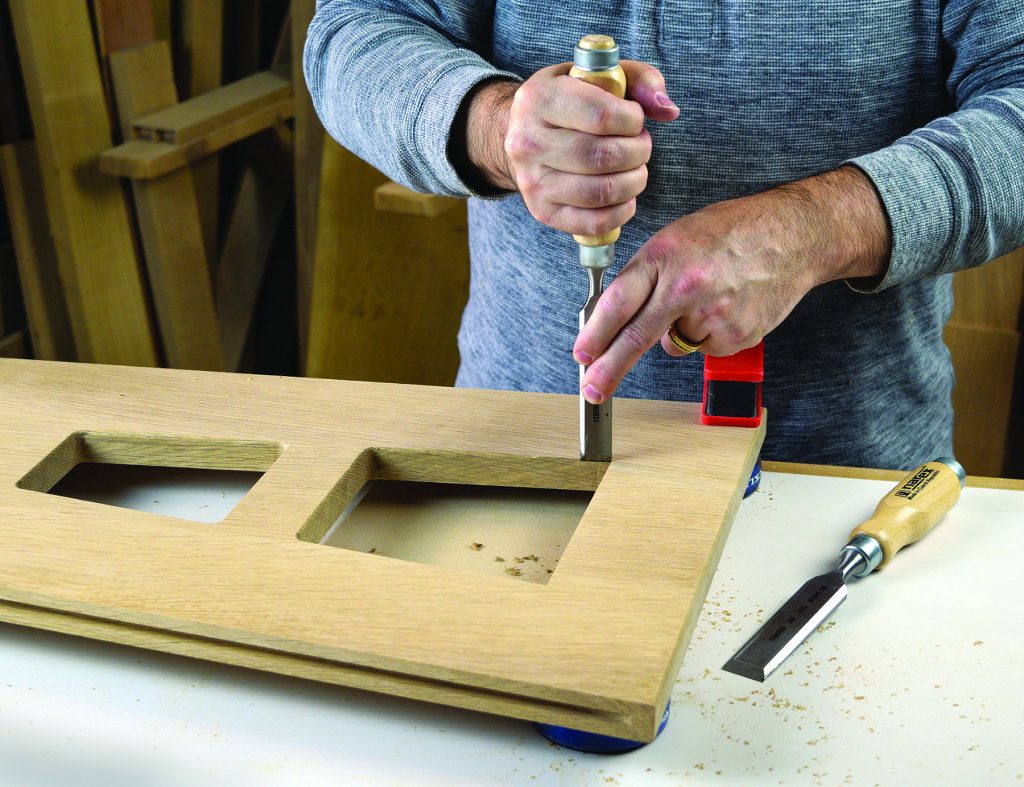
Chisel the corners sharp, but only the lower corners of the larger trapezoid. This will let the lower shelf fit snugly, without visible gaps.
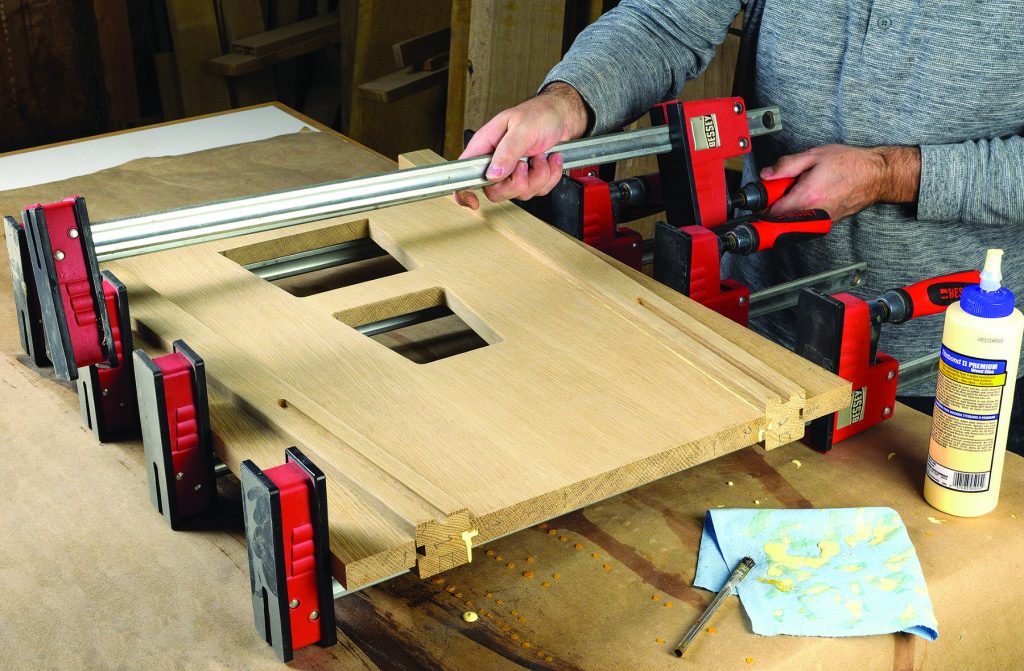
Glue the side assemblies together with 1/4″ thick x 1/2″ wide splines. Use the tapered offcuts as cauls to give the clamps a flat bearing surface as you tighten them home.
Arched Rails
Although the arched rails feature angled sides, the joinery for these parts is actually quite simple. Rip a pair of rails to 95/8″ wide and cut them to a rough length of 241/2″. Then set a miter gauge at the tablesaw to 5°, and angle both end of the rails. Now switch to a full dado stack and cut the tenons. This process is just like cutting traditional square tenons, except you’ll reference the angled end of the rail against the rip fence. Luckily the rail is wide enough to make the cuts safely without a miter gauge. Once the tenon cheeks are established, raise the blade to a height of 1/2″ to remove the waste between the divided tenons. For this operation you’ll use a miter gauge, and reference the end grain of the tenon against the tablesaw. The remaining shoulder cuts can be completed with a dovetail saw.
Angle first, then tenon. After trimming both ends of the arched rail to 5°, raise the tenons with a dado stack
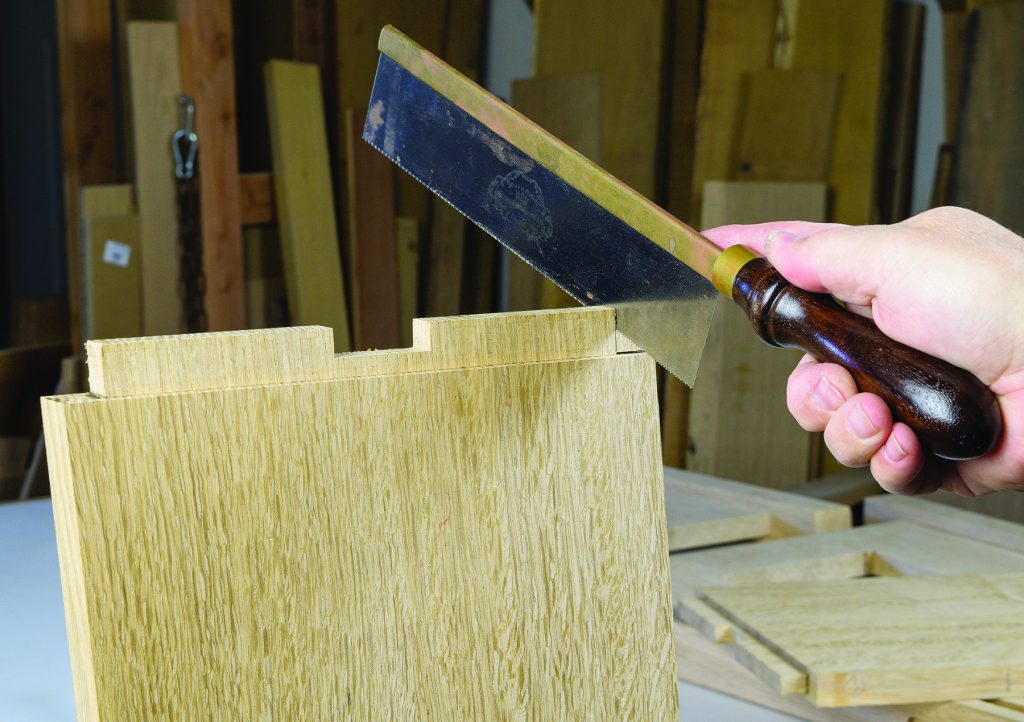
Finally, trim the tenon shoulders with a handsaw.
While the dado blade is still on the saw, take care of the centered notch at the top of each arched rail. Position the rail against the miter gauge and use an angled block to support it at the required 5° angle. The notch is 21/8″ deep and 7/8″ wide. Then switch to a standard tablesaw blade and bevel the top edge of the arched rail to 5°, just as you did with the side panels. If you have a left-tilting saw, orient the “show face” downward as you complete these bevel cuts.

Dado notch for cross rail. Use a scrap block angled to 5° to pitch the arched rail forward toward the blade. Steadily pass the rail over the dado blade with a miter gauge
The final process for the arched rails is to cut the curved shape. Mark the Tudor style curve and cut close to your line at the bandsaw. Refine the shape with a spokeshave and sand it smooth. At this point it’s advisable to test the rails, and check that all the angles come together as they should.
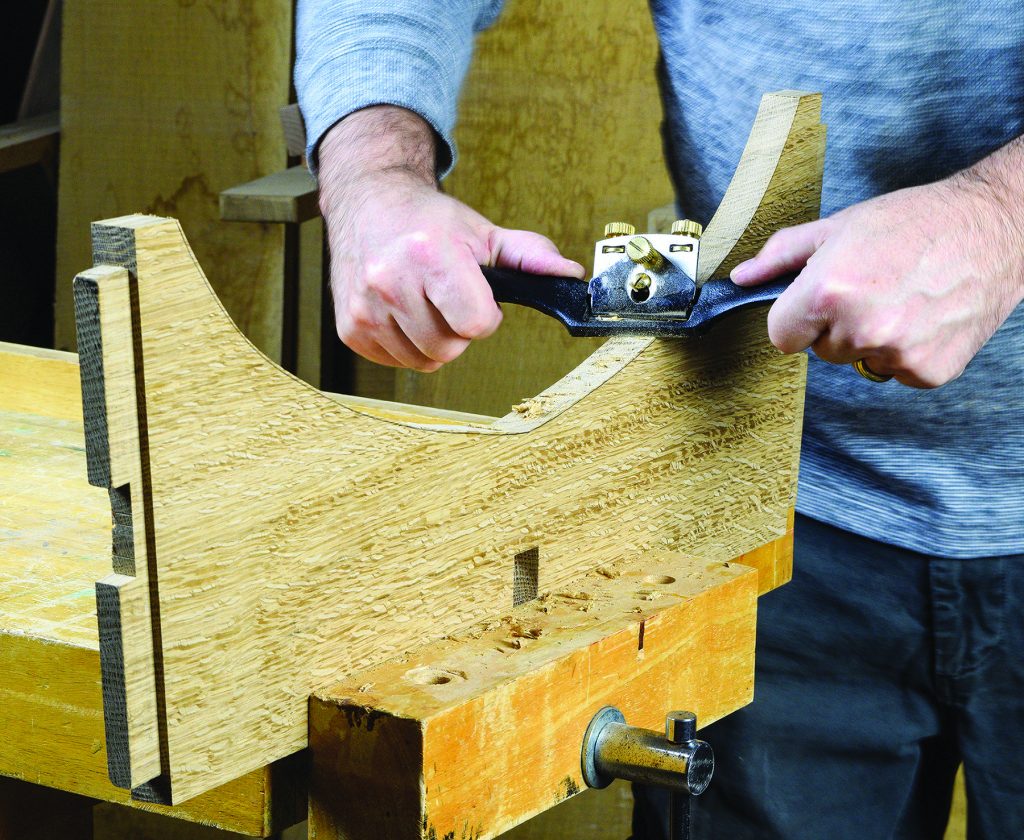
Only after all the joinery for the arched rail is complete—including beveling the top edge—can you mark and trim the Tudor style arch. Cut close to your layout line at the bandsaw, and refine the shape with a spokeshave, file and sandpaper.
Cross Rail and Corbels
It may be tempting to alter the plans to make the notch for the cross rail a true half-lap. My advice is to notch only the arched rail, and not the cross rail. Otherwise you will have an impossible puzzle that only goes together one way and may be difficult to test fit. Make up the cross rail component and cut it to shape. Drop the cross rail into position and stand back to admire your handiwork. It’s this stage of the project that you see indelible progress as the table starts to take shape.
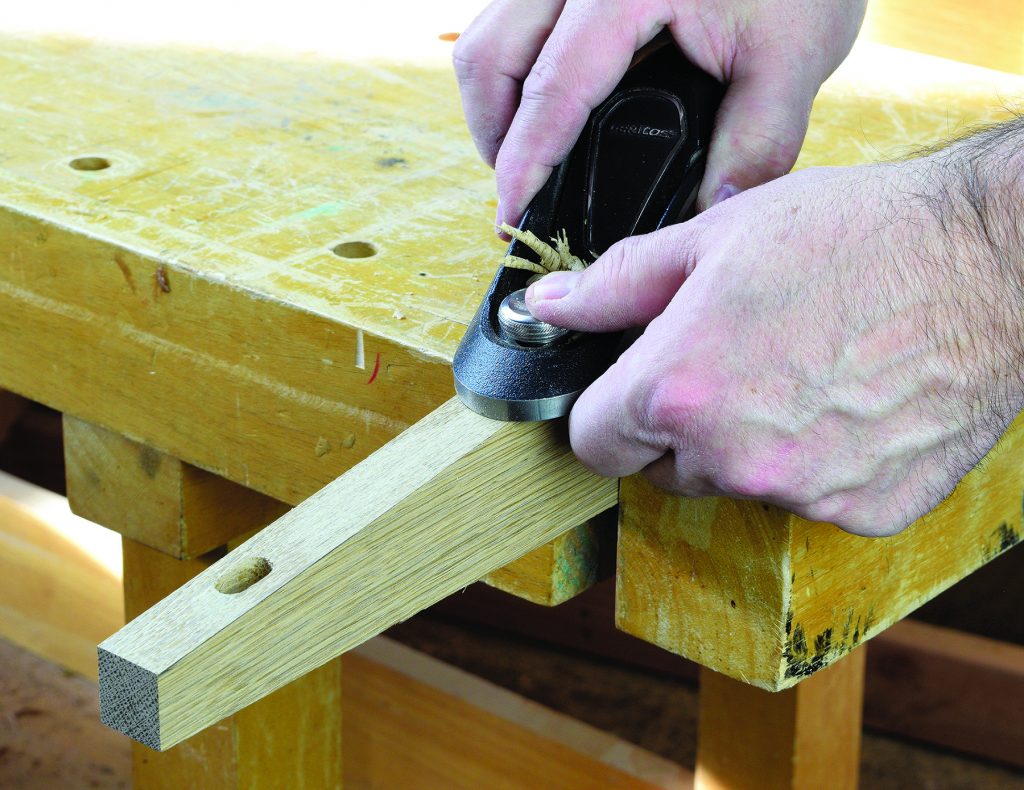
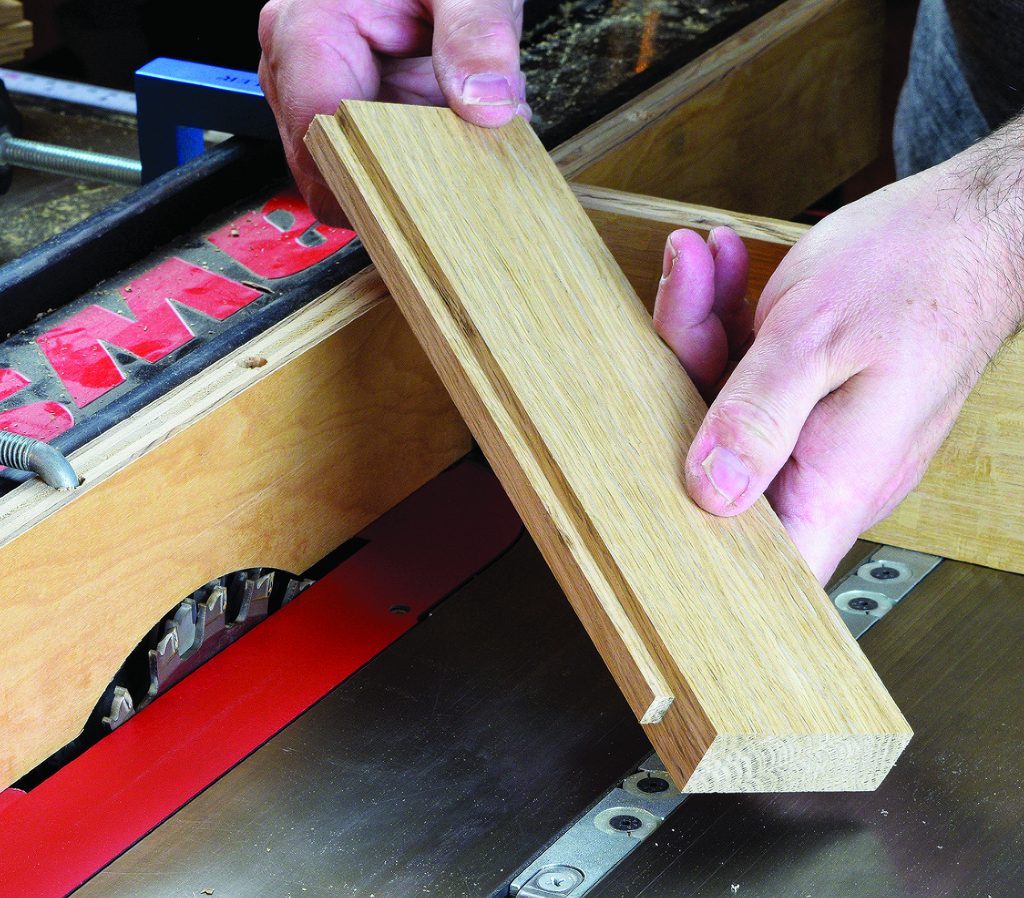
Angle the cross rail leaving the end profile 7/8″ square. Plane the angle smooth, and form elongated holes for mounting the top
Make the eight corbels, and form stub tenons to match the grooves in the legs. The corbels need to be trimmed at a compound angle to meet the underside of the tabletop. The lower end of the corbels are trimmed in a similar manner. Tilt the tablesaw blade to 5° and angle the miter gauge to 5° as well. Trim four corbels with the miter gauge angled to the left, and the remaining four corbels with the miter gauge angled to the right. Use a stop block on an auxiliary fence for corbels of uniform length.
Corbel blanks. Raise stub tenons on the corbels, sized to fit the groove. Then form compound angles at the top and bottom.

With the blade tilted 5°, angle the miter gauge 5°. Just like the legs “cut, slide, cut” is our mantra for the compound angles
Lower Shelf
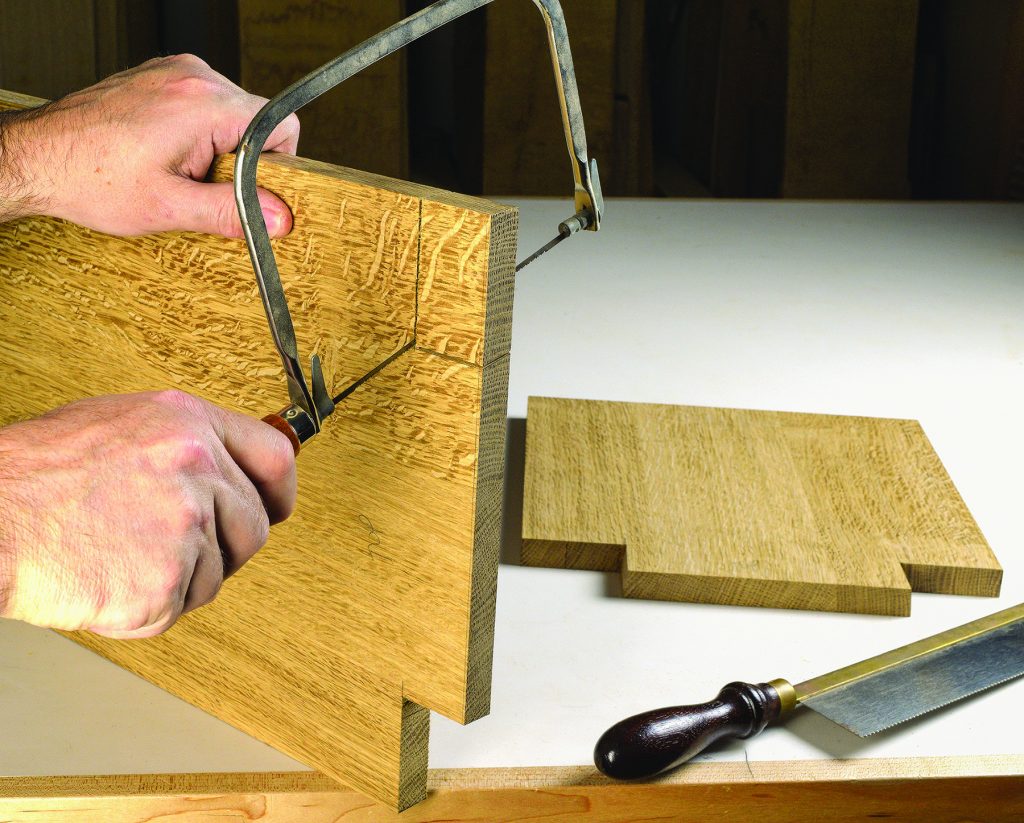
The shelf juts out the through the lower trapezoid, giving the impression of a through tenon. To successfully mate the parts, the projection on the shelf is cut at a 7° angle. The shoulders of the shelf are cut at a 5° angle to fully seat against the side panels. The angled notch is readily handled at the bandsaw by tilting the table left or right. Start by measuring between the side panels of the dry assembled table. The inside-to-inside measurement at the bottom of the lower trapezoid is the shelf. A few swipes with a coping saw are required to complete the bandsawn notch. Finally, drill four pocket holes on the underside of the shelf.
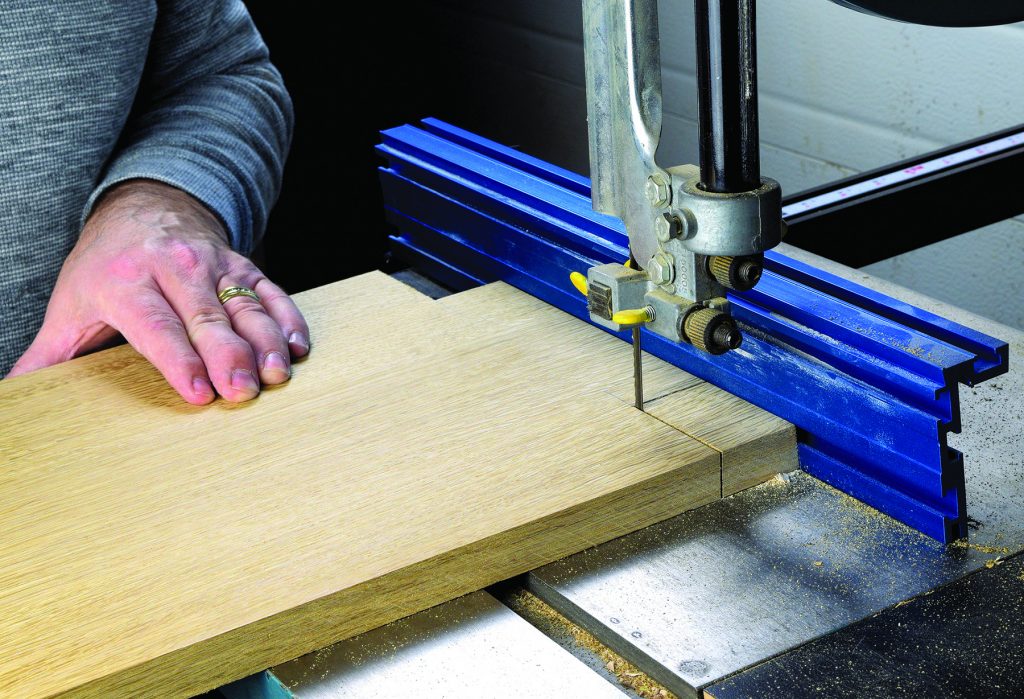
Angle the bandsaw 5° upward to complete the first two shoulder cuts. Then reset the table to 5° downward and complete two more shoulder cuts.
The Elusive Ellipse
Sand the parts you’ve made and glue the table together. As that dries, revisit the tabletop panel, and setup a router and jig to cut the ellipse. While there are commercial jigs available, I wasn’t able to find one that could cut the 45″ x 30″ size required. Instead, I built a simple jig that could handle the large difference between the major radius and minor radius. (See page 56 for detailed instructions on making your own ellipse-cutting jig.)
Using a plunge router and 1/4″ spiral upcut bit, cut the tabletop to shape in several passes. Then make a micro adjustment for a slightly smaller ellipse. You’re looking for a small change here—just enough to clean up the bit marks from the initial passes. Sand the top and ease the edges with a roundover bit, and you’re on the home stretch.
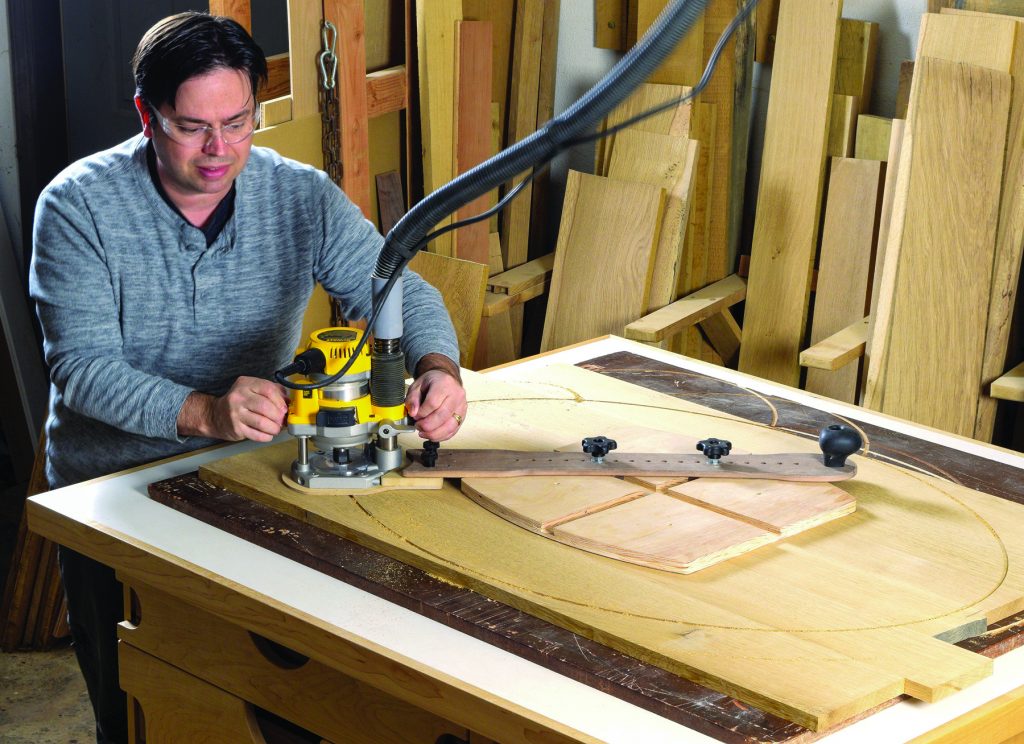
Cut out the elliptical-shaped top in multiple counterclockwise passes. Reset the jig for a slightly smaller ellipse and complete a full-depth trimming pass to clean up the router bit marks.
Final Details
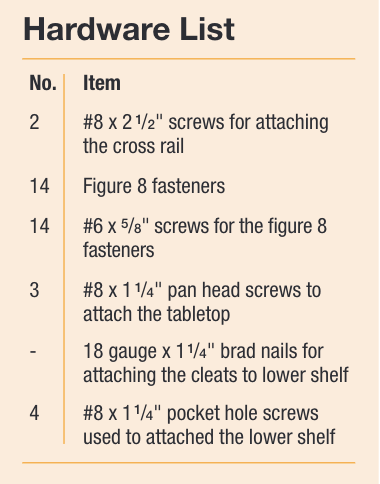
Glue the corbels in place, making sure each one sits flush with the top of the leg. Counterbore holes in the underside of the cross rail to serve as screw holes for mounting the top. The outer holes will need to be elongated to allow wood movement. Secure the cross rail to the arched rails with 21/2″ long x #8 screws, driven in from the top. The world is your oyster when it comes to finishing, but I kept it simple with this project. An oil-based stain in a warm brown tone supplied the color, while two coats of lacquer will keep it protected for years to come. Wet sand the final coat with a 1500 grit soft sanding sponge and soapy water, for that velvety smooth finish. Add a few of your favorite collectibles, and this unique treasure is ready for display.
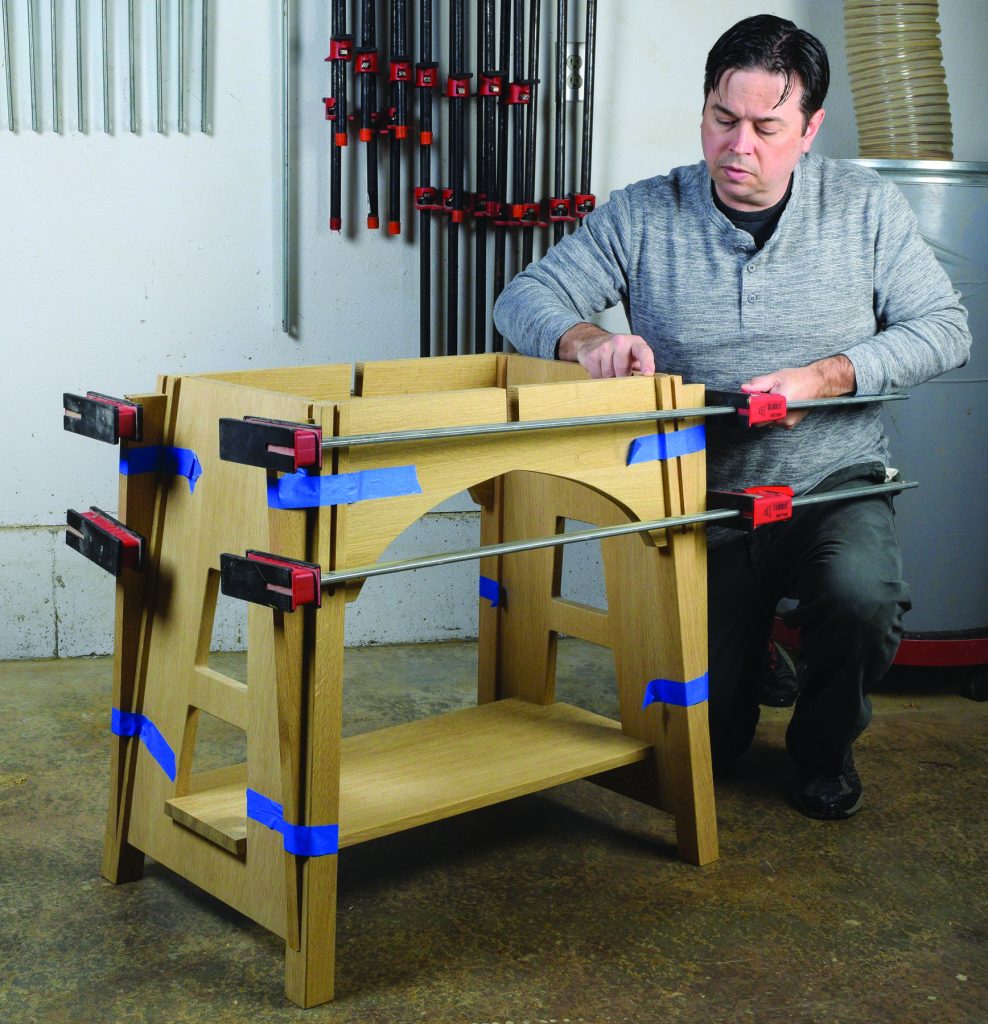
When gluing the table frame together, loosely insert the shelf (without glue), and focus on aligning the arched rails with the top of the legs as you tighten the clamps. The lower shelf will be attached in a separate step. Painter’s tape holds the long angled cauls in place
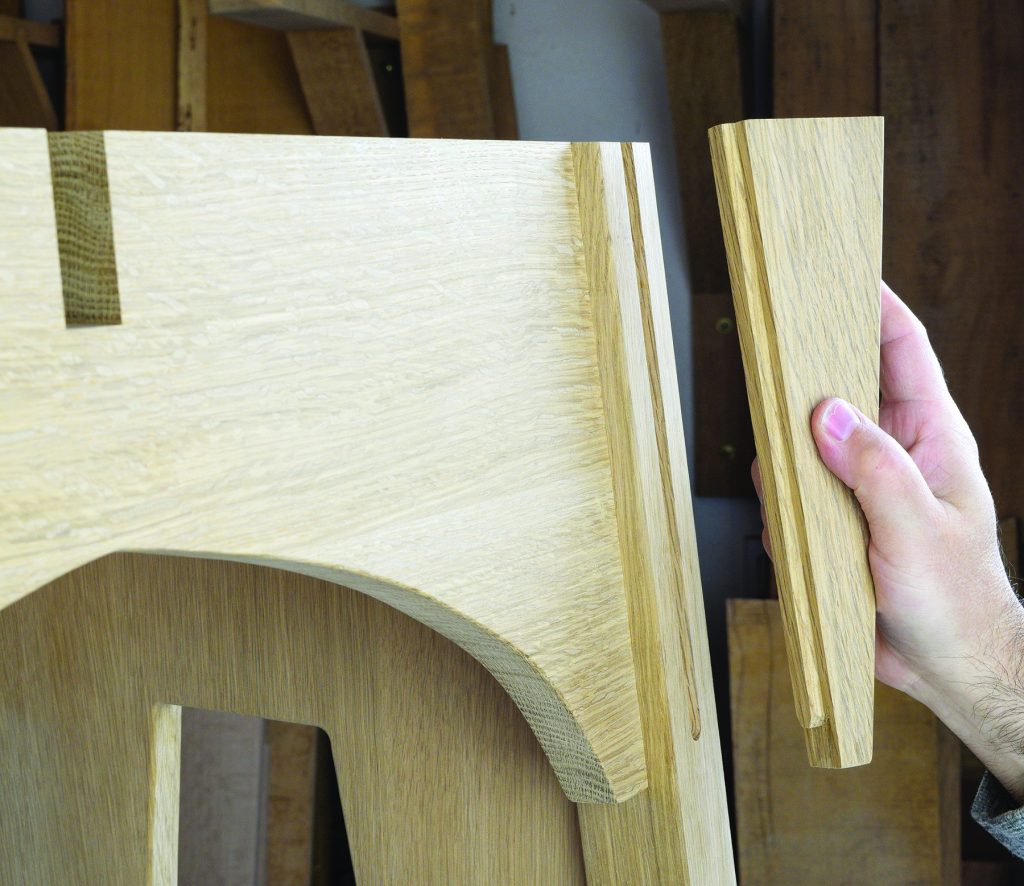
Glue two corbels to each leg, making sure the parts are flush at the top
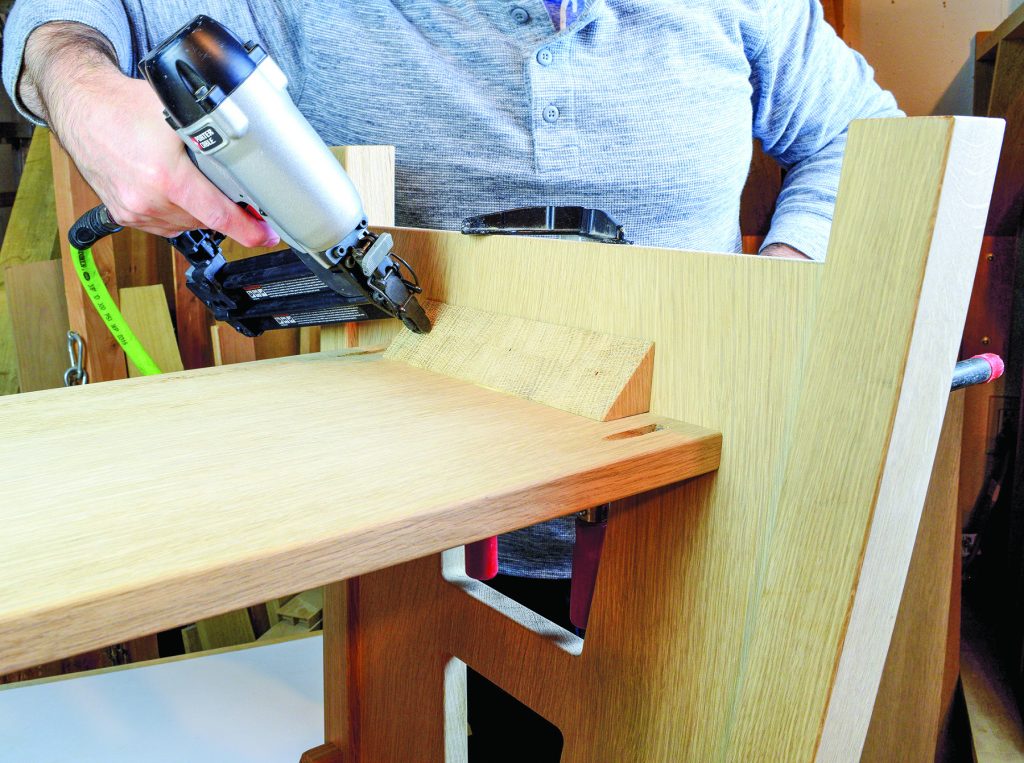
Just like the original, the lower shelf is attached with four pocket hole screws and a pair of glue blocks. Angle the blocks to fit, and glue them in place with 18 gauge brad nails. Note the blocks are cut from an end grain lamination, to avoid a wide cross-grain glue joint.
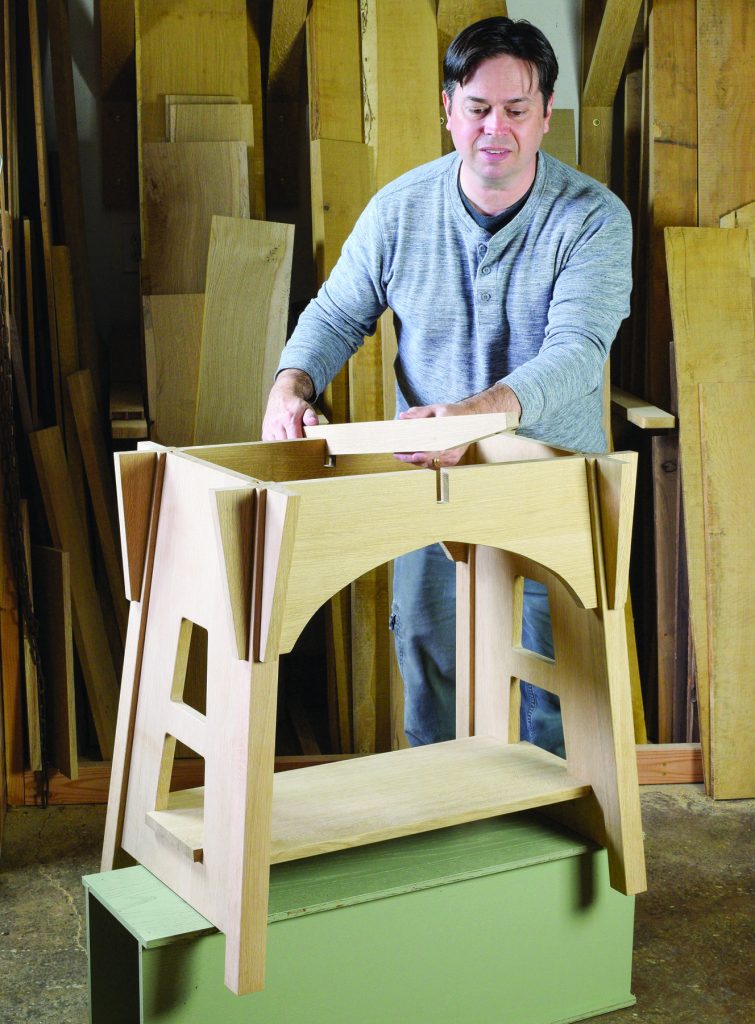
Insert the cross rail into the notches and secure it with a pair of screws. Check for a gap-free intersection between the cross rail and arched rails
Here are some supplies and tools we find essential in our everyday work around the shop. We may receive a commission from sales referred by our links; however, we have carefully selected these products for their usefulness and quality.