We may receive a commission when you use our affiliate links. However, this does not impact our recommendations.
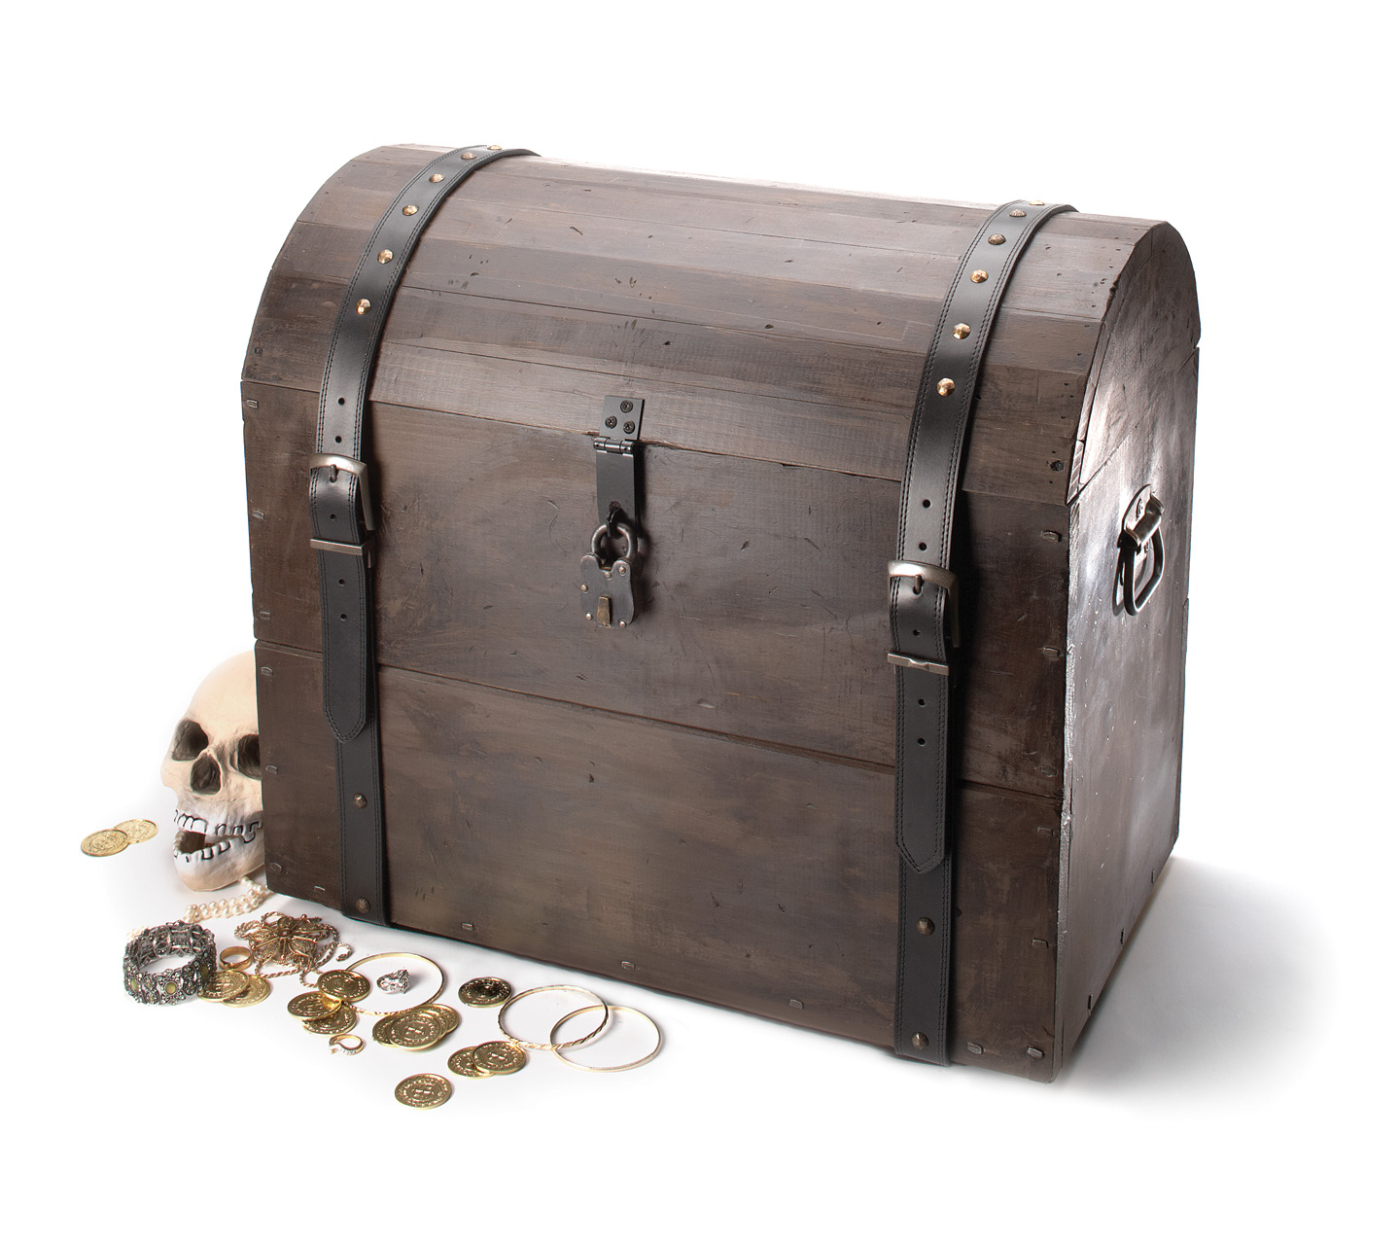
Curve appeal. This “pirate chest” is really just a simple box. What gives it appeal is the curved top, which is constructed from 12 slats that are shaped with a block plane. (The belts help, too.)
Masonry nails and two XXL leather belts impart the ‘arghh!’ in this build.
Don’t let the curved top of this “pirate chest” scare you. It’s a lot less tricky than it may appear – and it’s excellent practice with your block plane.
Click here for the SketchUp model of this project.
For this build, you’ll have to venture a bit beyond the home center – but stop there to pick up a 6′ 1×12, two 8′ 1x8s and 21′ of 1-1/2″ x 1 slats (though if you have a table saw or band saw with which to rip the slats, that will be more economical). Also get 40 or so upholstery nails, a box of at least 40 6d masonry nails, a hasp, two 4″ gate hinges and two handles. Go for the cheap zinc-coated hardware; I’ll give you a few options for aging it. Now, you need to visit a “big and tall” clothing department for some 50″ (or better, 60″) leather belts. At 50″ (the largest available where I shopped), I had to cut the belts and nail them at the front and back edge of the bottom. Just 10 additional inches would have meant no cuts – the belts would have wrapped all the way around (and saved a little time and trouble).
Build the Box First
To make things simple, I used the full width of my stock lumber for the front, back and sides. So I set up a stop at the miter saw and cut the four front and back pieces from the 1x8s to 22″ long. Then, I cut the two sides to 14″ long – but, because dimensional lumber can vary slightly in width, you should butt the two front pieces (or the two back pieces) against one another, and cut the length of your side pieces to match that measurement.
In other words, it’s always risky to rely on the cutlist or drawing for exact dimensions; yours could end being slightly different in any build. Always generate measurements from the actual parts when possible.
Both the front and back have chamfers on the long edges where the two pieces meet in the middle, which serve two purposes: They create a shadow line for a more pleasing aesthetic, and they hide the fact that the two pieces don’t form a perfect joint (an impossibility with two home center edges). I simply eyeballed the chamfers using a block plane held at a 45° (or so) angle for each piece, and continued planing until I was content with the chamfer depth. If eyeballing it isn’t your style, measure and mark a line across both the face and edge at 1⁄8″ and plane down to your lines.

No wedgies. When using masonry nails (or period cut nails) it’s important to align the wedge-shaped nail so that the wide part is going with the grain in the top piece of wood. If you align it across the grain, you’ll likely wedge the grain right open and cause a split.
Now clamp the front and back pieces in place to the sides, then decide on your nail layout (I used on three nails on each plank end: one 3⁄4″ from each edge and one in the middle) and drill 1⁄8″ pilot holes – which seems big, but it isn’t. In fact, the wood may still split when you sink the nail – especially if you aren’t careful to line it the wide part of the nail in line with the grain. (If you get a split, don’t panic. Just pull the nail out and drill a bigger pilot hole.) Masonry nails, like period cut nails, are actually wedges, so if you align them incorrectly, you’re basically wedging the wood apart – especially in this case, when you’re nailing so close to the end.
With the case assembled, cut the bottom to length just a hair undersized at the miter saw, then take a few strokes along a long edge with your block plane. The piece should be a tight fit in the bottom of the case. I knocked it in with a rubber mallet, then put everything on the floor to push the bottom piece firmly in place. Measure, mark and drill pilot holes. I used five nails across the front and back, and three on either side. Locate the side nails in far enough that you won’t hit the ones coming in from the front and back.
Do you really need such big nails to hold this small box together? Of course not. And do you really need to use so many of them? Again, no. But the large heads and interesting shape add to the overall look of the chest. It’s all about the aesthetics.
Make a Curved Top
First, use a compass to mark the two side pieces for the top with a 5-15⁄16″ radius – or just use a 5-gallon bucket to trace the curve. Either way, the apex of the curve is 4″ from the bottom center of the pieces.
Before you start attaching the slats to your top end pieces, you’ll first have to plane an angle on at least one long edge of each slat (and on both edges as you round the top). What angle? Well, I eyeballed it. I held my first slat in position at the bottom front edge, and marked an angle on the end that looked as if, once the waste was removed, it would allow the slat edge to sit flat to the top edge of the case. Then, I marked the cut along the edges of the slat, clamped it into position, and used a block plane to plane down to my lines.

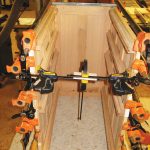
Rounding the top. In the story, you discover two ways to fit the slats for this curved top. No matter which approach you choose, you’ll need to plane angles on the slat edges with your block plane to get the pieces to fit.
I temporarily secured the slat in position to the top end pieces with one 2d finish nail at each end, then fit the next slat in the same manner, marking the angle on the edge facing the previous slat while leaving the top edge at 90°, until I came to the two center top pieces. Those must be planed along both long edges. Then, I worked down the other side, with the angle planed on the side facing the back edge of the chest. (Or, you can mark and plane angles on both edges of each piece for a tighter fit, as shown in the drawing.)
Once all the slats are fit and temporarily tacked in place, drill pilot holes for 4d finish nails, mark the order in which each slat is attached to the ends, then pull the slats off. Now apply glue to each long edge as you reattach the slats in order using 4d finish nails. Use a nail set to set each nail well below the wood’s surface (and using an oversized nail set will help you jump-start the “aging” process, by making a bigger indentation, giving the top the appearance of long use and abuse).


Once the glue dries, use your block plane to smooth the arris where each slat meets (double-check first that all your 4d nails are below the surface; if they’re not, you’ll nick your plane blade).
I painted my piece dark brown, then beat the heck out of it using a bunch of keys and a hammer. This process exposed raw wood in the “wounds,” but I added a topcoat of dark Briwax paste wax to simulate years of dirt, working it in well to the newly exposed wood.
To age your hardware, you have a few options. You can soak everything in vinegar to remove the bright coating, or simply paint it black. Or, grab a propane torch and burn the finish off (make sure you do this in a well-ventilated area, and have a bucket of water on hand for quenching).
Attach the hardware, then wrap the belts around the chest, buckle them, drive in a bunch of upholstery nails to effect a studded look (I used them every 11⁄2″ across the top, and every 2″ on the front and back). If your belt is less than 60″ long, you’ll have to cut it and attach it at the top and bottom edge – I suggest long staples for this, covered with a upholstery nail.
Now load your chest with booty and start talking like a pirate.
Here are some supplies and tools we find essential in our everyday work around the shop. We may receive a commission from sales referred by our links; however, we have carefully selected these products for their usefulness and quality.