We may receive a commission when you use our affiliate links. However, this does not impact our recommendations.
Display all your skills building an exquisite project.
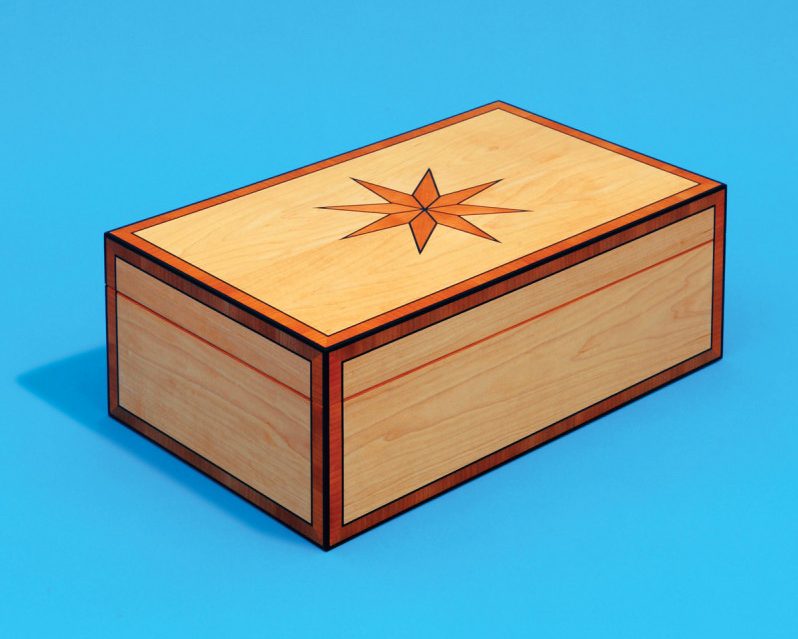
Building a small box can challenge your skills just as much as making a huge cabinet. This box, made from maple, cherry and ebony, will take your craftsmanship to a new level. You’ll learn an advanced dovetailing technique, make your own inlay, and embellish a piece with crossbanding and stringing.
 That’s a lot of work to invest in a small project, but I feel that a jewelry box should be just as elegant as its contents. I made this box as a present for my daughter, Jessica, on her 21st birthday. As a family heirloom, it will probably outlast the cabinets I’ve made!
Jessica’s Jewelry Box Cut List
Overall Dimensions: 5-1/2″ H x 14″ W x 8-5/8″ D
|
Section |
Part |
Name |
Qty. |
Material |
Th x W x L |
|
Box |
|||||
|
A |
Side |
2 |
Maple |
1/2″ x 5-3/8″ x 14″ |
|
|
B |
End |
2 |
Maple |
1/2″ x 5-3/8″ x 8-5/8″ |
|
|
C |
Top |
1 |
Maple |
1/4″ x 8-5/8″ x 14″ (a) |
|
|
D |
Bottom |
1 |
Maple |
1/4″ x 8-5/8″ x 14″ (a) |
|
|
E |
Side lining |
2 |
Maple |
1/4″ x 4″ X 13″ |
|
|
F |
End lining |
2 |
Maple |
1/4″ x 4″ x 7-5/8″ |
|
|
G |
Crossbanding |
Cherry |
1/16″ thick (b) |
||
|
H |
Long edging |
4 |
Cherry |
1/16″ x 1/2″ x 14″ |
|
|
J |
Short edging |
4 |
Cherry |
1/16″ x 1/2′ x 8-5/8″ |
|
|
K |
Star inlay |
8 |
Cherry |
1/16″ x 1″ x 3″ |
|
|
L |
Wide stringing |
Ebony |
1/8″ x 1/8″ x 13′ |
||
|
M |
Narrow stringing |
Ebony |
1/16″ x 1/16″ x 26′ |
||
|
Tray |
|||||
|
N |
Side |
2 |
Maple |
1/4″ x 2″ x 12-3/4″ |
|
|
P |
End |
2 |
Maple |
1/4″ x 2″ x 7-3/8″ |
|
|
Q |
Bottom |
1 |
Maple |
1/8″ x 7-1/8″ x 12-1/2″ |
|
|
R |
Center divider |
1 |
Maple |
1/4″ x 2-3/8″ x 12-5/8″ |
|
|
S |
Divider |
4 |
Maple |
1/4″ x 1-11/16″ x 3-1/2″ |
Notes:
a) Make from 2 bookmatched pieces.
b) Crossbanding pieces are 1/2″ long, measured in the direction of the grain. Make enough for about 16 feet in total width.
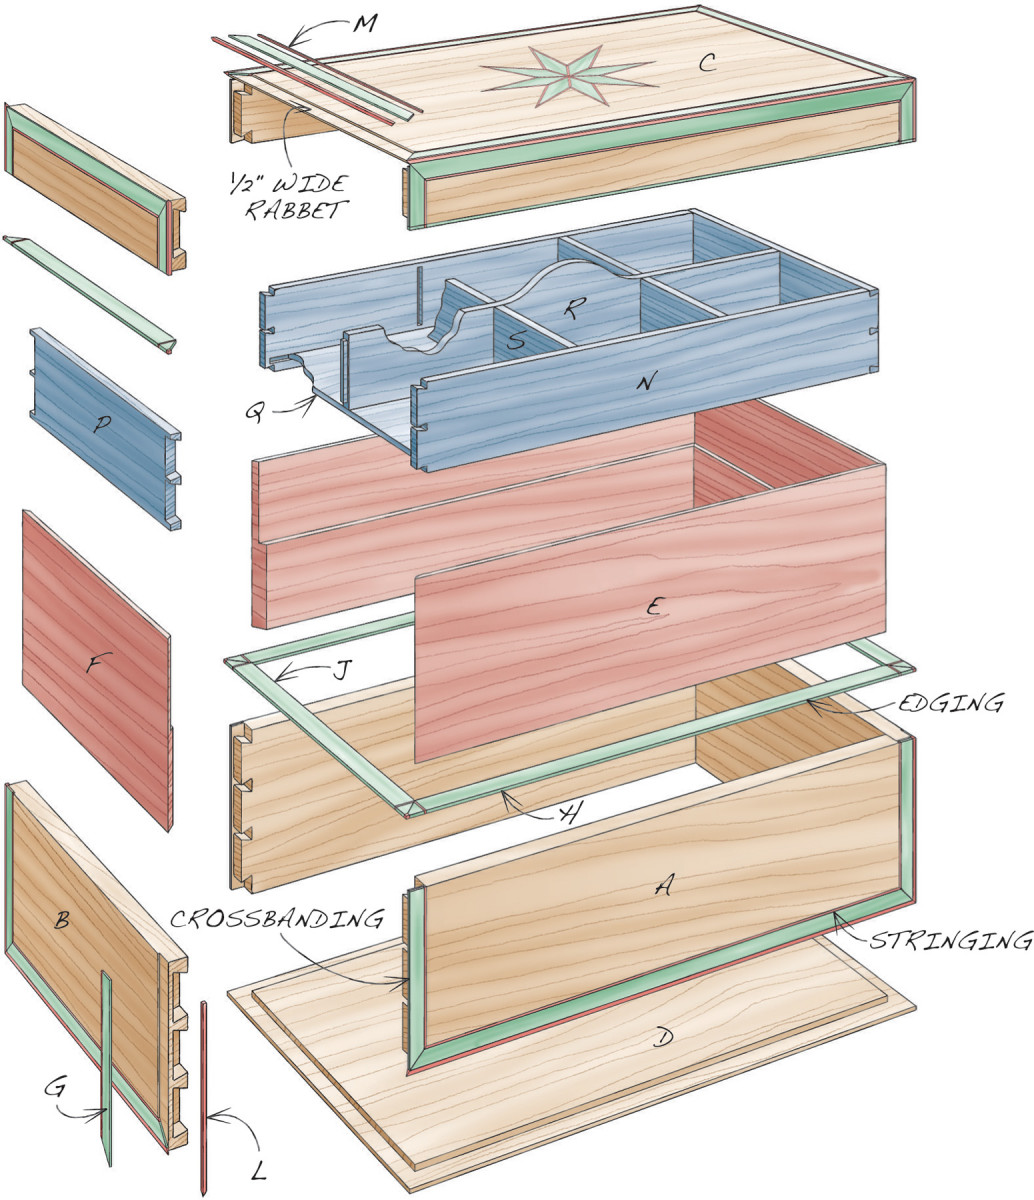
Fig. A) Exploded View
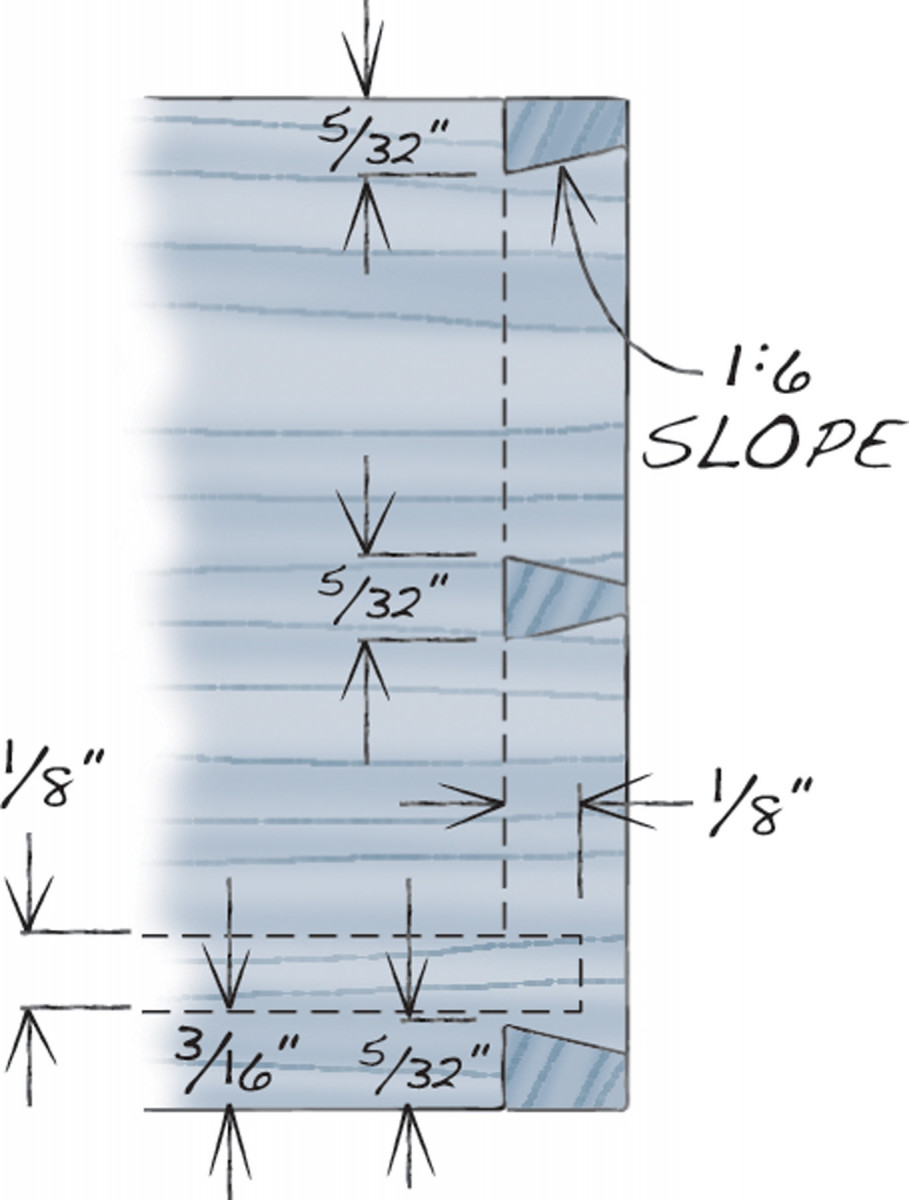
Fig. B) Tray Dovetails
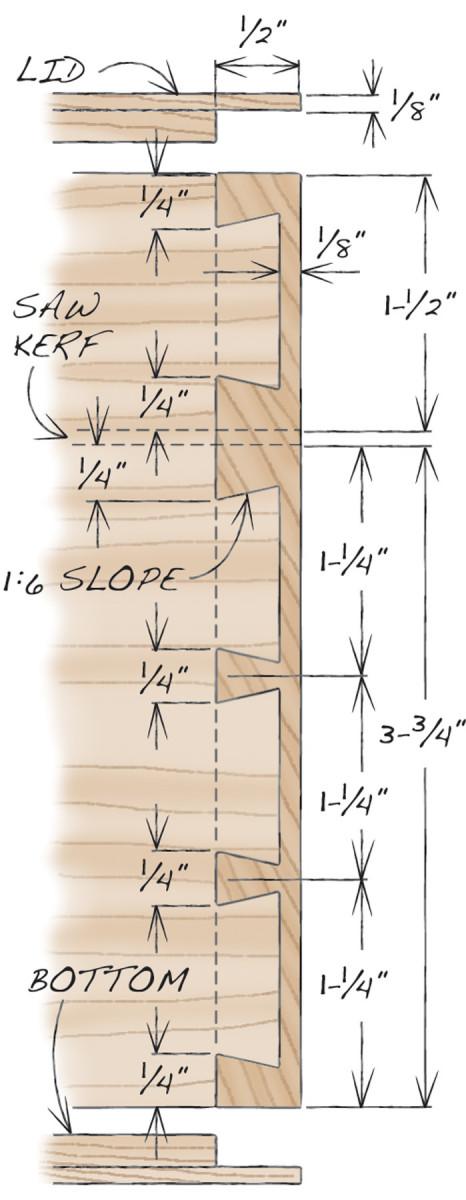
Fig. C) Lid and Base Dovetails
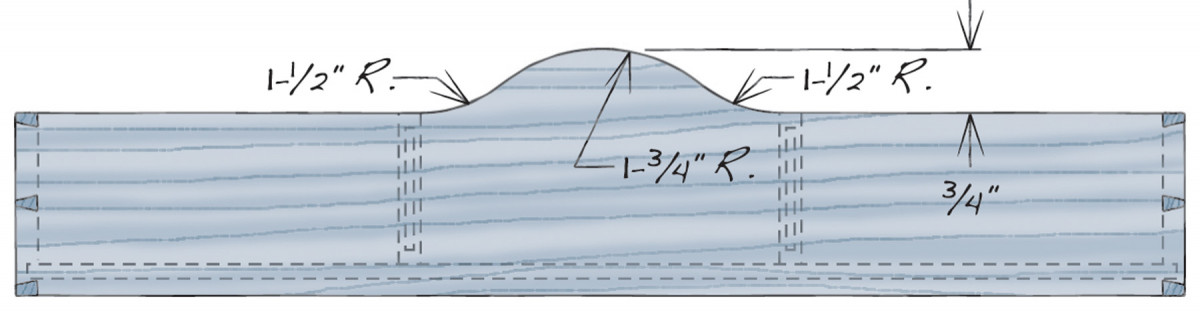
Fig. D) Tray Cross Section

Fig. E) Star Inlay
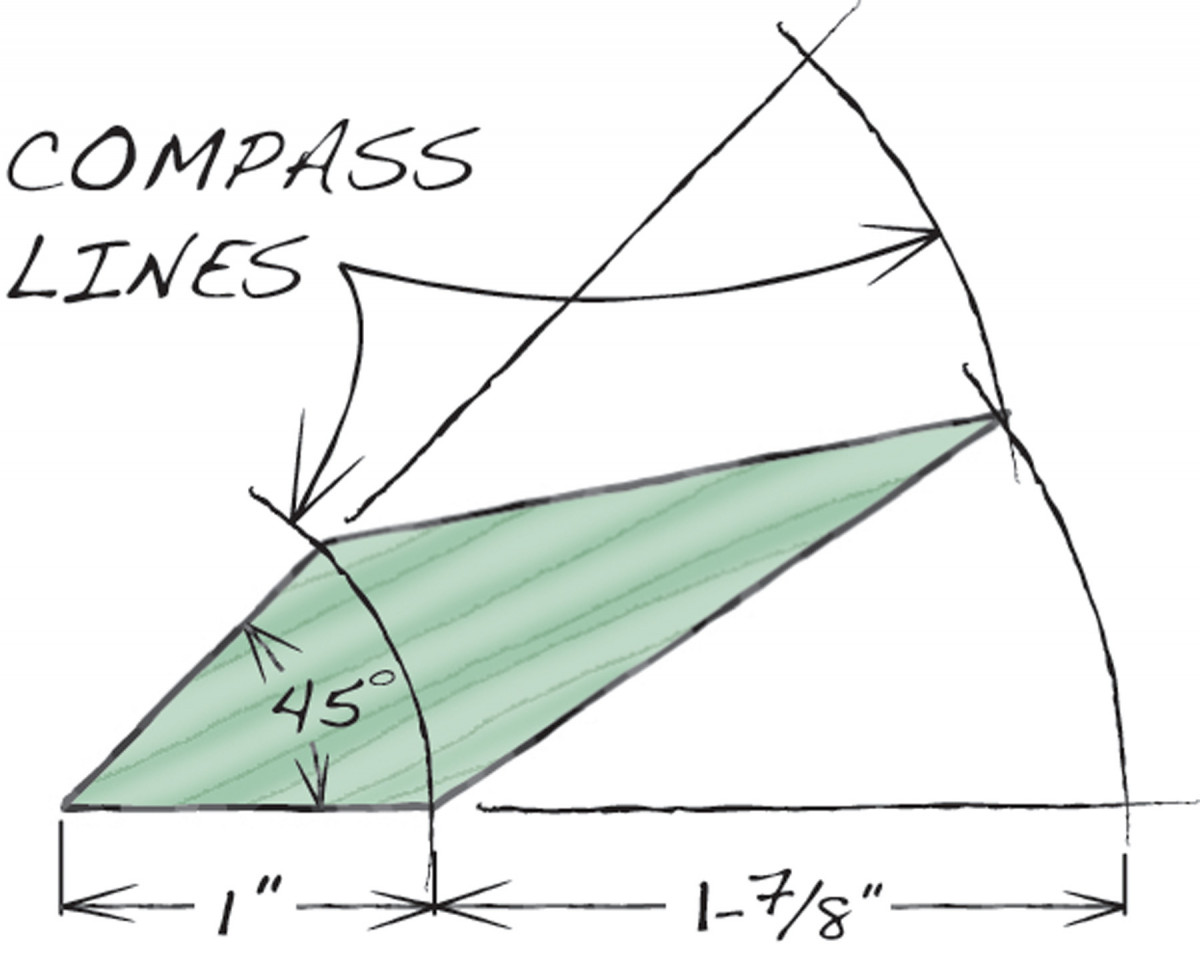
Fig. F) Star Inlay Pattern
Notes on construction
I use an old trick: First, I glue up a hollow box, with sides, ends, top and bottom. Then I cut all the way around the box, creating a lid that’s separate from the base. Following this technique, the figure of the lid automatically matches the figure of the base, and the lid and base are exactly the same length and width.
The sides, ends, top and bottom of this box are all made from solid wood. The top and the bottom are glued all the way around the lid and base. I live in the U.K., where wood’s moisture content doesn’t change much from season to season, so this method of construction is acceptable. However, if you live in a place where indoor humidity swings widely from summer to winter, solid wood may be a risky choice. The top and bottom could crack if they are sufficiently restrained by the glue from expanding and contracting. Consider making these parts from plywood instead. You could make your own, using a subtly figured maple veneer, if you wish.
This box is embellished with ebony stringing and 1/16″ thick cherry crossbanding, edging and inlay (Fig. A). I purchased the stringing (see Sources, page 42) and cut all of the 1/16” thick cherry pieces from solid wood. Alternatively, you could buy 1/16″ thick cherry veneer (see Sources).
I made this box with an unusual kind of joint: double lap dovetails. While there are many ways to join a box, I believe dovetails are the best choice; they’ll never come apart. However, through or half-blind dovetails wouldn’t be appropriate for this design. Over time, they’d show under the crossbanding covering the box’s corners (see The Telegraphing Effect, below). Double lap dovetails avoid this problem.
Double lap dovetails require skill to make by hand. If you haven’t had much experience cutting dovetails, I recommend that you master half-blind dovetails first. They’re easier to make than double lap dovetails, but both use similar techniques.
It’s possible to make double laps with a router and a dovetail jig, providing the jig can handle thin material. Basically, you’d make the sides of the box from 3/8″ thick pieces and the sides from 1/2″ thick pieces. You’d rout standard half-blind joints, then glue 1/8″ thick faces onto the side pieces.
As a completely different alternative, you could miter the box’s corners and reinforce the joints with cross-grain spline. If you were to make the box from plywood, this would be the best joint to use.
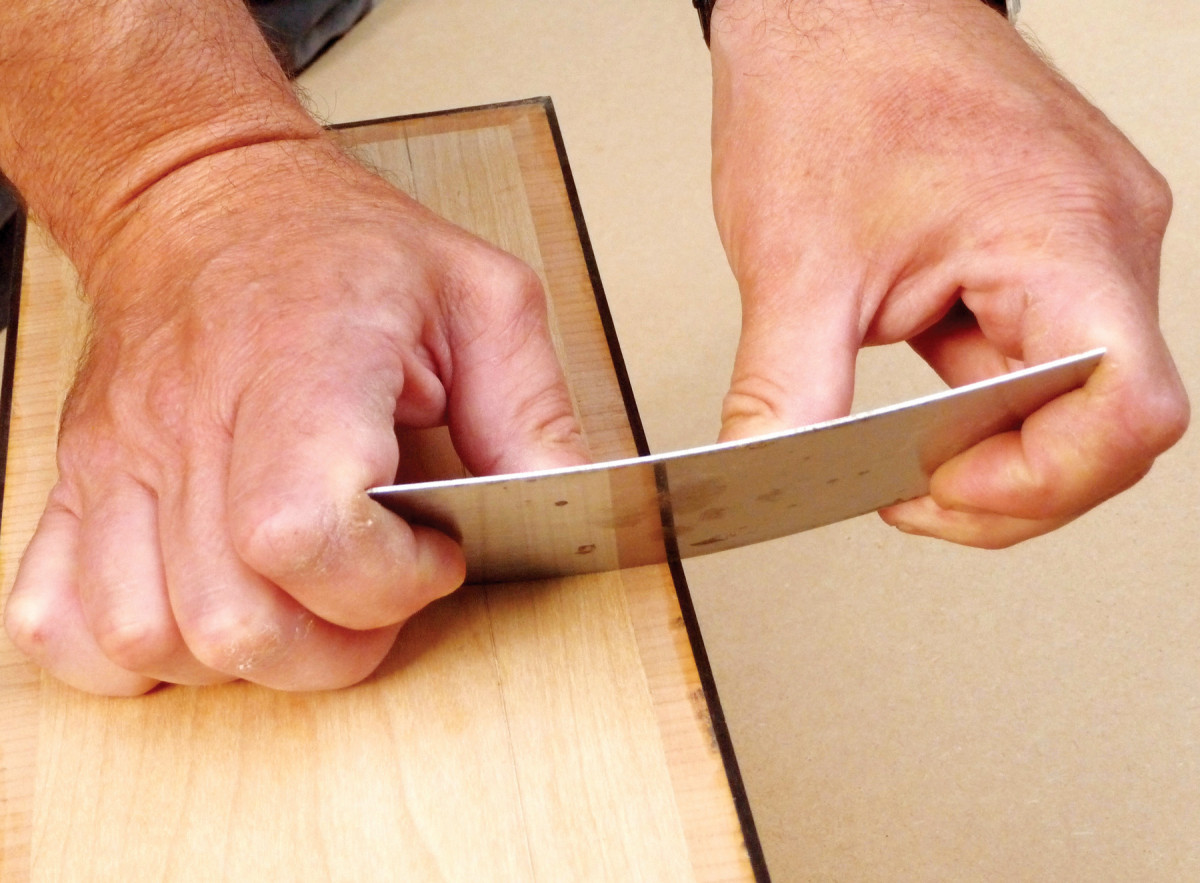
Cut the dovetails
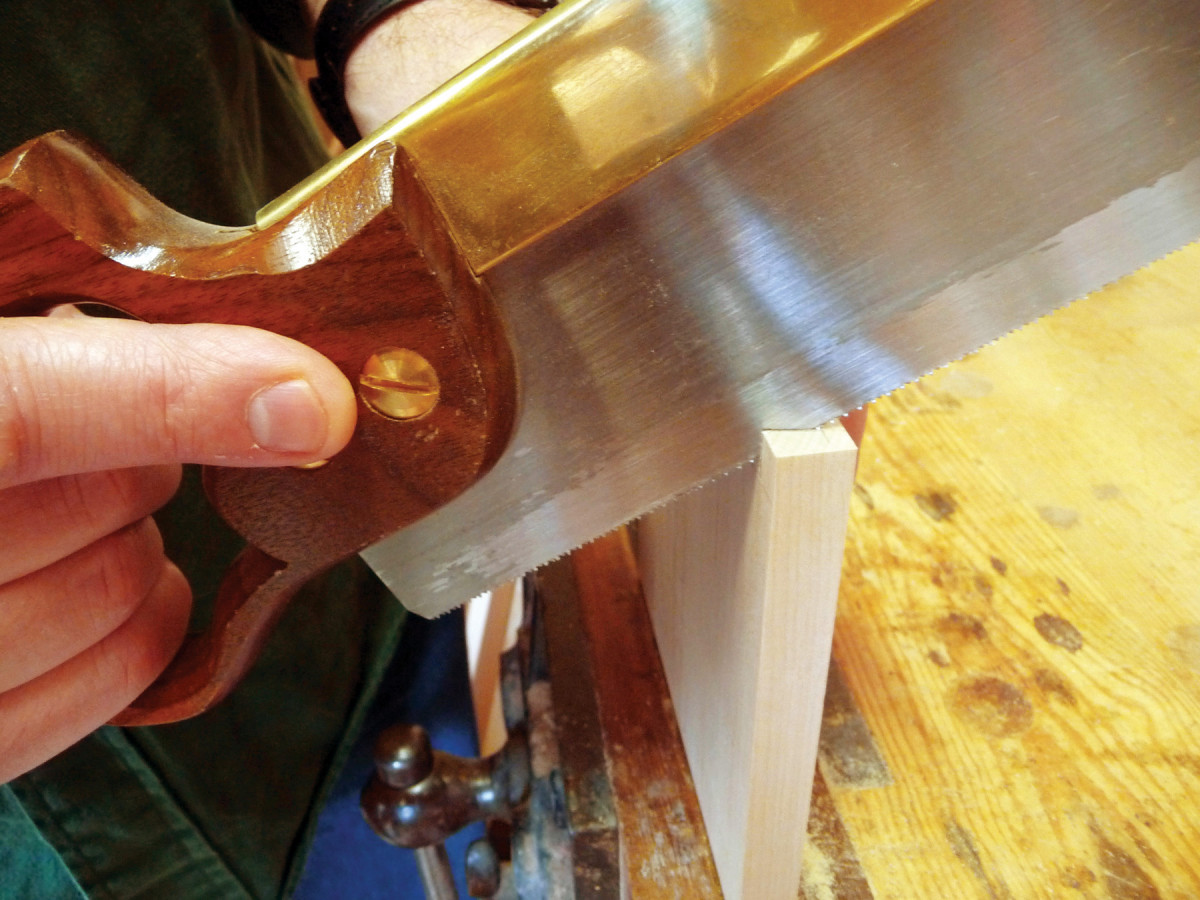
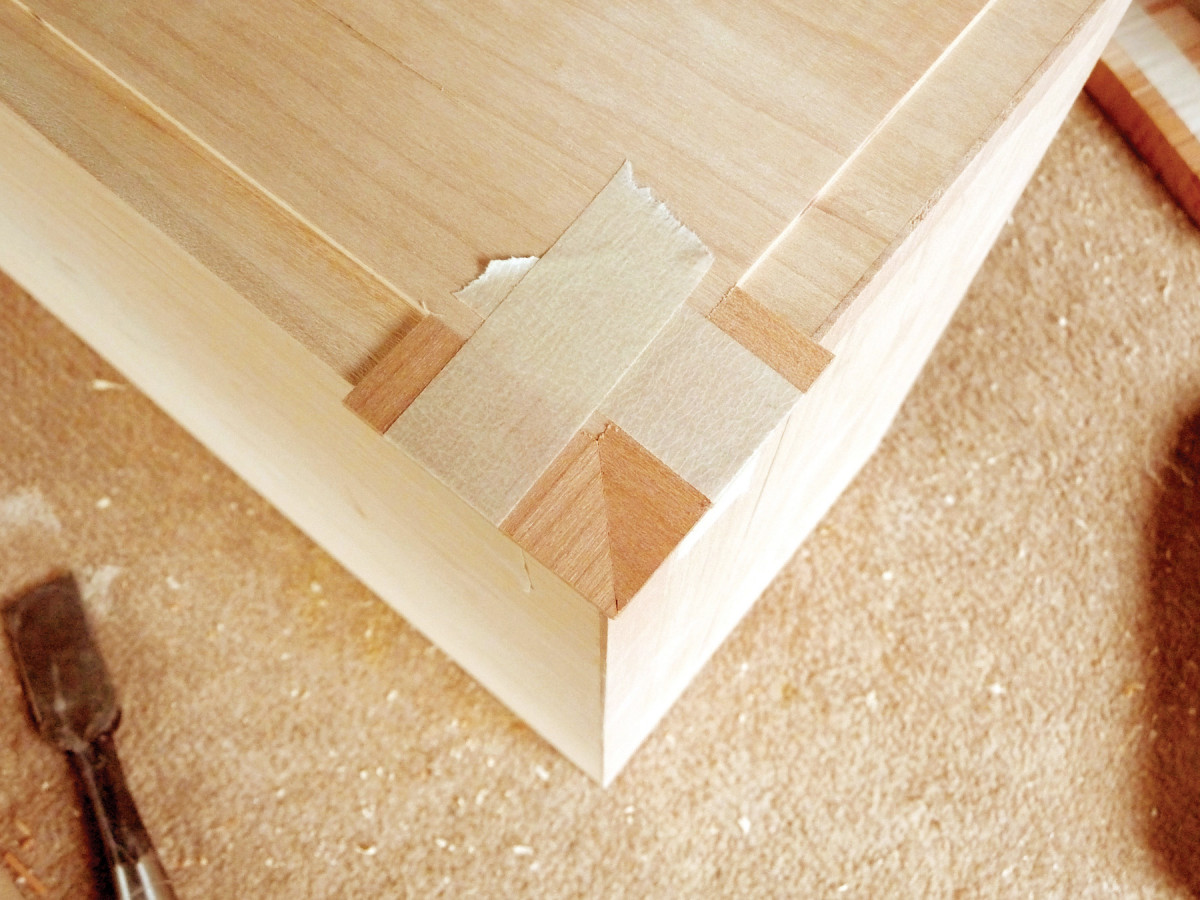
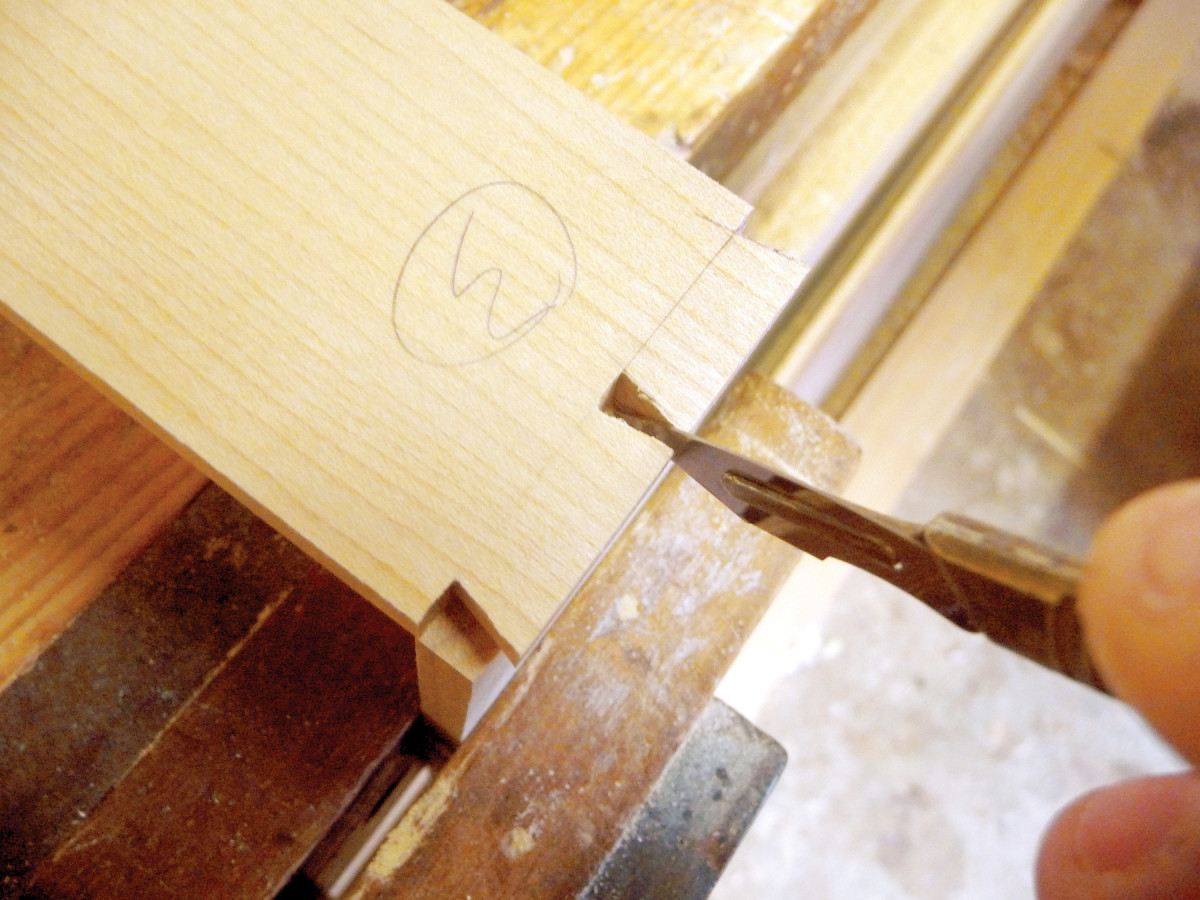
1. Saw the box’s dovetails by hand, beginning with the end pieces.
Begin by milling the sides (A) and ends (B). Lay out the pins on the end pieces (Fig. C), then saw and chop the joints (Photo 1).

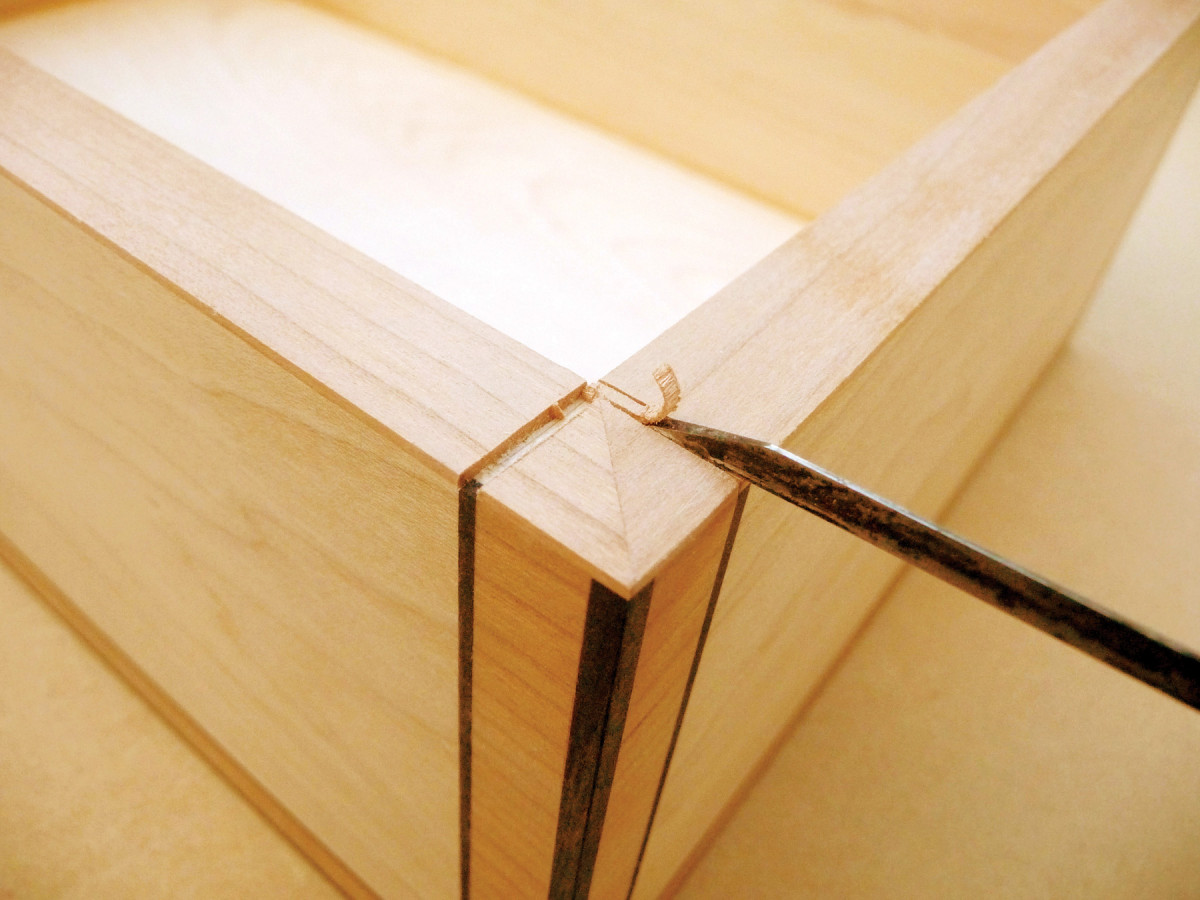
2. Remove the waste around the pins. Use a router first, then use a chisel to clean up the end grain and corners.
This procedure is just like making a half-blind drawer joint, only here you’re making the drawer front first. I use a router, equipped with a fence, to remove most of the waste, then remove the remaining waste with a chisel (Photo 2).
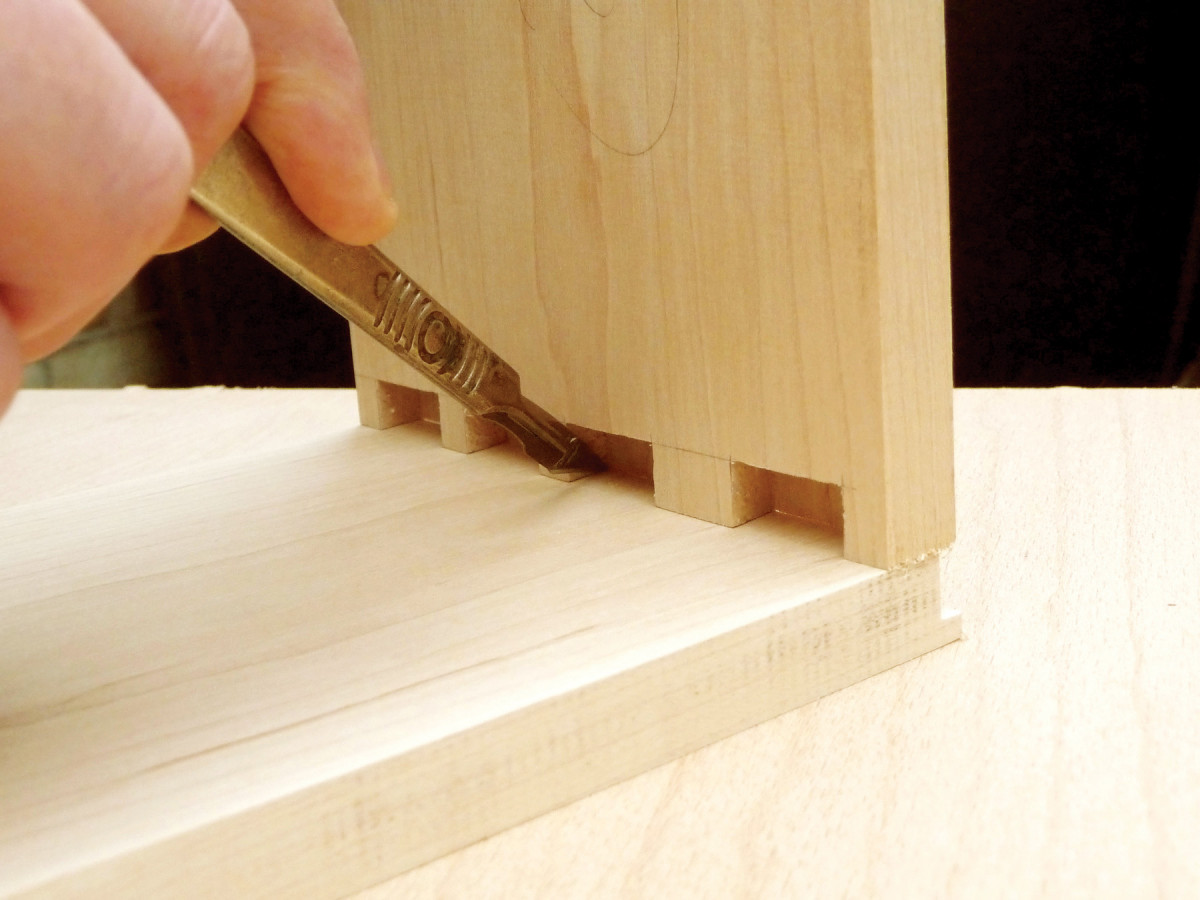
3. Cut a rabbet on each side piece. Stand the end piece on top of the side piece and mark around the pins.
Lay out the dovetails on the side pieces. First, scribe gauge lines 1/2″ in from the end on the pieces’ inside faces. Next, use a router table to cut 3/8″ x 1/8″ rabbets on the ends. Stand each side piece on the gauge line of the corresponding end piece and trace around the pins (Photo 3). Saw and chop out the waste (Photo 4).
4. Saw and chop the tails, then glue the sides and ends together.
Before gluing, apply finish to the inside faces of the ends and sides—just on the upper half, above the lining (E & F), plus a 1/4″ wide strip at the bottom. Finishing these areas will make it easier for you to remove dried glue after the box is assembled.
Glue the box
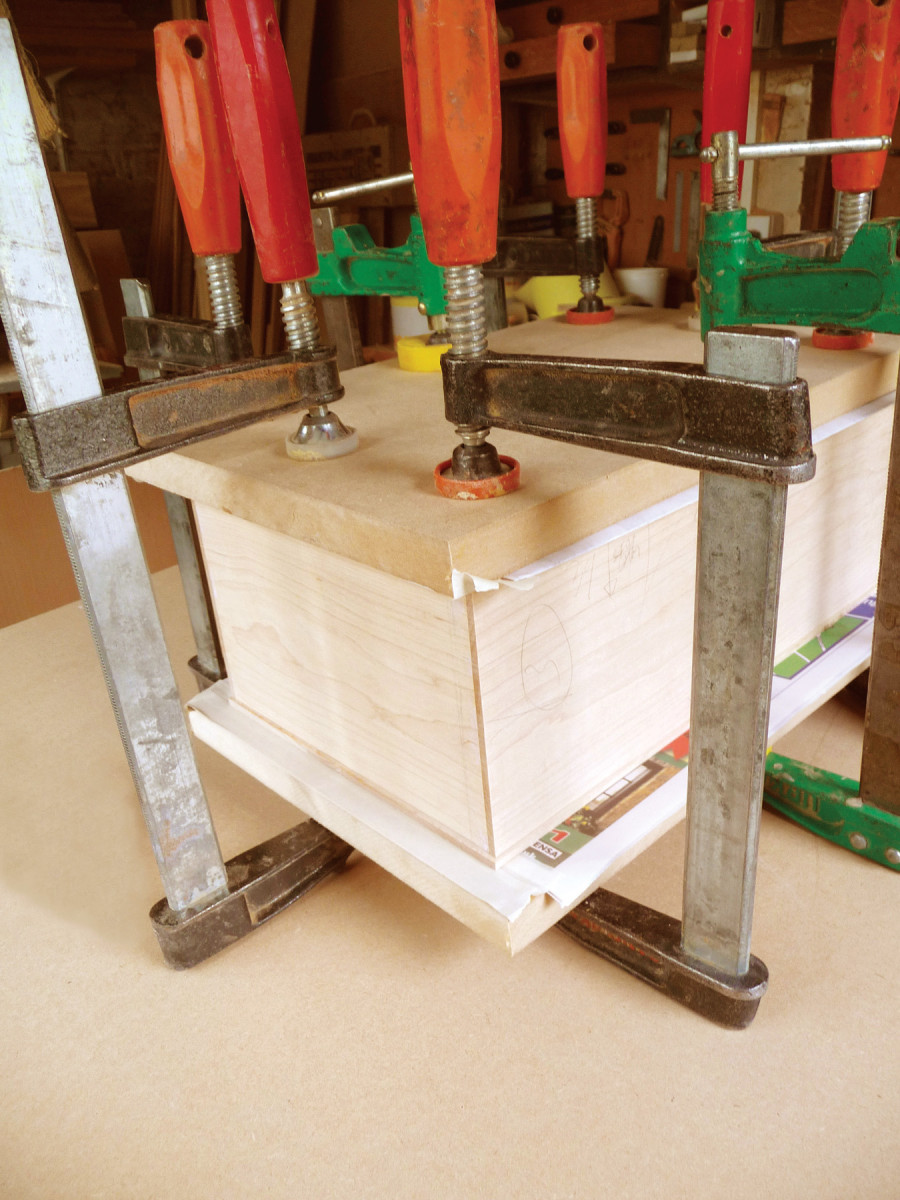
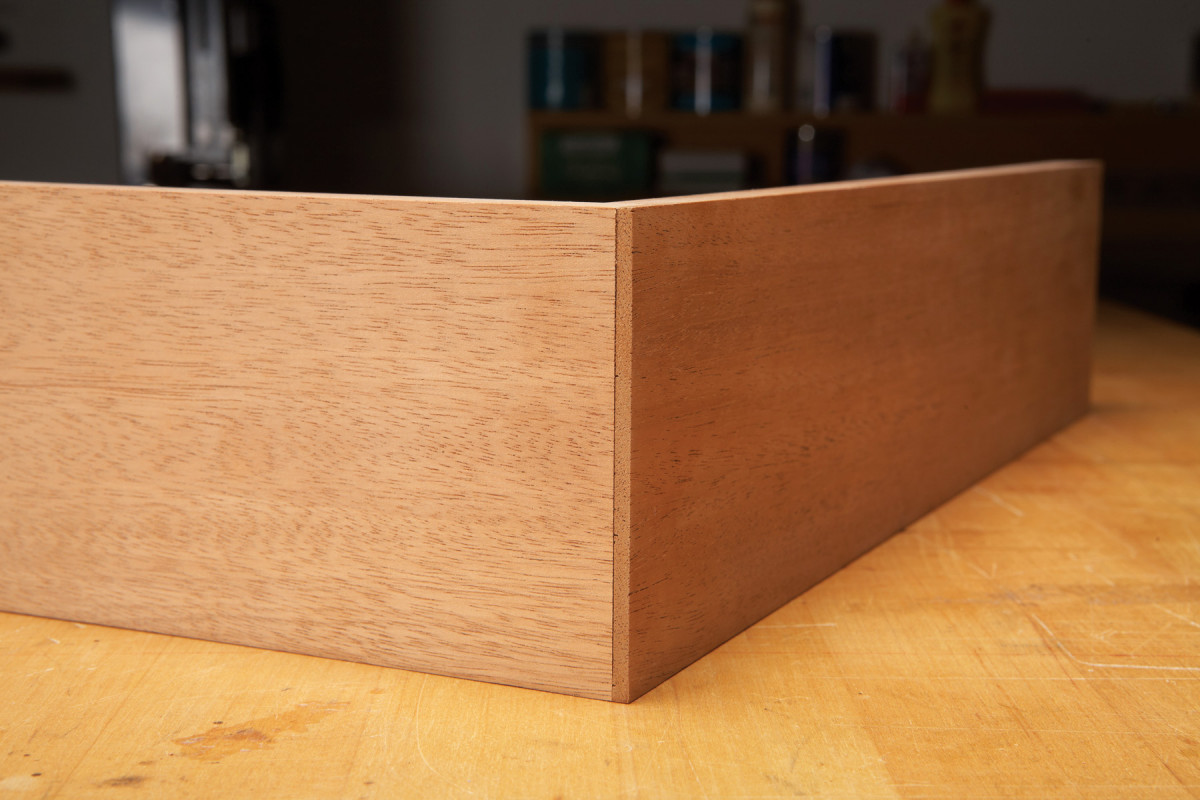
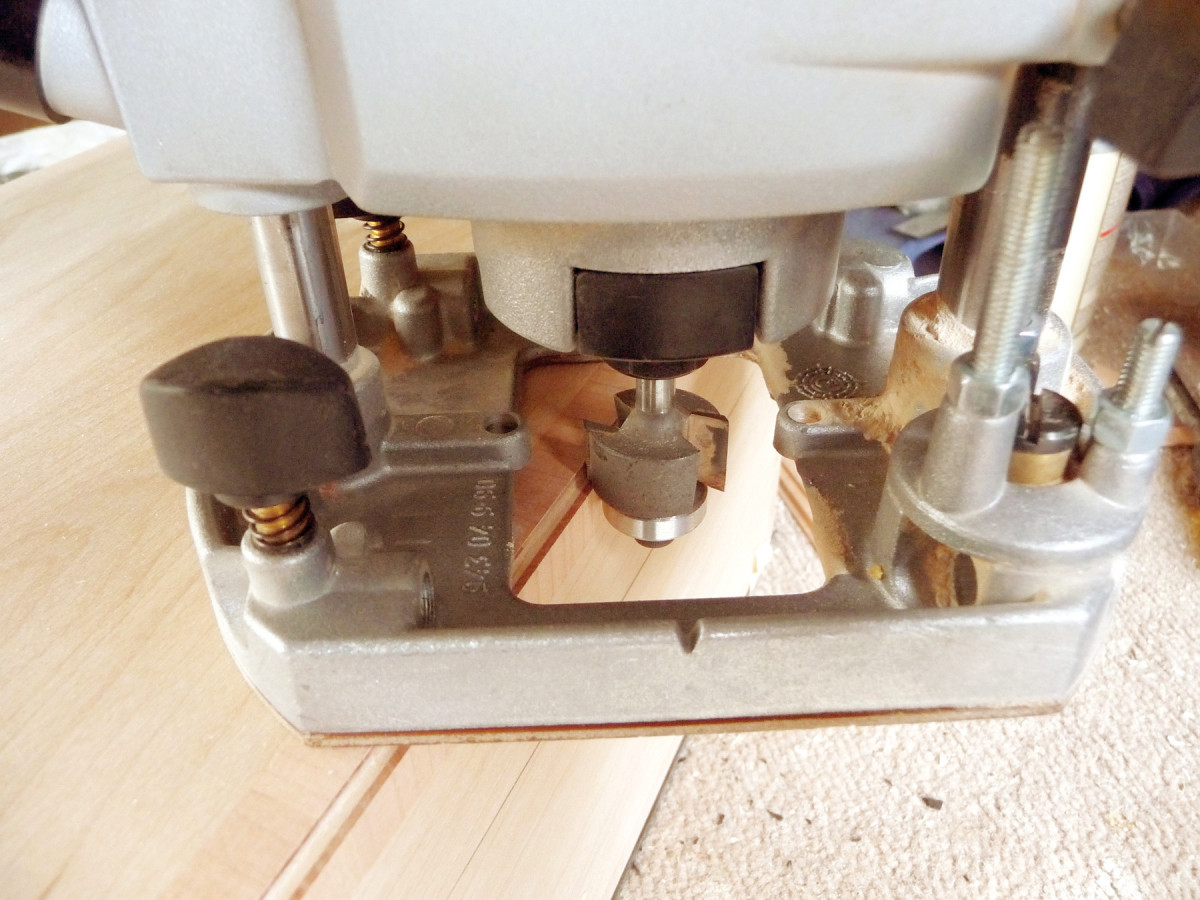
5. Glue on the top and bottom pieces. They’re rabbeted all the way around to fit inside the box. Use a flush-trim bit to remove the overhanging lips of these pieces.
Glue the sides and ends. Plane or sand the outside corners flush. Mill the top (C) and bottom (D)—I glue them up from two bookmatched pieces. Cut the top and bottom 1/8″ oversize in length and width, then rout rabbets all the way around both pieces. Glue the top and bottom to the box (Photo 5).
Use a router and a flush-trim bit to remove the 1/16″ overhang all the way around the top and bottom. When you’re done, all the edges of the box should be perfectly even.
Add the cross banding
6. Glue cherry crossbanding into a shallow rabbet routed into the top. Start with the corners, using tape to hold the pieces in place, then fill the spaces in between.
Cut the crossbanding (G) from solid wood or use veneer. Rout a shallow rabbet all the way around the top and glue the crossbanding in place (Photo 6). Use clamps and blocks—tape alone isn’t adequate.
Plane, scrape or sand the cross banding so it’s flush with the top. Remove any overhang with a block plane or a router and a flush-trim bit. Repeat the same process all the way around the sides and ends of the box.
The Telegraphing Effect
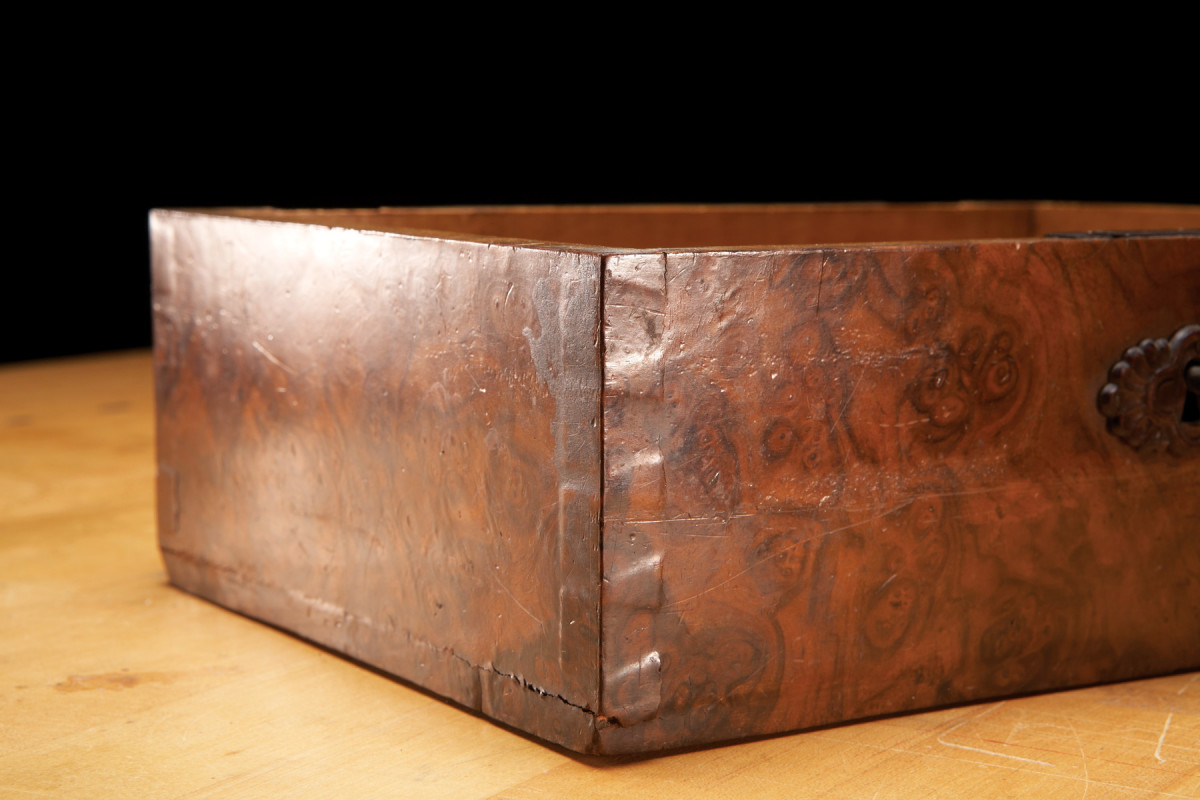 Years ago, dovetails were commonly used to join high-end furniture. It’s easy to spot them on the veneered jewelry box at right, isn’t it? Over the years, the sides of the box have shrunk in thickness, but not in length. This results in dovetails that are slightly proud of the surface. Their protruding end grain has deformed the veneer on top.
 Old-timers had a word for this: telegraphing. In this case, telegraphing doesn’t refer to Morse code sent along a wire. It means “sending a message unwittingly,” like raising your eyebrows when you’re dealt four aces. Only here, you haven’t hit the jackpot.
 You can find many examples of telegraphing on antique veneered pieces of furniture. Most of these pieces were made using air-dried wood which has since contracted in width and thickness in modern, centrally heated homes. Just about any flaw in the substrate (the wood under the veneer) might show through. Knots, checks, uneven gluelines—all of these eventually come to the surface, so to speak, even though the veneers used were often quite thick.
Does telegraphing rule out the use of dovetails under a veneer? No, you just have to make a modified half-blind joint: the double lap dovetail (used on the jewelry box in this article), or a secret mitered dovetail (which is even trickier to make). When these joints are glued, neither the pins nor the tails show on the outside.
Add the stringing
7. Cut a small rabbet all the way around the edges of the lid. Glue 1/8″ square strips of ebony stringing into the rabbets.
Make or purchase the stringing (L & M). Rout a slightly undersize 1/8″ x 1/8″ rabbet along all the edges of the box (Photo 7).
8. Scrape the stringing so it’s flush with the surface.
Cut the 1/8″ stringing to length using a chisel, mitering the ends. Glue and tape each piece in place, then scrape or sand the stringing so it’s flush with the surface (Photo 8).
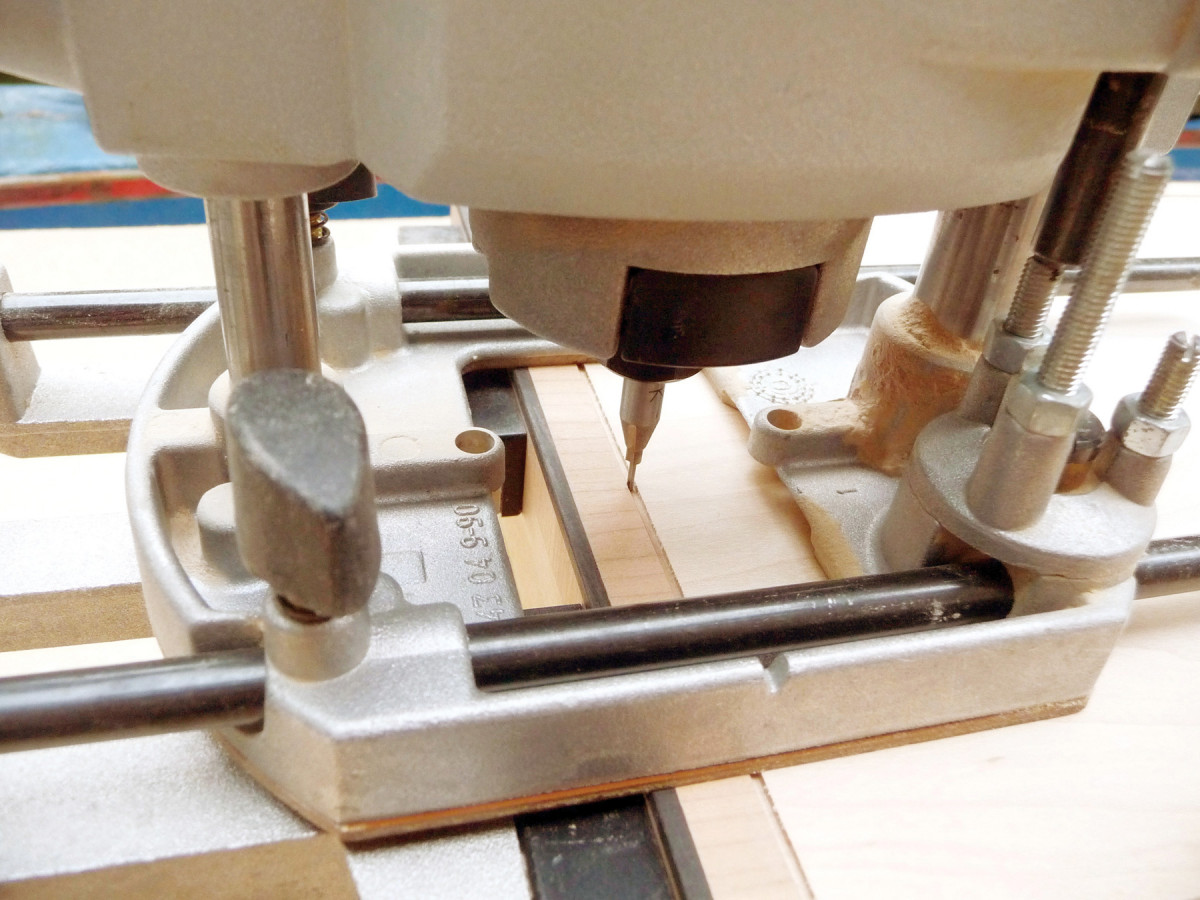
9. Rout a small groove on the inside edge of the crossbanding. Use a fence to guide the router.
Rout grooves for the 1/16″ inner stringing (Photo 9).
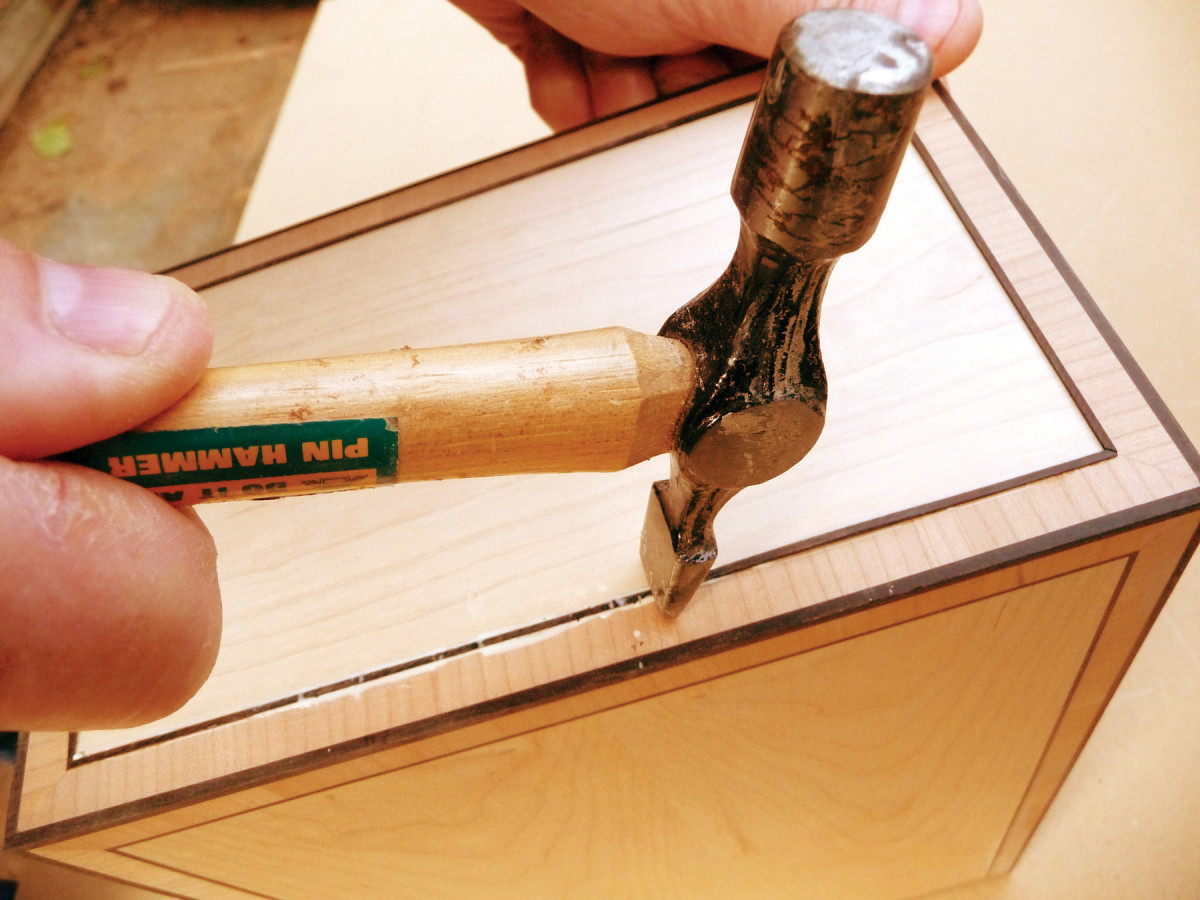
10. Glue 1/16″ square ebony stringing into the groove. Press in the stringing with a hammer—it doesn’t need to be clamped.
Miter the ends of the stringing and glue each piece in place (Photo 10). Scrape or sand the stringing so it’s flush.
Cut off the lid

11. Saw all the way around the box to separate the lid from the base. Minimize tearout by placing a laminate-covered piece of plywood on top of the saw.
Saw all the way around the box using a thin-kerf crosscut blade (Photo 11). Plane or sand all of the sawn edges.
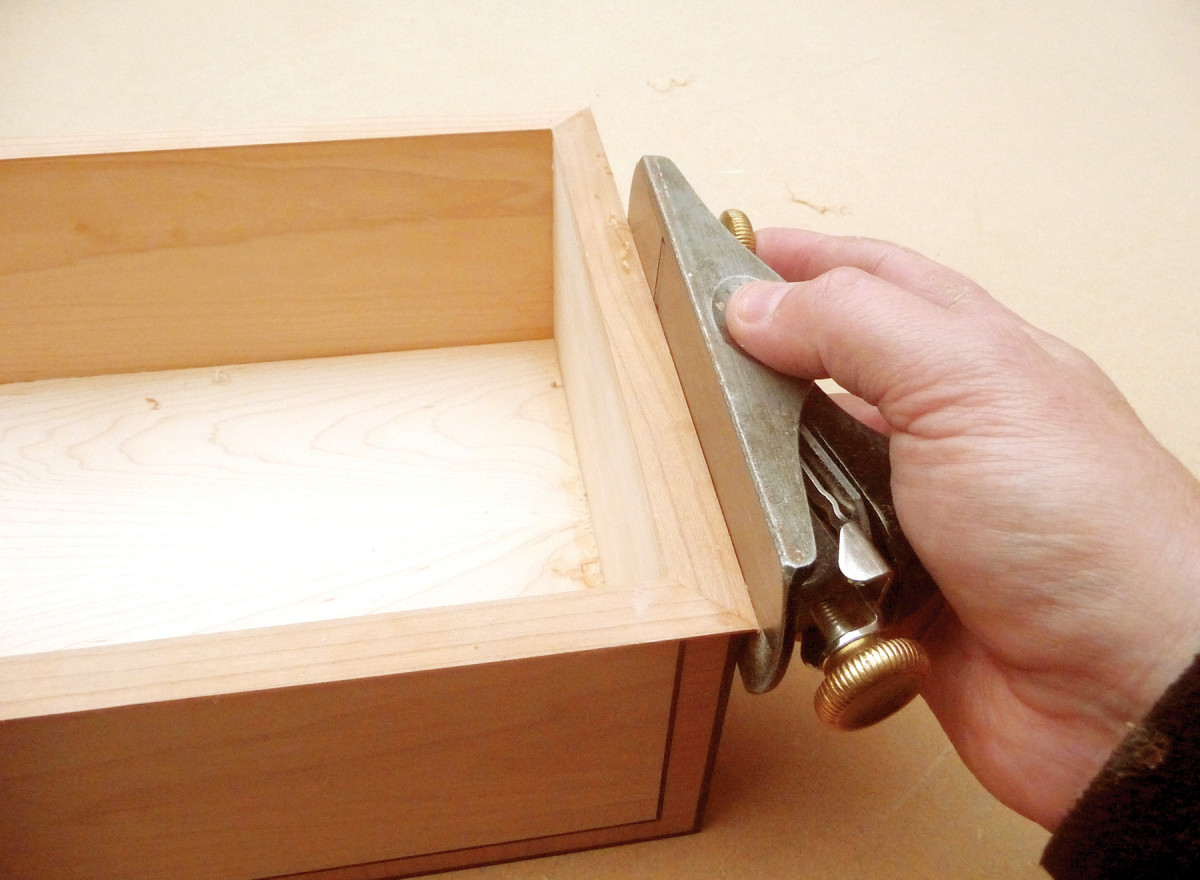
12. Glue 1/16″ thick cherry edging to the top edges of the base and the bottom edges of the lid. Trim the edging with a low-angle block plane.
Using solid wood or veneer, make the edging (H & J) about 1/32″ extra-wide. Cut the pieces to length, mitering the ends. They should be flush with the inside of the lid and base, and overhang on the outside. Glue them in place. Sand the inside edges and trim the outside edges (Photo 12).
13. Pare grooves at each corner to continue the stringing.
Continue the 1/16″ stringing around the corners of the lid and base (Photo 13). Score these grooves with a marking knife first, then remove the waste with a 1/16″ chisel. Add a small ebony square on each outside corner, so the 1/8” stringing appears to run right through the corner.
Make the star inlay

14. Begin making the star inlay for the lid by sawing out diamond-shaped pieces of cherry.
Use a compass to draw a paper pattern for the star segments (Figs. E & F). Cut 8 small pieces of inlay material (K), trace the pattern on each piece, and cut the segments (Photo 14). Draw centerlines on the lid.
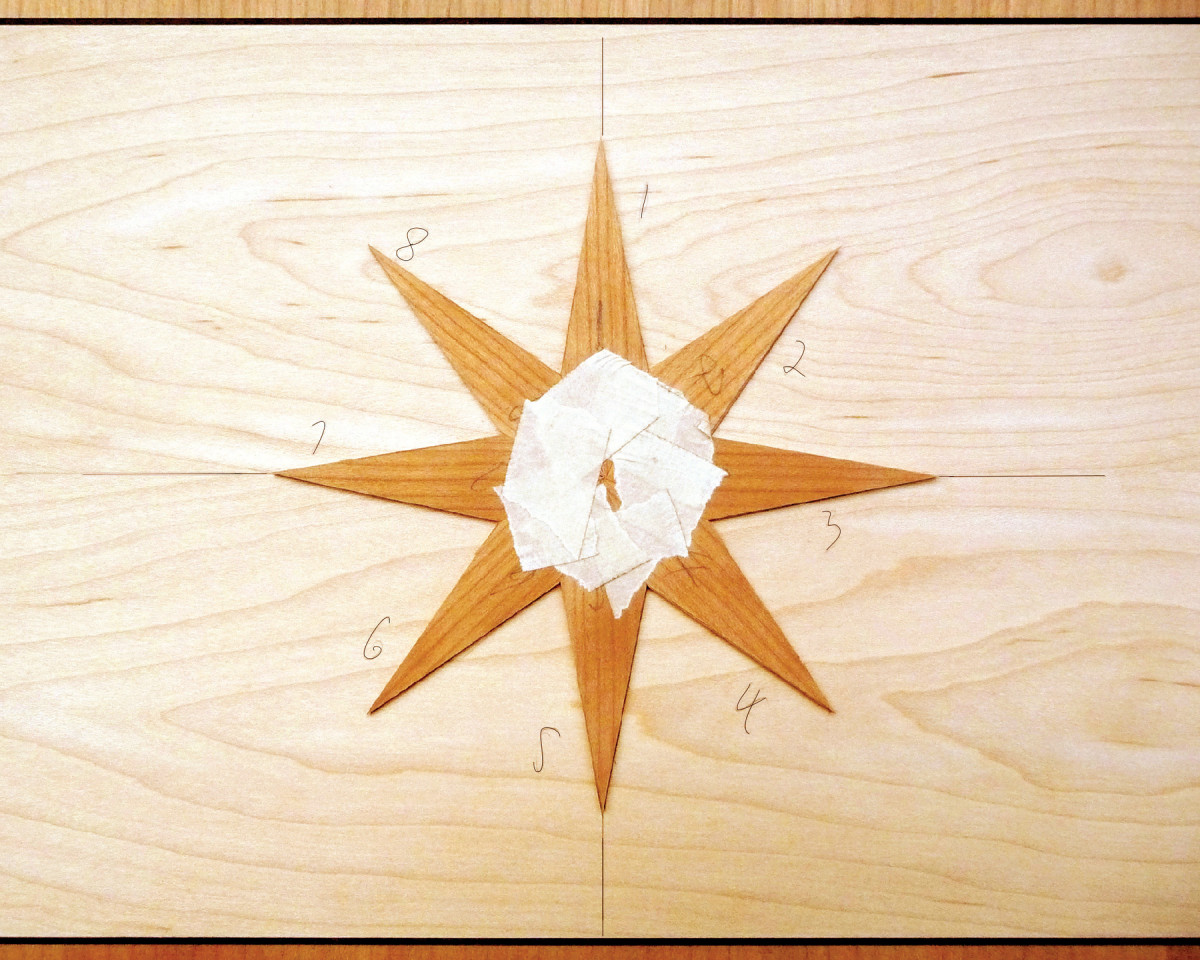
15. Tape the pieces together and position the pattern on top of the lid. Score lines around the pattern.
Tape the segments together and place the assembly on the lid, aligning it with the centerlines (Photo 15). Score lines around the star.
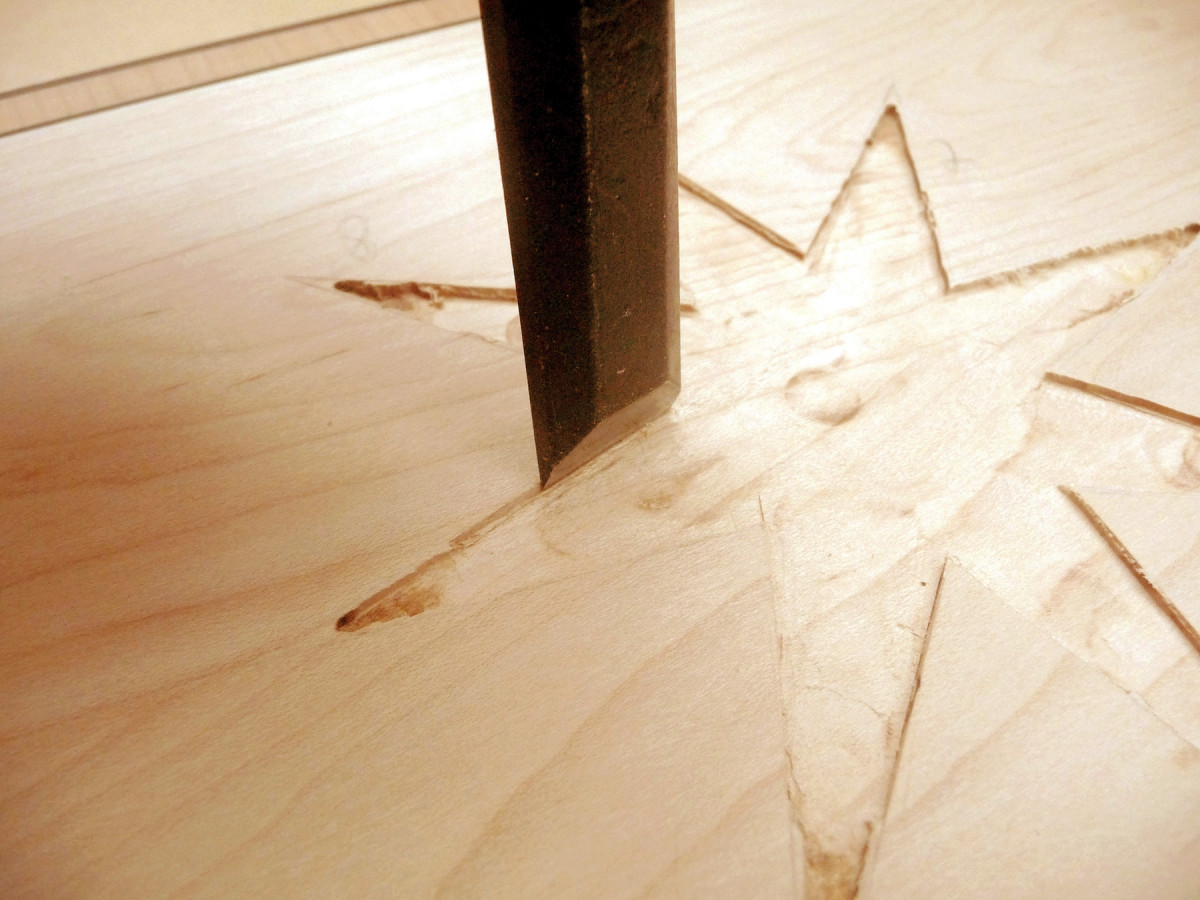
16. Make a recess for the inlay. Begin by using a router, freehand. Straighten the edges of the recess using a chisel, then use a knife to clean out the tips. Glue the inlay in the recess.
Rout a recess for the inlay, freehand. Clean up the edges and corners with a chisel and a knife (Photo 16).

17. Rout a 1/6″ groove all the way around the pattern. Use a straight board, clamped to the lid, to guide the router.
Glue the inlay in the recess.
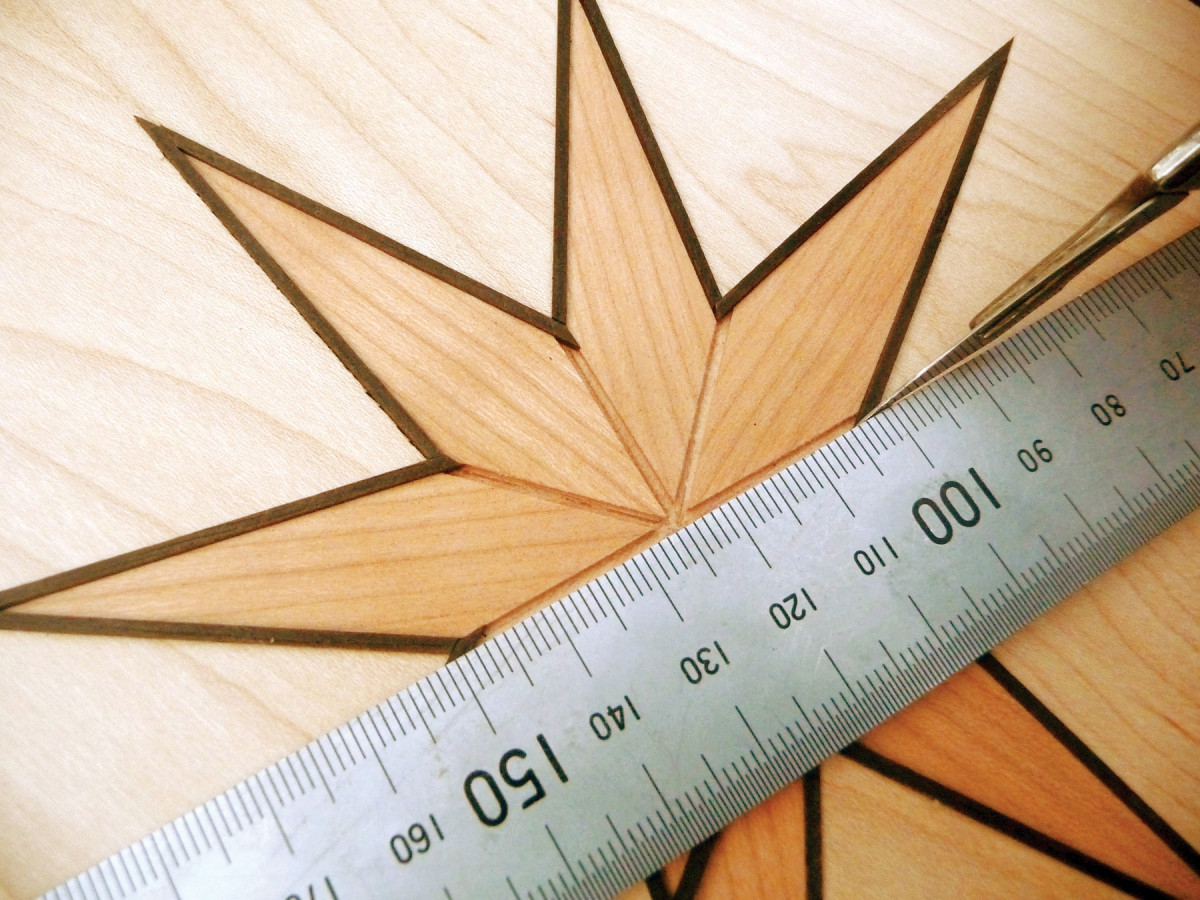
18. Glue stringing in the grooves. Trim the ends of each outer piece with a knife, guided by a straightedge, in order to fit the pieces that will go across the star.
Rout grooves for the ebony stringing that border the star segments (Photos 17 & 18). Glue the stringing, then scrape and sand it flush.
Tray and hinges
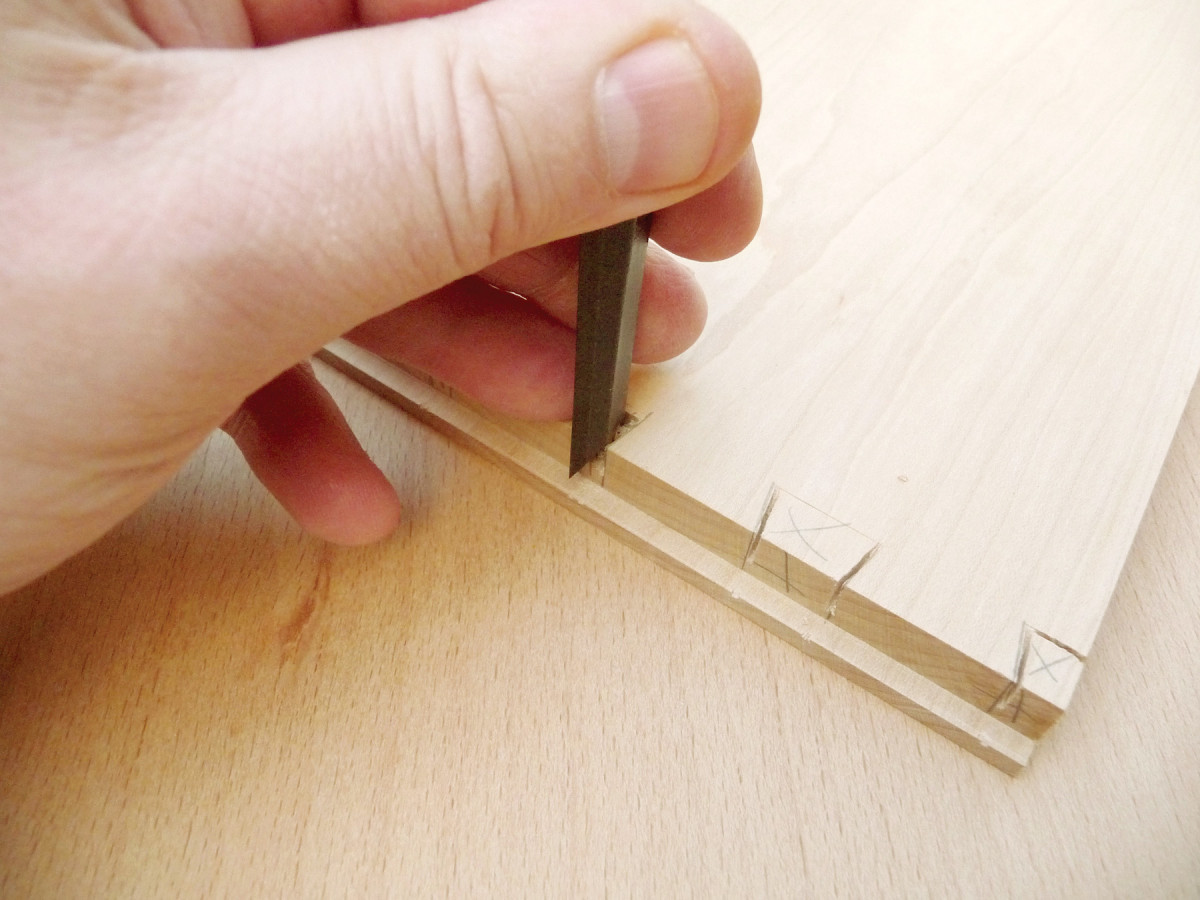
19. Dovetail the tray. These joints are very small and are best laid out using a thin-bladed knife or scalpel.
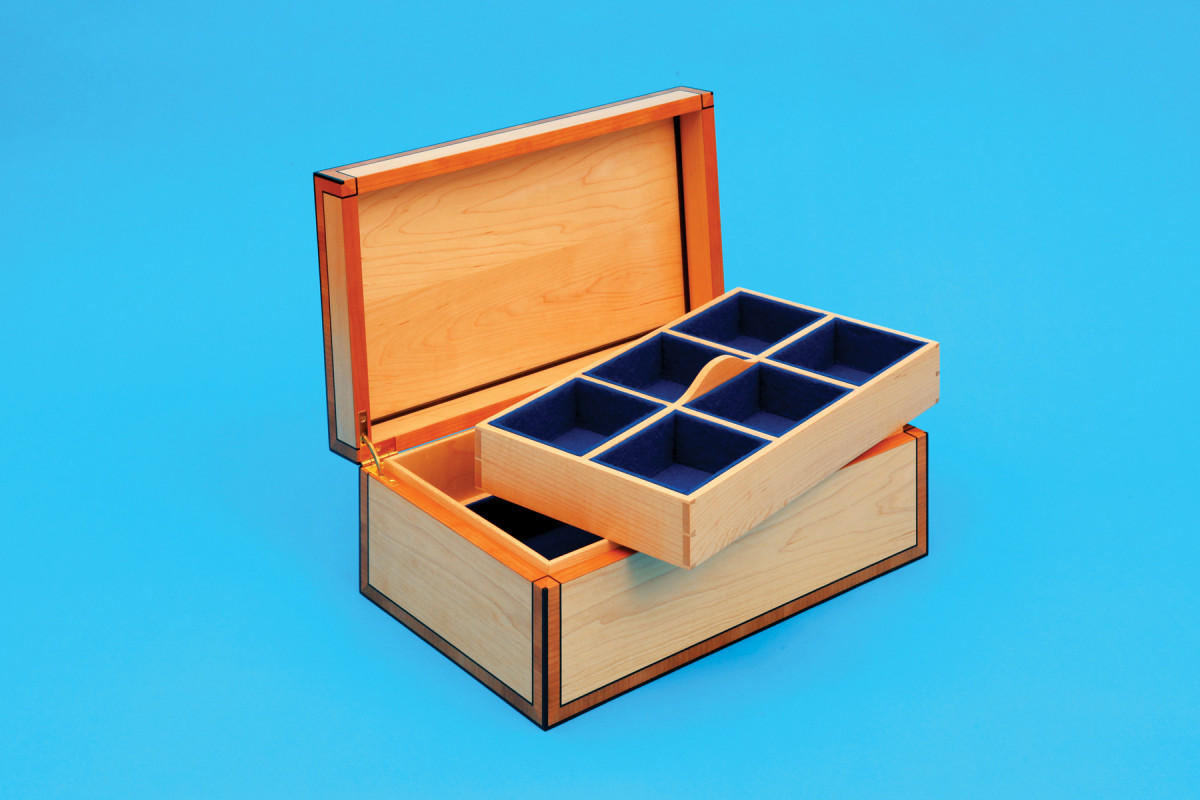
Make pieces for the lining (E & F). (The purpose of the lining is to create a tight seal all the way around the box when it’s closed.) Cut rabbets in the pieces (to support the tray), miter their ends, and glue them inside the base.
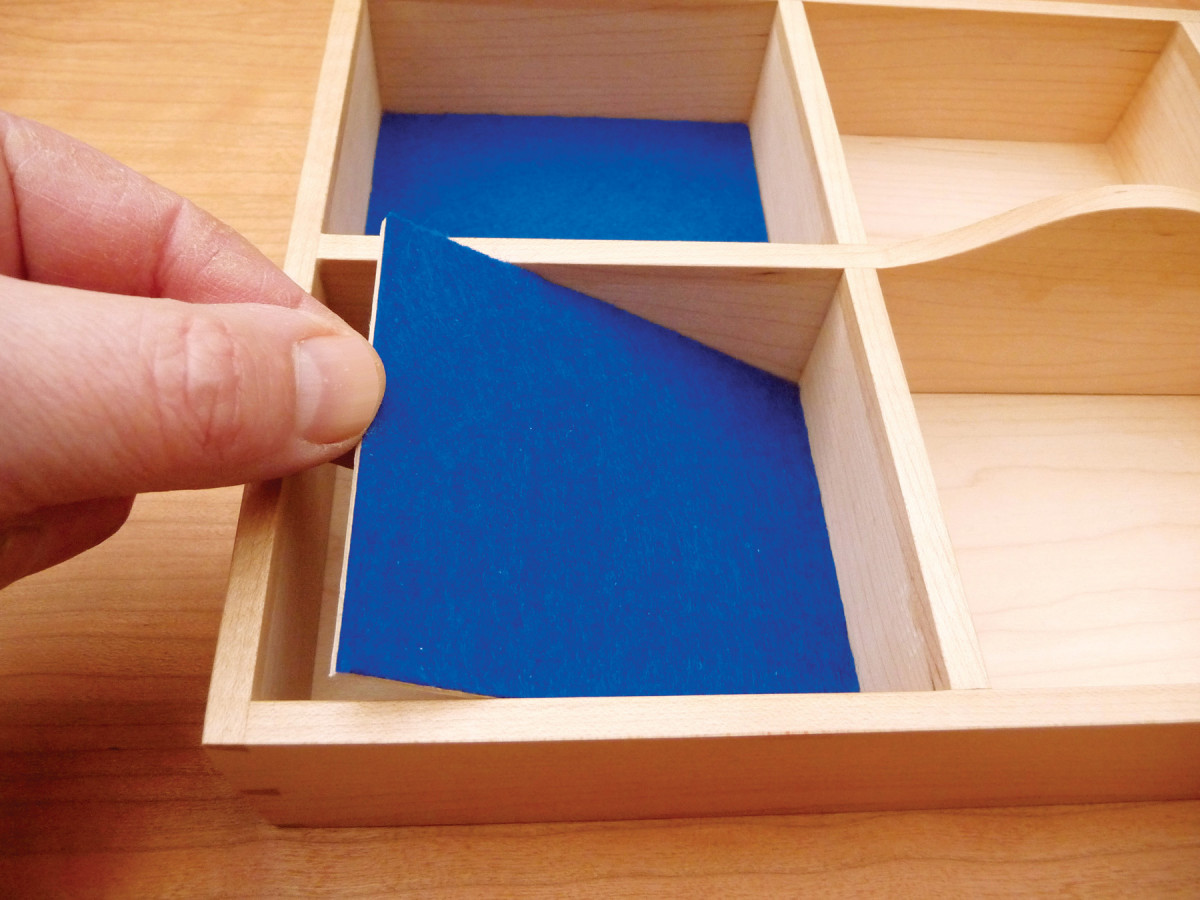
20. Add felt lining inside each section of the tray.
Build the tray (N through S). Dovetail the corners (Photo 19 and Fig. B) and chop shallow mortises for the dividers. Shape the top of the center divider (Fig. D) and glue the tray together. Add felt lining in each compartment (Photo 20). I glue felt fabric to pre-cut pieces of cardboard, but you could also use adhesive-backed felt, available at craft stores.
Install the hinges. I use quadrant hinges (see Sources), which incorporate a stay to hold the lid in an open position. These hinges require some careful mortising, but they’re quite elegant—in keeping with the rest of the box.
Martin Greshoff, a graduate of Rycotewood College, designs and builds custom furniture in Mitcham, South London. You can see more of his work at www.martingreshoff.co.uk
SOURCES
Inlay Banding, www.inlaybanding.com, (704) 221-2147, 1/8″ x 1/8″ x 36″ Ebony stringing, $6.40 ea.; 1/16″ Ebony stringing, $1.10/ft.
Constantines, www.constantines.com, (800) 443-9667, 1/16″ thick cherry veneer, #16CH, $2.25/ sq. ft.
Rockler. www.rockler.com, (800) 279-4441, Brusso Solid Brass Quadrant Hinges, #11099, $46/pr.
Here are some supplies and tools we find essential in our everyday work around the shop. We may receive a commission from sales referred by our links; however, we have carefully selected these products for their usefulness and quality.